System Administrator - WorkOasis
49
SYSTEM ADMINISTRATOR USER GUIDE rev. May 1, 2014
Transcript of System Administrator - WorkOasis
SYSTEM ADMINISTRATOR
USER GUIDE rev. May 1, 2014
WorkOasis System Administrator
1
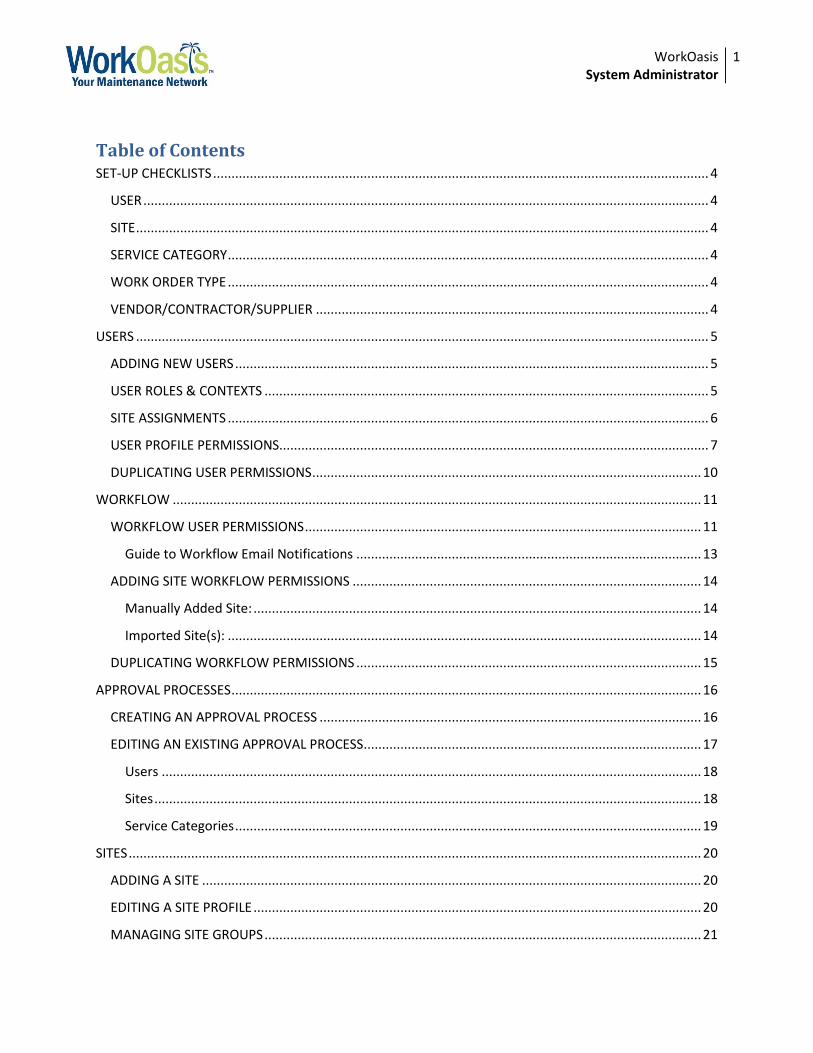
Table of Contents SET-UP CHECKLISTS ....................................................................................................................................... 4
USER .......................................................................................................................................................... 4
SITE ............................................................................................................................................................ 4
SERVICE CATEGORY ................................................................................................................................... 4
WORK ORDER TYPE ................................................................................................................................... 4
VENDOR/CONTRACTOR/SUPPLIER ........................................................................................................... 4
USERS ............................................................................................................................................................ 5
ADDING NEW USERS ................................................................................................................................. 5
USER ROLES & CONTEXTS ......................................................................................................................... 5
SITE ASSIGNMENTS ................................................................................................................................... 6
USER PROFILE PERMISSIONS..................................................................................................................... 7
DUPLICATING USER PERMISSIONS .......................................................................................................... 10
WORKFLOW ................................................................................................................................................ 11
WORKFLOW USER PERMISSIONS ............................................................................................................ 11
Guide to Workflow Email Notifications .............................................................................................. 13
ADDING SITE WORKFLOW PERMISSIONS ............................................................................................... 14
Manually Added Site: .......................................................................................................................... 14
Imported Site(s): ................................................................................................................................. 14
DUPLICATING WORKFLOW PERMISSIONS .............................................................................................. 15
APPROVAL PROCESSES ................................................................................................................................ 16
CREATING AN APPROVAL PROCESS ........................................................................................................ 16
EDITING AN EXISTING APPROVAL PROCESS ............................................................................................ 17
Users ................................................................................................................................................... 18
Sites ..................................................................................................................................................... 18
Service Categories ............................................................................................................................... 19
SITES ............................................................................................................................................................ 20
ADDING A SITE ........................................................................................................................................ 20
EDITING A SITE PROFILE .......................................................................................................................... 20
MANAGING SITE GROUPS ....................................................................................................................... 21
WorkOasis System Administrator
2
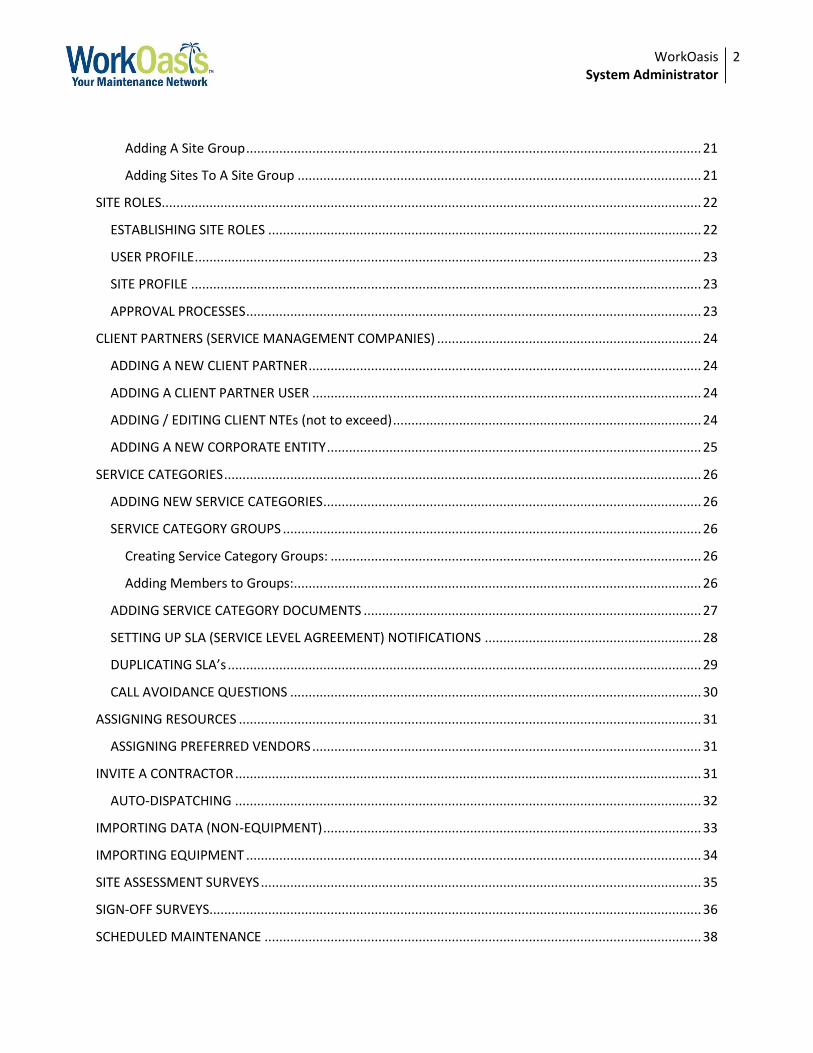
Adding A Site Group ............................................................................................................................ 21
Adding Sites To A Site Group .............................................................................................................. 21
SITE ROLES ................................................................................................................................................... 22
ESTABLISHING SITE ROLES ...................................................................................................................... 22
USER PROFILE .......................................................................................................................................... 23
SITE PROFILE ........................................................................................................................................... 23
APPROVAL PROCESSES ............................................................................................................................ 23
CLIENT PARTNERS (SERVICE MANAGEMENT COMPANIES) ........................................................................ 24
ADDING A NEW CLIENT PARTNER ........................................................................................................... 24
ADDING A CLIENT PARTNER USER .......................................................................................................... 24
ADDING / EDITING CLIENT NTEs (not to exceed) .................................................................................... 24
ADDING A NEW CORPORATE ENTITY ...................................................................................................... 25
SERVICE CATEGORIES .................................................................................................................................. 26
ADDING NEW SERVICE CATEGORIES ....................................................................................................... 26
SERVICE CATEGORY GROUPS .................................................................................................................. 26
Creating Service Category Groups: ..................................................................................................... 26
Adding Members to Groups: ............................................................................................................... 26
ADDING SERVICE CATEGORY DOCUMENTS ............................................................................................ 27
SETTING UP SLA (SERVICE LEVEL AGREEMENT) NOTIFICATIONS ........................................................... 28
DUPLICATING SLA’s ................................................................................................................................. 29
CALL AVOIDANCE QUESTIONS ................................................................................................................ 30
ASSIGNING RESOURCES .............................................................................................................................. 31
ASSIGNING PREFERRED VENDORS .......................................................................................................... 31
INVITE A CONTRACTOR ............................................................................................................................... 31
AUTO-DISPATCHING ............................................................................................................................... 32
IMPORTING DATA (NON-EQUIPMENT) ....................................................................................................... 33
IMPORTING EQUIPMENT ............................................................................................................................ 34
SITE ASSESSMENT SURVEYS ........................................................................................................................ 35
SIGN-OFF SURVEYS ...................................................................................................................................... 36
SCHEDULED MAINTENANCE ....................................................................................................................... 38

WorkOasis System Administrator
3
CREATING A SCHEDULE: .......................................................................................................................... 41
Schedule Fields Defined: ..................................................................................................................... 41
Selecting Sites and Contractor (Supplier): .......................................................................................... 42
RETIRING DATA TYPES ................................................................................................................................. 44
REQUESTS FOR PROPOSALS (RFPs) ............................................................................................................. 45
REPORTS ...................................................................................................................................................... 47
Custom Reports: ..................................................................................................................................... 47
To create an ad-hoc Report: ............................................................................................................... 47
To Save and/or Schedule a Report: ..................................................................................................... 47
Other Reports: ........................................................................................................................................ 48

WorkOasis System Administrator
4
SET-UP CHECKLISTS
USER If using SITE ROLES (not the same as User Role, if in doubt, contact WorkOasis), is their Site Role
defined, if necessary? Be sure to update the Site Role field on the Site Profile(s). Are their User Profile permissions established? Are they assigned to all appropriate Sites, including the master Template site in Georgia if using the
Master Workflow concept? Are they going to have Work Orders dispatched to them for resolution?
Please contact WorkOasis Support for assistance in setting up their Vendor context Are they established in the Site Workflow(s)?
Service Management Organizations: Be sure to apply the organization’s address information to the new User in the Workflow. Refer to Workflow->Workflow User Permissions-> Edit 3rd Party Management Info
Do they need to be established in the Approval Process(es)? Do they need to have Dispatcher Assignments for Service Categories? Only applicable if Call Center
Rotation is in use. Call Support for assistance and supplemental administration guide.
SITE If using SITE ROLES, are the Roles defined on the Site Profile? Are the necessary Users assigned to the Site? Does the Site need to be added to a Site Group(s)?
*If a Site has been added to a Site Group, Users assigned to the newly modified Site Group, will need to have the Site Group re-selected on their User Profile.
Refer to Users ->Duplicating User Permissions for instructions on how to copy Sites Only to multiple Users.
Service Management Organizations Only: o Does the Site need assignment to a Client Partner? o If adding a new Client Partner for the Site to have assignment to, does a new Entity need to be
added? Does a new Site Group need to be added? Has the Site had a Workflow established? Has the Site been included in the established Approval Proccess(es)? Do Vendors need to be assigned, Default or otherwise? Does Auto-Dispatching need to be set up for the Site?
SERVICE CATEGORY Does the Service Category need to be added to Service Category Group? Has the Service Category been included in the established Approval Process(es)? Are there SLAs needing to be established for or duplicated to the new Service Category? Do Call Avoidance questions need to be established? Do Dispatchers need to be assigned? Only applicable if Call Center Rotation is in use. Call Support for
assistance and supplemental administration guide. Are there Vendors needing to be assigned to the new Service Category, as Default and for Auto-
dispatching?
WORK ORDER TYPE Does a new Work Order Type need to be created? If so, please contact WorkOasis Has the Work Order Type been included in the established Approval Process(es)?
VENDOR/CONTRACTOR/SUPPLIER Do they need to be Preferred (Assigned Resource)?
Does Auto-Dispatching need to be defined?
WorkOasis System Administrator
5
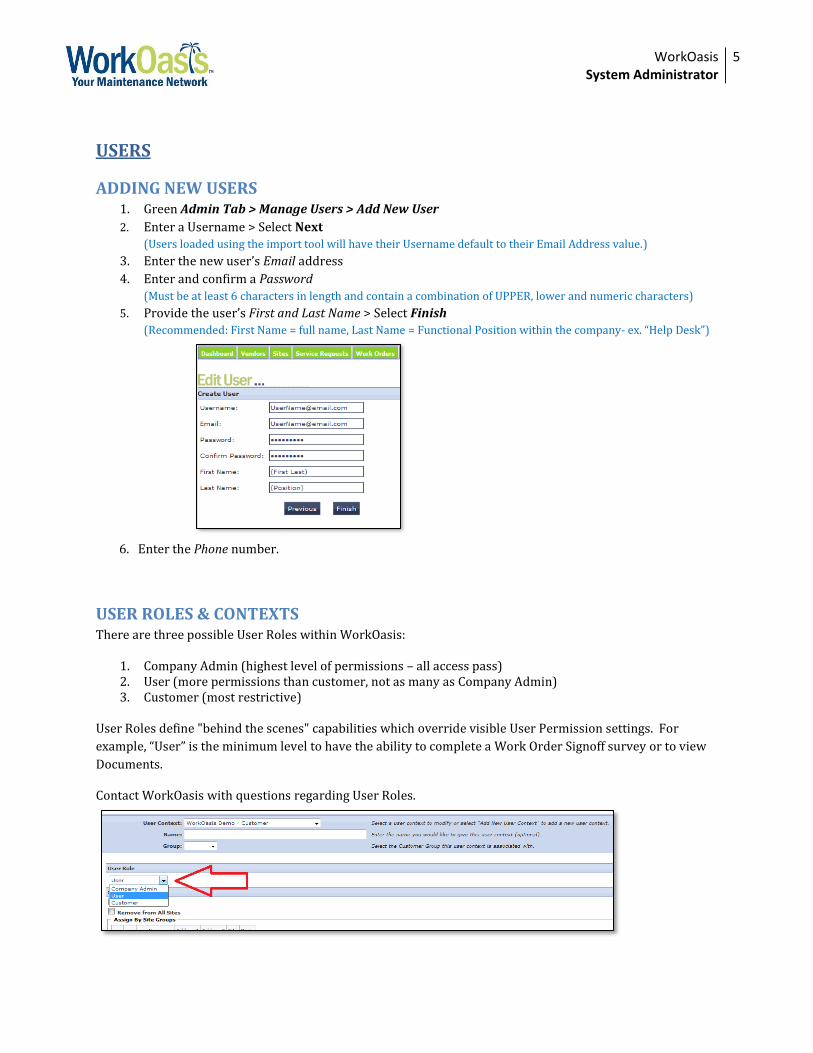
USERS
ADDING NEW USERS 1. Green Admin Tab > Manage Users > Add New User
2. Enter a Username > Select Next
(Users loaded using the import tool will have their Username default to their Email Address value.)
3. Enter the new user’s Email address
4. Enter and confirm a Password
(Must be at least 6 characters in length and contain a combination of UPPER, lower and numeric characters)
5. Provide the user’s First and Last Name > Select Finish
(Recommended: First Name = full name, Last Name = Functional Position within the company- ex. “Help Desk”)
6. Enter the Phone number.
USER ROLES & CONTEXTS There are three possible User Roles within WorkOasis:
1. Company Admin (highest level of permissions – all access pass) 2. User (more permissions than customer, not as many as Company Admin) 3. Customer (most restrictive)
User Roles define "behind the scenes" capabilities which override visible User Permission settings. For
example, “User” is the minimum level to have the ability to complete a Work Order Signoff survey or to view
Documents.
Contact WorkOasis with questions regarding User Roles.

WorkOasis System Administrator
6
Once the User Role is defined, enter a name in the “Name” field under “User Context.” It is recommended to
enter the Functional Position here (ex. “Help Desk”). Click “Save” at the bottom of the User Profile, and the
User Context will be created as a combination of the User Role & Name.
A User’s Role and/or Context can also be established using the Duplicate Permissions feature (refer to “Duplicating User Permissions”).
SITE ASSIGNMENTS Site Assignments are necessary in order for a User to view the different record types (Service Requests, Work
Orders, Quotes, Invoices, etc.) created for a Site within WorkOasis. A User can only access records for Sites to
which they are assigned.
1. Select the check box next to the Sitename(s) or the Site Group the User needs assignment to. Alternatively, if access to all sites is necessary, select “Add to All Sites.”
2. Scroll down to the bottom of the page and select Save.
A User’s Site Assignment(s) can also be established using the Duplicate Permissions feature (refer to “Duplicating User Permissions”). NOTE: If all Sites within another defined Site Group are contained within a larger, selected Site Group, after Save is selected, it too will be checked by default.

WorkOasis System Administrator
7
USER PROFILE PERMISSIONS User Profile Permissions define what modules/areas a User is able to access. Additionally, they define some
of the functions a User can perform. Other functions of a User are defined with Workflow Permissions.
1. Select the check box next to the Permission(s) the User needs. 2. Scroll down to the bottom of the page and select Save. The next step is to define User(s) in the
Workflow.
PERMSSION: WHAT IT DOES: RECOMMENDED FOR:
Dashboard Allows users to utilize the dashboard tab. All users.
View Dashboard Statistics
Allows users to see an overview of current Statistics. New Service Requests (Requests needing to be converted to a Work
Order for Contractor assignments) Open Service Requests (Requests converted to a Work Order) New Work Orders (Work Orders waiting for Contractor Acceptance) Open Work Orders (Work Orders that have been at a minimum
Accepted by Contractor) Contractors (Contractors Actively associated to Work Orders) Average Service Rating (Average star rating of active Contractors.
Determined by Survey results.) Average MTTR Rating (Mean Time To Resolution) Average Cost Rating (Cost associated to Work Orders)
All users interested in having an overview for records associated with their User Profile.
View Dashboard Service
Requests
Allows users to access Service Requests for their assigned sites. An alternative to using the Service Requests tab.
User with access to Service Requests.
View Dashboard Work Orders
Allows users to access Work Orders with notification of any action required for their assigned sites. An alternative to using the Work Orders tab.
Users with access to Work Orders.
View Dashboard Invoices
Allows users to access Invoices with notification of any Approval that is required for their assigned sites. An alternative to using the Invoices tab.
AP Users, Invoice Approvers, WorkOasis Admins
View Dashboard RFPs
Allows users to access RFPs (Request for Proposals) for their assigned sites. An alternative to using the Service Requests tab.
Users utilizing the RFP module
Contractor Certification
Allows users to Search the Certified Supplier Network in conjunction with Assigning Resources. This should be selected on the User Profile if “Manage Resources” is also selected.
Contract Administrator, Vendor Management, Company Administrator
Service Requests
Displays the green Service Requests tab. Applicable for Site Level Users entering Service Requests.
Site Personnel, Dispatchers, Region/District Managers, Company Admins
Create Service Requests
Allows users to create Service Requests. Site Personnel, Dispatchers, Company Admins
View Service Requests
Allows users to view service requests. If a User is only needing permission to View Only Service Requests, this should be the only Service Request option selected. All other Service Request Users should have this selected in addition to the other permissions.
Site Personnel, Dispatchers, Region/District Managers, Company Admins
Cancel Service Requests
Allows users to cancel a service request (for example, an issue can be resolved without a work order needing to be opened)
Site Personnel, Dispatchers, Company Admins
Work Orders Displays the green Work Orders tab. Allows users to view work orders. Site Personnel, Dispatchers, Region/District Managers, Company Admins
Create Work Orders
Allows user to convert a Service Request to a Work Order or create a Work Order initially. Users selecting Contractors need this permission.
Dispatchers, Company Admins
View/Add Service History
Allows users to view/monitor Work Order activity performed by all users accessing a Work Order. Additionally, gives the ability to add a note directly to the Service History of a Work Order.
Site Personnel, Dispatchers, Region/District Managers, Company Admins
Cancel Work Orders
Allows users to cancel a Work order. Company Admins
Delete Work Orders
Allows users to delete a Work Order. NONE- use Cancel rather than Delete to retain transparency/record.
WorkOasis System Administrator
8
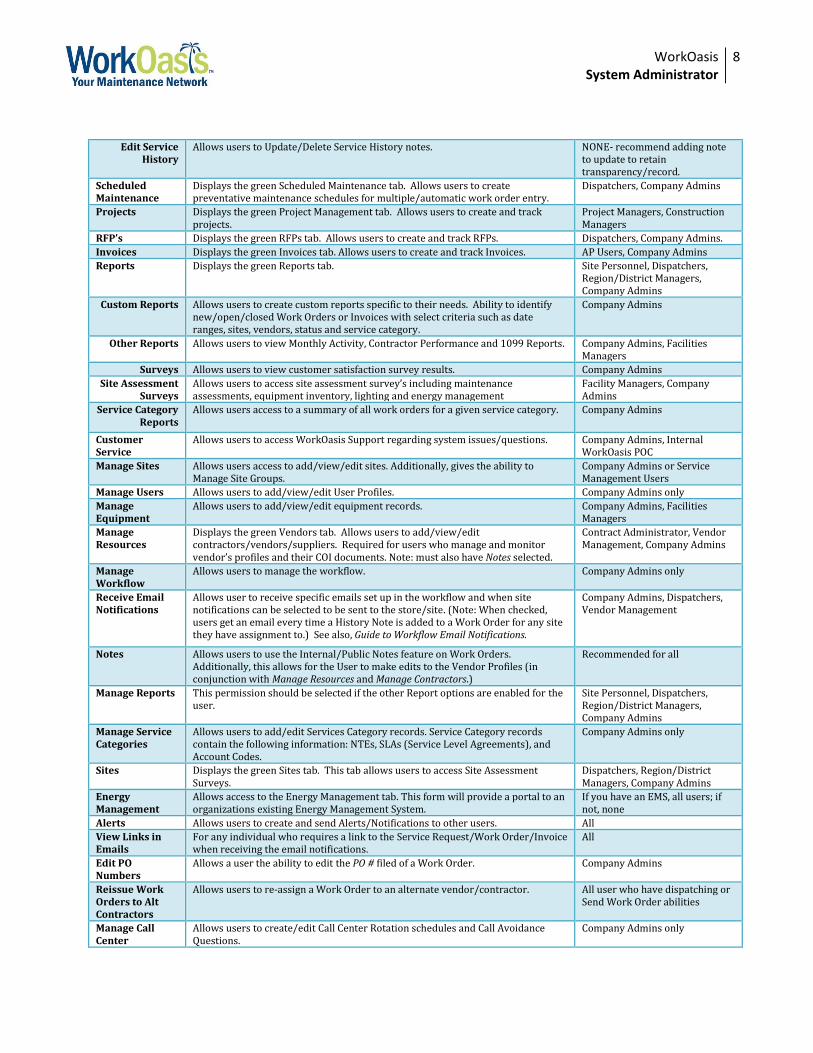
Edit Service History
Allows users to Update/Delete Service History notes. NONE- recommend adding note to update to retain transparency/record.
Scheduled Maintenance
Displays the green Scheduled Maintenance tab. Allows users to create preventative maintenance schedules for multiple/automatic work order entry.
Dispatchers, Company Admins
Projects Displays the green Project Management tab. Allows users to create and track projects.
Project Managers, Construction Managers
RFP’s Displays the green RFPs tab. Allows users to create and track RFPs. Dispatchers, Company Admins.
Invoices Displays the green Invoices tab. Allows users to create and track Invoices. AP Users, Company Admins
Reports Displays the green Reports tab. Site Personnel, Dispatchers, Region/District Managers, Company Admins
Custom Reports Allows users to create custom reports specific to their needs. Ability to identify new/open/closed Work Orders or Invoices with select criteria such as date ranges, sites, vendors, status and service category.
Company Admins
Other Reports Allows users to view Monthly Activity, Contractor Performance and 1099 Reports. Company Admins, Facilities Managers
Surveys Allows users to view customer satisfaction survey results. Company Admins
Site Assessment Surveys
Allows users to access site assessment survey’s including maintenance assessments, equipment inventory, lighting and energy management
Facility Managers, Company Admins
Service Category Reports
Allows users access to a summary of all work orders for a given service category. Company Admins
Customer Service
Allows users to access WorkOasis Support regarding system issues/questions. Company Admins, Internal WorkOasis POC
Manage Sites Allows users access to add/view/edit sites. Additionally, gives the ability to Manage Site Groups.
Company Admins or Service Management Users
Manage Users Allows users to add/view/edit User Profiles. Company Admins only
Manage Equipment
Allows users to add/view/edit equipment records. Company Admins, Facilities Managers
Manage Resources
Displays the green Vendors tab. Allows users to add/view/edit contractors/vendors/suppliers. Required for users who manage and monitor vendor’s profiles and their COI documents. Note: must also have Notes selected.
Contract Administrator, Vendor Management, Company Admins
Manage Workflow
Allows users to manage the workflow. Company Admins only
Receive Email Notifications
Allows user to receive specific emails set up in the workflow and when site notifications can be selected to be sent to the store/site. (Note: When checked, users get an email every time a History Note is added to a Work Order for any site they have assignment to.) See also, Guide to Workflow Email Notifications.
Company Admins, Dispatchers, Vendor Management
Notes Allows users to use the Internal/Public Notes feature on Work Orders. Additionally, this allows for the User to make edits to the Vendor Profiles (in conjunction with Manage Resources and Manage Contractors.)
Recommended for all
Manage Reports This permission should be selected if the other Report options are enabled for the user.
Site Personnel, Dispatchers, Region/District Managers, Company Admins
Manage Service Categories
Allows users to add/edit Services Category records. Service Category records contain the following information: NTEs, SLAs (Service Level Agreements), and Account Codes.
Company Admins only
Sites Displays the green Sites tab. This tab allows users to access Site Assessment Surveys.
Dispatchers, Region/District Managers, Company Admins
Energy Management
Allows access to the Energy Management tab. This form will provide a portal to an organizations existing Energy Management System.
If you have an EMS, all users; if not, none
Alerts Allows users to create and send Alerts/Notifications to other users. All
View Links in Emails
For any individual who requires a link to the Service Request/Work Order/Invoice when receiving the email notifications.
All
Edit PO Numbers
Allows a user the ability to edit the PO # filed of a Work Order. Company Admins
Reissue Work Orders to Alt Contractors
Allows users to re-assign a Work Order to an alternate vendor/contractor. All user who have dispatching or Send Work Order abilities
Manage Call Center
Allows users to create/edit Call Center Rotation schedules and Call Avoidance Questions.
Company Admins only

WorkOasis System Administrator
9
Receive New Vendor Notification Emails
Allows users to receive an email notification when a new vendor/contractor has registered.
Vendor Management
Can be Manually Selected as Dispatcher
Allows users to be manually selected as the dispatcher for a Service Request from the Service Request grid. Additionally, the user will be selectable when Assign Dispatcher is selected on the Service Category record, and Call Center Rotation if feature is enabled.
Dispatchers
Edit Work Order Type
Allows users to change the Work Order type on an Open Work order. Company Admins, Dispatchers
Manage Documents
Allows users to manage the various WorkOasis system documents. Note: If enabled, email notifications will be sent when vendor COI documents are due to expire, or when documents are added to a Work Order with an assigned Site.
Vendor Relations Manager, Company Admins
Edit Work Order Priority
Allows users to change the Work Order Priority on an Open Work Order. Company Admins, Dispatchers
Can Add External Contractors
Allows users to search for and add WorkOasis vendors to the specific instance. Contract Administrator, Vendor Management, Company Admins
Manage Contractor
Allows users view/edit Vendor profiles. Note: must also have Notes selected. Contract Administrator, Vendor Management, Company Admins
Edit Invoice Number
Allows users to edit the Vendor Invoice number when an Invoice is created. Company Admins, AP User
Edit WorkOrder Vendor NTE
Allows users to edit the NTE amount on an existing Open Work Order. Company Admins, Dispatchers
Edit WorkOrder Client NTE
Allows users to edit the Client NTE amount on an existing Open Work Order. (For Service Management companies.)
Company Admins, Dispatchers
Can Re-open Closed Work Orders
Allows users to re-open a closed Work Order. Company Admins, Dispatchers, AP users
Can Re-open Closed Invoices
Allows users to re-open a Paid Invoice. Company Admins, AP users.
Can Check-In Check-Out Vendors
Allows users to check a vendor in and out when the contractor is on-site. Typically used if IVR is not utilized.
Site Personnel, Dispatchers, Company Admins
Is a Service Request Dispatcher
Allows users the ability to assign a Service Request to a dispatcher. Displays hyperlink on Service Request grid.
Dispatcher, Company Admins
Can View Purchasing Module
Displays the green Purch Orders tab. Allows users to create and track Purchase Orders.
Company Admins, Site Personnel, Facility Managers
View Quotes Allows users to view quotes module. Company Admins, Dispatchers, AP users
Edit Quotes Allows users the ability to mark-up vendor quotes. (For service management companies.)
Company Admins, Dispatchers, AP users
Approve Quotes Allows users to approve quotes. (User will also need to be established in the necessary Quote Approval Process(es).)
Anyone needing to approve quotes
Assign Resources
Allows users to assign preferred vendors for a Service Category / Site combination.
Company Admins, Dispatchers, Facility Managers, Vendor Rltions
Can Approve and Reject Bid Documents
Allows users the ability to Approve/Reject uploaded documents marked as “Bid” Documents. Additionally, this should be selected for any user needing to approve/reject Work Completion documentation.
Company Admins, Dispatchers
Create WO Permissions Only (No New/Open/Closed View)
Allows users to only create Work Orders, not view, etc after it’s created. Site Personnel
Edit Ref Numbers
Allows users to edit the work order Job #. Dispatchers, Company Admins
Edit Work Order Responsibility
Allows users to change the “Service Requestor” on a work order.
Reset User Passwords
Enables the password reset function in the User grid. (When clicked next to a user’s name, it sends that user an email asking them to make a new password.)
Company Admins only

WorkOasis System Administrator
10
DUPLICATING USER PERMISSIONS Duplicating User Permissions is an efficient way to set the various User Profile definitions.
Note: The User Profile to duplicate permissions from, is the profile to have open. The User Profile to duplicate
permissions to will be selected when Duplicate Permissions is selected.
1. Green Admin Tab > Manage Users > View/Edit Users
2. Locate a User Profile defined with the permissions to be duplicated to the new User.
It is recommended to search for “Template” Users. Often these “Template Users” are configured with
the appropriate permissions for your organization. (Ex- if the new User is a Dispatcher, select
TemplateDispatcher). The “Template User” permissions should be verified prior to duplication to an
actual User.
3. Select Edit for the User to duplicate permissions from.
4. Once on the User’s profile, scroll to the bottom of the page and select Duplicate Permissions
5. On the pop-up, select the Profile permissions to duplicate. There are several permissions to select:
a. Sites and Permissions
b. Sites Only or Permissions only
c. Overwrite the User’s Role and/or Context
6. Locate and select the User to Duplicate Permissions to. Multiple Users can be selected by holding
down the Ctrl key and highlighting each of the Users.
7. Select Copy Permissions. A pop-up verifying the action will display. Review and select YES if the
correct selections are made.
WorkOasis System Administrator
11
WORKFLOW
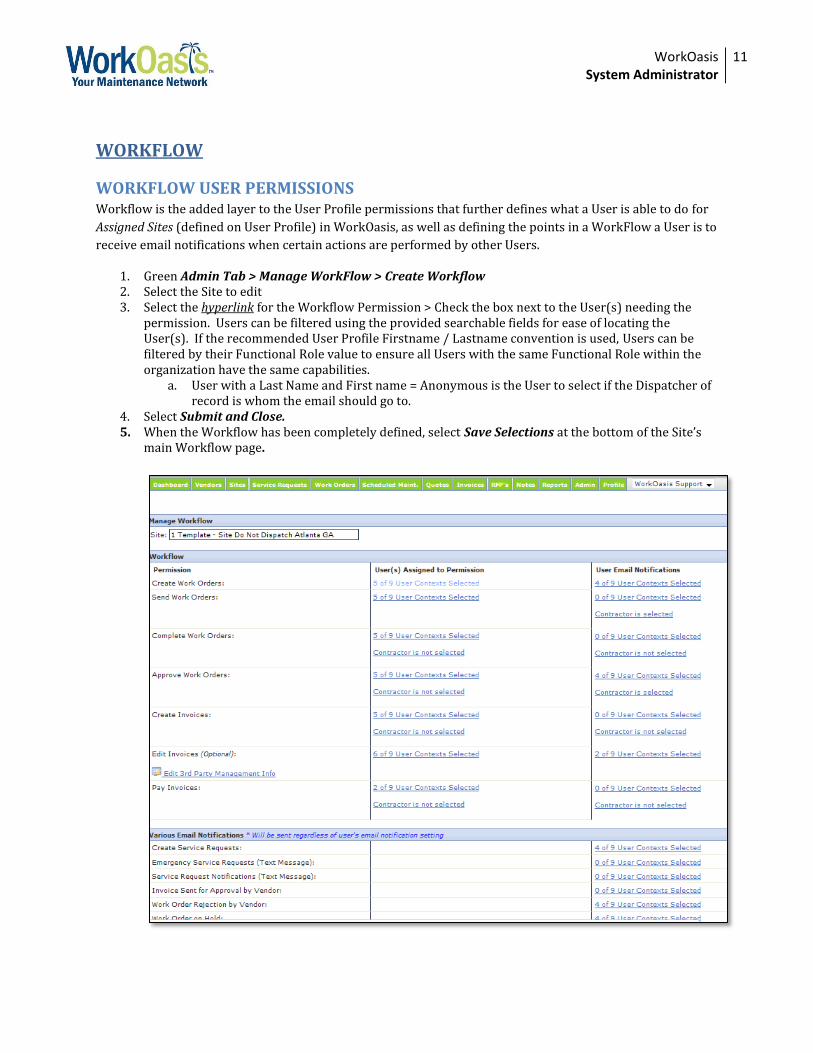
WORKFLOW USER PERMISSIONS Workflow is the added layer to the User Profile permissions that further defines what a User is able to do for
Assigned Sites (defined on User Profile) in WorkOasis, as well as defining the points in a WorkFlow a User is to
receive email notifications when certain actions are performed by other Users.
1. Green Admin Tab > Manage WorkFlow > Create Workflow 2. Select the Site to edit 3. Select the hyperlink for the Workflow Permission > Check the box next to the User(s) needing the
permission. Users can be filtered using the provided searchable fields for ease of locating the User(s). If the recommended User Profile Firstname / Lastname convention is used, Users can be filtered by their Functional Role value to ensure all Users with the same Functional Role within the organization have the same capabilities.
a. User with a Last Name and First name = Anonymous is the User to select if the Dispatcher of record is whom the email should go to.
4. Select Submit and Close. 5. When the Workflow has been completely defined, select Save Selections at the bottom of the Site’s
main Workflow page.

WorkOasis System Administrator
12
PERMSSION: WHAT IT DOES: RECOMMENDED FOR: Create Work Orders Allows users to create Work Orders. Dispatchers, Company Admins
Send Work Orders Allows users to select and send Work Orders to a Vendor. Dispatchers, Company Admins
Complete Work Orders Allows users to complete Work Orders. Dispatchers, Company Admins, Contractor
Approve Work Orders Allows users to complete the signoff survey for Work Orders. Dispatchers, Company Admins
Create Invoices Allows users to create Invoices for Work Orders. Dispatchers, Company Admins, AP users, Contractor
Edit Invoices (Optional) For Service Management Companies ONLY- Allows users to mark-up sub-contractor Invoices and Quotes. Creates a customer version of Invoices and Quotes.
Dispatchers, Company Admins, AP users
Edit 3rd Party Management Info
Selecting this hyperlink while no site is selected: 1) Enables the address Service Management customers will see instead of the actual sub-contractor’s information on work orders. 2) The Work Order header and Footer are also defined here. 3) See “Note:” below.
WorkOasis Support
Pay Invoices Allows users to enter Invoice payment information. AP users, Company Admins
Create Purchase Orders If PO module enabled: Allows users to create and send Purchase Orders to Vendors.
Company Admins, Facility Managers
Edit Purchase Orders (Optional)
If PO module enabled: Allows users to edit an existing Purchase Order sent for fulfillment.
Company Admins, Facility Managers
Approve Purchase Orders (fields with dollar amounts)
If PO module enabled: Allows users to approve Purchase Orders up to the dollar amount listed in the field. (ex. - $1000, user can approve $0-1000 POs.)
Company Admins, Facility Managers
Refer to Guide to Workflow Email Notifications for “Various Email Notifications” definitions.
Note: Service Management Organizations need to do the following for newly added Users: Without selecting
a Site, select Edit 3rd Party Management Info, select the “Support” User (the organization’s address
information should display) and select Apply this address/information to ALL Users. Select Save. This will
ensure the sub-contractor’s contact information does not display on Quotes and Invoices.
The next step, define User(s) in Quote and Invoice Approval Process(es), if necessary.
WorkOasis System Administrator
13
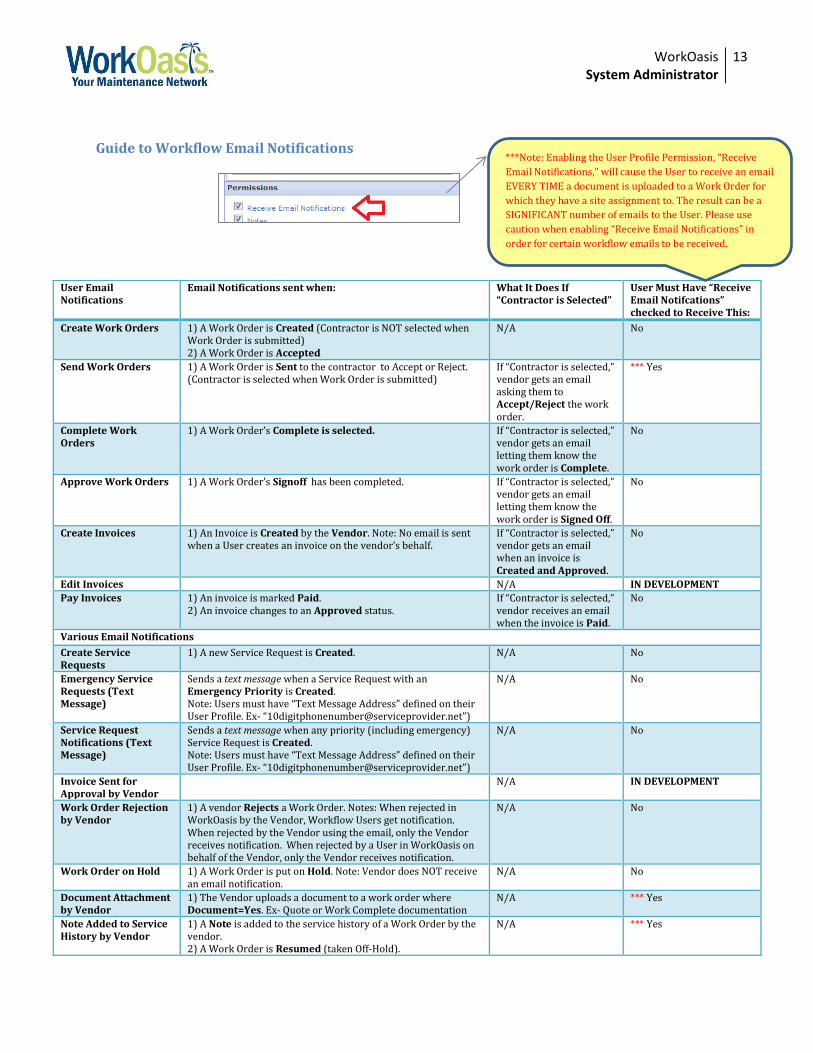
Guide to Workflow Email Notifications
User Email Notifications
Email Notifications sent when: What It Does If “Contractor is Selected”
User Must Have “Receive Email Notifcations” checked to Receive This:
Create Work Orders 1) A Work Order is Created (Contractor is NOT selected when Work Order is submitted) 2) A Work Order is Accepted
N/A No
Send Work Orders 1) A Work Order is Sent to the contractor to Accept or Reject. (Contractor is selected when Work Order is submitted)
If “Contractor is selected,” vendor gets an email asking them to Accept/Reject the work order.
*** Yes
Complete Work Orders
1) A Work Order’s Complete is selected. If “Contractor is selected,” vendor gets an email letting them know the work order is Complete.
No
Approve Work Orders 1) A Work Order’s Signoff has been completed. If “Contractor is selected,” vendor gets an email letting them know the work order is Signed Off.
No
Create Invoices 1) An Invoice is Created by the Vendor. Note: No email is sent when a User creates an invoice on the vendor’s behalf.
If “Contractor is selected,” vendor gets an email when an invoice is Created and Approved.
No
Edit Invoices N/A IN DEVELOPMENT
Pay Invoices 1) An invoice is marked Paid. 2) An invoice changes to an Approved status.
If “Contractor is selected,” vendor receives an email when the invoice is Paid.
No
Various Email Notifications
Create Service Requests
1) A new Service Request is Created. N/A No
Emergency Service Requests (Text Message)
Sends a text message when a Service Request with an Emergency Priority is Created. Note: Users must have “Text Message Address” defined on their User Profile. Ex- “[email protected]”)
N/A No
Service Request Notifications (Text Message)
Sends a text message when any priority (including emergency) Service Request is Created. Note: Users must have “Text Message Address” defined on their User Profile. Ex- “[email protected]”)
N/A No
Invoice Sent for Approval by Vendor
N/A IN DEVELOPMENT
Work Order Rejection by Vendor
1) A vendor Rejects a Work Order. Notes: When rejected in WorkOasis by the Vendor, Workflow Users get notification. When rejected by the Vendor using the email, only the Vendor receives notification. When rejected by a User in WorkOasis on behalf of the Vendor, only the Vendor receives notification.
N/A No
Work Order on Hold 1) A Work Order is put on Hold. Note: Vendor does NOT receive an email notification.
N/A No
Document Attachment by Vendor
1) The Vendor uploads a document to a work order where Document=Yes. Ex- Quote or Work Complete documentation
N/A *** Yes
Note Added to Service History by Vendor
1) A Note is added to the service history of a Work Order by the vendor. 2) A Work Order is Resumed (taken Off-Hold).
N/A *** Yes
***Note: Enabling the User Profile Permission, “Receive
Email Notifications,” will cause the User to receive an email
EVERY TIME a document is uploaded to a Work Order for
which they have a site assignment to. The result can be a
SIGNIFICANT number of emails to the User. Please use
caution when enabling “Receive Email Notifications” in
order for certain workflow emails to be received.

WorkOasis System Administrator
14
ADDING SITE WORKFLOW PERMISSIONS
Manually Added Site:
For Sites manually added to WorkOasis AND there exists a Site with a name containing the string Template, the defined workflow of the Template Site will automatically be duplicated to the newly added site. Note: It is recommended to always verify the Workflow of a newly added site is what is actually needed.
If a Template Site does not exist, Workflow permissions will need to be defined individually, refer to Workflow User Permissions for more information. Alternatively, Workflow permissions of an existing Site can be duplicated to the newly added Site. Refer to Duplicating Workflow Permissions for more information. Note: It is recommended to always verify the Workflow of the Site used to Duplicate from is correct prior to duplication to the new Site.
Imported Site(s):
For Sites imported into WorkOasis, Workflow permissions will need to be defined individually, refer to Workflow User Permissions for more information. Alternatively, Workflow permissions of an existing Site can be duplicated to the newly added Site(s). Refer to Duplicating Workflow Permissions for more information. Note: It is recommended to always verify the Workflow of the Site used to duplicate from is correct prior to duplication to the new Site.

WorkOasis System Administrator
15
DUPLICATING WORKFLOW PERMISSIONS Duplicating Workflow Permissions is an efficient way to set the same capabilities defined by the Workflow of
a single Site for a User or Users, for ALL of their Assigned Sites.
Notes:
a) The Site Workflow to duplicate permissions from, is the Workflow to have open. The Site Workflow to
duplicate permissions to will be selected when Duplicate Workflow is selected.
b) Users will only be given Workflow permissions to sites they are Assigned to. If the Workflow duplicating from has a
User selected for permissions, but a Site duplicating to, does not have the User Assigned, the User will not have
permission to the unassigned site.
1. Green Admin Tab > Manage WorkFlow > Create Workflow 2. Enter the Site name containing the Workflow permissions of all Users to duplicate to one or more of
the other Sites. It is recommended to search for a “Template” Site. Often this “Template Site” is configured with the appropriate permissions for your organization. (Ex - 1 Template - Site Do Not
Dispatch Atlanta GA). The “Template Site” (as with any Site used to duplicate from) User permissions should be verified prior to duplication to an actual Site or Sites.
3. Select Duplicate Workflow
4. Select the check box Copy to All Sites > then Select Copy Workflow. If NOT copying to all sites, select
the Site Group or Individual Sites(s) this workflow applies to.
WorkOasis System Administrator
16
APPROVAL PROCESSES
CREATING AN APPROVAL PROCESS Quote and Invoice Approval Processes, if applicable, were defined during the implementation of
WorkOasis. It is recommended to review existing Approval Processes to see if one needs to only be
modified, rather than creating a new Approval Process.
1. Green tab, Admin > Manage Workflow > Manage Approval Processes 2. Select Add Approval Process 3. Enter a name for the Approval Process. It is recommended to maintain a consistent naming
convention with existing Approval Processes. Naming conventions might include, but not limited to, the following:
a. Reference to Quotes and/or Invoices b. Dollar limitations c. Site limitations, is this Approval Process only applicable to a particular Region, for example. d. Service Category limitations
Enter the Dollar Limitations, if applicable. Select Next
4. Select the Module(s) for the Approval Process: Quotes and/or Invoices. a. If Invoices, select the type of Invoice to include in this Approval Process.
Select Next
5. Select the dropdown on the “Service Categories” tab and place a check mark next to all Service Categories to be included in the Approval Process. If ALL Service Categories are to be included, choose the “Select All” button. Select Close, and then Next
6. Select the dropdown on the “Sites” tab and place check marks next to all Sites to be included in the Approval Process. If ALL Sites are to be included, choose the “Select All” Button. Select Close then Next
7. On the “Approval Levels” tab, select “Add Level” to add the 1st Approval Level. Select the dropdown next to each of the field needing to be defined for the Approval Process. All fields DO NOT need to be defined. Additionally, any combination of Specific User fields and Site Role fields can be used on a single Approval Level.
a. Approver – The preferred or required (if no Override is defined) specific User b. Email Only Users – Specific User(s) to receive an email alerting there is a Quote/Invoice
needing attention c. Override Users – The specific User(s) to Approve in lieu of the preferred or required User d. Final Approver Users – The preferred or required (if no Override is defined) specific User,
with Invoice editing capabilities, not recommended. e. Final Approver Override Users - The specific User(s) to Approve in lieu of the preferred or
required User, with Invoice editing capabilities, not recommended. f. Final Approver Email Users – Specific User(s) to receive an email alerting there is a
Quote/Invoice needing attention g. Work Order Types – The Work Order Types to be approved by the Approval Process. At
least one Type must be selected. The following are only for systems utilizing Site Roles. Refer to Site Roles -> Using Site Roles for more information.
h. Required Site Role Users – The preferred or required (if no Override is defined) Site Role to approve the Quote/Invoice.

WorkOasis System Administrator
17
i. Site Role Email Recipients – Site Role(s) to receive an email alerting there is a Quote/Invoice needing attention
j. Override Site Role Users – The Site Role(s) to Approve in lieu of the preferred or required Role.
k. Required FA Site Role Users – The preferred or required (if no Override is defined) Site Role, with Invoice editing capabilities, not recommended.
l. FA Site Role Email Recipients – Site Role(s) to receive an email alerting there is a Quote/Invoice needing attention
m. Override FA Site Role Users - The Site Role(s) to Approve in lieu of the preferred or required Site Role, with Invoice editing capabilities, not recommended.
Select Finish
8. If more approval levels are needed, select “Add Level” and repeat step 7 until all levels have been defined. Select Next
9. On the “Summary” tab, review the Approval Process. If correct, place a check in the box next to “Do you want to make this Approval Process Active?” and select Finish
EDITING AN EXISTING APPROVAL PROCESS Quote and Invoice Approval Processes, if applicable, were defined during the implementation of
WorkOasis.
Notes:
1) An Approval Process for all Quote and/or Invoice scenarios must be set up before the Quote or Invoice is created.
Changes made to an Approval Process after a Quote or Invoice is created will not apply to the existing Quote or Invoice —
the Approval Process definition in effect at the time of Quote / Invoice creation will remain in effect after a change was
made.
2) If a Quote or Invoice for a Work Order is created with a newly added User, Site, Service Category, or Work Order Type,
AND the Approval Process(es) were NOT updated with the new User, Site, Service Category, and/or Work Order Type, the
Quote and/or Invoice will automatically be “Approved” upon creation. All Approval Processes will be by-passed.

WorkOasis System Administrator
18
1. Green Admin Tab> Manage Workflow > Manage Approval Processes and click View next to the Approval Process to edit. Make and necessary changes and select Finish
a. Data additions requiring a review of Approval Processes are: i. Users, Sites, Service Categories, and Work Order Types
Users
Select the “Approval Levels” tab. View the Approval Level needing the User change. Click the dropdown next
to the appropriate line(s) and modify the User selections, then click Close. Refer to Step 7 of Creating an
Approval Process for field definition. Select Finish at the bottom of the screen, and then Finish on the
“Summary” tab. If the Approval Process is to be used, be sure the “Do you want to make this Approval
Process Active?” box is checked.
Sites
Manually Added Site:
Approval Process having all Sites selected on the “Sites” tab will automatically have a manually added Site
included in the Approval Process.
Note: It is recommended to always verify the Approval Process(es) set-up when a new Site is added to WorkOasis.
Imported Site(s):
Select the “Sites” tab and place check marks next to all Sites to be included in the Approval Process. If ALL
Sites are to be included, choose the “Select All” Button. Click “Close” and select Finish at the bottom of the
screen, and then Finish on the “Summary” tab. If the Approval Process is to be used, be sure the “Do you want
to make this Approval Process Active?” box is checked.
WorkOasis System Administrator
19
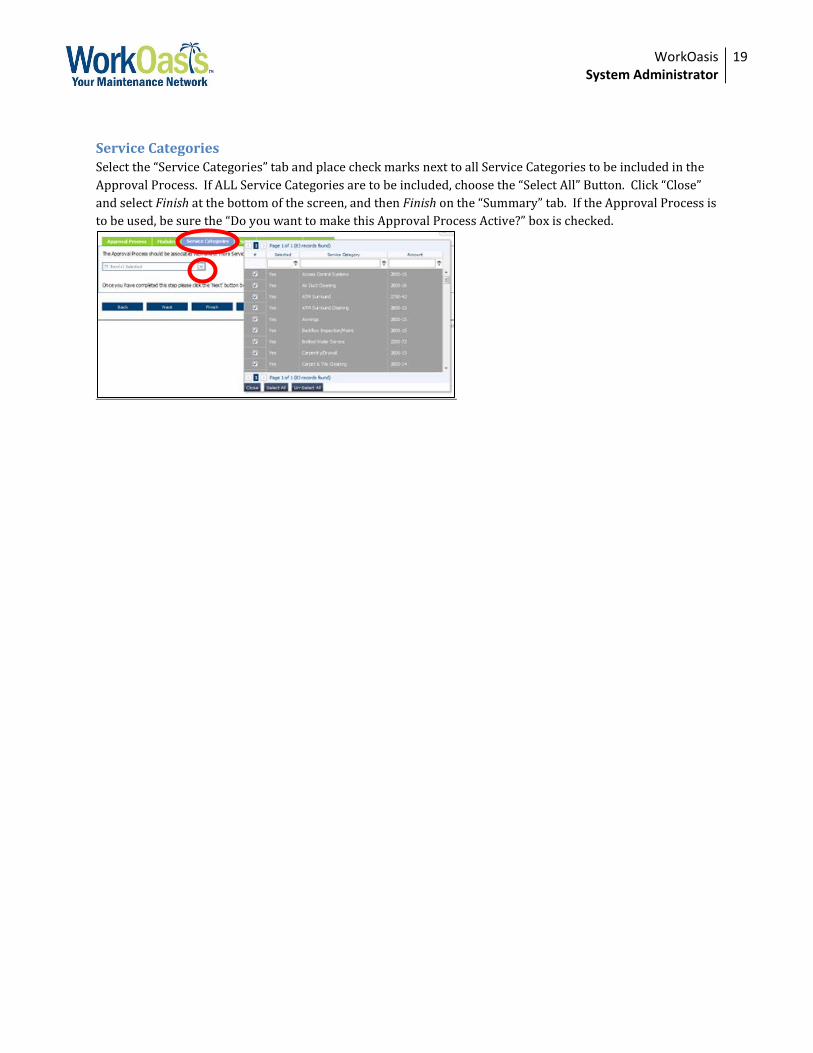
Service Categories
Select the “Service Categories” tab and place check marks next to all Service Categories to be included in the
Approval Process. If ALL Service Categories are to be included, choose the “Select All” Button. Click “Close”
and select Finish at the bottom of the screen, and then Finish on the “Summary” tab. If the Approval Process is
to be used, be sure the “Do you want to make this Approval Process Active?” box is checked.
WorkOasis System Administrator
20
SITES
ADDING A SITE 1. Green Admin Tab > Manage Sites > Add New Site 2. Populate all information about the Site and select Add New at the bottom of the screen.
a. Verify any Site Name naming conventions prior to entering a Site. Consistency is key. b. Service Management Organizations – It is recommended to concatenate the Client Partner
Name as part of the Site Name (example – “Waffle House – Greenbrier Mall” instead of “Greenbrier Mall”, as this allows for Site filters to be more effective throughout WorkOasis.)
Once a Site is added to WorkOasis, the following areas need to be reviewed and edited as needed
to ensure the Site is fully available in WorkOasis. Refer to the Site Set-Up Checklist.
Users – Refer to Users -> Site Assignments. Note: If the Site is manually added, not imported, and all
User Profiles with “All Sites” selected for Site Assignments, the Site also be included in their Assignments.
All other Users who need Assignment will need their Profiles edited to include the new Site. If the Sites are
imported, User Profiles (including Template Users) with “All Sites” selected for Site Assignments, the new
Sites will NOT automatically be included. The User Profiles (including Template Users) will need to have
“All Sites” reselected and Saved.
Site Groups – Refer to Sites -> Managing Site Groups
Approval Process(es) – Refer to Approval Processes -> Editing An Existing Approval Process ->
Sites
Workflow – Refer to Workflow-> Adding Site Workflow Permissions
Client Partner / Entity – Refer to Client Partners (Service Management Companies)
EDITING A SITE PROFILE Site Profiles can have edits made to the base information as well as having Site specific documents, such as
blueprints, lease agreements, etc attached for reference at a later date.
1. Green Admin Tab > Manage Sites > View/Edit Sites 2. Locate the Site Profile to modify by using the search field 3. Select Edit to view the Site Profile 4. On the Edit Site page, make any necessary changes to the Site Profile and be sure to select Save at the
bottom of the page
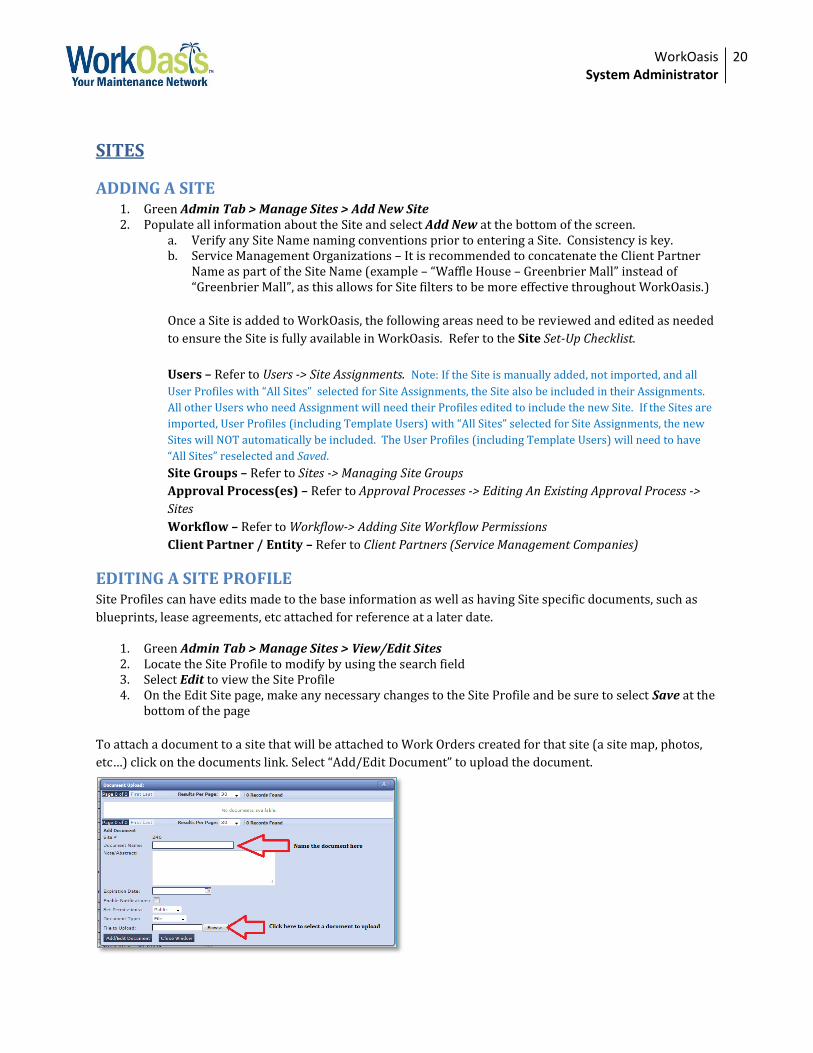
To attach a document to a site that will be attached to Work Orders created for that site (a site map, photos,
etc…) click on the documents link. Select “Add/Edit Document” to upload the document.
WorkOasis System Administrator
21
MANAGING SITE GROUPS Site Groups are an efficient way to cluster multiple Sites under one umbrella. Using Site Groups will aid in
efficiently identifying multiple Sites quickly when utilizing the following features in WorkOasis: Reports,
Scheduled Maintenance, User Site Assignment, and Site Workflow.
It is recommended to make Site Groups if Sites are defined by Regions, Districts, and/or Client Partners
(Service Management companies only).
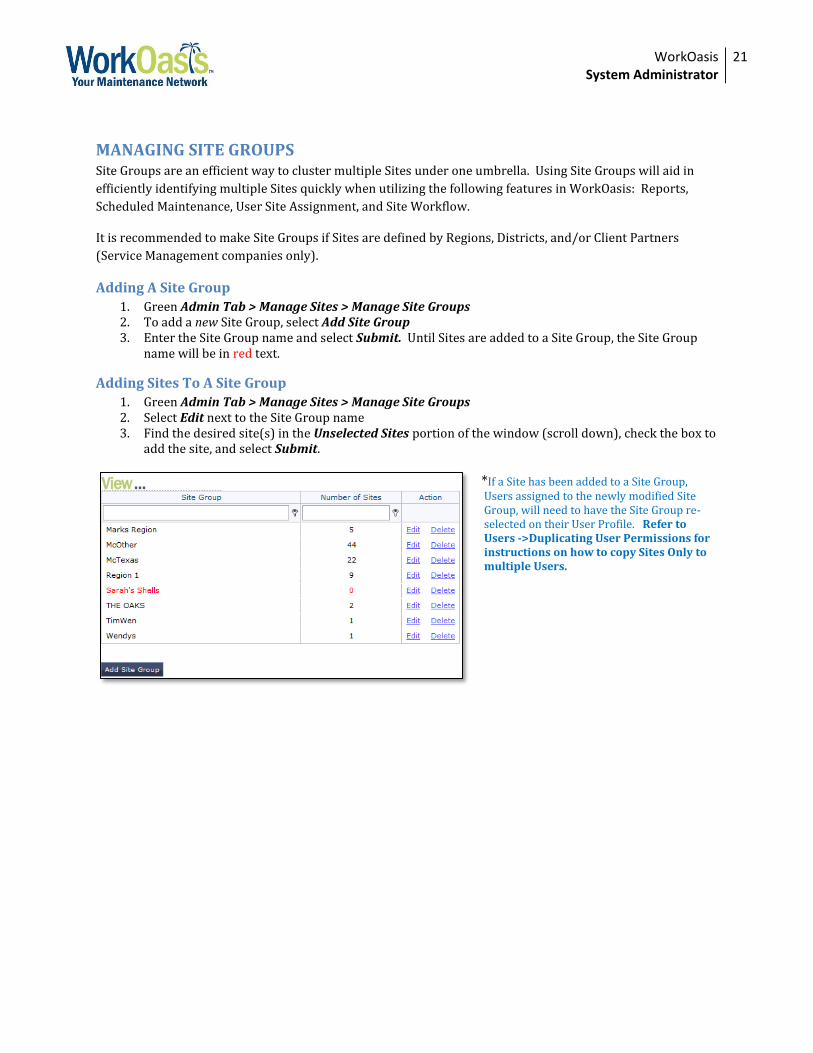
Adding A Site Group
1. Green Admin Tab > Manage Sites > Manage Site Groups 2. To add a new Site Group, select Add Site Group 3. Enter the Site Group name and select Submit. Until Sites are added to a Site Group, the Site Group
name will be in red text.
Adding Sites To A Site Group
1. Green Admin Tab > Manage Sites > Manage Site Groups 2. Select Edit next to the Site Group name 3. Find the desired site(s) in the Unselected Sites portion of the window (scroll down), check the box to
add the site, and select Submit.
*If a Site has been added to a Site Group, Users assigned to the newly modified Site Group, will need to have the Site Group re-selected on their User Profile. Refer to Users ->Duplicating User Permissions for instructions on how to copy Sites Only to multiple Users.
WorkOasis System Administrator
22
SITE ROLES
ESTABLISHING SITE ROLES Site Roles are used in WorkOasis as an efficient way to reduce the number of Approval Processes needing to
be established and managed for Quotes and Invoices. Site Roles allow Approval Levels to be defined using a
user’s position (Site Role) within an organization, rather than by specific individuals.
For example, an organization has 100 Sites divided into 10 regions, with each region containing 2 districts.
Therefore, each region has 1 Regional Manager(RM) and 2 District Managers(DM). Their Quote and Invoice
Approval Process is as follows:
Every Site’s Quote and Invoice must be approved first by the Site’s DM and then their RM.
In this example, if specific Users were used to define the Approval Processes, 1 Approval Process would need
to be established for each combination of an RM and DM. There are 2 combinations for each region, and there
are 10 regions, for a total of 20 Approval Processes.
Using Site Roles allows for the 20 Approval Processes to be reduced to 1.
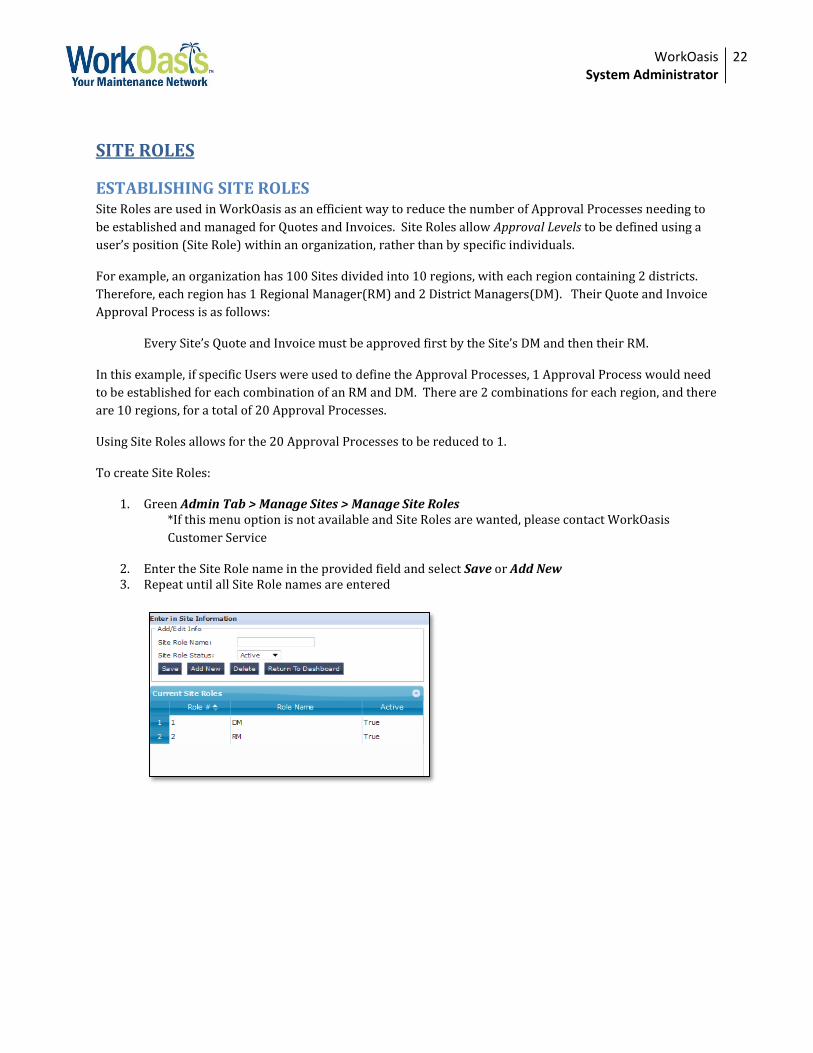
To create Site Roles:
1. Green Admin Tab > Manage Sites > Manage Site Roles *If this menu option is not available and Site Roles are wanted, please contact WorkOasis
Customer Service
2. Enter the Site Role name in the provided field and select Save or Add New 3. Repeat until all Site Role names are entered

WorkOasis System Administrator
23
USER PROFILE Once Site Role names are defined, the Site Role names need to be added/edited on the User Profiles.
1. Green Admin Tab > Manage Users > View/Edit Users 2. Edit the User Profile needing a Site Role defined. 3. Select the Site Role name for the Choose Role field. Select Save. NOTE: This is NOT to be confused
with the User Role field. 4. Repeat until all User Profiles needing Site Roles are completed
SITE PROFILE Once Site Role names are added/edited on the User Profiles, the Site Role Users need to be added/edited on
the Site Profiles .
1. Green Admin Tab > Manage Sites > View/Edit Users 2. Edit the Site Profile needing Roles updated 3. Select the User’s name for each Role Name field. Select Update. NOTE: If “No Users Set for this Role”
is displaying, there are no User Profiles with this Site Role selected. 4. Repeat until all Role Names are completed
APPROVAL PROCESSES Once Site Role names are added/edited on the Site Profiles, Approval Processes can now be defined using Site
Roles instead of, or in combination with specific Users.
When an Approval Process is in use, WorkOasis maps the Site Role in the Approval Process to the like Role of
the Site named on the Quote or Invoice. The User named on the Site Profile is then mapped to the User Profile
to determine the email address to send notification to.
Refer to Approval Processes –> Creating An Approval Process for more information.
WorkOasis System Administrator
24
CLIENT PARTNERS (SERVICE MANAGEMENT COMPANIES) It is recommended to first create/verify the Entity profile, second, create/verify the Client Partner, and lastly,
create the Site Profile.
ADDING A NEW CLIENT PARTNER 1. Green Admin Tab > Manage Clients/ Entities > Add New Client Partner
2. Enter the Client Partner’s name and Client Specific Instructions needing to be communicated to all
technicians resolving a Work Order for the client. Select Add New. NOTE: The Client Partner Profile
is the main billing address where invoices are to be sent. If the Site is to receive the Invoice, “Use for
Bill To Site Only” should be checked. Otherwise, uncheck for the Client Partner to receive the
bill/invoice.
3. Green Admin Tab > Manage Sites > View/Edit Sites
4. Every Site to be associated with the Client Partner will need to be edited. Edit the Site Profile and
highlight the Client Partner(s). Select Save
ADDING A CLIENT PARTNER USER
If a Client Partner is needs to access to WorkOasis to review Work Orders, Invoices, etc. A Client Partner User
will need to be created. The following convention is recommended:
1) Green Admin Tab > Manage Users > Add New User
a. User Name, use “ClientPartnerName@YourCompanyName”
b. Enter the Client Partner email address
c. Password, use “YourCompanyName1”)
d. First name, “ClientPartnerName”
e. Last Name, “Client User”. Select Finish
f. Enter the Phone Number
g. User Context, use “ClientPartnerName” for Name.
h. Select the Site Group the Client User needs Assignment to. Select Save at the end of the
User Profile
2) Duplicate Permissions from the “Template Client” User’s Profile permissions. Refer to Users -
>Duplicating User Permissions for instructions. NOTE: Be sure to Copy Permissions Only and
Overwrite Role.
Note: A Site can have more than one Client Partner. If a Site has multiple Client Partners assigned, when a Work Order is created for the Site, a Client Partner dropdown will display prompting the selection of a Client Partner.
ADDING / EDITING CLIENT NTEs (not to exceed) 1. Green Admin Tab > Manage Client Partners/ Entities > View/Edit Client Partners. 2. Locate the Client Partner, select Edit. 3. To add a Client NTE, uncheck the “Use for Bill To Site Only” box. 4. Select the Corporate Entity to which the NTE’s should be associated to, only if using Entities. 5. Next to each service category, enter the Client NTE amount, and select Save All. These amounts will
populate automatically on Work Orders in Client NTE. Setting NTE’s are optional. To associate an Entity to a Client Partner, at minimum, uncheck “Ignore Entities for Service Category NTE’s” on the Client Partner profile, select the Entity to be associated, and select
WorkOasis System Administrator
25
“SaveAll” at the end of the Service Category listing. Current Assignments for the Client Partner will display to the right of the Service Category listing. If you have a site that you have different NTE amounts for based on who you send your invoice to, then you can set up multiple Corporate Entities. Contact WorkOasis support for assistance with this.
ADDING A NEW CORPORATE ENTITY 1. Green Admin Tab > Manage Clients/ Entities > Add New Corp Entity
2. Enter the Entity’s name and contact information. Select Add New.
3. Refer to Adding A New Client Partner and Adding / Editing Client NTE’s to complete the set-up.
WorkOasis System Administrator
26
SERVICE CATEGORIES
ADDING NEW SERVICE CATEGORIES 1. Green Admin Tab > Manage Service Categories > Add/Edit Service Cats 2. Enter the Name of the new Service Category 3. If applicable, enter the “Not to Exceed Amount: $” amount. This automatically populate on Work
Orders with this Service Category. 4. If applicable, enter the General Ledger Account Code 5. For the Service Category to be available for use in WorkOasis, the Current Status should be
“Available for Assignment”. Select Add New.
Once a Service Category is added to WorkOasis, the following areas need to be reviewed and edited
as needed to ensure the Service Category is fully available in WorkOasis. Refer to the Service
Category Set-Up Checklist.
Service Category Groups – Refer to Service Categories -> Managing Service Category Groups
Approval Process(es) – Refer to Approval Processes -> Editing An Existing Approval Process -
> Sites
NOTE: If Service Categories are a separation used to define Approval Processes, it is beneficial to concatenate the
“Group Name – “ to the beginning of Service Category names for ease of identification when defining Approval
Processes.
SERVICE CATEGORY GROUPS Service Category Groups are an efficient way to filter extensive Service Category lists as a User is entering
either a Service Request or Work Order. When a Service Category Group is selected, only Group members
will populate the Service Category list. Service Category Groups are optional.
Creating Service Category Groups:
1. Green Admin Tab > Manage Service Categories > Add/Edit Service Cat Groups
2. Enter the Name of the new Group and select Create New
Adding Members to Groups:
1. Select the “Select Service Category” dropdown to select the Service Category Group. 2. Select the “Member Service Categories” 3. Place check marks next to all the Service Categories to belong in the Group. Select Close, then Save.
Note: Service categories can be part of more than one group.
WorkOasis System Administrator
27
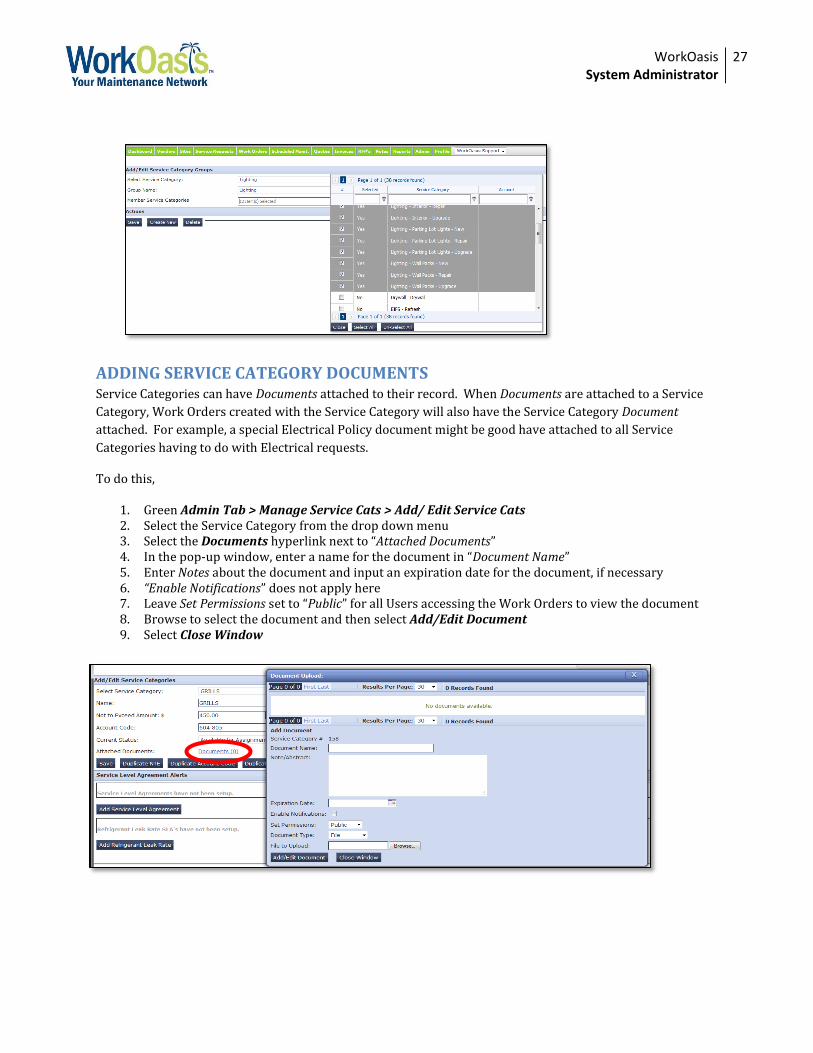
ADDING SERVICE CATEGORY DOCUMENTS Service Categories can have Documents attached to their record. When Documents are attached to a Service
Category, Work Orders created with the Service Category will also have the Service Category Document
attached. For example, a special Electrical Policy document might be good have attached to all Service
Categories having to do with Electrical requests.
To do this,
1. Green Admin Tab > Manage Service Cats > Add/ Edit Service Cats 2. Select the Service Category from the drop down menu 3. Select the Documents hyperlink next to “Attached Documents” 4. In the pop-up window, enter a name for the document in “Document Name” 5. Enter Notes about the document and input an expiration date for the document, if necessary 6. “Enable Notifications” does not apply here 7. Leave Set Permissions set to “Public” for all Users accessing the Work Orders to view the document 8. Browse to select the document and then select Add/Edit Document 9. Select Close Window
WorkOasis System Administrator
28
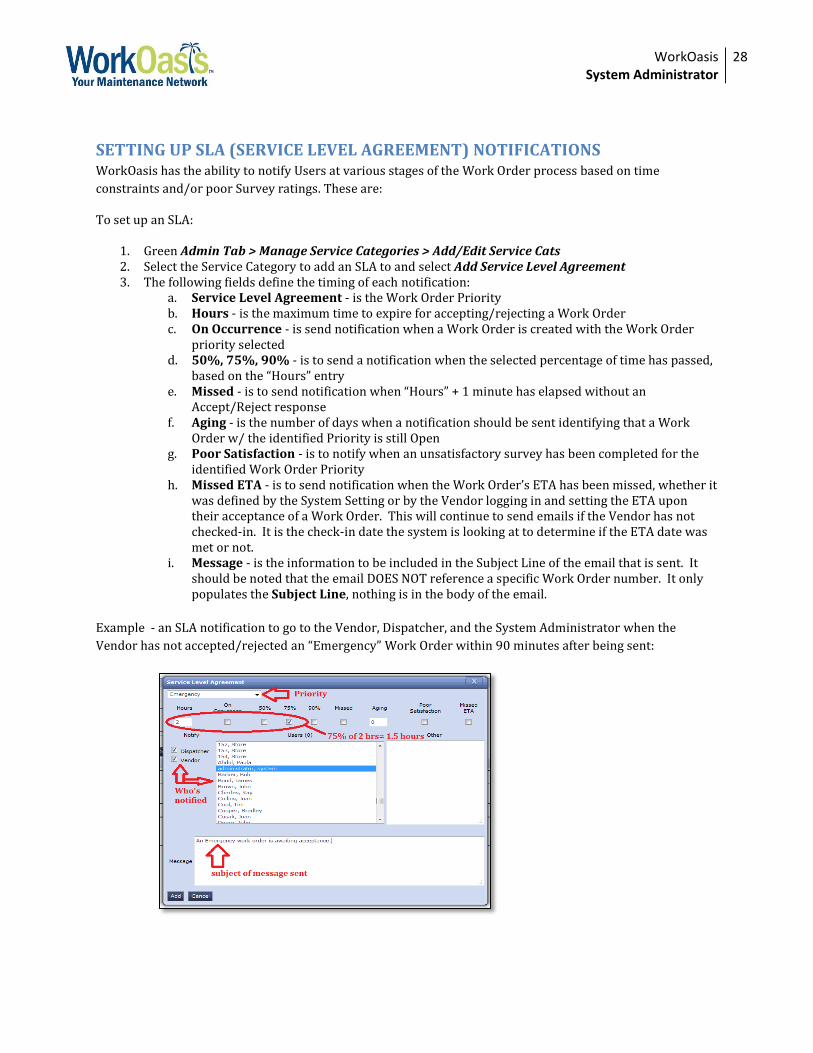
SETTING UP SLA (SERVICE LEVEL AGREEMENT) NOTIFICATIONS WorkOasis has the ability to notify Users at various stages of the Work Order process based on time
constraints and/or poor Survey ratings. These are:
To set up an SLA:
1. Green Admin Tab > Manage Service Categories > Add/Edit Service Cats 2. Select the Service Category to add an SLA to and select Add Service Level Agreement 3. The following fields define the timing of each notification:
a. Service Level Agreement - is the Work Order Priority b. Hours - is the maximum time to expire for accepting/rejecting a Work Order c. On Occurrence - is send notification when a Work Order is created with the Work Order
priority selected d. 50%, 75%, 90% - is to send a notification when the selected percentage of time has passed,
based on the “Hours” entry e. Missed - is to send notification when “Hours” + 1 minute has elapsed without an
Accept/Reject response f. Aging - is the number of days when a notification should be sent identifying that a Work
Order w/ the identified Priority is still Open g. Poor Satisfaction - is to notify when an unsatisfactory survey has been completed for the
identified Work Order Priority h. Missed ETA - is to send notification when the Work Order’s ETA has been missed, whether it
was defined by the System Setting or by the Vendor logging in and setting the ETA upon their acceptance of a Work Order. This will continue to send emails if the Vendor has not checked-in. It is the check-in date the system is looking at to determine if the ETA date was met or not.
i. Message - is the information to be included in the Subject Line of the email that is sent. It should be noted that the email DOES NOT reference a specific Work Order number. It only populates the Subject Line, nothing is in the body of the email.
Example - an SLA notification to go to the Vendor, Dispatcher, and the System Administrator when the
Vendor has not accepted/rejected an “Emergency” Work Order within 90 minutes after being sent:
WorkOasis System Administrator
29
DUPLICATING SLA’s Often times Work Order Priority Service Level Agreements for one Service Category are in effect for other
Service Categories, if not all Service Categories.
To duplicate an SLA:
1) Green Admin Tab > Manage Service Categories > Add/Edit Service Cats 2) Select the Service Category with the defined SLAs to be duplicated and select Duplicate SLA 3) Check the Service Category(ies) to copy the SLAs to. If the SLAs are to be used for ALL Service
Categories, check the “All Service Categories” box only. 4) Select Copy SLA
Note: Duplicating an SLA will only add to a Service Category’s SLAs. Therefore, if an SLA for a Work Order Priority / Service
Category combination already exists, and an SLA with the same Work Order Priority / Service Category combination is
duplicated, the Service Category will have 2 SLAs for the given combination.

WorkOasis System Administrator
30
CALL AVOIDANCE QUESTIONS Call Avoidance Questions are statements or questions to display as a “checklist” to aid the Service Requestor
with possible self-help solutions before submitting a Service Request or Work Order. If available, the
Requestor will be required to acknowledge the Call Avoidance box by selecting the check box next to “I have
complied with these requirements” prior to Service Request or Work Order submission. Some companies also
use this as a place to present “after-hours” instructions. Call Avoidance Questions can be set up based on
Service Category or Work Order Type.
To set up Call Avoidance Questions:
1. Green tab Admin> Manage Call Center > Add/Edit Questions 2. Select the Service Category or Work Order Type 3. Enter a “Header Text”. Header Text must have a value entered.
(ex- “Try these self-help techniques before creating a Work Order:”) 4. Enter the first question over-writing “Enter New Question Here.” Select Add 5. Repeat step 4 as needed to add more questions, using the “Edit” and “Delete” links as necessary 6. Select Save
WorkOasis System Administrator
31
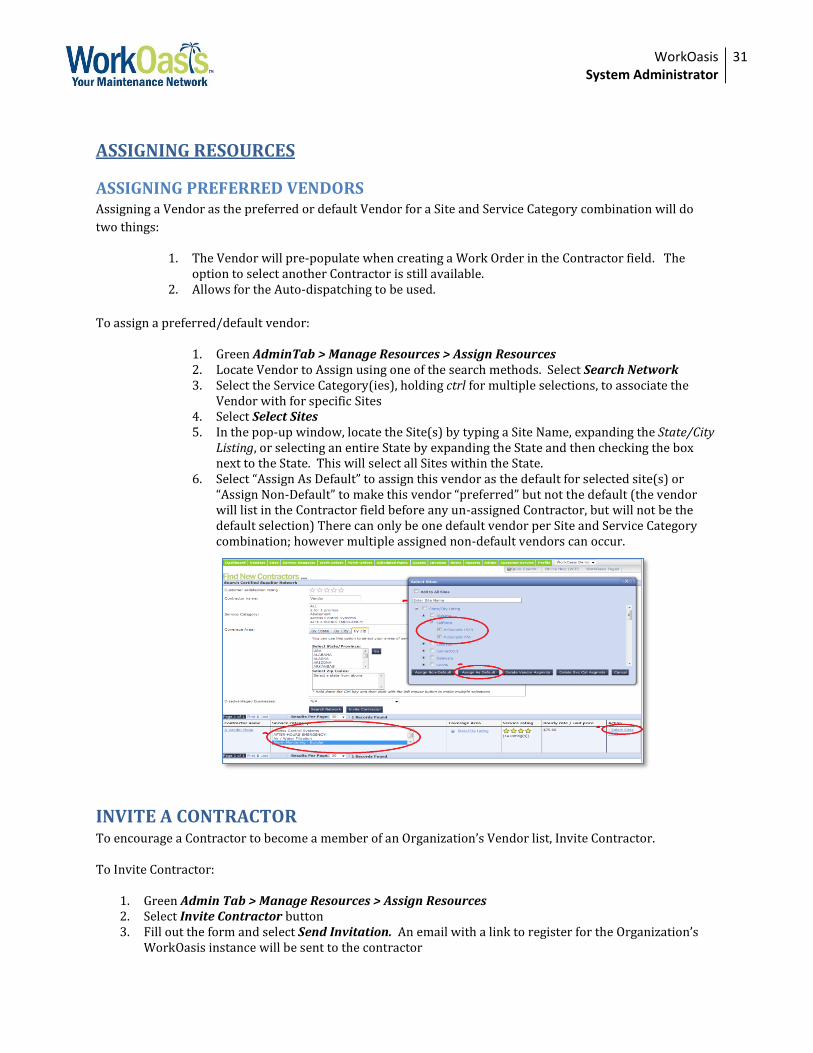
ASSIGNING RESOURCES
ASSIGNING PREFERRED VENDORS Assigning a Vendor as the preferred or default Vendor for a Site and Service Category combination will do
two things:
1. The Vendor will pre-populate when creating a Work Order in the Contractor field. The option to select another Contractor is still available.
2. Allows for the Auto-dispatching to be used.
To assign a preferred/default vendor:
1. Green AdminTab > Manage Resources > Assign Resources 2. Locate Vendor to Assign using one of the search methods. Select Search Network 3. Select the Service Category(ies), holding ctrl for multiple selections, to associate the
Vendor with for specific Sites 4. Select Select Sites 5. In the pop-up window, locate the Site(s) by typing a Site Name, expanding the State/City
Listing, or selecting an entire State by expanding the State and then checking the box next to the State. This will select all Sites within the State.
6. Select “Assign As Default” to assign this vendor as the default for selected site(s) or “Assign Non-Default” to make this vendor “preferred” but not the default (the vendor will list in the Contractor field before any un-assigned Contractor, but will not be the default selection) There can only be one default vendor per Site and Service Category combination; however multiple assigned non-default vendors can occur.
INVITE A CONTRACTOR To encourage a Contractor to become a member of an Organization’s Vendor list, Invite Contractor.
To Invite Contractor:
1. Green Admin Tab > Manage Resources > Assign Resources 2. Select Invite Contractor button 3. Fill out the form and select Send Invitation. An email with a link to register for the Organization’s
WorkOasis instance will be sent to the contractor
3 4
5
6
WorkOasis System Administrator
32
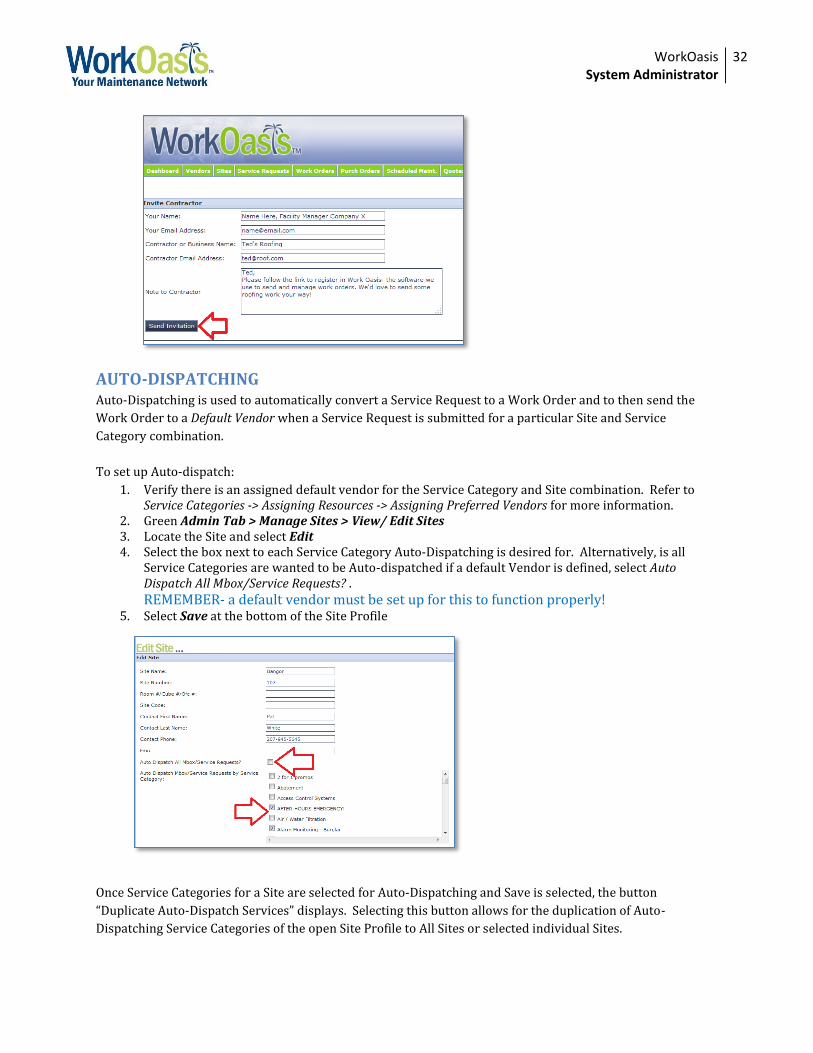
AUTO-DISPATCHING Auto-Dispatching is used to automatically convert a Service Request to a Work Order and to then send the
Work Order to a Default Vendor when a Service Request is submitted for a particular Site and Service
Category combination.
To set up Auto-dispatch:
1. Verify there is an assigned default vendor for the Service Category and Site combination. Refer to Service Categories -> Assigning Resources -> Assigning Preferred Vendors for more information.
2. Green Admin Tab > Manage Sites > View/ Edit Sites 3. Locate the Site and select Edit 4. Select the box next to each Service Category Auto-Dispatching is desired for. Alternatively, is all
Service Categories are wanted to be Auto-dispatched if a default Vendor is defined, select Auto Dispatch All Mbox/Service Requests? .
REMEMBER- a default vendor must be set up for this to function properly! 5. Select Save at the bottom of the Site Profile
Once Service Categories for a Site are selected for Auto-Dispatching and Save is selected, the button
“Duplicate Auto-Dispatch Services” displays. Selecting this button allows for the duplication of Auto-
Dispatching Service Categories of the open Site Profile to All Sites or selected individual Sites.

WorkOasis System Administrator
33
IMPORTING DATA (NON-EQUIPMENT) When adding a large number of data records (Users, Sites, Service Categories, and/or Vendors), there is an
option to import the data rather than manually entering the records.
When importing data, the WorkOasis templates provided MUST used without modification to the template
file structure, including the format. The format MUST be .csv. To download a copy of the template:
1. Green Admin Tab > Manage (data type) > Import (data type to import) The first tab of all of the import templates includes instructions outlining required fields, helpful hints and limits on number of records to import at one time.
2. Populate the information on the template. It is recommended to export the current data in WorkOasis and to use this export file to populate with the new information (leaving the exported data in place). This method will aid with consistent formatting of values and naming conventions.
a. If using an export file, before importing, locate the column, “Action.” Any NEW row(s) will need have “Update” selected from the dropdown list. All rows without “Update” will be ignored.
b. Site imports only: i. Apostrophes CANNOT exist as part of the Site Name, Site Group name, Client Partner
name, or an Entity Name value. ii. Be cognizant of any data contained in the Data Option # columns. Be sure to keep
this information consistent. These are the custom data fields created during the Implementation process.
iii. Create Site Group first, then import iv. Site Group values listed in import file must match EXACTLY to values existing in
WorkOasis v. Client Partner values listed in import file must match EXACTLY to values listed on
Client Partner tab or to values existing in WorkOasis (typically for Service Management companys only)
vi. Multiple Site Group assignments must be separated with the pipe character, “|” c. Vendor imports only:
i. Service Category values listed in import file must match EXACTLY to values existing in WorkOasis
ii. Multiple Service Category assignments must be separated with the pipe character, “|”
3. Returning to Green AdminTab > Manage (data type) > Import (data type to import) , Browse to select the import file and select Import File.
4. After the Import, an Excel document will open showing the results of the Import. Save this file immediately, as it will not be accessible again if it is closed prior to saving.
5. In the far right column of the results file, each row will have a “Processing Message” that will indicate Imported or Failed- with the reason for the failure.
6. For failed import records, correct the data, and re-import using the results file. Before re-importing, locate the column, “Action.” Any corrected row(s) will need have “Update” selected from the dropdown list. All rows without “Update” will be ignored.
NOTE: For Sites that are Imported, User Profiles (including Template Users) with “All Sites” selected for Site Assignments,
the new Sites will NOT automatically be included. The User Profiles (including Template Users) will need to have “All
Sites” reselected and Saved. Refer to Users -> Duplicating Permissions for a tool to due this application more efficiently.
If you have any questions, please contact WorkOasis Support before importing at 1-866-641-3919.

WorkOasis System Administrator
34
IMPORTING EQUIPMENT Lists of equipment can be uploaded to track warranty information, equipment aging, and to specify which
piece of equipment needs to be serviced for a Work Order. To download a copy of the template,
1. Green AdminTab > Manage Equipment > Import Equipment. Select the hyperlink “template”. 2. The required fields are:
Name - This is the name of the piece of equipment. It must be unique per Site. If there are multiple items with the same name for the same site, it is recommended to concatenate the serial number to the name. (Ex- “Coffeemaker – XR12345” and “Coffeemaker – XR67890”)
Site Name - This must EXACTLY match the site name in the database Site # - This must EXACTLY match the site number in the database Serial # - This is a unique value for each piece of equipment and ensures the correct piece of
equipment is being selected. Date in Service - The date the piece of equipment was first installed/ purchased for use at the
site. Format is MM/DD/YYYY. 3. Once the template is complete, Save the file. 4. Returning to Green AdminTab > Manage Equipment > Import Equipment, Browse to select the
import file and select Import File. After the Import, an Excel document will open showing the results of the Import. Save this file immediately, as it will not be accessible again if it is closed prior to saving.
5. In the far right column of the results file, each row will have a “Processing Message” that will indicate Imported or Failed- with the reason for the failure.
6. For failed import records, correct the data, and re-import using the results file. Before re-importing, locate the column, “Action.” Any corrected row(s) will need have “Update” selected from the dropdown list. All rows without “Update” will be ignored.
To view or make edits to Equipment:
1. Green AdminTab > Manage Equipment > Manage Equipment 2. Select to view the equipment record then select “Edit” to update the record. Remember to Save after
adding/editing any information on the record.
Equipment can also be Imported, Viewed, and Edited through Sites > Manage Sites > Site Assessment
Surveys. Type the Site Name in “Select a Site”, and select the Equipment tab. Photos for equipment can also
uploaded here. After an edit of an equipment record, be sure to select Save.
WorkOasis System Administrator
35
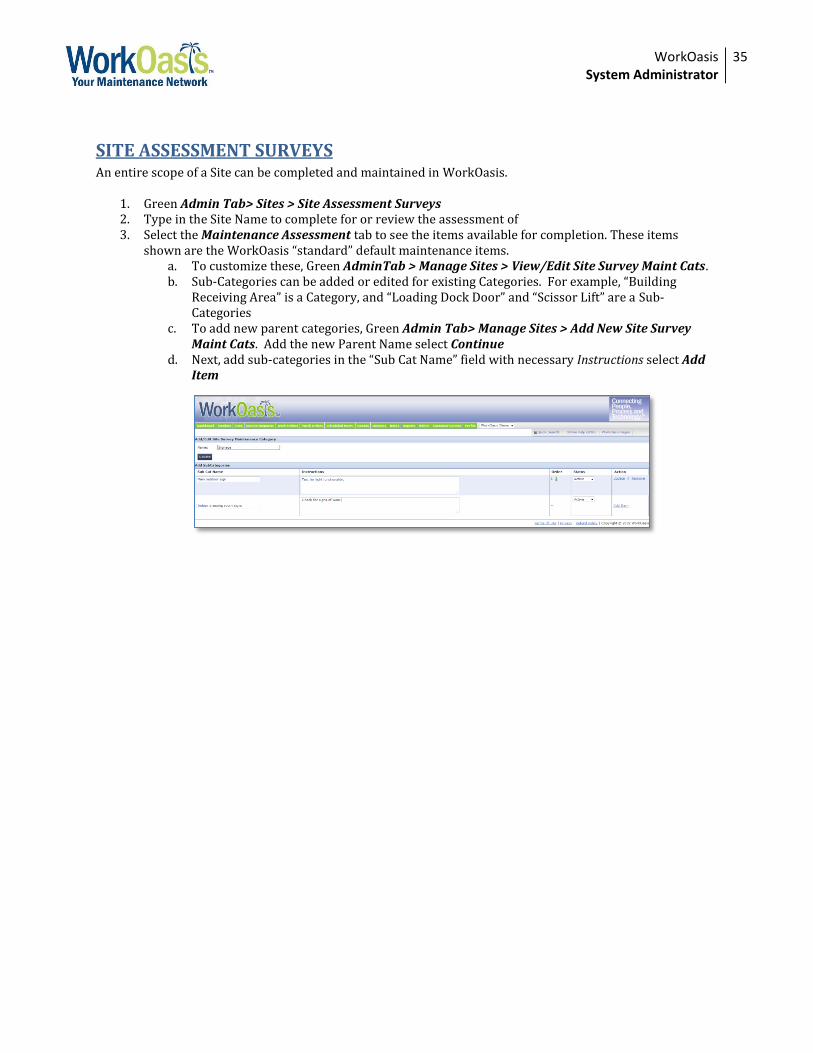
SITE ASSESSMENT SURVEYS An entire scope of a Site can be completed and maintained in WorkOasis.
1. Green Admin Tab> Sites > Site Assessment Surveys 2. Type in the Site Name to complete for or review the assessment of 3. Select the Maintenance Assessment tab to see the items available for completion. These items
shown are the WorkOasis “standard” default maintenance items. a. To customize these, Green AdminTab > Manage Sites > View/Edit Site Survey Maint Cats. b. Sub-Categories can be added or edited for existing Categories. For example, “Building
Receiving Area” is a Category, and “Loading Dock Door” and “Scissor Lift” are a Sub-Categories
c. To add new parent categories, Green Admin Tab> Manage Sites > Add New Site Survey Maint Cats. Add the new Parent Name select Continue
d. Next, add sub-categories in the “Sub Cat Name” field with necessary Instructions select Add Item
WorkOasis System Administrator
36
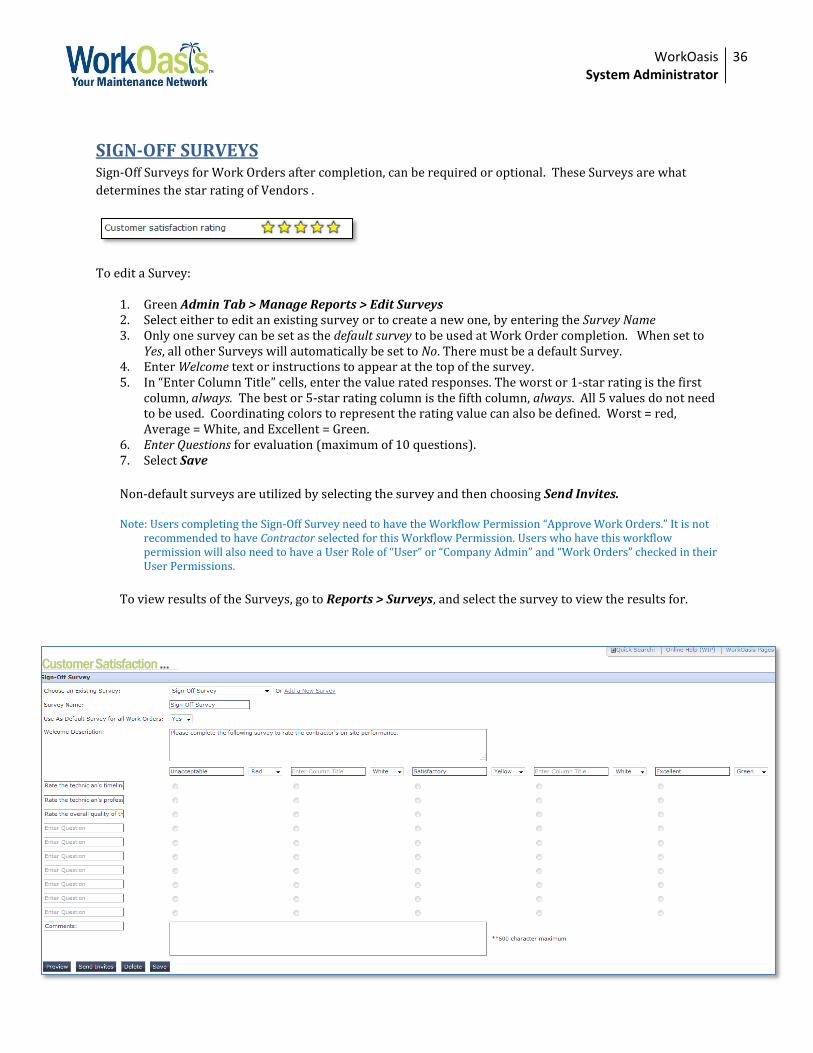
SIGN-OFF SURVEYS Sign-Off Surveys for Work Orders after completion, can be required or optional. These Surveys are what
determines the star rating of Vendors .
To edit a Survey:
1. Green Admin Tab > Manage Reports > Edit Surveys 2. Select either to edit an existing survey or to create a new one, by entering the Survey Name 3. Only one survey can be set as the default survey to be used at Work Order completion. When set to
Yes, all other Surveys will automatically be set to No. There must be a default Survey. 4. Enter Welcome text or instructions to appear at the top of the survey. 5. In “Enter Column Title” cells, enter the value rated responses. The worst or 1-star rating is the first
column, always. The best or 5-star rating column is the fifth column, always. All 5 values do not need to be used. Coordinating colors to represent the rating value can also be defined. Worst = red, Average = White, and Excellent = Green.
6. Enter Questions for evaluation (maximum of 10 questions). 7. Select Save
Non-default surveys are utilized by selecting the survey and then choosing Send Invites.
Note: Users completing the Sign-Off Survey need to have the Workflow Permission “Approve Work Orders.” It is not recommended to have Contractor selected for this Workflow Permission. Users who have this workflow permission will also need to have a User Role of “User” or “Company Admin” and “Work Orders” checked in their User Permissions.
To view results of the Surveys, go to Reports > Surveys, and select the survey to view the results for.
WorkOasis System Administrator
37
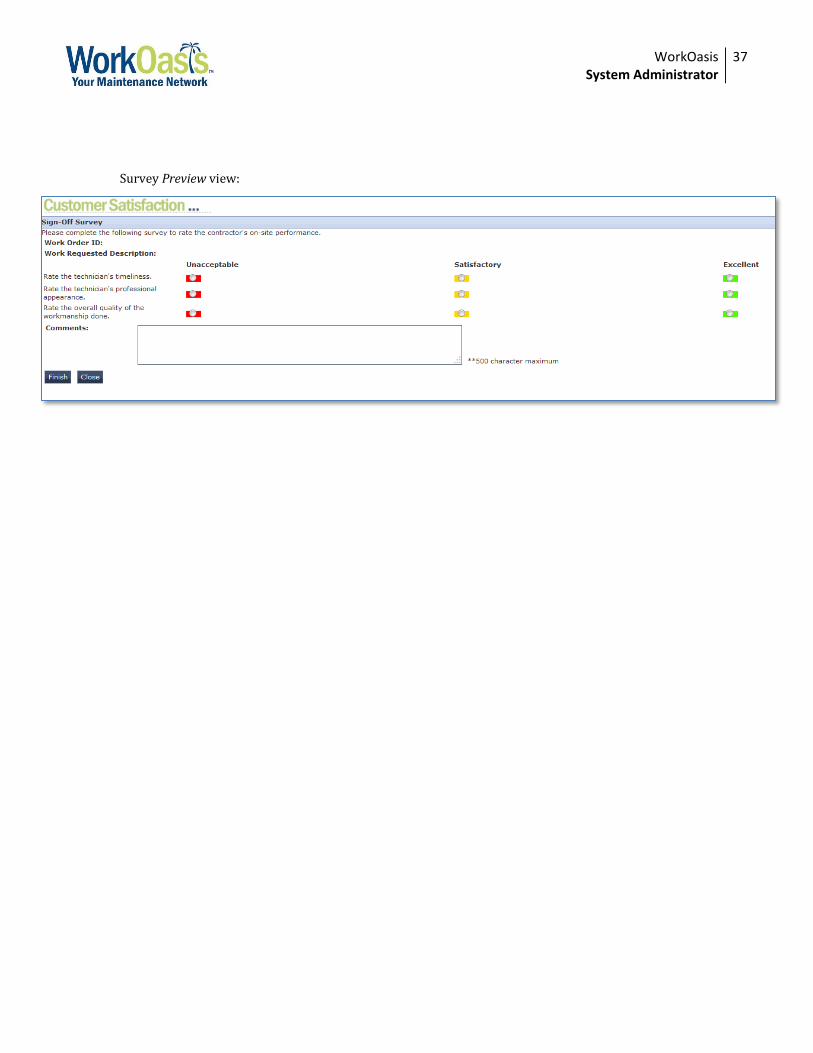
Survey Preview view:
WorkOasis System Administrator
38
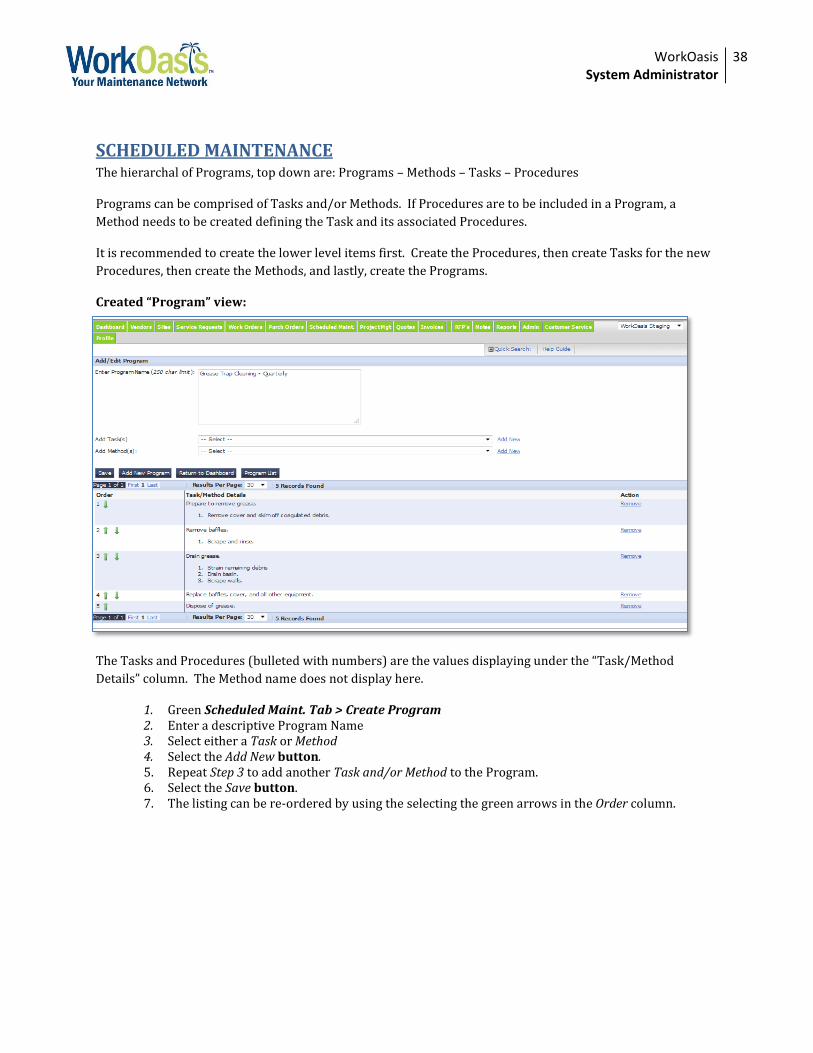
SCHEDULED MAINTENANCE The hierarchal of Programs, top down are: Programs – Methods – Tasks – Procedures
Programs can be comprised of Tasks and/or Methods. If Procedures are to be included in a Program, a
Method needs to be created defining the Task and its associated Procedures.
It is recommended to create the lower level items first. Create the Procedures, then create Tasks for the new
Procedures, then create the Methods, and lastly, create the Programs.
Created “Program” view:
The Tasks and Procedures (bulleted with numbers) are the values displaying under the “Task/Method
Details” column. The Method name does not display here.
1. Green Scheduled Maint. Tab > Create Program 2. Enter a descriptive Program Name 3. Select either a Task or Method 4. Select the Add New button. 5. Repeat Step 3 to add another Task and/or Method to the Program. 6. Select the Save button. 7. The listing can be re-ordered by using the selecting the green arrows in the Order column.
WorkOasis System Administrator
39
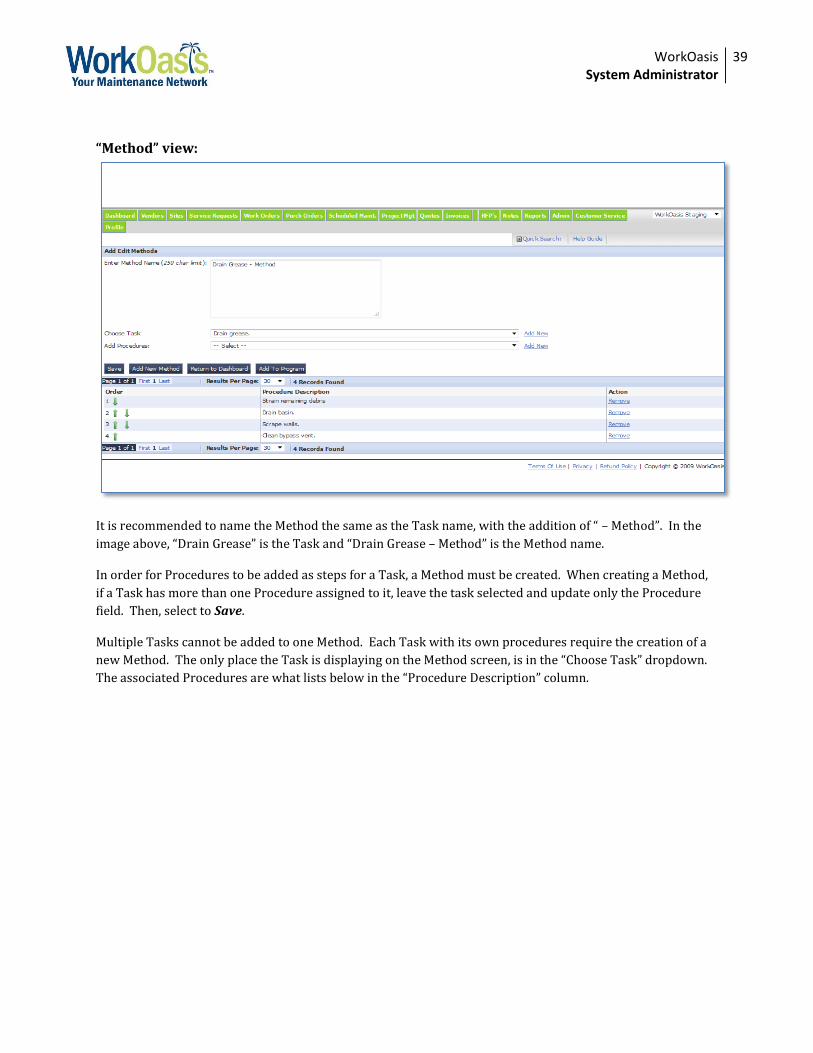
“Method” view:
It is recommended to name the Method the same as the Task name, with the addition of “ – Method”. In the
image above, “Drain Grease” is the Task and “Drain Grease – Method” is the Method name.
In order for Procedures to be added as steps for a Task, a Method must be created. When creating a Method,
if a Task has more than one Procedure assigned to it, leave the task selected and update only the Procedure
field. Then, select to Save.
Multiple Tasks cannot be added to one Method. Each Task with its own procedures require the creation of a
new Method. The only place the Task is displaying on the Method screen, is in the “Choose Task” dropdown.
The associated Procedures are what lists below in the “Procedure Description” column.
WorkOasis System Administrator
40
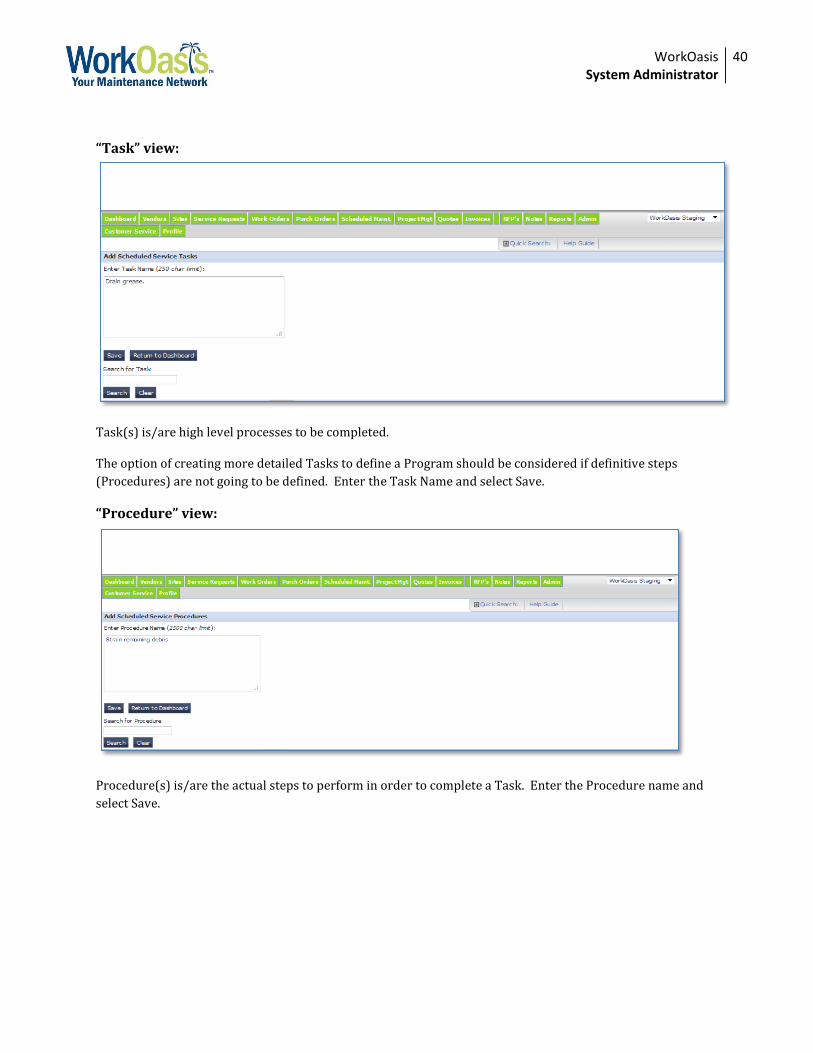
“Task” view:
Task(s) is/are high level processes to be completed.
The option of creating more detailed Tasks to define a Program should be considered if definitive steps
(Procedures) are not going to be defined. Enter the Task Name and select Save.
“Procedure” view:
Procedure(s) is/are the actual steps to perform in order to complete a Task. Enter the Procedure name and
select Save.
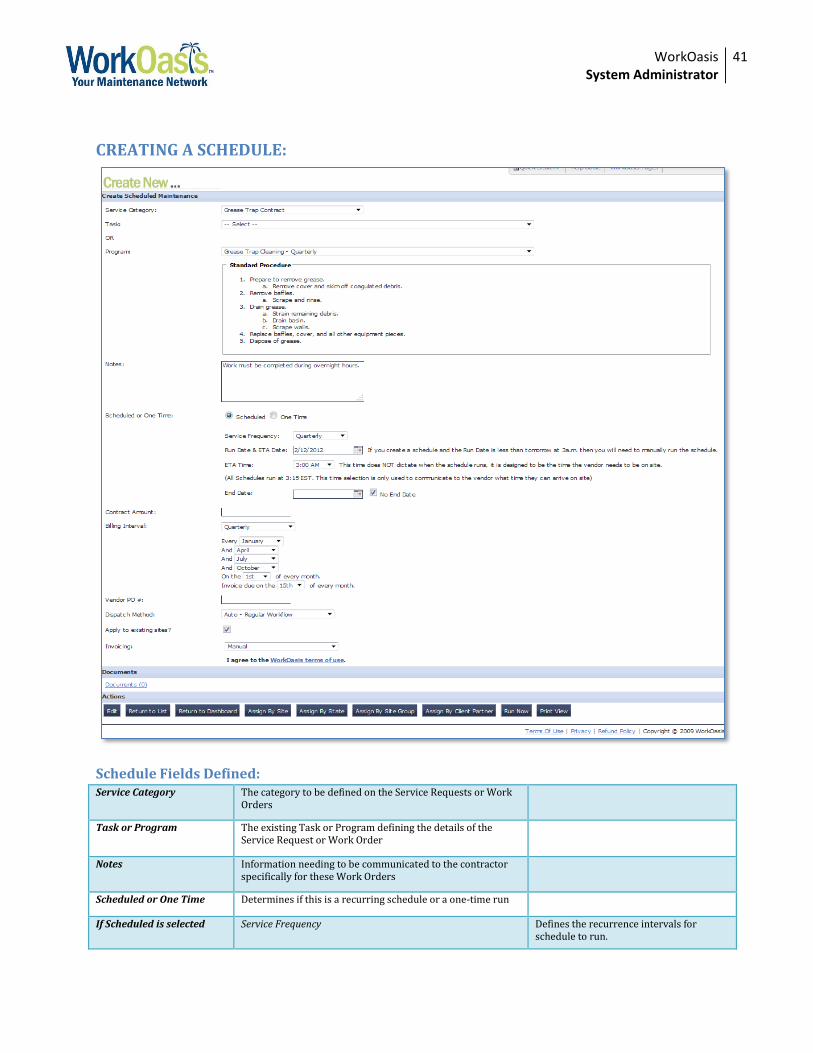
WorkOasis System Administrator
41
CREATING A SCHEDULE:
Schedule Fields Defined: Service Category The category to be defined on the Service Requests or Work
Orders
Task or Program The existing Task or Program defining the details of the Service Request or Work Order
Notes Information needing to be communicated to the contractor specifically for these Work Orders
Scheduled or One Time Determines if this is a recurring schedule or a one-time run
If Scheduled is selected Service Frequency Defines the recurrence intervals for schedule to run.

WorkOasis System Administrator
42
Run Date and ETA Time The first day schedule will run. The time the contractor is expected to be on site by. The first time a created schedule runs must be more than 24 hours after creation.
End Date Last date the scheduled maintenance item will run.
Contract Amount The amount every site selected will be charged for the service rendered
The Contractor will need to accept the Contract Amount prior to accepting the work order. Contract must be Accepted prior to the first schedule run.
Billing Interval The frequency of the billing cycle for the scheduled item.
Vendor PO # Vendor PO #, if applicable This will carry over to all work orders created. If the PO # is site specific, this should not be completed.
Dispatch Method Defines the level of control over the workflow of Service Requests and Work Orders when created by automation
Manual Only creates the Service Request.
Auto – Regular Workflow (recommended, allows for verification of work completion, and cost)
Creates the Work Order, and sends to the selected Contractor.
Auto – Shortened Workflow Creates a Contract Creates completed, signed off Work
Order IF contract is Accepted prior to the run, otherwise, the Work Orders themselves will need to be accepted.
Emails Supplier Contract updates
Invoicing How the invoicing is to be handled
None No invoice will be created.
Manual Invoice manually created.
Auto (If Work Order has been signed off only) Invoice is automatic. Not recommended.
Dispatch Method MUST be Auto – Shortened Workflow
If the Contract is not accepted prior to the Work Order status becoming Customer Signoff then the Auto Invoicing Option is NOT enabled and the automation will not occur until the contract is accepted and then the work order status is updated from complete to customer signoff
Note: If Dispatch Method is Auto – Shortened Workflow, a Contract will be created. When a Contract is created, the selected Supplier MUST accept the Contract in order to proceed with Work Orders.
Selecting Sites and Contractor (Supplier):
Sites can be Assigned to the Scheduled Maintenance in one of four ways:
1) Site – if one or more sites are to receive the service and are not grouped in another manner. 2) State – if all sites within one or more states are to receive the service. Note: Not all sites within a
State need to be selected. 3) Site Group – if all sites with in a defined WorkOasis Site Group are to receive the service. Note:
Not all sites within a Site Group need to be selected. 4) Client Partner (mainly used for Service Management users of WorkOasis)
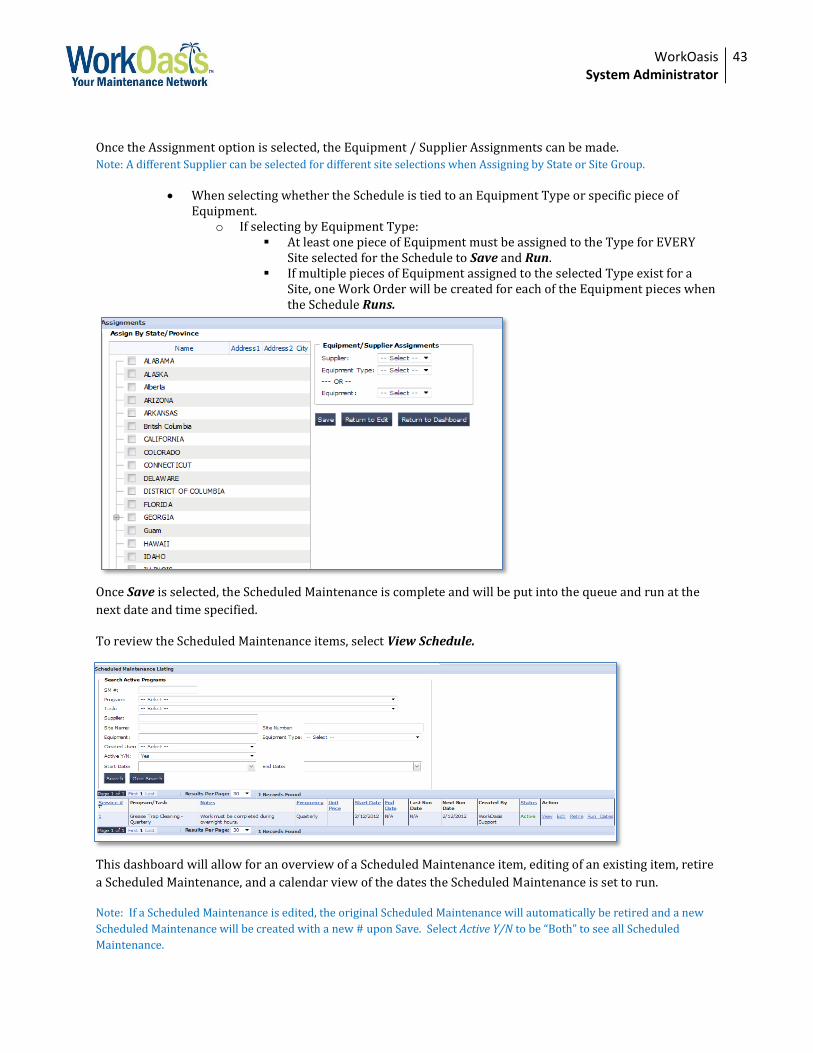
WorkOasis System Administrator
43
Once the Assignment option is selected, the Equipment / Supplier Assignments can be made.
Note: A different Supplier can be selected for different site selections when Assigning by State or Site Group.
When selecting whether the Schedule is tied to an Equipment Type or specific piece of Equipment.
o If selecting by Equipment Type: At least one piece of Equipment must be assigned to the Type for EVERY
Site selected for the Schedule to Save and Run. If multiple pieces of Equipment assigned to the selected Type exist for a
Site, one Work Order will be created for each of the Equipment pieces when the Schedule Runs.
Once Save is selected, the Scheduled Maintenance is complete and will be put into the queue and run at the
next date and time specified.
To review the Scheduled Maintenance items, select View Schedule.
This dashboard will allow for an overview of a Scheduled Maintenance item, editing of an existing item, retire
a Scheduled Maintenance, and a calendar view of the dates the Scheduled Maintenance is set to run.
Note: If a Scheduled Maintenance is edited, the original Scheduled Maintenance will automatically be retired and a new
Scheduled Maintenance will be created with a new # upon Save. Select Active Y/N to be “Both” to see all Scheduled
Maintenance.
WorkOasis System Administrator
44
RETIRING DATA TYPES
With continued use of the WorkOasis system, some data profiles and records may become outdated or
obsolete. Instead of deleting this information, WorkOasis enables the Administrator to Retire or to Set
Inactive, this data. Retiring data is done in order to retain the historical information for Service Requests,
Work Orders, Quotes, Invoices, etc.
Users
1. Green Admin Tab > View/Edit Users 2. Locate the User Profile to retire 3. In the Action column, select Retire
*To allow the User to once again use WorkOasis, select Activate in the Action column.
Sites
1. Green Admin Tab > View/Edit Sites 2. Locate the Site Profile to retire 3. In the Action column, select Retire
*To allow the Site to once again be utilized in WorkOasis, select Open in the Action column.
Service Category (Note: It is not recommended to Delete Service Categories.)
1. Green Admin Tab > Add/Edit Service Cats 2. Select the Service Category to retire 3. In the Current Status field, change the dropdown value to (Retire Unavailable for Assignment) 4. Select Save
*To allow the Service Category to once again be utilized in WorkOasis, select Available for Assignment in the Current Status column.
Vendors
1. Green Admin Tab > View Vendors (or, Green Vendor Tab > View Vendors) 2. Locate the Vendor Profile to retire 3. In the Action column, select Set Inactive
*To allow the Vendor to once again use WorkOasis, select Set Active in the Action column.
Equipment (Note: It is not recommended to Delete Service Categories.)
1. Green Admin Tab > Manage Equipment 2. Locate the Equipment piece to retire 3. In the Action column, select Select 4. Select Retire EquipmentName on the Select Action menu
*To allow the Equipment piece to once again be utilized in WorkOasis, select Activate EquipmentName on the Select Action menu.
Scheduled Maintenance
1. Green Scheduled Maint. Tab > View Schedule 2. Locate the Schedule to retire 3. In the Action column, select Retire
*To allow the Schedule to once again be utilized in WorkOasis, select Edit. Make the required changes to the Schedule. When
completed, a new Schedule is created. The original Schedule is still retired.

WorkOasis System Administrator
45
REQUESTS FOR PROPOSALS (RFPs) The Requests for Proposals (RFP) module is used to send out proposal requests to one or more contractors to
place a bid.
To create an RFP:
1. Green RFP’s Tab > Create New 2. Complete the RFP form, and select Add New
Once added, the requests will be forwarded to the selected Vendor(s). The Open RFP can be viewed by selecting the RFP number. When logged in to WorkOasis, the Vendor can View the RFP, and opt to either Accept Invitation to Bid or Reject Invitation to Bid.
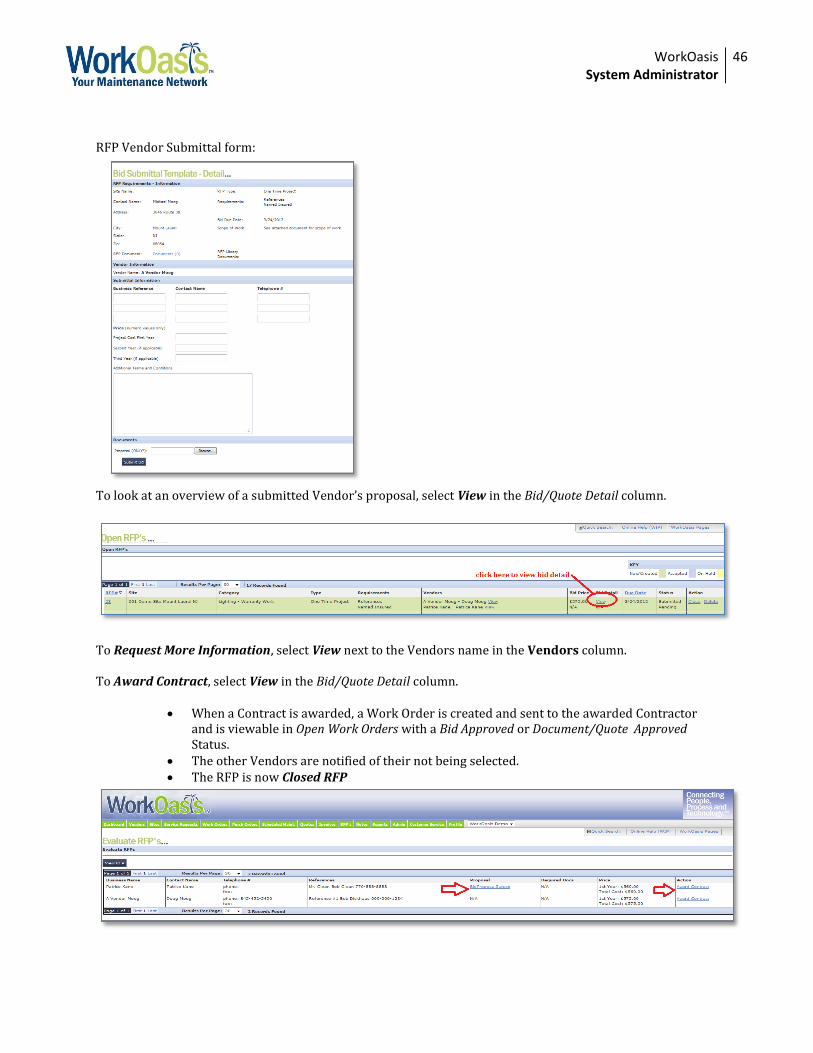
WorkOasis System Administrator
46
RFP Vendor Submittal form:
To look at an overview of a submitted Vendor’s proposal, select View in the Bid/Quote Detail column.
To Request More Information, select View next to the Vendors name in the Vendors column.
To Award Contract, select View in the Bid/Quote Detail column.
When a Contract is awarded, a Work Order is created and sent to the awarded Contractor and is viewable in Open Work Orders with a Bid Approved or Document/Quote Approved Status.
The other Vendors are notified of their not being selected. The RFP is now Closed RFP
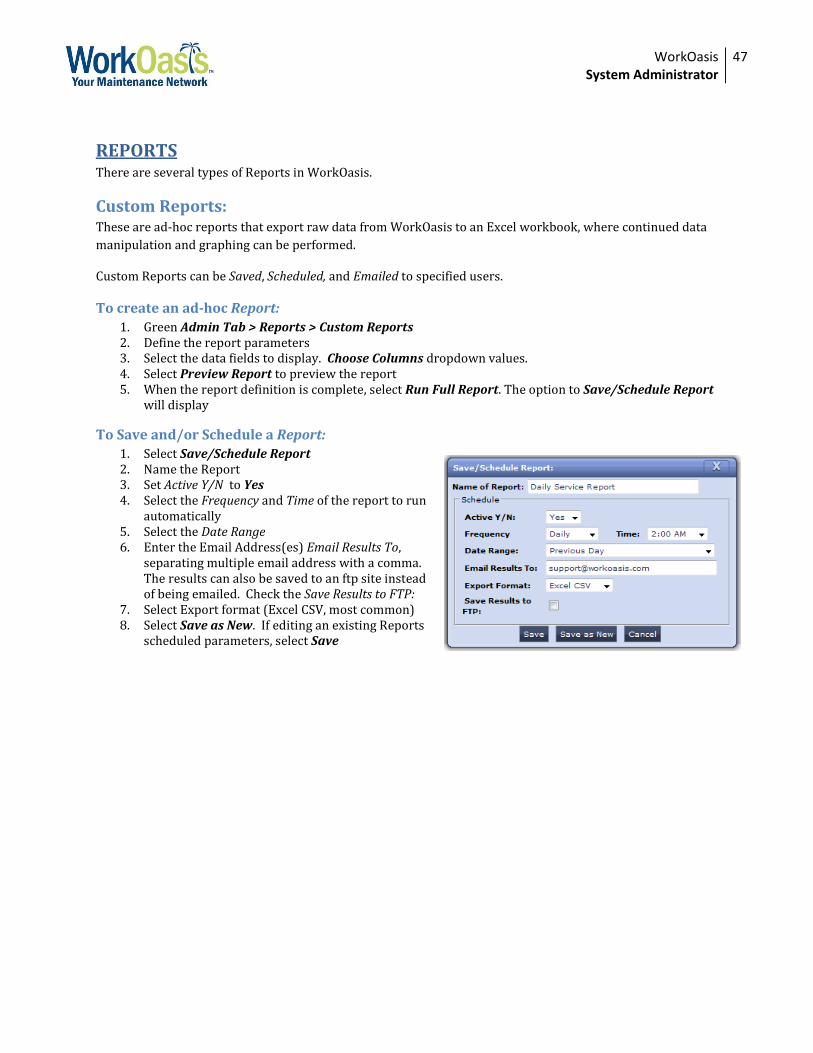
WorkOasis System Administrator
47
REPORTS There are several types of Reports in WorkOasis.
Custom Reports:
These are ad-hoc reports that export raw data from WorkOasis to an Excel workbook, where continued data
manipulation and graphing can be performed.
Custom Reports can be Saved, Scheduled, and Emailed to specified users.
To create an ad-hoc Report:
1. Green Admin Tab > Reports > Custom Reports 2. Define the report parameters 3. Select the data fields to display. Choose Columns dropdown values. 4. Select Preview Report to preview the report 5. When the report definition is complete, select Run Full Report. The option to Save/Schedule Report
will display
To Save and/or Schedule a Report:
1. Select Save/Schedule Report 2. Name the Report 3. Set Active Y/N to Yes 4. Select the Frequency and Time of the report to run
automatically 5. Select the Date Range 6. Enter the Email Address(es) Email Results To,
separating multiple email address with a comma. The results can also be saved to an ftp site instead of being emailed. Check the Save Results to FTP:
7. Select Export format (Excel CSV, most common) 8. Select Save as New. If editing an existing Reports
scheduled parameters, select Save
WorkOasis System Administrator
48
Other Reports:
Data Analysis – Allows for pivot table analysis of data.
Data Analysis - Equipment - Allow for pivot table analysis of Equipment data.
Monthly Activity - An overview of the current month’s Work Order activity. Displays the Work Order
number, Vendor, Work Order Priority, the Service Rating (if Surveys were completed), and the Invoice
Amount.
Contractor Performance - An overview of Contractor Performance, based on Survey responses. Display the
Contractor Name, Scope of Service Categories, average Service Rating, Mean Time To Resolution (MTTR),
their Average Invoice Cost.
1099 Report – An overview of reportable 1099 information for the current year. Displays the Vendor Name,
Address of Vendor, Tax-ID (if available), and their Total Year Expenditure.
Service Category Report – For a selected Service Category, gives an overview of Work Orders displaying the
Work Order number, the Site, Work Order Created Date, and the current Status.