NL Gebruiksaanwijzing 2 User manual 12 · NL Gebruiksaanwijzing 2 EN User manual 12 FR Notice...
64
NL Gebruiksaanwijzing 2 EN User manual 12 FR Notice d'utilisation 21 DE Benutzerinformation 31 PT Manual de instruções 41 ES Manual de instrucciones 51 Inbouwoven Built-in oven Four encastrable Elektro-Einbaubackofen Forno encastrável Horno empotrado ZOB361
Transcript of NL Gebruiksaanwijzing 2 User manual 12 · NL Gebruiksaanwijzing 2 EN User manual 12 FR Notice...
NL Gebruiksaanwijzing 2EN User manual 12FR Notice d'utilisation 21DE Benutzerinformation 31PT Manual de instruções 41ES Manual de instrucciones 51
InbouwovenBuilt-in ovenFour encastrableElektro-EinbaubackofenForno encastrávelHorno empotrado
ZOB361
InhoudVeiligheidsinformatie _ _ _ _ _ _ _ _ _ _ _ _ _ _ _ 2Voor het eerste gebruik _ _ _ _ _ _ _ _ _ _ _ _ _ _ 3Beschrijving van het product _ _ _ _ _ _ _ _ _ _ _ 3Dagelijks gebruik _ _ _ _ _ _ _ _ _ _ _ _ _ _ _ _ _ 4Nuttige aanwijzingen en tips _ _ _ _ _ _ _ _ _ _ _ _ 5Bereidingstabel _ _ _ _ _ _ _ _ _ _ _ _ _ _ _ _ _ _ 5
Onderhoud en reiniging _ _ _ _ _ _ _ _ _ _ _ _ _ _ 7Problemen oplossen _ _ _ _ _ _ _ _ _ _ _ _ _ _ _ 9Montage _ _ _ _ _ _ _ _ _ _ _ _ _ _ _ _ _ _ _ _ _ 9Aansluiting aan het elektriciteitsnet _ _ _ _ _ _ _ _ 10Milieubescherming _ _ _ _ _ _ _ _ _ _ _ _ _ _ _ 10
Wijzigingen voorbehouden
Veiligheidsinformatie
Lees voor uw eigen veiligheid en een correcte werk-ing van het apparaat eerst deze handleiding aan-
dachtig door, alvorens het apparaat te installeren en tegebruiken. Bewaar deze instructies altijd bij het apparaat,zelfs wanneer u het verplaatst of verkoopt. Gebruikersmoeten volledig op de hoogte zijn van de bediening enveiligheidsfuncties van het apparaat.
Correct gebruik• Laat het apparaat tijdens het gebruik niet onbeheerd
achter.• Het apparaat is uitsluitend ontworpen voor huishou-
delijk gebruik.• Het apparaat mag niet worden gebruikt als werkopper-
vlak of een vlak om iets op te bergen.• Plaats geen brandbare vloeistoffen, licht ontvlambare
materialen of voorwerpen die kunnen smelten (bijv.plastic folie, plastic, aluminium) in of in de buurt vanhet apparaat.
• Wees voorzichtig bij het aansluiten van elektrische ap-paraten op stopcontacten in de buurt van het apparaatLaat de contacten niet in aanraking komen met of onderde hete ovendeur komen.
• Bewaar geen vochtige gerechten en voedsel in de ovennadat u klaar bent met de bereiding, omdat het vochthet email kan beschadigen of in de inbouwmeubelskan dringen.
• Voer niet eigenhandig reparaties uit om letsel en scha-de aan het apparaat te voorkomen. Neem altijd contactop met uw plaatselijke servicecentrum.
• Gebruik nooit agressieve reinigingsmiddelen of scher-pe metalen schrapers om het glas van de ovendeur tereinigen. Deze kunnen krassen op het oppervlak ver-oorzaken, waardoor het glas zou kunnen breken.
Opmerking over de emaillaagKleurveranderingen van de emaillaag van de oven
als gevolg van het gebruik zijn niet van invloed op dedeugdelijkheid van het apparaat. Dit zijn derhalve geengebreken in de zin van het recht op garantie.
Veiligheid van kinderen• Dit apparaat is alleen bedoeld voor gebruik door vol-
wassenen. Kinderen moeten in de gaten gehoudenworden om te voorkomen dat zij met het apparaat gaanspelen.
• Houd alle verpakkingsmaterialen uit de buurt van kin-deren. Gevaar voor verstikking.
• Houd kinderen uit de buurt van het apparaat als hetwerkt. Toegankelijke onderdelen kunnen zeer heet wor-den tijdens gebruik. Er kunnen brandwonden ontstaan.
Algemene veiligheid• Dit apparaat is niet bedoeld voor gebruik door perso-
nen (met inbegrip van kinderen) met beperkte licha-melijke, zintuiglijke of verstandelijke vermogens of eengebrek aan ervaring en kennis, tenzij dit onder toezichtgebeurt van een voor hun veiligheid verantwoordelijkepersoon of tenzij zij van een dergelijke persoon in-structie hebben ontvangen over het gebruik van hetapparaat.
• De binnenkant van het apparaat wordt zeer heet tijdensgebruik. Wees voorzichtig en raak de verwarmings-elementen niet aan. Er kunnen brandwonden ontstaan.
• Ga altijd achteruit als u de ovendeur tijdens de berei-ding of op het eind van de bereiding opent, zodateventuele stoom of hitte kan ontsnappen.
Installatie• Controleer of het apparaat niet beschadigd is tijdens
het transport. Sluit een beschadigd apparaat niet aan.Neem indien nodig contact op met de leverancier.
2
• Dit apparaat mag alleen gerepareerd worden door eenerkende servicemonteur. Gebruik alleen originele re-serveonderdelen.
• Inbouwapparaten mogen alleen worden gebruikt nadatzij ingebouwd zijn in geschikte inbouwunits of werk-bladen die aan de normen voldoen.
• Verander de specificaties van dit product niet en wijzighet niet. Gevaar voor letsel en schade aan het apparaat.
Waarschuwing! Volg de instructies voor deelektrische aansluitingen nauwkeurig op.
Voor het eerste gebruik
Verwijder al het verpakkingsmateriaal binnenin enaan de buitenkant van de oven, voordat u de oven
in gebruik neemt. Verwijder het typeplaatje niet.
Let op! Pak, om de deur te openen, altijd dehandgreep in het midden vast.
Eerste reiniging• Verwijder alle onderdelen van het apparaat.• Reinig het apparaat voor het eerste gebruik
Let op! Gebruik geen schuurmiddelen! Deoppervlakken zouden beschadigd kunnen worden.
Zie het hoofdstuk "Onderhoud en reiniging".
VoorverwarmenStel een ovenfunctie en een maximumtemperatuur in enlaat de oven 45 minuten werken om eventuele restantenvan het oppervlak weg te branden. De accessoires kunnenheter worden dan bij normaal gebruik. Tijdens deze pe-riode kunt u een bepaalde geur ruiken. Dit is normaal.Zorg ervoor dat de kamer goed geventileerd is.
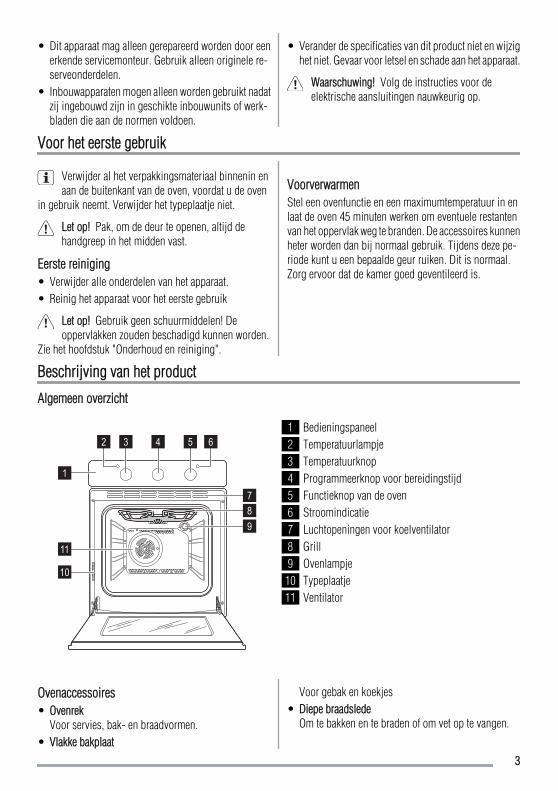
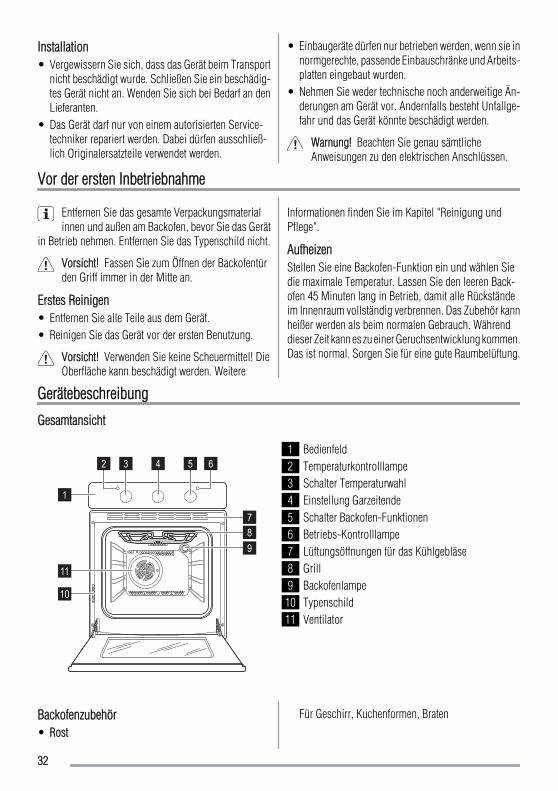
Beschrijving van het product
Algemeen overzicht
1
2 3 4 5 6
789
10
11
1 Bedieningspaneel2 Temperatuurlampje3 Temperatuurknop4 Programmeerknop voor bereidingstijd5 Functieknop van de oven6 Stroomindicatie7 Luchtopeningen voor koelventilator8 Grill9 Ovenlampje
10 Typeplaatje11 Ventilator
Ovenaccessoires• Ovenrek
Voor servies, bak- en braadvormen.• Vlakke bakplaat
Voor gebak en koekjes• Diepe braadslede
Om te bakken en te braden of om vet op te vangen.
3
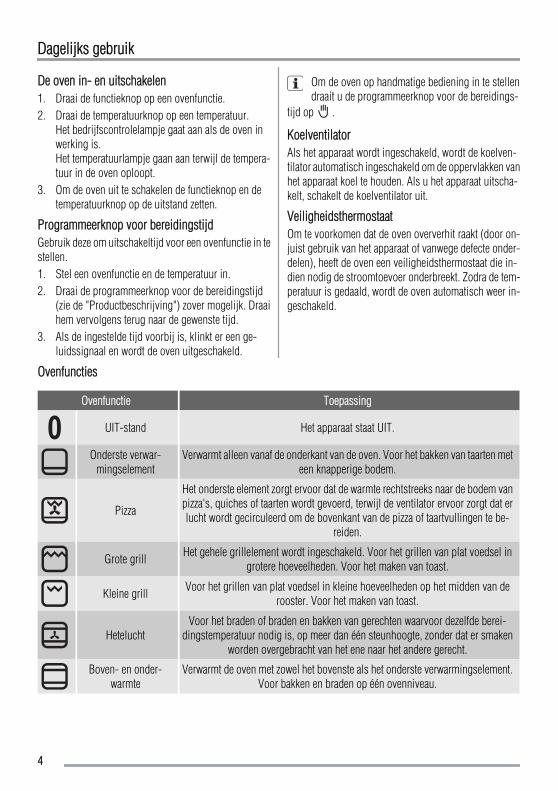
Dagelijks gebruik
De oven in- en uitschakelen1. Draai de functieknop op een ovenfunctie.2. Draai de temperatuurknop op een temperatuur.
Het bedrijfscontrolelampje gaat aan als de oven inwerking is.Het temperatuurlampje gaan aan terwijl de tempera-tuur in de oven oploopt.
3. Om de oven uit te schakelen de functieknop en detemperatuurknop op de uitstand zetten.
Programmeerknop voor bereidingstijdGebruik deze om uitschakeltijd voor een ovenfunctie in testellen.1. Stel een ovenfunctie en de temperatuur in.2. Draai de programmeerknop voor de bereidingstijd
(zie de "Productbeschrijving") zover mogelijk. Draaihem vervolgens terug naar de gewenste tijd.
3. Als de ingestelde tijd voorbij is, klinkt er een ge-luidssignaal en wordt de oven uitgeschakeld.
Om de oven op handmatige bediening in te stellendraait u de programmeerknop voor de bereidings-
tijd op .
KoelventilatorAls het apparaat wordt ingeschakeld, wordt de koelven-tilator automatisch ingeschakeld om de oppervlakken vanhet apparaat koel te houden. Als u het apparaat uitscha-kelt, schakelt de koelventilator uit.
VeiligheidsthermostaatOm te voorkomen dat de oven oververhit raakt (door on-juist gebruik van het apparaat of vanwege defecte onder-delen), heeft de oven een veiligheidsthermostaat die in-dien nodig de stroomtoevoer onderbreekt. Zodra de tem-peratuur is gedaald, wordt de oven automatisch weer in-geschakeld.
Ovenfuncties
Ovenfunctie Toepassing
UIT-stand Het apparaat staat UIT.
Onderste verwar-mingselement
Verwarmt alleen vanaf de onderkant van de oven. Voor het bakken van taarten meteen knapperige bodem.
Pizza
Het onderste element zorgt ervoor dat de warmte rechtstreeks naar de bodem vanpizza's, quiches of taarten wordt gevoerd, terwijl de ventilator ervoor zorgt dat erlucht wordt gecirculeerd om de bovenkant van de pizza of taartvullingen te be-
reiden.
Grote grill Het gehele grillelement wordt ingeschakeld. Voor het grillen van plat voedsel ingrotere hoeveelheden. Voor het maken van toast.
Kleine grill Voor het grillen van plat voedsel in kleine hoeveelheden op het midden van derooster. Voor het maken van toast.
HeteluchtVoor het braden of braden en bakken van gerechten waarvoor dezelfde berei-
dingstemperatuur nodig is, op meer dan één steunhoogte, zonder dat er smakenworden overgebracht van het ene naar het andere gerecht.
Boven- en onder-warmte
Verwarmt de oven met zowel het bovenste als het onderste verwarmingselement.Voor bakken en braden op één ovenniveau.
4
Nuttige aanwijzingen en tips
Waarschuwing! Sluit altijd de deur van de oventijdens de bereiding, ook bij grillen.
Plaats geen bakplaten, potten, etc. op de bodem vande oven om beschadiging van het email te voorko-
men.
Wees voorzichtig bij het verwijderen of installerenvan accessoires om beschadiging van het email te
voorkomen.
• De oven heeft vier inschuifniveaus. Tel de inschuifni-veaus vanaf de onderkant van de oven.
• U kunt verschillende gerechten op twee niveaus tege-lijk bereiden. Plaats de bakplaten op niveau 1 en 3.
• De oven is voorzien van een speciaal systeem dat voorluchtcirculatie zorgt en de stoom continu recycleert.Met dit systeem kunt u gerechten in een stoomomge-ving bereiden en het voedsel zacht van binnen enknapperig van buiten houden. Hierdoor worden de be-reidingstijd en het energieverbruik tot een minimumbeperkt.
• Vocht kan in het apparaat of op de glazen deuren con-denseren. Dit is normaal. Ga altijd achteruit als u deovendeur opent tijdens de bereiding. Om condensvor-ming te voorkomen kunt u de oven het beste 10 mi-nuten voor de bereiding inschakelen.
• Neem vocht af na elk gebruik van het apparaat.
Taarten bakken• De beste temperatuur voor het bakken van taarten is
tussen de 150 °C en 200 °C.• Verwarm de oven ongeveer 10 minuten voor.
• Doe de ovendeur niet open voordat driekwart van deingestelde baktijd is verstreken.
• Als u twee bakplaten tegelijk gebruikt, houd dan éénniveau vrij tussen de platen.
Vlees en vis bereiden• Bereid geen vlees met een gewicht van minder dan 1
kg. Het bereiden van te kleine hoeveelheden maakt hetvlees droog.
• Om rood vlees van buiten goed gaar en van binnensappig te houden, stelt u de temperatuur in tussen de200 °C-250 °C.
• Voor wit vlees, gevogelte en vis dient u de temperatuurtussen de 150°C-175°C in te stellen.
• Gebruik een lekbak voor zeer vet voedsel, om te voor-komen dat er vlekken op de oven komen die mogelijkpermanent zijn.
• Laat het vlees ongeveer 15 minuten rusten voordat uhet aansnijdt, zodat het vleesvocht niet wegloopt.
• Giet een beetje water in de lekbak om te veel rookvor-ming in de oven te voorkomen tijdens roosteren. Omrookcondensatie te voorkomen dient u telkens eenbeetje water toe te voegen als dit opgedroogd is.
BereidingstijdenBereidingstijden zijn afhankelijk van het soort voedsel, destructuur en het volume.Houd de werking van de oven in de gaten tijdens de eerstekeren dat u het apparaat gebruikt. Op die manier ontdektu de beste instellingen (warmte-instelling, bereidingstijdetc.) voor uw ovenschalen, recepten en hoeveelhedenwanneer u dit apparaat gebruikt.
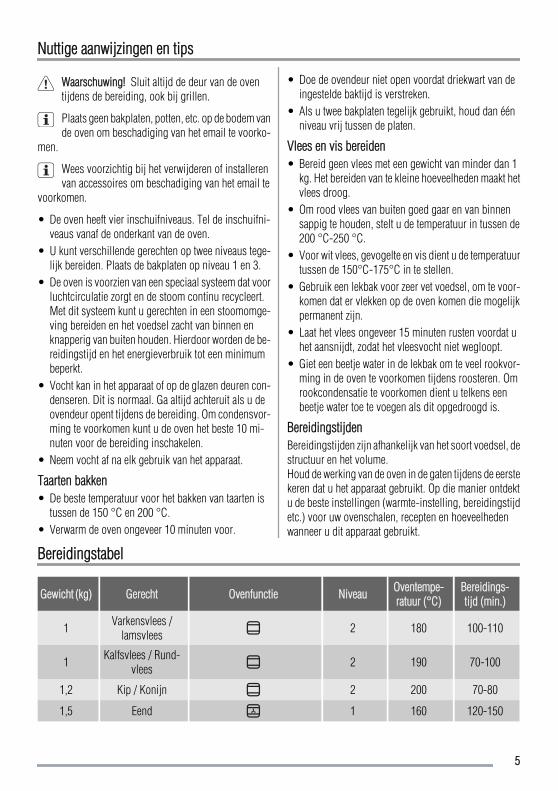
Bereidingstabel
Gewicht (kg) Gerecht Ovenfunctie Niveau Oventempe-ratuur (°C)
Bereidings-tijd (min.)
1 Varkensvlees /lamsvlees 2 180 100-110
1 Kalfsvlees / Rund-vlees 2 190 70-100
1,2 Kip / Konijn 2 200 70-80
1,5 Eend 1 160 120-150
5
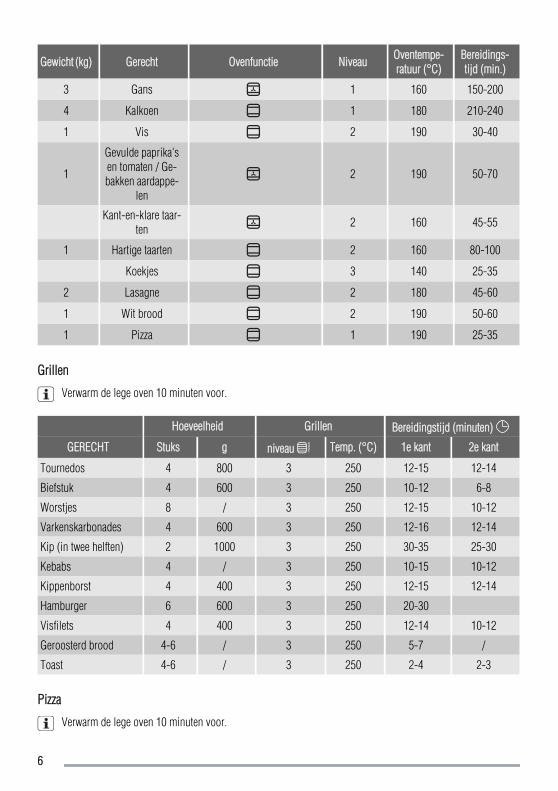
Gewicht (kg) Gerecht Ovenfunctie Niveau Oventempe-ratuur (°C)
Bereidings-tijd (min.)
3 Gans 1 160 150-200
4 Kalkoen 1 180 210-240
1 Vis 2 190 30-40
1
Gevulde paprika'sen tomaten / Ge-bakken aardappe-
len
2 190 50-70
Kant-en-klare taar-ten 2 160 45-55
1 Hartige taarten 2 160 80-100
Koekjes 3 140 25-35
2 Lasagne 2 180 45-60
1 Wit brood 2 190 50-60
1 Pizza 1 190 25-35
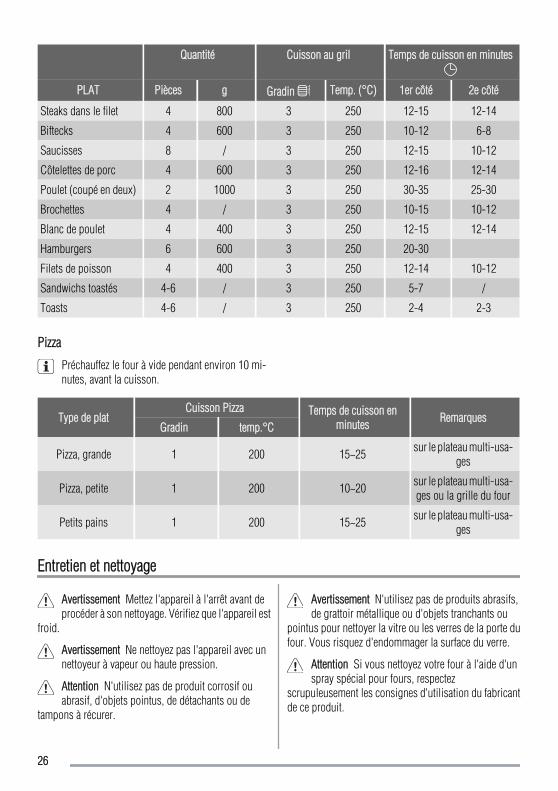
Grillen
Verwarm de lege oven 10 minuten voor.
Hoeveelheid Grillen Bereidingstijd (minuten)
GERECHT Stuks g niveau Temp. (°C) 1e kant 2e kant
Tournedos 4 800 3 250 12-15 12-14
Biefstuk 4 600 3 250 10-12 6-8
Worstjes 8 / 3 250 12-15 10-12
Varkenskarbonades 4 600 3 250 12-16 12-14
Kip (in twee helften) 2 1000 3 250 30-35 25-30
Kebabs 4 / 3 250 10-15 10-12
Kippenborst 4 400 3 250 12-15 12-14
Hamburger 6 600 3 250 20-30
Visfilets 4 400 3 250 12-14 10-12
Geroosterd brood 4-6 / 3 250 5-7 /
Toast 4-6 / 3 250 2-4 2-3
Pizza
Verwarm de lege oven 10 minuten voor.
6
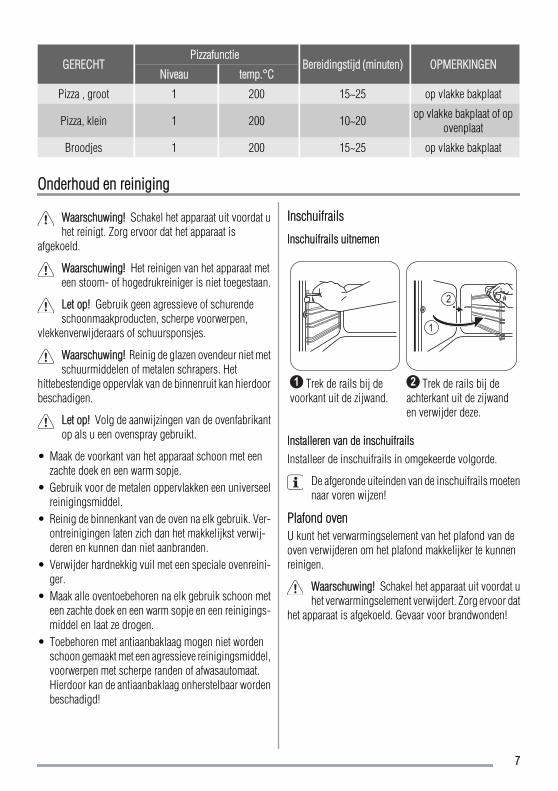
GERECHTPizzafunctie
Bereidingstijd (minuten) OPMERKINGENNiveau temp.°C
Pizza , groot 1 200 15~25 op vlakke bakplaat
Pizza, klein 1 200 10~20 op vlakke bakplaat of opovenplaat
Broodjes 1 200 15~25 op vlakke bakplaat
Onderhoud en reiniging
Waarschuwing! Schakel het apparaat uit voordat uhet reinigt. Zorg ervoor dat het apparaat is
afgekoeld.
Waarschuwing! Het reinigen van het apparaat meteen stoom- of hogedrukreiniger is niet toegestaan.
Let op! Gebruik geen agressieve of schurendeschoonmaakproducten, scherpe voorwerpen,
vlekkenverwijderaars of schuursponsjes.
Waarschuwing! Reinig de glazen ovendeur niet metschuurmiddelen of metalen schrapers. Het
hittebestendige oppervlak van de binnenruit kan hierdoorbeschadigen.
Let op! Volg de aanwijzingen van de ovenfabrikantop als u een ovenspray gebruikt.
• Maak de voorkant van het apparaat schoon met eenzachte doek en een warm sopje.
• Gebruik voor de metalen oppervlakken een universeelreinigingsmiddel.
• Reinig de binnenkant van de oven na elk gebruik. Ver-ontreinigingen laten zich dan het makkelijkst verwij-deren en kunnen dan niet aanbranden.
• Verwijder hardnekkig vuil met een speciale ovenreini-ger.
• Maak alle oventoebehoren na elk gebruik schoon meteen zachte doek en een warm sopje en een reinigings-middel en laat ze drogen.
• Toebehoren met antiaanbaklaag mogen niet wordenschoon gemaakt met een agressieve reinigingsmiddel,voorwerpen met scherpe randen of afwasautomaat.Hierdoor kan de antiaanbaklaag onherstelbaar wordenbeschadigd!
Inschuifrails
Inschuifrails uitnemen
1 Trek de rails bij devoorkant uit de zijwand.
1
2
2 Trek de rails bij deachterkant uit de zijwanden verwijder deze.
Installeren van de inschuifrailsInstalleer de inschuifrails in omgekeerde volgorde.
De afgeronde uiteinden van de inschuifrails moetennaar voren wijzen!
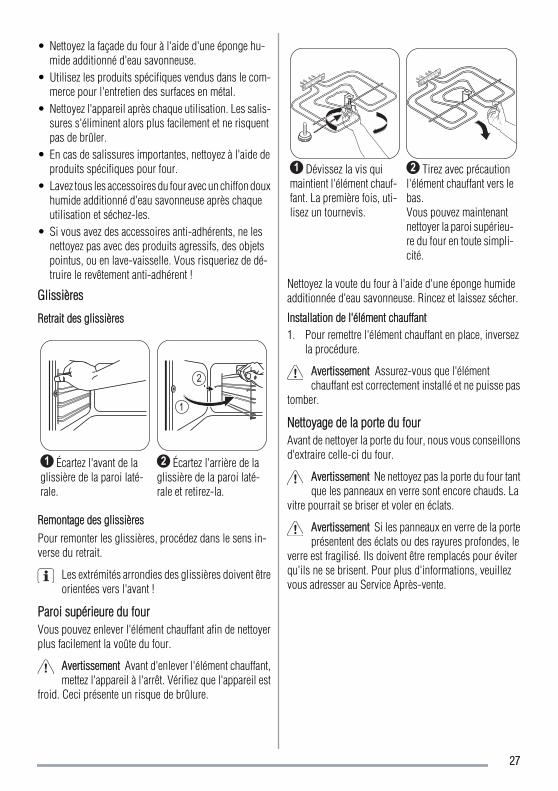
Plafond ovenU kunt het verwarmingselement van het plafond van deoven verwijderen om het plafond makkelijker te kunnenreinigen.
Waarschuwing! Schakel het apparaat uit voordat uhet verwarmingselement verwijdert. Zorg ervoor dat
het apparaat is afgekoeld. Gevaar voor brandwonden!
7
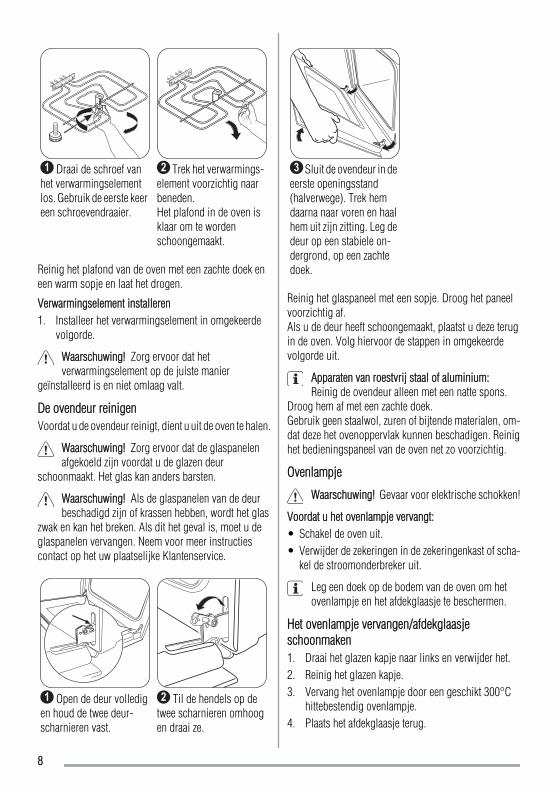
1 Draai de schroef vanhet verwarmingselementlos. Gebruik de eerste keereen schroevendraaier.
2 Trek het verwarmings-element voorzichtig naarbeneden.Het plafond in de oven isklaar om te wordenschoongemaakt.
Reinig het plafond van de oven met een zachte doek eneen warm sopje en laat het drogen.
Verwarmingselement installeren1. Installeer het verwarmingselement in omgekeerde
volgorde.
Waarschuwing! Zorg ervoor dat hetverwarmingselement op de juiste manier
geïnstalleerd is en niet omlaag valt.
De ovendeur reinigenVoordat u de ovendeur reinigt, dient u uit de oven te halen.
Waarschuwing! Zorg ervoor dat de glaspanelenafgekoeld zijn voordat u de glazen deur
schoonmaakt. Het glas kan anders barsten.
Waarschuwing! Als de glaspanelen van de deurbeschadigd zijn of krassen hebben, wordt het glas
zwak en kan het breken. Als dit het geval is, moet u deglaspanelen vervangen. Neem voor meer instructiescontact op het uw plaatselijke Klantenservice.
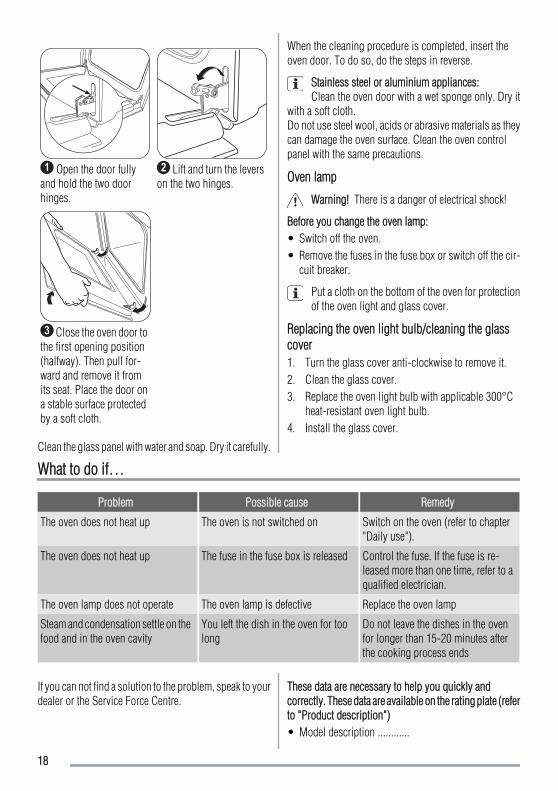
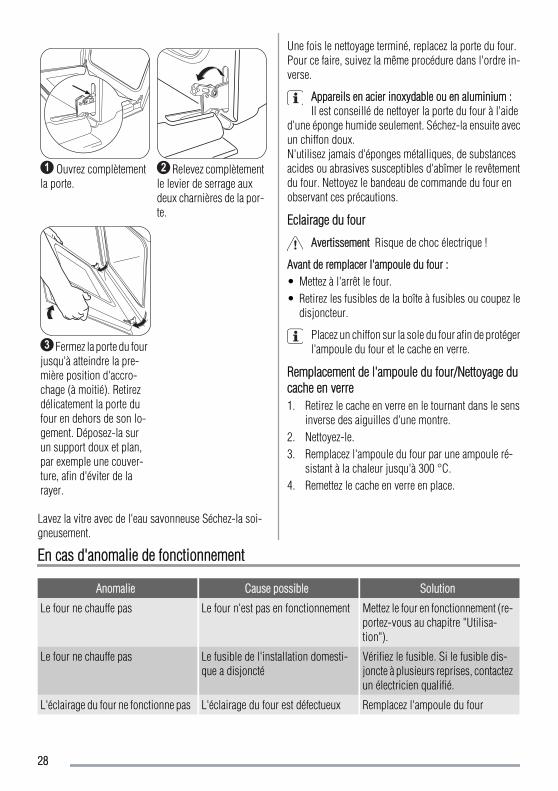
1 Open de deur volledigen houd de twee deur-scharnieren vast.
2 Til de hendels op detwee scharnieren omhoogen draai ze.
3 Sluit de ovendeur in deeerste openingsstand(halverwege). Trek hemdaarna naar voren en haalhem uit zijn zitting. Leg dedeur op een stabiele on-dergrond, op een zachtedoek.
Reinig het glaspaneel met een sopje. Droog het paneelvoorzichtig af.Als u de deur heeft schoongemaakt, plaatst u deze terugin de oven. Volg hiervoor de stappen in omgekeerdevolgorde uit.
Apparaten van roestvrij staal of aluminium:Reinig de ovendeur alleen met een natte spons.
Droog hem af met een zachte doek.Gebruik geen staalwol, zuren of bijtende materialen, om-dat deze het ovenoppervlak kunnen beschadigen. Reinighet bedieningspaneel van de oven net zo voorzichtig.
Ovenlampje
Waarschuwing! Gevaar voor elektrische schokken!
Voordat u het ovenlampje vervangt:• Schakel de oven uit.• Verwijder de zekeringen in de zekeringenkast of scha-
kel de stroomonderbreker uit.
Leg een doek op de bodem van de oven om hetovenlampje en het afdekglaasje te beschermen.
Het ovenlampje vervangen/afdekglaasjeschoonmaken1. Draai het glazen kapje naar links en verwijder het.2. Reinig het glazen kapje.3. Vervang het ovenlampje door een geschikt 300°C
hittebestendig ovenlampje.4. Plaats het afdekglaasje terug.
8
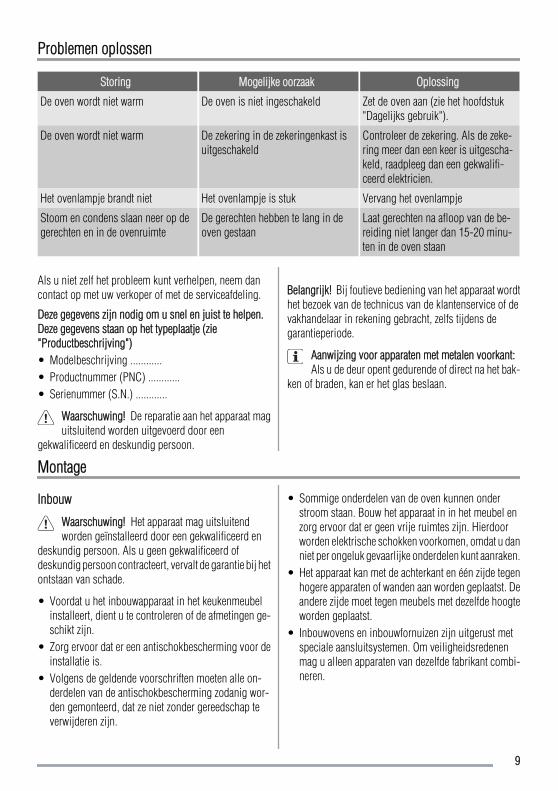
Problemen oplossen
Storing Mogelijke oorzaak Oplossing
De oven wordt niet warm De oven is niet ingeschakeld Zet de oven aan (zie het hoofdstuk"Dagelijks gebruik").
De oven wordt niet warm De zekering in de zekeringenkast isuitgeschakeld
Controleer de zekering. Als de zeke-ring meer dan een keer is uitgescha-keld, raadpleeg dan een gekwalifi-ceerd elektricien.
Het ovenlampje brandt niet Het ovenlampje is stuk Vervang het ovenlampje
Stoom en condens slaan neer op degerechten en in de ovenruimte
De gerechten hebben te lang in deoven gestaan
Laat gerechten na afloop van de be-reiding niet langer dan 15-20 minu-ten in de oven staan
Als u niet zelf het probleem kunt verhelpen, neem dancontact op met uw verkoper of met de serviceafdeling.
Deze gegevens zijn nodig om u snel en juist te helpen.Deze gegevens staan op het typeplaatje (zie"Productbeschrijving")• Modelbeschrijving ............• Productnummer (PNC) ............• Serienummer (S.N.) ............
Waarschuwing! De reparatie aan het apparaat maguitsluitend worden uitgevoerd door een
gekwalificeerd en deskundig persoon.
Belangrijk! Bij foutieve bediening van het apparaat wordthet bezoek van de technicus van de klantenservice of devakhandelaar in rekening gebracht, zelfs tijdens degarantieperiode.
Aanwijzing voor apparaten met metalen voorkant:Als u de deur opent gedurende of direct na het bak-
ken of braden, kan er het glas beslaan.
Montage
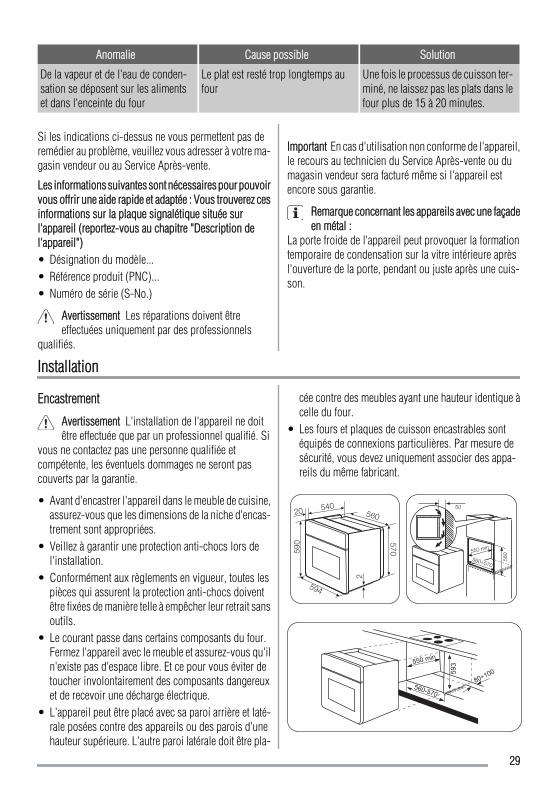
Inbouw
Waarschuwing! Het apparaat mag uitsluitendworden geïnstalleerd door een gekwalificeerd en
deskundig persoon. Als u geen gekwalificeerd ofdeskundig persoon contracteert, vervalt de garantie bij hetontstaan van schade.
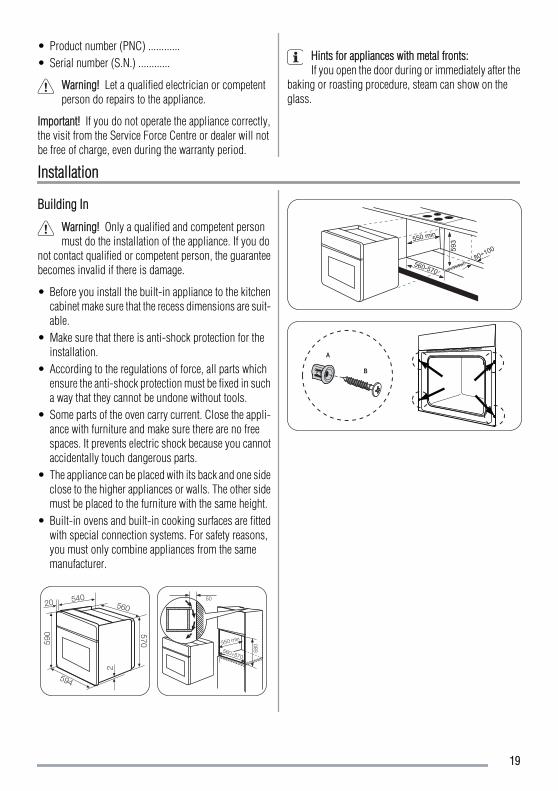
• Voordat u het inbouwapparaat in het keukenmeubelinstalleert, dient u te controleren of de afmetingen ge-schikt zijn.
• Zorg ervoor dat er een antischokbescherming voor deinstallatie is.
• Volgens de geldende voorschriften moeten alle on-derdelen van de antischokbescherming zodanig wor-den gemonteerd, dat ze niet zonder gereedschap teverwijderen zijn.
• Sommige onderdelen van de oven kunnen onderstroom staan. Bouw het apparaat in in het meubel enzorg ervoor dat er geen vrije ruimtes zijn. Hierdoorworden elektrische schokken voorkomen, omdat u danniet per ongeluk gevaarlijke onderdelen kunt aanraken.
• Het apparaat kan met de achterkant en één zijde tegenhogere apparaten of wanden aan worden geplaatst. Deandere zijde moet tegen meubels met dezelfde hoogteworden geplaatst.
• Inbouwovens en inbouwfornuizen zijn uitgerust metspeciale aansluitsystemen. Om veiligheidsredenenmag u alleen apparaten van dezelfde fabrikant combi-neren.
9
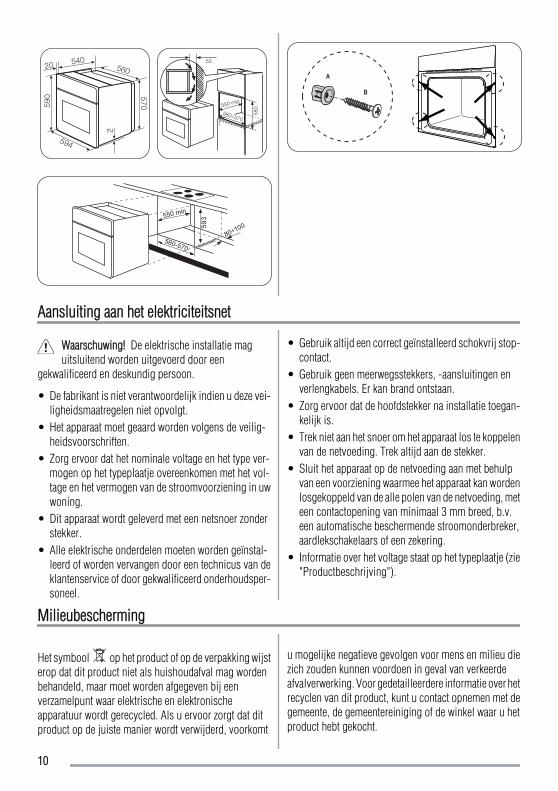
594
2
20
570590
540560
50
580550 min
560÷570
550 min59
3
560-570
80÷100
A
B
Aansluiting aan het elektriciteitsnet
Waarschuwing! De elektrische installatie maguitsluitend worden uitgevoerd door een
gekwalificeerd en deskundig persoon.
• De fabrikant is niet verantwoordelijk indien u deze vei-ligheidsmaatregelen niet opvolgt.
• Het apparaat moet geaard worden volgens de veilig-heidsvoorschriften.
• Zorg ervoor dat het nominale voltage en het type ver-mogen op het typeplaatje overeenkomen met het vol-tage en het vermogen van de stroomvoorziening in uwwoning.
• Dit apparaat wordt geleverd met een netsnoer zonderstekker.
• Alle elektrische onderdelen moeten worden geïnstal-leerd of worden vervangen door een technicus van deklantenservice of door gekwalificeerd onderhoudsper-soneel.
• Gebruik altijd een correct geïnstalleerd schokvrij stop-contact.
• Gebruik geen meerwegsstekkers, -aansluitingen enverlengkabels. Er kan brand ontstaan.
• Zorg ervoor dat de hoofdstekker na installatie toegan-kelijk is.
• Trek niet aan het snoer om het apparaat los te koppelenvan de netvoeding. Trek altijd aan de stekker.
• Sluit het apparaat op de netvoeding aan met behulpvan een voorziening waarmee het apparaat kan wordenlosgekoppeld van de alle polen van de netvoeding, meteen contactopening van minimaal 3 mm breed, b.v.een automatische beschermende stroomonderbreker,aardlekschakelaars of een zekering.
• Informatie over het voltage staat op het typeplaatje (zie"Productbeschrijving").
Milieubescherming
Het symbool op het product of op de verpakking wijsterop dat dit product niet als huishoudafval mag wordenbehandeld, maar moet worden afgegeven bij eenverzamelpunt waar elektrische en elektronischeapparatuur wordt gerecycled. Als u ervoor zorgt dat ditproduct op de juiste manier wordt verwijderd, voorkomt
u mogelijke negatieve gevolgen voor mens en milieu diezich zouden kunnen voordoen in geval van verkeerdeafvalverwerking. Voor gedetailleerdere informatie over hetrecyclen van dit product, kunt u contact opnemen met degemeente, de gemeentereiniging of de winkel waar u hetproduct hebt gekocht.
10
VerpakkingsmaterialenDe materialen die voorzien zijn van het symbool kun-nen gerecycled worden. Gooi de verpakking in een ge-schikte verzamelcontainer om het te recyclen.
Afdanken van het apparaat1. Trek de stekker uit het stopcontact.
2. Snijd het netsnoer door en gooi het weg.3. Verwijder de deurvergrendeling. Hierdoor wordt
voorkomen dat kinderen zich kunnen opsluiten in hetapparaat. Er bestaat een gevaar voor verstikking.
11

ContentsSafety information _ _ _ _ _ _ _ _ _ _ _ _ _ _ _ _ 12Before first use _ _ _ _ _ _ _ _ _ _ _ _ _ _ _ _ _ 13Product description _ _ _ _ _ _ _ _ _ _ _ _ _ _ _ 13Daily use _ _ _ _ _ _ _ _ _ _ _ _ _ _ _ _ _ _ _ _ 14Helpful hints and tips _ _ _ _ _ _ _ _ _ _ _ _ _ _ 14Cooking tables _ _ _ _ _ _ _ _ _ _ _ _ _ _ _ _ _ 15
Care and cleaning _ _ _ _ _ _ _ _ _ _ _ _ _ _ _ _ 17What to do if… _ _ _ _ _ _ _ _ _ _ _ _ _ _ _ _ _ 18Installation _ _ _ _ _ _ _ _ _ _ _ _ _ _ _ _ _ _ _ 19Electrical connection _ _ _ _ _ _ _ _ _ _ _ _ _ _ _ 20Environment concerns _ _ _ _ _ _ _ _ _ _ _ _ _ _ 20
Subject to change without notice
Safety information
For your safety and correct operation of the appli-ance, read this manual carefully before installation
and use. Always keep these instructions with the appli-ance even if you move or sell it. Users must fully knowthe operation and safety features of the appliance.
Correct use• Do not leave the appliance unattended during opera-
tion.• The appliance is designed exclusively for domestic
use.• The appliance must not be used as a work surface or
as a storage surface.• Do not place or store flammable liquids, highly in-
flammable materials or fusible objects (e.g. plasticfilm, plastic, aluminium) in or near the appliance.
• Watch out when connecting electric appliances tosockets nearby. Do not allow connecting leads to comeinto contact with or to catch beneath the hot oven door.
• Do not keep moist dishes and food in the oven afterfinishing the cooking as the moist can damage the en-amel or get into the units.
• Do not do repairs yourself to prevent injury and dam-age to the appliance. Always contact your local ServiceCentre.
• Do not use harsh abrasive or sharp metal scrappers toclean the oven door glass since they can scratch thesurface, which may result in shattering of the glass.
Note on enamel coatingChanges in the colour of the oven enamel coating
as a result of use do not affect the appliance suitability fornormal and correct use. They therefore do not constitutea defect in the sense of the warranty law.
Child safety• Only adults can use this appliance. Children must get
supervision to make sure that they do not play with theappliance.
• Keep all packaging away from children. There is a riskof suffocation.
• Keep children away from the appliance when it oper-ates. Reachable parts can become very hot during use.There is risk of burns.
General safety• This appliance is not intended for use by persons (in-
cluding children) with reduced physical, sensory ormental capabilities, or lack of experience and knowl-edge, unless they have been given supervision or in-struction concerning use of the appliance by a personresponsible for their safety.
• The inner side of the appliance becomes very hot dur-ing use. Be careful and do not touch any heating ele-ments. There is risk of burns.
• Always stand back from the appliance when openingthe oven door during cooking or at the end of it to allowany build up of steam or heat to release.
Installation• Make sure that the appliance is not damaged because
of transport. Do not connect a damaged appliance. Ifnecessary, contact the supplier.
• Only an authorised service engineer can repair thisappliance. Use only original spare parts.
• Built-in appliances can only be used after they arebuilt-in to suitable built-in units and work surfaces thatmeet standards.
• Do not change the specifications or modify this prod-uct. Risk of injury and damage to the appliance.
12
Warning! Carefully obey the instructions forelectrical connections.
Before first use
Remove all packaging, both inside and outside theoven, before using the appliance. Do not remove the
rating plate.
Caution! To open the oven door, always hold thehandle in the centre.
Initial Cleaning• Remove all parts from the appliance.• Clean the appliance before first use.
Caution! Do not use abrasive cleaning agents! Thiscan damage the surface. Refer to chapter "Care and
Cleaning".
PreheatingSet an oven function and maximum temperature and runan empty oven for 45 minutes, to burn off any residuefrom the cavity surface. Accessories can become hotterthan in normal use. During this period an odour can beemitted. This is normal. Make sure the room is well ven-tilated.
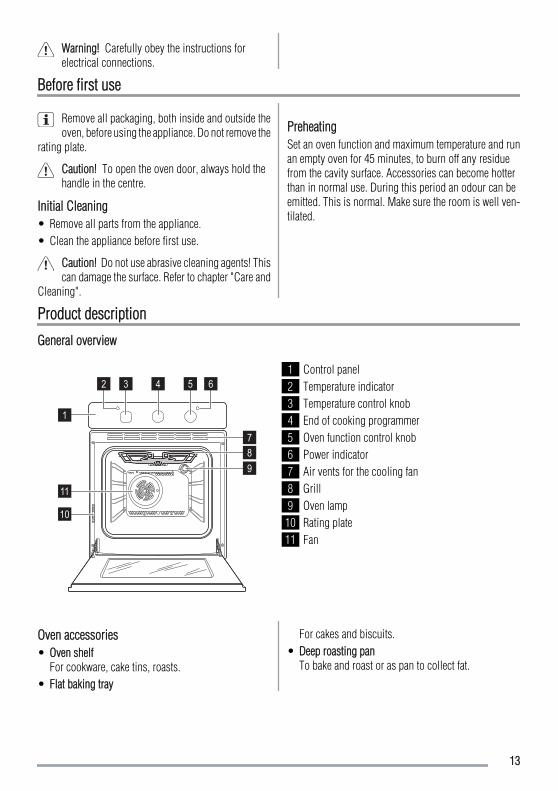
Product description
General overview
1
2 3 4 5 6
789
10
11
1 Control panel2 Temperature indicator3 Temperature control knob4 End of cooking programmer5 Oven function control knob6 Power indicator7 Air vents for the cooling fan8 Grill9 Oven lamp
10 Rating plate11 Fan
Oven accessories• Oven shelf
For cookware, cake tins, roasts.• Flat baking tray
For cakes and biscuits.• Deep roasting pan
To bake and roast or as pan to collect fat.
13
Daily use
Switching the Oven On and Off1. Turn the oven functions control knob to an oven
function.2. Turn the temperature control knob to a temperature.
The power indicator comes on while the oven is inoperation.The temperature indicator comes on while the oventemperature increases.
3. To switch off the oven, turn the oven functions controlknob and the temperature control knob to the Off po-sition.
End of cooking programmerUse it to set the switch-off time for an oven function.1. Set an oven function and the temperature.2. Turn the End of cooking programmer control knob
(refer to "Product description") as far as it goes. Afterthat turn it to required time period value.
3. After the time period is completed, a signal soundsand the oven switches off.
To set the oven on manual operation, turn the Endof cooking programmer control knob to .
Cooling fanWhen the appliance operates, the cooling fan switches onautomatically to keep the surfaces of the appliance cool.If you switch off the appliance, the cooling fan stops.
Safety thermostatTo prevent dangerous overheating (due to incorrect useof the appliance or defective components), the oven hasa safety thermostat, which interrupts the power supply.The oven switches back on again automatically, when thetemperature drops.
Oven Functions
Oven function Application
OFF position The appliance is OFF.
Bottom heating ele-ment Heats only from the bottom of the oven. To bake cakes with crispy or crusty bases.
Pizza The bottom element provides direct heat to the base of pizzas, quiches or pies,while the fan ensures air is circulated to cook the pizza toppings or pie fillings.
Full grill The full grill element is on. To grill flat food items in large quantities. To maketoasts.
Inner grill To grill flat food items in small quantities in the middle of the shelf. To maketoasts.
Fan cooking To roast or roast and bake the food that requires the same cooking temperature,using more than one shelf, without flavour transference.
Conventional cooking Heats both from the top and bottom element. To bake and roast on one oven level.
Helpful hints and tips
Warning! Always close the oven door when youcook, even while grilling.
Do not put baking trays, pots, etc. on the oven floorto prevent damage to the oven enamel.
14
Be careful when you remove or install the accesso-ries to prevent damage to the oven enamel.
• The oven has four shelf levels. Count the shelf levelsfrom the bottom of the oven floor.
• You can cook different dishes on two levels at the sametime. Place the shelves on level 1 and 3.
• The oven is supplied with a special system which cir-culates the air and constantly recycles the steam. Thissystem allows to cook in a steamy environment andkeep the food soft inside and crusty outside. It reducesthe cooking time and energy consumption to a mini-mum.
• Moisture can condense in the appliance or on the glassdoors. This is normal. Always stand back form the ap-pliance when you open the oven door while cooking.To reduce condensation, run the oven for 10 minutesbefore cooking.
• Wipe away moisture after every use of the appliance.
Baking cakes• The best temperature for baking cakes is between 150
°C and 200 °C.• Preheat the oven for approximately 10 minutes before
baking.• Do not open the oven door before 3/4 of the set cooking
time is up.
• If you use two baking trays at the same time, keep onelevel empty between them.
Cooking meat and fish• Do not cook meat with weight below 1 kg. Cooking too
small quantities makes the meat too dry.• To keep the red meat well cooked outside and juicy
inside set the temperature between 200 °C-250 °C.• For white meat, poultry and fish set the temperature
between 150°C-175°C.• Use a dripping pan for very fatty food to prevent the
oven from stains that can be permanent.• Leave the meat for approximately 15 minutes before
carving so that the juice does not seep out.• To prevent too much smoke in the oven during roast-
ing, add some water into the dripping pan. To preventthe smoke condensation, add water each time after itdries up.
Cooking timesCooking times depend on the type of food, its consisten-cy, and volume.Initially, monitor the performance when you cook. Findthe best settings (heat setting, cooking time, etc.) for yourcookware, recipes and quantities when you use this ap-pliance.
Cooking tables
Weight (kg) Food Oven Function Level Oven temper-ature (°C)
CookingTime (min)
1 Pork / lamb 2 180 100-110
1 Veal / Beaf 2 190 70-100
1,2 Chicken/Rabbit 2 200 70-80
1,5 Duck 1 160 120-150
3 Goose 1 160 150-200
4 Turkey 1 180 210-240
1 Fish 2 190 30-40
1Stuffed PepperoniTomatos/Roasted
Potatos2 190 50-70
Instant cakes 2 160 45-55
15
Weight (kg) Food Oven Function Level Oven temper-ature (°C)
CookingTime (min)
1 Pies 2 160 80-100
Biscuits 3 140 25-35
2 Lasagne 2 180 45-60
1 White Bread 2 190 50-60
1 Pizza 1 190 25-35
Grilling
Preheat the empty oven for 10 minutes, beforecooking.
Quantity Grilling Cooking time in minutes
TYPE OF DISH Pieces g level Temp. (°C) 1st side 2nd side
Fillet steaks 4 800 3 250 12-15 12-14
Beef steaks 4 600 3 250 10-12 6-8
Sausages 8 / 3 250 12-15 10-12
Pork chops 4 600 3 250 12-16 12-14
Chicken (cut in 2) 2 1000 3 250 30-35 25-30
Kebabs 4 / 3 250 10-15 10-12
Breast of chicken 4 400 3 250 12-15 12-14
Hamburger 6 600 3 250 20-30
Fish Fillet 4 400 3 250 12-14 10-12
Toasted sandwiches 4-6 / 3 250 5-7 /
Toast 4-6 / 3 250 2-4 2-3
Pizza
Preheat the empty oven for 10 minutes, beforecooking.
TYPE OF DISHPizza Function
Cooking time in minutes NOTESLevel temp.°C
Pizza , large 1 200 15~25 on flat baking tray
Pizza , small 1 200 10~20 on flat baking tray or onoven shelf
Bread rolls 1 200 15~25 on flat baking tray
16
Care and cleaning
Warning! Before you clean the appliance, switch itoff. Make sure that the appliance is cold.
Warning! Do not clean the appliance with steamcleaners or high-pressure cleaners.
Caution! Do not use corrosive or scouring cleaningagents, sharp objects, stain removers or abrasive
sponges.
Warning! Do not clean the glass door with abrasivecleaning agents or metal scraper. Heat resistant
surface of the inner glass can damage.
Caution! If you use an oven spray, follow theinstructions from the manufacturer.
• Clean the front of the appliance with a soft cloth withwarm water and cleaning agent.
• To clean metal surfaces use a usual cleaning agent• Clean the oven interior after each use. Thus you can
remove dirt more easily and it does not burn on.• Clean stubborn dirt with a special oven cleaner.• Clean all oven accessories (with a soft cloth with warm
water and cleaning agent) after each use and let themdry.
• If you have nonstick accessories, do not clean themusing an aggressive agents, sharp edged objects ordishwasher. It can destroy nonstick coating!
Shelf Support Rails
Removing the shelf support rails
1 Pull the front of theshelf support rail awayfrom the side wall.
1
2
2 Pull the rear shelf sup-port rail away from the sidewall and remove it.
Installing the shelf support railsInstall the shelf support rails in opposite sequence.
The rounded ends of the shelf support rails mustpoint to the front!
Oven ceilingYou can remove the heating element on the oven ceilingto clean the oven ceiling easily.
Warning! Before you remove the heating elementswitch off the appliance. Make sure that the
appliance is cold. There is a risk of burns!
1 Unscrew the screwwhich holds the heatingelement. For the first time,use a screwdriver.
2 Carefully pull the heat-ing element downwards.The oven ceiling is readyto clean.
Clean the oven ceiling with a soft cloth with warm waterand cleaning agent and let it dry.
Installing the heating element1. Install the heating element in opposite sequence.
Warning! Make sure that the heating element iscorrectly installed and it does not fall down.
Cleaning the oven doorBefore you clean the oven door, remove it from the oven.
Warning! Make sure that the glass panels are cool,before you clean the glass door. There is risk that
the glass breaks.
Warning! When the door glass panels are damagedor have scratches, the glass becomes weak and can
break. To prevent this you must replace them. For moreinstructions, speak with your local Service Centre.
17
1 Open the door fullyand hold the two doorhinges.
2 Lift and turn the leverson the two hinges.
3 Close the oven door tothe first opening position(halfway). Then pull for-ward and remove it fromits seat. Place the door ona stable surface protectedby a soft cloth.
Clean the glass panel with water and soap. Dry it carefully.
When the cleaning procedure is completed, insert theoven door. To do so, do the steps in reverse.
Stainless steel or aluminium appliances:Clean the oven door with a wet sponge only. Dry it
with a soft cloth.Do not use steel wool, acids or abrasive materials as theycan damage the oven surface. Clean the oven controlpanel with the same precautions.
Oven lamp
Warning! There is a danger of electrical shock!
Before you change the oven lamp:• Switch off the oven.• Remove the fuses in the fuse box or switch off the cir-
cuit breaker.
Put a cloth on the bottom of the oven for protectionof the oven light and glass cover.
Replacing the oven light bulb/cleaning the glasscover1. Turn the glass cover anti-clockwise to remove it.2. Clean the glass cover.3. Replace the oven light bulb with applicable 300°C
heat-resistant oven light bulb.4. Install the glass cover.
What to do if…
Problem Possible cause Remedy
The oven does not heat up The oven is not switched on Switch on the oven (refer to chapter"Daily use").
The oven does not heat up The fuse in the fuse box is released Control the fuse. If the fuse is re-leased more than one time, refer to aqualified electrician.
The oven lamp does not operate The oven lamp is defective Replace the oven lamp
Steam and condensation settle on thefood and in the oven cavity
You left the dish in the oven for toolong
Do not leave the dishes in the ovenfor longer than 15-20 minutes afterthe cooking process ends
If you can not find a solution to the problem, speak to yourdealer or the Service Force Centre.
These data are necessary to help you quickly andcorrectly. These data are available on the rating plate (referto "Product description")• Model description ............
18
• Product number (PNC) ............• Serial number (S.N.) ............
Warning! Let a qualified electrician or competentperson do repairs to the appliance.
Important! If you do not operate the appliance correctly,the visit from the Service Force Centre or dealer will notbe free of charge, even during the warranty period.
Hints for appliances with metal fronts:If you open the door during or immediately after the
baking or roasting procedure, steam can show on theglass.
Installation
Building In
Warning! Only a qualified and competent personmust do the installation of the appliance. If you do
not contact qualified or competent person, the guaranteebecomes invalid if there is damage.
• Before you install the built-in appliance to the kitchencabinet make sure that the recess dimensions are suit-able.
• Make sure that there is anti-shock protection for theinstallation.
• According to the regulations of force, all parts whichensure the anti-shock protection must be fixed in sucha way that they cannot be undone without tools.
• Some parts of the oven carry current. Close the appli-ance with furniture and make sure there are no freespaces. It prevents electric shock because you cannotaccidentally touch dangerous parts.
• The appliance can be placed with its back and one sideclose to the higher appliances or walls. The other sidemust be placed to the furniture with the same height.
• Built-in ovens and built-in cooking surfaces are fittedwith special connection systems. For safety reasons,you must only combine appliances from the samemanufacturer.
594
2
20
570590
540560
50
580550 min
560÷570
550 min
593
560-570
80÷100
A
B
19
Electrical connection
Warning! Only a qualified and competent personmust do the electrical installation.
• The manufacturer is not responsible if you do not fol-low these safety precautions.
• Ground the appliance according to safety precautions.• Make sure that the rated voltage and type of power on
the rating plate agree with the voltage and the powerof the local power supply.
• This appliance is supplied with a mains cable withoutplug.
• Any electrical component must be installed or replacedby the Service Centre technician or qualified servicepersonnel.
• Always use a correctly installed shockproof socket.• Do not use multi-way plugs, connectors and extension
cables. There is a risk of fire.• Make sure that the mains plug is accessible after in-
stallation.• Do not pull the mains cable to disconnect the appli-
ance. Always pull the mains plug.• Connect the appliance to the mains using a device that
allows to disconnect the appliance from the mains atall poles with a contact opening width of at least 3 mm,eg. automatic line protecting cut-out, earth leakagetrips or fuse.
• Information on the voltage is given on the rating plate(refer to "Product description").
Environment concerns
The symbol on the product or on its packagingindicates that this product may not be treated ashousehold waste. Instead it should be taken to theappropriate collection point for the recycling of electricaland electronic equipment. By ensuring this product isdisposed of correctly, you will help prevent potentialnegative consequences for the environment and humanhealth, which could otherwise be caused by inappropriatewaste handling of this product. For more detailedinformation about recycling of this product, pleasecontact your local council, your household waste disposalservice or the shop where you purchased the product.
Packaging materialsThe materials with the symbol are recyclable. Disposethe packaging in a suitable collection containers to recycleit.
Disposal of the appliance1. Disconnect the mains plug from the mains socket.2. Cut off the mains cable and discard it.3. Discard the door catch. This prevents the children to
close themselves inside the appliance. There is riskof suffocation.
20
SommaireConsignes de sécurité _ _ _ _ _ _ _ _ _ _ _ _ _ _ 21Avant la première utilisation _ _ _ _ _ _ _ _ _ _ _ 22Description de l'appareil _ _ _ _ _ _ _ _ _ _ _ _ _ 23Utilisation quotidienne _ _ _ _ _ _ _ _ _ _ _ _ _ _ 23Conseils utiles _ _ _ _ _ _ _ _ _ _ _ _ _ _ _ _ _ 24Tableaux de cuisson _ _ _ _ _ _ _ _ _ _ _ _ _ _ _ 25
Entretien et nettoyage _ _ _ _ _ _ _ _ _ _ _ _ _ _ 26En cas d'anomalie de fonctionnement _ _ _ _ _ _ _ 28Installation _ _ _ _ _ _ _ _ _ _ _ _ _ _ _ _ _ _ _ 29Branchement électrique _ _ _ _ _ _ _ _ _ _ _ _ _ 30En matière de protection de l'environnement _ _ _ 30
Sous réserve de modifications
Consignes de sécurité
Pour votre sécurité et pour garantir une utilisationcorrecte de l'appareil, lisez attentivement cette no-
tice d'utilisation, ainsi que ses conseils et avertissements,avant d'installer et d'utiliser l'appareil pour la premièrefois. Conservez cette notice d'utilisation avec votre ap-pareil. Si l'appareil devait être vendu ou cédé à une autrepersonne, assurez-vous que la notice d'utilisation l'ac-compagne. Le nouvel utilisateur pourra alors être informédu fonctionnement de celui-ci et des avertissements s'yrapportant. Pour éviter toute erreur ou accident, veillez àce que toute personne qui utilise l'appareil connaisse bienson fonctionnement et ses options de sécurité.
Utilisation• Ne laissez pas l'appareil sans surveillance en cours de
fonctionnement.• Votre appareil est destiné à un usage domestique nor-
mal.• L'appareil ne peut en aucun cas servir de plan de travail
ou de support.• Ne posez pas ou ne stockez pas de liquides ou des
matériaux inflammables, des objets susceptibles defondre (plastique, aluminium) sur ou à proximité del'appareil.
• Soyez prudent lorsque vous utilisez un appareil élec-trique à fil à proximité de votre appareil. Les câbles nedoivent pas être en contact avec la porte du four chaudou être coincés dessous.
• Ne conservez pas d'aliments humides dans le four.Cela pourrait endommager l'émail du four.
• Vous ne devez pas réparer vous-même l'appareil. Uneréparation non conforme peut être la cause de gravesdommages (corporel ou matériel). Les réparations nedoivent être effectuées que par un service après-ventequalifié.
• N'utilisez pas de produits abrasifs ou d'objets tran-chants ou pointus pour nettoyer les verres de la portedu four sous peine de rayer la vitre de la porte du fouret de la briser.
Remarque sur l'émailL'usage du four peut provoquer des modifications
de couleur du revêtement en émail qui n'influent aucu-nement sur la performance de l'appareil s'il est utilisédans des conditions normales. De ce fait, elles ne con-stituent pas une malfaçon entrant dans le cadre de la ga-rantie.
Sécurité des enfants• Cet appareil a été conçu pour être utilisé par des adul-
tes. Veillez à ce que les enfants n'y touchent pas et nel'utilisent pas comme un jouet.
• Ne laissez pas les emballages à portée de main desenfants. Ils pourraient s'asphyxier !
• Tenez les enfants éloignés de l'appareil pendant sonfonctionnement. Les pièces accessibles peuvent de-venir très chaudes en cours d'utilisation. Risque debrûlure.
Avertissements importants• Cet appareil n'est pas destiné à être utilisé par des
enfants ou des personnes dont les capacités physi-ques, sensorielles ou mentales, ou le manque d'expé-rience et de connaissances les empêchent d'utiliserl'appareil sans risque lorsqu'ils sont sans surveillanceou en l'absence d'instructions d'une personne res-ponsable qui puisse leur assurer une utilisation del'appareil sans danger.
• Pendant l'utilisation, l'intérieur de l'appareil devienttrès chaud. Évitez de toucher les éléments chauffantsà l'intérieur du four. Risque de brûlure.
21
• Au moment de l'ouverture de la porte du four, durantla phase de cuisson ou à la fin de cette dernière, faitesattention à la bouffée d'air chaud qui sort du four.
Installation• Vérifiez que l'appareil n'a pas été endommagé pendant
le transport. Ne branchez jamais un appareil endom-magé. Si nécessaire, contactez le magasin vendeur.
• Les réparations ne doivent être effectuées que par unservice après vente qualifié. En cas d'intervention surl'appareil, exigez du Service Après-vente des piècesde rechange certifiées constructeur.
• Les appareils encastrables ne peuvent être mis enfonctionnement qu'après avoir été installés dans desmeubles et des plans de travail homologués et adaptés.
• Ne modifiez pas ou n'essayez pas de modifier vous-même les caractéristiques de cet appareil. Cela repré-senterait un danger pour vous.
Avertissement Les opérations d'installation et debranchement doivent être réalisées par un
technicien qualifié.
Avant la première utilisation
Avant d'installer et d'utiliser l'appareil, retirez tousles éléments constituant l'emballage, y compris les
étiquettes et tout éventuel film protecteur. Ne retirez pasla plaque signalétique.
Attention Pour ouvrir la porte du four, saisisseztoujours la poignée au centre.
Premier nettoyage• Retirez tous les accessoires de l'appareil.• Nettoyez l'appareil avant de l'utiliser pour la première
fois.
Attention N'utilisez pas de détergents abrasifs !Vous risqueriez d'endommager la surface.
Reportez-vous au chapitre "Entretien et nettoyage".
PréchauffageSélectionnez une fonction quelconque et faites fonction-ner le four à vide pendant 45 minutes environ à la tem-pérature maximum, pour brûler les éventuels résidus defabrication à l'intérieur du four. Les accessoires peuventchauffer davantage que dans des conditions normalesd'utilisation. Une odeur désagréable peut s'en dégager.Ce phénomène est normal. L'odeur est émise par les ré-sidus de fabrication. Veillez à bien aérer la pièce.
22
Description de l'appareil
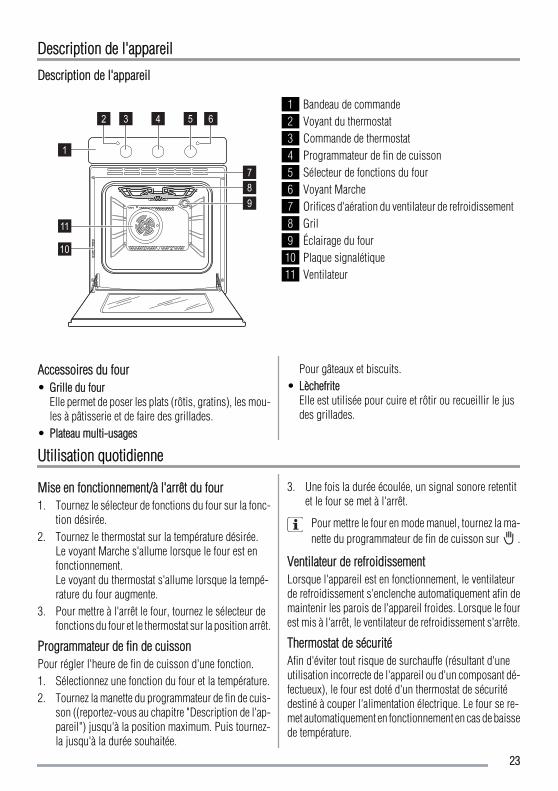
Description de l'appareil
1
2 3 4 5 6
789
10
11
1 Bandeau de commande2 Voyant du thermostat3 Commande de thermostat4 Programmateur de fin de cuisson5 Sélecteur de fonctions du four6 Voyant Marche7 Orifices d'aération du ventilateur de refroidissement8 Gril9 Éclairage du four
10 Plaque signalétique11 Ventilateur
Accessoires du four• Grille du four
Elle permet de poser les plats (rôtis, gratins), les mou-les à pâtisserie et de faire des grillades.
• Plateau multi-usages
Pour gâteaux et biscuits.• Lèchefrite
Elle est utilisée pour cuire et rôtir ou recueillir le jusdes grillades.
Utilisation quotidienne
Mise en fonctionnement/à l'arrêt du four1. Tournez le sélecteur de fonctions du four sur la fonc-
tion désirée.2. Tournez le thermostat sur la température désirée.
Le voyant Marche s'allume lorsque le four est enfonctionnement.Le voyant du thermostat s'allume lorsque la tempé-rature du four augmente.
3. Pour mettre à l'arrêt le four, tournez le sélecteur defonctions du four et le thermostat sur la position arrêt.
Programmateur de fin de cuissonPour régler l'heure de fin de cuisson d'une fonction.1. Sélectionnez une fonction du four et la température.2. Tournez la manette du programmateur de fin de cuis-
son ((reportez-vous au chapitre "Description de l'ap-pareil") jusqu'à la position maximum. Puis tournez-la jusqu'à la durée souhaitée.
3. Une fois la durée écoulée, un signal sonore retentitet le four se met à l'arrêt.
Pour mettre le four en mode manuel, tournez la ma-nette du programmateur de fin de cuisson sur .
Ventilateur de refroidissementLorsque l'appareil est en fonctionnement, le ventilateurde refroidissement s'enclenche automatiquement afin demaintenir les parois de l'appareil froides. Lorsque le fourest mis à l'arrêt, le ventilateur de refroidissement s'arrête.
Thermostat de sécuritéAfin d'éviter tout risque de surchauffe (résultant d'uneutilisation incorrecte de l'appareil ou d'un composant dé-fectueux), le four est doté d'un thermostat de sécuritédestiné à couper l'alimentation électrique. Le four se re-met automatiquement en fonctionnement en cas de baissede température.
23
Fonctions du four
Fonction du four Application
Position Arrêt L'appareil est à l'arrêt.
Élément chauffant in-férieur
La chaleur provient uniquement de la partie inférieure du four. Pour la cuissonde gâteaux au fond croustillant.
PizzaLa résistance inférieure dirige la chaleur directement sur le fond des pizzas, qui-ches ou tourtes, tandis que le ventilateur fait circuler l'air pour cuire la garniture
des pizzas ou des tourtes.
Gril complet Le gril complet est activé. Pour faire griller des aliments peu épais en grandesquantités. Pour faire des toasts.
Gril intérieur Pour faire griller des aliments peu épais en petites quantités au centre de la grille.Pour faire des toasts.
Multichaleur tournan-te
Pour cuire ou rôtir plusieurs préparations simultanément, sur différents niveaux,sans que les odeurs ne se mélangent.
Cuisson traditionnelle La chaleur provient des éléments chauffants supérieur et inférieur. Pour cuire etrôtir sur un seul niveau.
Conseils utiles
Avertissement Fermez toujours la porte du fourpendant la cuisson, même en utilisant le gril.
Ne placez jamais d'ustensile, plat ou accessoire di-rectement en contact avec la sole de votre four, ceci
entraînerait une détérioration de l'émail ou de l'appareil.
Faites attention à ne pas endommager l'émail dufour lorsque vous enlevez ou installez des acces-
soires.
• Le four dispose de quatre niveaux de gradins. Les gra-dins sont numérotés en partant du bas.
• Différents plats peuvent reposer sur deux gradins enmême temps. Placez une grille au gradin 1 et une augradin 3.
• Le four est doté d'un système spécial qui produit unecirculation naturelle de l'air et le recyclage constant dela vapeur. Ce système permet de cuisiner des platsdans un environnement de vapeur, tout en maintenantceux-ci tendres à l'intérieur et croquants à l'extérieur.Le temps de cuisson et la consommation énergétiquesont réduits au minimum.
• De la vapeur peut être produite en cours de cuisson etse déposer sur les parois du four ou sur les vitres de
la porte. Ce phénomène est normal. Au moment del'ouverture de la porte du four, durant la phase decuisson, faites attention à la bouffée d'air chaud quisort du four. Pour réduire la condensation, préchauffeztoujours le four à vide pendant 10 minutes.
• Il est conseillé d'essuyer les gouttes d'eau après cha-que cycle de cuisson.
Cuisson de gâteaux• Pour cuire les gâteaux, réglez la température entre 150
et 200 °C.• Préchauffez le four pendant environ 10 minutes avant
la cuisson.• N'ouvrez la porte du four qu'aux 3/4 du temps de cuis-
son.• Si vous enfournez simultanément deux plaques de
cuisson, laissez un gradin libre entre les deux.
Cuisson de la viande et du poisson• Nous vous conseillons de rôtir les viandes et les pois-
sons au four seulement à partir d'un poids de 1 kg. Desrôtis d'un poids inférieur risquent de sécher en coursde cuisson.
24
• Pour préparer des rôtis tendres et moelleux, réglez latempérature entre 200 et 250 °C.
• En revanche, pour les viandes blanches, les volailleset les poissons, réglez la température entre 150 et 175°C.
• Utilisez une lèchefrite pour éviter que les sucs et lesgraisses des aliments qui s'égouttent laissent des ta-ches indélébiles.
• Laissez reposer la viande pendant environ 15 minutesavant de la couper pour la laisser s'imbiber de jus.
• Pour réduire la formation de fumées dans le four, ver-sez un peu d'eau dans la lèchefrite. Versez un peu d'eau
à plusieurs reprises pour empêcher que de la conden-sation ne se forme.
Temps de cuissonLes temps de cuisson varient en fonction de la compo-sition, des ingrédients et de la quantité de liquide quecontient chaque plat.Surveillez toujours l'appareil pendant son fonctionne-ment. Annotez les meilleurs réglages (niveau de cuisson,temps de cuisson, etc.) en fonction des ustensiles et desrecettes lors de vos expériences de cuisson.
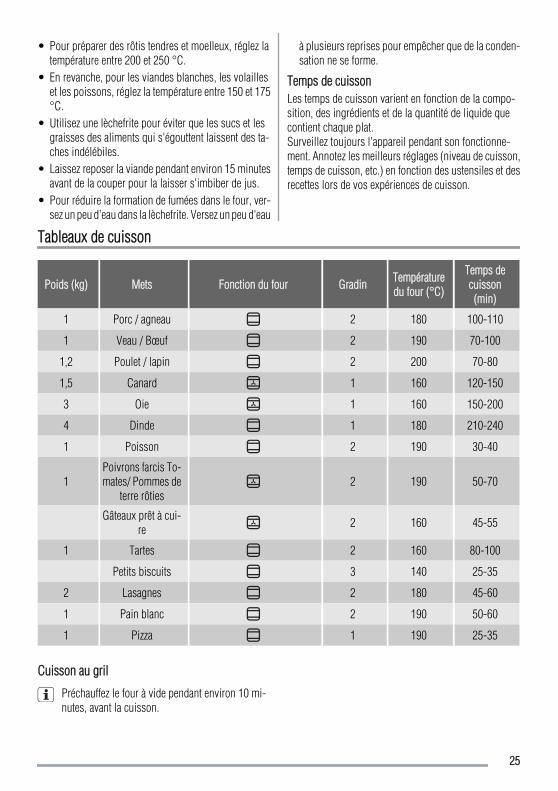
Tableaux de cuisson
Poids (kg) Mets Fonction du four Gradin Températuredu four (°C)
Temps decuisson(min)
1 Porc / agneau 2 180 100-110
1 Veau / Bœuf 2 190 70-100
1,2 Poulet / lapin 2 200 70-80
1,5 Canard 1 160 120-150
3 Oie 1 160 150-200
4 Dinde 1 180 210-240
1 Poisson 2 190 30-40
1Poivrons farcis To-mates/ Pommes de
terre rôties2 190 50-70
Gâteaux prêt à cui-re 2 160 45-55
1 Tartes 2 160 80-100
Petits biscuits 3 140 25-35
2 Lasagnes 2 180 45-60
1 Pain blanc 2 190 50-60
1 Pizza 1 190 25-35
Cuisson au gril
Préchauffez le four à vide pendant environ 10 mi-nutes, avant la cuisson.
25
Quantité Cuisson au gril Temps de cuisson en minutes
PLAT Pièces g Gradin Temp. (°C) 1er côté 2e côté
Steaks dans le filet 4 800 3 250 12-15 12-14
Biftecks 4 600 3 250 10-12 6-8
Saucisses 8 / 3 250 12-15 10-12
Côtelettes de porc 4 600 3 250 12-16 12-14
Poulet (coupé en deux) 2 1000 3 250 30-35 25-30
Brochettes 4 / 3 250 10-15 10-12
Blanc de poulet 4 400 3 250 12-15 12-14
Hamburgers 6 600 3 250 20-30
Filets de poisson 4 400 3 250 12-14 10-12
Sandwichs toastés 4-6 / 3 250 5-7 /
Toasts 4-6 / 3 250 2-4 2-3
Pizza
Préchauffez le four à vide pendant environ 10 mi-nutes, avant la cuisson.
Type de platCuisson Pizza Temps de cuisson en
minutes RemarquesGradin temp.°C
Pizza, grande 1 200 15~25 sur le plateau multi-usa-ges
Pizza, petite 1 200 10~20 sur le plateau multi-usa-ges ou la grille du four
Petits pains 1 200 15~25 sur le plateau multi-usa-ges
Entretien et nettoyage
Avertissement Mettez l'appareil à l'arrêt avant deprocéder à son nettoyage. Vérifiez que l'appareil est
froid.
Avertissement Ne nettoyez pas l'appareil avec unnettoyeur à vapeur ou haute pression.
Attention N'utilisez pas de produit corrosif ouabrasif, d'objets pointus, de détachants ou de
tampons à récurer.
Avertissement N'utilisez pas de produits abrasifs,de grattoir métallique ou d'objets tranchants ou
pointus pour nettoyer la vitre ou les verres de la porte dufour. Vous risquez d'endommager la surface du verre.
Attention Si vous nettoyez votre four à l'aide d'unspray spécial pour fours, respectez
scrupuleusement les consignes d'utilisation du fabricantde ce produit.
26
• Nettoyez la façade du four à l'aide d'une éponge hu-mide additionné d'eau savonneuse.
• Utilisez les produits spécifiques vendus dans le com-merce pour l'entretien des surfaces en métal.
• Nettoyez l'appareil après chaque utilisation. Les salis-sures s'éliminent alors plus facilement et ne risquentpas de brûler.
• En cas de salissures importantes, nettoyez à l'aide deproduits spécifiques pour four.
• Lavez tous les accessoires du four avec un chiffon douxhumide additionné d'eau savonneuse après chaqueutilisation et séchez-les.
• Si vous avez des accessoires anti-adhérents, ne lesnettoyez pas avec des produits agressifs, des objetspointus, ou en lave-vaisselle. Vous risqueriez de dé-truire le revêtement anti-adhérent !
Glissières
Retrait des glissières
1 Écartez l'avant de laglissière de la paroi laté-rale.
1
2
2 Écartez l'arrière de laglissière de la paroi laté-rale et retirez-la.
Remontage des glissièresPour remonter les glissières, procédez dans le sens in-verse du retrait.
Les extrémités arrondies des glissières doivent êtreorientées vers l'avant !
Paroi supérieure du fourVous pouvez enlever l'élément chauffant afin de nettoyerplus facilement la voûte du four.
Avertissement Avant d'enlever l'élément chauffant,mettez l'appareil à l'arrêt. Vérifiez que l'appareil est
froid. Ceci présente un risque de brûlure.
1 Dévissez la vis quimaintient l'élément chauf-fant. La première fois, uti-lisez un tournevis.
2 Tirez avec précautionl'élément chauffant vers lebas.Vous pouvez maintenantnettoyer la paroi supérieu-re du four en toute simpli-cité.
Nettoyez la voute du four à l'aide d'une éponge humideadditionnée d'eau savonneuse. Rincez et laissez sécher.
Installation de l'élément chauffant1. Pour remettre l'élément chauffant en place, inversez
la procédure.
Avertissement Assurez-vous que l'élémentchauffant est correctement installé et ne puisse pas
tomber.
Nettoyage de la porte du fourAvant de nettoyer la porte du four, nous vous conseillonsd'extraire celle-ci du four.
Avertissement Ne nettoyez pas la porte du four tantque les panneaux en verre sont encore chauds. La
vitre pourrait se briser et voler en éclats.
Avertissement Si les panneaux en verre de la porteprésentent des éclats ou des rayures profondes, le
verre est fragilisé. Ils doivent être remplacés pour éviterqu'ils ne se brisent. Pour plus d'informations, veuillezvous adresser au Service Après-vente.
27
1 Ouvrez complètementla porte.
2 Relevez complètementle levier de serrage auxdeux charnières de la por-te.
3 Fermez la porte du fourjusqu'à atteindre la pre-mière position d'accro-chage (à moitié). Retirezdélicatement la porte dufour en dehors de son lo-gement. Déposez-la surun support doux et plan,par exemple une couver-ture, afin d'éviter de larayer.
Lavez la vitre avec de l'eau savonneuse Séchez-la soi-gneusement.
Une fois le nettoyage terminé, replacez la porte du four.Pour ce faire, suivez la même procédure dans l'ordre in-verse.
Appareils en acier inoxydable ou en aluminium :Il est conseillé de nettoyer la porte du four à l'aide
d'une éponge humide seulement. Séchez-la ensuite avecun chiffon doux.N'utilisez jamais d'éponges métalliques, de substancesacides ou abrasives susceptibles d'abîmer le revêtementdu four. Nettoyez le bandeau de commande du four enobservant ces précautions.
Eclairage du four
Avertissement Risque de choc électrique !
Avant de remplacer l'ampoule du four :• Mettez à l'arrêt le four.• Retirez les fusibles de la boîte à fusibles ou coupez le
disjoncteur.
Placez un chiffon sur la sole du four afin de protégerl'ampoule du four et le cache en verre.
Remplacement de l'ampoule du four/Nettoyage ducache en verre1. Retirez le cache en verre en le tournant dans le sens
inverse des aiguilles d'une montre.2. Nettoyez-le.3. Remplacez l'ampoule du four par une ampoule ré-
sistant à la chaleur jusqu'à 300 °C.4. Remettez le cache en verre en place.
En cas d'anomalie de fonctionnement
Anomalie Cause possible Solution
Le four ne chauffe pas Le four n'est pas en fonctionnement Mettez le four en fonctionnement (re-portez-vous au chapitre "Utilisa-tion").
Le four ne chauffe pas Le fusible de l'installation domesti-que a disjoncté
Vérifiez le fusible. Si le fusible dis-joncte à plusieurs reprises, contactezun électricien qualifié.
L'éclairage du four ne fonctionne pas L'éclairage du four est défectueux Remplacez l'ampoule du four
28
Anomalie Cause possible Solution
De la vapeur et de l'eau de conden-sation se déposent sur les alimentset dans l'enceinte du four
Le plat est resté trop longtemps aufour
Une fois le processus de cuisson ter-miné, ne laissez pas les plats dans lefour plus de 15 à 20 minutes.
Si les indications ci-dessus ne vous permettent pas deremédier au problème, veuillez vous adresser à votre ma-gasin vendeur ou au Service Après-vente.
Les informations suivantes sont nécessaires pour pouvoirvous offrir une aide rapide et adaptée : Vous trouverez cesinformations sur la plaque signalétique située surl'appareil (reportez-vous au chapitre "Description del'appareil")• Désignation du modèle...• Référence produit (PNC)...• Numéro de série (S-No.)
Avertissement Les réparations doivent êtreeffectuées uniquement par des professionnels
qualifiés.
Important En cas d'utilisation non conforme de l'appareil,le recours au technicien du Service Après-vente ou dumagasin vendeur sera facturé même si l'appareil estencore sous garantie.
Remarque concernant les appareils avec une façadeen métal :
La porte froide de l'appareil peut provoquer la formationtemporaire de condensation sur la vitre intérieure aprèsl'ouverture de la porte, pendant ou juste après une cuis-son.
Installation
Encastrement
Avertissement L'installation de l'appareil ne doitêtre effectuée que par un professionnel qualifié. Si
vous ne contactez pas une personne qualifiée etcompétente, les éventuels dommages ne seront pascouverts par la garantie.
• Avant d'encastrer l'appareil dans le meuble de cuisine,assurez-vous que les dimensions de la niche d'encas-trement sont appropriées.
• Veillez à garantir une protection anti-chocs lors del'installation.
• Conformément aux règlements en vigueur, toutes lespièces qui assurent la protection anti-chocs doiventêtre fixées de manière telle à empêcher leur retrait sansoutils.
• Le courant passe dans certains composants du four.Fermez l'appareil avec le meuble et assurez-vous qu'iln'existe pas d'espace libre. Et ce pour vous éviter detoucher involontairement des composants dangereuxet de recevoir une décharge électrique.
• L'appareil peut être placé avec sa paroi arrière et laté-rale posées contre des appareils ou des parois d'unehauteur supérieure. L'autre paroi latérale doit être pla-
cée contre des meubles ayant une hauteur identique àcelle du four.
• Les fours et plaques de cuisson encastrables sontéquipés de connexions particulières. Par mesure desécurité, vous devez uniquement associer des appa-reils du même fabricant.
594
2
20
570590
540560
5058
0550 min
560÷570
550 min
593
560-570
80÷100
29
A
B
Branchement électrique
Avertissement L'installation de l'appareil ne doitêtre effectuée que par un professionnel qualifié.
• Le fabricant ne peut pas être tenu responsable si vousne respectez pas ces consignes de sécurité.
• Quel que soit le mode de raccordement, l'appareil doitêtre relié à la terre conformément aux règlements envigueur.
• Vérifiez que la tension nominale et le type d'alimenta-tion figurant sur la plaque signalétique correspondentaux valeurs d'alimentation locales.
• L'appareil est fourni avec un câble d'alimentation sansfiche.
• Pour toute intervention sur votre appareil, faites appelau Service Après-vente de votre magasin vendeur ouà un professionnel qualifié autorisé.
• Utilisez toujours une prise de courant de sécurité cor-rectement installée selon les normes en vigueur.
• L'appareil ne doit pas être raccordé à l'aide d'un pro-longateur, d'une prise multiple ou d'un raccordementmultiple. Risque d'incendie.
• Assurez-vous que la prise murale est accessible aprèsinstallation.
• Ne tirez pas sur le câble d'alimentation pour débran-cher l'appareil. Retirez la fiche d'alimentation.
• Dans le cas d'une installation fixe, le raccordement auréseau doit être effectué par l'intermédiaire d'un inter-rupteur à coupure omnipolaire, ayant une distanced'ouverture des contacts d'au moins 3 mm, par ex. uncoupe-circuit automatique, un disjoncteur différentielou des fusibles.
• Les informations concernant le branchement électri-que, la tension et la puissance totale figurent sur laplaque signalétique (veuillez vous reporter au chapitre"Description de l'appareil").
En matière de protection de l'environnement
Le symbole sur le produit ou son emballage indiqueque ce produit ne peut être traité comme déchet ménager.Il doit être remis au point de collecte dédié à cet effet(collecte et recyclage du matériel électrique etélectronique).En procédant à la mise au rebut de l'appareil dans lesrègles de l’art, nous préservons l'environnement et notresécurité, s’assurant ainsi que les déchets seront traitésdans des conditions optimum.Pour obtenir plus de détails sur le recyclage de ce produit,veuillez prendre contact avec les services de votrecommune ou le magasin où vous avez effectué l'achat.
Matériaux d'emballageTous les matériaux marqués par le symbole sont re-cyclables. Déposez-les dans une déchetterie prévue à ceteffet (renseignez-vous auprès des services de votre com-mune) pour qu'ils puissent être récupérés et recyclés.
Mise au rebut de l'appareil1. Débranchez l'appareil.2. Coupez le câble d'alimentation et mettez-le au rebut.3. Éliminez le dispositif de verrouillage de porte. Ceci
pour empêcher que des enfants ne restent enfermésà l'intérieur de l'appareil. Ils pourraient s'asphyxier !
30
InhaltSicherheitshinweise _ _ _ _ _ _ _ _ _ _ _ _ _ _ _ 31Vor der ersten Inbetriebnahme _ _ _ _ _ _ _ _ _ _ 32Gerätebeschreibung _ _ _ _ _ _ _ _ _ _ _ _ _ _ _ 32Täglicher Gebrauch _ _ _ _ _ _ _ _ _ _ _ _ _ _ _ 33Praktische Tipps und Hinweise _ _ _ _ _ _ _ _ _ _ 34Kochtabellen _ _ _ _ _ _ _ _ _ _ _ _ _ _ _ _ _ _ 35
Reinigung und Pflege _ _ _ _ _ _ _ _ _ _ _ _ _ _ 36Was tun, wenn … _ _ _ _ _ _ _ _ _ _ _ _ _ _ _ _ 38Gerät aufstellen _ _ _ _ _ _ _ _ _ _ _ _ _ _ _ _ _ 39Elektrischer Anschluss _ _ _ _ _ _ _ _ _ _ _ _ _ _ 39Umwelttipps _ _ _ _ _ _ _ _ _ _ _ _ _ _ _ _ _ _ _ 40
Änderungen vorbehalten
Sicherheitshinweise
Lesen Sie diese Bedienungsanleitung bitte sorgfäl-tig durch, bevor Sie das Gerät anschließen und be-
nutzen, um Gefahren zu vermeiden und einen korrektenBetrieb des Geräts zu gewährleisten. Bewahren Sie dieBedienungsanleitung für einen Weiterverkauf des Gerätesoder eine späteren Umzug auf. Jeder, der dieses Gerätbenutzt, muss mit den Bedienungs- und Sicherheitshin-weisen gut vertraut sein.
Bestimmungsgemäße Verwendung• Das Gerät während des Betriebes nicht unbeaufsichtigt
lassen.• Das Gerät ist ausschließlich zur Verwendung im Haus-
halt bestimmt!• Das Gerät darf nicht als Arbeits- oder Abstellfläche
verwendet werden.• Brennbare Flüssigkeiten, leicht entzündliche Materia-
lien oder schmelzbare Gegenstände (z.B. Folien,Kunststoff, Aluminium) nicht im Gerät oder in dessenNähe abstellen oder lagern.
• Vorsicht bei Anschluss von Elektrogeräten an Steck-dosen in Gerätenähe. Die Anschlussleitungen dürfennicht unter der heißen Backofen-Tür eingeklemmt wer-den.
• Bewahren Sie nach dem Garen keine feuchten Lebens-mittel oder Gerichte in dem Gerät auf, um Beschädi-gungen der Emailbeschichtung zu verhindern.
• Versuchen Sie nicht, selbst Reparaturen auszuführen.Andernfalls besteht Unfallgefahr, und das Gerät könntebeschädigt werden. Wenden Sie sich bitte stets an Ih-ren Kundendienst.
• Benutzen Sie keine Scheuermittel oder Metallschaberzum Reinigen der Glasbackofentür; dies könnte dieOberfläche zerkratzen und zum Zersplittern der Schei-be führen.
Hinweis zur EmailbeschichtungFarbliche Veränderungen an der Emailbeschich-
tung des Backofens als Folge des Gebrauchs beeinträch-tigen nicht die Eignung des Gerätes zur gewöhnlichenbzw. vertragsgemäßen Verwendung. Sie stellen daherkeinen Mangel im Sinne des Gewährleistungsrechtes dar.
Sicherheit für Kinder• Nur Erwachsene dürfen dieses Gerät bedienen. Kinder
müssen beaufsichtigt werden, so dass sie nicht mitdem Gerät spielen können.
• Halten Sie das Verpackungsmaterial von Kindern fern.Andernfalls besteht Erstickungsgefahr.
• Halten Sie Kinder vom Gerät fern, wenn dieses einge-schaltet ist. Die zugänglichen Geräteteile können beimBetrieb sehr heiß werden. Es besteht Verbrennungs-gefahr.
Allgemeine Sicherheit• Personen (einschließlich Kinder), die aufgrund ihrer
physischen, sensorischen oder geistigen Fähigkeitenoder ihrer Unerfahrenheit oder Unkenntnis nicht in derLage sind, das Gerät sicher zu bedienen, sollten diesesGerät nicht ohne Aufsicht oder Anweisung durch eineverantwortliche Person benutzen.
• Der Innenraum des Geräts wird bei der Benutzung sehrheiß. Seien Sie bitte vorsichtig und berühren Sie keinesder Heizelemente! Es besteht Verbrennungsgefahr.
• Stellen Sie sich daher nie direkt vor den Backofen,wenn Sie die Tür während des Garvorgangs öffnen,und lassen Sie am Ende des Garvorgangs den Dampfund die Hitze entweichen.
31
Installation• Vergewissern Sie sich, dass das Gerät beim Transport
nicht beschädigt wurde. Schließen Sie ein beschädig-tes Gerät nicht an. Wenden Sie sich bei Bedarf an denLieferanten.
• Das Gerät darf nur von einem autorisierten Service-techniker repariert werden. Dabei dürfen ausschließ-lich Originalersatzteile verwendet werden.
• Einbaugeräte dürfen nur betrieben werden, wenn sie innormgerechte, passende Einbauschränke und Arbeits-platten eingebaut wurden.
• Nehmen Sie weder technische noch anderweitige Än-derungen am Gerät vor. Andernfalls besteht Unfallge-fahr und das Gerät könnte beschädigt werden.
Warnung! Beachten Sie genau sämtlicheAnweisungen zu den elektrischen Anschlüssen.
Vor der ersten Inbetriebnahme
Entfernen Sie das gesamte Verpackungsmaterialinnen und außen am Backofen, bevor Sie das Gerät
in Betrieb nehmen. Entfernen Sie das Typenschild nicht.
Vorsicht! Fassen Sie zum Öffnen der Backofentürden Griff immer in der Mitte an.
Erstes Reinigen• Entfernen Sie alle Teile aus dem Gerät.• Reinigen Sie das Gerät vor der ersten Benutzung.
Vorsicht! Verwenden Sie keine Scheuermittel! DieOberfläche kann beschädigt werden. Weitere
Informationen finden Sie im Kapitel "Reinigung undPflege".
AufheizenStellen Sie eine Backofen-Funktion ein und wählen Siedie maximale Temperatur. Lassen Sie den leeren Back-ofen 45 Minuten lang in Betrieb, damit alle Rückständeim Innenraum vollständig verbrennen. Das Zubehör kannheißer werden als beim normalen Gebrauch. Währenddieser Zeit kann es zu einer Geruchsentwicklung kommen.Das ist normal. Sorgen Sie für eine gute Raumbelüftung.
Gerätebeschreibung
Gesamtansicht
1
2 3 4 5 6
789
10
11
1 Bedienfeld2 Temperaturkontrolllampe3 Schalter Temperaturwahl4 Einstellung Garzeitende5 Schalter Backofen-Funktionen6 Betriebs-Kontrolllampe7 Lüftungsöffnungen für das Kühlgebläse8 Grill9 Backofenlampe
10 Typenschild11 Ventilator
Backofenzubehör• Rost
Für Geschirr, Kuchenformen, Braten
32
• BackblechFür Kuchen und Plätzchen
• Fettpfanne
Zum Backen und Braten oder zum Auffangen von aus-tretendem Fett.
Täglicher Gebrauch
Ein- und Ausschalten des Backofens1. Drehen Sie den Schalter für die Backofenfunktionen
auf die gewünschte Funktion.2. Drehen Sie den Schalter für die Temperaturwahl auf
eine gewünschte Temperatur.Die Betriebs-Kontrolllampe leuchtet, solange derBackofen in Betrieb ist.Die Temperatur-Kontrolllampe leuchtet, solange dieBackofentemperatur ansteigt.
3. Drehen Sie den Schalter für die Backofenfunktionenund den Schalter für die Temperaturwahl auf die Po-sition AUS, um den Backofen auszuschalten.
Einstellung GarzeitendeZum Einstellen der Abschaltzeit einer Backofenfunktion.1. Stellen Sie die gewünschte Backofen-Funktion und
Temperatur ein.2. Drehen Sie den Schalter für die Einstellung des Gar-
zeitendes bis zum Anschlag (siehe "Produktbeschrei-bung"). Drehen Sie ihn danach auf die gewünschteZeitdauer.
3. Nach Ablauf der eingestellten Zeit ertönt ein Signalund der Ofen schaltet sich aus.
Um den Ofen auf manuellen Betrieb umzustellen,drehen Sie den Schalter für die Einstellung des
Garzeitendes auf .
KühlgebläseWenn das Gerät in Betrieb ist, schaltet sich das Kühlge-bläse automatisch ein, um die Geräteoberfläche zu küh-len. Wenn Sie das Gerät ausschalten, stoppt das Kühl-gebläse.
Sicherheits-ThermostatUm eine gefährliche Überhitzung (durch unsachgemäßenGebrauch des Gerätes oder defekte Bestandteile) zu ver-meiden, ist der Backofen mit einem Sicherheits-Ther-mostat ausgestattet, der die Stromversorgung unter-bricht. Die Wiedereinschaltung des Ofens erfolgt auto-matisch bei Temperaturabfall.
Backofenfunktionen
Backofenfunktion Anwendung
Position AUS Das Gerät ist AUSGESCHALTET.
Unterhitze Die Hitze kommt ausschließlich vom Heizelement unten im Backofen. Zum Nach-backen von Kuchen mit krossen Böden.
PizzaDas untere Heizelement liefert direkte Hitze für Pizza-, Quiche- oder Pastetenbö-
den, während das Gebläse die Luft um den Belag bzw. die Füllung zirkulierenlässt.
Großflächengrill Das gesamte Grillelement schaltet sich ein. Zum Grillen flacher Lebensmittel ingrößeren Mengen. Zum Toasten.
Grill Zum Grillen flacher Lebensmittel in kleinen Mengen in der Mitte des Rostes. ZumToasten.
Heißluft mit Ringheiz-körper
Bei dieser Einstellung können Speisen mit der gleichen Gartemperatur auf meh-reren Ebenen gleichzeitig braten bzw. braten und backen, ohne dass es zu einer
Aromaübertragung kommt.
33
Backofenfunktion Anwendung
Ober- und Unterhitze Die Hitze kommt von den Heizelementen oben und unten im Backofen. Zum Ba-cken und Braten auf einer Ebene.
Praktische Tipps und Hinweise
Warnung! Schließen Sie beim Braten oder Backenimmer die Backofen-Tür, ebenso beim Grillen.
Stellen Sie keine Backbleche, Töpfe usw. auf denBoden des Backofens, um Beschädigungen der
Emailbeschichtung zu verhindern.
Gehen Sie beim Entfernen oder Einsetzen des Zu-behörs sorgsam vor, um die Emailbeschichtung des
Ofens nicht zu beschädigen.
• Der Backofen hat vier Einsatzebenen. Zählen Sie dieEinsatzebenen vom Boden aus.
• Sie können verschiedene Gerichte auf zwei Einsatz-ebenen gleichzeitig garen oder backen. Setzen Sie dieBleche auf die Einsatzebenen 1 und 3.
• Der Backofen besitzt ein spezielles Umluft- undDampfsystem. Dieses System ermöglicht das Garenmit Dampf; es macht Ihre Speisen innen weich undaußen knusprig. Die Gardauer und der Energiever-brauch werden dabei außerdem erheblich reduziert.
• Feuchtigkeit kann sich im Gerät oder an den Glastürenniederschlagen. Das ist normal. Stellen Sie sich niedirekt vor den Backofen, wenn Sie die Tür während desGarvorgangs öffnen. Um Kondensation zu verringern,heizen Sie bitte den leeren Backofen immer 10 Minutenvor dem Beginn des Garens vor.
• Wischen Sie Kondenswassertropfen nach jeder Be-nutzung des Gerätes weg.
Kuchenbacken• Die beste Temperatur zum Backen von Kuchen liegt
zwischen 150 °C und 200 °C.• Heizen Sie den leeren Backofen vor dem Backen etwa
10 Minuten vor.
• Öffnen Sie die Backofen-Tür nicht, bevor 3/4 der Back-zeit abgelaufen ist.
• Werden zwei Backbleche gleichzeitig in den Backofeneingeschoben, muss zwischen den Blechen eine Ein-satzebene frei gelassen werden.
Garen von Fleisch und Fisch• Garen oder braten Sie kein Fleisch mit einem Gewicht
unter 1 kg. Das Garen in zu kleinen Mengen trocknetdas Fleisch aus.
• Braten Sie rotes Fleisch, das außen leicht gebräunt undinnen saftig sein soll, bei höheren Temperaturen zwi-schen 200 °C und 250 °C.
• Helles Fleisch, Geflügel, und Fisch erfordern dagegeneine Temperatur zwischen 150°C und 175°C.
• Verwenden Sie bitte zum Garen von sehr fetten Speisendie Fettpfanne, um den Backofen vor Spritzern zuschützen, die dauerhaft einbrennen könnten.
• Lassen Sie den Braten vor dem Anschneiden mindes-tens 15 Minuten stehen, damit der Fleischsaft nichtausfließen kann.
• Geben Sie etwas Wasser in die Fettpfanne, um eine zuhohe Rauchbildung im Backofen beim Braten zu ver-meiden. Um die Rauchbildung zu vermindern, emp-fiehlt es sich, immer wieder ein wenig Wasser dazu-zugeben.
GarzeitenDie Garzeiten hängen von der Art, Menge und Konsistenzdes Gargutes ab.Überprüfen Sie die Leistung zu Beginn des Garens. Fin-den Sie die besten Einstellungen (Heizstufe, Garzeit usw.)für Ihre Brat- und Backformen und Ihre persönlichen Re-zepte und Mengen heraus, wenn Sie das Gerät benutzen.
34
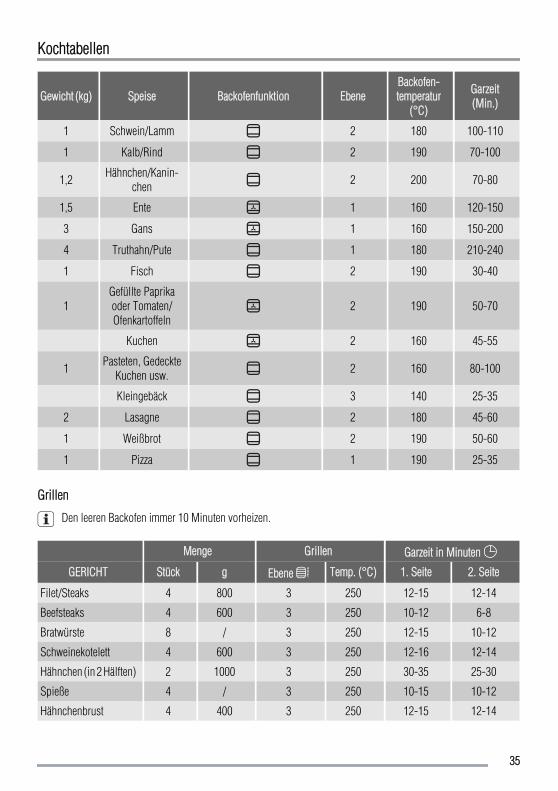
Kochtabellen
Gewicht (kg) Speise Backofenfunktion EbeneBackofen-temperatur
(°C)
Garzeit(Min.)
1 Schwein/Lamm 2 180 100-110
1 Kalb/Rind 2 190 70-100
1,2 Hähnchen/Kanin-chen 2 200 70-80
1,5 Ente 1 160 120-150
3 Gans 1 160 150-200
4 Truthahn/Pute 1 180 210-240
1 Fisch 2 190 30-40
1Gefüllte Paprikaoder Tomaten/Ofenkartoffeln
2 190 50-70
Kuchen 2 160 45-55
1 Pasteten, GedeckteKuchen usw. 2 160 80-100
Kleingebäck 3 140 25-35
2 Lasagne 2 180 45-60
1 Weißbrot 2 190 50-60
1 Pizza 1 190 25-35
Grillen
Den leeren Backofen immer 10 Minuten vorheizen.
Menge Grillen Garzeit in Minuten
GERICHT Stück g Ebene Temp. (°C) 1. Seite 2. Seite
Filet/Steaks 4 800 3 250 12-15 12-14
Beefsteaks 4 600 3 250 10-12 6-8
Bratwürste 8 / 3 250 12-15 10-12
Schweinekotelett 4 600 3 250 12-16 12-14
Hähnchen (in 2 Hälften) 2 1000 3 250 30-35 25-30
Spieße 4 / 3 250 10-15 10-12
Hähnchenbrust 4 400 3 250 12-15 12-14
35
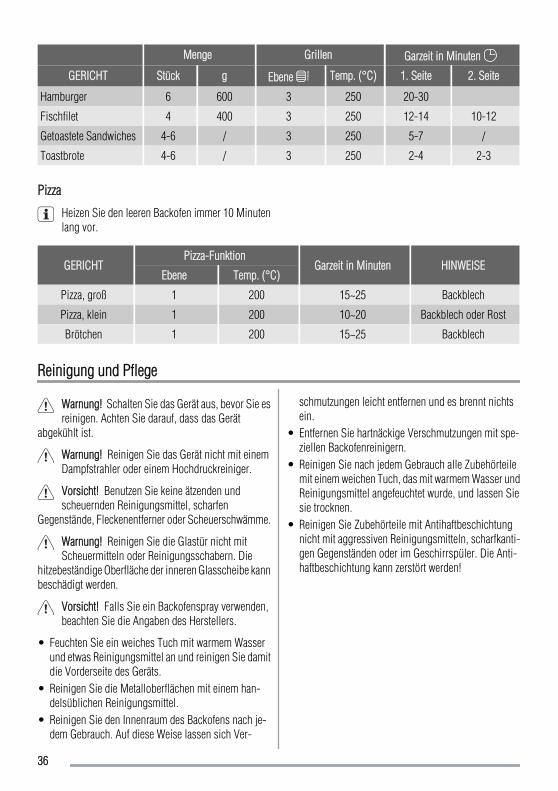
Menge Grillen Garzeit in Minuten
GERICHT Stück g Ebene Temp. (°C) 1. Seite 2. Seite
Hamburger 6 600 3 250 20-30
Fischfilet 4 400 3 250 12-14 10-12
Getoastete Sandwiches 4-6 / 3 250 5-7 /
Toastbrote 4-6 / 3 250 2-4 2-3
Pizza
Heizen Sie den leeren Backofen immer 10 Minutenlang vor.
GERICHTPizza-Funktion
Garzeit in Minuten HINWEISEEbene Temp. (°C)
Pizza, groß 1 200 15~25 Backblech
Pizza, klein 1 200 10~20 Backblech oder Rost
Brötchen 1 200 15~25 Backblech
Reinigung und Pflege
Warnung! Schalten Sie das Gerät aus, bevor Sie esreinigen. Achten Sie darauf, dass das Gerät
abgekühlt ist.
Warnung! Reinigen Sie das Gerät nicht mit einemDampfstrahler oder einem Hochdruckreiniger.
Vorsicht! Benutzen Sie keine ätzenden undscheuernden Reinigungsmittel, scharfen
Gegenstände, Fleckenentferner oder Scheuerschwämme.
Warnung! Reinigen Sie die Glastür nicht mitScheuermitteln oder Reinigungsschabern. Die
hitzebeständige Oberfläche der inneren Glasscheibe kannbeschädigt werden.
Vorsicht! Falls Sie ein Backofenspray verwenden,beachten Sie die Angaben des Herstellers.
• Feuchten Sie ein weiches Tuch mit warmem Wasserund etwas Reinigungsmittel an und reinigen Sie damitdie Vorderseite des Geräts.
• Reinigen Sie die Metalloberflächen mit einem han-delsüblichen Reinigungsmittel.
• Reinigen Sie den Innenraum des Backofens nach je-dem Gebrauch. Auf diese Weise lassen sich Ver-
schmutzungen leicht entfernen und es brennt nichtsein.
• Entfernen Sie hartnäckige Verschmutzungen mit spe-ziellen Backofenreinigern.
• Reinigen Sie nach jedem Gebrauch alle Zubehörteilemit einem weichen Tuch, das mit warmem Wasser undReinigungsmittel angefeuchtet wurde, und lassen Siesie trocknen.
• Reinigen Sie Zubehörteile mit Antihaftbeschichtungnicht mit aggressiven Reinigungsmitteln, scharfkanti-gen Gegenständen oder im Geschirrspüler. Die Anti-haftbeschichtung kann zerstört werden!
36
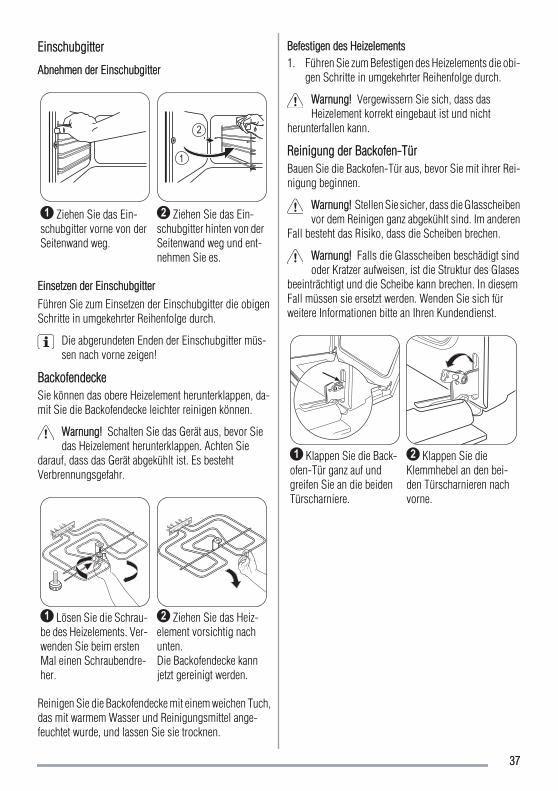
Einschubgitter
Abnehmen der Einschubgitter
1 Ziehen Sie das Ein-schubgitter vorne von derSeitenwand weg.
1
2
2 Ziehen Sie das Ein-schubgitter hinten von derSeitenwand weg und ent-nehmen Sie es.
Einsetzen der EinschubgitterFühren Sie zum Einsetzen der Einschubgitter die obigenSchritte in umgekehrter Reihenfolge durch.
Die abgerundeten Enden der Einschubgitter müs-sen nach vorne zeigen!
BackofendeckeSie können das obere Heizelement herunterklappen, da-mit Sie die Backofendecke leichter reinigen können.
Warnung! Schalten Sie das Gerät aus, bevor Siedas Heizelement herunterklappen. Achten Sie
darauf, dass das Gerät abgekühlt ist. Es bestehtVerbrennungsgefahr.
1 Lösen Sie die Schrau-be des Heizelements. Ver-wenden Sie beim erstenMal einen Schraubendre-her.
2 Ziehen Sie das Heiz-element vorsichtig nachunten.Die Backofendecke kannjetzt gereinigt werden.
Reinigen Sie die Backofendecke mit einem weichen Tuch,das mit warmem Wasser und Reinigungsmittel ange-feuchtet wurde, und lassen Sie sie trocknen.
Befestigen des Heizelements1. Führen Sie zum Befestigen des Heizelements die obi-
gen Schritte in umgekehrter Reihenfolge durch.
Warnung! Vergewissern Sie sich, dass dasHeizelement korrekt eingebaut ist und nicht
herunterfallen kann.
Reinigung der Backofen-TürBauen Sie die Backofen-Tür aus, bevor Sie mit ihrer Rei-nigung beginnen.
Warnung! Stellen Sie sicher, dass die Glasscheibenvor dem Reinigen ganz abgekühlt sind. Im anderen
Fall besteht das Risiko, dass die Scheiben brechen.
Warnung! Falls die Glasscheiben beschädigt sindoder Kratzer aufweisen, ist die Struktur des Glases
beeinträchtigt und die Scheibe kann brechen. In diesemFall müssen sie ersetzt werden. Wenden Sie sich fürweitere Informationen bitte an Ihren Kundendienst.
1 Klappen Sie die Back-ofen-Tür ganz auf undgreifen Sie an die beidenTürscharniere.
2 Klappen Sie dieKlemmhebel an den bei-den Türscharnieren nachvorne.
37
3 Schließen Sie dieBackofen-Tür bis zur ers-ten Raststellung (halbeStellung). Ziehen Sie siedann nach vorn aus derHalterung. Legen Sie dieBackofen-Tür auf eineweiche, ebene Unterlage.
Reinigen Sie die Glasscheibe mit Wasser und Spülmittel.Trocknen Sie sie sorgfältig ab.Setzen Sie nach der Reinigung die Backofen-Tür wiederein. Führen Sie dazu die Schritte in umgekehrter Reihen-folge aus.
Geräte aus Edelstahl oder Aluminium:Reinigen Sie die Backofen-Tür nur mit einem nas-
sen Schwamm. Trocknen Sie sie hinterher mit einem wei-chen Tuch ab.
Verwenden Sie nie Stahlwolle, ätzende Reinigungsmitteloder Scheuermittel, die die Oberfläche des Backofens be-schädigen können. Reinigen Sie die Bedienblende desOfens ebenso vorsichtig.
Backofenlampe
Warnung! Es besteht die Gefahr eines elektrischenSchlags!
Bevor Sie die Backofenlampe austauschen:• Schalten Sie den Backofen aus.• Nehmen Sie die Sicherungen aus dem Sicherungs-
kasten oder legen Sie den Schutzschalter um.
Legen Sie ein Tuch auf den Boden des Backofens,um die Backofenlampe und die Glasabdeckung zu
schützen.
Austauschen der Backofenlampe/Reinigen derGlasabdeckung1. Drehen Sie die Glasabdeckung gegen den Uhrzei-
gersinn und nehmen Sie sie ab.2. Reinigen Sie die Glasabdeckung.3. Ersetzen Sie die Backofenlampe durch eine geeignete
300 °C hitzbeständige Backofenlampe.4. Bringen Sie die Glasabdeckung wieder an.
Was tun, wenn …
Störung Mögliche Ursache Abhilfe
Der Backofen heizt nicht auf Der Backofen ist nicht eingeschaltet Schalten Sie den Ofen ein (siehe Ka-pitel "Täglicher Gebrauch").
Der Backofen heizt nicht auf Die Sicherung im Sicherungskastenhat ausgelöst
Kontrollieren Sie die Sicherung.Falls die Sicherung mehrmals aus-gelöst hat, wenden Sie sich an einenqualifizierten Elektriker.
Die Backofenlampe funktioniert nicht Die Backofenlampe ist defekt Tauschen Sie die Backofenlampe aus
Dampf und Kondenswasser schlagensich auf den Speisen und im Back-ofen nieder
Sie haben die Speisen zu lange imBackofen stehen lassen
Lassen Sie die Speisen nach Been-digung des Gar- oder Backvorgangsnicht länger als 15-20 Minuten imBackofen stehen
Wenn Sie das Problem nicht selbst lösen können, wendenSie sich an Ihren Händler oder Kundendienst.
Halten Sie folgende Angaben bereit, damit man Ihnenschnell und korrekt helfen kann: Diese Angaben findenSie auf dem Typenschild (siehe "Produktbeschreibung").• Modellbezeichnung ........................................
38
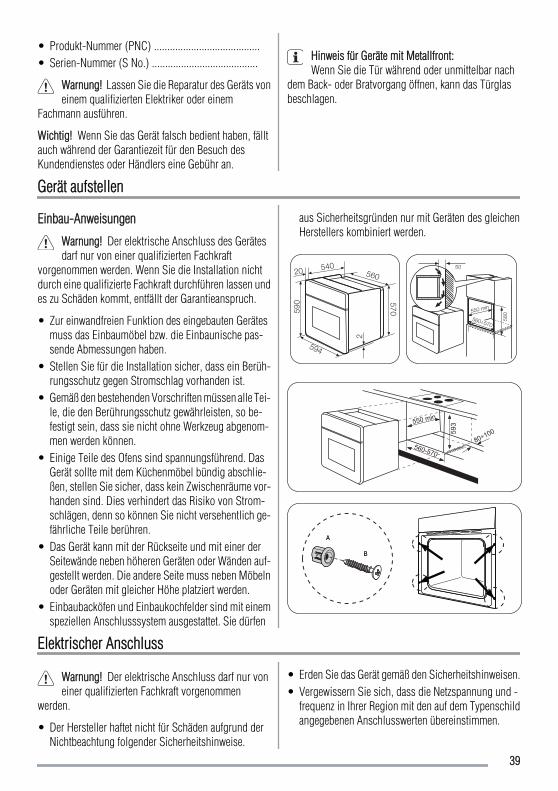
• Produkt-Nummer (PNC) ........................................• Serien-Nummer (S No.) ........................................
Warnung! Lassen Sie die Reparatur des Geräts voneinem qualifizierten Elektriker oder einem
Fachmann ausführen.
Wichtig! Wenn Sie das Gerät falsch bedient haben, fälltauch während der Garantiezeit für den Besuch desKundendienstes oder Händlers eine Gebühr an.
Hinweis für Geräte mit Metallfront:Wenn Sie die Tür während oder unmittelbar nach
dem Back- oder Bratvorgang öffnen, kann das Türglasbeschlagen.
Gerät aufstellen
Einbau-Anweisungen
Warnung! Der elektrische Anschluss des Gerätesdarf nur von einer qualifizierten Fachkraft
vorgenommen werden. Wenn Sie die Installation nichtdurch eine qualifizierte Fachkraft durchführen lassen undes zu Schäden kommt, entfällt der Garantieanspruch.
• Zur einwandfreien Funktion des eingebauten Gerätesmuss das Einbaumöbel bzw. die Einbaunische pas-sende Abmessungen haben.
• Stellen Sie für die Installation sicher, dass ein Berüh-rungsschutz gegen Stromschlag vorhanden ist.
• Gemäß den bestehenden Vorschriften müssen alle Tei-le, die den Berührungsschutz gewährleisten, so be-festigt sein, dass sie nicht ohne Werkzeug abgenom-men werden können.
• Einige Teile des Ofens sind spannungsführend. DasGerät sollte mit dem Küchenmöbel bündig abschlie-ßen, stellen Sie sicher, dass kein Zwischenräume vor-handen sind. Dies verhindert das Risiko von Strom-schlägen, denn so können Sie nicht versehentlich ge-fährliche Teile berühren.
• Das Gerät kann mit der Rückseite und mit einer derSeitewände neben höheren Geräten oder Wänden auf-gestellt werden. Die andere Seite muss neben Möbelnoder Geräten mit gleicher Höhe platziert werden.
• Einbaubacköfen und Einbaukochfelder sind mit einemspeziellen Anschlusssystem ausgestattet. Sie dürfen
aus Sicherheitsgründen nur mit Geräten des gleichenHerstellers kombiniert werden.
5942
20
570590
540560
50
580550 min
560÷570
550 min
593
560-570
80÷100
A
B
Elektrischer Anschluss
Warnung! Der elektrische Anschluss darf nur voneiner qualifizierten Fachkraft vorgenommen
werden.
• Der Hersteller haftet nicht für Schäden aufgrund derNichtbeachtung folgender Sicherheitshinweise.
• Erden Sie das Gerät gemäß den Sicherheitshinweisen.• Vergewissern Sie sich, dass die Netzspannung und -
frequenz in Ihrer Region mit den auf dem Typenschildangegebenen Anschlusswerten übereinstimmen.
39
• Das Gerät wird mit Netzkabel, aber ohne Netzsteckergeliefert.
• Elektrische Bauteile dürfen nur vom Kundendienstoder von einer kompetenten Fachkraft installiert oderausgewechselt werden.
• Schließen Sie das Gerät nur an eine sachgemäß in-stallierte Schutzkontaktsteckdose an.
• Verwenden Sie keine Mehrfachsteckdosen, Steckver-binder oder Verlängerungskabel. Andernfalls bestehtFeuergefahr.
• Wählen Sie eine Steckdose, die auch nach der Instal-lation des Geräts noch zugänglich ist.
• Ziehen Sie nicht am Netzkabel, wenn Sie das Gerät vonder Netzversorgung trennen möchten. Ziehen Sie im-mer den Netzstecker.
• In der elektrischen Installation ist eine Einrichtungvorzusehen, die es ermöglicht, das Gerät mit einerKontaktöffnungsweite von mindestens 3 mm allpoligvom Netz zu trennen (z.B. LS-Schalter, Sicherungen).
• Angaben zur Spannung finden Sie auf dem Typen-schild (siehe "Produktbeschreibung").
Umwelttipps
Das Symbol auf dem Produkt oder seiner Verpackungweist darauf hin, dass dieses Produkt nicht als normalerHaushaltsabfall zu behandeln ist, sondern an einemSammelpunkt für das Recycling von elektrischen undelektronischen Geräten abgegeben werden muss. DurchIhren Beitrag zum korrekten Entsorgen dieses Produktsschützen Sie die Umwelt und die Gesundheit IhrerMitmenschen. Umwelt und Gesundheit werden durchfalsches Entsorgen gefährdet. Weitere Informationen überdas Recycling dieses Produkts erhalten Sie von IhremRathaus, Ihrer Müllabfuhr oder dem Geschäft, in dem Siedas Produkt gekauft haben.
VerpackungsmaterialienDie Materialien mit dem Symbol sind wiederverwert-bar. Bitte entsorgen Sie das Verpackungsmaterial in ge-eigneten Recycling-Sammelbehältern.
Entsorgung des Gerätes1. Trennen Sie den Netzstecker von der Netzversorgung.2. Schneiden Sie das Netzkabel ab und entsorgen Sie
es.3. Entfernen Sie die Türverriegelung und entsorgen Sie
sie. Dadurch verhindern Sie, dass sich Kinder imGerät einsperren können. Es besteht Erstickungsge-fahr.
40
ÍndiceInformações de segurança _ _ _ _ _ _ _ _ _ _ _ _ 41Antes da primeira utilização _ _ _ _ _ _ _ _ _ _ _ 42Descrição do produto _ _ _ _ _ _ _ _ _ _ _ _ _ _ 42Utilização diária _ _ _ _ _ _ _ _ _ _ _ _ _ _ _ _ _ 43Sugestões e conselhos úteis _ _ _ _ _ _ _ _ _ _ _ 44Tabela de cozedura _ _ _ _ _ _ _ _ _ _ _ _ _ _ _ 44
Manutenção e limpeza _ _ _ _ _ _ _ _ _ _ _ _ _ _ 46O que fazer se… _ _ _ _ _ _ _ _ _ _ _ _ _ _ _ _ 48Instalação _ _ _ _ _ _ _ _ _ _ _ _ _ _ _ _ _ _ _ _ 48Ligação eléctrica _ _ _ _ _ _ _ _ _ _ _ _ _ _ _ _ _ 49Preocupações ambientais _ _ _ _ _ _ _ _ _ _ _ _ 49
Sujeito a alterações sem aviso prévio
Informações de segurança
Para a sua segurança e funcionamento correcto doaparelho, leia atentamente este manual antes da
instalação e utilização. Guarde sempre estas instruçõescom o aparelho, mesmo que o desloque ou venda. Osutilizadores têm de ter um conhecimento total do funcio-namento e das funcionalidades de seguranças do apare-lho.
Utilização correcta• Não abandone o aparelho durante o funcionamento.• O aparelho destina-se exclusivamente a utilização do-
méstica.• O aparelho não pode ser utilizado como uma superfície
de trabalho ou superfície de armazenamento.• Não coloque nem guarde líquidos inflamáveis, mate-
riais altamente inflamáveis ou objectos fusíveis (porexemplo, película em plástico, plástico, alumínio) so-bre ou perto do aparelho.
• Tenha cuidado ao ligar aparelhos eléctricos a tomadasna proximidade. Não permita que as fichas de ligaçãoentrem em contacto ou fiquem presas por baixo daporta do forno quente.
• Não guarde pratos húmidos e alimentos no forno apósterminar a confecção, uma vez que a humidade podedanificar o esmalte ou penetrar nas unidades.
• Não efectue reparações sozinho para evitar ferimentose danos no aparelho. Contacte sempre o seu Centrode Assistência local.
• Não utilize raspadores abrasivos ou de metal pontia-gudos para limpar o vidro da porta do forno, uma vezque podem arranhar a superfície, o que pode resultarna quebra do vidro.
Nota sobre o revestimento de esmalteAs alterações na cor do revestimento de esmalte do
forno como resultado da utilização, não afectam a aptidão
do aparelho para uma utilização normal e correcta. Porisso, não constituem um defeito ao abrigo da lei da ga-rantia.
Segurança para crianças• O aparelho só pode ser utilizado por adultos. As cri-
anças devem ser vigiadas para garantir que não brin-cam com o aparelho.
• Mantenha as embalagens fora do alcance das crianças.Existe o risco de asfixia.
• Mantenha as crianças afastadas do aparelho quandoeste está em funcionamento. As partes alcançáveispodem ficar muito quentes durante a utilização. Existerisco de queimaduras.
Segurança geral• Este aparelho não se destina à utilização por pessoas
(incluindo crianças) com capacidades físicas, senso-riais ou mentais reduzidas ou falta de experiência econhecimento, a menos que tenham supervisão ouformação relativamente à utilização do aparelho poruma pessoa responsável pela sua segurança.
• O lado interior do aparelho fica muito quente durantea utilização. Tenha cuidado e não toque em quaisquerelementos de aquecimento. Existe risco de queima-duras.
• Afaste-se sempre do aparelho quando abrir a porta doforno durante a confecção ou na extremidade da portapara permitir a libertação de qualquer vapor ou caloracumulado.
Instalação• Certifique-se de que o aparelho não está danificado
devido ao transporte. Não ligue um aparelho danifi-cado. Se necessário, contacte o fornecedor.
41
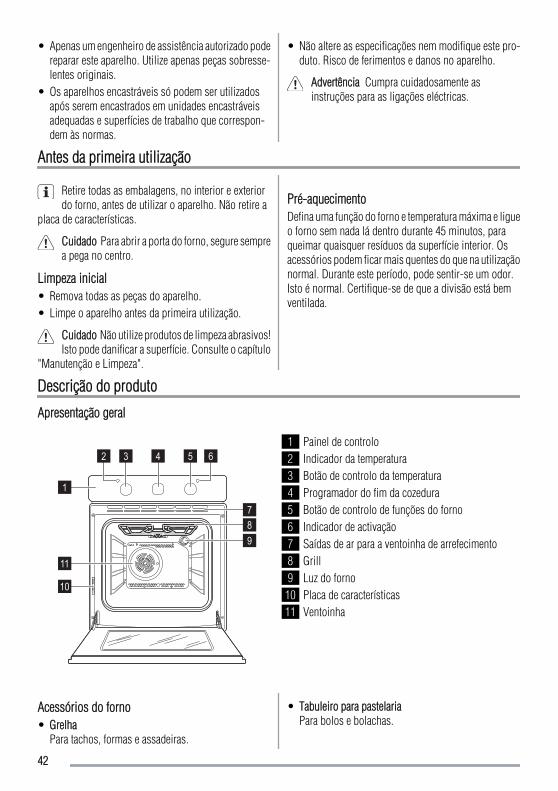
• Apenas um engenheiro de assistência autorizado podereparar este aparelho. Utilize apenas peças sobresse-lentes originais.
• Os aparelhos encastráveis só podem ser utilizadosapós serem encastrados em unidades encastráveisadequadas e superfícies de trabalho que correspon-dem às normas.
• Não altere as especificações nem modifique este pro-duto. Risco de ferimentos e danos no aparelho.
Advertência Cumpra cuidadosamente asinstruções para as ligações eléctricas.
Antes da primeira utilização
Retire todas as embalagens, no interior e exteriordo forno, antes de utilizar o aparelho. Não retire a
placa de características.
Cuidado Para abrir a porta do forno, segure semprea pega no centro.
Limpeza inicial• Remova todas as peças do aparelho.• Limpe o aparelho antes da primeira utilização.
Cuidado Não utilize produtos de limpeza abrasivos!Isto pode danificar a superfície. Consulte o capítulo
"Manutenção e Limpeza".
Pré-aquecimentoDefina uma função do forno e temperatura máxima e ligueo forno sem nada lá dentro durante 45 minutos, paraqueimar quaisquer resíduos da superfície interior. Osacessórios podem ficar mais quentes do que na utilizaçãonormal. Durante este período, pode sentir-se um odor.Isto é normal. Certifique-se de que a divisão está bemventilada.
Descrição do produto
Apresentação geral
1
2 3 4 5 6
789
10
11
1 Painel de controlo2 Indicador da temperatura3 Botão de controlo da temperatura4 Programador do fim da cozedura5 Botão de controlo de funções do forno6 Indicador de activação7 Saídas de ar para a ventoinha de arrefecimento8 Grill9 Luz do forno
10 Placa de características11 Ventoinha
Acessórios do forno• Grelha
Para tachos, formas e assadeiras.
• Tabuleiro para pastelariaPara bolos e bolachas.
42
• Tabuleiro para assar Para cozer e assar ou para recolher a gordura.
Utilização diária
Ligar e Desligar o Forno1. Rode o botão de controlo de funções do forno para a
função desejada.2. Rode o botão de controlo da temperatura para uma
determinada temperatura.O indicador de potência acende-se com o forno emfuncionamento.O indicador de temperatura acende-se quando a tem-peratura do forno aumenta.
3. Para desligar o forno, rode o botão de controlo defunções do forno e o botão de controlo da tempera-tura para a posição Off.
Programador do fim da cozeduraUse-o para definir a hora a que se deverá desligar umadeterminada função do forno.1. Defina uma função do forno e a temperatura.2. Rode o botão de controlo do programador do fim da
cozedura (consulte "Descrição do produto") até ao
limite máximo. Depois disso, rode-o para o períodode tempo desejado.
3. Depois de decorrido o tempo regulado, é emitido umsinal sonoro e o forno desliga-se.
Para definir o forno para o funcionamento manual,rode o botão de controlo do programador do fim da
cozedura para .
Ventoinha de arrefecimentoQuando o aparelho começa a funcionar, a ventoinha dearrefecimento liga-se automaticamente para manter assuperfícies frias. Se desligar o aparelho, a ventoinha dearrefecimento pára.
Termóstato de segurançaPara evitar um sobreaquecimento perigoso (devido à uti-lização incorrecta do aparelho ou componentes com de-feitos), o forno tem um termóstato de segurança, que in-terrompe a fonte de alimentação. O forno torna a ligar-seautomaticamente, quando a temperatura desce.
Funções do forno
Função do forno Utilização
Posição OFF O aparelho está desligado.
Resistência inferior Aquece apenas a base do forno. Para cozer bolos com bases estaladiças.
PizzaA resistência inferior fornece um calor directo à base das pizzas, quiches ou tartes,enquanto que a ventoinha assegura a circulação do ar para cozer o recheio das
pizzas ou tartes.
Grill A resistência do grill está ligada. Para grelhar alimentos planos em grandesquantidades. Para fazer tostas.
Grill interno Para grelhar pequenas quantidades de alimentos planos no centro do tabuleiro.Para fazer tostas.
Cozedura ventilada Para assar ou assar e cozer os alimentos que requerem a mesma temperatura decozedura, usando mais do que um tabuleiro, sem transferência de sabores.
Cozedura convencio-nal Aquece a resistência superior e inferior. Para cozer e assar num único nível.
43
Sugestões e conselhos úteis
Advertência Feche sempre a porta do forno quandocozinha, mesmo quando grelha.
Não coloque tabuleiros, recipientes, etc. no fundodo forno, a fim de evitar danificar o esmalte do forno.
Tenha cuidado quando retira ou instala os acessó-rios para evitar danos no esmalte do forno.
• O forno tem quatro níveis de grelha. Conte os níveisde grelha a partir da parte inferior do forno.
• É possível confeccionar pratos diferentes em dois ní-veis ao mesmo tempo. Coloque as grelhas no nível 1e 3.
• O forno é fornecido com um sistema especial que cir-cula o ar e recicla constantemente o vapor. Este sis-tema permite confeccionar num ambiente com vapore manter os alimentos fofos por dentro e estaladiçospor fora. Reduz o tempo de confecção e o consumo deenergia a um mínimo.
• A humidade pode condensar no interior do aparelhoou nas portas de vidro. Isto é normal. Afaste-se sempredo aparelho quando abrir a porta do forno enquantoconfecciona. Para reduzir a condensação, ligue o fornodurante 10 minutos antes de confeccionar.
• Limpe a humidade após cada utilização do aparelho.
Cozer bolos• A melhor temperatura para cozer bolos é entre 150 °C
e 200 °C.• Pré-aqueça o forno durante aproximadamente 10 mi-
nutos antes de cozer.
• Não abra a porta do forno antes de se esgotarem 3/4do tempo de confecção definido.
• Se utilizar dois tabuleiros ao mesmo tempo, deixe umnível vazio entre os tabuleiros.
Confeccionar carne e peixe• Não confeccione carne com um peso inferior a 1 kg.
Confeccionar quantidades demasiado pequenas tornaa carne muito seca.
• Para manter a carne vermelha bem confeccionada noexterior e suculenta no interior, defina a temperaturaentre 200 °C-250 °C.
• Para carne branca, aves e peixe, defina a temperaturaentre 150°C-175°C.
• Utilize um tabuleiro de recolha para todos os alimentosgordurosos para evitar que o forno ganhe manchaspermanentes,
• Deixe a carne durante aproximadamente 15 minutosantes de trinchar para que não fique seca.
• Para evitar demasiado fumo no forno durante o assado,acrescente alguma água no tabuleiro de recolha. Paraevitar a condensação de fumo, acrescente água sempreque secar.
Tempos de confecçãoOs tempos de confecção dependem do tipo de alimentos,consistência e volume.Inicialmente, controle o desempenho quando confeccio-na. Encontre as melhores definições (grau de cozedura,tempo de confecção, etc.) para os seus utensílios, receitase quantidades quando utilizar este aparelho.
Tabela de cozedura
Peso (kg) Alimentos Função do forno Nível Temperaturado forno (°C)
Tempo de co-zedura (min)
1 Porco/borrego 2 180 100-110
1 Vitela/Vaca 2 190 70-100
1,2 Frango/Coelho 2 200 70-80
1,5 Pato 1 160 120-150
3 Ganso 1 160 150-200
4 Peru 1 180 210-240
44
Peso (kg) Alimentos Função do forno Nível Temperaturado forno (°C)
Tempo de co-zedura (min)
1 Peixe 2 190 30-40
1Pimentos e toma-tes recheados/Ba-
tatas assadas2 190 50-70
Bolos instantâneos 2 160 45-55
1 Tartes 2 160 80-100
Pastelaria pequena 3 140 25-35
2 Lasanha 2 180 45-60
1 Pão branco 2 190 50-60
1 Pizza 1 190 25-35
Grelhar
Aqueça previamente o forno vazio durante 10 mi-nutos, antes de cozinhar.
Quantidade Grelhar Tempo de cozedura em minu-tos
TIPO DE PRATO Unidades g nível Temp. (°C) 1.º lado 2.º lado
Bifes do lombo 4 800 3 250 12-15 12-14
Bifes de vaca 4 600 3 250 10-12 6-8
Salsichas 8 / 3 250 12-15 10-12
Costeletas de porco 4 600 3 250 12-16 12-14
Frango (cortado aomeio)
2 1000 3 250 30-35 25-30
Espetadas 4 / 3 250 10-15 10-12
Peito de frango 4 400 3 250 12-15 12-14
Hambúrguer 6 600 3 250 20-30
Filetes de peixe 4 400 3 250 12-14 10-12
Tostas 4-6 / 3 250 5-7 /
Torradas 4-6 / 3 250 2-4 2-3
Pizza
Aqueça previamente o forno vazio durante 10 mi-nutos, antes de cozinhar.
45
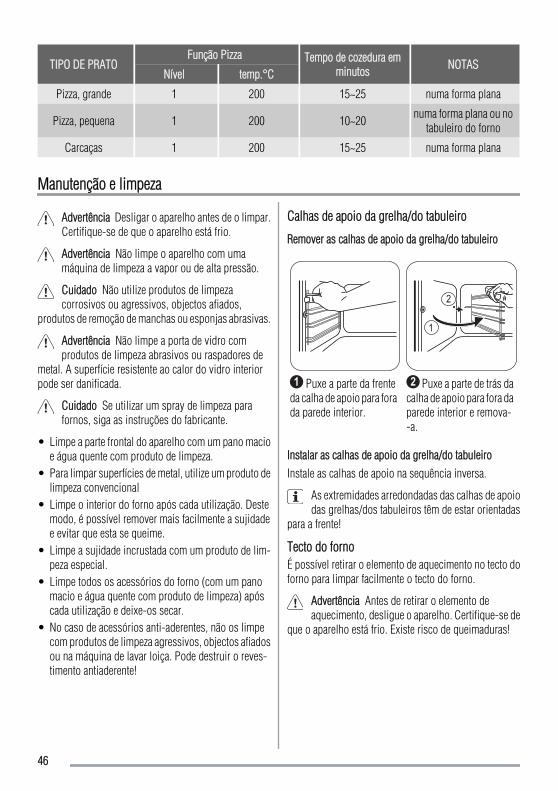
TIPO DE PRATOFunção Pizza Tempo de cozedura em
minutos NOTASNível temp.°C
Pizza, grande 1 200 15~25 numa forma plana
Pizza, pequena 1 200 10~20 numa forma plana ou notabuleiro do forno
Carcaças 1 200 15~25 numa forma plana
Manutenção e limpeza
Advertência Desligar o aparelho antes de o limpar.Certifique-se de que o aparelho está frio.
Advertência Não limpe o aparelho com umamáquina de limpeza a vapor ou de alta pressão.
Cuidado Não utilize produtos de limpezacorrosivos ou agressivos, objectos afiados,
produtos de remoção de manchas ou esponjas abrasivas.
Advertência Não limpe a porta de vidro comprodutos de limpeza abrasivos ou raspadores de
metal. A superfície resistente ao calor do vidro interiorpode ser danificada.
Cuidado Se utilizar um spray de limpeza parafornos, siga as instruções do fabricante.
• Limpe a parte frontal do aparelho com um pano macioe água quente com produto de limpeza.
• Para limpar superfícies de metal, utilize um produto delimpeza convencional
• Limpe o interior do forno após cada utilização. Destemodo, é possível remover mais facilmente a sujidadee evitar que esta se queime.
• Limpe a sujidade incrustada com um produto de lim-peza especial.
• Limpe todos os acessórios do forno (com um panomacio e água quente com produto de limpeza) apóscada utilização e deixe-os secar.
• No caso de acessórios anti-aderentes, não os limpecom produtos de limpeza agressivos, objectos afiadosou na máquina de lavar loiça. Pode destruir o reves-timento antiaderente!
Calhas de apoio da grelha/do tabuleiro
Remover as calhas de apoio da grelha/do tabuleiro
1 Puxe a parte da frenteda calha de apoio para forada parede interior.
1
2
2 Puxe a parte de trás dacalha de apoio para fora daparede interior e remova--a.
Instalar as calhas de apoio da grelha/do tabuleiroInstale as calhas de apoio na sequência inversa.
As extremidades arredondadas das calhas de apoiodas grelhas/dos tabuleiros têm de estar orientadas
para a frente!
Tecto do fornoÉ possível retirar o elemento de aquecimento no tecto doforno para limpar facilmente o tecto do forno.
Advertência Antes de retirar o elemento deaquecimento, desligue o aparelho. Certifique-se de
que o aparelho está frio. Existe risco de queimaduras!
46
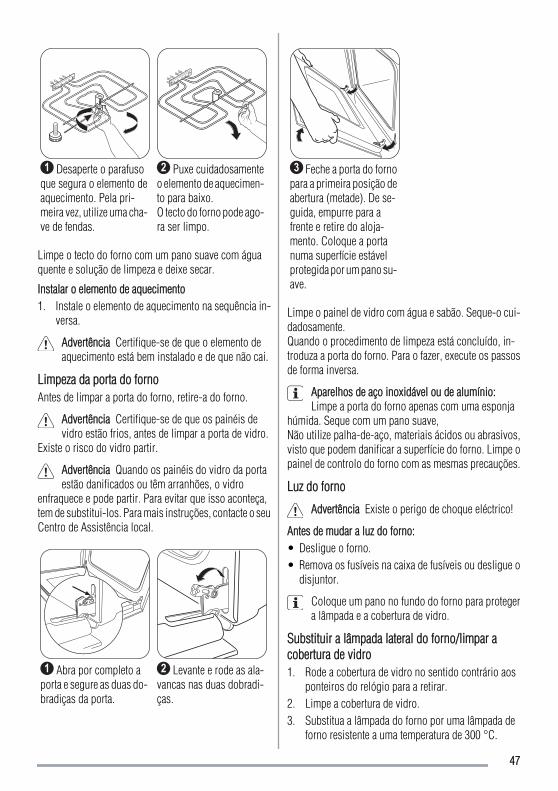
1 Desaperte o parafusoque segura o elemento deaquecimento. Pela pri-meira vez, utilize uma cha-ve de fendas.
2 Puxe cuidadosamenteo elemento de aquecimen-to para baixo.O tecto do forno pode ago-ra ser limpo.
Limpe o tecto do forno com um pano suave com águaquente e solução de limpeza e deixe secar.
Instalar o elemento de aquecimento1. Instale o elemento de aquecimento na sequência in-
versa.
Advertência Certifique-se de que o elemento deaquecimento está bem instalado e de que não cai.
Limpeza da porta do fornoAntes de limpar a porta do forno, retire-a do forno.
Advertência Certifique-se de que os painéis devidro estão frios, antes de limpar a porta de vidro.
Existe o risco do vidro partir.
Advertência Quando os painéis do vidro da portaestão danificados ou têm arranhões, o vidro
enfraquece e pode partir. Para evitar que isso aconteça,tem de substitui-los. Para mais instruções, contacte o seuCentro de Assistência local.
1 Abra por completo aporta e segure as duas do-bradiças da porta.
2 Levante e rode as ala-vancas nas duas dobradi-ças.
3 Feche a porta do fornopara a primeira posição deabertura (metade). De se-guida, empurre para afrente e retire do aloja-mento. Coloque a portanuma superfície estávelprotegida por um pano su-ave.
Limpe o painel de vidro com água e sabão. Seque-o cui-dadosamente.Quando o procedimento de limpeza está concluído, in-troduza a porta do forno. Para o fazer, execute os passosde forma inversa.
Aparelhos de aço inoxidável ou de alumínio:Limpe a porta do forno apenas com uma esponja
húmida. Seque com um pano suave,Não utilize palha-de-aço, materiais ácidos ou abrasivos,visto que podem danificar a superfície do forno. Limpe opainel de controlo do forno com as mesmas precauções.
Luz do forno
Advertência Existe o perigo de choque eléctrico!
Antes de mudar a luz do forno:• Desligue o forno.• Remova os fusíveis na caixa de fusíveis ou desligue o
disjuntor.
Coloque um pano no fundo do forno para protegera lâmpada e a cobertura de vidro.
Substituir a lâmpada lateral do forno/limpar acobertura de vidro1. Rode a cobertura de vidro no sentido contrário aos
ponteiros do relógio para a retirar.2. Limpe a cobertura de vidro.3. Substitua a lâmpada do forno por uma lâmpada de
forno resistente a uma temperatura de 300 °C.
47
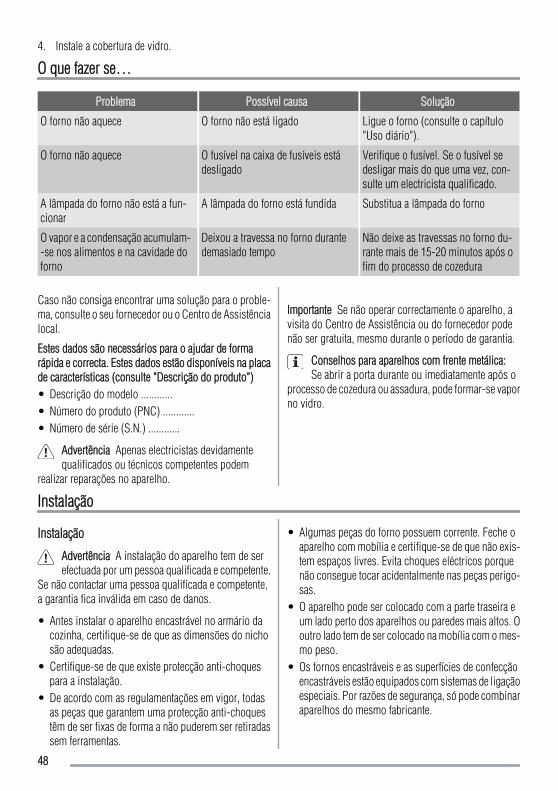
4. Instale a cobertura de vidro.
O que fazer se…
Problema Possível causa Solução
O forno não aquece O forno não está ligado Ligue o forno (consulte o capítulo"Uso diário").
O forno não aquece O fusível na caixa de fusíveis estádesligado
Verifique o fusível. Se o fusível sedesligar mais do que uma vez, con-sulte um electricista qualificado.
A lâmpada do forno não está a fun-cionar
A lâmpada do forno está fundida Substitua a lâmpada do forno
O vapor e a condensação acumulam--se nos alimentos e na cavidade doforno
Deixou a travessa no forno durantedemasiado tempo
Não deixe as travessas no forno du-rante mais de 15-20 minutos após ofim do processo de cozedura
Caso não consiga encontrar uma solução para o proble-ma, consulte o seu fornecedor ou o Centro de Assistêncialocal.
Estes dados são necessários para o ajudar de formarápida e correcta. Estes dados estão disponíveis na placade características (consulte "Descrição do produto")• Descrição do modelo ............• Número do produto (PNC) ............• Número de série (S.N.) ............
Advertência Apenas electricistas devidamentequalificados ou técnicos competentes podem
realizar reparações no aparelho.
Importante Se não operar correctamente o aparelho, avisita do Centro de Assistência ou do fornecedor podenão ser gratuita, mesmo durante o período de garantia.
Conselhos para aparelhos com frente metálica:Se abrir a porta durante ou imediatamente após o
processo de cozedura ou assadura, pode formar-se vaporno vidro.
Instalação
Instalação
Advertência A instalação do aparelho tem de serefectuada por um pessoa qualificada e competente.
Se não contactar uma pessoa qualificada e competente,a garantia fica inválida em caso de danos.
• Antes instalar o aparelho encastrável no armário dacozinha, certifique-se de que as dimensões do nichosão adequadas.
• Certifique-se de que existe protecção anti-choquespara a instalação.
• De acordo com as regulamentações em vigor, todasas peças que garantem uma protecção anti-choquestêm de ser fixas de forma a não puderem ser retiradassem ferramentas.
• Algumas peças do forno possuem corrente. Feche oaparelho com mobília e certifique-se de que não exis-tem espaços livres. Evita choques eléctricos porquenão consegue tocar acidentalmente nas peças perigo-sas.
• O aparelho pode ser colocado com a parte traseira eum lado perto dos aparelhos ou paredes mais altos. Ooutro lado tem de ser colocado na mobília com o mes-mo peso.
• Os fornos encastráveis e as superfícies de confecçãoencastráveis estão equipados com sistemas de ligaçãoespeciais. Por razões de segurança, só pode combinaraparelhos do mesmo fabricante.
48
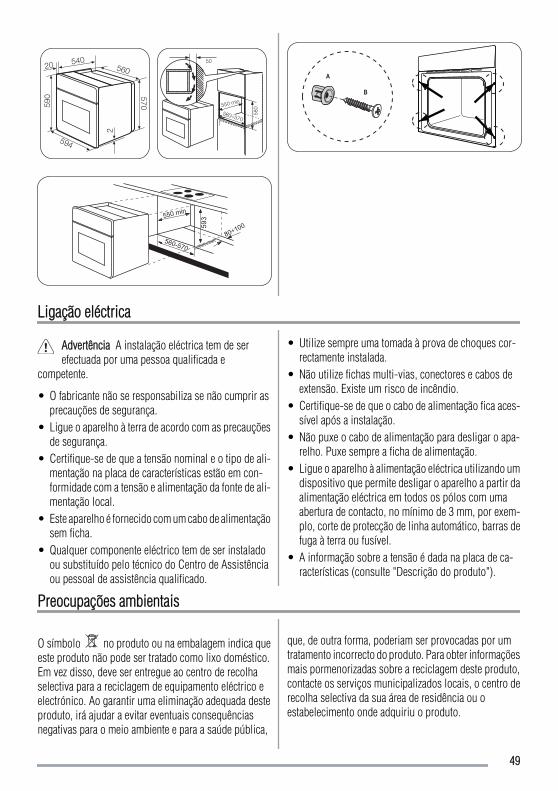
594
2
20
570590
540560
50
580550 min
560÷570
550 min59
3
560-570
80÷100
A
B
Ligação eléctrica
Advertência A instalação eléctrica tem de serefectuada por uma pessoa qualificada e
competente.
• O fabricante não se responsabiliza se não cumprir asprecauções de segurança.
• Ligue o aparelho à terra de acordo com as precauçõesde segurança.
• Certifique-se de que a tensão nominal e o tipo de ali-mentação na placa de características estão em con-formidade com a tensão e alimentação da fonte de ali-mentação local.
• Este aparelho é fornecido com um cabo de alimentaçãosem ficha.
• Qualquer componente eléctrico tem de ser instaladoou substituído pelo técnico do Centro de Assistênciaou pessoal de assistência qualificado.
• Utilize sempre uma tomada à prova de choques cor-rectamente instalada.
• Não utilize fichas multi-vias, conectores e cabos deextensão. Existe um risco de incêndio.
• Certifique-se de que o cabo de alimentação fica aces-sível após a instalação.
• Não puxe o cabo de alimentação para desligar o apa-relho. Puxe sempre a ficha de alimentação.
• Ligue o aparelho à alimentação eléctrica utilizando umdispositivo que permite desligar o aparelho a partir daalimentação eléctrica em todos os pólos com umaabertura de contacto, no mínimo de 3 mm, por exem-plo, corte de protecção de linha automático, barras defuga à terra ou fusível.
• A informação sobre a tensão é dada na placa de ca-racterísticas (consulte "Descrição do produto").
Preocupações ambientais
O símbolo no produto ou na embalagem indica queeste produto não pode ser tratado como lixo doméstico.Em vez disso, deve ser entregue ao centro de recolhaselectiva para a reciclagem de equipamento eléctrico eelectrónico. Ao garantir uma eliminação adequada desteproduto, irá ajudar a evitar eventuais consequênciasnegativas para o meio ambiente e para a saúde pública,
que, de outra forma, poderiam ser provocadas por umtratamento incorrecto do produto. Para obter informaçõesmais pormenorizadas sobre a reciclagem deste produto,contacte os serviços municipalizados locais, o centro derecolha selectiva da sua área de residência ou oestabelecimento onde adquiriu o produto.
49
Materiais de embalagemOs materiais com o símbolo são recicláveis. Elimineas embalagens em contentores de recolha adequadospara reciclá-las.
Eliminação do aparelho1. Desligue a ficha de alimentação da tomada de ali-
mentação.
2. Corte o cabo de alimentação e elimine-o.3. Elimine o trinco da porta. Isto evita que as crianças
fiquem trancadas no interior do aparelho. Existe orisco de asfixia.
50
Índice de materiasInformación sobre seguridad _ _ _ _ _ _ _ _ _ _ _ 51Antes del primer uso _ _ _ _ _ _ _ _ _ _ _ _ _ _ _ 52Descripción del producto _ _ _ _ _ _ _ _ _ _ _ _ 52Uso diario _ _ _ _ _ _ _ _ _ _ _ _ _ _ _ _ _ _ _ _ 53Consejos útiles _ _ _ _ _ _ _ _ _ _ _ _ _ _ _ _ _ 54Tablas de cocción _ _ _ _ _ _ _ _ _ _ _ _ _ _ _ _ 54
Mantenimiento y limpieza _ _ _ _ _ _ _ _ _ _ _ _ 56Qué hacer si… _ _ _ _ _ _ _ _ _ _ _ _ _ _ _ _ _ 58Instalación _ _ _ _ _ _ _ _ _ _ _ _ _ _ _ _ _ _ _ 58Conexión eléctrica _ _ _ _ _ _ _ _ _ _ _ _ _ _ _ _ 59Aspectos medioambientales _ _ _ _ _ _ _ _ _ _ _ 59
Salvo modificaciones
Información sobre seguridad
Por su seguridad y para garantizar el funciona-miento correcto del aparato, antes de instalarlo y
utilizarlo por primera vez lea atentamente este manual.Conserve siempre estas instrucciones con el aparato,aunque lo cambie de lugar o lo venda. Los usuarios debenconocer a la perfección el funcionamiento y las caracte-rísticas de seguridad del aparato.
Uso correcto• No deje nunca el aparato sin la debida vigilancia.• Este aparato se ha diseñado para uso doméstico ex-
clusivamente.• No utilice el electrodoméstico como superficie de tra-
bajo ni para depositar objetos.• No coloque ni guarde líquidos inflamables, materiales
altamente inflamables ni objetos que pueda fundirse(por ejemplo, plástico o papel transparente o de alu-minio) encima o cerca del aparato.
• Tenga cuidado al conectar aparatos eléctricos en losenchufes situados cerca del electrodoméstico. No per-mita que los cables eléctricos entren en contacto conla puerta del horno caliente ni queden atrapados bajoésta.
• No guarde platos ni alimentos calientes en el hornocuanto termine de cocinarlos, ya que el vapor puededañar el esmalte y filtrarse en las unidades.
• Para evitar lesiones personales y daños al aparato, nointente repararlo por sus medios. Póngase siempre encontacto con el centro de servicio local.
• No utilice limpiadores abrasivos ásperos ni rascadoresde metal afilado para limpiar el cristal de la puerta delhorno si no quiere arañar su superficie, lo que podríahacer que el cristal se hiciese añicos.
Nota sobre el revestimiento de esmalteEl cambio de color del esmalte del horno debido al
uso no impide que el aparato funcione de forma correctay normal. Tampoco se puede considerar un defecto quecubra la garantía.
Seguridad para niños• Este aparato sólo debe ser utilizado por personas adul-
tas. No descuide la supervisión de los niños ni permitaque jueguen con el aparato.
• Mantenga todo el material de embalaje alejado de losniños. Existe riesgo de asfixia.
• Mantenga a los niños alejados del aparato mientrasesté funcionando. Las piezas accesibles se calientanmucho durante el funcionamiento y pueden provocarquemaduras.
Normas generales de seguridad• Este electrodoméstico no está diseñado para que lo
usen personas (incluidos niños) con discapacidad fí-sica, sensorial o mental, o con experiencia y conoci-miento insuficientes, a menos que una persona res-ponsable de su seguridad les supervise o les instruyaen el uso del electrodoméstico.
• El interior del aparato se calienta mucho durante el uso.Preste atención y no toque las resistencias. Puedenprovocar quemaduras.
• Retírese siempre del horno cuando abra su puertamientras cocina o cuando acabe a fin de eliminar lasacumulaciones de vapor o calor.
Instalación• Asegúrese de que el aparato no ha sufrido daños du-
rante el transporte. No conecte el aparato si observaalgún daño. En caso necesario, póngase en contactocon el proveedor.
51
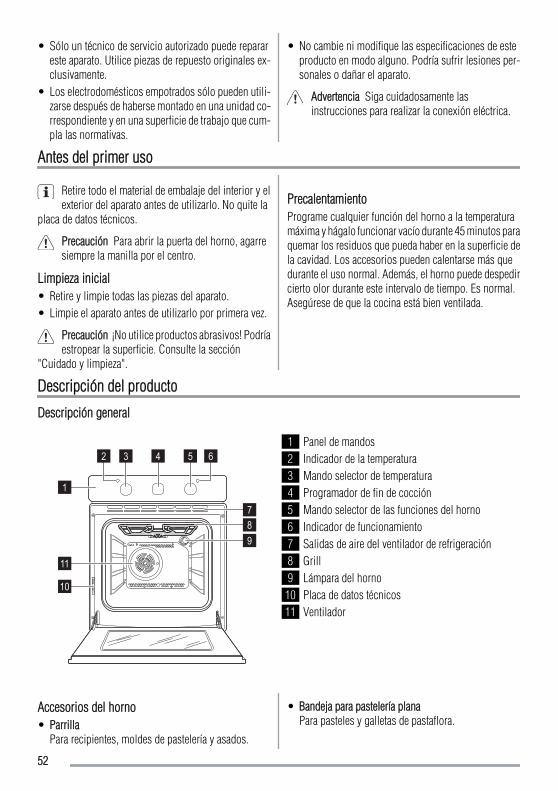
• Sólo un técnico de servicio autorizado puede reparareste aparato. Utilice piezas de repuesto originales ex-clusivamente.
• Los electrodomésticos empotrados sólo pueden utili-zarse después de haberse montado en una unidad co-rrespondiente y en una superficie de trabajo que cum-pla las normativas.
• No cambie ni modifique las especificaciones de esteproducto en modo alguno. Podría sufrir lesiones per-sonales o dañar el aparato.
Advertencia Siga cuidadosamente lasinstrucciones para realizar la conexión eléctrica.
Antes del primer uso
Retire todo el material de embalaje del interior y elexterior del aparato antes de utilizarlo. No quite la
placa de datos técnicos.
Precaución Para abrir la puerta del horno, agarresiempre la manilla por el centro.
Limpieza inicial• Retire y limpie todas las piezas del aparato.• Limpie el aparato antes de utilizarlo por primera vez.
Precaución ¡No utilice productos abrasivos! Podríaestropear la superficie. Consulte la sección
"Cuidado y limpieza".
PrecalentamientoPrograme cualquier función del horno a la temperaturamáxima y hágalo funcionar vacío durante 45 minutos paraquemar los residuos que pueda haber en la superficie dela cavidad. Los accesorios pueden calentarse más quedurante el uso normal. Además, el horno puede despedircierto olor durante este intervalo de tiempo. Es normal.Asegúrese de que la cocina está bien ventilada.
Descripción del producto
Descripción general
1
2 3 4 5 6
789
10
11
1 Panel de mandos2 Indicador de la temperatura3 Mando selector de temperatura4 Programador de fin de cocción5 Mando selector de las funciones del horno6 Indicador de funcionamiento7 Salidas de aire del ventilador de refrigeración8 Grill9 Lámpara del horno
10 Placa de datos técnicos11 Ventilador
Accesorios del horno• Parrilla
Para recipientes, moldes de pastelería y asados.
• Bandeja para pastelería planaPara pasteles y galletas de pastaflora.
52
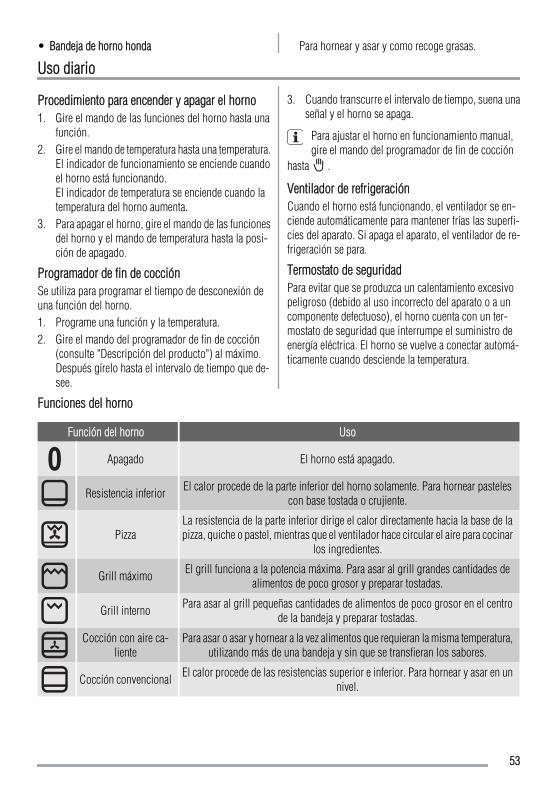
• Bandeja de horno honda Para hornear y asar y como recoge grasas.
Uso diario
Procedimiento para encender y apagar el horno1. Gire el mando de las funciones del horno hasta una
función.2. Gire el mando de temperatura hasta una temperatura.
El indicador de funcionamiento se enciende cuandoel horno está funcionando.El indicador de temperatura se enciende cuando latemperatura del horno aumenta.
3. Para apagar el horno, gire el mando de las funcionesdel horno y el mando de temperatura hasta la posi-ción de apagado.
Programador de fin de cocciónSe utiliza para programar el tiempo de desconexión deuna función del horno.1. Programe una función y la temperatura.2. Gire el mando del programador de fin de cocción
(consulte "Descripción del producto") al máximo.Después gírelo hasta el intervalo de tiempo que de-see.
3. Cuando transcurre el intervalo de tiempo, suena unaseñal y el horno se apaga.
Para ajustar el horno en funcionamiento manual,gire el mando del programador de fin de cocción
hasta .
Ventilador de refrigeraciónCuando el horno está funcionando, el ventilador se en-ciende automáticamente para mantener frías las superfi-cies del aparato. Si apaga el aparato, el ventilador de re-frigeración se para.
Termostato de seguridadPara evitar que se produzca un calentamiento excesivopeligroso (debido al uso incorrecto del aparato o a uncomponente defectuoso), el horno cuenta con un ter-mostato de seguridad que interrumpe el suministro deenergía eléctrica. El horno se vuelve a conectar automá-ticamente cuando desciende la temperatura.
Funciones del horno
Función del horno Uso
Apagado El horno está apagado.
Resistencia inferior El calor procede de la parte inferior del horno solamente. Para hornear pastelescon base tostada o crujiente.
PizzaLa resistencia de la parte inferior dirige el calor directamente hacia la base de lapizza, quiche o pastel, mientras que el ventilador hace circular el aire para cocinar
los ingredientes.
Grill máximo El grill funciona a la potencia máxima. Para asar al grill grandes cantidades dealimentos de poco grosor y preparar tostadas.
Grill interno Para asar al grill pequeñas cantidades de alimentos de poco grosor en el centrode la bandeja y preparar tostadas.
Cocción con aire ca-liente
Para asar o asar y hornear a la vez alimentos que requieran la misma temperatura,utilizando más de una bandeja y sin que se transfieran los sabores.
Cocción convencional El calor procede de las resistencias superior e inferior. Para hornear y asar en unnivel.
53
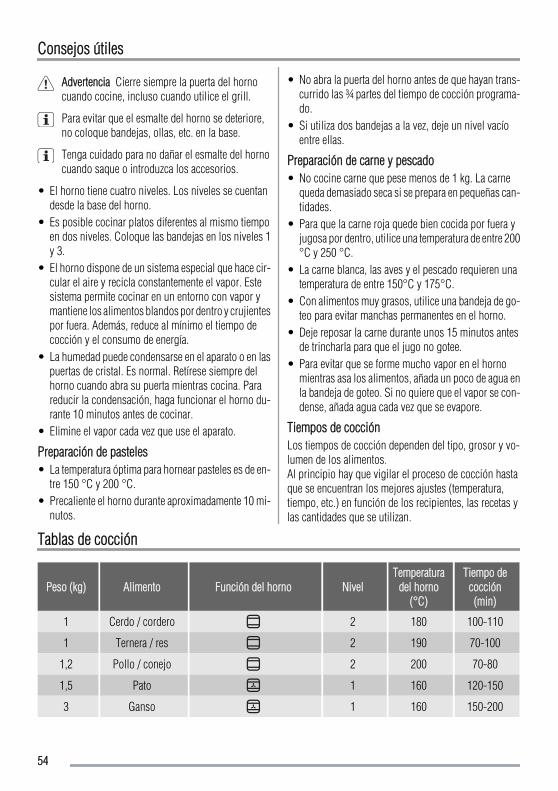
Consejos útiles
Advertencia Cierre siempre la puerta del hornocuando cocine, incluso cuando utilice el grill.
Para evitar que el esmalte del horno se deteriore,no coloque bandejas, ollas, etc. en la base.
Tenga cuidado para no dañar el esmalte del hornocuando saque o introduzca los accesorios.
• El horno tiene cuatro niveles. Los niveles se cuentandesde la base del horno.
• Es posible cocinar platos diferentes al mismo tiempoen dos niveles. Coloque las bandejas en los niveles 1y 3.
• El horno dispone de un sistema especial que hace cir-cular el aire y recicla constantemente el vapor. Estesistema permite cocinar en un entorno con vapor ymantiene los alimentos blandos por dentro y crujientespor fuera. Además, reduce al mínimo el tiempo decocción y el consumo de energía.
• La humedad puede condensarse en el aparato o en laspuertas de cristal. Es normal. Retírese siempre delhorno cuando abra su puerta mientras cocina. Parareducir la condensación, haga funcionar el horno du-rante 10 minutos antes de cocinar.
• Elimine el vapor cada vez que use el aparato.
Preparación de pasteles• La temperatura óptima para hornear pasteles es de en-
tre 150 °C y 200 °C.• Precaliente el horno durante aproximadamente 10 mi-
nutos.
• No abra la puerta del horno antes de que hayan trans-currido las ¾ partes del tiempo de cocción programa-do.
• Si utiliza dos bandejas a la vez, deje un nivel vacíoentre ellas.
Preparación de carne y pescado• No cocine carne que pese menos de 1 kg. La carne
queda demasiado seca si se prepara en pequeñas can-tidades.
• Para que la carne roja quede bien cocida por fuera yjugosa por dentro, utilice una temperatura de entre 200°C y 250 °C.
• La carne blanca, las aves y el pescado requieren unatemperatura de entre 150°C y 175°C.
• Con alimentos muy grasos, utilice una bandeja de go-teo para evitar manchas permanentes en el horno.
• Deje reposar la carne durante unos 15 minutos antesde trincharla para que el jugo no gotee.
• Para evitar que se forme mucho vapor en el hornomientras asa los alimentos, añada un poco de agua enla bandeja de goteo. Si no quiere que el vapor se con-dense, añada agua cada vez que se evapore.
Tiempos de cocciónLos tiempos de cocción dependen del tipo, grosor y vo-lumen de los alimentos.Al principio hay que vigilar el proceso de cocción hastaque se encuentran los mejores ajustes (temperatura,tiempo, etc.) en función de los recipientes, las recetas ylas cantidades que se utilizan.
Tablas de cocción
Peso (kg) Alimento Función del horno NivelTemperatura
del horno(°C)
Tiempo decocción(min)
1 Cerdo / cordero 2 180 100-110
1 Ternera / res 2 190 70-100
1,2 Pollo / conejo 2 200 70-80
1,5 Pato 1 160 120-150
3 Ganso 1 160 150-200
54
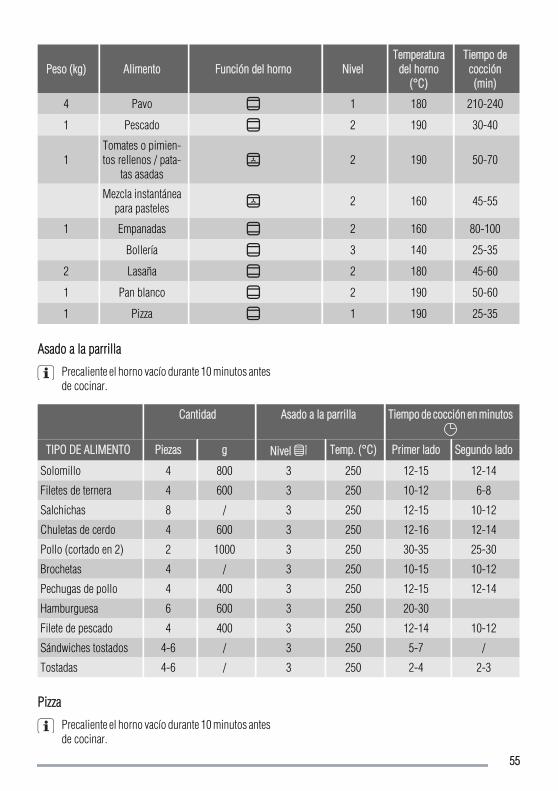
Peso (kg) Alimento Función del horno NivelTemperatura
del horno(°C)
Tiempo decocción(min)
4 Pavo 1 180 210-240
1 Pescado 2 190 30-40
1Tomates o pimien-tos rellenos / pata-
tas asadas2 190 50-70
Mezcla instantáneapara pasteles 2 160 45-55
1 Empanadas 2 160 80-100
Bollería 3 140 25-35
2 Lasaña 2 180 45-60
1 Pan blanco 2 190 50-60
1 Pizza 1 190 25-35
Asado a la parrilla
Precaliente el horno vacío durante 10 minutos antesde cocinar.
Cantidad Asado a la parrilla Tiempo de cocción en minutos
TIPO DE ALIMENTO Piezas g Nivel Temp. (°C) Primer lado Segundo lado
Solomillo 4 800 3 250 12-15 12-14
Filetes de ternera 4 600 3 250 10-12 6-8
Salchichas 8 / 3 250 12-15 10-12
Chuletas de cerdo 4 600 3 250 12-16 12-14
Pollo (cortado en 2) 2 1000 3 250 30-35 25-30
Brochetas 4 / 3 250 10-15 10-12
Pechugas de pollo 4 400 3 250 12-15 12-14
Hamburguesa 6 600 3 250 20-30
Filete de pescado 4 400 3 250 12-14 10-12
Sándwiches tostados 4-6 / 3 250 5-7 /
Tostadas 4-6 / 3 250 2-4 2-3
Pizza
Precaliente el horno vacío durante 10 minutos antesde cocinar.
55
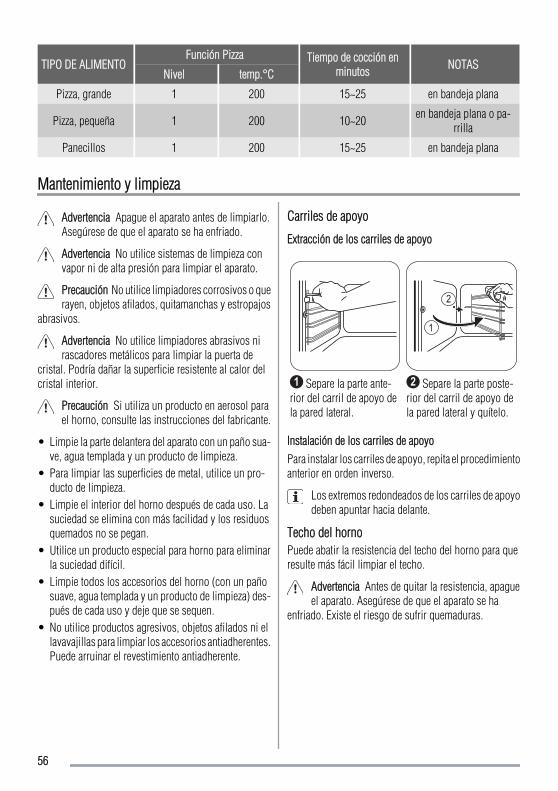
TIPO DE ALIMENTOFunción Pizza Tiempo de cocción en
minutos NOTASNivel temp.°C
Pizza, grande 1 200 15~25 en bandeja plana
Pizza, pequeña 1 200 10~20 en bandeja plana o pa-rrilla
Panecillos 1 200 15~25 en bandeja plana
Mantenimiento y limpieza
Advertencia Apague el aparato antes de limpiarlo.Asegúrese de que el aparato se ha enfriado.
Advertencia No utilice sistemas de limpieza convapor ni de alta presión para limpiar el aparato.
Precaución No utilice limpiadores corrosivos o querayen, objetos afilados, quitamanchas y estropajos
abrasivos.
Advertencia No utilice limpiadores abrasivos nirascadores metálicos para limpiar la puerta de
cristal. Podría dañar la superficie resistente al calor delcristal interior.
Precaución Si utiliza un producto en aerosol parael horno, consulte las instrucciones del fabricante.
• Limpie la parte delantera del aparato con un paño sua-ve, agua templada y un producto de limpieza.
• Para limpiar las superficies de metal, utilice un pro-ducto de limpieza.
• Limpie el interior del horno después de cada uso. Lasuciedad se elimina con más facilidad y los residuosquemados no se pegan.
• Utilice un producto especial para horno para eliminarla suciedad difícil.
• Limpie todos los accesorios del horno (con un pañosuave, agua templada y un producto de limpieza) des-pués de cada uso y deje que se sequen.
• No utilice productos agresivos, objetos afilados ni ellavavajillas para limpiar los accesorios antiadherentes.Puede arruinar el revestimiento antiadherente.
Carriles de apoyo
Extracción de los carriles de apoyo
1 Separe la parte ante-rior del carril de apoyo dela pared lateral.
1
2
2 Separe la parte poste-rior del carril de apoyo dela pared lateral y quítelo.
Instalación de los carriles de apoyoPara instalar los carriles de apoyo, repita el procedimientoanterior en orden inverso.
Los extremos redondeados de los carriles de apoyodeben apuntar hacia delante.
Techo del hornoPuede abatir la resistencia del techo del horno para queresulte más fácil limpiar el techo.
Advertencia Antes de quitar la resistencia, apagueel aparato. Asegúrese de que el aparato se ha
enfriado. Existe el riesgo de sufrir quemaduras.
56
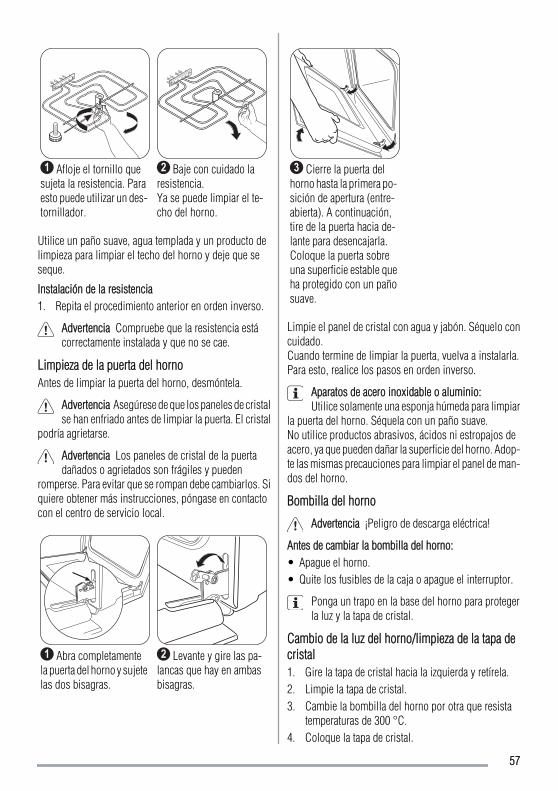
1 Afloje el tornillo quesujeta la resistencia. Paraesto puede utilizar un des-tornillador.
2 Baje con cuidado laresistencia.Ya se puede limpiar el te-cho del horno.
Utilice un paño suave, agua templada y un producto delimpieza para limpiar el techo del horno y deje que seseque.
Instalación de la resistencia1. Repita el procedimiento anterior en orden inverso.
Advertencia Compruebe que la resistencia estácorrectamente instalada y que no se cae.
Limpieza de la puerta del hornoAntes de limpiar la puerta del horno, desmóntela.
Advertencia Asegúrese de que los paneles de cristalse han enfriado antes de limpiar la puerta. El cristal
podría agrietarse.
Advertencia Los paneles de cristal de la puertadañados o agrietados son frágiles y pueden
romperse. Para evitar que se rompan debe cambiarlos. Siquiere obtener más instrucciones, póngase en contactocon el centro de servicio local.
1 Abra completamentela puerta del horno y sujetelas dos bisagras.
2 Levante y gire las pa-lancas que hay en ambasbisagras.
3 Cierre la puerta delhorno hasta la primera po-sición de apertura (entre-abierta). A continuación,tire de la puerta hacia de-lante para desencajarla.Coloque la puerta sobreuna superficie estable queha protegido con un pañosuave.
Limpie el panel de cristal con agua y jabón. Séquelo concuidado.Cuando termine de limpiar la puerta, vuelva a instalarla.Para esto, realice los pasos en orden inverso.
Aparatos de acero inoxidable o aluminio:Utilice solamente una esponja húmeda para limpiar
la puerta del horno. Séquela con un paño suave.No utilice productos abrasivos, ácidos ni estropajos deacero, ya que pueden dañar la superficie del horno. Adop-te las mismas precauciones para limpiar el panel de man-dos del horno.
Bombilla del horno
Advertencia ¡Peligro de descarga eléctrica!
Antes de cambiar la bombilla del horno:• Apague el horno.• Quite los fusibles de la caja o apague el interruptor.
Ponga un trapo en la base del horno para protegerla luz y la tapa de cristal.
Cambio de la luz del horno/limpieza de la tapa decristal1. Gire la tapa de cristal hacia la izquierda y retírela.2. Limpie la tapa de cristal.3. Cambie la bombilla del horno por otra que resista
temperaturas de 300 °C.4. Coloque la tapa de cristal.
57
Qué hacer si…
Problema Posible causa Solución
El horno no se calienta El horno no está conectado Encienda el horno (consulte la sec-ción "Uso diario")
El horno no se calienta Ha saltado el fusible de la caja Revise el fusible. Si el fusible saltavarias veces, consulte a un electri-cista.
La lámpara del horno no funciona La lámpara es defectuosa Cambie la lámpara del horno
Se acumula vapor y condensación enlos alimentos y en la cavidad
Ha dejado el plato en el horno de-masiado tiempo
No deje los alimentos más de 15 o20 minutos en el horno después decocinarlos
Si no logra solucionar el problema, consulte al distribui-dor o al servicio técnico.
Estos datos son necesarios para poder ayudarle demanera rápida y correcta. Los datos se encuentrandisponibles en la placa de datos técnicos (consulte"Descripción del producto").• Denominación del modelo ........................................• Número del producto
("PNC") ........................................• Número de serie (S.N.) ............
Advertencia Permita que un electricistahomologado o una persona competente reparen el
aparato.
Importante Si el aparato se ha utilizado de formaincorrecta, se facturará la visita del servicio técnico o deldistribuidor, incluso en el caso de que electrodomésticose encuentre aún en garantía.
Consejos para aparatos con frontal metálico:Si abre la puerta del horno mientras está cocinando
o inmediatamente después de terminar, puede aparecervapor en el cristal.
Instalación
Empotrado
Advertencia Deje la instalación en manos de unprofesional cualificado y homologado. Si no utiliza
los servicios de un profesional competente y se ocasionaalgún daño en el aparato, la garantía no tendrá validez.
• Antes de instalar el aparato en el mueble de cocina,asegúrese de que el hueco tiene las dimensiones co-rrectas.
• Cerciórese de que existe una protección contra des-cargas eléctricas en la instalación.
• De acuerdo con las normas en vigor, todas las piezasque aseguran la protección contra descargas eléctricasse deben fijar de forma que no se puedan aflojar sinutilizar herramientas.
• Algunas piezas del horno dan corriente. Aísle el apa-rato con muebles y asegúrese de que no quedan es-pacios libres. Esto evita las descargas eléctricas por-que impide tocar accidentalmente las piezas peligro-sas.
• El aparato se puede instalar con la parte posterior yuno de los laterales cerca de aparatos o paredes másaltos. El mueble situado en el otro lateral del aparatodebe ser de la misma altura.
• Los hornos y placas de cocción empotrados disponende sistemas de conexión especiales. Por seguridad,sólo debe combinar aparatos del mismo fabricante.
58
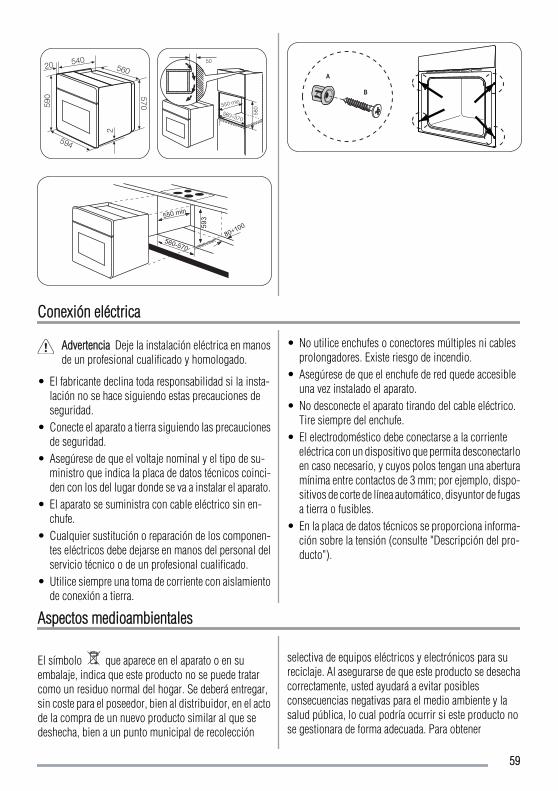
594
2
20
570590
540560
50
580550 min
560÷570
550 min59
3
560-570
80÷100
A
B
Conexión eléctrica
Advertencia Deje la instalación eléctrica en manosde un profesional cualificado y homologado.
• El fabricante declina toda responsabilidad si la insta-lación no se hace siguiendo estas precauciones deseguridad.
• Conecte el aparato a tierra siguiendo las precaucionesde seguridad.
• Asegúrese de que el voltaje nominal y el tipo de su-ministro que indica la placa de datos técnicos coinci-den con los del lugar donde se va a instalar el aparato.
• El aparato se suministra con cable eléctrico sin en-chufe.
• Cualquier sustitución o reparación de los componen-tes eléctricos debe dejarse en manos del personal delservicio técnico o de un profesional cualificado.
• Utilice siempre una toma de corriente con aislamientode conexión a tierra.
• No utilice enchufes o conectores múltiples ni cablesprolongadores. Existe riesgo de incendio.
• Asegúrese de que el enchufe de red quede accesibleuna vez instalado el aparato.
• No desconecte el aparato tirando del cable eléctrico.Tire siempre del enchufe.
• El electrodoméstico debe conectarse a la corrienteeléctrica con un dispositivo que permita desconectarloen caso necesario, y cuyos polos tengan una aberturamínima entre contactos de 3 mm; por ejemplo, dispo-sitivos de corte de línea automático, disyuntor de fugasa tierra o fusibles.
• En la placa de datos técnicos se proporciona informa-ción sobre la tensión (consulte "Descripción del pro-ducto").
Aspectos medioambientales
El símbolo que aparece en el aparato o en suembalaje, indica que este producto no se puede tratarcomo un residuo normal del hogar. Se deberá entregar,sin coste para el poseedor, bien al distribuidor, en el actode la compra de un nuevo producto similar al que sedeshecha, bien a un punto municipal de recolección
selectiva de equipos eléctricos y electrónicos para sureciclaje. Al asegurarse de que este producto se desechacorrectamente, usted ayudará a evitar posiblesconsecuencias negativas para el medio ambiente y lasalud pública, lo cual podría ocurrir si este producto nose gestionara de forma adecuada. Para obtener
59

información más detallada sobre el reciclaje de esteproducto, póngase en contacto con el Ayuntamiento desu Municipio, ó con la tienda donde lo compró.
Materiales de embalajeLos materiales con el símbolo son reciclables. Des-hágase de los materiales de embalaje en los contenedoresde reciclado instalados al efecto.
Eliminación del aparato1. Desconecte el enchufe de la toma de corriente.2. Corte el cable y el enchufe y deséchelos.3. Retire el cierre de la puerta. Así evitará que los niños
se queden atrapados en el interior del aparato. Existeriesgo de asfixia.
60

61

62

63

Benötigen Sie Zubehör, Verbrauchsmaterial und Ersatzteile? Dann besuchen Sie bitteunseren Onlineshop unter:www.zanussi.de
Voor het on-line bestellen van accessoires, consumables en onderdelen gaat u naarde ’webwinkel’ op:www.zanussi.nl
Para comprar acessórios e consumiveis na nossa loja web, por favor, visite:www.zanussi.pt
Para comprar accesorios, consumibles y recambios en nuestra tienda online, por favorvisite nuestro site:www.zanussi.es
www.zanussi.com
3971
4600
1-A-
1020
09