
CW-K85 User’s Guide - Support | Home | CASIO · 3. Contact your original retailer. Do not...
61
E CW-K85 User’s Guide We recommend that you print on a disc* before you record anything on it. Printing on a disc that already has data recorded on it can cause the data to become corrupted. Note that CASIO COMPUTER CO., LTD. shall not be held liable for any loss or corruption of data on discs arising through the use of this printer. * CD-R, CD-RW, DVD-R, etc. Be sure to read the Safety Precautions contained in this manual before trying to use the printer for the first time, and always keep this manual on hand for future reference. RCA502991-001V01
Transcript of CW-K85 User’s Guide - Support | Home | CASIO · 3. Contact your original retailer. Do not...
E
CW-K85
User’s Guide
� We recommend that you print on a disc* before you record anythingon it. Printing on a disc that already has data recorded on it cancause the data to become corrupted.
� Note that CASIO COMPUTER CO., LTD. shall not be held liable forany loss or corruption of data on discs arising through the use of thisprinter.
* CD-R, CD-RW, DVD-R, etc.
Be sure to read the Safety Precautions contained in this manual before tryingto use the printer for the first time, and always keep this manual on hand forfuture reference.
RCA502991-001V01
GUIDELINES LAID DOWN BY FCC RULES FOR USE OF THEUNIT IN THE U.S.A. (not applicable to other areas).
NOTICEThis equipment has been tested and found to comply with the limits for a Class B digitaldevice, pursuant to Part 15 of the FCC Rules. These limits are designed to providereasonable protection against harmful interference in a residential installation. Thisequipment generates, uses and can radiate radio frequency energy and, if not installedand used in accordance with the instructions, may cause harmful interference to radiocommunications. However, there is no guarantee that interference will not occur in aparticular installation. If this equipment does cause harmful interference to radio ortelevision reception, which can be determined by turning the equipment off and on, theuser is encouraged to try to correct the interference by one or more of the followingmeasures:
� Reorient or relocate the receiving antenna.� Increase the separation between the equipment and receiver.� Connect the equipment into an outlet on a circuit different from that to which the
receiver is connected.� Consult the dealer or an experienced radio/TV technician for help.
Caution: Changes or modification to the product not expressly approved by CASIOcould void the user’s authority to operate the product.
FCC WARNINGChanges or modifications not expressly approved by the party responsible forcompliance could void the user’s authority to operate the equipment.
Proper connectors must be used for connection to host computer and/orperipherals in order to meet FCC emission limits.
Cable specified for PC Windows® compatible PC to CW-K85
Declaration of ConformityModel Number: CW-K85Trade Name: CASIO COMPUTER CO., LTD.Responsible party: CASIO, INC.Address: 570 MT.PLEASANT AVENUE, DOVER, NEW JERSEY 07801Telephone number: 201-361-5400
This device complies with Part 15 of the FCC Rules. Operation is subject to thefollowing two conditions: (1) This device may not cause harmful interference,and (2) this device must accept any interference received, including interferencethat may cause undesired operation.
1 E
Read This First!
� CASIO COMPUTER CO., LTD. shall not be held liable for any loss orclaims by you or any other person or entity that may arise through the useof this printer.
� Reproduction of this manual in any form, either in part or its entirety, isforbidden without the express permission of CASIO COMPUTER CO.,LTD.
� The contents of the manual are subject to change without notice.
© Copyright 2006 CASIO COMPUTER CO., LTD. All rights reserved.
� Be sure to read this manual carefully before attempting to use the productfor the first time.
Safety Precautions
Thank you for purchasing this quality CASIO product.Before using it, be sure to read the following Safety Precautions. Keep themanual in a convenient location for future reference when necessary.
DangerThis symbol indicates information that, if ignored or applied incorrectly,creates the danger of death or serious personal injury.
WarningThis symbol indicates information that, if ignored or applied incorrectly,creates the possibility of death or serious personal injury.
CautionThis symbol indicates information that, if ignored or applied incorrectly,creates the possibility of personal injury or material damage.
Examples of graphic markings
indicates something you should not do. The symbol shown here
indicates you should not try to take the unit apart.
indicates something you should do. The symbol shown here
indicates you should unplug the unit from the wall outlet.
E 2
Danger
Alkaline BatteriesPerform the following steps immediately if fluid leaking fromalkaline batteries ever gets into your eyes.1. Do not rub your eyes! Rinse them with water.2. Contact your physician immediately.
Leaving alkaline battery fluid in your eyes can lead to loss ofsight.
Warning
Smoke, abnormal odor, overheating, and otherabnormalities
Continued use of the product while it is emitting smoke or strangeodor, or overheating creates the risk of fire and electric shock.Immediately perform the following steps whenever any of theabove symptoms are present.1. Turn off power.2. Unplug the power cord from the wall outlet.3. Contact your original retailer.
Power cord, AC adaptor, USB cableMisuse of the power cord, AC adaptor, or USB cable createsthe risk of fire and electric shock.Make sure you follow the precautions listed below.� Use only items that are specified for the product.� Use only a power source whose output matches the rating
marked on the plate on the back of the product.� Never plug the power cord into a wall outlet that is shared by
other devices, or into a shared extension cord.
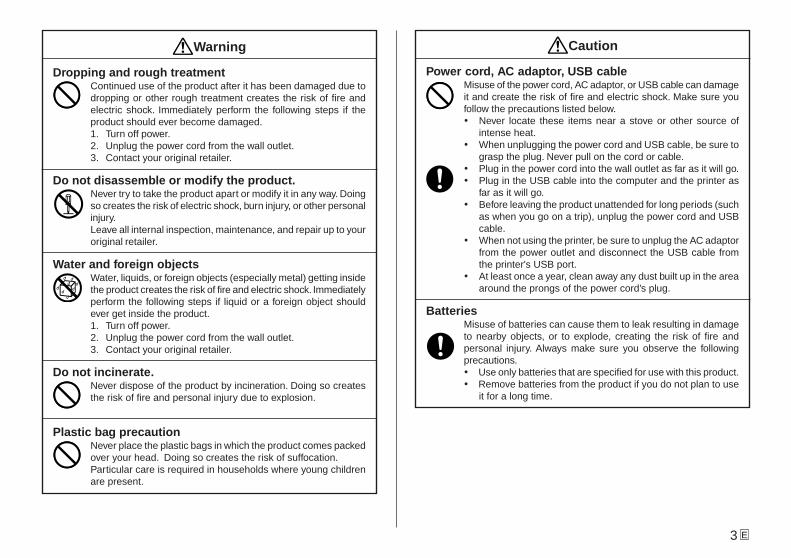
Warning
Power cord, AC adaptor, USB cableMisuse of the power cord, AC adaptor, or USB cable can damageit and create the risk of fire and electric shock. Make sure youfollow the precautions listed below.� Never place heavy objects on these items or subject them to
direct heat.� Never modify these items or subject them to bending.� Do not subject these items to twisting or pulling.� Should the power cord, AC adaptor, or USB cable or its plug
ever become damaged, contact your original retailer.
Power cord, AC adaptor, USB cable� Never touch the power cord, AC adaptor, or USB cable or its
plugs while your hands are wet. Doing so creates the risk ofelectric shock.
� Never use the power cord or AC adaptor in areas where itmay become wet. Water creates the risk of fire and electricshock.
� Never place a vase or any other liquid container on top of thepower cord, AC adaptor, or USB cable. Water creates therisk of fire and electric shock.
BatteriesMisuse of batteries can cause them to leak, resulting in damageto nearby objects, or to explode, creating the risk of fire andpersonal injury. Always make sure you observe the followingprecautions.� Never try to take batteries apart or allow them to become
shorted.� Never expose batteries to heat or dispose of them by
incineration.� Never mix old batteries with new ones.� Never mix batteries of different types.� Do not charge the batteries.� Make sure the positive (+) and negative (–) ends of the
batteries are facing correctly.
3 E
Warning
Dropping and rough treatmentContinued use of the product after it has been damaged due todropping or other rough treatment creates the risk of fire andelectric shock. Immediately perform the following steps if theproduct should ever become damaged.1. Turn off power.2. Unplug the power cord from the wall outlet.3. Contact your original retailer.
Do not disassemble or modify the product.Never try to take the product apart or modify it in any way. Doingso creates the risk of electric shock, burn injury, or other personalinjury.Leave all internal inspection, maintenance, and repair up to youroriginal retailer.
Water and foreign objectsWater, liquids, or foreign objects (especially metal) getting insidethe product creates the risk of fire and electric shock. Immediatelyperform the following steps if liquid or a foreign object shouldever get inside the product.1. Turn off power.2. Unplug the power cord from the wall outlet.3. Contact your original retailer.
Do not incinerate.Never dispose of the product by incineration. Doing so createsthe risk of fire and personal injury due to explosion.
Plastic bag precautionNever place the plastic bags in which the product comes packedover your head. Doing so creates the risk of suffocation.Particular care is required in households where young childrenare present.
Caution
Power cord, AC adaptor, USB cableMisuse of the power cord, AC adaptor, or USB cable can damageit and create the risk of fire and electric shock. Make sure youfollow the precautions listed below.� Never locate these items near a stove or other source of
intense heat.� When unplugging the power cord and USB cable, be sure to
grasp the plug. Never pull on the cord or cable.� Plug in the power cord into the wall outlet as far as it will go.� Plug in the USB cable into the computer and the printer as
far as it will go.� Before leaving the product unattended for long periods (such
as when you go on a trip), unplug the power cord and USBcable.
� When not using the printer, be sure to unplug the AC adaptorfrom the power outlet and disconnect the USB cable fromthe printer's USB port.
� At least once a year, clean away any dust built up in the areaaround the prongs of the power cord’s plug.
BatteriesMisuse of batteries can cause them to leak resulting in damageto nearby objects, or to explode, creating the risk of fire andpersonal injury. Always make sure you observe the followingprecautions.� Use only batteries that are specified for use with this product.� Remove batteries from the product if you do not plan to use
it for a long time.
E 4
Caution
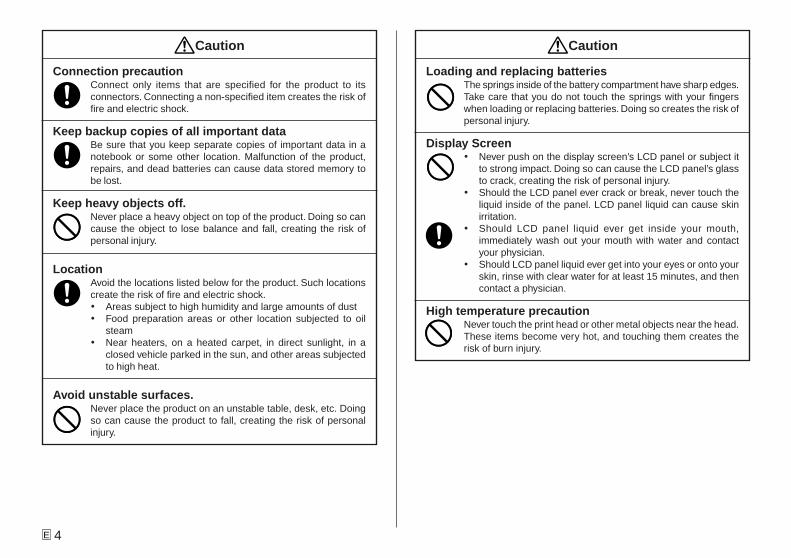
Connection precautionConnect only items that are specified for the product to itsconnectors. Connecting a non-specified item creates the risk offire and electric shock.
Keep backup copies of all important dataBe sure that you keep separate copies of important data in anotebook or some other location. Malfunction of the product,repairs, and dead batteries can cause data stored memory tobe lost.
Keep heavy objects off.Never place a heavy object on top of the product. Doing so cancause the object to lose balance and fall, creating the risk ofpersonal injury.
LocationAvoid the locations listed below for the product. Such locationscreate the risk of fire and electric shock.� Areas subject to high humidity and large amounts of dust� Food preparation areas or other location subjected to oil
steam� Near heaters, on a heated carpet, in direct sunlight, in a
closed vehicle parked in the sun, and other areas subjectedto high heat.
Avoid unstable surfaces.Never place the product on an unstable table, desk, etc. Doingso can cause the product to fall, creating the risk of personalinjury.
Caution
Loading and replacing batteriesThe springs inside of the battery compartment have sharp edges.Take care that you do not touch the springs with your fingerswhen loading or replacing batteries. Doing so creates the risk ofpersonal injury.
Display Screen� Never push on the display screen’s LCD panel or subject it
to strong impact. Doing so can cause the LCD panel’s glassto crack, creating the risk of personal injury.
� Should the LCD panel ever crack or break, never touch theliquid inside of the panel. LCD panel liquid can cause skinirritation.
� Should LCD panel liquid ever get inside your mouth,immediately wash out your mouth with water and contactyour physician.
� Should LCD panel liquid ever get into your eyes or onto yourskin, rinse with clear water for at least 15 minutes, and thencontact a physician.
High temperature precautionNever touch the print head or other metal objects near the head.These items become very hot, and touching them creates therisk of burn injury.
5 E
Safety Precautions ................................................................ 1Operating Precautions.......................................................... 5
CW-K85 Printer Features ...................................................... 7
General Guide........................................................................ 8Power Requirements............................................................. 9
Using the AC Adaptor ....................................................... 9Using batteries ................................................................ 10
Initializing Printer Memory ................................................. 12To initialize printer memory ............................................. 12Data Error ....................................................................... 12
Powering Up and Selecting a Printing Mode .................... 12To turn power on and off ................................................. 12Auto Power Off ................................................................ 13Mode Selection Basics .................................................... 14
Loading and Removing an Ink Ribbon Cassette .............. 15To load the ink ribbon cassette ....................................... 15To remove the ink ribbon cassette .................................. 16
Using the Printer’s Keys ..................................................... 17Display Symbols and Indicators ........................................ 18Label Printing Basics.......................................................... 19
Label Printing General Procedure ................................... 19
DISC Label Data .................................................................. 25
Disc Printing Terms ............................................................. 25Creating Disc Label Data .................................................... 25Creating a New Label .......................................................... 26Inserting a Logo Into a Label ............................................. 28
Built In Logos .................................................................. 28
Operating Precautions
Observe the following precautions to ensure that the printer provides you withthe years of trouble-free operation for which it is designed.� Avoid using the printer in areas exposed to direct sunlight, and in areas
subjected to high humidity, electrostatic charge, sudden temperaturechanges, and temperature extremes. Operating Temperature Range: 10°Cto 35°C (50°F to 95°F)
� Never subject the printer to strong impact or shock.� Never allow paper clips, pins, or other similar objects to get inside the printer
mechanism.� Place the printer on a level surface when printing. A tilted surface can make
normal printing impossible.� Unclear printing can indicate a dirty print head. If printing becomes unclear,
use the procedures on page 46 to clean the print head.� Using the printer in a location where it is exposed to direct sunlight or other
strong light can cause malfunction of its photo sensor. Use the printer in alocation where it is not exposed to strong light.
Contents
E 6
Output Samples .............................................................. 29To insert a logo into a label ............................................. 29
Inserting a Frame Into a Label ........................................... 30Output Samples .............................................................. 30To insert a frame into a label ........................................... 30
Inputting Text into an AUTO Format .................................. 31To input text into an AUTO format label ........................... 31
Specifying Character Spacing ........................................... 31To turn proportional spacing on and off .......................... 31
Specifying Text Alignment .................................................. 32To specify text alignment ................................................. 32
Inputting and Editing Label Text ........................................ 33
Moving the Cursor .............................................................. 33Basic Alpha Numeric Input ................................................ 33
To input alpha-numeric characters .................................. 33About the CODE key ....................................................... 34
Inputting Symbols and Special Characters ...................... 34To use the SYMBOL menu .............................................. 34
Inputting Illustrations ......................................................... 35To input illustrations ......................................................... 35
Deleting an Individual Character ....................................... 35To delete a character using the BS key ........................... 35To delete a character using the DEL key ........................ 35
Clearing Input Text .............................................................. 36To clear all text ................................................................ 36
Text Editing .......................................................................... 36To switch between overwrite and insert .......................... 36
Using Phrase Memory ........................................................ 37To recall a phrase ............................................................ 37To create new phrase memory text ................................. 37To save input text in phrase memory............................... 37
To edit a phrase memory record ..................................... 38To delete a phrase memory record ................................. 38
Using Copy and Paste ........................................................ 38User Characters .................................................................. 39
To recall a user character ................................................ 40To delete a user character ............................................... 40
Controlling the Appearance of Text ................................... 41
Selecting a Font .................................................................. 41SMALL FONT ................................................................. 41To change the default font setting ................................... 42To change the font of text you have just input ................. 42
Using STYLE Menu Attributes ........................................... 42
Saving, Recalling and Deleting Labels.............................. 44To save a label ................................................................ 44To recall a label ............................................................... 44To delete a label .............................................................. 44
Configuring the Printer Setup ............................................ 45Demo Printing ................................................................. 45
Reference ............................................................................. 46
Caring for the Printer .......................................................... 46Troubleshooting .................................................................. 47Error Messages ................................................................... 49Illustrations .......................................................................... 52Symbols, Dingbats, and Special Characters .................... 52Frames ................................................................................. 53Label Formats...................................................................... 54Specifications ...................................................................... 56
7 E
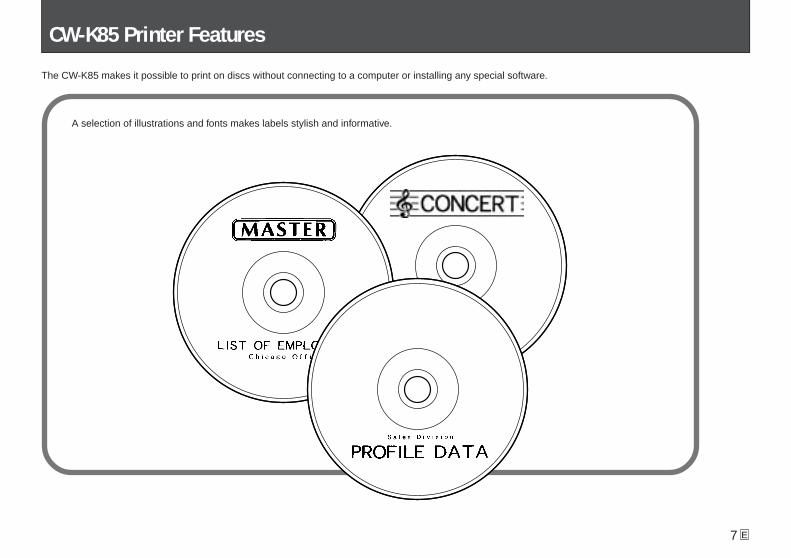
CW-K85 Printer Features
The CW-K85 makes it possible to print on discs without connecting to a computer or installing any special software.
A selection of illustrations and fonts makes labels stylish and informative.

E 8
General Guide
Press to turn onpower.
Press to turn offpower.
Keyboard
DisplayCassette coverOpen this cover toload or remove theink ribbon cassette.
SlitSlide thedisc to beprinted intothe slit.
USB portFor connection of a USB cable whenexchanging data with a computer.
AC adaptor terminalConnect theAC adaptor here.
Battery cover
If you cannot remove the disc from the printer due to printer malfunction, tryperforming the following steps to remove the disc.1 Press OFF.2 While holding down the D and H keys, press ON.If you are still unable to remove the disc after performing the aboveoperations, perform the following steps to remove the disc from the printer.Normally, you should not use the following procedure to release the printhead. Use this procedure only when the print head fails to release normallydue to malfunction.
Print Head Release Button Hole
9 E
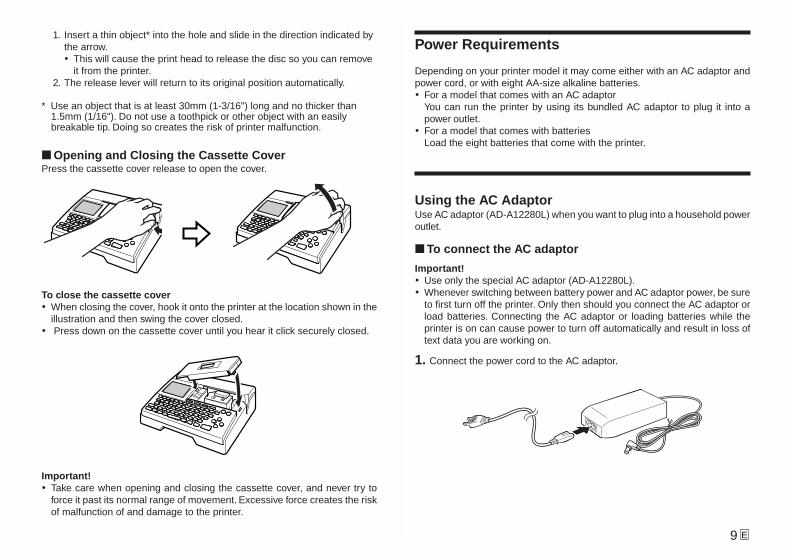
1. Insert a thin object* into the hole and slide in the direction indicated bythe arrow.� This will cause the print head to release the disc so you can remove
it from the printer.2. The release lever will return to its original position automatically.
* Use an object that is at least 30mm (1-3/16") long and no thicker than1.5mm (1/16"). Do not use a toothpick or other object with an easilybreakable tip. Doing so creates the risk of printer malfunction.
■ Opening and Closing the Cassette CoverPress the cassette cover release to open the cover.
Important!� Take care when opening and closing the cassette cover, and never try to
force it past its normal range of movement. Excessive force creates the riskof malfunction of and damage to the printer.
Power Requirements
Depending on your printer model it may come either with an AC adaptor andpower cord, or with eight AA-size alkaline batteries.� For a model that comes with an AC adaptor
You can run the printer by using its bundled AC adaptor to plug it into apower outlet.
� For a model that comes with batteriesLoad the eight batteries that come with the printer.
Using the AC AdaptorUse AC adaptor (AD-A12280L) when you want to plug into a household poweroutlet.
■ To connect the AC adaptor
Important!� Use only the special AC adaptor (AD-A12280L).� Whenever switching between battery power and AC adaptor power, be sure
to first turn off the printer. Only then should you connect the AC adaptor orload batteries. Connecting the AC adaptor or loading batteries while theprinter is on can cause power to turn off automatically and result in loss oftext data you are working on.
1. Connect the power cord to the AC adaptor.
To close the cassette cover� When closing the cover, hook it onto the printer at the location shown in the
illustration and then swing the cover closed.� Press down on the cassette cover until you hear it click securely closed.
E 10
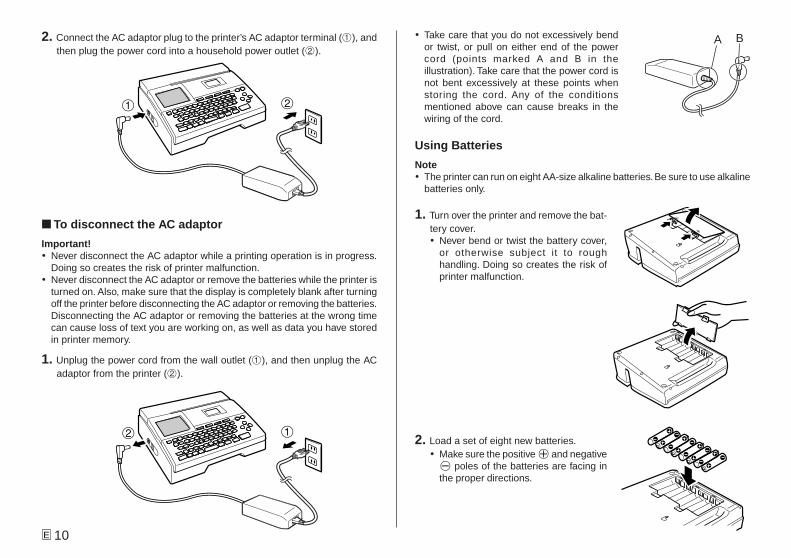
2. Connect the AC adaptor plug to the printer’s AC adaptor terminal (1), andthen plug the power cord into a household power outlet (2).
21
■ To disconnect the AC adaptor
Important!� Never disconnect the AC adaptor while a printing operation is in progress.
Doing so creates the risk of printer malfunction.� Never disconnect the AC adaptor or remove the batteries while the printer is
turned on. Also, make sure that the display is completely blank after turningoff the printer before disconnecting the AC adaptor or removing the batteries.Disconnecting the AC adaptor or removing the batteries at the wrong timecan cause loss of text you are working on, as well as data you have storedin printer memory.
1. Unplug the power cord from the wall outlet (1), and then unplug the ACadaptor from the printer (2).
2 1
� Take care that you do not excessively bendor twist, or pull on either end of the powercord (points marked A and B in theillustration). Take care that the power cord isnot bent excessively at these points whenstoring the cord. Any of the conditionsmentioned above can cause breaks in thewiring of the cord.
Using Batteries
Note� The printer can run on eight AA-size alkaline batteries. Be sure to use alkaline
batteries only.
1. Turn over the printer and remove the bat-tery cover.� Never bend or twist the battery cover,
or otherwise subject it to roughhandling. Doing so creates the risk ofprinter malfunction.
2. Load a set of eight new batteries.� Make sure the positive g and negativeh poles of the batteries are facing inthe proper directions.
A B
11 E
Memory Data Backup� Never disconnect the AC adaptor or remove the batteries while the printer
is turned on. Doing so can cause loss of text you are working on, as wellas data you have stored in printer memory.
� Be sure to keep separate backup copies of all important data you havestored in printer memory.
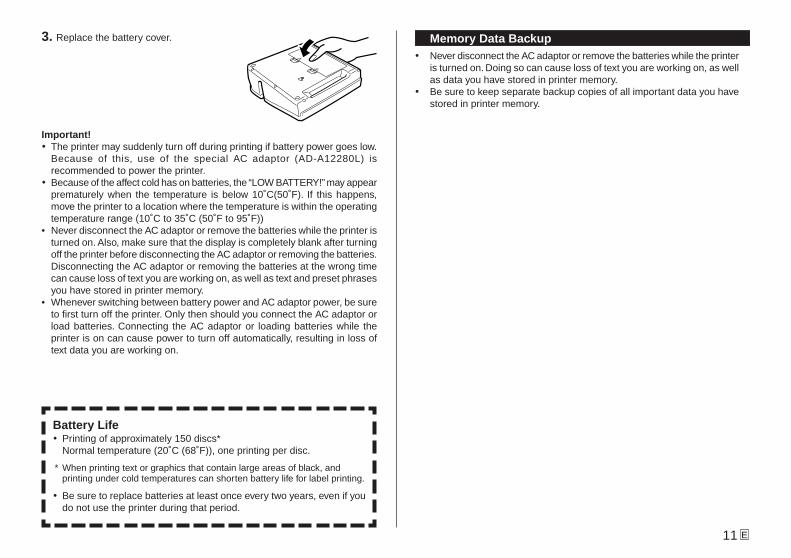
3. Replace the battery cover.
Important!� The printer may suddenly turn off during printing if battery power goes low.
Because of this, use of the special AC adaptor (AD-A12280L) isrecommended to power the printer.
� Because of the affect cold has on batteries, the “LOW BATTERY!” may appearprematurely when the temperature is below 10˚C(50˚F). If this happens,move the printer to a location where the temperature is within the operatingtemperature range (10˚C to 35˚C (50˚F to 95˚F))
• Never disconnect the AC adaptor or remove the batteries while the printer isturned on. Also, make sure that the display is completely blank after turningoff the printer before disconnecting the AC adaptor or removing the batteries.Disconnecting the AC adaptor or removing the batteries at the wrong timecan cause loss of text you are working on, as well as text and preset phrasesyou have stored in printer memory.
• Whenever switching between battery power and AC adaptor power, be sureto first turn off the printer. Only then should you connect the AC adaptor orload batteries. Connecting the AC adaptor or loading batteries while theprinter is on can cause power to turn off automatically, resulting in loss oftext data you are working on.
Battery Life� Printing of approximately 150 discs*
Normal temperature (20˚C (68˚F)), one printing per disc.
* When printing text or graphics that contain large areas of black, andprinting under cold temperatures can shorten battery life for label printing.
� Be sure to replace batteries at least once every two years, even if youdo not use the printer during that period.
E 12
Initializing Printer Memory
You should initialize the memory of the printer before using it for the first time,after you have not used it for a long time, or if it fails to operate normally whenyou turn power on.
Important!Initializing printer memory clears its memory of all input data.
To initialize printer memory1. Make sure that the printer is turned off.
2. While holding down the PRINT and ESC keys, press . Release first, but keep PRINT and ESC depressed until power turns on and a con-firmation message appears on the display.
3. In response to the confirmation message that appears, press SET to ini-tialize the printer memory or ESC to abort.
Data ErrorWhenever you turn on the printer, it performs an internal check of its memoryand functions. If it finds a serious data problem, it will display the followingmessage:
DATA ERROR! INITIALIZE THE PRINTER!
When this message appears, press any key. Next, in response to the “INI-TIALIZE? SET/ESC” message that appears, press SET to initialize printermemory (which deletes everything in memory) or ESC to clear the messagewithout initializing.
Powering Up and Selecting a Printing Mode
Turning the printer on and off is as simple as pressing a button. After theprinter powers up, you will need to select the type of operation you want toperform.
To turn power on and off
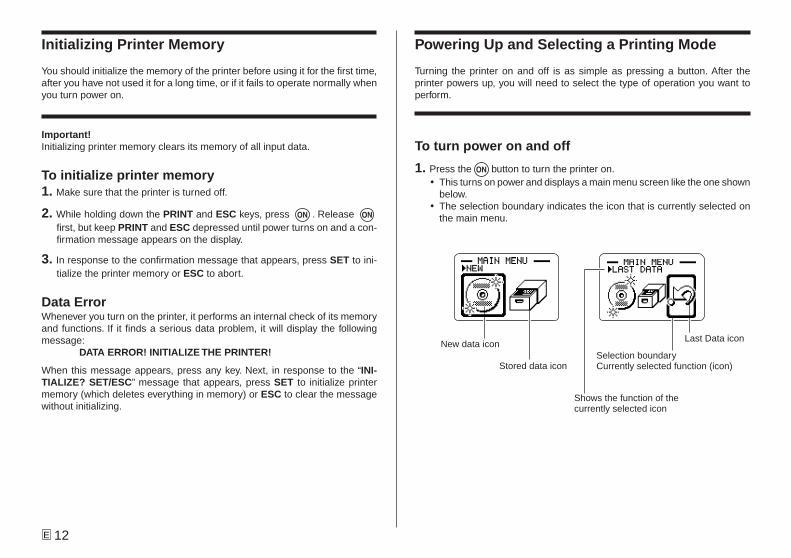
1. Press the button to turn the printer on.� This turns on power and displays a main menu screen like the one shown
below.� The selection boundary indicates the icon that is currently selected on
the main menu.
New data iconLast Data icon
Selection boundaryCurrently selected function (icon)Stored data icon
Shows the function of thecurrently selected icon
13 E
2. What you should do after turning on power depends on the type of printingoperation you want to perform.� See “Mode Selection Basics” on page 14 for more information.
3. To turn the printer off, press the button.
Auto Power OffThe printer automatically turns off if you do not perform any key operation forabout six minutes. To restore power, press .
NoteAuto Power Off is disabled while the printer is being powered by the AC adaptorand is connected to a computer.
Important� See page 45 for information about configuring contrast, print density,
and language (English, German, French, Italian, Spanish) settings.� All of the display examples in this User’s Guide use English as the
display language.
E 14
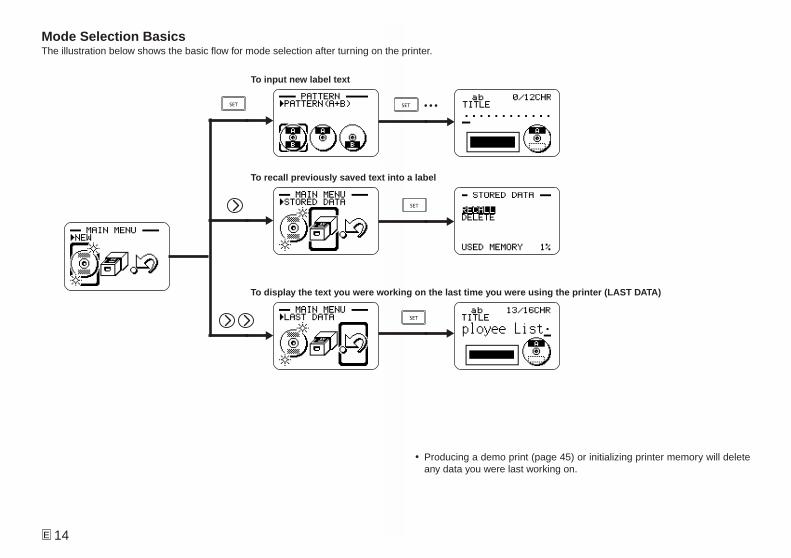
To input new label text
To recall previously saved text into a label
To display the text you were working on the last time you were using the printer (LAST DATA)
� Producing a demo print (page 45) or initializing printer memory will deleteany data you were last working on.
• • •
Mode Selection BasicsThe illustration below shows the basic flow for mode selection after turning on the printer.
15 E
Loading and Removing an Ink Ribbon Cassette
An ink ribbon cassette is required when printing disc labels.You should use only the special ink ribbon cassettes that are specified for this printer.
To load the ink ribbon cassette
1. Open the cassette cover.
2. Remove the stopper from the ink ribbon cassette.
3. If there is slack in the ink ribbon, use your fingers as shown in the illustra-tion to rotate the spindle of the cassette to remove the slack.� You may need to rotate the spindle several times if there is a lot of slack.
Important!� Never pull on the ink ribbon with excessive force or try to push the ink
ribbon into the cassette.� Loading the ink ribbon cassette while the ink ribbon is slack creates the
risk of malfunction.
Stopper
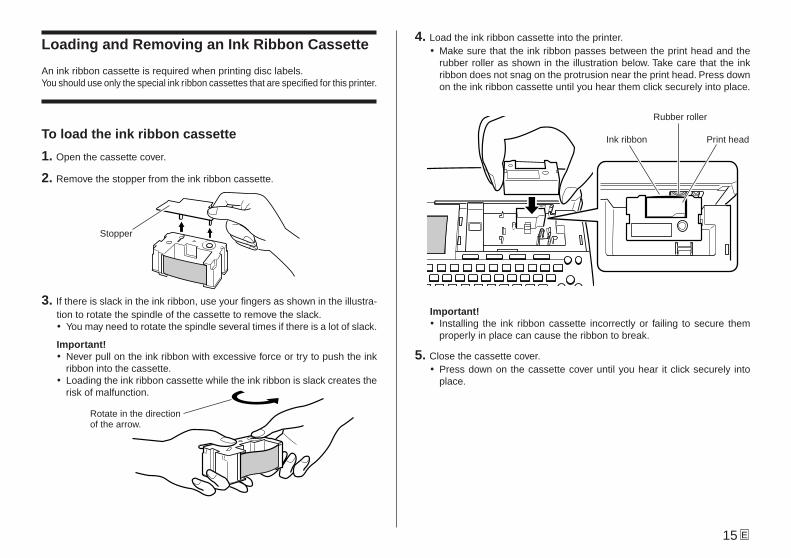
4. Load the ink ribbon cassette into the printer.� Make sure that the ink ribbon passes between the print head and the
rubber roller as shown in the illustration below. Take care that the inkribbon does not snag on the protrusion near the print head. Press downon the ink ribbon cassette until you hear them click securely into place.
Important!� Installing the ink ribbon cassette incorrectly or failing to secure them
properly in place can cause the ribbon to break.
5. Close the cassette cover.� Press down on the cassette cover until you hear it click securely into
place.
Rotate in the directionof the arrow.
Ink ribbon
Rubber roller
Print head
E 16
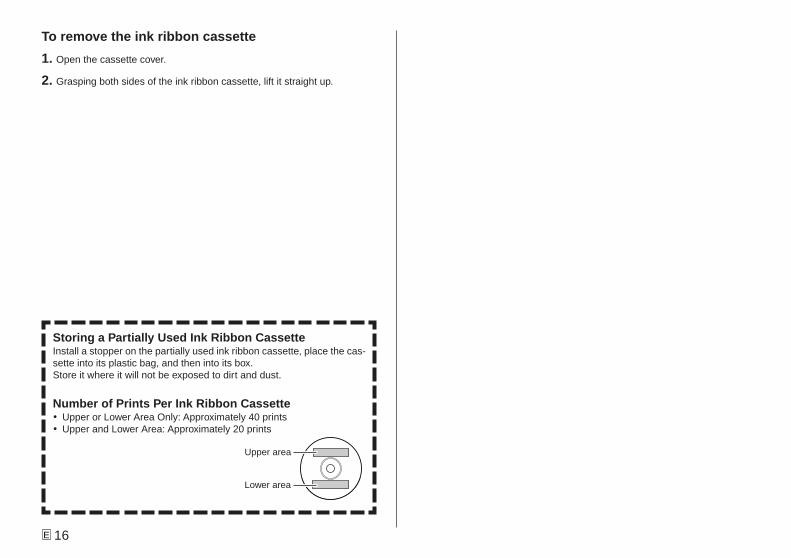
To remove the ink ribbon cassette
1. Open the cassette cover.
2. Grasping both sides of the ink ribbon cassette, lift it straight up.
Storing a Partially Used Ink Ribbon CassetteInstall a stopper on the partially used ink ribbon cassette, place the cas-sette into its plastic bag, and then into its box.Store it where it will not be exposed to dirt and dust.
Number of Prints Per Ink Ribbon Cassette� Upper or Lower Area Only: Approximately 40 prints� Upper and Lower Area: Approximately 20 prints
Upper area
Lower area
17 E
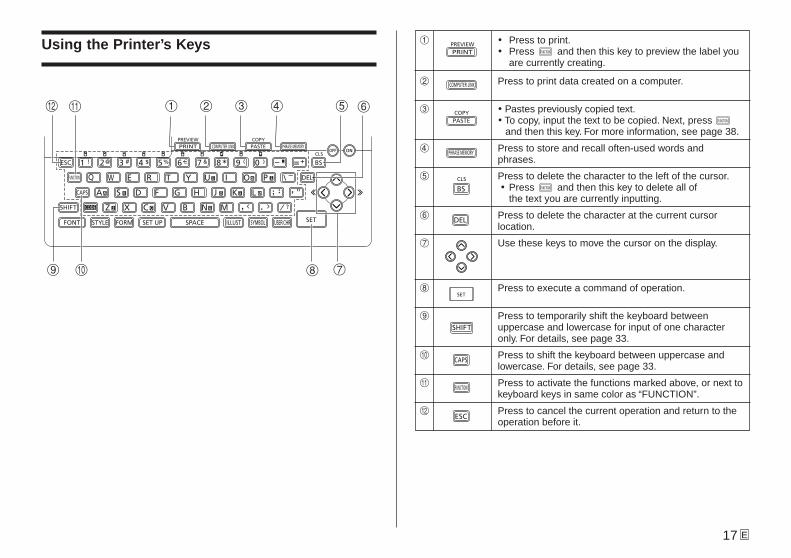
Using the Printer’s Keys
2 3 5 6
780
q 1 4
9
w
1
2
3
4
5
6
7
8
9
0
q
w
� Press to print.� Press and then this key to preview the label you
are currently creating.
Press to print data created on a computer.
� Pastes previously copied text.� To copy, input the text to be copied. Next, press
and then this key. For more information, see page 38.
Press to store and recall often-used words andphrases.
Press to delete the character to the left of the cursor. � Press and then this key to delete all of
the text you are currently inputting.
Press to delete the character at the current cursorlocation.
Use these keys to move the cursor on the display.
Press to execute a command of operation.
Press to temporarily shift the keyboard betweenuppercase and lowercase for input of one characteronly. For details, see page 33.
Press to shift the keyboard between uppercase andlowercase. For details, see page 33.
Press to activate the functions marked above, or next tokeyboard keys in same color as “FUNCTION”.
Press to cancel the current operation and return to theoperation before it.
E 18
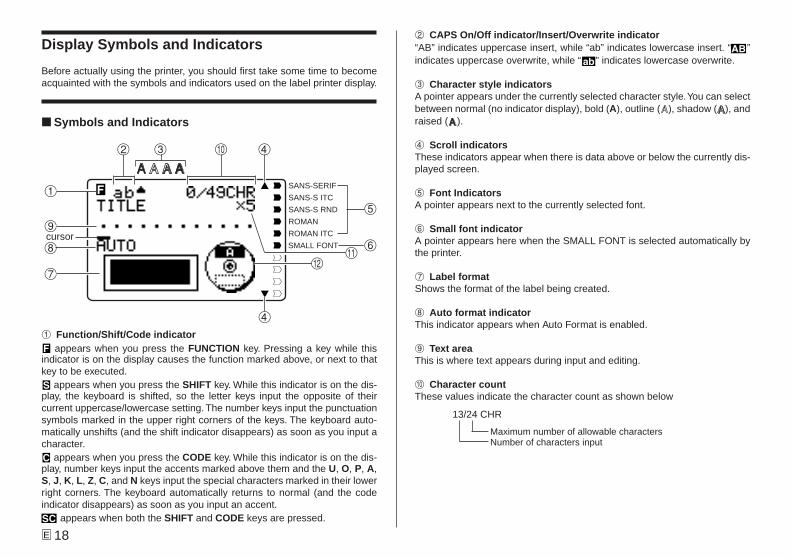
Display Symbols and Indicators
Before actually using the printer, you should first take some time to becomeacquainted with the symbols and indicators used on the label printer display.
■ Symbols and Indicators
1
5
6
2 CAPS On/Off indicator/Insert/Overwrite indicator“AB” indicates uppercase insert, while “ab” indicates lowercase insert. “ ”indicates uppercase overwrite, while “ ” indicates lowercase overwrite.
3 Character style indicatorsA pointer appears under the currently selected character style. You can selectbetween normal (no indicator display), bold (A), outline ( ), shadow ( ), andraised ( ).
4 Scroll indicatorsThese indicators appear when there is data above or below the currently dis-played screen.
5 Font IndicatorsA pointer appears next to the currently selected font.
6 Small font indicatorA pointer appears here when the SMALL FONT is selected automatically bythe printer.
1 Function/Shift/Code indicator appears when you press the FUNCTION key. Pressing a key while this
indicator is on the display causes the function marked above, or next to thatkey to be executed.
appears when you press the SHIFT key. While this indicator is on the dis-play, the keyboard is shifted, so the letter keys input the opposite of theircurrent uppercase/lowercase setting. The number keys input the punctuationsymbols marked in the upper right corners of the keys. The keyboard auto-matically unshifts (and the shift indicator disappears) as soon as you input acharacter.
appears when you press the CODE key. While this indicator is on the dis-play, number keys input the accents marked above them and the U, O, P, A,S, J, K, L, Z, C, and N keys input the special characters marked in their lowerright corners. The keyboard automatically returns to normal (and the codeindicator disappears) as soon as you input an accent.
appears when both the SHIFT and CODE keys are pressed.
SANS-SERIF
SANS-S ITC
SANS-S RND
ROMAN
ROMAN ITC
SMALL FONTcursor
4
4
7
9
8
2 03
qw
7 Label formatShows the format of the label being created.
8 Auto format indicatorThis indicator appears when Auto Format is enabled.
9 Text areaThis is where text appears during input and editing.
0 Character countThese values indicate the character count as shown below
13/24 CHR
Maximum number of allowable charactersNumber of characters input
19 E
q Size indicatorThis indicator appears when you are using Auto Format.
w Upper/lower label indicatorThis indicator shows the label (upper or lower) that is currently selected fortext input.
This indicator: Means this:x 1 3 mm (1ÚÚÚÚÚ8")x 2 6 mm (1ÚÚÚÚÚ4")x 3 9 mm (3ÚÚÚÚÚ8")x 4 12 mm (1ÚÚÚÚÚ2")x 5 15 mm (5ÚÚÚÚÚ8")
Label Printing Basics
This section contains general procedures for laying out and printing disc la-bels.
Disc Label Printing General ProcedureConnect the AC adaptor (Page 9).
Or load batteries into the printer. (Page 10)Load an ink ribbon cassette (Page 15).Select the print pattern you want to use (Page 20).Select the format and input its text.Print the label (Page 21).
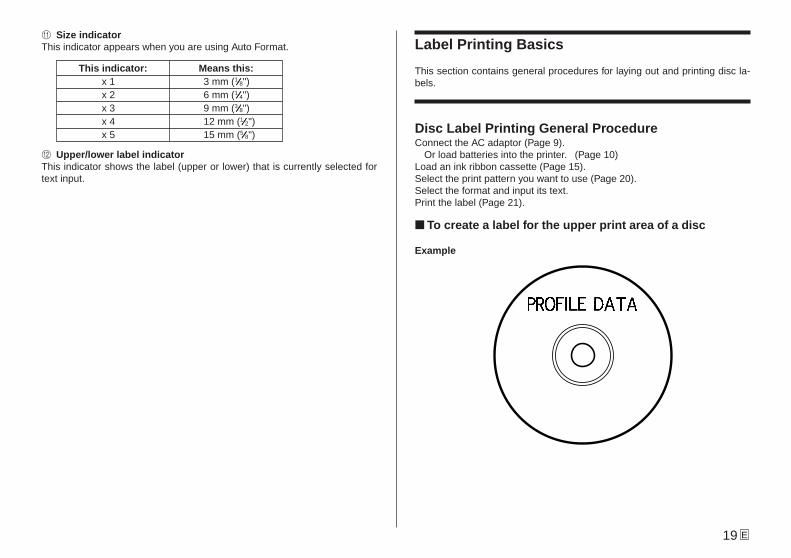
■ To create a label for the upper print area of a disc
Example
E 20
1. Press to turn on the printer.
� A LAST DATA icon will also appear on the Main Menu if there is inputdata left over from the last time you used the printer. See page 14 formore information.
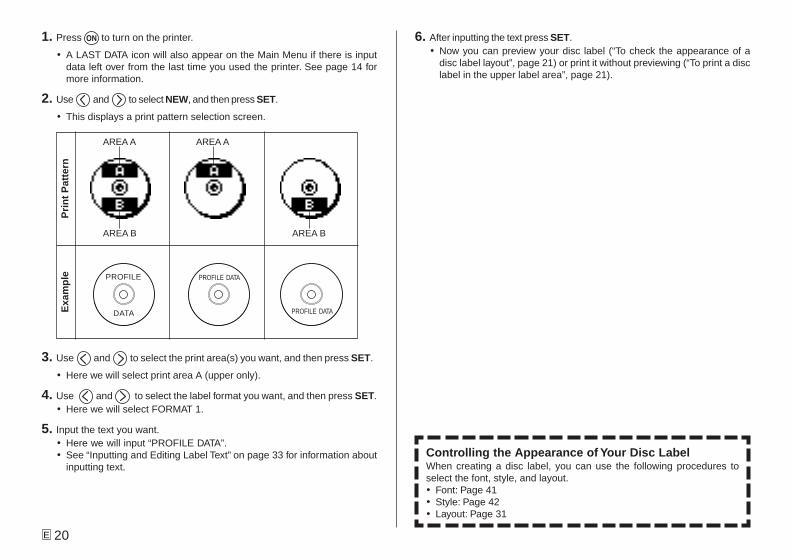
2. Use and to select NEW, and then press SET.
� This displays a print pattern selection screen.
Pri
nt
Pat
tern
Exa
mp
le
AREA A AREA A
AREA BAREA B
3. Use and to select the print area(s) you want, and then press SET.
� Here we will select print area A (upper only).
4. Use and to select the label format you want, and then press SET.� Here we will select FORMAT 1.
5. Input the text you want.� Here we will input “PROFILE DATA”.� See “Inputting and Editing Label Text” on page 33 for information about
inputting text.
6. After inputting the text press SET.� Now you can preview your disc label (“To check the appearance of a
disc label layout”, page 21) or print it without previewing (“To print a disclabel in the upper label area”, page 21).
Controlling the Appearance of Your Disc LabelWhen creating a disc label, you can use the following procedures toselect the font, style, and layout.� Font: Page 41� Style: Page 42� Layout: Page 31
PROFILE
DATA
PROFILE DATA
PROFILE DATA
21 E
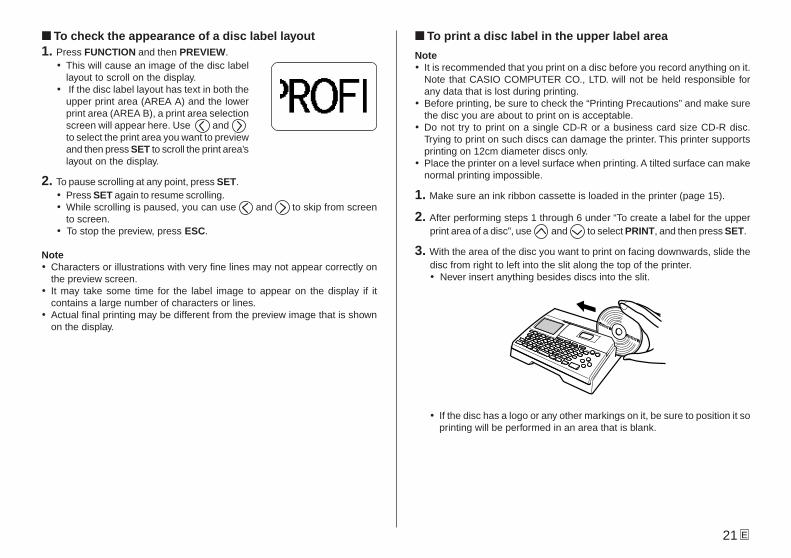
■ To check the appearance of a disc label layout1. Press FUNCTION and then PREVIEW.
� This will cause an image of the disc labellayout to scroll on the display.
� If the disc label layout has text in both theupper print area (AREA A) and the lowerprint area (AREA B), a print area selectionscreen will appear here. Use andto select the print area you want to previewand then press SET to scroll the print area’slayout on the display.
2. To pause scrolling at any point, press SET.� Press SET again to resume scrolling.� While scrolling is paused, you can use and to skip from screen
to screen.� To stop the preview, press ESC.
Note� Characters or illustrations with very fine lines may not appear correctly on
the preview screen.� It may take some time for the label image to appear on the display if it
contains a large number of characters or lines.� Actual final printing may be different from the preview image that is shown
on the display.
■ To print a disc label in the upper label area
Note� It is recommended that you print on a disc before you record anything on it.
Note that CASIO COMPUTER CO., LTD. will not be held responsible forany data that is lost during printing.
� Before printing, be sure to check the “Printing Precautions” and make surethe disc you are about to print on is acceptable.
� Do not try to print on a single CD-R or a business card size CD-R disc.Trying to print on such discs can damage the printer. This printer supportsprinting on 12cm diameter discs only.
� Place the printer on a level surface when printing. A tilted surface can makenormal printing impossible.
1. Make sure an ink ribbon cassette is loaded in the printer (page 15).
2. After performing steps 1 through 6 under “To create a label for the upperprint area of a disc”, use and to select PRINT, and then press SET.
3. With the area of the disc you want to print on facing downwards, slide thedisc from right to left into the slit along the top of the printer.� Never insert anything besides discs into the slit.
� If the disc has a logo or any other markings on it, be sure to position it soprinting will be performed in an area that is blank.
E 22
Important!� Handle the disc gently when sliding it into place. Rough handling can
damage the disc.� Check to make sure that there is no dirt, dust, or other foreign matter on
the disc. Dirt or dust can scratch the recording surface of the disc andmake it impossible to record data onto it.
� Sliding the disc onto the slit with the recording side facing you will result inprinting on the recording side of the disc, which will make the disc unrecordable.
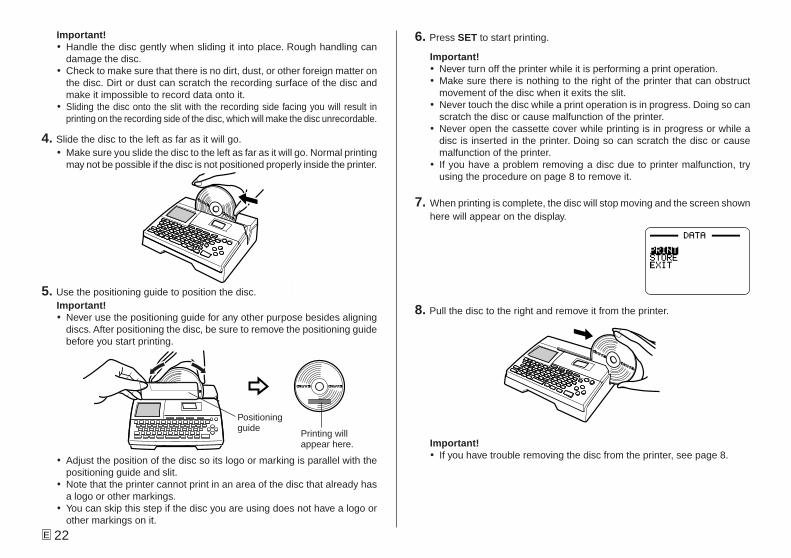
4. Slide the disc to the left as far as it will go.� Make sure you slide the disc to the left as far as it will go. Normal printing
may not be possible if the disc is not positioned properly inside the printer.
5. Use the positioning guide to position the disc.Important!� Never use the positioning guide for any other purpose besides aligning
discs. After positioning the disc, be sure to remove the positioning guidebefore you start printing.
� Adjust the position of the disc so its logo or marking is parallel with thepositioning guide and slit.
� Note that the printer cannot print in an area of the disc that already hasa logo or other markings.
� You can skip this step if the disc you are using does not have a logo orother markings on it.
6. Press SET to start printing.
Important!� Never turn off the printer while it is performing a print operation.� Make sure there is nothing to the right of the printer that can obstruct
movement of the disc when it exits the slit.� Never touch the disc while a print operation is in progress. Doing so can
scratch the disc or cause malfunction of the printer.� Never open the cassette cover while printing is in progress or while a
disc is inserted in the printer. Doing so can scratch the disc or causemalfunction of the printer.
� If you have a problem removing a disc due to printer malfunction, tryusing the procedure on page 8 to remove it.
7. When printing is complete, the disc will stop moving and the screen shownhere will appear on the display.
8. Pull the disc to the right and remove it from the printer.
Important!� If you have trouble removing the disc from the printer, see page 8.
Positioningguide
Printing willappear here.
23 E
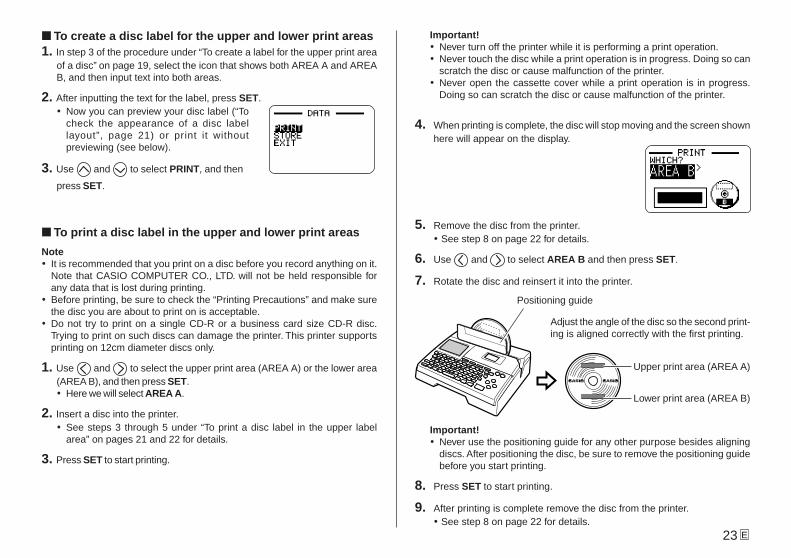
■ To create a disc label for the upper and lower print areas1. In step 3 of the procedure under “To create a label for the upper print area
of a disc” on page 19, select the icon that shows both AREA A and AREAB, and then input text into both areas.
2. After inputting the text for the label, press SET.� Now you can preview your disc label (“To
check the appearance of a disc labellayout”, page 21) or print it withoutpreviewing (see below).
3. Use and to select PRINT, and then
press SET.
■ To print a disc label in the upper and lower print areas
Note� It is recommended that you print on a disc before you record anything on it.
Note that CASIO COMPUTER CO., LTD. will not be held responsible forany data that is lost during printing.
� Before printing, be sure to check the “Printing Precautions” and make surethe disc you are about to print on is acceptable.
� Do not try to print on a single CD-R or a business card size CD-R disc.Trying to print on such discs can damage the printer. This printer supportsprinting on 12cm diameter discs only.
1. Use and to select the upper print area (AREA A) or the lower area(AREA B), and then press SET.� Here we will select AREA A.
2. Insert a disc into the printer.� See steps 3 through 5 under “To print a disc label in the upper label
area” on pages 21 and 22 for details.
3. Press SET to start printing.
Important!� Never turn off the printer while it is performing a print operation.� Never touch the disc while a print operation is in progress. Doing so can
scratch the disc or cause malfunction of the printer.� Never open the cassette cover while a print operation is in progress.
Doing so can scratch the disc or cause malfunction of the printer.
4. When printing is complete, the disc will stop moving and the screen shownhere will appear on the display.
5. Remove the disc from the printer.� See step 8 on page 22 for details.
6. Use and to select AREA B and then press SET.
7. Rotate the disc and reinsert it into the printer.
Important!� Never use the positioning guide for any other purpose besides aligning
discs. After positioning the disc, be sure to remove the positioning guidebefore you start printing.
8. Press SET to start printing.
9. After printing is complete remove the disc from the printer.� See step 8 on page 22 for details.
Adjust the angle of the disc so the second print-ing is aligned correctly with the first printing.
Upper print area (AREA A)
Positioning guide
Lower print area (AREA B)
E 24
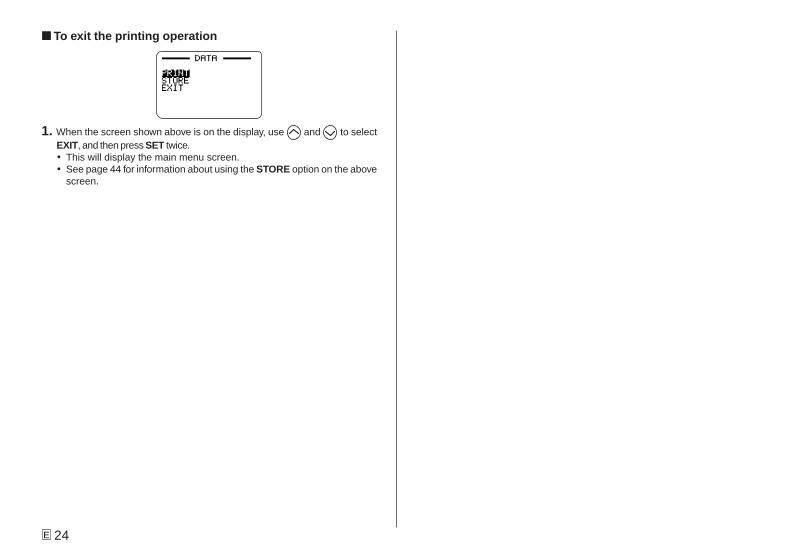
■ To exit the printing operation
1. When the screen shown above is on the display, use and to selectEXIT, and then press SET twice.� This will display the main menu screen.� See page 44 for information about using the STORE option on the above
screen.
25 E
DISC Label Data
Disc Printing Terms
The following defines a few disc printing terms that are used in this part of themanual.
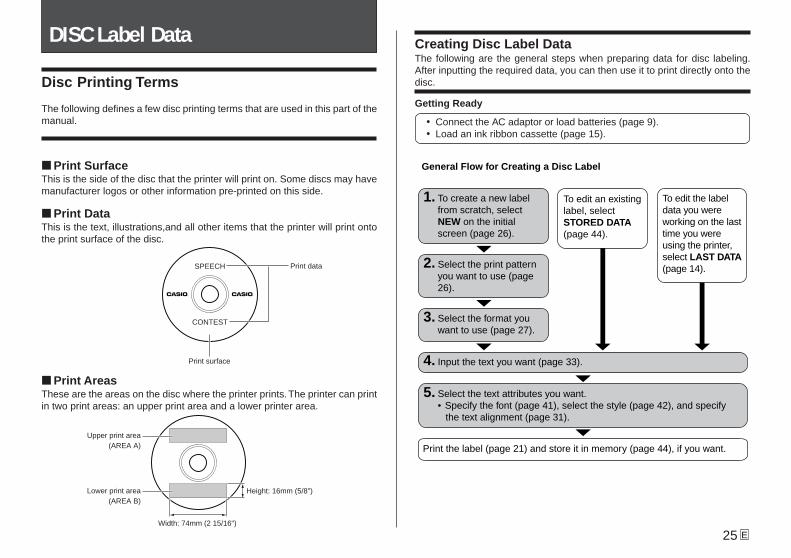
■ Print SurfaceThis is the side of the disc that the printer will print on. Some discs may havemanufacturer logos or other information pre-printed on this side.
■ Print DataThis is the text, illustrations,and all other items that the printer will print ontothe print surface of the disc.
CONTEST
SPEECH Print data
Print surface
■ Print AreasThese are the areas on the disc where the printer prints. The printer can printin two print areas: an upper print area and a lower printer area.
Width: 74mm (2 15/16")
Upper print area(AREA A)
Height: 16mm (5/8")Lower print area(AREA B)
Creating Disc Label DataThe following are the general steps when preparing data for disc labeling.After inputting the required data, you can then use it to print directly onto thedisc.
Getting Ready
� Connect the AC adaptor or load batteries (page 9).� Load an ink ribbon cassette (page 15).
1. To create a new label from scratch, select NEW on the initial screen (page 26).
2. Select the print pattern you want to use (page 26).
3. Select the format you want to use (page 27).
4. Input the text you want (page 33).
5. Select the text attributes you want.• Specify the font (page 41), select the style (page 42), and specify
the text alignment (page 31).
To edit an existing label, select STORED DATA (page 44).
To edit the label data you were working on the last time you were using the printer, select LAST DATA (page 14).
General Flow for Creating a Disc Label
Print the label (page 21) and store it in memory (page 44), if you want.

E 26
Creating a New Label
This section explains how to specify the print area and select a label format forcreating new disc printing data.� For information about printing data that you have previously saved to memory,
see page 44.
Example
■ To create a new label
1. Press to turn on the printer.
� A LAST DATA icon will also appear on the Main Menu if there is input dataleft over from the last time you used the printer. If you want to continueworking with the data from your previous session, use and toselect LAST DATA, and then press SET.
2. Use and to select NEW, and then press SET.
� This displays a print pattern selection screen.
3. Use the cursor keys to select the print pattern you want.
Pri
nt
Pat
tern
Exa
mp
le
AREA A AREA A
AREA BAREA B
Selected print pattern

27 E
4. Press SET.
■ Label FormatsThe label format determines the types and positions of text and logo data foreach block. There are a total of 29 different formats, which are divided amongfour groups: standard formats (FORMAT 1 through FORMAT 18), logo for-mats (LOGO 1 through LOGO 4), frame formats (FRAME 1 through FRAME5), and auto formats (AUTO 1 and AUTO 2).
�See “Label Formats” on page 54 for details about all the label formats that
are available.
5. Use and to scroll through the available label formats until the one
you want is displayed.
6. Press SET.� Note that if you selected as the print pattern in step 3, pressing SET
will display a screen for specifying the label format for the AREA B area.Repeat steps 5 and 6.
� Pressing SET causes the text input screen to appear.
7. Input the text you want.
� See “Inputting and Editing Label Text” on page 33 for information aboutinputting text.
8. Press SET.
9. Repeat steps 7 and 8 for other blocks.
Label format image
If you want to do this:
Input text only
Input text and a logo� See “Inserting a Logo Into a La-
bel” on page 28 for informationabout inputting logos.
Input text and a frame� See “Inserting a Frame Into a
Label” on page 30 for informa-tion about inputting frames.
Have the printer automatically se-lect text size in accordance withthe number of characters� See page 31 for more informa-
tion.
Select this type of format:
FORMAT 1 through FORMAT 18
LOGO 1 through LOGO 4
FRAME 1 through FRAME 5
AUTO 1 or AUTO 2
This is the currently selected label format.
Name of block where you arecurrently inputting text.
Block where you are inputting text flashes.
E 28
10. After all input is complete, press SET.� This displays a screen, which you can use to print the label (page 21) or
to save the label (page 44).
� You can also exit your label making session by using the cursor keys toselect EXIT, and then pressing SET twice.
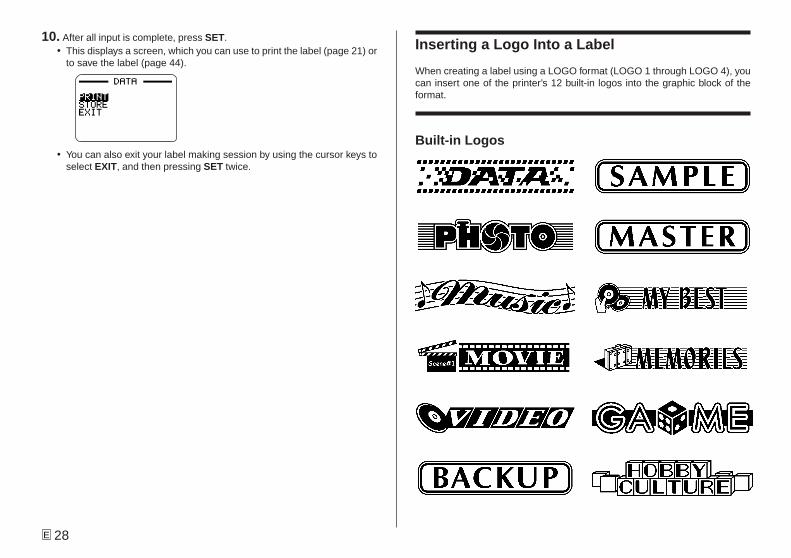
Inserting a Logo Into a Label
When creating a label using a LOGO format (LOGO 1 through LOGO 4), youcan insert one of the printer’s 12 built-in logos into the graphic block of theformat.
Built-in Logos

29 E
Output SamplesThe following shows examples of labels that use logos.
LOGO 1
LOGO 2
LOGO 3
LOGO 4
To insert a logo into a label1. Perform steps 1 through 4 of the procedure under “To create a new label”
on page 26.
2. On the label format selection screen, use and to scroll through the
label formats until one of the LOGO formats (LOGO 1 through LOGO 4) isdisplayed.
3. Press SET.
4. Use and to scroll through the logo data names, until the one you
want is on the display.
5. Press SET.� This inserts the logo into the label. Now you can perform the other steps
under “To create a new label” on page 26 to input text.
E 30
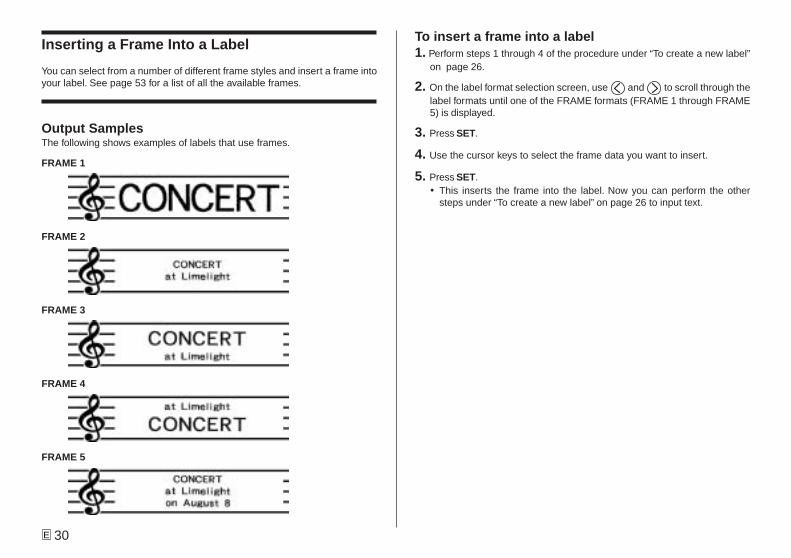
Inserting a Frame Into a Label
You can select from a number of different frame styles and insert a frame intoyour label. See page 53 for a list of all the available frames.
Output SamplesThe following shows examples of labels that use frames.
To insert a frame into a label1. Perform steps 1 through 4 of the procedure under “To create a new label”
on page 26.
2. On the label format selection screen, use and to scroll through thelabel formats until one of the FRAME formats (FRAME 1 through FRAME5) is displayed.
3. Press SET.
4. Use the cursor keys to select the frame data you want to insert.
5. Press SET.� This inserts the frame into the label. Now you can perform the other
steps under “To create a new label” on page 26 to input text.
FRAME 1
FRAME 2
FRAME 3
FRAME 4
FRAME 5

31 E
Inputting Text into an AUTO Format
The two AUTO formats automatically adjust the size of characters in accord-ance with the number of characters you input.
The table below shows how character size is adjusted for each auto format.
To input text into an AUTO format label1. Perform steps 1 through 4 of the procedure under “To create a new label”
on page 26.
2. On the label format selection screen, use and to scroll through the
label formats until AUTO1 or AUTO2 is displayed.
3. Press SET.
4. Input the text you want.
5. Press SET.
� Now you can perform the other steps under “To create a new label” on page26 to complete the label.
AUTO 1 (1 line) AUTO 2 (2 lines)Displayed Size Printed Size Displayed Size Printed Size
0 to 9 ×5 15mm (5ÚÚÚÚÚ8") ×2 6mm (1ÚÚÚÚÚ4")10 to 12 ×4 12mm (1ÚÚÚÚÚ2") ×2 6mm (1ÚÚÚÚÚ4")13 to 16 ×3 9mm (3ÚÚÚÚÚ8") ×2 6mm (1ÚÚÚÚÚ4")17 to 24 ×2 6mm (1ÚÚÚÚÚ4") ×2 6mm (1ÚÚÚÚÚ4")25 to 49 ×1 3mm (1ÚÚÚÚÚ8") ×1 3mm (1ÚÚÚÚÚ8")
Number of InputCharacters
Specifying Character Spacing
There are two ways that characters can be spaced: proportional spacing anduniform spacing.
With proportional spacing, the amount of space between two characters de-pends on what those two characters are.
With uniform spacing, all characters are separated by the same amount ofspace.
To turn proportional spacing on and off1. While inputting text, press FORM.
2. Use and to select PROPORTIONAL, and then press SET.
3. Use and to turn proportional spacing on or off.
� Note that the setting you select is applied to all the text of the label.
4. Press SET to apply your setting and return to the text input screen.
E 32
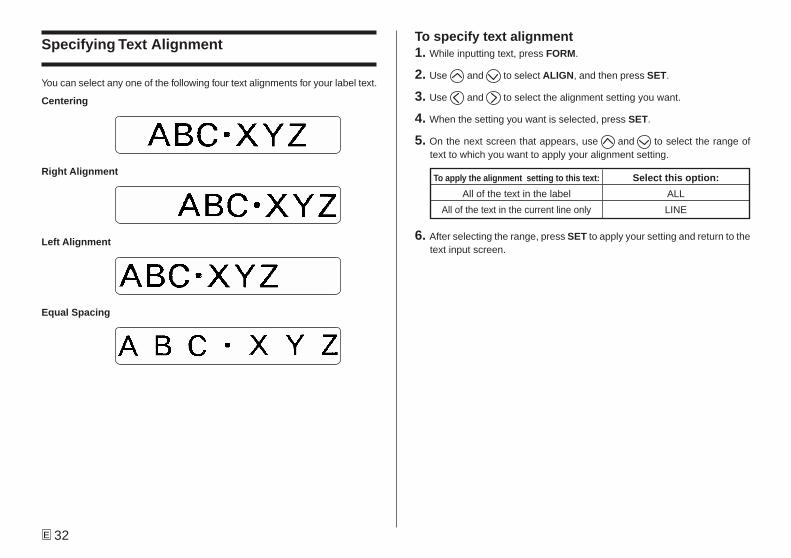
Specifying Text Alignment
You can select any one of the following four text alignments for your label text.
Centering
Right Alignment
Left Alignment
Equal Spacing
To specify text alignment1. While inputting text, press FORM.
2. Use and to select ALIGN, and then press SET.
3. Use and to select the alignment setting you want.
4. When the setting you want is selected, press SET.
5. On the next screen that appears, use and to select the range oftext to which you want to apply your alignment setting.
6. After selecting the range, press SET to apply your setting and return to thetext input screen.
To apply the alignment setting to this text:
All of the text in the label
All of the text in the current line only
Select this option:
ALL
LINE
33 E
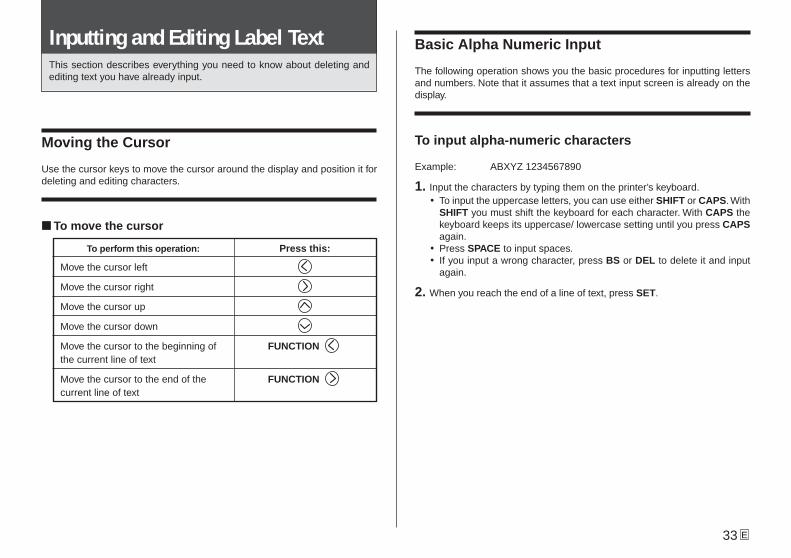
Inputting and Editing Label TextThis section describes everything you need to know about deleting andediting text you have already input.
Moving the Cursor
Use the cursor keys to move the cursor around the display and position it fordeleting and editing characters.
■ To move the cursor
Basic Alpha Numeric Input
The following operation shows you the basic procedures for inputting lettersand numbers. Note that it assumes that a text input screen is already on thedisplay.
To input alpha-numeric characters
Example: ABXYZ 1234567890
1. Input the characters by typing them on the printer’s keyboard.� To input the uppercase letters, you can use either SHIFT or CAPS. With
SHIFT you must shift the keyboard for each character. With CAPS thekeyboard keeps its uppercase/ lowercase setting until you press CAPSagain.
� Press SPACE to input spaces.� If you input a wrong character, press BS or DEL to delete it and input
again.
2. When you reach the end of a line of text, press SET.
To perform this operation:
Move the cursor left
Move the cursor right
Move the cursor up
Move the cursor down
Move the cursor to the beginning ofthe current line of text
Move the cursor to the end of thecurrent line of text
Press this:
FUNCTION
FUNCTION
E 34
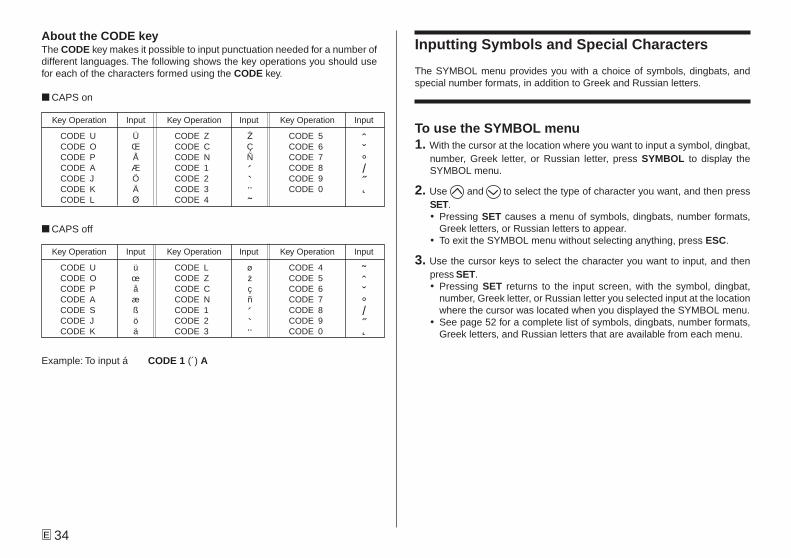
About the CODE keyThe CODE key makes it possible to input punctuation needed for a number ofdifferent languages. The following shows the key operations you should usefor each of the characters formed using the CODE key.
■ CAPS on
■ CAPS off
Example: To input á CODE 1 (´) A
Key Operation Input Key Operation Input Key Operation Input
CODE U üCODE O œCODE P åCODE A æCODE S ßCODE J öCODE K ä
CODE L j
CODE Z w
CODE C çCODE N ñCODE 1 ´CODE 2 `CODE 3 ¨
CODE 4 ˜CODE 5 ˆCODE 6 ˇCODE 7 °CODE 8 /CODE 9 ˝CODE 0 ˛
Key Operation Input Key Operation Input Key Operation Input
CODE U ÜCODE O ŒCODE P ÅCODE A ÆCODE J ÖCODE K ÄCODE L J
CODE Z W
CODE C ÇCODE N ÑCODE 1 ´CODE 2 `CODE 3 ¨CODE 4 ˜
CODE 5 ˆCODE 6 ˇCODE 7 °CODE 8 /CODE 9 ˝CODE 0 ˛
Inputting Symbols and Special Characters
The SYMBOL menu provides you with a choice of symbols, dingbats, andspecial number formats, in addition to Greek and Russian letters.
To use the SYMBOL menu1. With the cursor at the location where you want to input a symbol, dingbat,
number, Greek letter, or Russian letter, press SYMBOL to display theSYMBOL menu.
2. Use and to select the type of character you want, and then pressSET.� Pressing SET causes a menu of symbols, dingbats, number formats,
Greek letters, or Russian letters to appear.� To exit the SYMBOL menu without selecting anything, press ESC.
3. Use the cursor keys to select the character you want to input, and thenpress SET.� Pressing SET returns to the input screen, with the symbol, dingbat,
number, Greek letter, or Russian letter you selected input at the locationwhere the cursor was located when you displayed the SYMBOL menu.
� See page 52 for a complete list of symbols, dingbats, number formats,Greek letters, and Russian letters that are available from each menu.
35 E
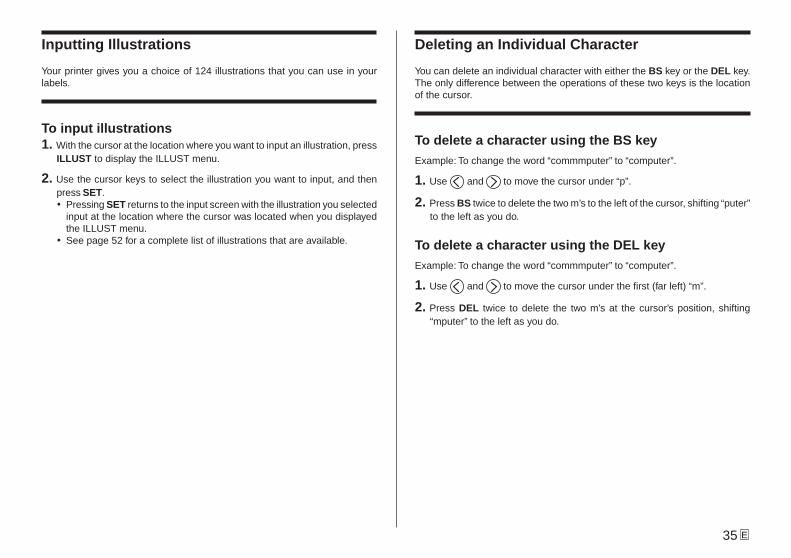
Inputting Illustrations
Your printer gives you a choice of 124 illustrations that you can use in yourlabels.
To input illustrations1. With the cursor at the location where you want to input an illustration, press
ILLUST to display the ILLUST menu.
2. Use the cursor keys to select the illustration you want to input, and thenpress SET.� Pressing SET returns to the input screen with the illustration you selected
input at the location where the cursor was located when you displayedthe ILLUST menu.
� See page 52 for a complete list of illustrations that are available.
Deleting an Individual Character
You can delete an individual character with either the BS key or the DEL key.The only difference between the operations of these two keys is the locationof the cursor.
To delete a character using the BS keyExample: To change the word “commmputer” to “computer”.
1. Use and to move the cursor under “p”.
2. Press BS twice to delete the two m’s to the left of the cursor, shifting “puter”to the left as you do.
To delete a character using the DEL keyExample: To change the word “commmputer” to “computer”.
1. Use and to move the cursor under the first (far left) “m”.
2. Press DEL twice to delete the two m’s at the cursor’s position, shifting“mputer” to the left as you do.
E 36
Clearing Input Text
Use the following steps to clear text on the input screen.
To clear all text1. Press FUNCTION and then BS (CLS).
2. In response to the confirmation message that appears, press SET.
� This clears all the text from the input screen.� If you want to abort the clear operation without deleting anything, press
ESC in place of SET.
Text Editing
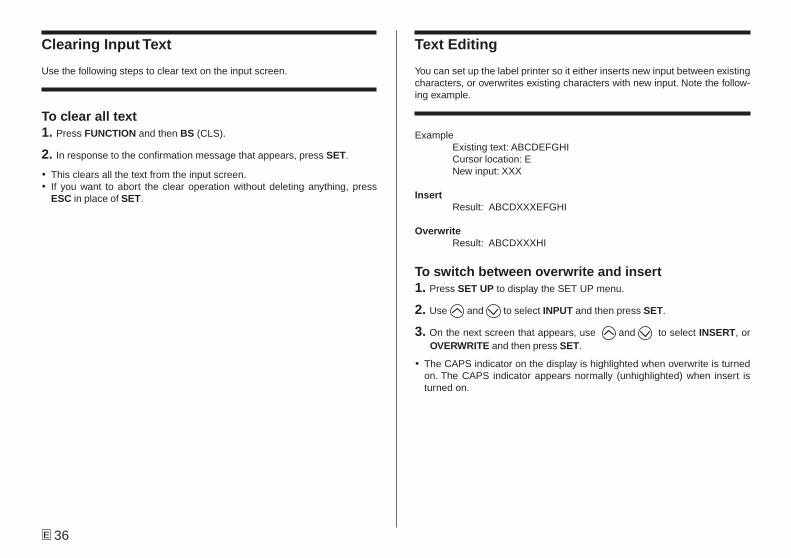
You can set up the label printer so it either inserts new input between existingcharacters, or overwrites existing characters with new input. Note the follow-ing example.
ExampleExisting text: ABCDEFGHICursor location: ENew input: XXX
InsertResult: ABCDXXXEFGHI
OverwriteResult: ABCDXXXHI
To switch between overwrite and insert1. Press SET UP to display the SET UP menu.
2. Use and to select INPUT and then press SET.
3. On the next screen that appears, use and to select INSERT, orOVERWRITE and then press SET.
� The CAPS indicator on the display is highlighted when overwrite is turnedon. The CAPS indicator appears normally (unhighlighted) when insert isturned on.
37 E
Using Phrase Memory
Phrase memory provides storage of nine phrases you can recall and inputinto your labels. Initially, phrase memory records 1 through 8 are preset withoften-used label phrases. You can use these as they are or replace them withyour own text.
The following are the initial contents of the phrase memory records.1 Digital Image2 Date Recorded:3 Backup Data4 Confidential5 Hit Album6 Omnibus7 My Favorites8 Recorded At:9 <Empty>
To recall a phrase1. While inputting text, press PHRASE MEMORY.
� This displays a list of available phrases.
2. Use and to select the phrase you want to recall, and then pressSET.
� This recalls the phrase you selected and inputs it into the input screen.� You can also select a phrase by inputting its record number, from 1 through
9.� If the phrase you selected causes the number of input characters to exceed
the allowable limit, the error message “ENTIRE PHRASE COULD NOT BERECALLED!” appears. The phrase is partially input, up to the allowable limit.
To create new phrase memory text1. Press PHRASE MEMORY.
2. Use and to select [DATA EDIT], and then press SET.
3. Use and to select MAKE, and then press SET.
4. Use and to select NEW, and then press SET.� The NEW / STRING→PHRASE screen does not appear if there is not
text currently input on the text input screen.
5. On input screen that appears, input the text that you want, and then pressSET.
6. Use and to select the phrase memory where you want to store thetext, and then press SET.
7. In response to the confirmation message that appears, press SET to savethe phrase or ESC to abort.
To save input text in phrase memory1. While inputting the text you want to save on the input screen, press PHRASE
MEMORY.
2. Use and to select [DATA EDIT], and then press SET.
3. Use and to select MAKE, and then press SET.
4. Use and to select STRING→PHRASE, and then press SET.
5. On the input screen that appears, check the text and make any changesthat you want and then press SET.
6. Use and to select the phrase memory where you want to store thetext, and then press SET.
7. In response to the confirmation message that appears, press SET to savethe phrase or ESC to abort.
E 38
To edit a phrase memory record1. Press PHRASE MEMORY.
2. Use and to select [DATA EDIT], and then press SET.
3. Use and to select EDIT, and then press SET.
4. Use and to select the phrase memory record whose contents youwant to edit, and then press SET.
5. On the text screen that appears, check the text and make any changesthat you want, and then press SET.
6. Use and to select the phrase memory where you want to store thetext, and then press SET.
7. In response to the confirmation message that appears, press SET to savethe phrase or ESC to abort.
To delete a phrase memory record1. Press PHRASE MEMORY.
2. Use and to select [DATA EDIT], and then press SET.
3. Use and to select DELETE, and then press SET.
4. Use and to select the phrase memory record whose contents youwant to delete, and then press SET.
5. In response to the confirmation message that appears, press SET to de-lete the phrase or ESC to abort.
Using Copy and Paste
You can copy text data you have input in one location, and paste it into an-other location.
■ To copy text1. Input the text you want to copy.
2. Press FUNCTION and then COPY.
3. Use and to move the cursor to the first character of the string oftext to which you want to copy, and then press SET.
4. Use and to move the cursor to the last character of the string oftext to which you want to copy, and then press SET.� The message ”COPY OPERATION COMPLETE” appears and the input
screen appears when the copy operation is complete.� You can have up to nine copies in memory. The 10th copy operation
causes the oldest copied text to be deleted to make room for the newlycopied text.
■ To paste copied text1. When inputting text, press PASTE.
2. On the list of copied text that appears, use and to select the textyou want, and then press SET.� This pastes the selected data at the current cursor location.� If the text you are copying causes the maximum number of input character
limit to be exceeded, the message “TOO MANY CHARACTERS! SOMEWERE NOT PASTED” appears and some of the text is not pasted.
39 E
User Characters
You can create up to four user characters and store them in memory. You cancreate a character from scratch, or you can use an existing character or sym-bol as a basis for your new character.
■ To create a user character from scratch1. Press USER CHR.
2. Use and to select MAKE and then press SET.
3. Use and to select NEW and then press SET.
� The NEW/USE INPUT CHAR screen does not appear if there is no inputcharacter at the cursor location on the text input screen.
User Character Drawing Screen
Cursor
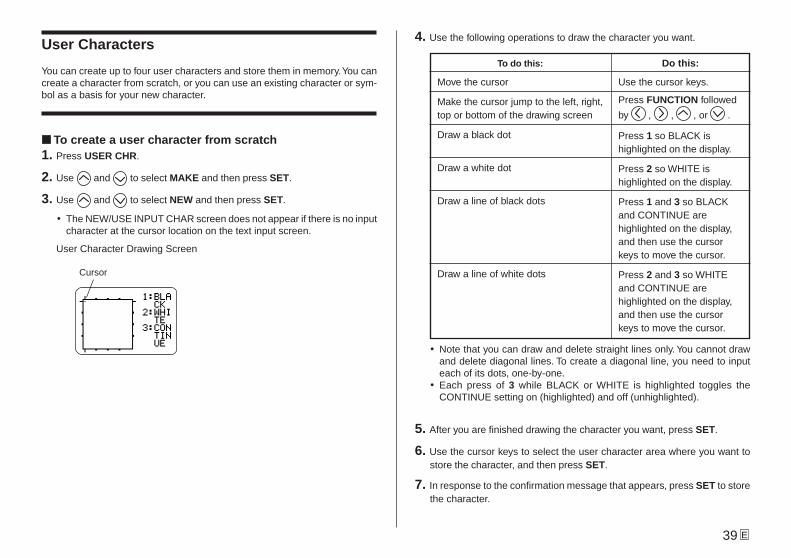
4. Use the following operations to draw the character you want.
Do this:
Use the cursor keys.
Press FUNCTION followed
by , , , or .
Press 1 so BLACK ishighlighted on the display.
Press 2 so WHITE ishighlighted on the display.
Press 1 and 3 so BLACKand CONTINUE arehighlighted on the display,and then use the cursorkeys to move the cursor.
Press 2 and 3 so WHITEand CONTINUE arehighlighted on the display,and then use the cursorkeys to move the cursor.
To do this:
Move the cursor
Make the cursor jump to the left, right,top or bottom of the drawing screen
Draw a black dot
Draw a white dot
Draw a line of black dots
Draw a line of white dots
� Note that you can draw and delete straight lines only. You cannot drawand delete diagonal lines. To create a diagonal line, you need to inputeach of its dots, one-by-one.
� Each press of 3 while BLACK or WHITE is highlighted toggles theCONTINUE setting on (highlighted) and off (unhighlighted).
5. After you are finished drawing the character you want, press SET.
6. Use the cursor keys to select the user character area where you want tostore the character, and then press SET.
7. In response to the confirmation message that appears, press SET to storethe character.
E 40
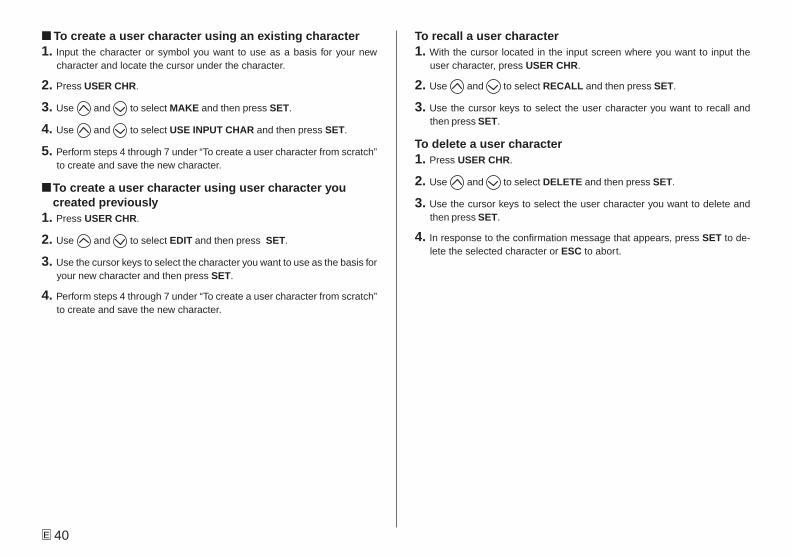
To recall a user character1. With the cursor located in the input screen where you want to input the
user character, press USER CHR.
2. Use and to select RECALL and then press SET.
3. Use the cursor keys to select the user character you want to recall andthen press SET.
To delete a user character1. Press USER CHR.
2. Use and to select DELETE and then press SET.
3. Use the cursor keys to select the user character you want to delete andthen press SET.
4. In response to the confirmation message that appears, press SET to de-lete the selected character or ESC to abort.
■ To create a user character using an existing character1. Input the character or symbol you want to use as a basis for your new
character and locate the cursor under the character.
2. Press USER CHR.
3. Use and to select MAKE and then press SET.
4. Use and to select USE INPUT CHAR and then press SET.
5. Perform steps 4 through 7 under “To create a user character from scratch”to create and save the new character.
■ To create a user character using user character youcreated previously
1. Press USER CHR.
2. Use and to select EDIT and then press SET.
3. Use the cursor keys to select the character you want to use as the basis foryour new character and then press SET.
4. Perform steps 4 through 7 under “To create a user character from scratch”to create and save the new character.
41 E
Controlling the Appearance of TextThe operations in this section explain how to select fonts, and how to usestyles to make text more attractive and eye-catching.
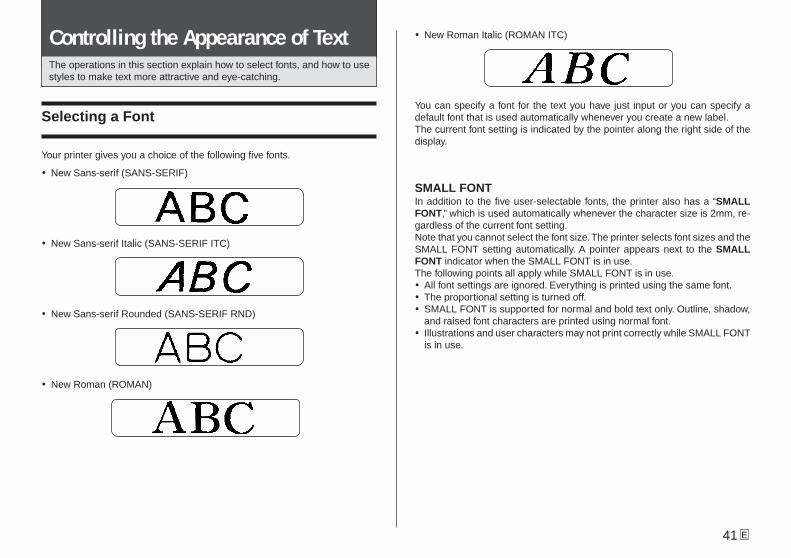
� New Roman Italic (ROMAN ITC)
You can specify a font for the text you have just input or you can specify adefault font that is used automatically whenever you create a new label.The current font setting is indicated by the pointer along the right side of thedisplay.
SMALL FONTIn addition to the five user-selectable fonts, the printer also has a “SMALLFONT,” which is used automatically whenever the character size is 2mm, re-gardless of the current font setting.Note that you cannot select the font size. The printer selects font sizes and theSMALL FONT setting automatically. A pointer appears next to the SMALLFONT indicator when the SMALL FONT is in use.The following points all apply while SMALL FONT is in use.� All font settings are ignored. Everything is printed using the same font.� The proportional setting is turned off.� SMALL FONT is supported for normal and bold text only. Outline, shadow,
and raised font characters are printed using normal font.� Illustrations and user characters may not print correctly while SMALL FONT
is in use.
Selecting a Font
Your printer gives you a choice of the following five fonts.
� New Sans-serif (SANS-SERIF)
� New Sans-serif Italic (SANS-SERIF ITC)
� New Sans-serif Rounded (SANS-SERIF RND)
� New Roman (ROMAN)
E 42
To apply the font setting to this text:
All of the text in the label
All of the text in the current line
Select this option:
ALL
LINE
To change the default font setting1. Press SET UP to display the SET UP menu.
2. Use and to select DEFAULT FONT and then press SET.
3. Use and to select the font you want to use as the default, and thenpress SET.
� The default font you specified will be used first for all new labels. Wheninputting text, you can use the procedure above to change the font to anotherstyle, if you want.
To change the font of text you have just input1. After inputting the text you want, press FONT.
2. Use and to select the font you want to change to and then pressSET.
3. On the next screen that appears, select the range of text to which you wantto apply your font setting, and then press SET.
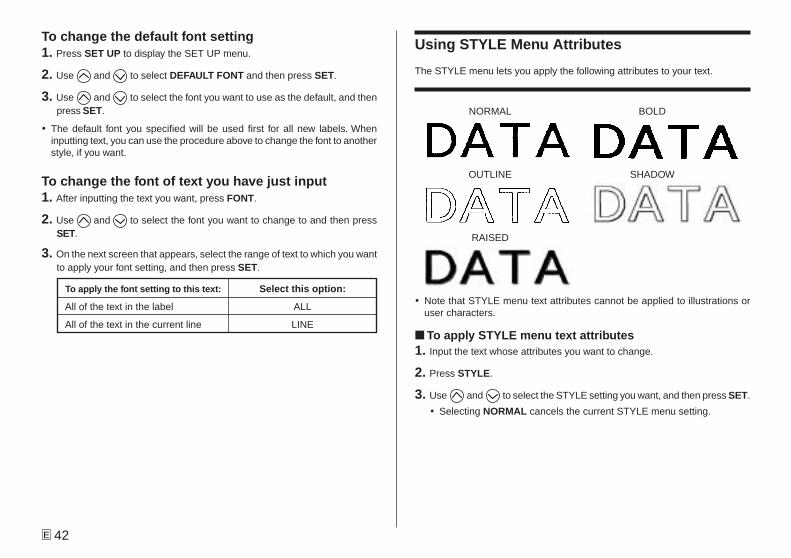
Using STYLE Menu Attributes
The STYLE menu lets you apply the following attributes to your text.
NORMAL BOLD
OUTLINE SHADOW
RAISED
� Note that STYLE menu text attributes cannot be applied to illustrations oruser characters.
■ To apply STYLE menu text attributes1. Input the text whose attributes you want to change.
2. Press STYLE.
3. Use and to select the STYLE setting you want, and then press SET.
� Selecting NORMAL cancels the current STYLE menu setting.

43 E
To apply the STYLE setting to this text:
All of the text in the label
All of the text in the current line
Select this option:
ALL
LINE
A pointer appears to indicate the current STYLE setting: [A] (BOLD), [ ](OUTLINE), [ ] (SHADOW), [ ] (RAISED).No pointer is shown when NORMAL is selected.
4. Use and to select the range of text for the STYLE setting you want,and then press SET.
� SMALL FONT is supported for normal and bold text only. Outline, shadow,and raised font characters are printed using normal font.
E 44
Saving, Recalling and DeletingLabels
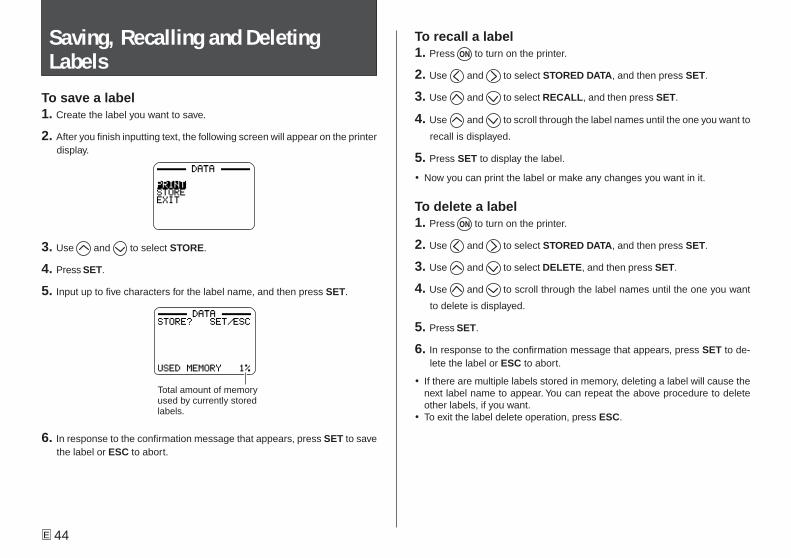
To save a label1. Create the label you want to save.
2. After you finish inputting text, the following screen will appear on the printerdisplay.
3. Use and to select STORE.
4. Press SET.
5. Input up to five characters for the label name, and then press SET.
6. In response to the confirmation message that appears, press SET to savethe label or ESC to abort.
To recall a label1. Press to turn on the printer.
2. Use and to select STORED DATA, and then press SET.
3. Use and to select RECALL, and then press SET.
4. Use and to scroll through the label names until the one you want to
recall is displayed.
5. Press SET to display the label.
� Now you can print the label or make any changes you want in it.
To delete a label1. Press to turn on the printer.
2. Use and to select STORED DATA, and then press SET.
3. Use and to select DELETE, and then press SET.
4. Use and to scroll through the label names until the one you want
to delete is displayed.
5. Press SET.
6. In response to the confirmation message that appears, press SET to de-lete the label or ESC to abort.
� If there are multiple labels stored in memory, deleting a label will cause thenext label name to appear. You can repeat the above procedure to deleteother labels, if you want.
� To exit the label delete operation, press ESC.
Total amount of memoryused by currently storedlabels.
45 E
Demo PrintingDemo printing uses built-in data to demonstrate the printing that can beperformed by the printer.
Important!� If there is label data from your last label layout session is still in memory,
performing a demo print will delete it. If you think you will need the datalater, save it in memory (page 44) before performing a demo print.
1. Make sure an ink ribbon cassette is loaded in the printer.� See page 15 for information about loading ink ribbon cassettes.
2. If the printer is on, press to turn it off.
3. Press to turn on the printer.
4. Press SET UP.
5. Use and to select DEMO PRINT, and then press SET.
6. Use and to select the demo data you want to print, and then pressSET.
7. Use and to select PRINT, and then press SET.
8. Use and to select the print area you want to print, and then pressSET.
9. Insert a disc into the printer.
10. Press SET to start printing.� Both DATA 1 and DATA 2 print in both the upper print area and
the lower print area of the disc.
11. After printing is complete, use and to select EXIT, and then pressSET.
12. In response to the confirmation message that appears, press SET.
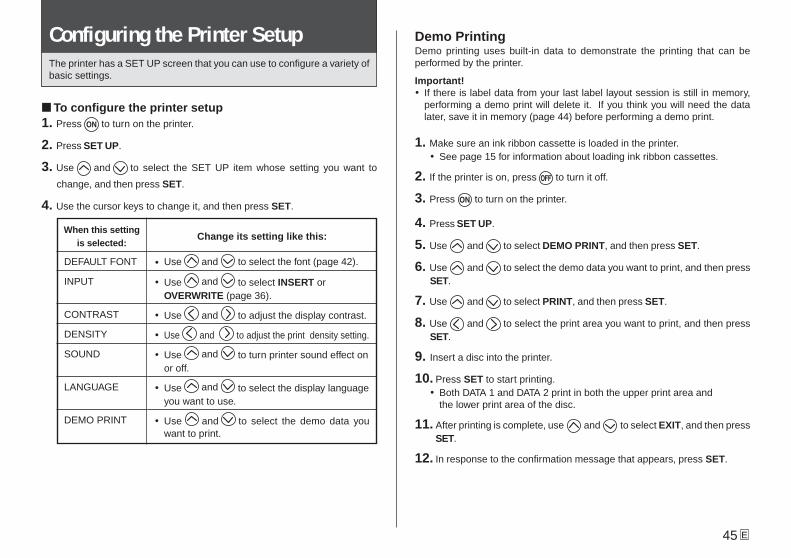
Configuring the Printer SetupThe printer has a SET UP screen that you can use to configure a variety ofbasic settings.
■ To configure the printer setup1. Press to turn on the printer.
2. Press SET UP.
3. Use and to select the SET UP item whose setting you want to
change, and then press SET.
4. Use the cursor keys to change it, and then press SET.
When this settingis selected:
DEFAULT FONT
INPUT
CONTRAST
DENSITY
SOUND
LANGUAGE
DEMO PRINT
Change its setting like this:
� Use and to select the font (page 42).
� Use and to select INSERT orOVERWRITE (page 36).
� Use and to adjust the display contrast.
� Use and to adjust the print density setting.
� Use and to turn printer sound effect onor off.
� Use and to select the display languageyou want to use.
� Use and to select the demo data youwant to print.
E 46
Reference
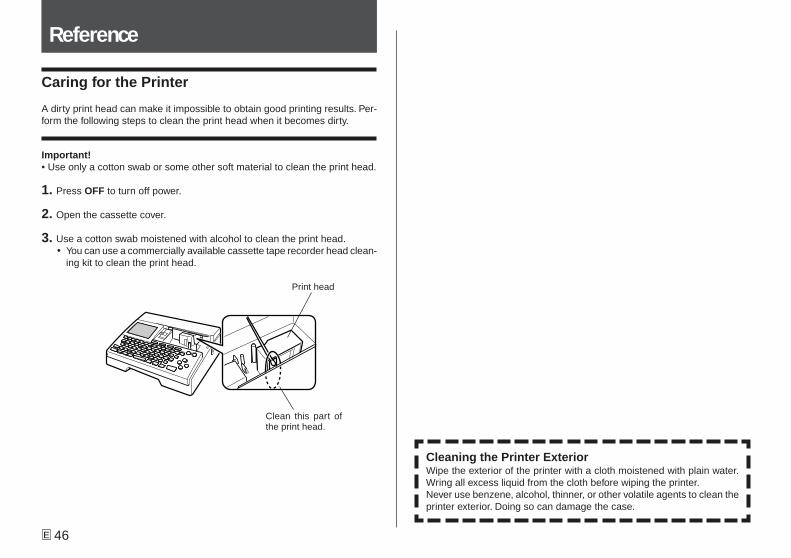
Caring for the Printer
A dirty print head can make it impossible to obtain good printing results. Per-form the following steps to clean the print head when it becomes dirty.
Important!• Use only a cotton swab or some other soft material to clean the print head.
1. Press OFF to turn off power.
2. Open the cassette cover.
3. Use a cotton swab moistened with alcohol to clean the print head.� You can use a commercially available cassette tape recorder head clean-
ing kit to clean the print head.
Cleaning the Printer ExteriorWipe the exterior of the printer with a cloth moistened with plain water.Wring all excess liquid from the cloth before wiping the printer.Never use benzene, alcohol, thinner, or other volatile agents to clean theprinter exterior. Doing so can damage the case.
Print head
Clean this part ofthe print head.
47 E
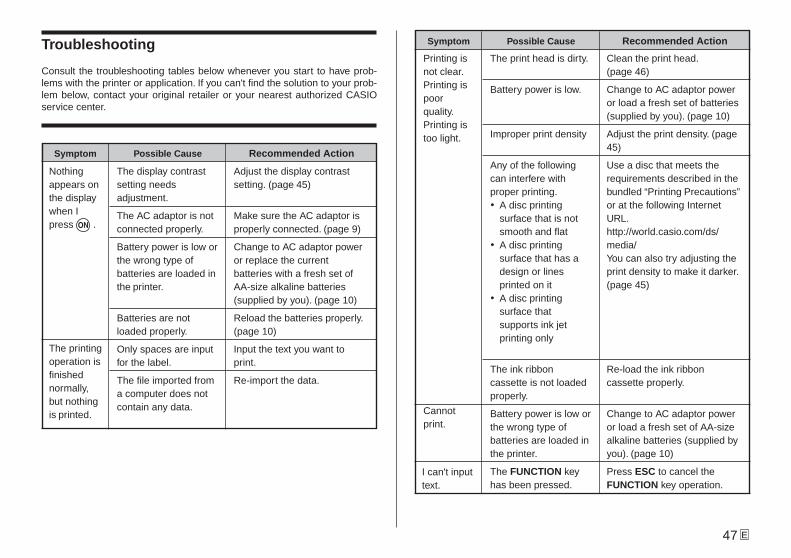
Clean the print head.(page 46)
Change to AC adaptor poweror load a fresh set of batteries(supplied by you). (page 10)
Adjust the print density. (page45)
Use a disc that meets therequirements described in thebundled “Printing Precautions”or at the following InternetURL.http://world.casio.com/ds/media/You can also try adjusting theprint density to make it darker.(page 45)
Re-load the ink ribboncassette properly.
Change to AC adaptor poweror load a fresh set of AA-sizealkaline batteries (supplied byyou). (page 10)
Press ESC to cancel theFUNCTION key operation.
The print head is dirty.
Battery power is low.
Improper print density
Any of the followingcan interfere withproper printing.� A disc printing
surface that is notsmooth and flat
� A disc printingsurface that has adesign or linesprinted on it
� A disc printingsurface thatsupports ink jetprinting only
The ink ribboncassette is not loadedproperly.
Battery power is low orthe wrong type ofbatteries are loaded inthe printer.
The FUNCTION keyhas been pressed.
Troubleshooting
Consult the troubleshooting tables below whenever you start to have prob-lems with the printer or application. If you can't find the solution to your prob-lem below, contact your original retailer or your nearest authorized CASIOservice center.
Symptom
Nothingappears onthe displaywhen Ipress .
Recommended Action
Adjust the display contrastsetting. (page 45)
Make sure the AC adaptor isproperly connected. (page 9)
Change to AC adaptor poweror replace the currentbatteries with a fresh set ofAA-size alkaline batteries(supplied by you). (page 10)
Reload the batteries properly.(page 10)
Input the text you want toprint.
Re-import the data.
Possible Cause
The display contrastsetting needsadjustment.
The AC adaptor is notconnected properly.
Battery power is low orthe wrong type ofbatteries are loaded inthe printer.
Batteries are notloaded properly.
Only spaces are inputfor the label.
The file imported froma computer does notcontain any data.
The printingoperation isfinishednormally,but nothingis printed.
Symptom Recommended ActionPossible Cause
Printing isnot clear.Printing ispoorquality.Printing istoo light.
Cannotprint.
I can't inputtext.

E 48
Symptom
I can't get aconnectionbetweenthe printerand acomputer.
The printingoperation isfinishednormally,but nothingis printed.
The printedcolor isdifferentfrom the inkribboncolor.
Recommended Action
Press the COMPUTER LINKbutton to establish a connec-tion.
Re-connect the cable properly.
Press to turn on theprinter.
Unplug the USB cable and theplug it back in again.
Try using a different USB porton your computer, or try usinga different USB cable.
Load a new ink ribboncassette (option). (page 15)
Try using a lighter color disc ora darker color ink ribbon.
Possible Cause
The COMPUTERLINK button has notbeen pressed.
The USB cabled is notconnected properly.
The printer is turnedoff.
The USB driver is notinstalled correctly.
Though the USB driveris installed correctly,data communication isnot possible for somereason.
The ink ribbon is usedup.
The color of the finalprintout is affected byboth the color of theink ribbon and thecolor of the disc youare printing on.
Symptom Recommended ActionPossible Cause
Improper alignment ofthe disc when it isplaced in the printer.
The power cord plugor the AC adaptor isnot plugged in as faras it will go.
The printer ismalfunctioning.
Battery power is low orthe wrong type ofbatteries are loaded inthe printer.
Use the positioning guidewhen aligning the disc. (page22)
Correctly connect the powercord and the AC adaptor.(page 9)
If you cannot easily removethe disc from between theprint head and roller, Removethe disc from the printer asshown on page 8.
Use the AC adaptor to powerthe printer, or replace thecurrent batteries with a freshset of AA-size alkalinebatteries.
The cassette cover isnot closed properly.
The disc is notpositioned correctly inthe printer.
Close the cassette coverproperly and insert the disc.(page 9)
Remove the disc and then re-insert it straight into the leftside of the slit along the top ofthe printer. (page 21)
The printingis notpositionedcorrectly onthe disc.
The discstops partwaythroughprinting.
I cannotinsert adisc intothe printer.
Printing willnot start.
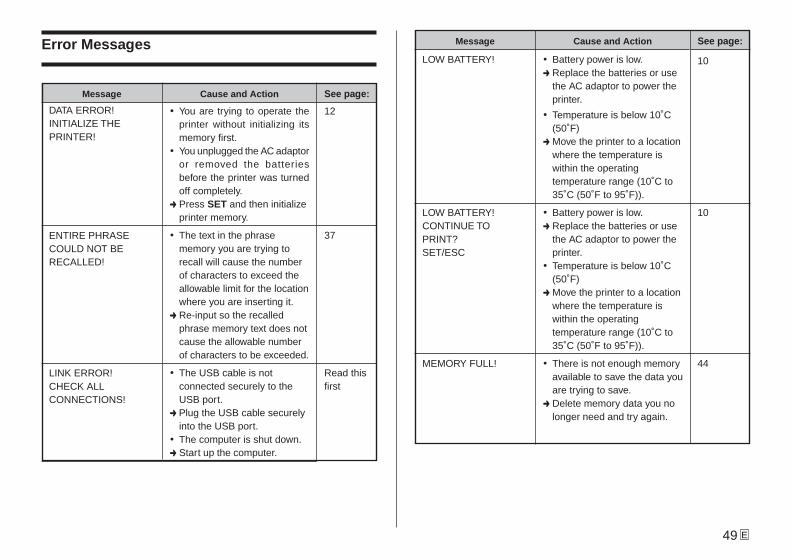
49 E
Error Messages Message See page:Cause and Action
Message See page:Cause and Action
DATA ERROR!INITIALIZE THEPRINTER!
ENTIRE PHRASECOULD NOT BERECALLED!
LINK ERROR!CHECK ALLCONNECTIONS!
� You are trying to operate theprinter without initializing itsmemory first.
� You unplugged the AC adaptoror removed the batteriesbefore the printer was turnedoff completely.
➜ Press SET and then initializeprinter memory.
� The text in the phrasememory you are trying torecall will cause the numberof characters to exceed theallowable limit for the locationwhere you are inserting it.
➜ Re-input so the recalledphrase memory text does notcause the allowable numberof characters to be exceeded.
� The USB cable is notconnected securely to theUSB port.
➜ Plug the USB cable securelyinto the USB port.
� The computer is shut down.➜ Start up the computer.
12
37
Read thisfirst
LOW BATTERY!
LOW BATTERY!CONTINUE TOPRINT?SET/ESC
MEMORY FULL!
� Battery power is low.➜ Replace the batteries or use
the AC adaptor to power theprinter.
� Temperature is below 10˚C(50˚F)
➜ Move the printer to a locationwhere the temperature iswithin the operatingtemperature range (10˚C to35˚C (50˚F to 95˚F)).
� Battery power is low.➜ Replace the batteries or use
the AC adaptor to power theprinter.
� Temperature is below 10˚C(50˚F)
➜ Move the printer to a locationwhere the temperature iswithin the operatingtemperature range (10˚C to35˚C (50˚F to 95˚F)).
� There is not enough memoryavailable to save the data youare trying to save.
➜ Delete memory data you nolonger need and try again.
10
10
44
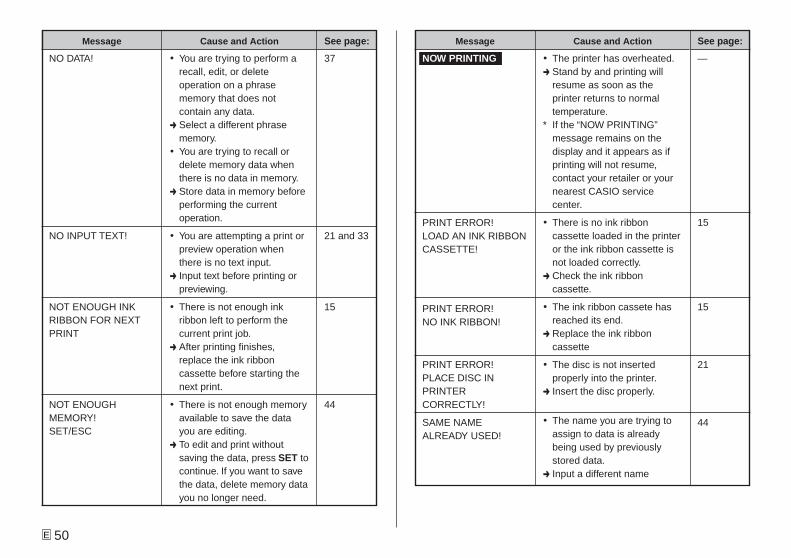
E 50
Message See page:Cause and Action Message See page:Cause and Action
NO DATA!
NO INPUT TEXT!
NOT ENOUGH INKRIBBON FOR NEXTPRINT
NOT ENOUGHMEMORY!SET/ESC
� You are trying to perform arecall, edit, or deleteoperation on a phrasememory that does notcontain any data.
➜ Select a different phrasememory.
� You are trying to recall ordelete memory data whenthere is no data in memory.
➜ Store data in memory beforeperforming the currentoperation.
� You are attempting a print orpreview operation whenthere is no text input.
➜ Input text before printing orpreviewing.
� There is not enough inkribbon left to perform thecurrent print job.
➜ After printing finishes,replace the ink ribboncassette before starting thenext print.
� There is not enough memoryavailable to save the datayou are editing.
➜ To edit and print withoutsaving the data, press SET tocontinue. If you want to savethe data, delete memory datayou no longer need.
37
21 and 33
15
44
—
15
15
21
44
� The printer has overheated.➜ Stand by and printing will
resume as soon as theprinter returns to normaltemperature.
* If the “NOW PRINTING”message remains on thedisplay and it appears as ifprinting will not resume,contact your retailer or yournearest CASIO servicecenter.
� There is no ink ribboncassette loaded in the printeror the ink ribbon cassette isnot loaded correctly.
➜ Check the ink ribboncassette.
� The ink ribbon cassete hasreached its end.
➜ Replace the ink ribboncassette
� The disc is not insertedproperly into the printer.
➜ Insert the disc properly.
� The name you are trying toassign to data is alreadybeing used by previouslystored data.
➜ Input a different name
PRINT ERROR!LOAD AN INK RIBBONCASSETTE!
PRINT ERROR!NO INK RIBBON!
PRINT ERROR!PLACE DISC INPRINTERCORRECTLY!
SAME NAMEALREADY USED!
NOW PRINTING
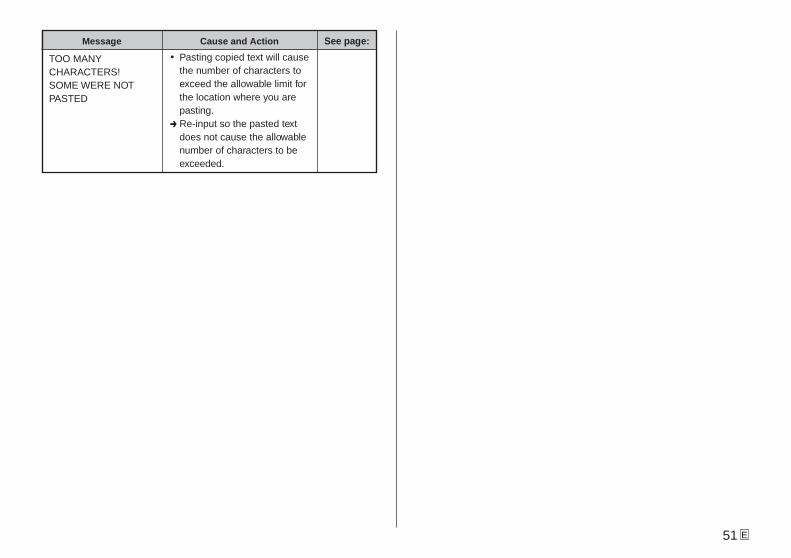
51 E
Message See page:Cause and Action
TOO MANYCHARACTERS!SOME WERE NOTPASTED
� Pasting copied text will causethe number of characters toexceed the allowable limit forthe location where you arepasting.
➜ Re-input so the pasted textdoes not cause the allowablenumber of characters to beexceeded.
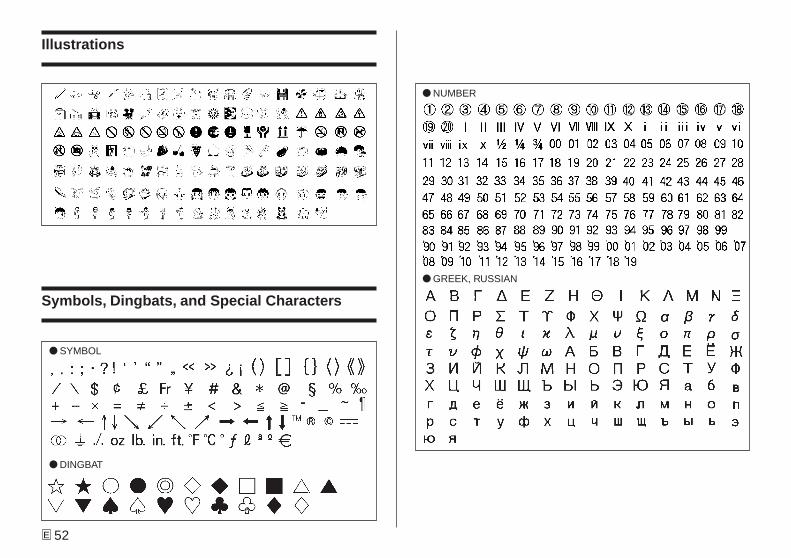
E 52
● NUMBER
● GREEK, RUSSIAN
● SYMBOL
● DINGBAT
Illustrations
Symbols, Dingbats, and Special Characters
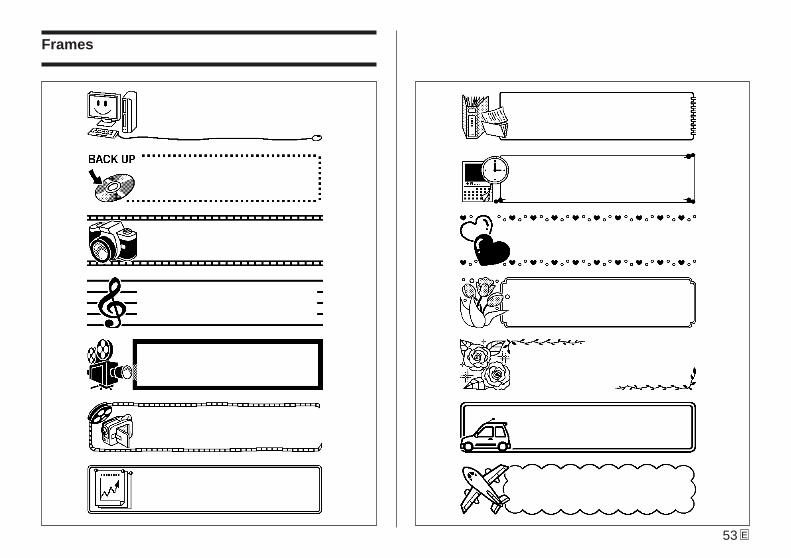
53 E
Frames
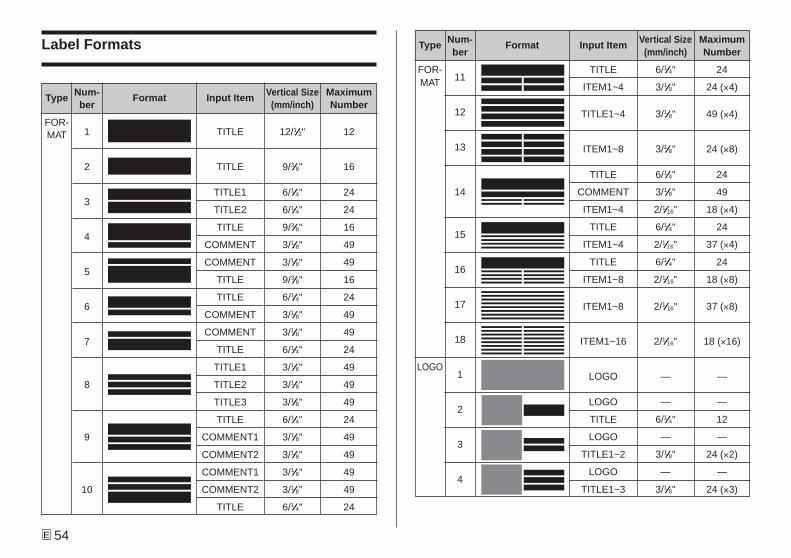
E 54
Type
FOR-MAT
Num-ber
1
2
3
4
5
6
7
8
9
10
Input Item
TITLE
TITLE
TITLE1
TITLE2
TITLE
COMMENT
COMMENT
TITLE
TITLE
COMMENT
COMMENT
TITLE
TITLE1
TITLE2
TITLE3
TITLE
COMMENT1
COMMENT2
COMMENT1
COMMENT2
TITLE
Vertical Size(mm/inch)
12/1ÚÚÚÚÚ2"
9/3ÚÚÚÚÚ8"
6/1ÚÚÚÚÚ4"
6/1ÚÚÚÚÚ4"
9/3ÚÚÚÚÚ8"
3/1ÚÚÚÚÚ8"
3/1ÚÚÚÚÚ8"
9/3ÚÚÚÚÚ8"
6/1ÚÚÚÚÚ4"
3/1ÚÚÚÚÚ8"
3/1ÚÚÚÚÚ8"
6/1ÚÚÚÚÚ4"
3/1ÚÚÚÚÚ8"
3/1ÚÚÚÚÚ8"
3/1ÚÚÚÚÚ8"
6/1ÚÚÚÚÚ4"
3/1ÚÚÚÚÚ8"
3/1ÚÚÚÚÚ8"
3/1ÚÚÚÚÚ8"
3/1ÚÚÚÚÚ8"
6/1ÚÚÚÚÚ4"
MaximumNumber
12
16
24
24
16
49
49
16
24
49
49
24
49
49
49
24
49
49
49
49
24
Format
Num-ber
11
12
13
14
15
16
17
18
1
2
3
4
Vertical Size(mm/inch)
6/1ÚÚÚÚÚ4"
3/1ÚÚÚÚÚ8"
3/1ÚÚÚÚÚ8"
3/1ÚÚÚÚÚ8"
6/1ÚÚÚÚÚ4"
3/1ÚÚÚÚÚ8"
2/1ÚÚÚÚÚ16"
6/1ÚÚÚÚÚ4"
2/1ÚÚÚÚÚ16"
6/1ÚÚÚÚÚ4"
2/1ÚÚÚÚÚ16"
2/1ÚÚÚÚÚ16"
2/1ÚÚÚÚÚ16"
—
—
6/1ÚÚÚÚÚ4"
—
3/1ÚÚÚÚÚ8"
—
3/1ÚÚÚÚÚ8"
MaximumNumber
24
24 (×4)
49 (×4)
24 (×8)
24
49
18 (×4)
24
37 (×4)
24
18 (×8)
37 (×8)
18 (×16)
—
—
12
—
24 (×2)
—
24 (×3)
FormatType
FOR-MAT
LOGO
Input Item
TITLE
ITEM1~4
TITLE1~4
ITEM1~8
TITLE
COMMENT
ITEM1~4
TITLE
ITEM1~4
TITLE
ITEM1~8
ITEM1~8
ITEM1~16
LOGO
LOGO
TITLE
LOGO
TITLE1~2
LOGO
TITLE1~3
Label Formats
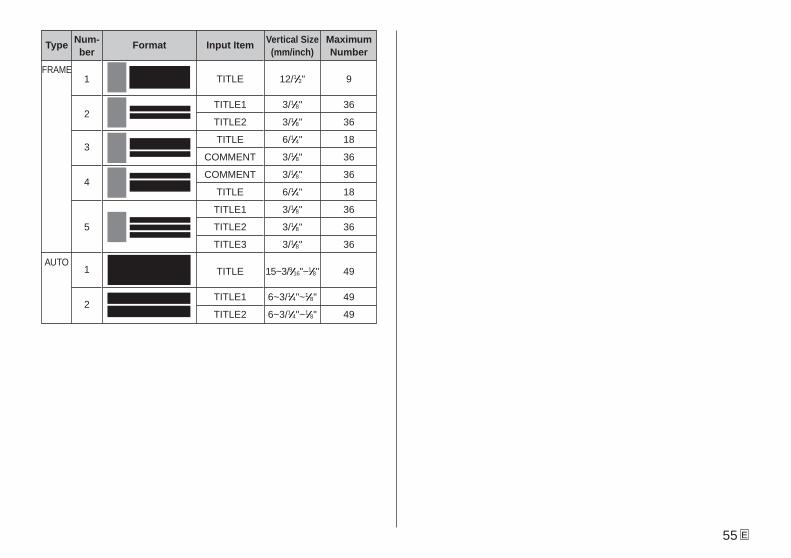
55 E
Type
FRAME
AUTO
Num-ber
1
2
3
4
5
1
2
Input Item
TITLE
TITLE1
TITLE2
TITLE
COMMENT
COMMENT
TITLE
TITLE1
TITLE2
TITLE3
TITLE
TITLE1
TITLE2
Vertical Size(mm/inch)
12/1ÚÚÚÚÚ2"
3/1ÚÚÚÚÚ8"
3/1ÚÚÚÚÚ8"
6/1ÚÚÚÚÚ4"
3/1ÚÚÚÚÚ8"
3/1ÚÚÚÚÚ8"
6/1ÚÚÚÚÚ4"
3/1ÚÚÚÚÚ8"
3/1ÚÚÚÚÚ8"
3/1ÚÚÚÚÚ8"
15~3/9ÚÚÚÚÚ16"~1ÚÚÚÚÚ8"
6~3/1ÚÚÚÚÚ4"~1ÚÚÚÚÚ8"
6~3/1ÚÚÚÚÚ4"~1ÚÚÚÚÚ8"
MaximumNumber
9
36
36
18
36
36
18
36
36
36
49
49
49
Format
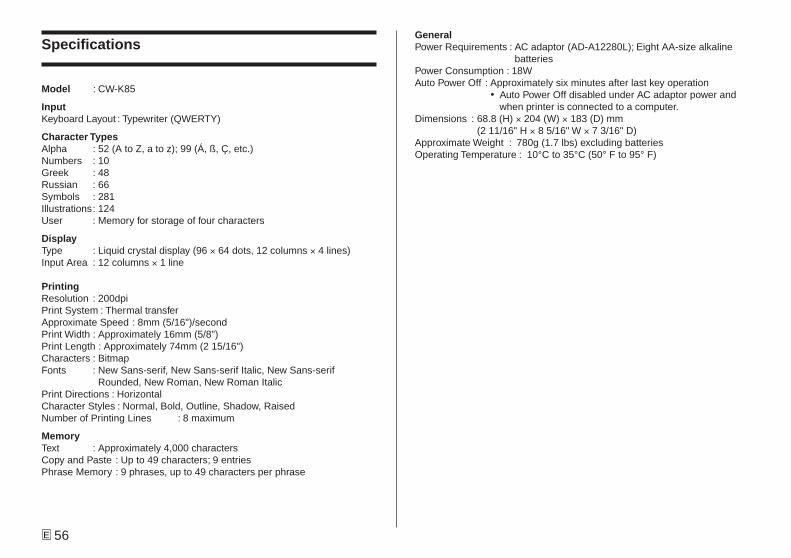
E 56
Specifications
Model : CW-K85
InputKeyboard Layout : Typewriter (QWERTY)
Character TypesAlpha : 52 (A to Z, a to z); 99 (Á, ß, Ç, etc.)Numbers : 10Greek : 48Russian : 66Symbols : 281Illustrations: 124User : Memory for storage of four characters
DisplayType : Liquid crystal display (96 × 64 dots, 12 columns × 4 lines)Input Area : 12 columns × 1 line
PrintingResolution : 200dpiPrint System : Thermal transferApproximate Speed : 8mm (5/16")/secondPrint Width : Approximately 16mm (5/8")Print Length : Approximately 74mm (2 15/16")Characters : BitmapFonts : New Sans-serif, New Sans-serif Italic, New Sans-serif
Rounded, New Roman, New Roman ItalicPrint Directions : HorizontalCharacter Styles : Normal, Bold, Outline, Shadow, RaisedNumber of Printing Lines : 8 maximum
MemoryText : Approximately 4,000 charactersCopy and Paste : Up to 49 characters; 9 entriesPhrase Memory : 9 phrases, up to 49 characters per phrase
GeneralPower Requirements : AC adaptor (AD-A12280L); Eight AA-size alkaline
batteriesPower Consumption : 18WAuto Power Off : Approximately six minutes after last key operation
� Auto Power Off disabled under AC adaptor power andwhen printer is connected to a computer.
Dimensions : 68.8 (H) × 204 (W) × 183 (D) mm(2 11/16" H × 8 5/16" W × 7 3/16" D)
Approximate Weight : 780g (1.7 lbs) excluding batteriesOperating Temperature : 10°C to 35°C (50° F to 95° F)
CASIO Europe GmbH Bornbarch 10, 22848 Norderstedt, Germany
This mark applies in EU countries only.Diese Markierung trifft nur auf EU-Länder Zu.Cette marque ne s’applique qu’aux pays de I’UE.Este símbolo es válido sólo en países de la UE.Questo marchio vale soltanto nei paesi dell’UE.

CASIO COMPUTER CO., LTD.6-2, Hon-machi 1-chome
Shibuya-ku, Tokyo 151-8543, Japan
MO0606-B