
AS150-250.2manual - artsound.be · als u ze door het rooster aanraakt kan dat METEEN schade...
2
1 4 Ontdek het volledige ArtSoundaanbod op www.artsound.be Découvrez la gamme ArtSound complète sur www.artsound.be Discover the complete ArtSound range at www.artsound.be TM Art_Sound AS150 AS250.2 NL Geachte klant, bedankt en proficiat met de aankoop van uw luidspreker(s). Gelieve deze instructies aandachtig te lezen en ze te bewaren. FR Cher client, merci d'avoir acheté ces enceintes. Veuillez lire attentivement ces instructions et les conserver. EN Dear Customer, Congratulations on the purchase of your loudspeaker(s). Please read these instructions carefully and keep them for future reference. NL: Gebruiksaanwijzing Model: AS 250 / AS 150 2-wegsluidspreker Waarschuwing Raak de oppervlakken van de aandrijfeenheden niet aan. De mobiele delen van een luidspreker zijn ZEER DELICAAT; zelfs als u ze door het rooster aanraakt kan dat METEEN schade berokkenen die DUUR kan uitvallen en niet gedekt is door de garantie. Bewaar de verpakking voor het geval u het product moet vervoeren. Als u de verpakking liever weggooit, doe dat dan op een gepaste manier. Zorg ervoor dat kinderen niet bij de plastic zakken kunnen. Plaatsing van de luidsprekers Weinig factoren hebben zo veel invloed op uw hifisysteem als de plaatsing van uw luidsprekers. Elke kamer is anders; test dus verschillende posities uit tot u de gewenste klank verkrijgt in uw kamer. Hier zijn enkele tips: Zorg voor een onbelemmerde direct-zichtverbinding naar de luidsprekers. Volg onze aanbevelingen voor de installatie van de luidspre- kers. Plaatst u de luidsprekers dicht bij een muur of in een hoek, dan verhoogt u de bassen, maar maakt u ze ook minder constant. Begin met een afstand tussen 45 en 120 cm en zorg ervoor dat de afstand tot zijwanden gelijk is aan de afstand tot de wand achter de luidspreker. U verkrijgt de beste stereoklank doorgaans als de luidspre- kers en de luisteraar zich aan de uiteinden van een gelijkzij- dige driehoek bevinden, waarbij de luidsprekers gericht zijn naar een punt net vóór de luisterpositie. Een symmetrie tussen links en rechts is altijd nuttig; tracht dus te vermijden dat er bijvoorbeeld enkel aan één kant zware overgordijnen hangen. Deze producten zijn voorzien van magnetische afschermingen om storingen in het tv-beeld te voorkomen en de gebruiker een zo groot mogelijke vrijheid te bieden in de plaatsing van de luidsprekers. Montagebeugel De AS150 & AS250.2 kun je aan de muur bevestigen met een montagebeu- gel. Deze laat je toe om de luidspreker te richten naar boven, onder, links of rechts. De montagebeugel bestaat uit 3 delen: • 1 L-profiel met 1 schroefopening • 1 L-profiel met 2 schroefopeningen • 1 grote aansluitschroef Monteer de beugel als volgt: • Bevestig het L-profiel met 2 schroefopeningen op de muur • Bevestig het L-profiel met 1 schroefopening op de luidspre- ker • Schuif de bolle uiteinden van de L-profielen over elkaar • Veranker de uiteinden met de grote aansluitschroef • Draai nu de luidspreker in de gewenste richting Aansluiting van de luidsprekers Gebruik kabels met een identieke en zo kort mogelijke lengte voor beide luidsprekers. Als één kabel korter is dan de andere dient de overtollige kabel in harmonica gevouwen en vastgemaakt worden om het interieur netjes te houden. Rol de kabel niet op; dit kan immers inductie veroorzaken die de hoge frequenties kan aantasten. Houd contactpunten uit de buurt van stopcontacten en andere evidente bronnen van radiofrequentie-energie, zoals mobiele draadloze telefoons. In het algemeen is het zo dat hoe dikker de luidsprekerkabel is, hoe makkelijker de twee conductors zullen kunnen onder- scheiden worden. Zorg ervoor dat alle aansluitingen in uw hifisysteem correct aangesloten zijn en goed vastzitten. Denk eraan om bij uw routineonderhoud de luidsprekeraansluitingen opnieuw uit te voeren, om oxidatie te voorkomen. Zorg ervoor dat er geen draden uitsteken of de klemmen (+) en (-) in contact brengen. Mounting bracket You can mount the AS150 and AS250.2 to the wall using a mounting bracket. This allows you to point the loudspeaker up or down, and to the left or right. The mounting bracket consists of three parts: • 1 L profile with one screw hole • 1 L profile with two screw holes • 1 large connecting screw Mount the bracket as follows: • Fasten the L profile with two screw holes to the wall • Fasten the L profile with one screw hole to the loudspeaker • Slide the round ends of the L profiles over each other • Anchor the ends using the large connecting screw • You can now rotate the loudspeaker to the desired position Connecting your speakers Use cables of equal length to both speakers and keep them as short as possible. If one cable is shorter than the other, the excess cable should be folded concertina fashion into a bundle and tied for neatness. Do not coil it as any inductance introduced may impair high frequencies. Run leads away from mains leads and obvious sources of radio frequency energy such as mobile cordless telephones. In general, the thicker the speaker cable, the easier it will be to distinguish both connectors. Make sure all of the connections in your hi-fi system are clean and tight. It is good practice to periodically disconnect and then reconnect your speaker cables to prevent oxidation from building up. Make certain there are no stray strands of wire bridging the (+) and (-) terminals. Speaker phase If you connect one speaker incorrectly, that speaker may be working in opposition to the other, resulting in poor stereo and bass response. If you suspect this is occurring, check by sit- ting exactly midway between the speakers and have someone reverse the connections at ONE END of ONE speaker cable ONLY, leaving all other connections intact. Operation Using your loudspeakers The loudspeakers have been designed to produce high-quality sound with a large dynamic range, and it is easy to operate them at very high levels unintentionally. A few simple points should be kept in mind: • Low-powered amplifiers operated at very high volumes will produce distortion, and this can damage the high-frequency driver. • Exaggerated setting of bass and treble controls can create significant distortion even when using a high-power ampli- fier. • In a noisy background – such as a party – your hearing be- comes less sensitive to loud music and distortion. Warning To avoid risk of damage, always reduce the volume if you can detect audible distortion. Choice of amplifier A low-powered amplifier will produce satisfactory results only at low volume settings. To obtain the best performance from your speakers, try to use an amplifier with a power rating close to or slightly higher than that of the loudspeakers. Specification* AS150 system 2-way bass reflex yes magnetic shielded yes woofer 3” carbon glass tweeter 1” silk dome max power 110 W nominal power (RMS) 56 W dB 86 dB impedance 8 ohm frequency 100 Hz - 20 kHz dim. mm (h x w x d) 185 x 135 x 152 weight 3,2 kg each colour wengé / yellow / red / black extra complete with bracket AS250.2 system 2-way bass reflex yes magnetic shielded no woofer 5.25” carbon glass tweeter 1” silk dome max power 160 W nominal power (RMS) 80 W dB 88 dB impedance 6 ohm frequency 70 Hz - 20 kHz dim. mm (h x w x d) 235 x 185 x 210 weight 4,5 kg each colour wenge / black extra complete with bracket * Design and specifications are subject to change without notice. Guarantee 2 years in case of correct use (cfr these manual and safety instructions) Jobetrade nv Kruishoutem, Belgium www.artsound.be � +32 9 380 81 80 - � +32 9 386 12 35 [email protected]
Transcript of AS150-250.2manual - artsound.be · als u ze door het rooster aanraakt kan dat METEEN schade...
14
Ontdek het volledige ArtSoundaanbod op www.artsound.be Découvrez la gamme ArtSound complète sur www.artsound.be
Discover the complete ArtSound range at www.artsound.be
TM
Art_Sound
AS150AS250.2
NLGeachte klant, bedankt en profi ciat met de aankoop van uw luidspreker(s). Gelieve deze instructies aandachtig te lezen en ze te bewaren.
FRCher client, merci d'avoir acheté ces enceintes. Veuillez lire attentivement ces instructions et les conserver.
ENDear Customer, Congratulations on the purchase of your loudspeaker(s). Please read these instructions carefully and keep them for future reference.
NL: GebruiksaanwijzingModel: AS 250 / AS 150 2-wegsluidspreker
Waarschuwing Raak de oppervlakken van de aandrijfeenheden niet aan. De mobiele delen van een luidspreker zijn ZEER DELICAAT; zelfs als u ze door het rooster aanraakt kan dat METEEN schade berokkenen die DUUR kan uitvallen en niet gedekt is door de garantie.
Bewaar de verpakking voor het geval u het product moet vervoeren. Als u de verpakking liever weggooit, doe dat dan op een gepaste manier. Zorg ervoor dat kinderen niet bij de plastic zakken kunnen.
Plaatsing van de luidsprekers Weinig factoren hebben zo veel invloed op uw hifisysteem als de plaatsing van uw luidsprekers. Elke kamer is anders; test dus verschillende posities uit tot u de gewenste klank verkrijgt in uw kamer. Hier zijn enkele tips: Zorg voor een onbelemmerde direct-zichtverbinding naar de luidsprekers.
Volg onze aanbevelingen voor de installatie van de luidspre-kers. Plaatst u de luidsprekers dicht bij een muur of in een hoek, dan verhoogt u de bassen, maar maakt u ze ook minder constant. Begin met een afstand tussen 45 en 120 cm en zorg ervoor dat de afstand tot zijwanden gelijk is aan de afstand tot de wand achter de luidspreker.
U verkrijgt de beste stereoklank doorgaans als de luidspre-kers en de luisteraar zich aan de uiteinden van een gelijkzij-dige driehoek bevinden, waarbij de luidsprekers gericht zijn naar een punt net vóór de luisterpositie.Een symmetrie tussen links en rechts is altijd nuttig; tracht dus te vermijden dat er bijvoorbeeld enkel aan één kant zware overgordijnen hangen.
Deze producten zijn voorzien van magnetische afschermingen om storingen in het tv-beeld te voorkomen en de gebruiker een zo groot mogelijke vrijheid te bieden in de plaatsing van de luidsprekers.
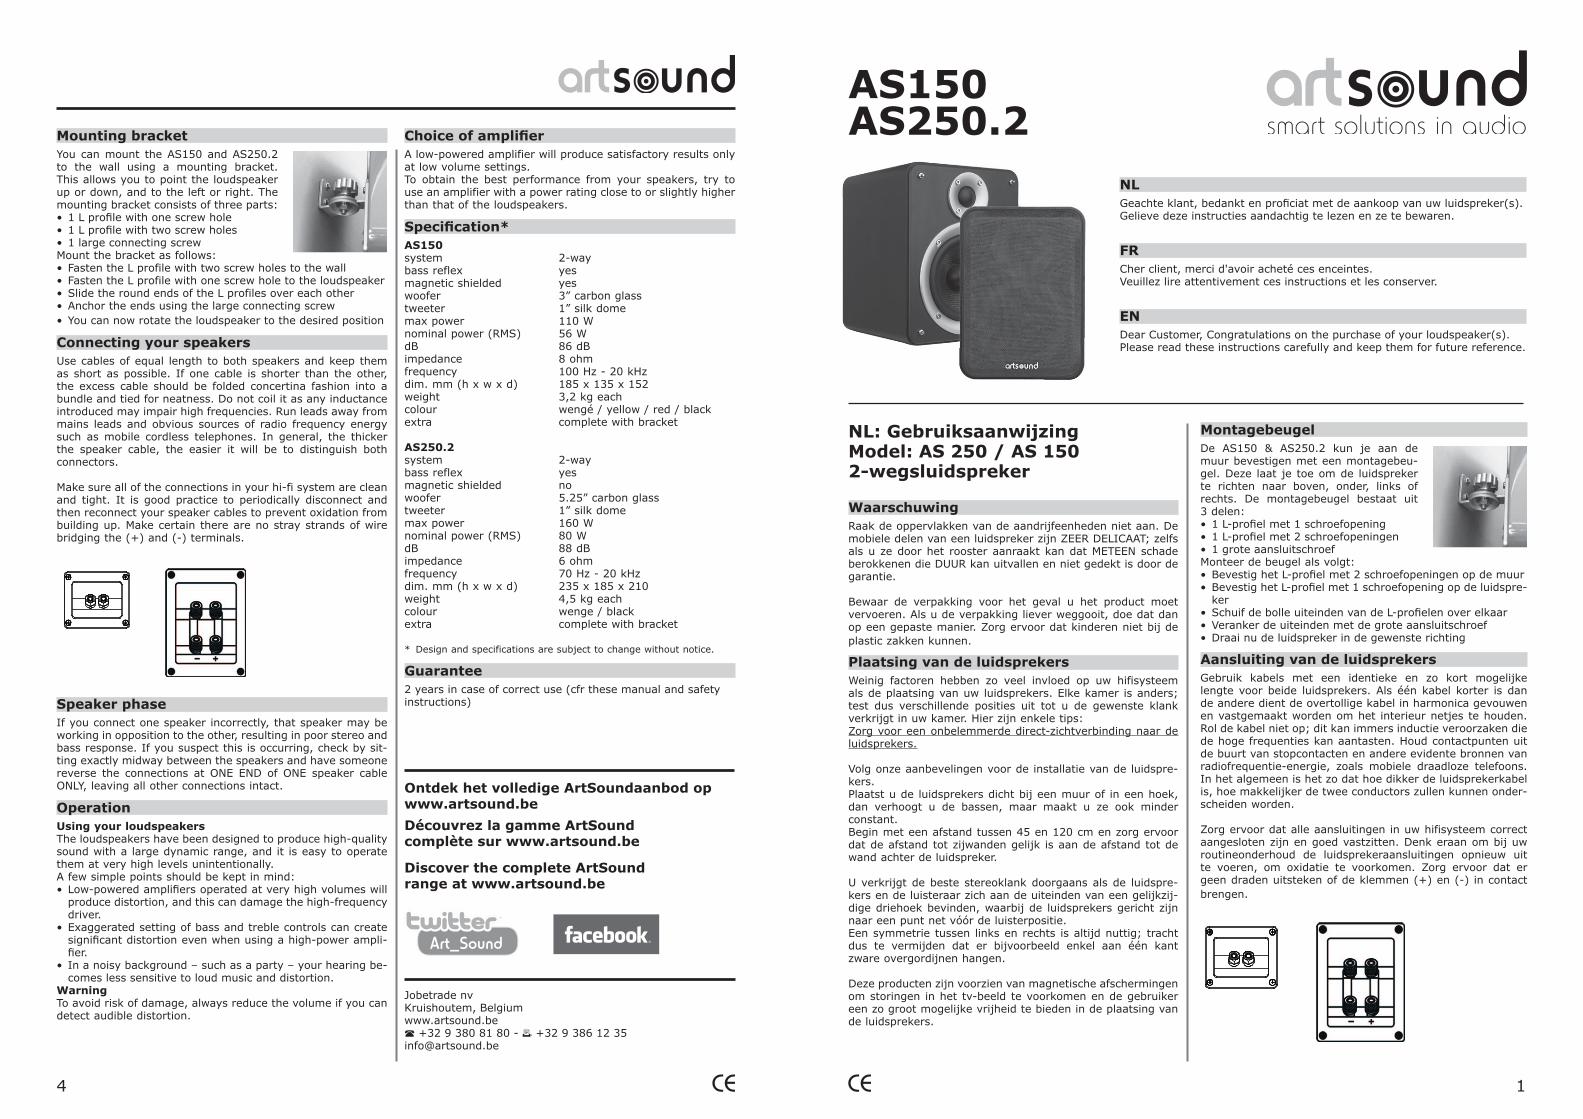
MontagebeugelDe AS150 & AS250.2 kun je aan de muur bevestigen met een montagebeu-gel. Deze laat je toe om de luidspreker te richten naar boven, onder, links of rechts. De montagebeugel bestaat uit 3 delen:• 1 L-profi el met 1 schroefopening• 1 L-profi el met 2 schroefopeningen• 1 grote aansluitschroefMonteer de beugel als volgt:• Bevestig het L-profi el met 2 schroefopeningen op de muur• Bevestig het L-profi el met 1 schroefopening op de luidspre-
ker• Schuif de bolle uiteinden van de L-profi elen over elkaar• Veranker de uiteinden met de grote aansluitschroef• Draai nu de luidspreker in de gewenste richting
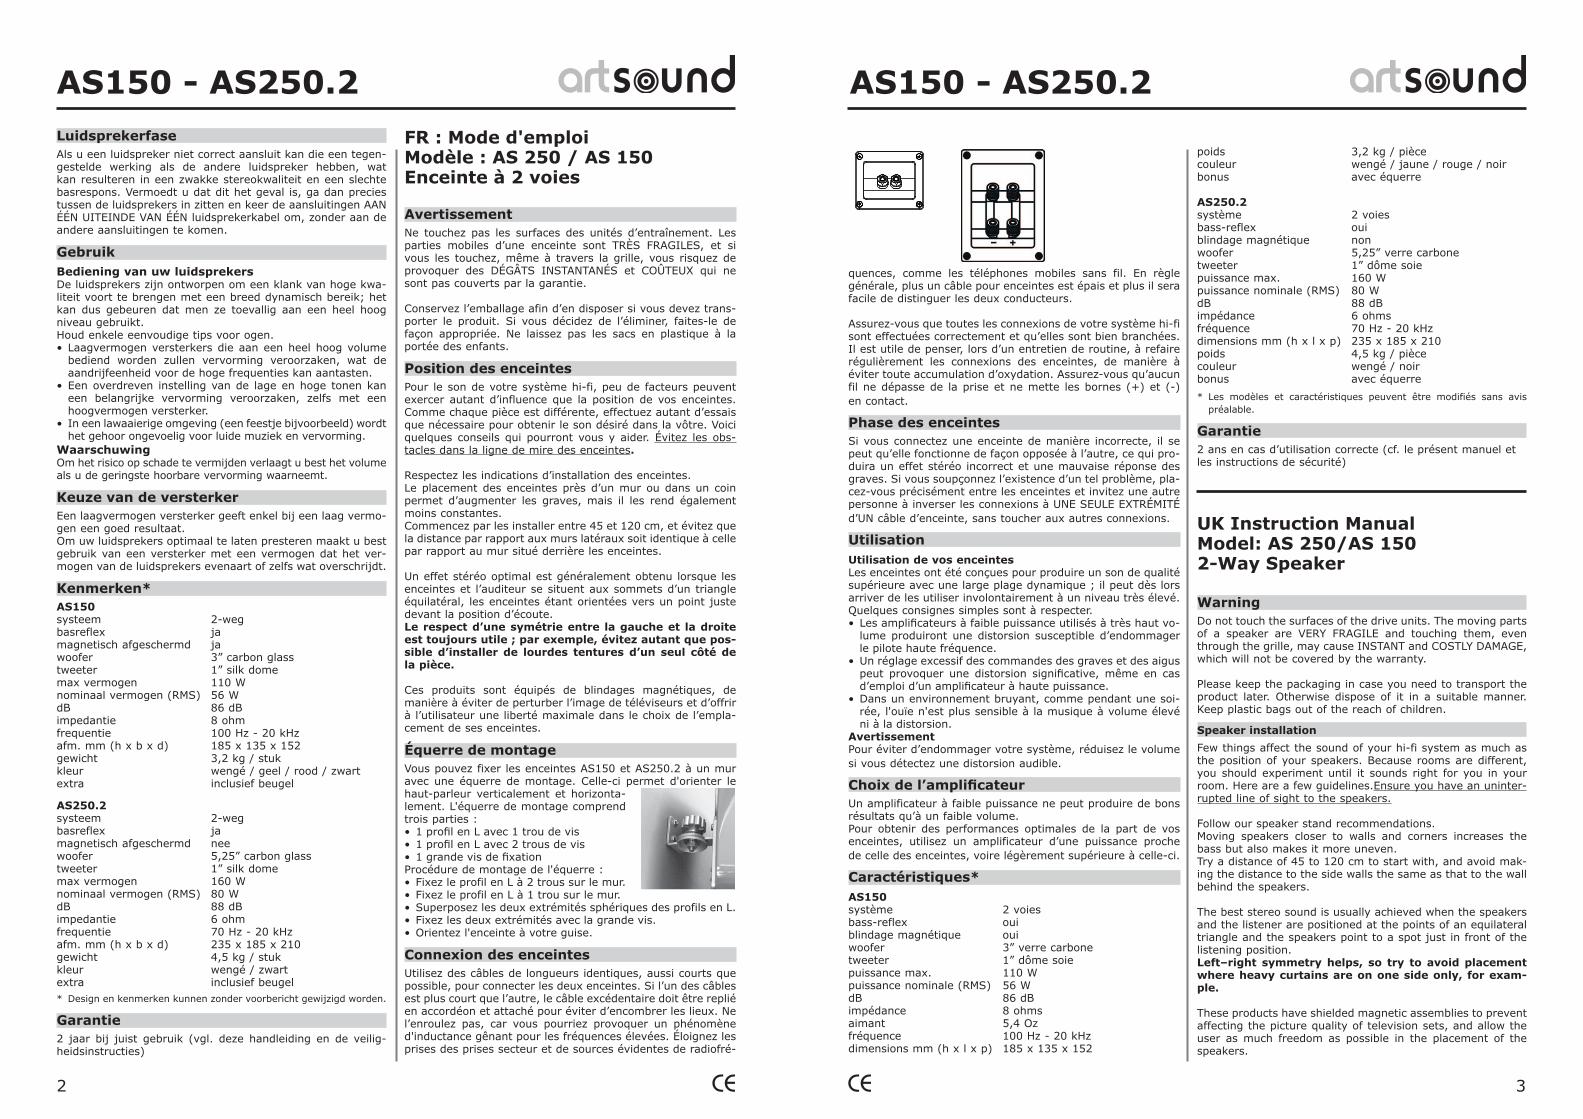
Aansluiting van de luidsprekersGebruik kabels met een identieke en zo kort mogelijke lengte voor beide luidsprekers. Als één kabel korter is dan de andere dient de overtollige kabel in harmonica gevouwen en vastgemaakt worden om het interieur netjes te houden. Rol de kabel niet op; dit kan immers inductie veroorzaken die de hoge frequenties kan aantasten. Houd contactpunten uit de buurt van stopcontacten en andere evidente bronnen van radiofrequentie-energie, zoals mobiele draadloze telefoons. In het algemeen is het zo dat hoe dikker de luidsprekerkabel is, hoe makkelijker de twee conductors zullen kunnen onder-scheiden worden.
Zorg ervoor dat alle aansluitingen in uw hifisysteem correct aangesloten zijn en goed vastzitten. Denk eraan om bij uw routineonderhoud de luidsprekeraansluitingen opnieuw uit te voeren, om oxidatie te voorkomen. Zorg ervoor dat er geen draden uitsteken of de klemmen (+) en (-) in contact brengen.
Mounting bracketYou can mount the AS150 and AS250.2 to the wall using a mounting bracket. This allows you to point the loudspeaker up or down, and to the left or right. The mounting bracket consists of three parts:• 1 L profi le with one screw hole• 1 L profi le with two screw holes• 1 large connecting screwMount the bracket as follows:• Fasten the L profile with two screw holes to the wall• Fasten the L profile with one screw hole to the loudspeaker• Slide the round ends of the L profiles over each other• Anchor the ends using the large connecting screw• You can now rotate the loudspeaker to the desired position
Connecting your speakersUse cables of equal length to both speakers and keep them as short as possible. If one cable is shorter than the other, the excess cable should be folded concertina fashion into a bundle and tied for neatness. Do not coil it as any inductance introduced may impair high frequencies. Run leads away from mains leads and obvious sources of radio frequency energy such as mobile cordless telephones. In general, the thicker the speaker cable, the easier it will be to distinguish both connectors.
Make sure all of the connections in your hi-fi system are clean and tight. It is good practice to periodically disconnect and then reconnect your speaker cables to prevent oxidation from building up. Make certain there are no stray strands of wire bridging the (+) and (-) terminals.
Speaker phaseIf you connect one speaker incorrectly, that speaker may be working in opposition to the other, resulting in poor stereo and bass response. If you suspect this is occurring, check by sit-ting exactly midway between the speakers and have someone reverse the connections at ONE END of ONE speaker cable ONLY, leaving all other connections intact.
OperationUsing your loudspeakersThe loudspeakers have been designed to produce high-quality sound with a large dynamic range, and it is easy to operate them at very high levels unintentionally.A few simple points should be kept in mind:• Low-powered amplifi ers operated at very high volumes will
produce distortion, and this can damage the high-frequency driver.
• Exaggerated setting of bass and treble controls can create signifi cant distortion even when using a high-power ampli-fi er.
• In a noisy background – such as a party – your hearing be-comes less sensitive to loud music and distortion.
WarningTo avoid risk of damage, always reduce the volume if you can detect audible distortion.
Choice of amplifi erA low-powered amplifier will produce satisfactory results only at low volume settings.To obtain the best performance from your speakers, try to use an amplifier with a power rating close to or slightly higher than that of the loudspeakers.
Specifi cation*AS150system 2-waybass reflex yesmagnetic shielded yeswoofer 3” carbon glass tweeter 1” silk domemax power 110 Wnominal power (RMS) 56 WdB 86 dBimpedance 8 ohmfrequency 100 Hz - 20 kHzdim. mm (h x w x d) 185 x 135 x 152weight 3,2 kg eachcolour wengé / yellow / red / black extra complete with bracket
AS250.2system 2-waybass reflex yesmagnetic shielded nowoofer 5.25” carbon glass tweeter 1” silk domemax power 160 Wnominal power (RMS) 80 WdB 88 dBimpedance 6 ohmfrequency 70 Hz - 20 kHzdim. mm (h x w x d) 235 x 185 x 210weight 4,5 kg eachcolour wenge / black extra complete with bracket
* Design and specifications are subject to change without notice.
Guarantee2 years in case of correct use (cfr these manual and safety instructions)
Jobetrade nvKruishoutem, Belgiumwww.artsound.be� +32 9 380 81 80 - � +32 9 386 12 [email protected]
2 3
AS150 - AS250.2 AS150 - AS250.2LuidsprekerfaseAls u een luidspreker niet correct aansluit kan die een tegen-gestelde werking als de andere luidspreker hebben, wat kan resulteren in een zwakke stereokwaliteit en een slechte basrespons. Vermoedt u dat dit het geval is, ga dan precies tussen de luidsprekers in zitten en keer de aansluitingen AAN ÉÉN UITEINDE VAN ÉÉN luidsprekerkabel om, zonder aan de andere aansluitingen te komen.
GebruikBediening van uw luidsprekersDe luidsprekers zijn ontworpen om een klank van hoge kwa-liteit voort te brengen met een breed dynamisch bereik; het kan dus gebeuren dat men ze toevallig aan een heel hoog niveau gebruikt.Houd enkele eenvoudige tips voor ogen.• Laagvermogen versterkers die aan een heel hoog volume
bediend worden zullen vervorming veroorzaken, wat de aandrijfeenheid voor de hoge frequenties kan aantasten.
• Een overdreven instelling van de lage en hoge tonen kan een belangrijke vervorming veroorzaken, zelfs met een hoogvermogen versterker.
• In een lawaaierige omgeving (een feestje bijvoorbeeld) wordt het gehoor ongevoelig voor luide muziek en vervorming.
WaarschuwingOm het risico op schade te vermijden verlaagt u best het volume als u de geringste hoorbare vervorming waarneemt.
Keuze van de versterkerEen laagvermogen versterker geeft enkel bij een laag vermo-gen een goed resultaat. Om uw luidsprekers optimaal te laten presteren maakt u best gebruik van een versterker met een vermogen dat het ver-mogen van de luidsprekers evenaart of zelfs wat overschrijdt.
Kenmerken*AS150systeem 2-wegbasreflex jamagnetisch afgeschermd jawoofer 3” carbon glasstweeter 1” silk domemax vermogen 110 Wnominaal vermogen (RMS) 56 WdB 86 dBimpedantie 8 ohmfrequentie 100 Hz - 20 kHzafm. mm (h x b x d) 185 x 135 x 152gewicht 3,2 kg / stukkleur wengé / geel / rood / zwartextra inclusief beugel
AS250.2systeem 2-wegbasreflex jamagnetisch afgeschermd neewoofer 5,25” carbon glass tweeter 1” silk domemax vermogen 160 Wnominaal vermogen (RMS) 80 WdB 88 dBimpedantie 6 ohmfrequentie 70 Hz - 20 kHzafm. mm (h x b x d) 235 x 185 x 210gewicht 4,5 kg / stukkleur wengé / zwartextra inclusief beugel* Design en kenmerken kunnen zonder voorbericht gewijzigd worden.
Garantie2 jaar bij juist gebruik (vgl. deze hand leiding en de veilig-heidsinstructies)
FR : Mode d'emploiModèle : AS 250 / AS 150 Enceinte à 2 voies
Avertissement Ne touchez pas les surfaces des unités d’entraînement. Les parties mobiles d’une enceinte sont TRÈS FRAGILES, et si vous les touchez, même à travers la grille, vous risquez de provoquer des DÉGÂTS INSTANTANÉS et COÛTEUX qui ne sont pas couverts par la garantie.
Conservez l’emballage afin d’en disposer si vous devez trans-porter le produit. Si vous décidez de l’éliminer, faites-le de façon appropriée. Ne laissez pas les sacs en plastique à la portée des enfants.
Position des enceintes Pour le son de votre système hi-fi, peu de facteurs peuvent exercer autant d’influence que la position de vos enceintes. Comme chaque pièce est différente, effectuez autant d’essais que nécessaire pour obtenir le son désiré dans la vôtre. Voici quelques conseils qui pourront vous y aider. Évitez les obs-tacles dans la ligne de mire des enceintes.
Respectez les indications d’installation des enceintes. Le placement des enceintes près d’un mur ou dans un coin permet d’augmenter les graves, mais il les rend également moins constantes. Commencez par les installer entre 45 et 120 cm, et évitez que la distance par rapport aux murs latéraux soit identique à celle par rapport au mur situé derrière les enceintes.
Un effet stéréo optimal est généralement obtenu lorsque les enceintes et l’auditeur se situent aux sommets d’un triangle équilatéral, les enceintes étant orientées vers un point juste devant la position d’écoute.Le respect d’une symétrie entre la gauche et la droite est toujours utile ; par exemple, évitez autant que pos-sible d’installer de lourdes tentures d’un seul côté de la pièce.
Ces produits sont équipés de blindages magnétiques, de manière à éviter de perturber l’image de téléviseurs et d’offrir à l’utilisateur une liberté maximale dans le choix de l’empla-cement de ses enceintes.
Équerre de montageVous pouvez fixer les enceintes AS150 et AS250.2 à un mur avec une équerre de montage. Celle-ci permet d'orienter le haut-parleur verticalement et horizonta-lement. L'équerre de montage comprend trois parties :• 1 profi l en L avec 1 trou de vis• 1 profi l en L avec 2 trous de vis• 1 grande vis de fi xationProcédure de montage de l'équerre :• Fixez le profil en L à 2 trous sur le mur.• Fixez le profil en L à 1 trou sur le mur.• Superposez les deux extrémités sphériques des profils en L.• Fixez les deux extrémités avec la grande vis.• Orientez l'enceinte à votre guise.
Connexion des enceintesUtilisez des câbles de longueurs identiques, aussi courts que possible, pour connecter les deux enceintes. Si l’un des câbles est plus court que l’autre, le câble excédentaire doit être replié en accordéon et attaché pour éviter d’encombrer les lieux. Ne l’enroulez pas, car vous pourriez provoquer un phénomène d'inductance gênant pour les fréquences élevées. Éloignez les prises des prises secteur et de sources évidentes de radiofré-
quences, comme les téléphones mobiles sans fil. En règle générale, plus un câble pour enceintes est épais et plus il sera facile de distinguer les deux conducteurs.
Assurez-vous que toutes les connexions de votre système hi-fi sont effectuées correctement et qu’elles sont bien branchées. Il est utile de penser, lors d’un entretien de routine, à refaire régulièrement les connexions des enceintes, de manière à éviter toute accumulation d’oxydation. Assurez-vous qu’aucun fil ne dépasse de la prise et ne mette les bornes (+) et (-) en contact.
Phase des enceintesSi vous connectez une enceinte de manière incorrecte, il se peut qu’elle fonctionne de façon opposée à l’autre, ce qui pro-duira un effet stéréo incorrect et une mauvaise réponse des graves. Si vous soupçonnez l’existence d’un tel problème, pla-cez-vous précisément entre les enceintes et invitez une autre personne à inverser les connexions à UNE SEULE EXTRÉMITÉ d’UN câble d’enceinte, sans toucher aux autres connexions.
UtilisationUtilisation de vos enceintesLes enceintes ont été conçues pour produire un son de qualité supérieure avec une large plage dynamique ; il peut dès lors arriver de les utiliser involontairement à un niveau très élevé.Quelques consignes simples sont à respecter.• Les amplifi cateurs à faible puissance utilisés à très haut vo-
lume produiront une distorsion susceptible d’endommager le pilote haute fréquence.
• Un réglage excessif des commandes des graves et des aigus peut provoquer une distorsion signifi cative, même en cas d’emploi d’un amplifi cateur à haute puissance.
• Dans un environnement bruyant, comme pendant une soi-rée, l'ouïe n'est plus sensible à la musique à volume élevé ni à la distorsion.
AvertissementPour éviter d’endommager votre système, réduisez le volume si vous détectez une distorsion audible.
Choix de l’amplifi cateurUn amplificateur à faible puissance ne peut produire de bons résultats qu’à un faible volume. Pour obtenir des performances optimales de la part de vos enceintes, utilisez un amplificateur d’une puissance proche de celle des enceintes, voire légèrement supérieure à celle-ci.
Caractéristiques*AS150système 2 voiesbass-reflex ouiblindage magnétique ouiwoofer 3” verre carbonetweeter 1” dôme soiepuissance max. 110 Wpuissance nominale (RMS) 56 WdB 86 dBimpédance 8 ohmsaimant 5,4 Ozfréquence 100 Hz - 20 kHzdimensions mm (h x l x p) 185 x 135 x 152
poids 3,2 kg / piècecouleur wengé / jaune / rouge / noirbonus avec équerre
AS250.2système 2 voiesbass-reflex ouiblindage magnétique nonwoofer 5,25” verre carbone tweeter 1” dôme soiepuissance max. 160 Wpuissance nominale (RMS) 80 WdB 88 dBimpédance 6 ohmsfréquence 70 Hz - 20 kHzdimensions mm (h x l x p) 235 x 185 x 210poids 4,5 kg / piècecouleur wengé / noirbonus avec équerre
* Les modèles et caractéristiques peuvent être modifiés sans avis préalable.
Garantie 2 ans en cas d’utilisation correcte (cf. le présent manuel et les instructions de sécurité)
UK Instruction ManualModel: AS 250/AS 150 2-Way Speaker
Warning Do not touch the surfaces of the drive units. The moving parts of a speaker are VERY FRAGILE and touching them, even through the grille, may cause INSTANT and COSTLY DAMAGE, which will not be covered by the warranty.
Please keep the packaging in case you need to transport the product later. Otherwise dispose of it in a suitable manner. Keep plastic bags out of the reach of children.
Speaker installation
Few things affect the sound of your hi-fi system as much as the position of your speakers. Because rooms are different, you should experiment until it sounds right for you in your room. Here are a few guidelines.Ensure you have an uninter-rupted line of sight to the speakers.
Follow our speaker stand recommendations. Moving speakers closer to walls and corners increases the bass but also makes it more uneven.Try a distance of 45 to 120 cm to start with, and avoid mak-ing the distance to the side walls the same as that to the wall behind the speakers.
The best stereo sound is usually achieved when the speakers and the listener are positioned at the points of an equilateral triangle and the speakers point to a spot just in front of the listening position.Left–right symmetry helps, so try to avoid placement where heavy curtains are on one side only, for exam-ple.
These products have shielded magnetic assemblies to prevent affecting the picture quality of television sets, and allow the user as much freedom as possible in the placement of the speakers.