TV cabinet - KARWEI
13
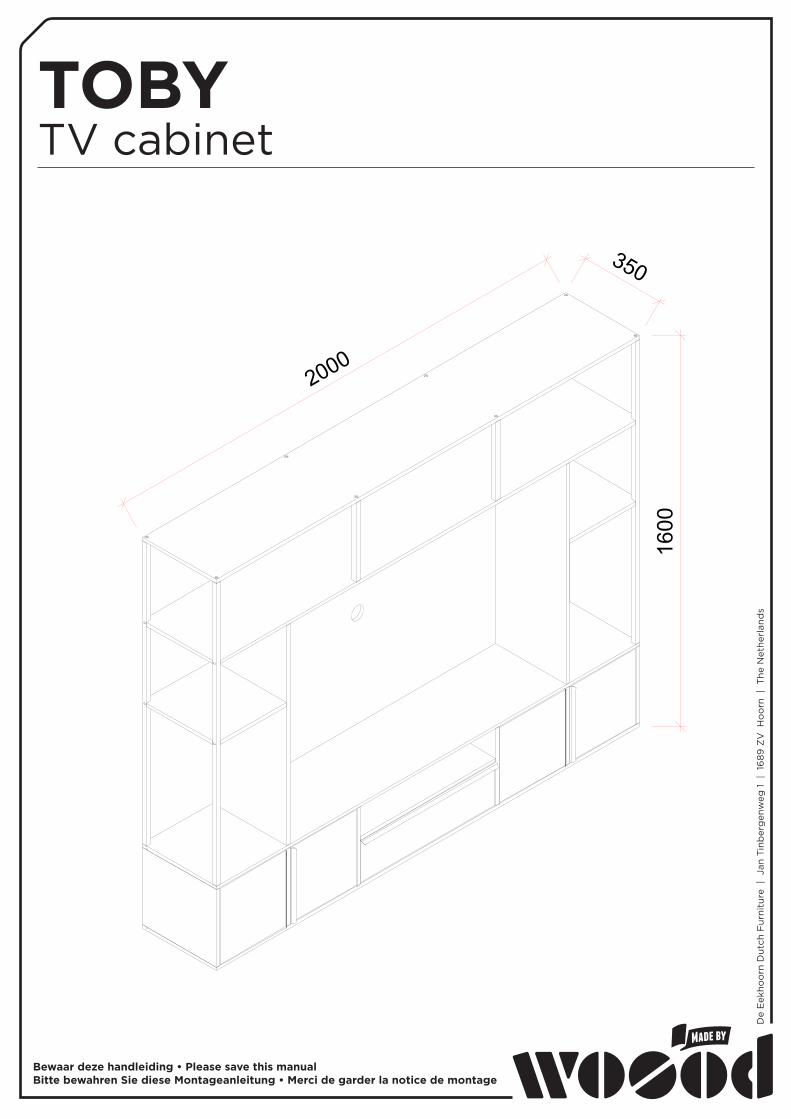
De Eekhoorn Dutch Furniture | Jan Tinbergenweg 1 | 1689 ZV Hoorn | The Netherlands TOBY TV cabinet Bewaar deze handleiding • Please save this manual Bitte bewahren Sie diese Montageanleitung • Merci de garder la notice de montage 2000 350 1600
Transcript of TV cabinet - KARWEI
De
Eek
hoo
rn D
utch
Fur
nitu
re |
Jan
Tin
ber
gen
weg
1 |
16
89
ZV
Ho
orn
| T
he N
ethe
rlan
ds
TOBYTV cabinet
Bewaar deze handleiding • Please save this manualBitte bewahren Sie diese Montageanleitung • Merci de garder la notice de montage
De
Eek
hoo
rn D
utch
Fur
nitu
re |
Jan
Tin
ber
gen
weg
1 |
16
89
ZV
Ho
orn
| T
he N
ethe
rlan
ds
TOBYTV cabinet
Bewaar deze handleiding • Please save this manualBitte bewahren Sie diese Montageanleitung • Merci de garder la notice de montage
2000
350
1600
2/132/13
3/133/13
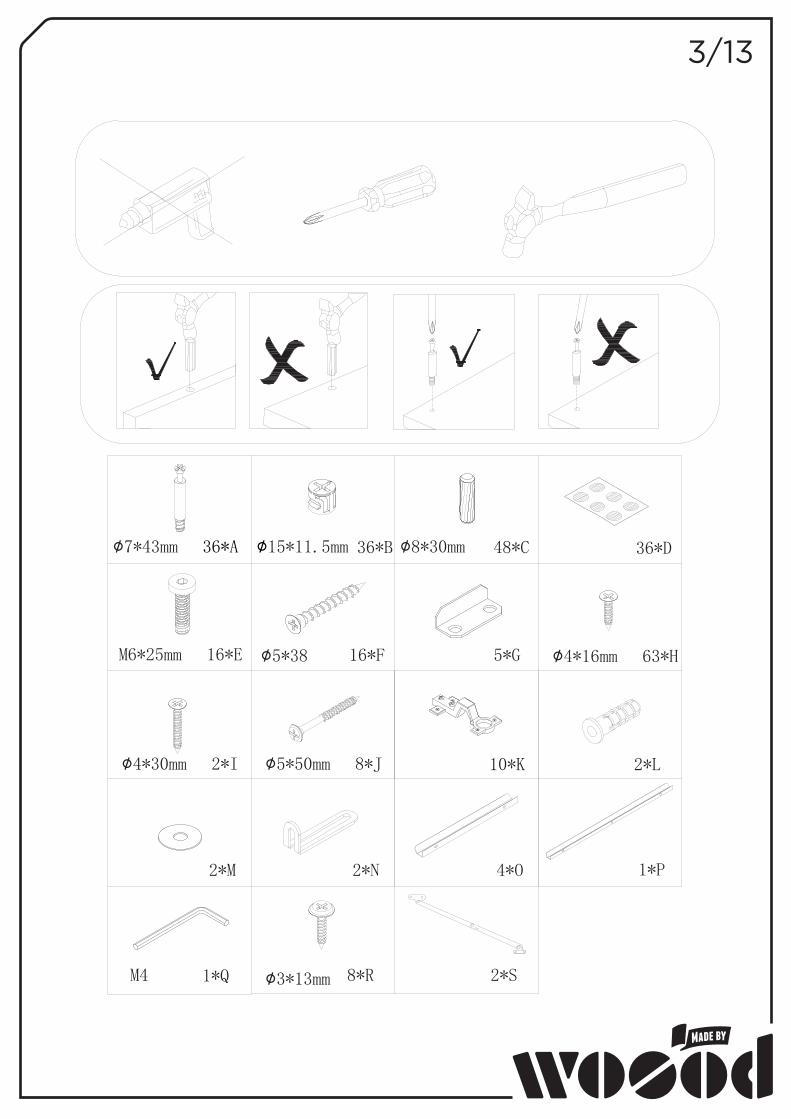
36*A 36*B∅15*11.5mm∅7*43mm 48*C∅8*30mm
16*F
3/12
36*D
16*EM6*25mm ∅5*38 63*H∅4*16mm
10*K
2*M 2*N 4*O 1*P
1*QM4
2*I∅4*30mm 8*J∅5*50mm
5*G
2*L
8*R 2*S∅3*13mm
4/134/13
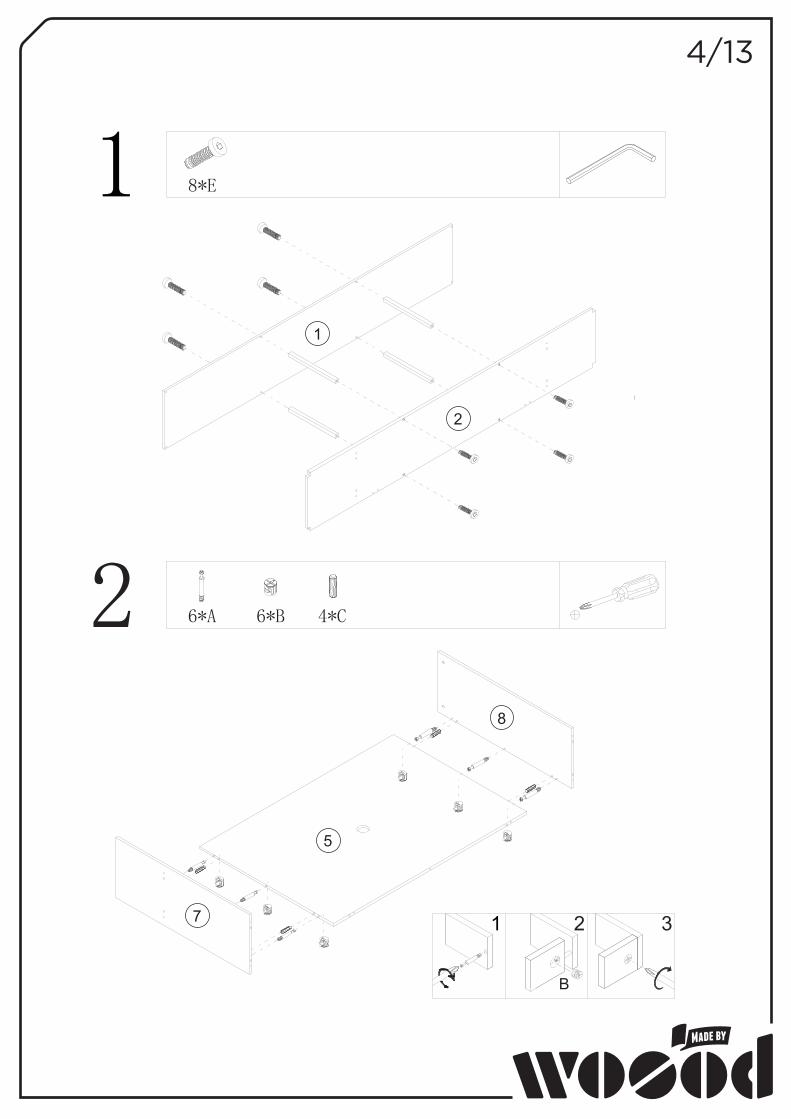
1 8*E
2 6*A 6*B 4*C
1 2 3
B
2
1
5
8
7
5/135/13
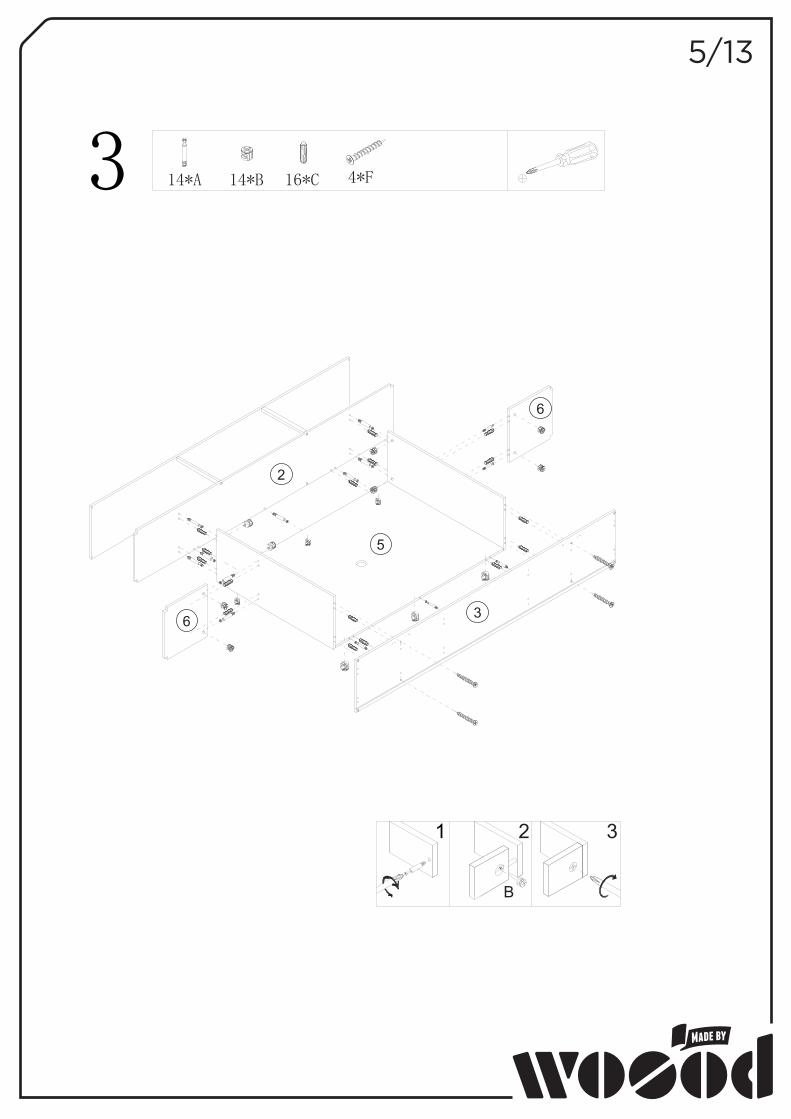
1 2 3
B
5/12
3 14*A 14*B 16*C 4*F
2
6 3
6
5
6/136/13
6/12
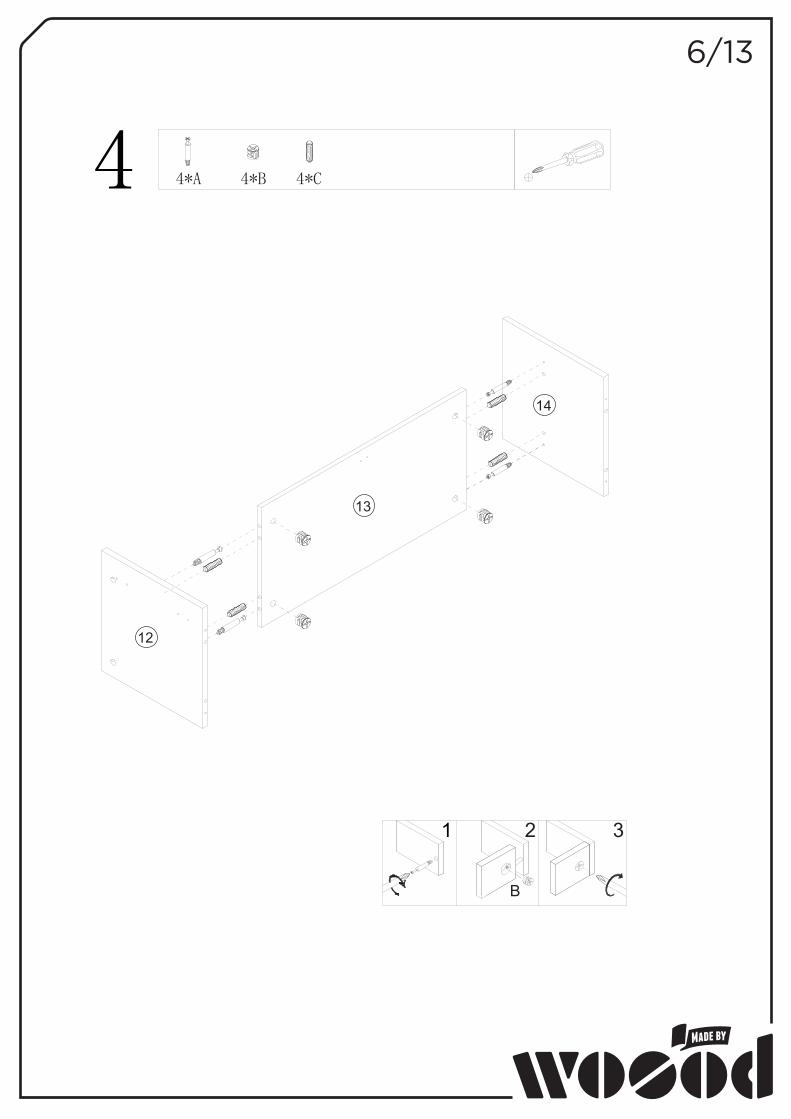
4
1 2 3
B
4*A 4*B 4*C
13
14
12
7/137/13
7/12
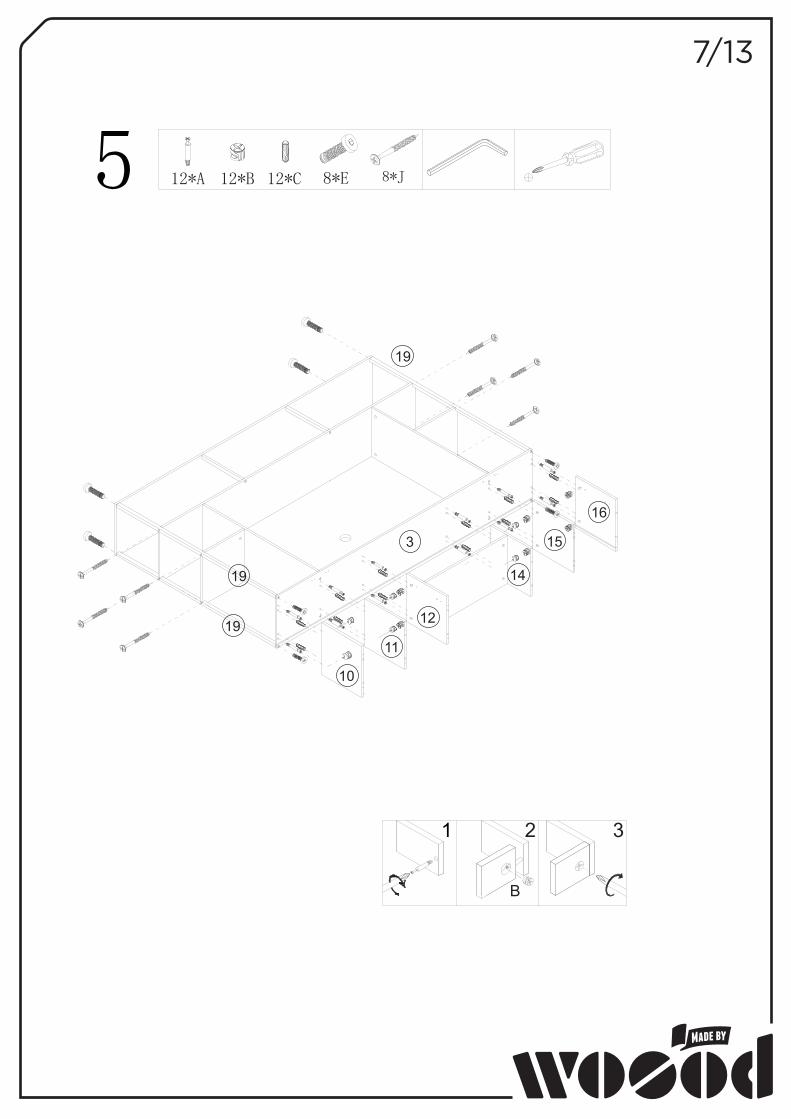
5 12*C 8*E12*A
1 2 3
B
8*J12*B
19
19
19
10
11
12
14
15
16
3
8/138/13
8/12
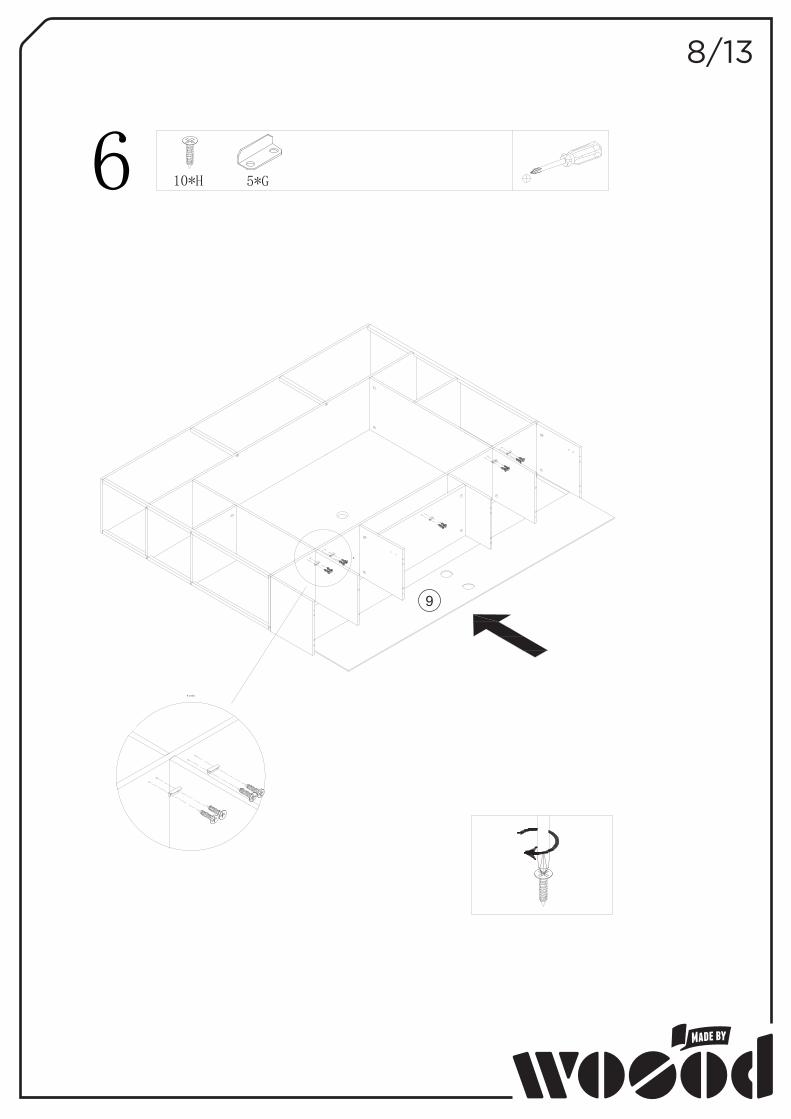
6 10*H
E
5*G
E (1.65)
9
9/139/13
9/12
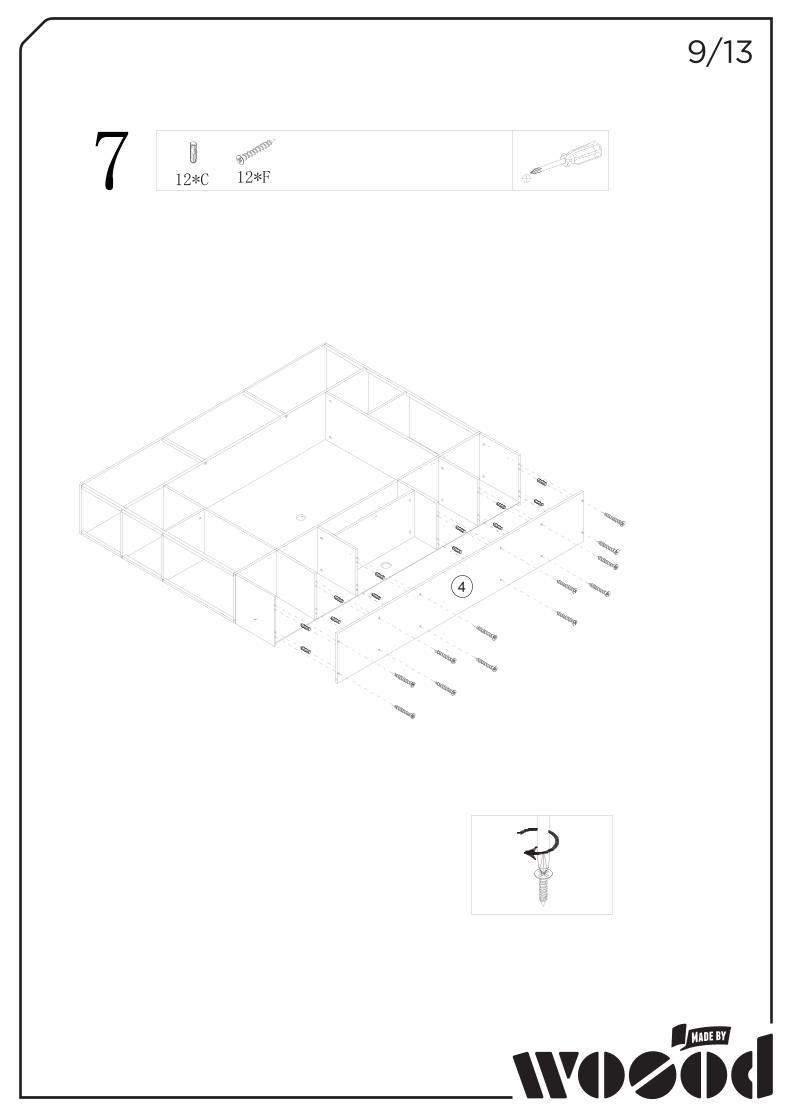
7 12*C 12*F
4

10/1310/13
10/12
8
9
X4
24*H
7*H
8*K
2*K
4*O
1*P
17
18
11/13
11/13
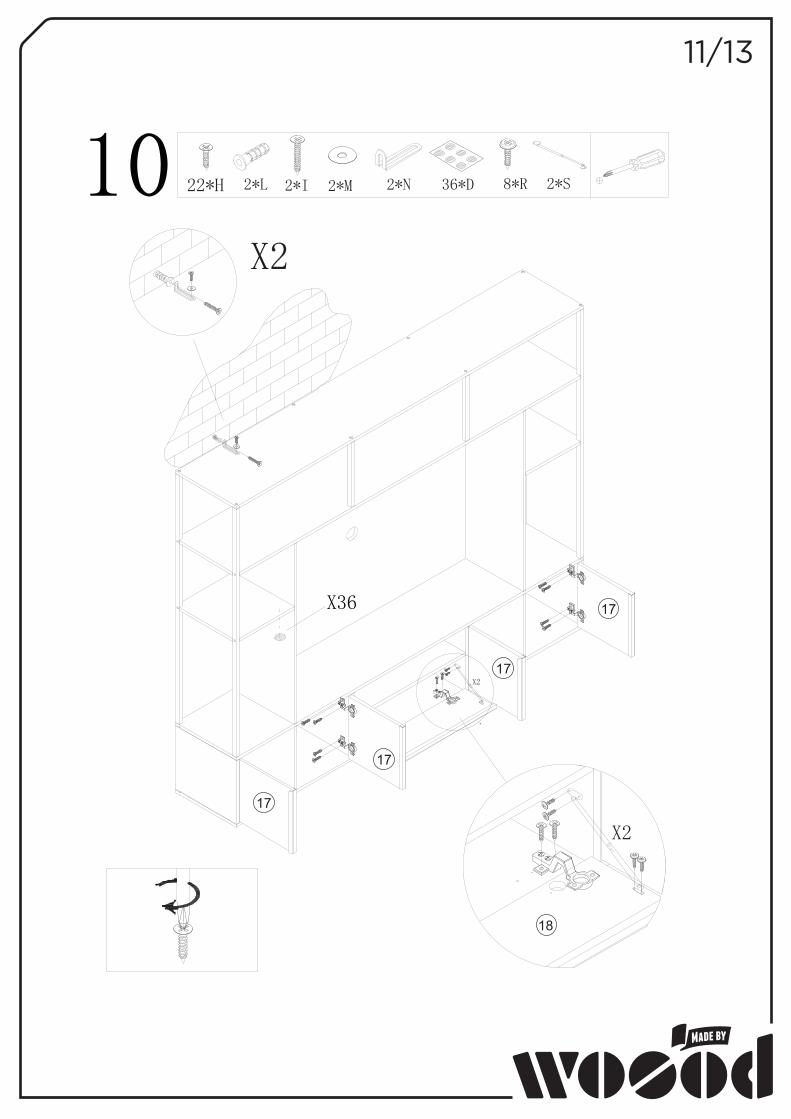
10 22*H
F
2*L 2*I 2*M 2*N 36*D
X36
X2
8*R 2*S
X2
X2
17
17
17
17
18
12/1312/13
12/12
11
12/13
11
22PPCC 22PPCC
33
22
Mounting InstructionsThis cabinet includes two holes on the back for mounting to a wall. We strongly recommend that you install
the provided anchors and screws to prevent the cabinet from accidentally falling and causing injury or damage.
(1) Perhaps with the help of another person, position the cabinet against a wall at a desired location. (2) Remove the first two drawers that on the top first. Use a pencil to lightly mark the wall through the two holes that on back of the cabinet.Then carefully move the cabinet aside. The mounting hardware will be
installed at these two insertion marks.(3) Install the anchor into the wall at each insertion mark until the wide end becomes even with the surface
of the wall. (4) Position the cabinet against the wall at same location that we can see the two installed anchors through
the two holes. Use the screwdriver to secure a screw into each installed anchor.Rotate each screw clockwise until tight.
(5) Put back the two drawers. Done!
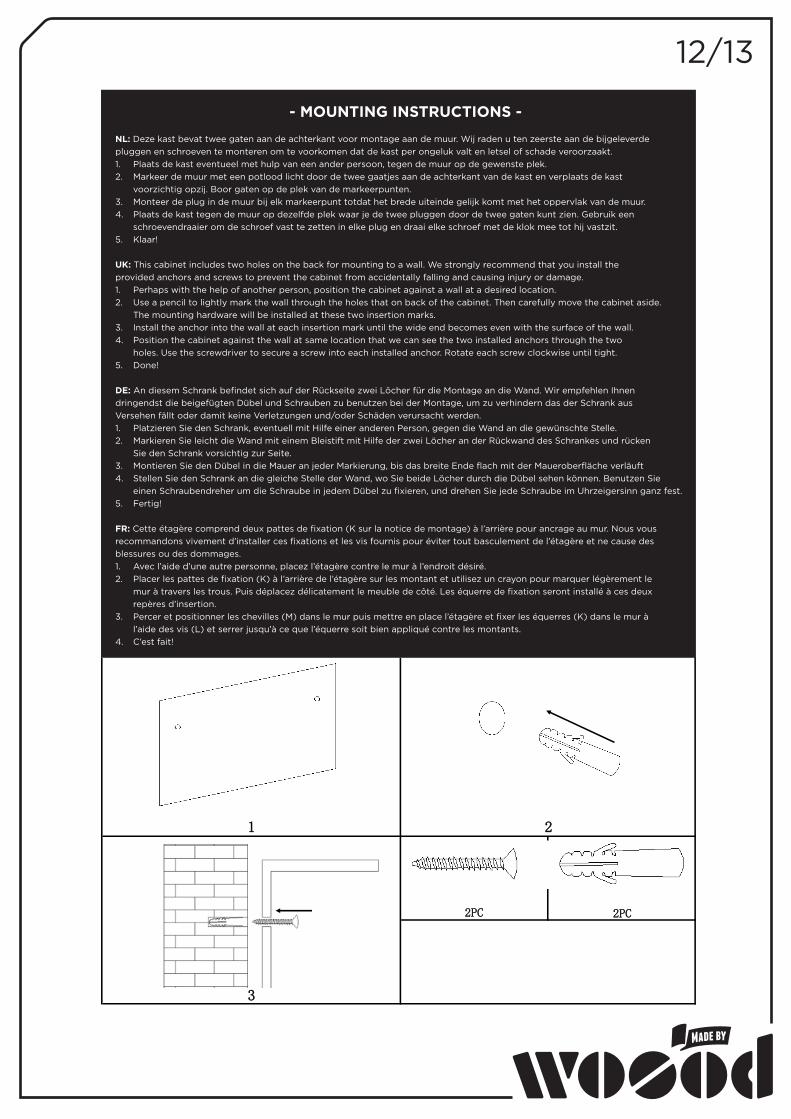
- MOUNTING INSTRUCTIONS -
NL: Deze kast bevat twee gaten aan de achterkant voor montage aan de muur. Wij raden u ten zeerste aan de bijgeleverde pluggen en schroeven te monteren om te voorkomen dat de kast per ongeluk valt en letsel of schade veroorzaakt.1. Plaats de kast eventueel met hulp van een ander persoon, tegen de muur op de gewenste plek.2. Markeer de muur met een potlood licht door de twee gaatjes aan de achterkant van de kast en verplaats de kast
voorzichtig opzij. Boor gaten op de plek van de markeerpunten.3. Monteer de plug in de muur bij elk markeerpunt totdat het brede uiteinde gelijk komt met het oppervlak van de muur.4. Plaats de kast tegen de muur op dezelfde plek waar je de twee pluggen door de twee gaten kunt zien. Gebruik een
schroevendraaier om de schroef vast te zetten in elke plug en draai elke schroef met de klok mee tot hij vastzit.5. Klaar!
UK: This cabinet includes two holes on the back for mounting to a wall. We strongly recommend that you install the provided anchors and screws to prevent the cabinet from accidentally falling and causing injury or damage.1. Perhaps with the help of another person, position the cabinet against a wall at a desired location.2. Use a pencil to lightly mark the wall through the holes that on back of the cabinet. Then carefully move the cabinet aside.
The mounting hardware will be installed at these two insertion marks.3. Install the anchor into the wall at each insertion mark until the wide end becomes even with the surface of the wall.4. Position the cabinet against the wall at same location that we can see the two installed anchors through the two
holes. Use the screwdriver to secure a screw into each installed anchor. Rotate each screw clockwise until tight.5. Done!
DE: An diesem Schrank befindet sich auf der Rückseite zwei Löcher für die Montage an die Wand. Wir empfehlen Ihnen dringendst die beigefügten Dübel und Schrauben zu benutzen bei der Montage, um zu verhindern das der Schrank aus Versehen fällt oder damit keine Verletzungen und/oder Schäden verursacht werden.1. Platzieren Sie den Schrank, eventuell mit Hilfe einer anderen Person, gegen die Wand an die gewünschte Stelle.2. Markieren Sie leicht die Wand mit einem Bleistift mit Hilfe der zwei Löcher an der Rückwand des Schrankes und rücken
Sie den Schrank vorsichtig zur Seite.3. Montieren Sie den Dübel in die Mauer an jeder Markierung, bis das breite Ende flach mit der Maueroberfläche verläuft4. Stellen Sie den Schrank an die gleiche Stelle der Wand, wo Sie beide Löcher durch die Dübel sehen können. Benutzen Sie
einen Schraubendreher um die Schraube in jedem Dübel zu fixieren, und drehen Sie jede Schraube im Uhrzeigersinn ganz fest.5. Fertig!
FR: Cette étagère comprend deux pattes de fixation (K sur la notice de montage) à l’arrière pour ancrage au mur. Nous vous recommandons vivement d’installer ces fixations et les vis fournis pour éviter tout basculement de l’étagère et ne cause des blessures ou des dommages.1. Avec l’aide d’une autre personne, placez l’étagère contre le mur à l’endroit désiré.2. Placer les pattes de fixation (K) à l’arrière de l’étagère sur les montant et utilisez un crayon pour marquer légèrement le
mur à travers les trous. Puis déplacez délicatement le meuble de côté. Les équerre de fixation seront installé à ces deux repères d’insertion.
3. Percer et positionner les chevilles (M) dans le mur puis mettre en place l’étagère et fixer les équerres (K) dans le mur à l’aide des vis (L) et serrer jusqu’à ce que l’équerre soit bien appliqué contre les montants.
4. C’est fait!