Quilt „Butterfly“ - ARNE & CARLOS
17
Quilt „Butterfly“ Free Design (2 sizes) #proud2craft #mezfabrics
Transcript of Quilt „Butterfly“ - ARNE & CARLOS

Quilt „Butterfly“ Free Design (2 sizes)
#proud2craft#mezfabrics
Article-No.: 9848013-00002Regia shadecardother countries
Article-No.: 9848013-00001 Regia Farbkarte D, A, CH, Benelux
MEZ GmbHHauptstraße 7879336 HerbolzheimDeutschlandwww.mezcrafts.com
WELCOME TO A WORLD OF INSPIRATIONschachenmayr.comFollow us on social media
WELCOME TO A WORLDOF INSPIRATIONschachenmayr.com
Follow us on social media
Article-No.: 9848013-00002Regia shadecardother countries
Article-No.: 9848013-00001 Regia Farbkarte D, A, CH, Benelux
MEZ GmbHHauptstraße 7879336 HerbolzheimDeutschlandwww.mezcrafts.com
WELCOME TO A WORLD OF INSPIRATIONschachenmayr.comFollow us on social media
WELCOME TO A WORLDOF INSPIRATIONschachenmayr.com
Follow us on social mediamezfabrics.com
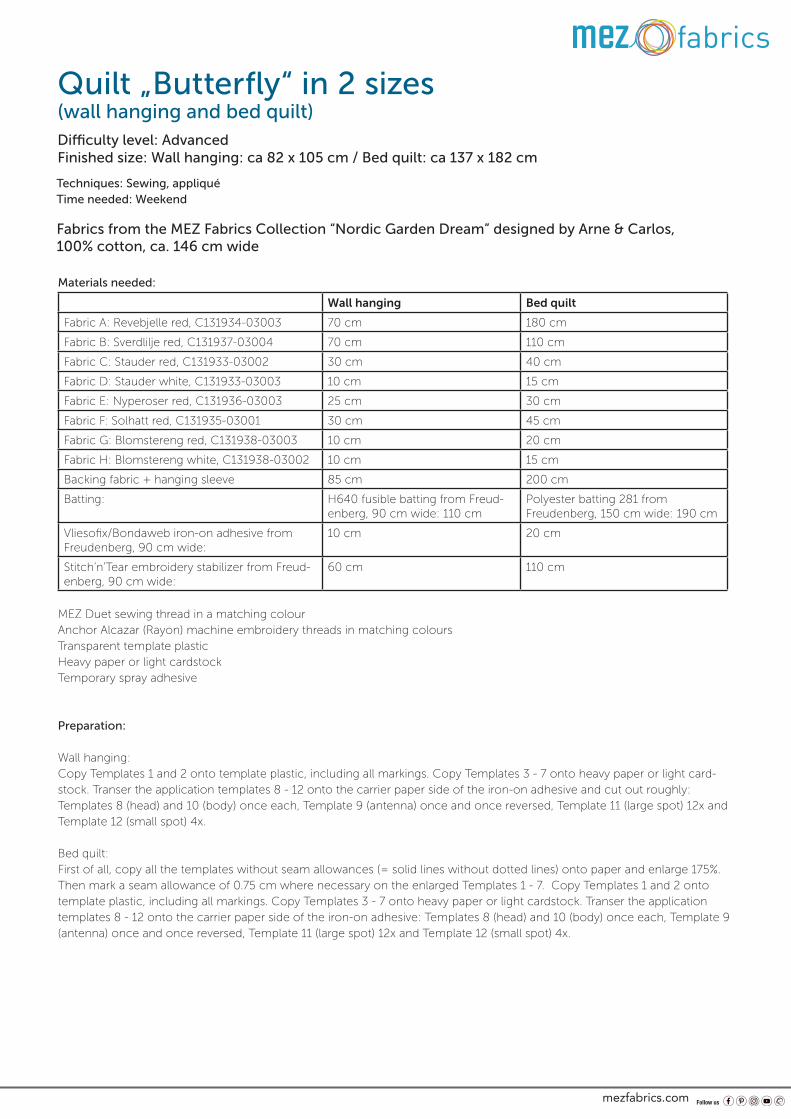
Quilt „Butterfly“ in 2 sizes (wall hanging and bed quilt)Difficulty level: AdvancedFinished size: Wall hanging: ca 82 x 105 cm / Bed quilt: ca 137 x 182 cm
Techniques: Sewing, appliquéTime needed: Weekend
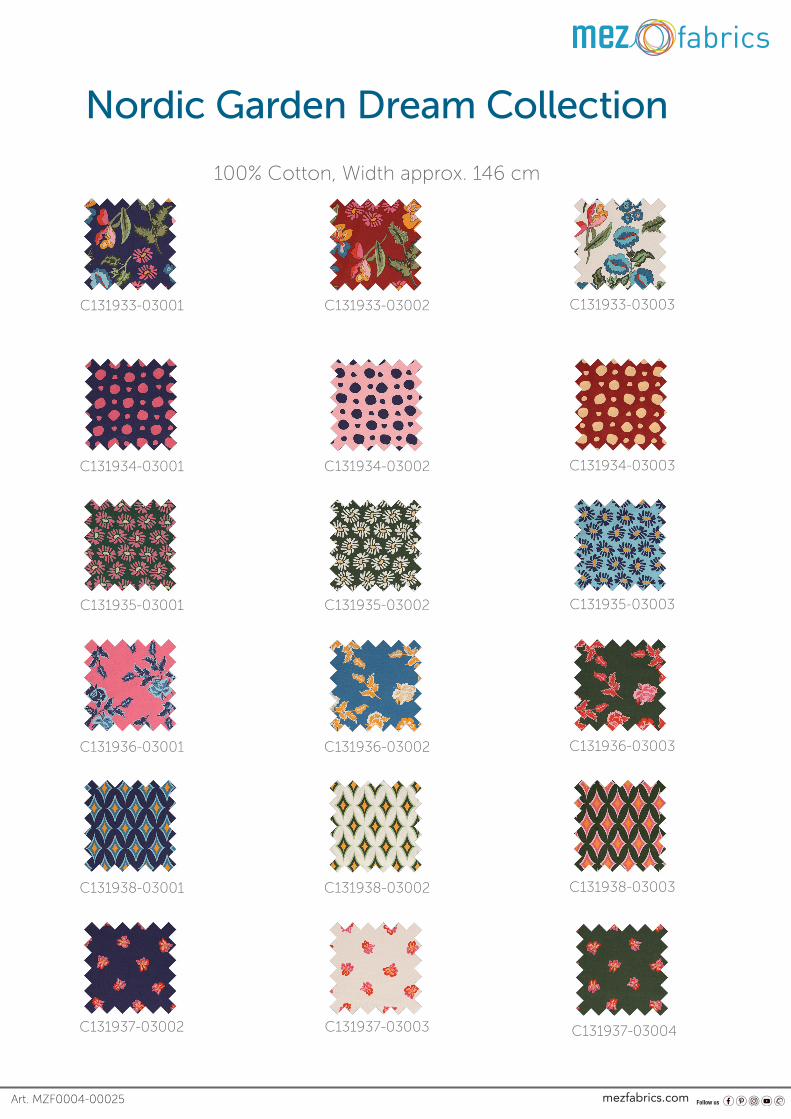
Fabrics from the MEZ Fabrics Collection “Nordic Garden Dream” designed by Arne & Carlos,100% cotton, ca. 146 cm wide
Materials needed:
Wall hanging Bed quilt
Fabric A: Revebjelle red, C131934-03003 70 cm 180 cm
Fabric B: Sverdlilje red, C131937-03004 70 cm 110 cm
Fabric C: Stauder red, C131933-03002 30 cm 40 cm
Fabric D: Stauder white, C131933-03003 10 cm 15 cm
Fabric E: Nyperoser red, C131936-03003 25 cm 30 cm
Fabric F: Solhatt red, C131935-03001 30 cm 45 cm
Fabric G: Blomstereng red, C131938-03003 10 cm 20 cm
Fabric H: Blomstereng white, C131938-03002 10 cm 15 cm
Backing fabric + hanging sleeve 85 cm 200 cm
Batting: H640 fusible batting from Freud-enberg, 90 cm wide: 110 cm
Polyester batting 281 from Freudenberg, 150 cm wide: 190 cm
Vliesofix/Bondaweb iron-on adhesive from Freudenberg, 90 cm wide:
10 cm 20 cm
Stitch’n’Tear embroidery stabilizer from Freud-enberg, 90 cm wide:
60 cm 110 cm
MEZ Duet sewing thread in a matching colourAnchor Alcazar (Rayon) machine embroidery threads in matching coloursTransparent template plasticHeavy paper or light cardstock Temporary spray adhesive
Preparation:
Wall hanging: Copy Templates 1 and 2 onto template plastic, including all markings. Copy Templates 3 - 7 onto heavy paper or light card-stock. Transer the application templates 8 - 12 onto the carrier paper side of the iron-on adhesive and cut out roughly: Templates 8 (head) and 10 (body) once each, Template 9 (antenna) once and once reversed, Template 11 (large spot) 12x and Template 12 (small spot) 4x.
Bed quilt: First of all, copy all the templates without seam allowances (= solid lines without dotted lines) onto paper and enlarge 175%. Then mark a seam allowance of 0.75 cm where necessary on the enlarged Templates 1 - 7. Copy Templates 1 and 2 onto template plastic, including all markings. Copy Templates 3 - 7 onto heavy paper or light cardstock. Transer the application templates 8 - 12 onto the carrier paper side of the iron-on adhesive: Templates 8 (head) and 10 (body) once each, Template 9 (antenna) once and once reversed, Template 11 (large spot) 12x and Template 12 (small spot) 4x.
Article-No.: 9848013-00002Regia shadecardother countries
Article-No.: 9848013-00001 Regia Farbkarte D, A, CH, Benelux
MEZ GmbHHauptstraße 7879336 HerbolzheimDeutschlandwww.mezcrafts.com
WELCOME TO A WORLD OF INSPIRATIONschachenmayr.comFollow us on social media
WELCOME TO A WORLDOF INSPIRATIONschachenmayr.com
Follow us on social media
Article-No.: 9848013-00002Regia shadecardother countries
Article-No.: 9848013-00001 Regia Farbkarte D, A, CH, Benelux
MEZ GmbHHauptstraße 7879336 HerbolzheimDeutschlandwww.mezcrafts.com
WELCOME TO A WORLD OF INSPIRATIONschachenmayr.comFollow us on social media
WELCOME TO A WORLDOF INSPIRATIONschachenmayr.com
Follow us on social mediamezfabrics.com
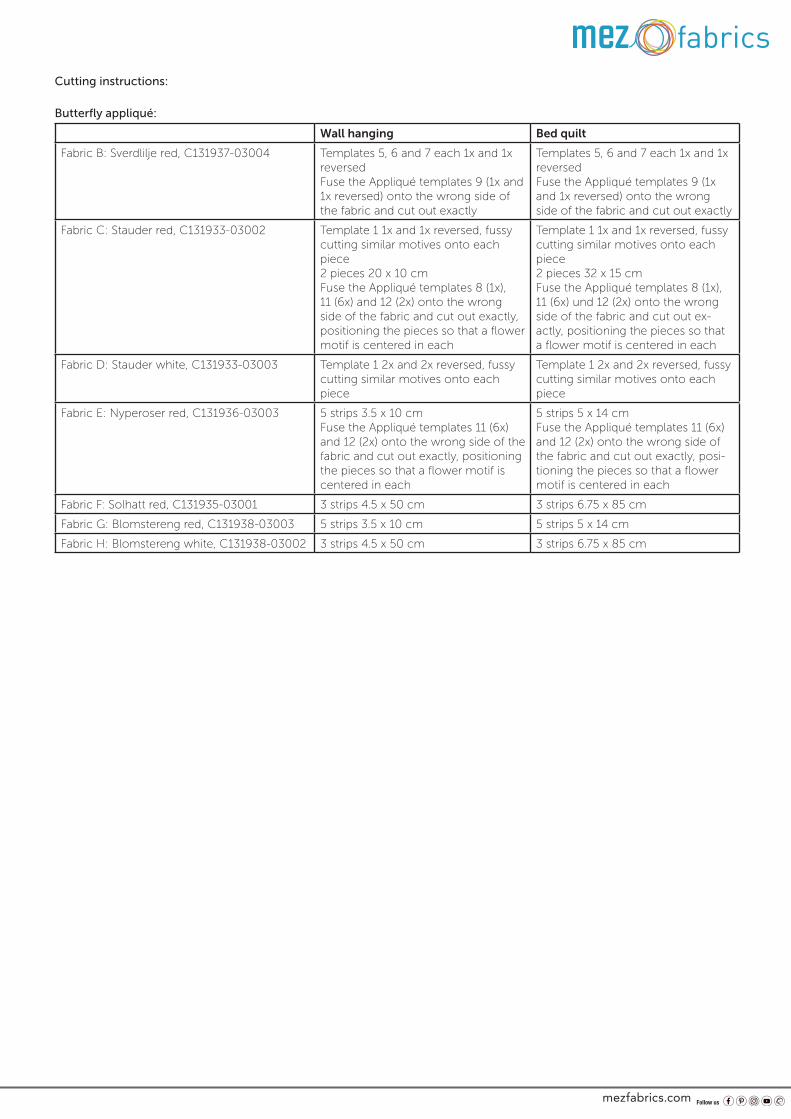
Cutting instructions:
Butterfly appliqué:
Wall hanging Bed quilt
Fabric B: Sverdlilje red, C131937-03004 Templates 5, 6 and 7 each 1x and 1x reversedFuse the Appliqué templates 9 (1x and 1x reversed) onto the wrong side of the fabric and cut out exactly
Templates 5, 6 and 7 each 1x and 1x reversedFuse the Appliqué templates 9 (1x and 1x reversed) onto the wrong side of the fabric and cut out exactly
Fabric C: Stauder red, C131933-03002 Template 1 1x and 1x reversed, fussy cutting similar motives onto each piece2 pieces 20 x 10 cmFuse the Appliqué templates 8 (1x), 11 (6x) and 12 (2x) onto the wrong side of the fabric and cut out exactly, positioning the pieces so that a flower motif is centered in each
Template 1 1x and 1x reversed, fussy cutting similar motives onto each piece2 pieces 32 x 15 cmFuse the Appliqué templates 8 (1x), 11 (6x) und 12 (2x) onto the wrong side of the fabric and cut out ex-actly, positioning the pieces so that a flower motif is centered in each
Fabric D: Stauder white, C131933-03003 Template 1 2x and 2x reversed, fussy cutting similar motives onto each piece
Template 1 2x and 2x reversed, fussy cutting similar motives onto each piece
Fabric E: Nyperoser red, C131936-03003 5 strips 3.5 x 10 cm Fuse the Appliqué templates 11 (6x) and 12 (2x) onto the wrong side of the fabric and cut out exactly, positioning the pieces so that a flower motif is centered in each
5 strips 5 x 14 cm Fuse the Appliqué templates 11 (6x) and 12 (2x) onto the wrong side of the fabric and cut out exactly, posi-tioning the pieces so that a flower motif is centered in each
Fabric F: Solhatt red, C131935-03001 3 strips 4.5 x 50 cm 3 strips 6.75 x 85 cm
Fabric G: Blomstereng red, C131938-03003 5 strips 3.5 x 10 cm 5 strips 5 x 14 cm
Fabric H: Blomstereng white, C131938-03002 3 strips 4.5 x 50 cm 3 strips 6.75 x 85 cm

Article-No.: 9848013-00002Regia shadecardother countries
Article-No.: 9848013-00001 Regia Farbkarte D, A, CH, Benelux
MEZ GmbHHauptstraße 7879336 HerbolzheimDeutschlandwww.mezcrafts.com
WELCOME TO A WORLD OF INSPIRATIONschachenmayr.comFollow us on social media
WELCOME TO A WORLDOF INSPIRATIONschachenmayr.com
Follow us on social media
Article-No.: 9848013-00002Regia shadecardother countries
Article-No.: 9848013-00001 Regia Farbkarte D, A, CH, Benelux
MEZ GmbHHauptstraße 7879336 HerbolzheimDeutschlandwww.mezcrafts.com
WELCOME TO A WORLD OF INSPIRATIONschachenmayr.comFollow us on social media
WELCOME TO A WORLDOF INSPIRATIONschachenmayr.com
Follow us on social mediamezfabrics.com
Remaining pieces for the quilt top:
Wall hanging Bed quilt
Fabric A: Revebjelle red, C131934-03003 Appliqué background:1 rectangle: 61.5 x 81.5 cmLog Cabin blocks:16x strip 2: 3 x 8 cmSetting triangles:2x square 3: 12.5 x 12.5 cm, subcut each 1x diagonally = 4x triangle 32x square 4: 23.5 x 23.5 cm, subcut each 2x diagonally = 8x triangle 4(only 6 are required)
Appliqué background:1 rectangle: 136.5 x 131.5 cmLog Cabin blocks:24x strip 2: 3.25 x 8.75 cmSetting triangles:2x square 3: 13.75 x 13.75 cm, subcut each 1x diagonally = 4x triangle 33x square 4: 26 x 26 cm, subcut each 2x diagonally = 12 triangle 4(only 10 are required)
Fabric B: Sverdlilje red, C131937-03004 Log Cabin blocks:16x strip 4: 3 x 11 cmBorder strips:2 strips 3 x 81.5 cmPieced setting triangles:4x square 1: 13.5 x 13.5 cm, subcut each 2x diagonally = 16x triangle 1Binding:3 strips 6.5 cm x WOF
Log Cabin blocks:24x strip 4: 3.25 x 12.25 cmBorder strips:2 strips 4 x 136.5 cmPieced setting triangles:6x square 1: 14.75 x 14.75 cm, subcut each 2x diagonally = 24x triangle 1Binding:5 strips 6.5 cm x WOF
Fabric C: Stauder red, C131933-03002 Log Cabin blocks:8 squares: 6.5 x 6.5 cm8x strip 5: 3 x 12.5 cm8x strip 7: 3 x 15.5 cm
Log Cabin blocks:12 squares: 7 x 7 cm12x strip 5: 3.25 x 14 cm12x strip 7: 3.25 x 17.5 cm
Fabric E: Nyperoser red, C131936-03003 Log Cabin blocks:16x strip 6: 3 x 14 cmPieced setting triangles:3x square 2: 9.5 x 9.5 cm, subcut each 1x diagonally = 6x triangle 2
Log Cabin blocks:24x strip 6: 3.25 x 15.75 cmPieced setting triangles:5x square 2: 10.5 x 10.5 cm, subcut each 1x diagonally = 10x triangle 2
Fabric F: Solhatt red, C131935-03001 Log Cabin blocks:8x strip 3: 3 x 9.5 cm8x strip 5: 3 x 12.5 cmPieced setting triangles:1x square 1: 13.5 x 13.5 cm, subcut 2x diagonally = 4x triangle 13x square 2: 9.5 x 9.5 cm, subcut each 1x diagonally = 6x triangle 2
Log Cabin blocks:12x strip 3: 3.25 x 10.5 cm12x strip 5: 3.25 x 14 cmPieced setting triangles:1x square 1: 14.75 x 14.75 cm, subcut 2x diagonally = 4x triangle 15x square 2: 10.5 x 10.5 cm, subcut each 1x diagonally = 10x triangle 2
Fabric G: Blomstereng red, C131938-03003 Log Cabin blocks:8x strip 1: 3 x 6.5 cm8x strip 3: 3 x 9.5 cm
Log Cabin blocks:12x strip 1: 3.25 x 8.75 cm12x strip 3: 3.25 x 10.5 cm
Backing + batting: 1 rectangle of each: 90 x 110 cm 1 rectangle of each: 150 x 190 cm
Hanging sleeve: 1 Strip: 20 x 75 cm
Article-No.: 9848013-00002Regia shadecardother countries
Article-No.: 9848013-00001 Regia Farbkarte D, A, CH, Benelux
MEZ GmbHHauptstraße 7879336 HerbolzheimDeutschlandwww.mezcrafts.com
WELCOME TO A WORLD OF INSPIRATIONschachenmayr.comFollow us on social media
WELCOME TO A WORLDOF INSPIRATIONschachenmayr.com
Follow us on social media
Article-No.: 9848013-00002Regia shadecardother countries
Article-No.: 9848013-00001 Regia Farbkarte D, A, CH, Benelux
MEZ GmbHHauptstraße 7879336 HerbolzheimDeutschlandwww.mezcrafts.com
WELCOME TO A WORLD OF INSPIRATIONschachenmayr.comFollow us on social media
WELCOME TO A WORLDOF INSPIRATIONschachenmayr.com
Follow us on social mediamezfabrics.com
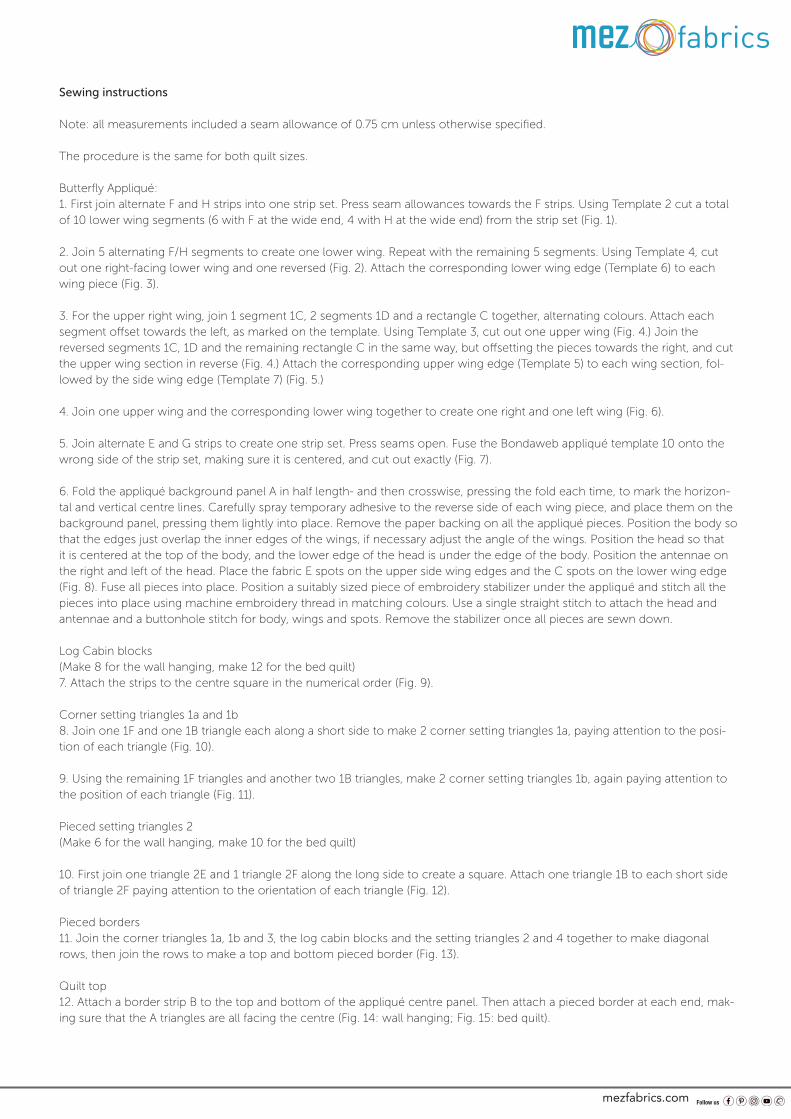
Sewing instructions
Note: all measurements included a seam allowance of 0.75 cm unless otherwise specified.
The procedure is the same for both quilt sizes.
Butterfly Appliqué:1. First join alternate F and H strips into one strip set. Press seam allowances towards the F strips. Using Template 2 cut a total of 10 lower wing segments (6 with F at the wide end, 4 with H at the wide end) from the strip set (Fig. 1).
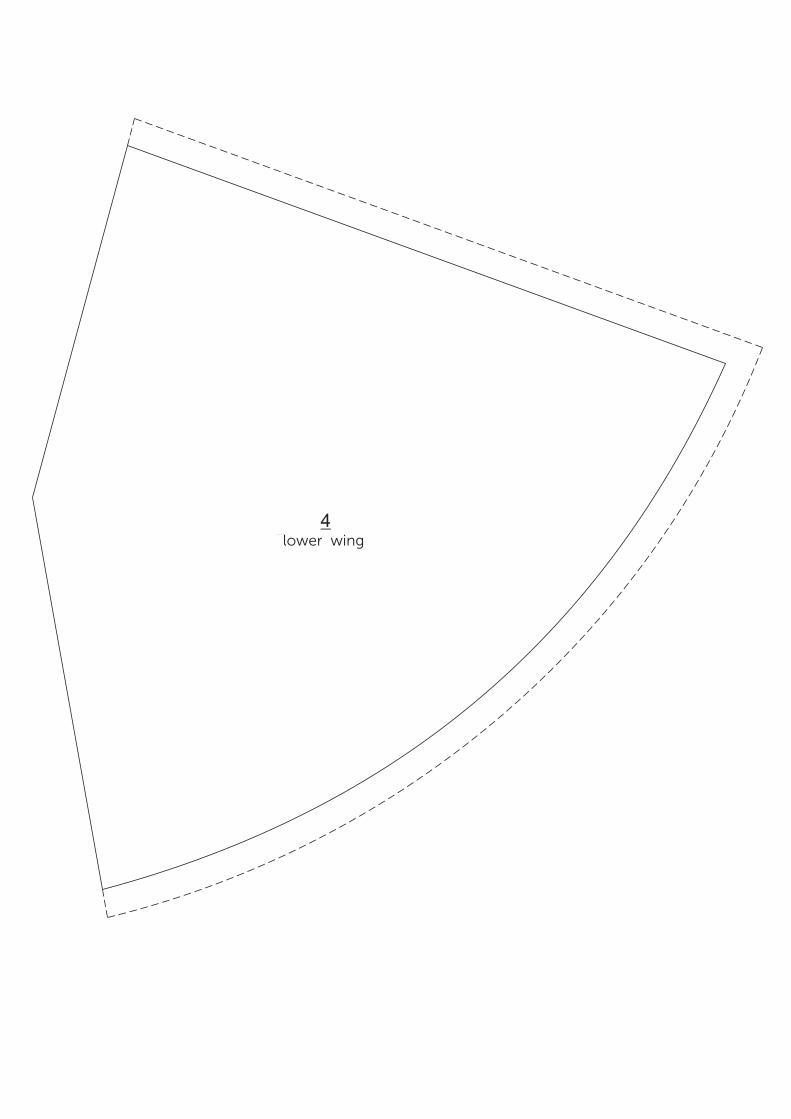
2. Join 5 alternating F/H segments to create one lower wing. Repeat with the remaining 5 segments. Using Template 4, cut out one right-facing lower wing and one reversed (Fig. 2). Attach the corresponding lower wing edge (Template 6) to each wing piece (Fig. 3).
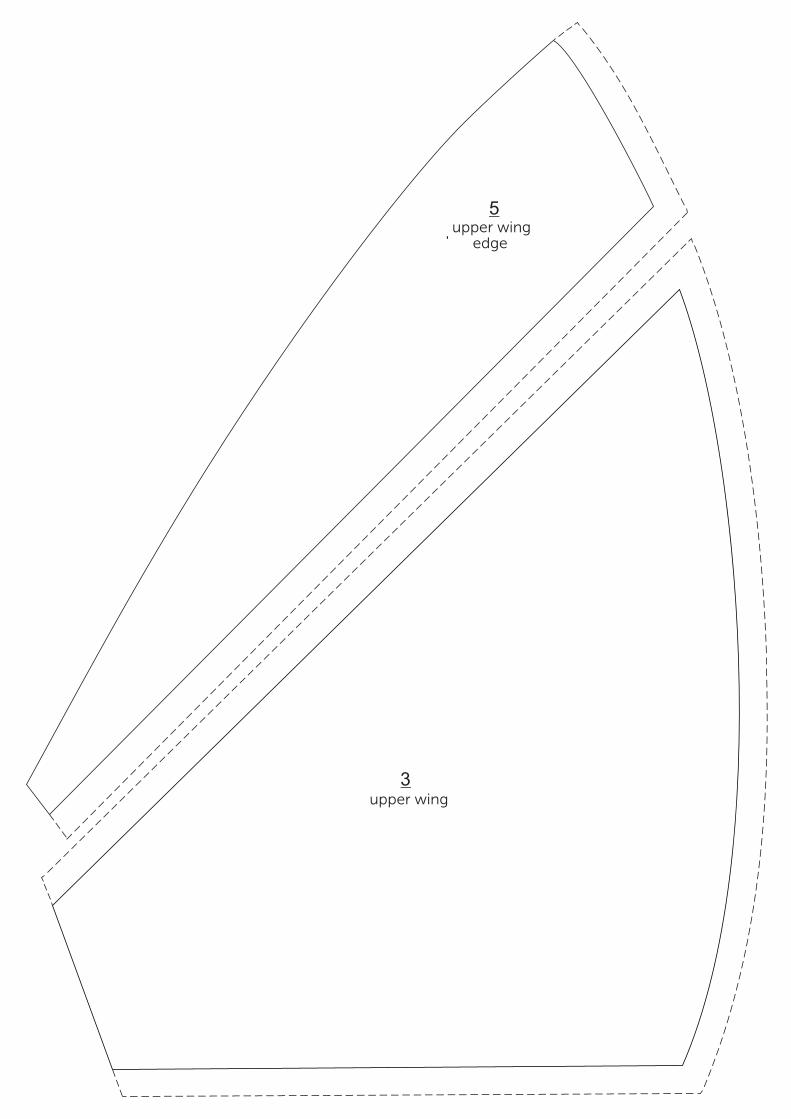
3. For the upper right wing, join 1 segment 1C, 2 segments 1D and a rectangle C together, alternating colours. Attach each segment offset towards the left, as marked on the template. Using Template 3, cut out one upper wing (Fig. 4.) Join the reversed segments 1C, 1D and the remaining rectangle C in the same way, but offsetting the pieces towards the right, and cut the upper wing section in reverse (Fig. 4.) Attach the corresponding upper wing edge (Template 5) to each wing section, fol-lowed by the side wing edge (Template 7) (Fig. 5.)
4. Join one upper wing and the corresponding lower wing together to create one right and one left wing (Fig. 6).
5. Join alternate E and G strips to create one strip set. Press seams open. Fuse the Bondaweb appliqué template 10 onto the wrong side of the strip set, making sure it is centered, and cut out exactly (Fig. 7).
6. Fold the appliqué background panel A in half length- and then crosswise, pressing the fold each time, to mark the horizon-tal and vertical centre lines. Carefully spray temporary adhesive to the reverse side of each wing piece, and place them on the background panel, pressing them lightly into place. Remove the paper backing on all the appliqué pieces. Position the body so that the edges just overlap the inner edges of the wings, if necessary adjust the angle of the wings. Position the head so that it is centered at the top of the body, and the lower edge of the head is under the edge of the body. Position the antennae on the right and left of the head. Place the fabric E spots on the upper side wing edges and the C spots on the lower wing edge (Fig. 8). Fuse all pieces into place. Position a suitably sized piece of embroidery stabilizer under the appliqué and stitch all the pieces into place using machine embroidery thread in matching colours. Use a single straight stitch to attach the head and antennae and a buttonhole stitch for body, wings and spots. Remove the stabilizer once all pieces are sewn down.
Log Cabin blocks(Make 8 for the wall hanging, make 12 for the bed quilt)7. Attach the strips to the centre square in the numerical order (Fig. 9).
Corner setting triangles 1a and 1b8. Join one 1F and one 1B triangle each along a short side to make 2 corner setting triangles 1a, paying attention to the posi-tion of each triangle (Fig. 10).
9. Using the remaining 1F triangles and another two 1B triangles, make 2 corner setting triangles 1b, again paying attention to the position of each triangle (Fig. 11).
Pieced setting triangles 2(Make 6 for the wall hanging, make 10 for the bed quilt)
10. First join one triangle 2E and 1 triangle 2F along the long side to create a square. Attach one triangle 1B to each short side of triangle 2F paying attention to the orientation of each triangle (Fig. 12).
Pieced borders11. Join the corner triangles 1a, 1b and 3, the log cabin blocks and the setting triangles 2 and 4 together to make diagonal rows, then join the rows to make a top and bottom pieced border (Fig. 13).
Quilt top12. Attach a border strip B to the top and bottom of the appliqué centre panel. Then attach a pieced border at each end, mak-ing sure that the A triangles are all facing the centre (Fig. 14: wall hanging; Fig. 15: bed quilt).

Article-No.: 9848013-00002Regia shadecardother countries
Article-No.: 9848013-00001 Regia Farbkarte D, A, CH, Benelux
MEZ GmbHHauptstraße 7879336 HerbolzheimDeutschlandwww.mezcrafts.com
WELCOME TO A WORLD OF INSPIRATIONschachenmayr.comFollow us on social media
WELCOME TO A WORLDOF INSPIRATIONschachenmayr.com
Follow us on social media
Article-No.: 9848013-00002Regia shadecardother countries
Article-No.: 9848013-00001 Regia Farbkarte D, A, CH, Benelux
MEZ GmbHHauptstraße 7879336 HerbolzheimDeutschlandwww.mezcrafts.com
WELCOME TO A WORLD OF INSPIRATIONschachenmayr.comFollow us on social media
WELCOME TO A WORLDOF INSPIRATIONschachenmayr.com
Follow us on social mediamezfabrics.com
Finishing the quilt
13. Place the quilt top and batting on top of the backing and baste together. For the wall hanging first fuse the batting to the wrong side of the backing fabric. Quilt as desired.
14. Trim batting and backing to the same size as the quilt top. Bind to finish.
15. For the wall hanging make a hanging sleeve and attach it to the back of the quilt before binding.
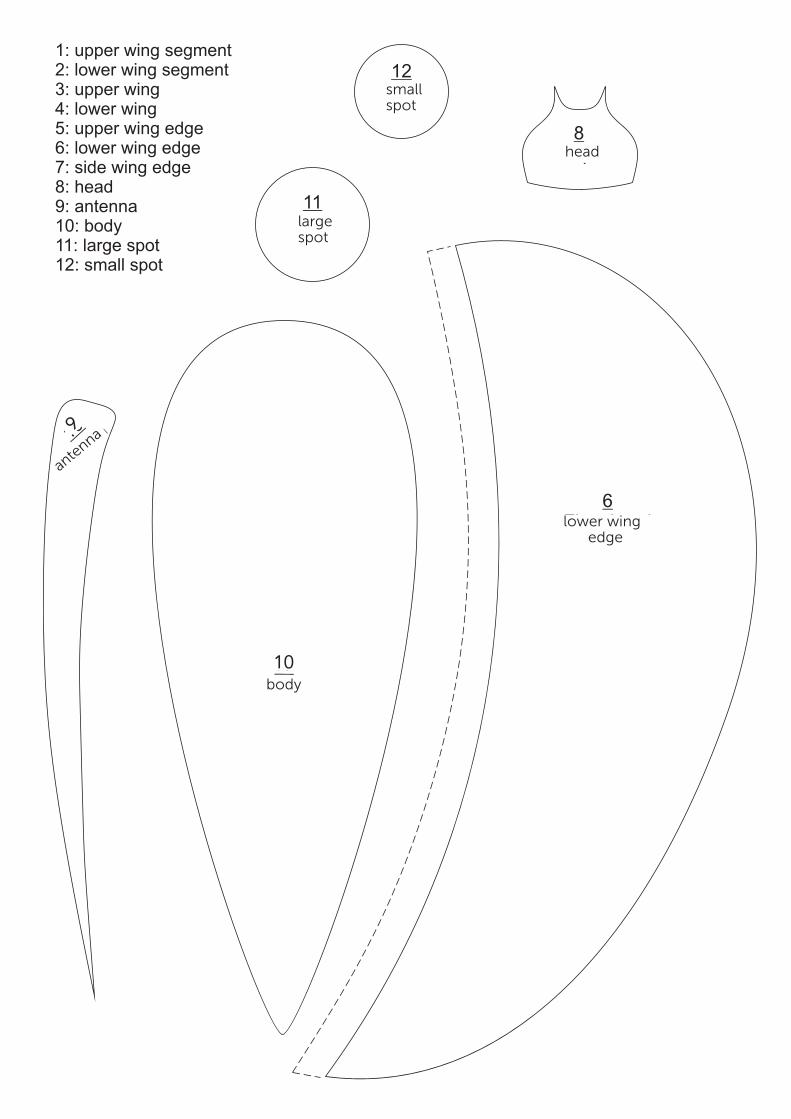
List of templates
1: upper wing segment 2: lower wing segment3: upper wing4: lower wing5: upper wing edge6: lower wing edge7: side wing edge8: head9: antenna10: body11: large spot12: small spot

2unteres Flügel-
segment
1oberes Flügel-
segment
Ansatzpunkt
7Flügelrand
seitlich upper wing segment
side wing edge
lower wing segment
start
11Körper
10
Fühle
r
8Kopf
11Punktgroß
12Punkt klein
6Flügelrand
unten
1: upper wing segment 2: lower wing segment3: upper wing4: lower wing5: upper wing edge6: lower wing edge7: side wing edge8: head9: antenna10: body11: large spot12: small spot
9
ante
nna
10 body
head
large spot
lower wing edge
small spot
3Flügel oben
5Flügelrand
oben upper wing edge
upper wing
4Flügel unten lower wing

Legende:
Sto A Sto B Sto C
Sto D Sto E Sto F
Sto G Sto H
Legend:
Fabric A Fabric B Fabric C
Fabric D Fabric E Fabric F
Fabric G Fabric H
Bild 1: Streifenfläche zusammensetzen und untere Flügelsegmente ausschneidenFig. 1: Create strip set and cut out lower wing segments
Bild 2: Flügelsegmente zusammensetzen und untere Flügel ausschneidenFig. 2: Join lower wing segments and cut out lower wings
Bild 3: Unteren Flügelrand annähenFig. 3; Attach lower wing edge

Bild 4: Flügelsegmente zusammensetzen und obere Flügel ausschneidenFig. 4: Join upper wing segments and cut out upper wings
Bild 5: Oberen und seitlichen Flügelrand annähenFig. 5: Attach upper and side wing edges
Bild 6: Obere und untere Flügel zusammennähenFig. 6: Join upper and lower wings together
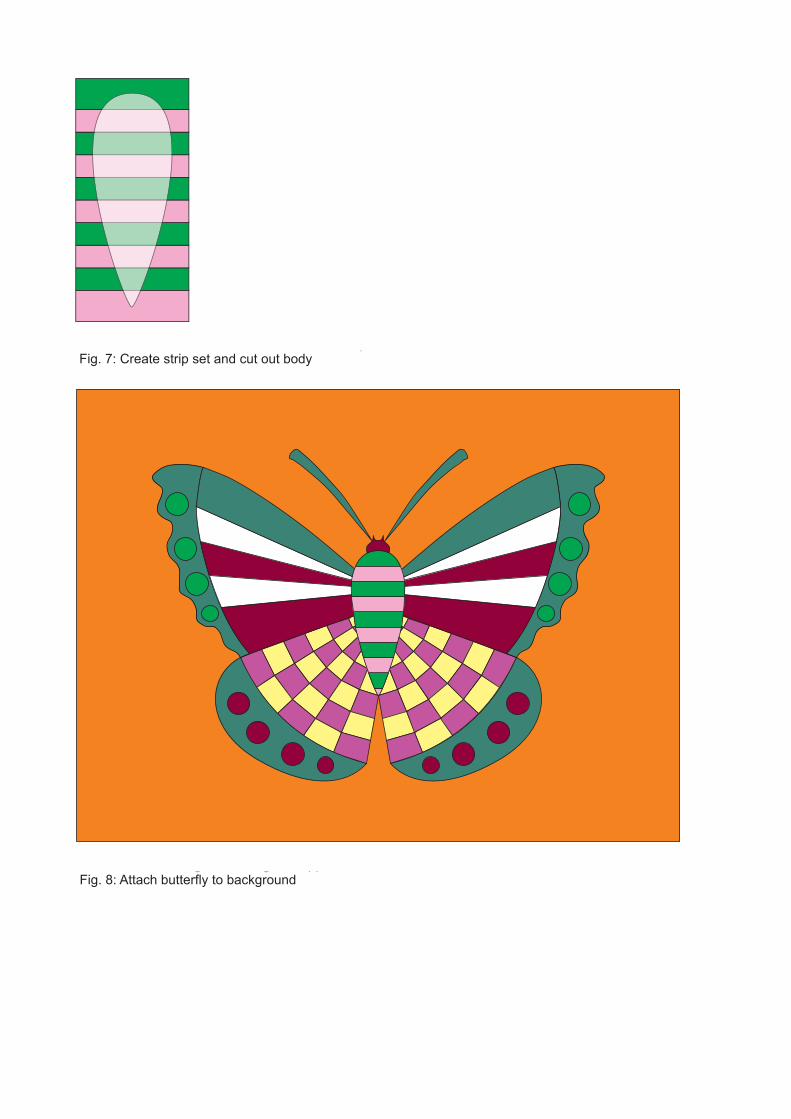
Bild 7: Streifenfläche zusammensetzen und Körper ausschneidenFig. 7: Create strip set and cut out body
Bild 8: Schmetterling auf Hintergrund applizierenFig. 8: Attach butterfly to background

C
7C
5C 1G
2A
2A3F
4B
6E
6E
5F
4B
3G
Bild 9: Log Cabin Blöcke zusammensetzenFig. 9: Create log cabin blocks
Bild 10: Eckdreiecke 1a zusammensetzenFig: 10: Make corner setting triangles 1a
Bild 12: Randdreiecke 2 zusammensetzenFig. 12: Make setting triangle 2
Bild 13: Randstreifen zusammensetzenFig 14: Make pieced borders
Bild 11: Eckdreiecke 1b zusammensetzenFig: 11 Make corner setting triangles 1b
1B
1F1F
1B
1B 1B2F
2E
1a
4
1b
3
2
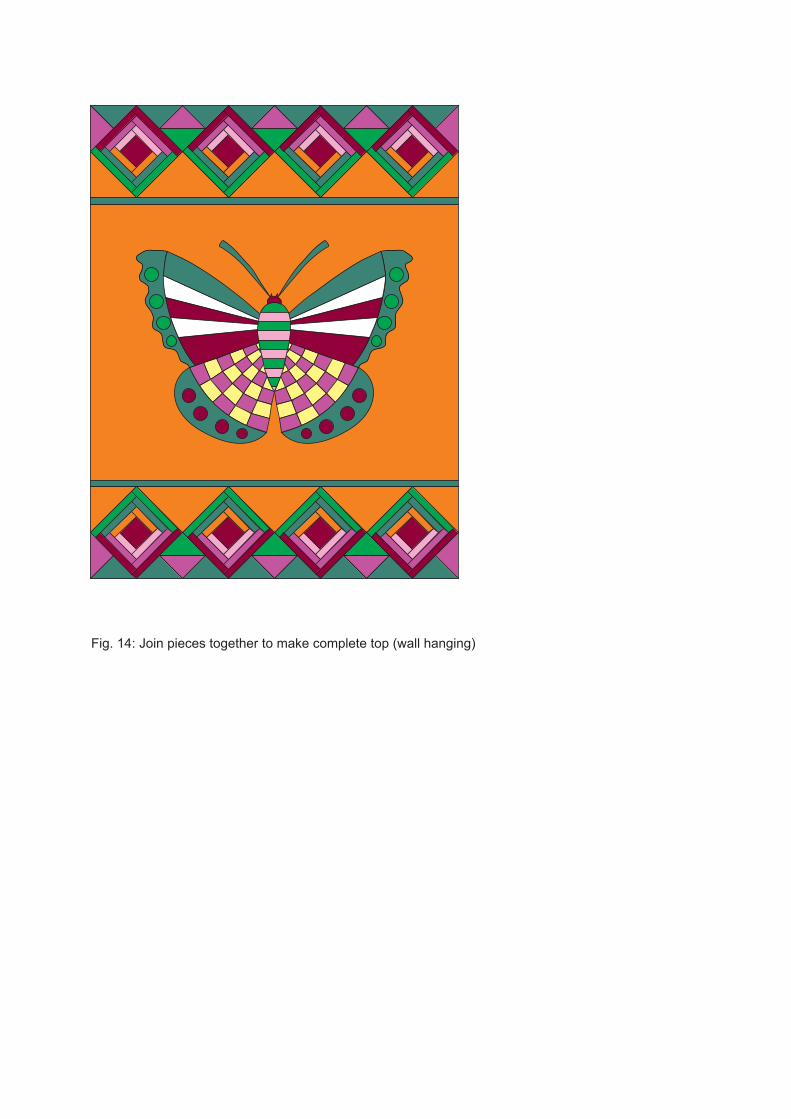
Bild 14: Gesamte Vorderseite zusammensetzen (Wandbehang)Fig. 14: Join pieces together to make complete top (wall hanging)
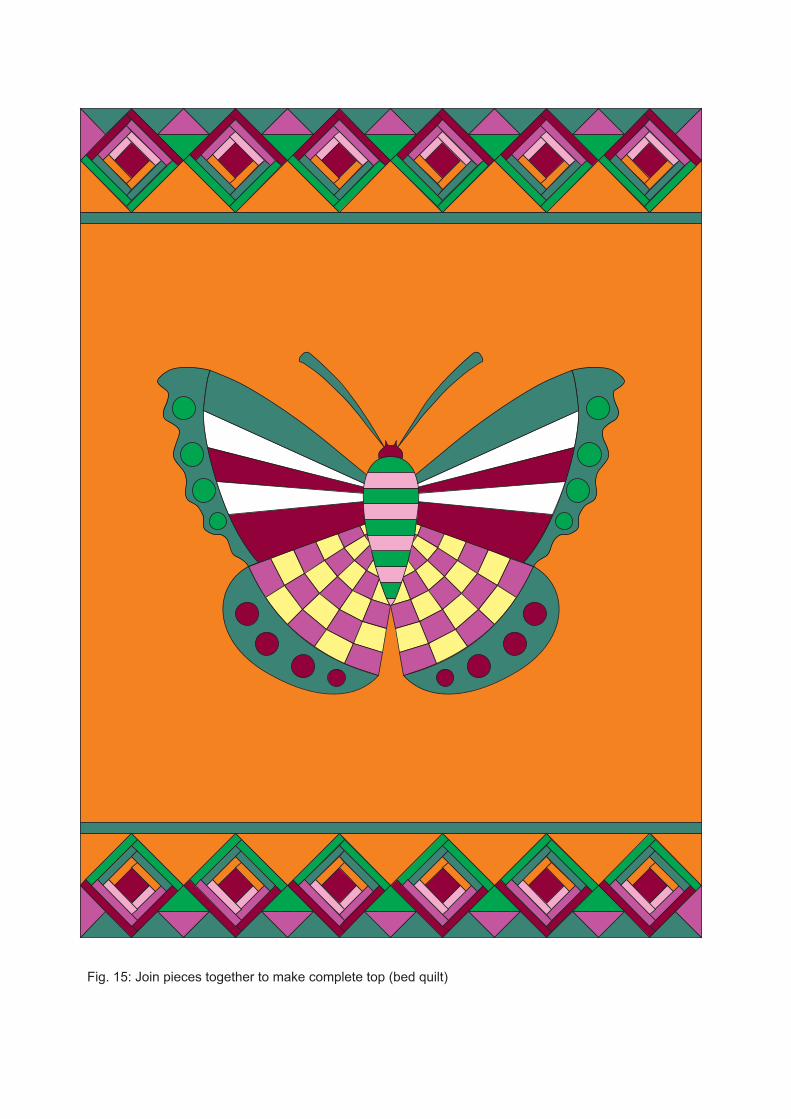
Bild 15: Gesamte Vorderseite zusammensetzen (Bettüberwurf)Fig. 15: Join pieces together to make complete top (bed quilt)
Article-No.: 9848013-00002Regia shadecardother countries
Article-No.: 9848013-00001 Regia Farbkarte D, A, CH, Benelux
MEZ GmbHHauptstraße 7879336 HerbolzheimDeutschlandwww.mezcrafts.com
WELCOME TO A WORLD OF INSPIRATIONschachenmayr.comFollow us on social media
WELCOME TO A WORLDOF INSPIRATIONschachenmayr.com
Follow us on social media
Article-No.: 9848013-00002Regia shadecardother countries
Article-No.: 9848013-00001 Regia Farbkarte D, A, CH, Benelux
MEZ GmbHHauptstraße 7879336 HerbolzheimDeutschlandwww.mezcrafts.com
WELCOME TO A WORLD OF INSPIRATIONschachenmayr.comFollow us on social media
WELCOME TO A WORLDOF INSPIRATIONschachenmayr.com
Follow us on social mediamezfabrics.comArt. MZF0004-00025
100% Cotton, Width approx. 146 cm
Nordic Garden Dream Collection
C131933-03001
C131934-03001
C131935-03001
C131936-03001
C131938-03001
C131933-03002
C131934-03002
C131935-03002
C131936-03002
C131938-03002
C131933-03003
C131934-03003
C131935-03003
C131936-03003
C131938-03003
C131937-03002 C131937-03003 C131937-03004