MKT 00113 10x18 Selenium EUA - J.ASSY
9
OPERATOR´S MANUAL versão 1.0
Transcript of MKT 00113 10x18 Selenium EUA - J.ASSY

OPERATOR´SMANUAL
versão 1.0
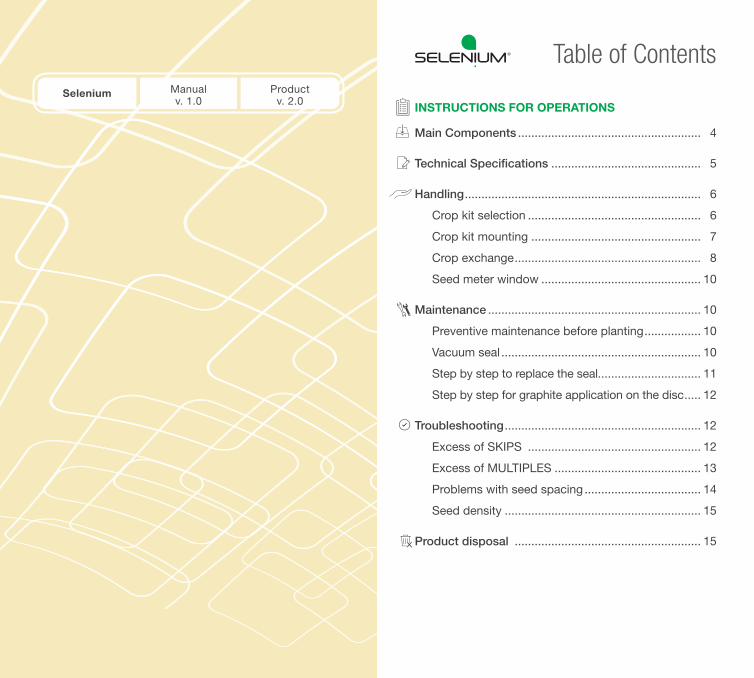
Table of ContentsManualv. 1.0
Productv. 2.0
SeleniumINSTRUCTIONS FOR OPERATIONS
Main Components ....................................................... 4
Technical Speci� cations ............................................. 5
Handling ....................................................................... 6
Crop kit selection .................................................... 6
Crop kit mounting ................................................... 7
Crop exchange ........................................................ 8
Seed meter window ................................................ 10
Maintenance ................................................................ 10
Preventive maintenance before planting ................. 10
Vacuum seal ............................................................ 10
Step by step to replace the seal............................... 11
Step by step for graphite application on the disc ..... 12
Troubleshooting ........................................................... 12
Excess of SKIPS .................................................... 12
Excess of MULTIPLES ............................................ 13
Problems with seed spacing ................................... 14
Seed density ........................................................... 15
Product disposal ........................................................ 15
INSTRUCTIONS FOR OPERATIONS | SELENIUM Pneumatic Seed Meter | | J.Assy Agricultural | INSTRUCTIONS FOR OPERATIONS 54
Instructions for Operations
Main Components
Meter
Mini Hopper
Mini HopperHatch
Seed Nozzle (Gravity)
Window
DiscLatch
Air Intake
VacuumSeal
Handle
Air intakeMeter lid
Vacuumnozzle
Air intakeAir intake
Seed tube
Designed forSelenium.
Meter Chassis
Crop Kit
More OPTIONS coming soon.
Edible BeanCotton Corn SoybeanMilo
Cultures available:
Technical SpecificationsPneumatic seed meter.
No need for adjustments.
Includes window to monitor operation in real time.
Dimensions:414mm (H) x 206mm (D) x 373mm (W).
Weight: 3 Kg.
Diameter of the vacuum nozzle: 36,5mm.
Diameter of the seed nozzle:74mm (gravity) ou 32mm (CCS).
INSTRUCTIONS FOR OPERATIONS | SELENIUM Pneumatic Seed Meter | | J.Assy Agricultural | INSTRUCTIONS FOR OPERATIONS 76
Handling
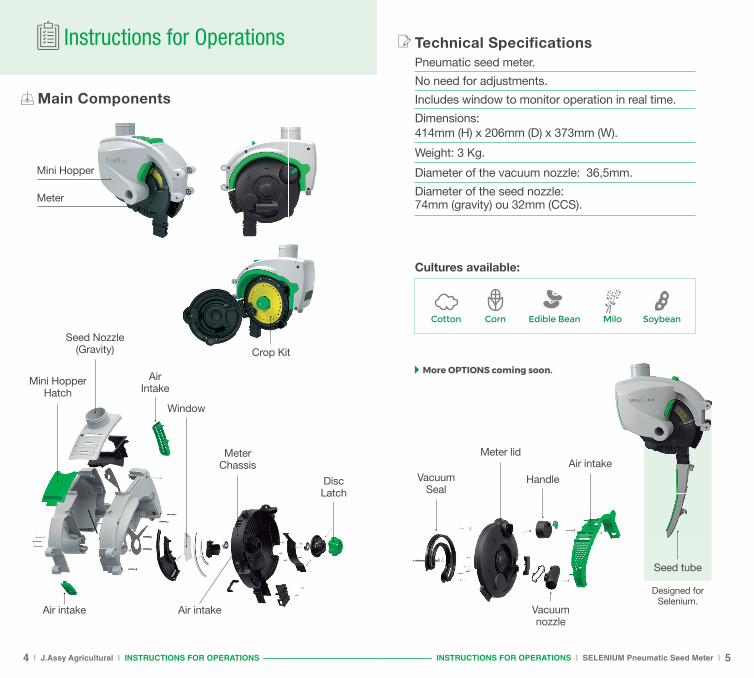
Crop kit selection
Selenium has three distinct crop kits with their respective singulator and ejector: for corn soybean and edible bean, soybean and cotton and milo.
Choose the specific set for the desired crop according to the colors of the discs. Table 1 lists the color of the disk for each crop.
Crop kit mounting
To mount the selected crop kit in the seed meter, it is not necessary to remove the meter from the mini hopper.
1. Open the meter lid by turning the handle in thecounter-clockwise direction.
2. Turn the disc latch counterclockwise.
Corn Kit
Side of the Vacuum Side of the Seed
Singulators
Ejector
The crop kit has no adjustment and should not be disassembled.
Crop Disc Color(Crop kit)
Number of holes
Hole diameter
Corn Yellow 28 4,5mm
Soybean and edible bean
Orange 55 4,0mm
Cotton and Sorghum
Blue 55 2,5mm
Table 1 - Description of the four crop kits (composed of Disc, Organizer and ejector) and respective crops.
More OPTIONS coming soon.
Ejector
Singulator ring
Disc hole
Lower ring
Disc
SingulatorLobes
Bottom Singulator
Handle
Latch
Soybean and edible bean kit
Cotton andmilo kit
INSTRUCTIONS FOR OPERATIONS | SELENIUM Pneumatic Seed Meter | | J.Assy Agricultural | INSTRUCTIONS FOR OPERATIONS 98
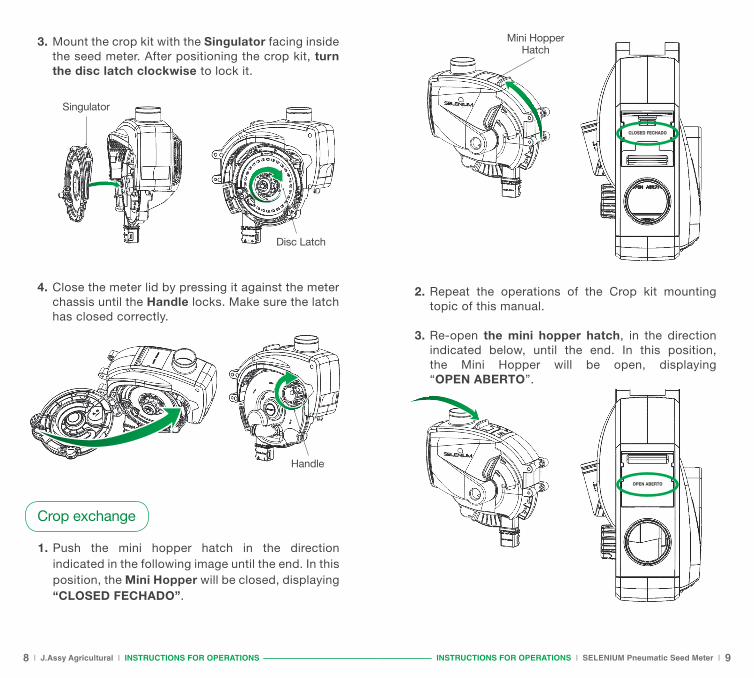
3. Mount the crop kit with the Singulator facing inside the seed meter. After positioning the crop kit, turn the disc latch clockwise to lock it.
4. Close the meter lid by pressing it against the meter chassis until the Handle locks. Make sure the latch has closed correctly.
2. Repeat the operations of the Crop kit mounting topic of this manual. .3. Re-open the mini hopper hatch, in the direction indicated below, until the end. In this position, the Mini Hopper will be open, displaying “OPEN ABERTO”.
Crop exchange
1. Push the mini hopper hatch in the direction indicated in the following image until the end. In this position, the Mini Hopper will be closed, displaying
“CLOSED FECHADO”.
Mini Hopper Hatch
CLOSED FECHADO
OPEN ABERTO
Singulator
Disc Latch
Handle
INSTRUCTIONS FOR OPERATIONS | SELENIUM Pneumatic Seed Meter | | J.Assy Agricultural | INSTRUCTIONS FOR OPERATIONS 1110
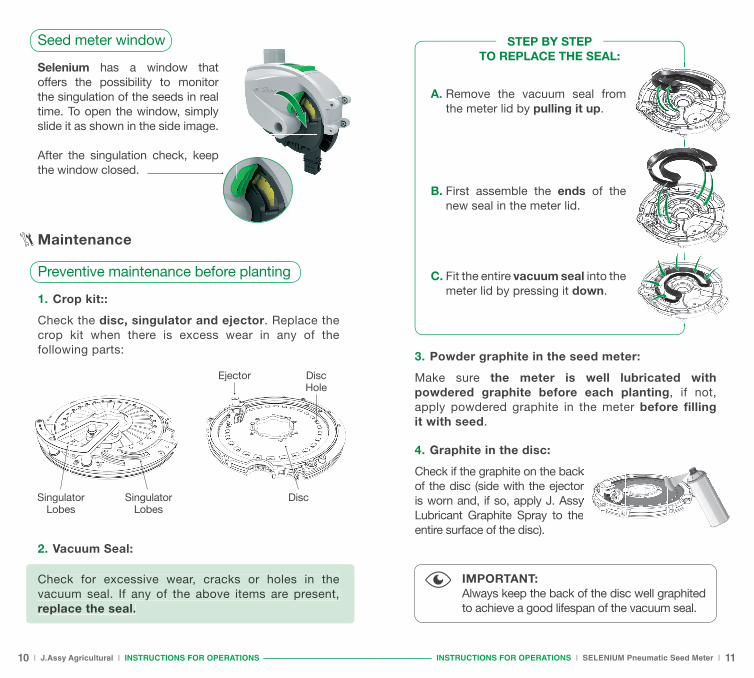
Seed meter window
Selenium has a window that offers the possibility to monitor the singulation of the seeds in real time. To open the window, simply slide it as shown in the side image.
After the singulation check, keep the window closed.
Maintenance
Preventive maintenance before planting
1. Crop kit::
Check the disc, singulator and ejector. Replace thecrop kit when there is excess wear in any of the following parts: 3. Powder graphite in the seed meter:
Make sure the meter is well lubricated with powdered graphite before each planting, if not, apply powdered graphite in the meter before filling it with seed.
SingulatorLobes
SingulatorLobes
Disc
Ejector DiscHole
2. Vacuum Seal:
Check for excessive wear, cracks or holes in the vacuum seal. If any of the above items are present, replace the seal.
Check for excessive wear, cracks or holes in the vacuum seal. If any of the above items are present, replace the seal.
4. Graphite in the disc:
Check if the graphite on the back of the disc (side with the ejector is worn and, if so, apply J. Assy Lubricant Graphite Spray to the entire surface of the disc).
Check if the graphite on the back of the disc (side with the ejector is worn and, if so, apply J. Assy Lubricant Graphite Spray to the
STEP BY STEPTO REPLACE THE SEAL:
A. Remove the vacuum seal from the meter lid by pulling it up.
B. First assemble the ends of the new seal in the meter lid.
C. Fit the entire vacuum seal into the meter lid by pressing it down.
IMPORTANT:Always keep the back of the disc well graphited to achieve a good lifespan of the vacuum seal.
INSTRUCTIONS FOR OPERATIONS | SELENIUM Pneumatic Seed Meter | | J.Assy Agricultural | INSTRUCTIONS FOR OPERATIONS 1312
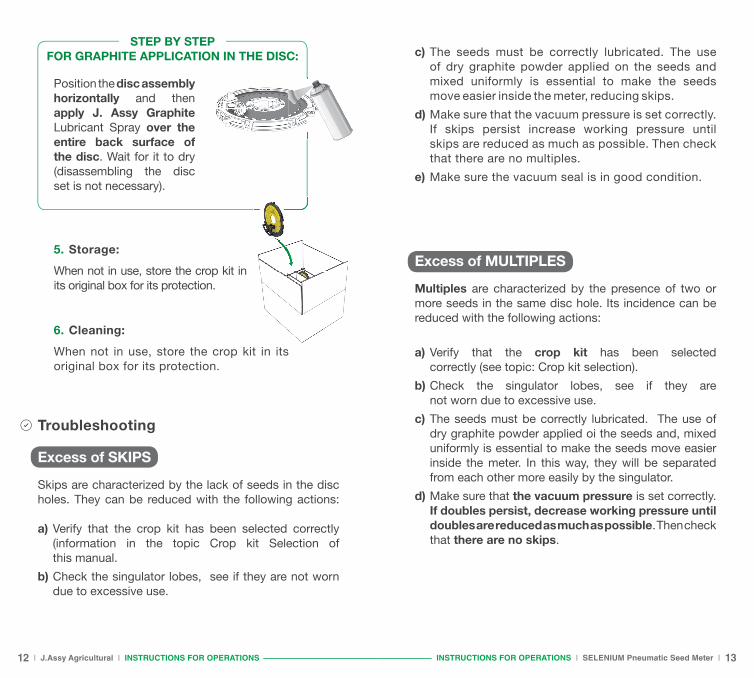
Position the disc assembly horizontally and then apply J. Assy Graphite Lubricant Spray over the entire back surface of the disc. Wait for it to dry (disassembling the disc set is not necessary).
5. Storage:
When not in use, store the crop kit in its original box for its protection.
6. Cleaning:
When not in use, store the crop kit in its original box for its protection.
c) The seeds must be correctly lubricated. The use of dry graphite powder applied on the seeds and mixed uniformly is essential to make the seeds move easier inside the meter, reducing skips. 0
d) Make sure that the vacuum pressure is set correctly. If skips persist increase working pressure until skips are reduced as much as possible. Then check that there are no multiples.
e) Make sure the vacuum seal is in good condition.
Troubleshooting
Excess of SKIPS
Skips are characterized by the lack of seeds in the disc holes. They can be reduced with the following actions:
a) Verify that the crop kit has been selected correctly (information in the topic Crop kit Selection of this manual.
b) Check the singulator lobes, see if they are not worn due to excessive use.
Excess of MULTIPLES
Multiples are characterized by the presence of two or more seeds in the same disc hole. Its incidence can be reduced with the following actions:
a) Verify that the crop kit has been selected correctly (see topic: Crop kit selection).
b) Check the singulator lobes, see if they are not worn due to excessive use.
c) The seeds must be correctly lubricated. The use of dry graphite powder applied oi the seeds and, mixed uniformly is essential to make the seeds move easier inside the meter. In this way, they will be separated from each other more easily by the singulator.
d) Make sure that the vacuum pressure is set correctly. If doubles persist, decrease working pressure until
doubles are reduced as much as possible. Then check that there are no skips.
STEP BY STEPFOR GRAPHITE APPLICATION IN THE DISC:

INSTRUCTIONS FOR OPERATIONS | SELENIUM Pneumatic Seed Meter | | J.Assy Agricultural | INSTRUCTIONS FOR OPERATIONS 1514
Problems with seed spacing
If seeds are not correctly spaced, we recommend the following actions:
a) Check the seed output of the meter and the seed tube Debris lodged in its walls can divert the course of the seeds.
b) Check the traction system. Make sure the system is in good condition and well lubricated.
c) Try rotating the meter manually. Listen for some unusual sound or signal as it rotates. If it rotates with difficulty, remove the crop kit looking for debris that could be making the rotation of the kit difficult.
d) Look for marks or evidence of where the seed is coming into contact with the seed tube. Make sure the meter is positioned so that the seed falls in the middle of the seed tube.
e) Check that the air inlets of the meter are opened (see pages 4 and 5) to allow free air flow in the meter.
f) Make sure the seeds are correctly lubricated. The use of the dry graphite powder, applied to the seeds and mixed uniformly, is essential to make the seeds move easier inside the meter. Thus, they will detach from the disk at the correct time. In case of humid weather, increase the dosage of the grapithe powder.
g) Decrease the planting speed to check if the problem is being caused by excessive vibration of the row unit.
h) If you have a seed sensor in the tube, check that the installation is correct. The sensor must not extend beyond the inner wall of the tube.
Seed density
If the seed density is not in accordance with the configured, the following actions can be taken:
a) If the meter is driven by a hydraulic motor or electric motor, check that the number of holes in the disc is correctly set in the terminal that controls the motors. Also check that the displayed density is correct.
b) If the meter is mechanically driven by the planter’s drag wheel, check in the dosage table if the correct gears are being used.
Product Disposal
At the end of the lifespan of the equipment, please send it to any J. Assy Agricultural resale partner nearby or to the implement assembler. From then on, the disposal will be carried out by those responsible in an appropriate manner.

Oct
ober
| 2
019
www.assyag.com