


Talen
Pages
Wettelijk


Web Media with Dreamweaver 8 Building an Electronic Portfolio
Macromedia K–12 Staff Development Workshops
Notice of Rights
Copyright © 2005 by Macromedia, Inc. All rights reserved.
For educational instruction purposes only, Macromedia grants you the right to make as many copies as you need of all or a portion of the Web Media with Dreamweaver 8 workshop, either by photocopy or by printing files from the PDF document, providing that you always include the page(s) containing copyright information and that you distribute such copies not for profit. It is the responsibility of your organization to monitor the copying and use of this curriculum and to comply with the terms of this notice. You agree that Macromedia reserves the right to audit your organization’s compliance with these terms, upon reasonable notice.
All other copying, reproduction, and transmission is otherwise prohibited.
This notice does not cover the use of Macromedia software. You must comply with the terms of the End-User License Agreement supplied with the software.
Notice of Liability
The information in these training materials is distributed on an “AS IS” basis, without warranty. Although reasonable precaution has been taken in the preparation of these materials, neither Macromedia, Inc., nor its licensors shall have any liability to any person or entity with respect to liability, loss, or damage alleged to be caused directly or indirectly by the instructions contained in these materials or by the computer software and hardware products described herein.
These materials contain links to third-party websites that are not under the control of Macromedia, and Macromedia is not responsible for the content on any linked site. Macromedia provides these links only as a convenience, and the inclusion of the link does not imply that Macromedia endorses the content on those third-party sites.
Trademarks
Macromedia, the Macromedia logo, Authorware, ColdFusion, Macromedia Contribute, Director, Dreamweaver, Fireworks, FreeHand, JRun, Macromedia Flash, and Shockwave are trademarks or registered trademarks of Macromedia, Inc., in the United States and/or other countries.
Third-party products, services, company names, logos, design, titles, words, or phrases within these materials may be trademarks of their respective owners.
Acknowledgements
Authors Anuja Dharkar and Dale Underwood
Copy Editor Malinda McCain
Dreamweaver 8 Revision Andrew Strombeck
Art Tanya Heins and Ann Gallenson
Editor Kirsti Aho
Program Manager Maryann Amado
Web Media with Dreamweaver 8 Building an Electronic Portfolio
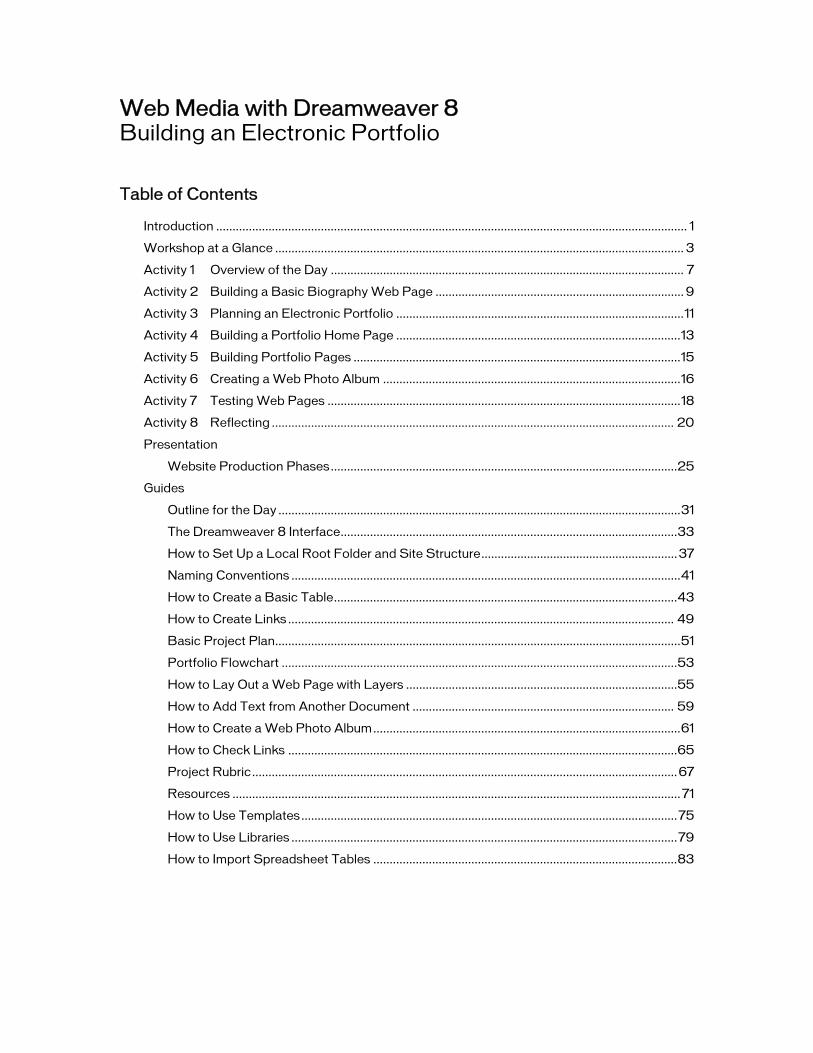
Table of Contents
Introduction ................................................................................................................................................ 1
Workshop at a Glance ............................................................................................................................. 3
Activity 1 Overview of the Day ............................................................................................................ 7
Activity 2 Building a Basic Biography Web Page ............................................................................ 9
Activity 3 Planning an Electronic Portfolio ........................................................................................11
Activity 4 Building a Portfolio Home Page .......................................................................................13
Activity 5 Building Portfolio Pages ....................................................................................................15
Activity 6 Creating a Web Photo Album ...........................................................................................16
Activity 7 Testing Web Pages ............................................................................................................18
Activity 8 Reflecting ........................................................................................................................... 20
Presentation
Website Production Phases..........................................................................................................25
Guides
Outline for the Day ...........................................................................................................................31
The Dreamweaver 8 Interface.......................................................................................................33
How to Set Up a Local Root Folder and Site Structure............................................................37
Naming Conventions .......................................................................................................................41
How to Create a Basic Table.........................................................................................................43
How to Create Links ...................................................................................................................... 49
Basic Project Plan............................................................................................................................51
Portfolio Flowchart .........................................................................................................................53
How to Lay Out a Web Page with Layers ...................................................................................55
How to Add Text from Another Document ................................................................................ 59
How to Create a Web Photo Album..............................................................................................61
How to Check Links .......................................................................................................................65
Project Rubric..................................................................................................................................67
Resources ......................................................................................................................................... 71
How to Use Templates...................................................................................................................75
How to Use Libraries ......................................................................................................................79
How to Import Spreadsheet Tables .............................................................................................83

Web Media with Dreamweaver 8 Building an Electronic Portfolio
Introduction
In the Web Media with Dreamweaver 8 workshop, participants create an electronic portfolio. The workshop introduces conceptual skills around the design and uses of an electronic portfolio and teaches the fundamentals of Dreamweaver 8. Participants learn to plan a simple portfolio, define a site, create tables, insert images, create links, manipulate text properties, use Flash buttons, test links, make a site accessible, and publish a website by using Dreamweaver. The workshop culminates with a discussion about classroom applications, assessment, and methods for supporting student learning. Participants leave the workshop with a completed sample electronic portfolio.
Note: This workshop uses Flash buttons, which require the latest version of Flash Player. Download the latest Flash Player from www.macromedia.com/downloads on each computer to be used for this workshop.
Trainer Materials
Workshop at a Glance (a summary of workshop activities and list of materials) Workshop Activity Plans
Activity 1: Overview of the Day Activity 2: Building a Basic Biography Web Page Activity 3: Planning an Electronic Portfolio Activity 4: Building a Portfolio Home Page Activity 5: Building Portfolio Pages Activity 6: Creating a Web Photo Album Activity 7: Testing Web Pages Activity 8: Reflecting
Presentation Website Production Phases
Electronic Files
You can download a completed sample, the presentation, and electronic files associated with particular activities at www.macromedia.com/go/school_staff_development_2005/. In this download, you will find sample completed projects to preview and other assets to use with the participants.
Participant Materials
Outline for the Day Guides
The Dreamweaver 8 Interface How to Set Up a Local Root Folder and Site Structure Naming Conventions How to Create a Basic Table
© 2005 Macromedia, Inc. Web Media with Dreamweaver 8 1
How to Create Links Basic Project Plan Portfolio Flowchart How to Lay Out a Web Page with Layers How to Add Text from Another Document How to Create a Web Photo Album How to Check Links Project Rubric Resources
Bonus Guides for Quick Learners How to Use Templates How to Use Libraries How to Import Spreadsheet Tables
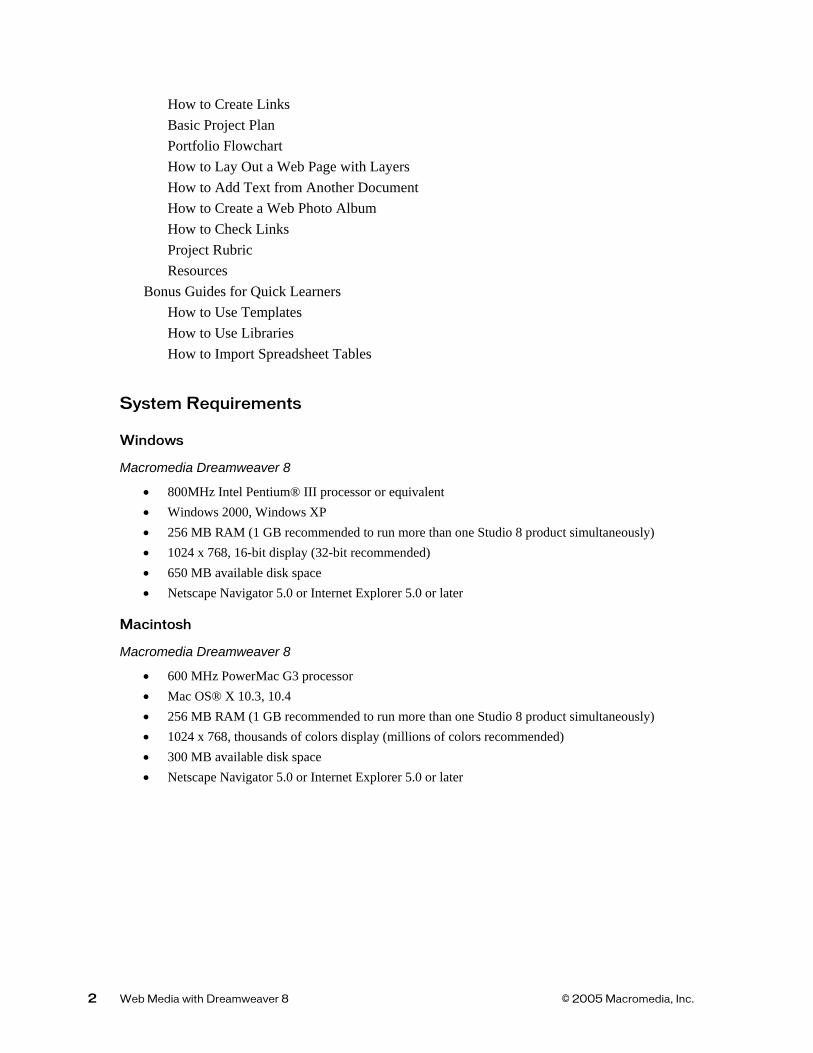
System Requirements
Windows
Macromedia Dreamweaver 8
• 800MHz Intel Pentium® III processor or equivalent • Windows 2000, Windows XP • 256 MB RAM (1 GB recommended to run more than one Studio 8 product simultaneously) • 1024 x 768, 16-bit display (32-bit recommended) • 650 MB available disk space • Netscape Navigator 5.0 or Internet Explorer 5.0 or later
Macintosh
Macromedia Dreamweaver 8
• 600 MHz PowerMac G3 processor • Mac OS® X 10.3, 10.4 • 256 MB RAM (1 GB recommended to run more than one Studio 8 product simultaneously) • 1024 x 768, thousands of colors display (millions of colors recommended) • 300 MB available disk space • Netscape Navigator 5.0 or Internet Explorer 5.0 or later
2 Web Media with Dreamweaver 8 © 2005 Macromedia, Inc.
Web Media with Dreamweaver 8
Workshop at a Glance
Time Activity Materials Technical Skills Participant Products
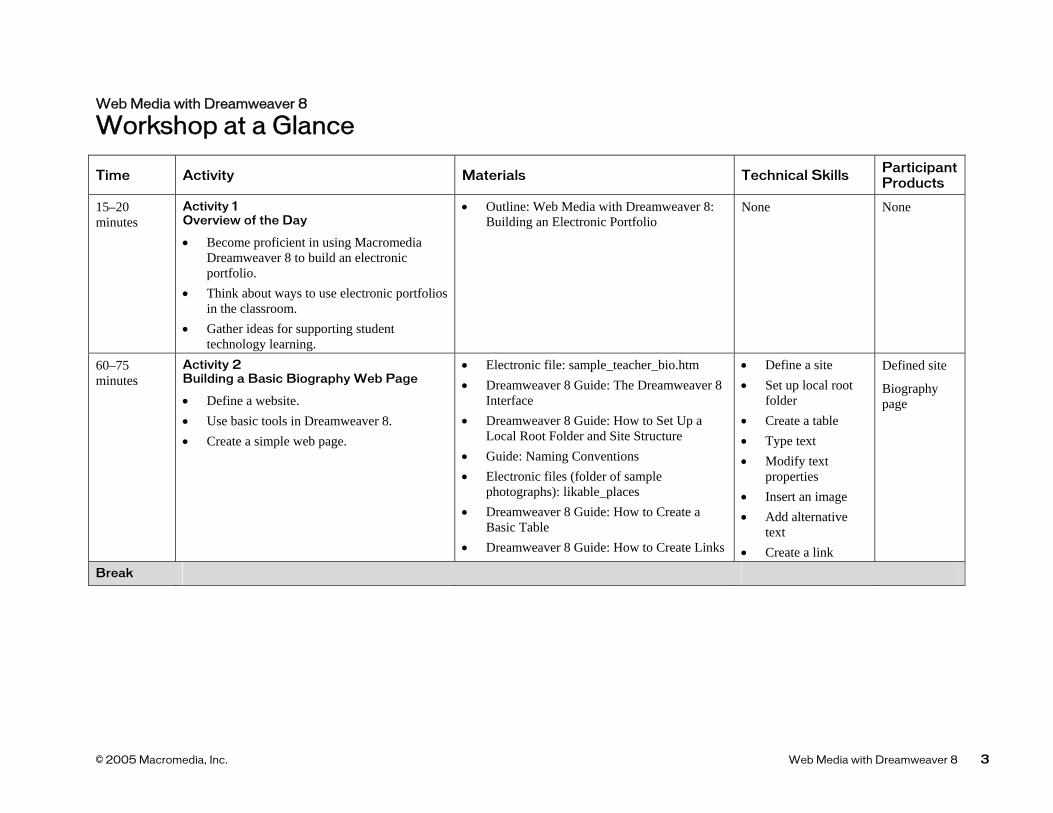
15–20 minutes
Activity 1 Overview of the Day
• Become proficient in using Macromedia Dreamweaver 8 to build an electronic portfolio.
• Think about ways to use electronic portfolios in the classroom.
• Gather ideas for supporting student technology learning.
• Outline: Web Media with Dreamweaver 8: Building an Electronic Portfolio
None None
60–75 minutes
Activity 2 Building a Basic Biography Web Page
• Define a website. • Use basic tools in Dreamweaver 8. • Create a simple web page.
• Electronic file: sample_teacher_bio.htm • Dreamweaver 8 Guide: The Dreamweaver 8
Interface • Dreamweaver 8 Guide: How to Set Up a
Local Root Folder and Site Structure • Guide: Naming Conventions • Electronic files (folder of sample
photographs): likable_places • Dreamweaver 8 Guide: How to Create a
Basic Table • Dreamweaver 8 Guide: How to Create Links
• Define a site • Set up local root
folder • Create a table • Type text • Modify text
properties • Insert an image • Add alternative
text • Create a link
Defined site
Biography page
Break
© 2005 Macromedia, Inc. Web Media with Dreamweaver 8 3
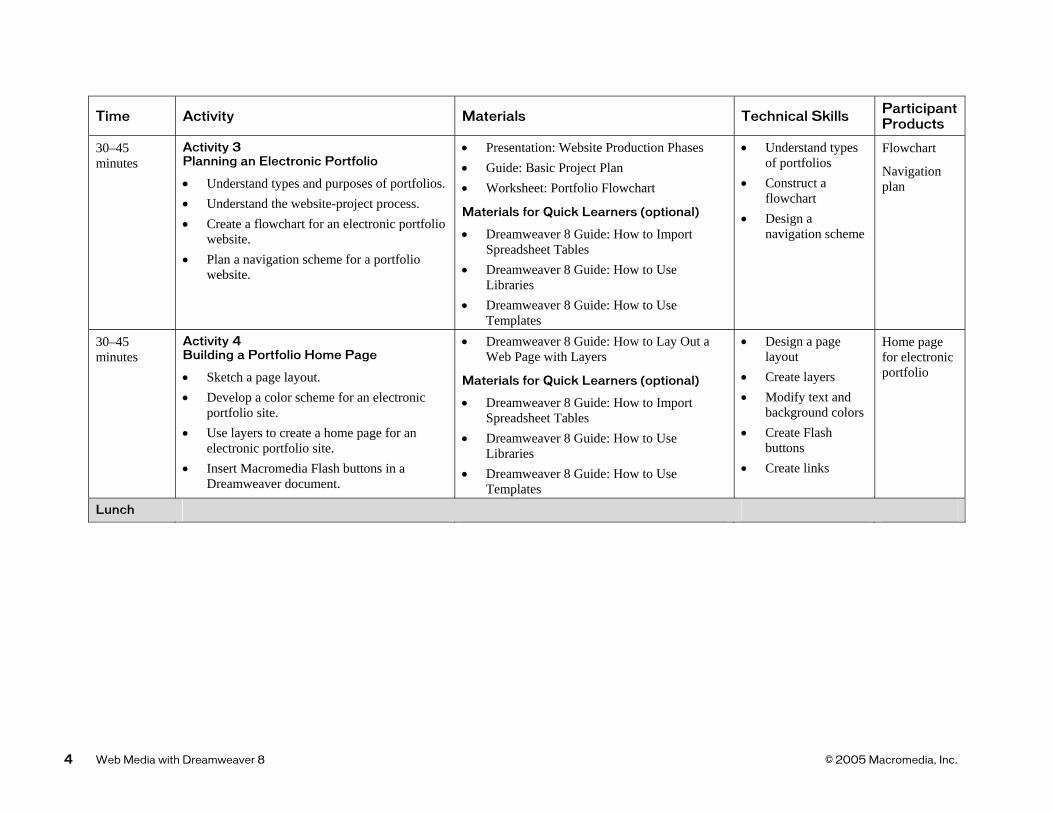
Time Activity Materials Technical Skills Participant Products
30–45 minutes
Activity 3 Planning an Electronic Portfolio
• Understand types and purposes of portfolios. • Understand the website-project process. • Create a flowchart for an electronic portfolio
website. • Plan a navigation scheme for a portfolio
website.
• Presentation: Website Production Phases • Guide: Basic Project Plan • Worksheet: Portfolio Flowchart
Materials for Quick Learners (optional)
• Dreamweaver 8 Guide: How to Import Spreadsheet Tables
• Dreamweaver 8 Guide: How to Use Libraries
• Dreamweaver 8 Guide: How to Use Templates
• Understand types of portfolios
• Construct a flowchart
• Design a navigation scheme
Flowchart
Navigation plan
30–45 minutes
Activity 4 Building a Portfolio Home Page
• Sketch a page layout. • Develop a color scheme for an electronic
portfolio site. • Use layers to create a home page for an
electronic portfolio site. • Insert Macromedia Flash buttons in a
Dreamweaver document.
• Dreamweaver 8 Guide: How to Lay Out a Web Page with Layers
Materials for Quick Learners (optional)
• Dreamweaver 8 Guide: How to Import Spreadsheet Tables
• Dreamweaver 8 Guide: How to Use Libraries
• Dreamweaver 8 Guide: How to Use Templates
• Design a page layout
• Create layers • Modify text and
background colors • Create Flash
buttons • Create links
Home page for electronic portfolio
Lunch
4 Web Media with Dreamweaver 8 © 2005 Macromedia, Inc.
Time Activity Materials Technical Skills Participant Products
50–70 minutes
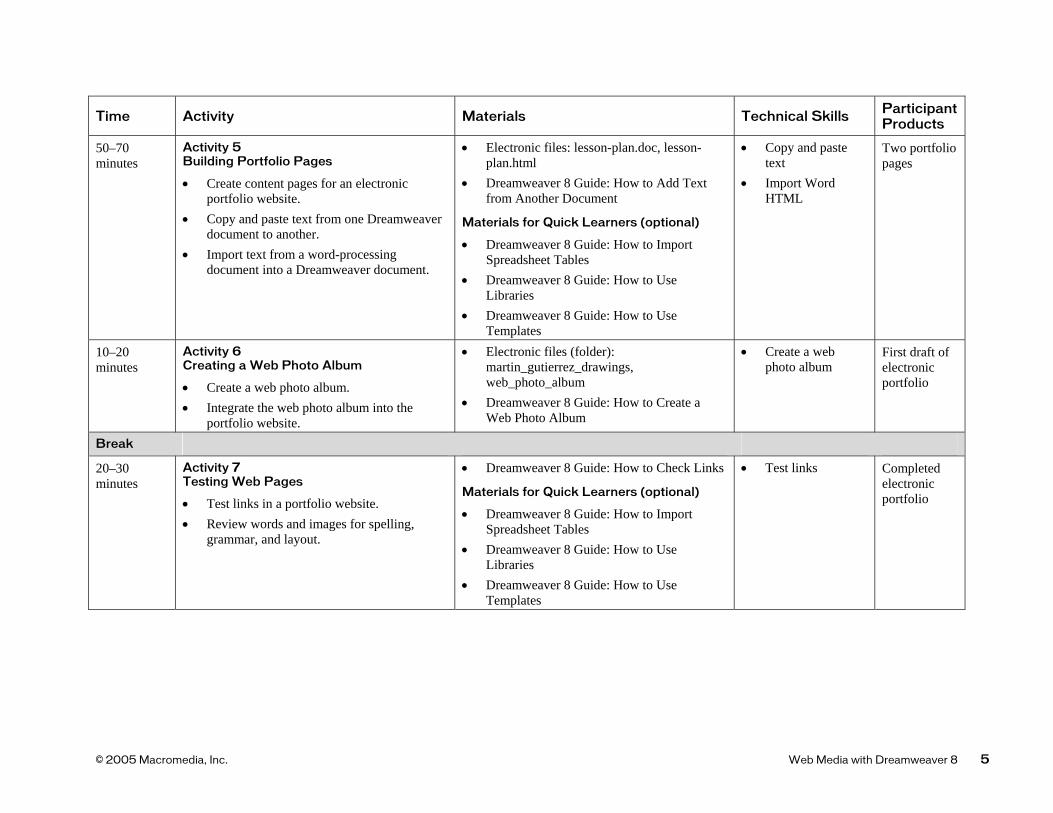
Activity 5 Building Portfolio Pages
• Create content pages for an electronic portfolio website.
• Copy and paste text from one Dreamweaver document to another.
• Import text from a word-processing document into a Dreamweaver document.
• Electronic files: lesson-plan.doc, lesson-plan.html
• Dreamweaver 8 Guide: How to Add Text from Another Document
Materials for Quick Learners (optional)
• Dreamweaver 8 Guide: How to Import Spreadsheet Tables
• Dreamweaver 8 Guide: How to Use Libraries
• Dreamweaver 8 Guide: How to Use Templates
• Copy and paste text
• Import Word HTML
Two portfolio pages
10–20 minutes
Activity 6 Creating a Web Photo Album
• Create a web photo album. • Integrate the web photo album into the
portfolio website.
• Electronic files (folder): martin_gutierrez_drawings, web_photo_album
• Dreamweaver 8 Guide: How to Create a Web Photo Album
• Create a web photo album
First draft of electronic portfolio
Break
20–30 minutes
Activity 7 Testing Web Pages
• Test links in a portfolio website. • Review words and images for spelling,
grammar, and layout.
• Dreamweaver 8 Guide: How to Check Links
Materials for Quick Learners (optional)
• Dreamweaver 8 Guide: How to Import Spreadsheet Tables
• Dreamweaver 8 Guide: How to Use Libraries
• Dreamweaver 8 Guide: How to Use Templates
• Test links Completed electronic portfolio
© 2005 Macromedia, Inc. Web Media with Dreamweaver 8 5
Time Activity Materials Technical Skills Participant Products
20–30 minutes
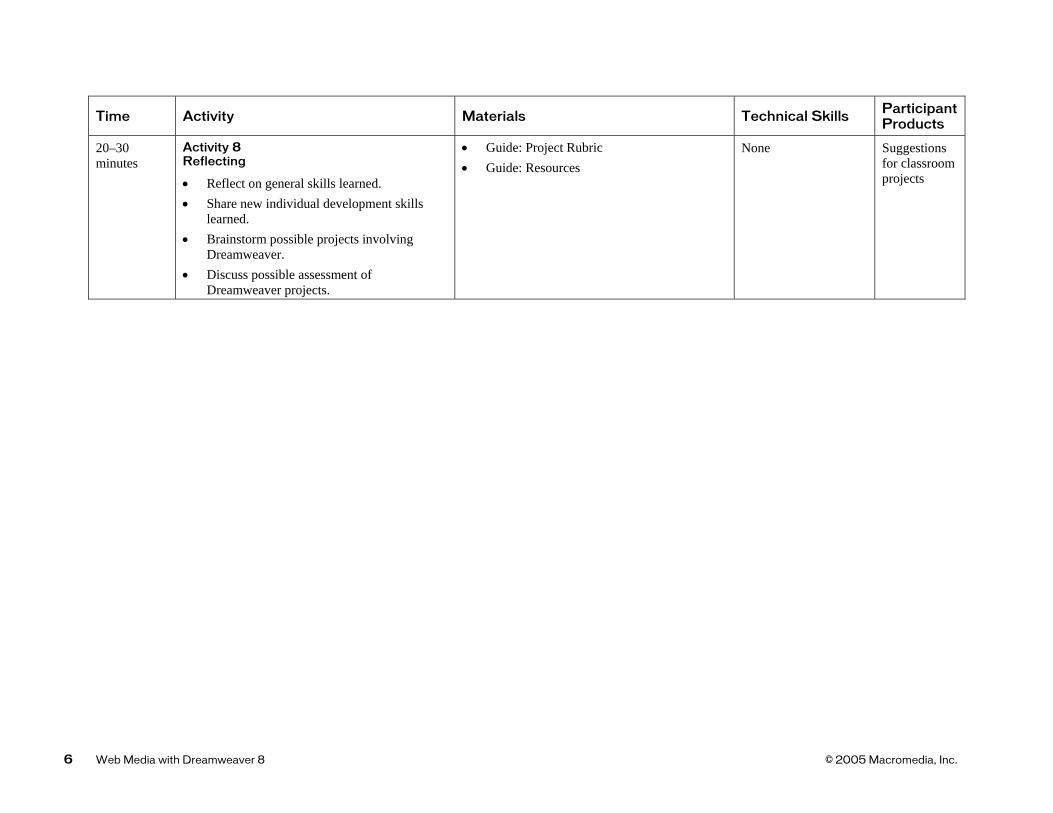
Activity 8 Reflecting
• Reflect on general skills learned. • Share new individual development skills
learned. • Brainstorm possible projects involving
Dreamweaver. • Discuss possible assessment of
Dreamweaver projects.
• Guide: Project Rubric • Guide: Resources
None Suggestions for classroom projects
6 Web Media with Dreamweaver 8 © 2005 Macromedia, Inc.
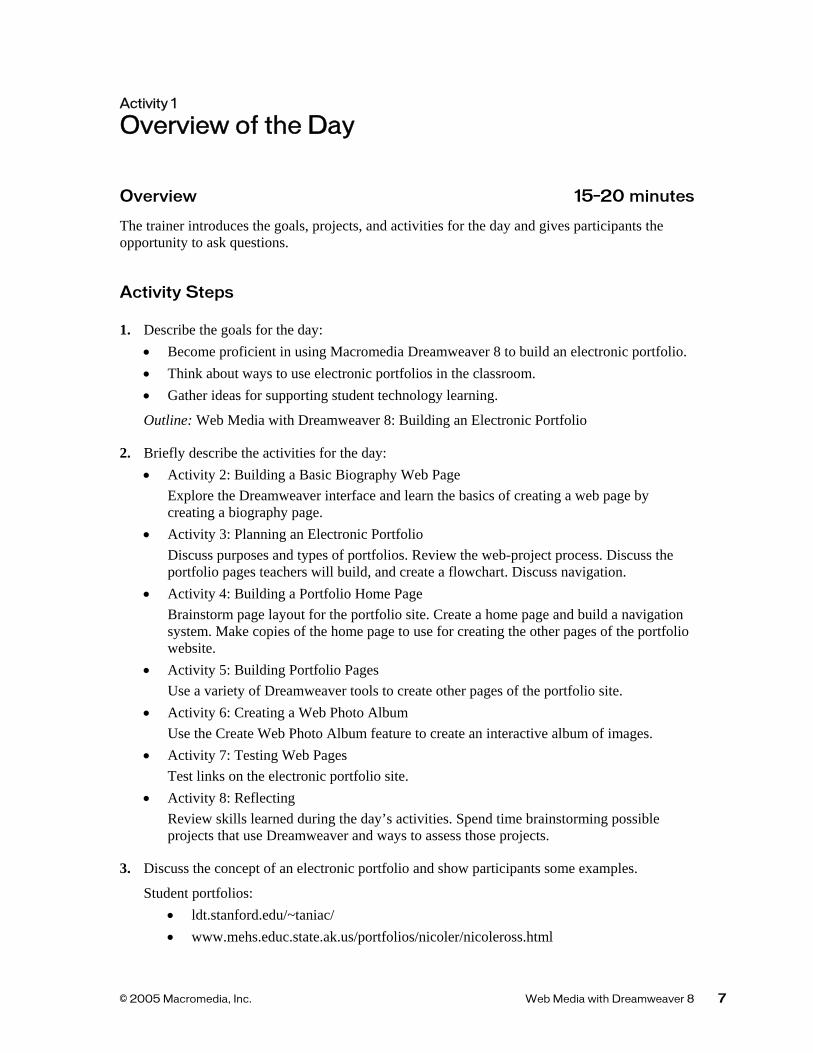
Activity 1
Overview of the Day
Overview 15–20 minutes
The trainer introduces the goals, projects, and activities for the day and gives participants the opportunity to ask questions.
Activity Steps
1. Describe the goals for the day: • Become proficient in using Macromedia Dreamweaver 8 to build an electronic portfolio. • Think about ways to use electronic portfolios in the classroom. • Gather ideas for supporting student technology learning.
Outline: Web Media with Dreamweaver 8: Building an Electronic Portfolio
2. Briefly describe the activities for the day: • Activity 2: Building a Basic Biography Web Page
Explore the Dreamweaver interface and learn the basics of creating a web page by creating a biography page.
• Activity 3: Planning an Electronic Portfolio Discuss purposes and types of portfolios. Review the web-project process. Discuss the portfolio pages teachers will build, and create a flowchart. Discuss navigation.
• Activity 4: Building a Portfolio Home Page Brainstorm page layout for the portfolio site. Create a home page and build a navigation system. Make copies of the home page to use for creating the other pages of the portfolio website.
• Activity 5: Building Portfolio Pages Use a variety of Dreamweaver tools to create other pages of the portfolio site.
• Activity 6: Creating a Web Photo Album Use the Create Web Photo Album feature to create an interactive album of images.
• Activity 7: Testing Web Pages Test links on the electronic portfolio site.
• Activity 8: Reflecting Review skills learned during the day’s activities. Spend time brainstorming possible projects that use Dreamweaver and ways to assess those projects.
3. Discuss the concept of an electronic portfolio and show participants some examples.
Student portfolios: • ldt.stanford.edu/~taniac/ • www.mehs.educ.state.ak.us/portfolios/nicoler/nicoleross.html
© 2005 Macromedia, Inc. Web Media with Dreamweaver 8 7
Teacher portfolios: • kml.carnegiefoundation.org/gallery/mhurley/index2.html • kml.carnegiefoundation.org/gallery/hlyne/
4. Answer any questions from participants.
8 Web Media with Dreamweaver 8 © 2005 Macromedia, Inc.
Activity 2
Building a Basic Biography Web Page
Overview 60–75 minutes
The trainer introduces the Dreamweaver 8 interface. Participants define a site and set up a biography page. Participants create the content for their biography page.
Participant product: Basic teacher biography web page
Activity Steps
1. Introduce the goals of this activity: • Define a website. • Use basic tools in Dreamweaver 8. • Create a simple web page.
2. Before beginning the activity, have participants create a folder for the workshop named <participant last name>_dreamweaver_wkshp.
3. Show the sample teacher biography web page, and explain that participants will work together to create a similar page for themselves.
Electronic file: sample_teacher_bio.htm (in sample_teacher_bio_web_page folder)
4. Have participants start Dreamweaver.
5. Discuss the basic elements of the Dreamweaver interface. • Document Window and Panels • Insert Bar • Property Inspector
Dreamweaver 8 Guide: The Dreamweaver 8 Interface
6. Using the “I do – we do – you do” method, demonstrate the following. First show a step and then complete the step again as a group.
Define a site. • Define and name a new website. • Create a local root folder named <participant last name>_teacher_site.
Set up the biography page. • Save the page in the <participant last name>_teacher_site folder, using proper naming
conventions. • Add a browser window title.
Dreamweaver 8 Guide: How to Set Up a Local Root Folder and Site Structure
© 2005 Macromedia, Inc. Web Media with Dreamweaver 8 9
Guide: Naming Conventions
7. Using the “I do – we do – you do” method, demonstrate the following:
Save and name the document and the page. • File menu • Page title field
Generate a basic layout. • Draw a basic table. • Split and merge cells to customize the layout of the table. • Add background color to table cells.
Add content. • Type text. (For example, type the title on the page.) • Modify text properties. (For example, change properties of the title text so it appears
larger, in color, and in a different font.) • Insert an image. (For example, insert one of the sample photographs under a heading such
as “A Place I Like.”) • Make the image accessible: Add alternative (Alt) text for the image using the Property
inspector. • Create a link. (For example, insert a link to the school website or an e-mail link.)
Electronic files (folder of sample photographs): likable_places
Dreamweaver 8 Guide: How to Create a Basic Table
Dreamweaver 8 Guide: How to Create Links
8. Wrap up the activity by having two or three participants show their completed biography page to the group.
9. Review the goals of the activity and how you might use student biography pages in the classroom (such as in electronic portfolios, personal websites, or class websites). Discuss potential challenges in the classroom.
Independent Activities for Quick Learners
Challenge individuals who complete the activity early to complete one or more of the following tasks independently:
• Assist other participants with their biography pages.
• Research the Dreamweaver Help system to learn how to create an e-mail link and a nested table.
10 Web Media with Dreamweaver 8 © 2005 Macromedia, Inc.
Activity 3
Planning an Electronic Portfolio
Overview 30–45 minutes
The trainer discusses types and purposes of electronic portfolios, reviews the phases in the development of a web project, and describes the pages participants will build for their portfolios. Participants create a flowchart and plan a navigation scheme.
Participant product: Flowchart
Activity Steps
1. Introduce the goals of this activity: • Understand types and purposes of portfolios. • Understand the website-project process. • Create a flowchart for an electronic portfolio website. • Plan a navigation scheme for a portfolio website.
2. Discuss different types of portfolios, as well as the audience and goals for each type. Some examples: • Showcase portfolio: Highlights the owner’s experience and expertise by showing
examples of best work. • Skill-growth portfolio: Shows multiple samples of work on the same project to
demonstrate increasing skill. • Project-progress portfolio: Contains a more complete selection of work around a
particular project to reflect the span of work.
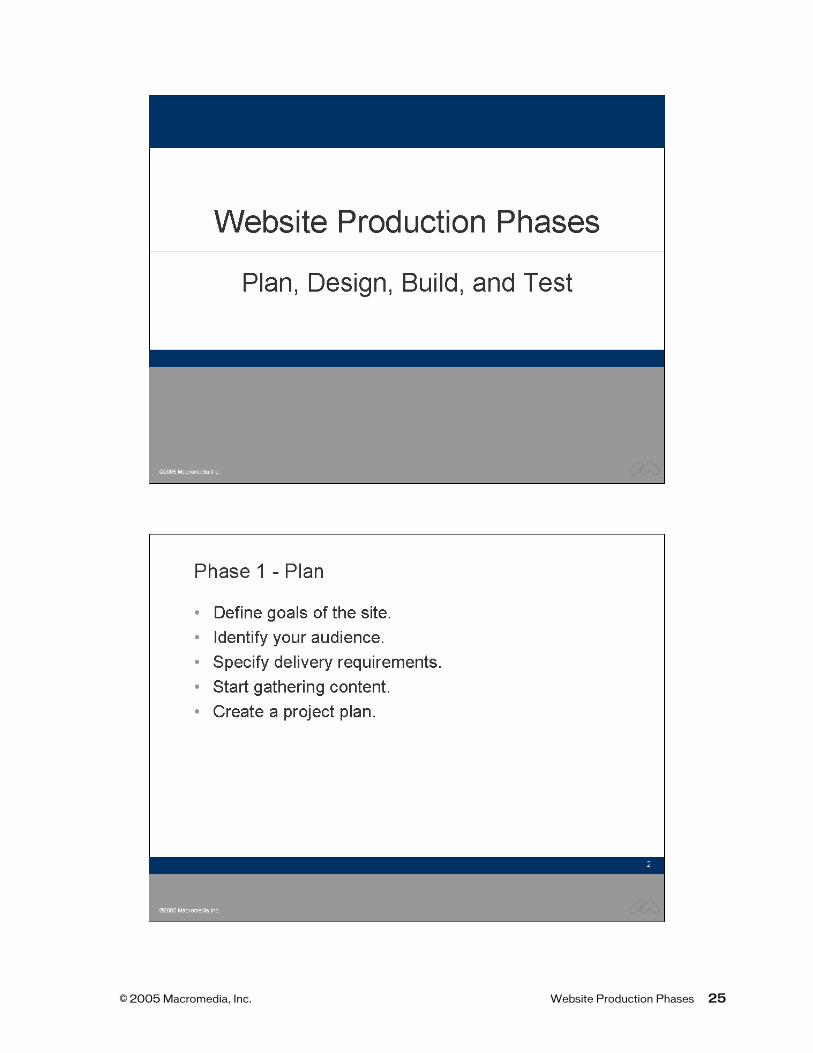
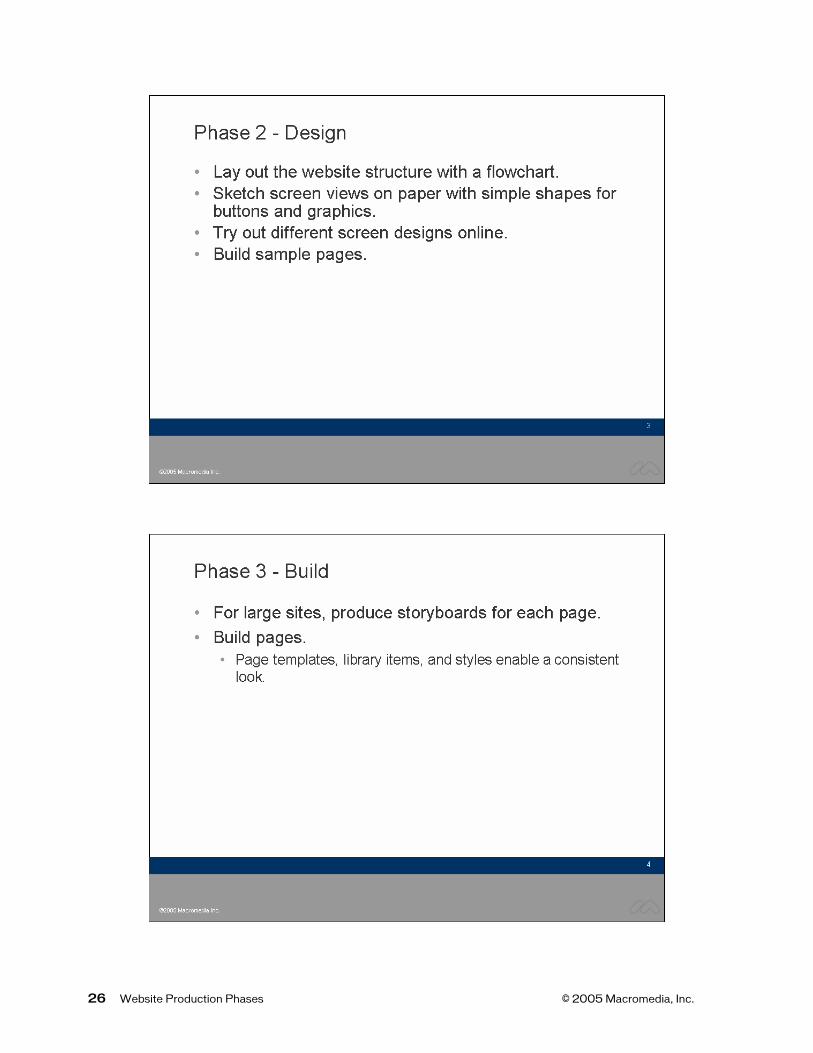
3. Present the phases of a website project. Talk about how you might track a project with a project-plan document. • Plan • Design • Build • Test
Presentation: Website Production Phases
Guide: Basic Project Plan
4. Briefly describe the use of a storyboard as a means for planning the layout and structure of a site in the design phase. Because of workshop time constraints, participants will not create storyboards, but they will plan the layout and color scheme for their electronic portfolio websites.
5. Describe the portfolio pages participants will build. For example a simple portfolio might include the following pages:
© 2005 Macromedia, Inc. Web Media with Dreamweaver 8 11
• Home
• Biography
• Sample lesson plan
• A catalog of photographs Note that each portfolio will be an abbreviated instance of a showcase portfolio. Decide how to name each of the pages. (Participants will need this information when they implement their navigation scheme.)
6. Using the “I do – we do – you do” method, demonstrate how to complete the flowchart for the four main pages in the portfolio.
7. Discuss navigation in the context of the flowchart. Help participants plan a navigation scheme. Ask participants to use drawn arrows to represent links between pages. Note: Treat the web photo album as a single page at this point. After participants have created the photo album, you can ask them to revise their flowchart to reflect the album pages generated by Dreamweaver.
Worksheet: Portfolio Flowchart
8. Review the goals of the activity and how you might use the different types of portfolios in the classroom. Discuss potential challenges in the classroom.
Independent Activities for Quick Learners
Challenge participants who complete the activity early to complete one or more of the following tasks independently:
• Import a spreadsheet into a table on an additional portfolio page by using “Dreamweaver 8 Guide: How to Import Spreadsheet Tables.”
• Learn how to create and insert library items on a web page by using “Dreamweaver 8 Guide: How to Use Libraries.”
• Create a template from the home page by using “Dreamweaver 8 Guide: How to Use Templates.”
12 Web Media with Dreamweaver 8 © 2005 Macromedia, Inc.
Activity 4
Building a Portfolio Home Page
Overview 30–45 minutes
Participants brainstorm a page layout for the portfolio pages and create a home page, including a navigation bar with Macromedia Flash buttons and text links for accessibility. Participants make copies of the home page to use as the basis for the other pages.
Participant product: Page layout and color scheme for portfolio pages and completed home page
Activity Steps
1. Introduce the goals of this activity: • Sketch a page layout. • Develop a color scheme for an electronic portfolio site. • Create a home page for an electronic portfolio site. • Insert Macromedia Flash buttons in a Dreamweaver document.
2. Brainstorm with participants how you might lay out portfolio pages that include a consistent navigation scheme. Plan a navigation scheme that will include both text links and a navigation bar with buttons. Discuss the importance of accessibility provided by the text links.
3. Ask participants to sketch their page layout (without any specific content). Include cells that will contain text, images, and navigation elements.
4. Have participants use layers to lay out their home pages according to their page layout sketches and save the file as index.htm in their <participant last name>_teacher_site folder. Have them add home page text, make color choices for the background and text elements, and type the names of the text links to other pages. Tell participants that they will create the actual text links after the content pages are created.
Dreamweaver 8 Guide: How to Lay Out a Web Page with Layers
5. Using the “I do – we do – you do” method, demonstrate how to create a navigation bar with Macromedia Flash buttons.
6. Have participants make two copies of their completed home pages to use as starting points for the biography and lesson-plan pages of the portfolio. This technique assures a consistent design across pages. (The layout of the web photo album is determined by Dreamweaver 8.)
7. Review the goals of the activity and how you might use planning and sketching to think through ideas prior to creating an entire site. Discuss potential challenges in the classroom and how best to support students in meeting these challenges.
© 2005 Macromedia, Inc. Web Media with Dreamweaver 8 13
Independent Activities for Quick Learners
Challenge participants who complete the activity early to complete one or more of the following tasks independently:
• Import a spreadsheet into a table on an additional portfolio page by using “Dreamweaver 8 Guide: How to Import Spreadsheet Tables.”
• Learn how to create and insert library items on a web page by using “Dreamweaver 8 Guide: How to Use Libraries.”
• Create a template from the home page by using “Dreamweaver 8 Guide: How to Use Templates.”
14 Web Media with Dreamweaver 8 © 2005 Macromedia, Inc.
Activity 5
Building Portfolio Pages
Overview 50-70 minutes
Participants adapt their biography page to the portfolio page layout. Participants build a lesson plan page by importing text from a word-processing document.
Participant product: Two portfolio web pages
Activity Steps
1. Introduce the goals of this activity: • Create content pages for an electronic portfolio website. • Copy and paste text from one Dreamweaver document to another. • Import text from a word-processing document into a Dreamweaver document.
2. Have participants create a portfolio biography page by copying and pasting the text from their completed biography page from Activity 2 into the formatted portfolio biography page (copied from the home page). Insert the same image as on the original biography page.
3. Ask participants to reformat the title and autobiography text to match the color, style, font size, and font type choices in their page sketch.
4. Using the “I do – we do – you do” method, demonstrate how to import a Microsoft Word document (Windows) or copy and paste from a Word document (Macintosh) to create the content of the lesson plan page for their portfolio.
Electronic files: lesson-plan.doc, lesson-plan.html
Dreamweaver 8 Guide: How to Add Text from Another Document
5. Ask participants to reformat the text in the lesson plan to match the color, style, font size, and font type choices in their page sketch.
Independent Activities for Quick Learners
Challenge participants who complete the activity early to complete one or more of the following tasks independently:
• Import a spreadsheet into a table on an additional portfolio page by using “Dreamweaver 8 Guide: How to Import Spreadsheet Tables.”
• Learn how to create and insert library items on a web page by using “Dreamweaver 8 Guide: How to Use Libraries.”
• Create a template from the home page by using “Dreamweaver 8 Guide: How to Use Templates.”
© 2005 Macromedia, Inc. Web Media with Dreamweaver 8 15
Activity 6
Creating a Web Photo Album
Overview 10-20 minutes
Participants use the Create Web Photo Album command to build a page that displays sample teacher work. Participants integrate the album into their portfolio.
Participant product: Completed draft of portfolio website
Activity Steps
1. Introduce the goal of this activity: • Create a web photo album. • Integrate the web photo album into the portfolio website.
2. Show a completed album and describe how it was made with Dreamweaver 8.
Electronic files (folder): web_photo_album
3. Using the “I do – we do – you do” method, demonstrate how to use the Create Web Photo Album command. In the process, ask participants to select Create Navigation Page for Each Photo. Note: Macromedia Fireworks must be installed on each workstation for participants to create a web photo album.
Electronic files (folder): martin_gutierrez_drawings
Dreamweaver 8 Guide: How to Create a Web Photo Album
4. After the album creation is complete, you might need to show participants how to tweak the layout of the table so that the rows line up properly.
5. Show participants how they can change and add text to the album.
6. Have participants create alternative text for the images in the album to add accessibility. Show how they can change and add text.
7. As a group, identify the folders and documents created in the album process. Have participants add the new pages to their flowcharts.
8. Using the “I do – we do – you do” method, demonstrate different ways to add the actual page links to the accessible text menu on the other pages.
Dreamweaver 8 Guide: How to Create Links
9. Review the goals of the activity and how you might use a web photo album in the classroom (such as for cataloging and organizing graphics, scanned images, or photographs). Discuss potential challenges in the classroom.
16 Web Media with Dreamweaver 8 © 2005 Macromedia, Inc.
Independent Activity for Quick Learners
Challenge participants who complete the activity early to complete the following task independently:
• Add text, links, and other graphics to individual pages in the album.
© 2005 Macromedia, Inc. Web Media with Dreamweaver 8 17
Activity 7
Testing Web Pages
Overview 20–30 minutes
Participants test the page links in their site and fix links as necessary.
Participant product: Completed portfolio website
Activity Steps
1. Introduce the goal of this activity: • Test links in a portfolio website. • Review words and images for spelling, grammar, and layout.
2. Using the “I do – we do – you do” method, demonstrate how to check the links in the portfolio by using the Link Checker.
Dreamweaver 8 Guide: How to Check Links
3. Give participants time to fix any broken links and to check them again.
4. Have participants test their links in a browser.
5. Ask participants to switch seats with a neighbor so they can test the links and review the layout and content of each other’s portfolios. Allow time for participants to give each other feedback and make any necessary changes. Some questions to guide their feedback might include: • Do all the links work? • How do the naming choices for navigation elements help you understand where you will
be directed? • How well are you able to navigate through the site? • How consistently is the design implemented between pages?
6. Review the goals of the activity and discuss the importance of having students test projects and give peer feedback as they create with web tools. Discuss potential challenges in the classroom.
Independent Activities for Quick Learners
Challenge participants who complete the activity early to complete one or more of the following tasks independently:
• Import a spreadsheet into a table on an additional portfolio page by using “Dreamweaver 8 Guide: How to Import Spreadsheet Tables.”
18 Web Media with Dreamweaver 8 © 2005 Macromedia, Inc.
• Learn how to create and insert library items on a web page by using “Dreamweaver 8 Guide: How to Use Libraries.”
• Create a template from the home page by using “Dreamweaver 8 Guide: How to Use Templates.”
© 2005 Macromedia, Inc. Web Media with Dreamweaver 8 19
Activity 8
Reflecting
Overview 20–30 minutes
The trainer summarizes the day. Participants discuss classroom applications of what they have learned.
Participant product: Suggestions for classroom projects
Activity Steps
1. Introduce the goals of this activity: • Reflect on general skills learned. • Share new individual development skills learned. • Brainstorm possible projects involving Dreamweaver. • Discuss possible assessment of Dreamweaver projects.
2. Briefly highlight the tasks participants completed during the day, tying tasks to technical skills in Dreamweaver 8.
3. Review and discuss classroom applications of what participants have learned. What classroom projects would they like to develop, based on their experience during the day? Examples of projects include: • An assessment portfolio for a one-semester course • A student-project portfolio that contains a presentation, a final report, and any
supplementary information used in the project • A portfolio for students to use as a resume after they graduate
4. How would they assess such projects?
Guide: Project Rubric
5. Discuss additional resources for learning about design, development, and assessment.
Guide: Resources
6. If participants are interested in curriculum for teaching about designing and building electronic portfolios, the following books are recommended: • Town Website Project for Dreamweaver 8 guides students as they build a basic
informational website about their town or city neighborhood. Project lessons enable students to build web technology and citizenship skills as they produce a simple website. You can find more information at www.macromedia.com/education.
• Digital Design (ISBN 1-932719-07-5) is a yearlong, project-based curriculum that develops IT skills in web design and production using Macromedia web tools. Digital Design can be used in career and technical education courses as well as general web
20 Web Media with Dreamweaver 8 © 2005 Macromedia, Inc.
design classes. Its projects develop four key skills: design, communication, project management, and web technology. You can find more information at www.macromedia.com/education.
7. Wrap up the activity by asking participants to answer the following questions: • What was the most challenging thing you learned today? Describe how you met the
challenge. • How did you help each other? • What surprised you about today? Why did it surprise you?
© 2005 Macromedia, Inc. Web Media with Dreamweaver 8 21

Presentation
• Website Production Phases
You can download the electronic file, dw_8.ppt, at www.macromedia.com/go/school_staff_development_2005/.
© 2005 Macromedia, Inc. 23

© 2005 Macromedia, Inc. Website Production Phases 25
26 Website Production Phases © 2005 Macromedia, Inc.
© 2005 Macromedia, Inc. Website Production Phases 27

Guides
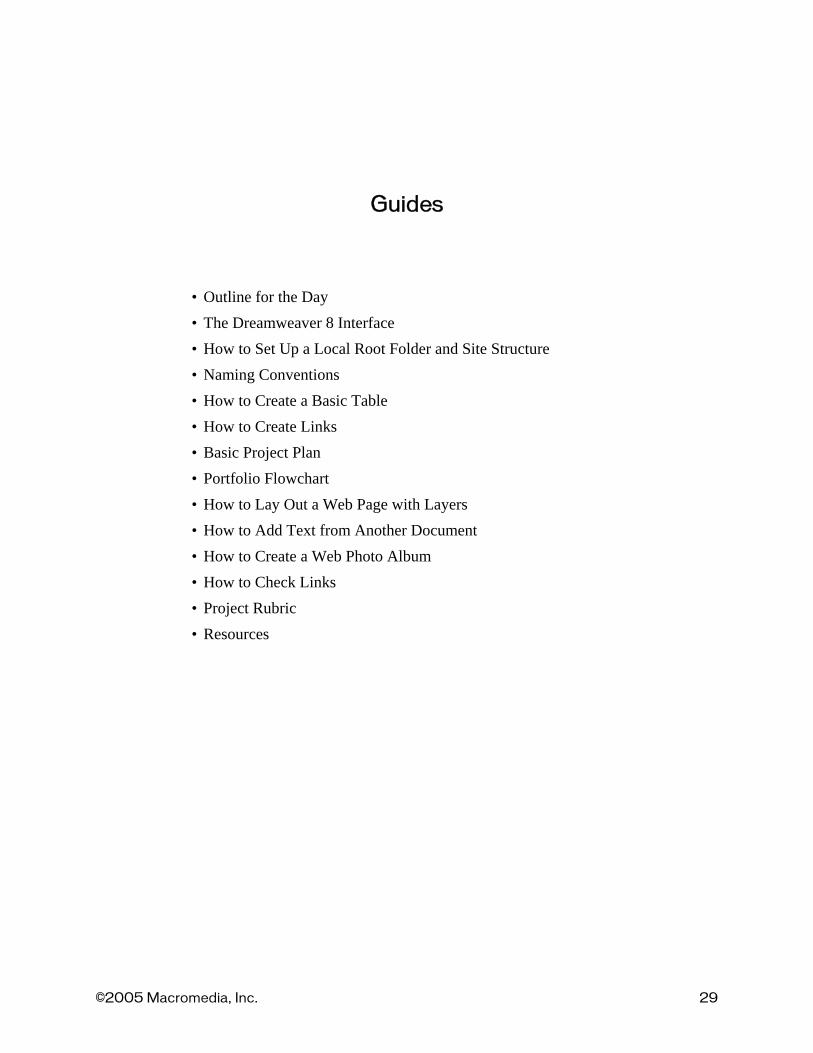
• Outline for the Day • The Dreamweaver 8 Interface • How to Set Up a Local Root Folder and Site Structure • Naming Conventions • How to Create a Basic Table • How to Create Links • Basic Project Plan • Portfolio Flowchart • How to Lay Out a Web Page with Layers • How to Add Text from Another Document • How to Create a Web Photo Album • How to Check Links • Project Rubric • Resources
©2005 Macromedia, Inc. 29

Outline
Web Media with Dreamweaver 8: Building an Electronic Portfolio
Time Task
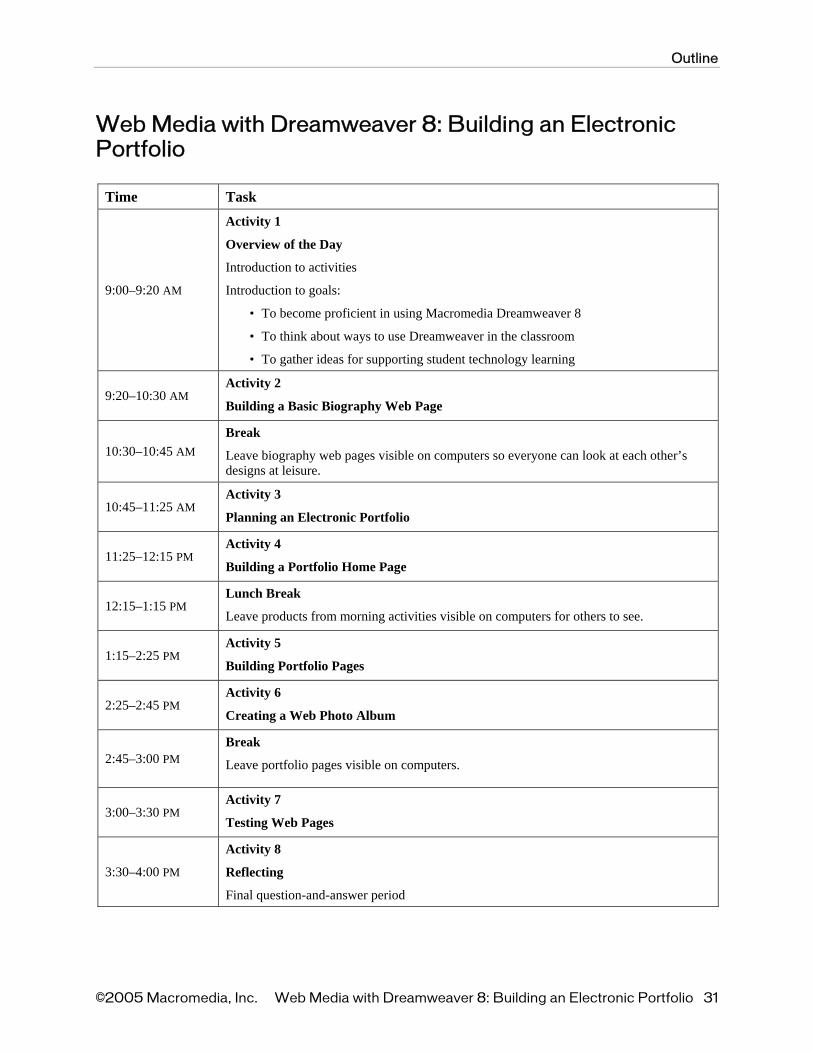
9:00–9:20 AM
Activity 1
Overview of the Day
Introduction to activities
Introduction to goals:
• To become proficient in using Macromedia Dreamweaver 8
• To think about ways to use Dreamweaver in the classroom
• To gather ideas for supporting student technology learning
9:20–10:30 AM Activity 2
Building a Basic Biography Web Page
10:30–10:45 AM Break
Leave biography web pages visible on computers so everyone can look at each other’s designs at leisure.
10:45–11:25 AM Activity 3
Planning an Electronic Portfolio
11:25–12:15 PM Activity 4
Building a Portfolio Home Page
12:15–1:15 PM Lunch Break
Leave products from morning activities visible on computers for others to see.
1:15–2:25 PM Activity 5
Building Portfolio Pages
2:25–2:45 PM Activity 6
Creating a Web Photo Album
2:45–3:00 PM Break
Leave portfolio pages visible on computers.
3:00–3:30 PM Activity 7
Testing Web Pages
3:30–4:00 PM
Activity 8
Reflecting
Final question-and-answer period
©2005 Macromedia, Inc. Web Media with Dreamweaver 8: Building an Electronic Portfolio 31

Dreamweaver 8 Guide
The Dreamweaver 8 Interface
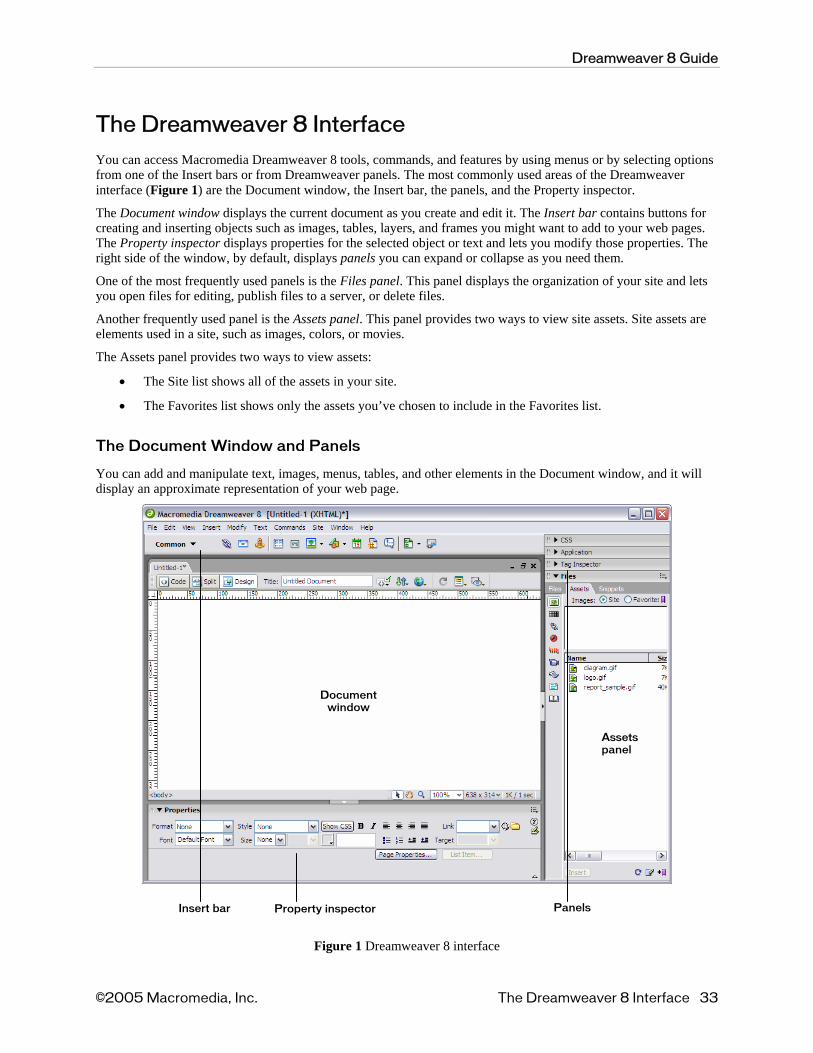
You can access Macromedia Dreamweaver 8 tools, commands, and features by using menus or by selecting options from one of the Insert bars or from Dreamweaver panels. The most commonly used areas of the Dreamweaver interface (Figure 1) are the Document window, the Insert bar, the panels, and the Property inspector.
The Document window displays the current document as you create and edit it. The Insert bar contains buttons for creating and inserting objects such as images, tables, layers, and frames you might want to add to your web pages. The Property inspector displays properties for the selected object or text and lets you modify those properties. The right side of the window, by default, displays panels you can expand or collapse as you need them.
One of the most frequently used panels is the Files panel. This panel displays the organization of your site and lets you open files for editing, publish files to a server, or delete files.
Another frequently used panel is the Assets panel. This panel provides two ways to view site assets. Site assets are elements used in a site, such as images, colors, or movies.
The Assets panel provides two ways to view assets:
• The Site list shows all of the assets in your site.
• The Favorites list shows only the assets you’ve chosen to include in the Favorites list.
The Document Window and Panels
You can add and manipulate text, images, menus, tables, and other elements in the Document window, and it will display an approximate representation of your web page.
Insert bar
Documentwindow
Property inspector Panels
Assets panel
Figure 1 Dreamweaver 8 interface
©2005 Macromedia, Inc. The Dreamweaver 8 Interface 33
Dreamweaver 8 Guide
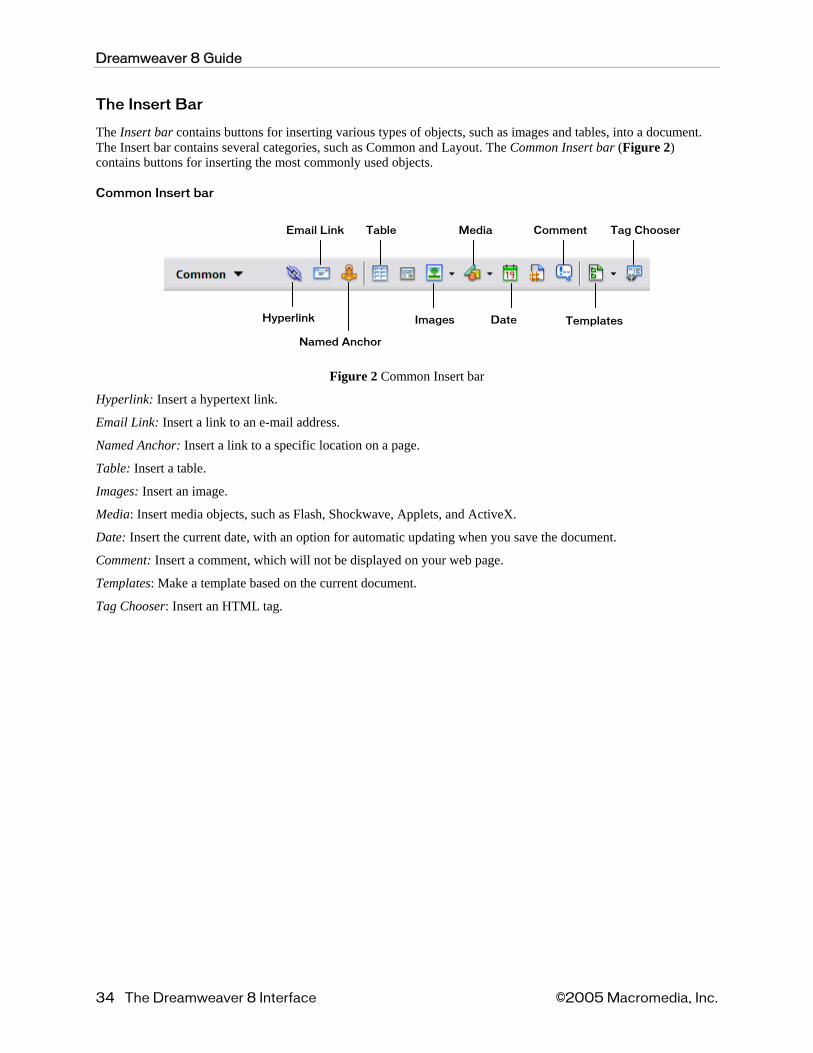
The Insert Bar
The Insert bar contains buttons for inserting various types of objects, such as images and tables, into a document. The Insert bar contains several categories, such as Common and Layout. The Common Insert bar (Figure 2) contains buttons for inserting the most commonly used objects.
Common Insert bar
Hyperlink
Named Anchor
Images Date
Email Link Table Media Comment
Templates
Tag Chooser
Figure 2 Common Insert bar
Hyperlink: Insert a hypertext link.
Email Link: Insert a link to an e-mail address.
Named Anchor: Insert a link to a specific location on a page.
Table: Insert a table.
Images: Insert an image.
Media: Insert media objects, such as Flash, Shockwave, Applets, and ActiveX.
Date: Insert the current date, with an option for automatic updating when you save the document.
Comment: Insert a comment, which will not be displayed on your web page.
Templates: Make a template based on the current document.
Tag Chooser: Insert an HTML tag.
34 The Dreamweaver 8 Interface ©2005 Macromedia, Inc.

Dreamweaver 8 Guide
Layout Insert bar
From the Layout Insert bar (Figure 3), you can insert tables and choose among three modes. Standard mode displays tables as a grid of lines. Expanded Tables mode adds cell padding and spacing to tables and increases table borders to make editing easier, and Layout mode displays tables as boxes you can draw, drag, and resize.
Table Draw Layer Tabular Data
Insert Div Tag Layout Table
Draw Layout Cell
Frames
Figure 3 Layout Insert bar
Table: Insert a table.
Insert Div Tag: Insert a div tag to create a content block.
Draw Layer: Insert a layer to hold content at any location on a page.
Layout Table: Draw a whole table with cells to hold information or objects.
Draw Layout Cell: Draw individual cells in a table.
Insert Row Above: Insert a row above the current row in a table.
Insert Row Below: Insert a row below the current row.
Insert Column to the Left: Insert a column to the left of the current column.
Insert Column to the Right: Insert a column to the right of the current column.
Frames: Insert a frame.
Tabular Data: Insert tabular data, such as from a spreadsheet.
The Property Inspector
In the Property inspector, you can view and change a variety of properties for the currently selected object or text. Each kind of object has different properties. Figure 4 shows the Property inspector for a selected table. It displays column and row attributes, cell colors, and border colors. You can change cell padding and cell spacing as well. When you select text, you can alter font, size, color, and alignment in the Property inspector.
Figure 4 Property inspector
©2005 Macromedia, Inc. The Dreamweaver 8 Interface 35

Dreamweaver 8 Guide
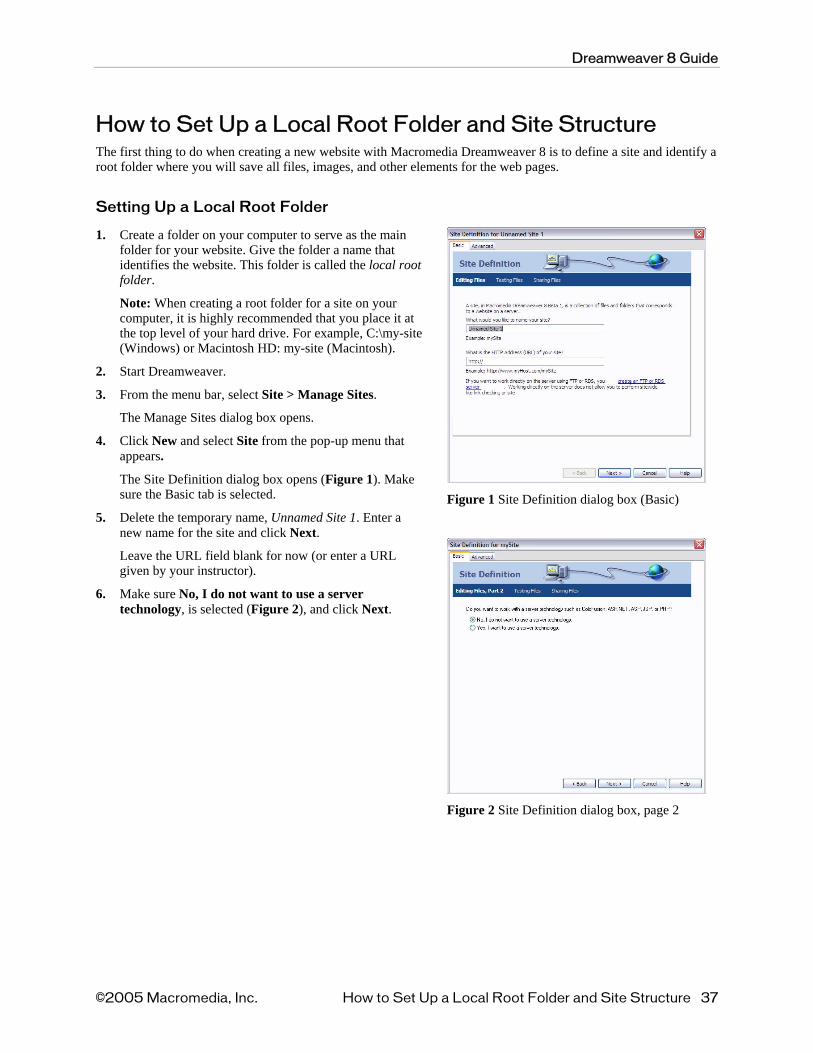
How to Set Up a Local Root Folder and Site Structure The first thing to do when creating a new website with Macromedia Dreamweaver 8 is to define a site and identify a root folder where you will save all files, images, and other elements for the web pages.
Setting Up a Local Root Folder
1. Create a folder on your computer to serve as the main folder for your website. Give the folder a name that identifies the website. This folder is called the local root folder.
Note: When creating a root folder for a site on your computer, it is highly recommended that you place it at the top level of your hard drive. For example, C:\my-site (Windows) or Macintosh HD: my-site (Macintosh).
2. Start Dreamweaver.
3. From the menu bar, select Site > Manage Sites.
The Manage Sites dialog box opens.
4. Click New and select Site from the pop-up menu that appears.
The Site Definition dialog box opens (Figure 1). Make sure the Basic tab is selected.
5. Delete the temporary name, Unnamed Site 1. Enter a new name for the site and click Next.
Leave the URL field blank for now (or enter a URL given by your instructor).
6. Make sure No, I do not want to use a server technology, is selected (Figure 2), and click Next.
Figure 1 Site Definition dialog box (Basic)
Figure 2 Site Definition dialog box, page 2
©2005 Macromedia, Inc. How to Set Up a Local Root Folder and Site Structure 37
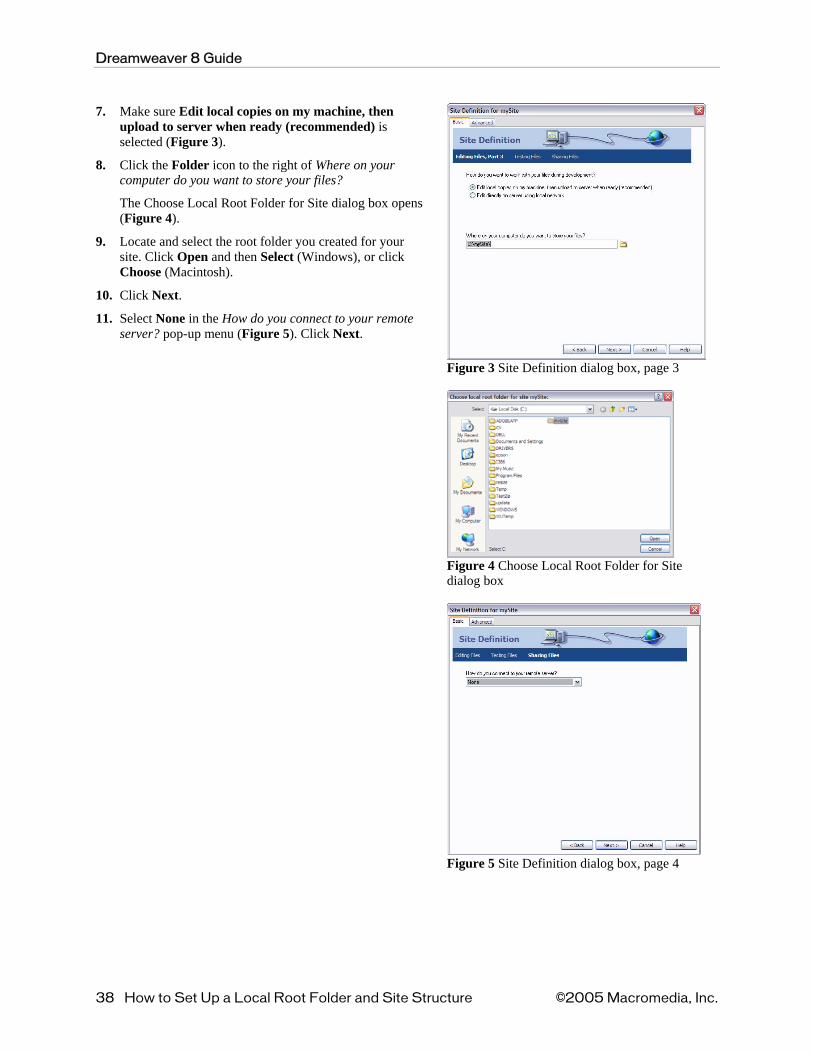
Dreamweaver 8 Guide
7. Make sure Edit local copies on my machine, then upload to server when ready (recommended) is selected (Figure 3).
8. Click the Folder icon to the right of Where on your computer do you want to store your files?
The Choose Local Root Folder for Site dialog box opens (Figure 4).
9. Locate and select the root folder you created for your site. Click Open and then Select (Windows), or click Choose (Macintosh).
10. Click Next.
11. Select None in the How do you connect to your remote server? pop-up menu (Figure 5). Click Next.
Figure 3 Site Definition dialog box, page 3
Figure 4 Choose Local Root Folder for Site dialog box
Figure 5 Site Definition dialog box, page 4
38 How to Set Up a Local Root Folder and Site Structure ©2005 Macromedia, Inc.
Dreamweaver 8 Guide
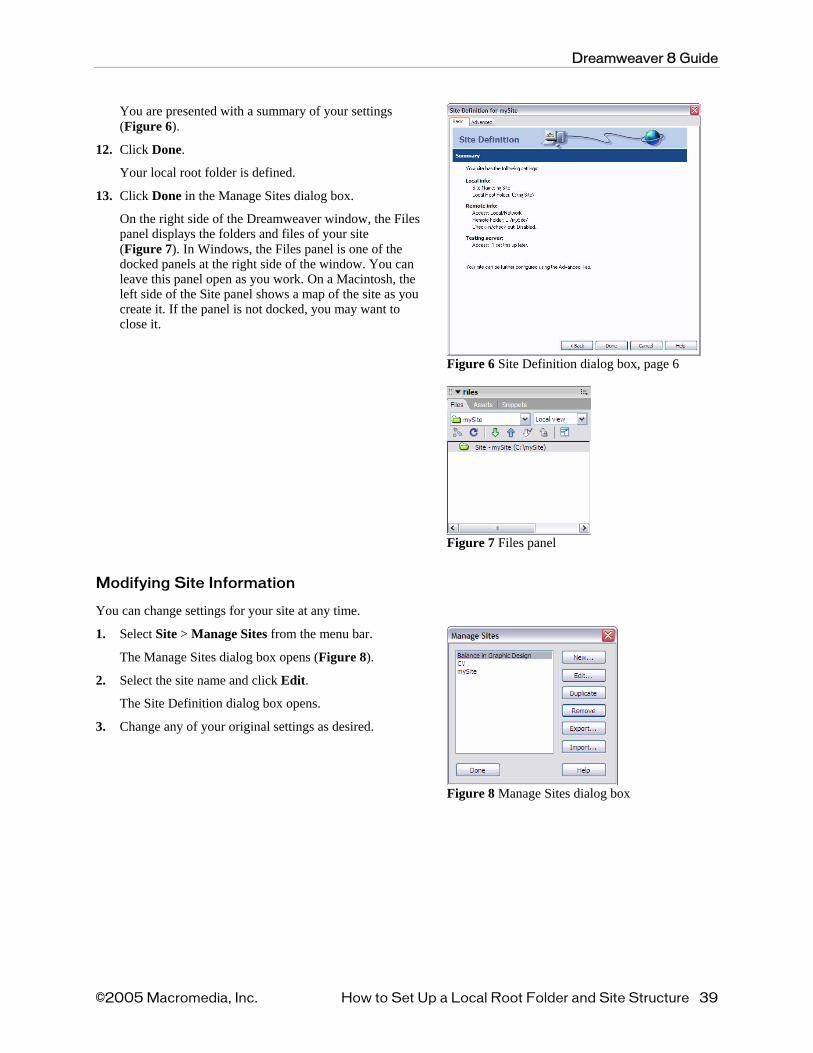
You are presented with a summary of your settings (Figure 6).
12. Click Done.
Your local root folder is defined.
13. Click Done in the Manage Sites dialog box.
On the right side of the Dreamweaver window, the Files panel displays the folders and files of your site (Figure 7). In Windows, the Files panel is one of the docked panels at the right side of the window. You can leave this panel open as you work. On a Macintosh, the left side of the Site panel shows a map of the site as you create it. If the panel is not docked, you may want to close it.
Figure 6 Site Definition dialog box, page 6
Figure 7 Files panel
Modifying Site Information
You can change settings for your site at any time.
1. Select Site > Manage Sites from the menu bar.
The Manage Sites dialog box opens (Figure 8).
2. Select the site name and click Edit.
The Site Definition dialog box opens.
3. Change any of your original settings as desired.
Figure 8 Manage Sites dialog box
©2005 Macromedia, Inc. How to Set Up a Local Root Folder and Site Structure 39

Guide
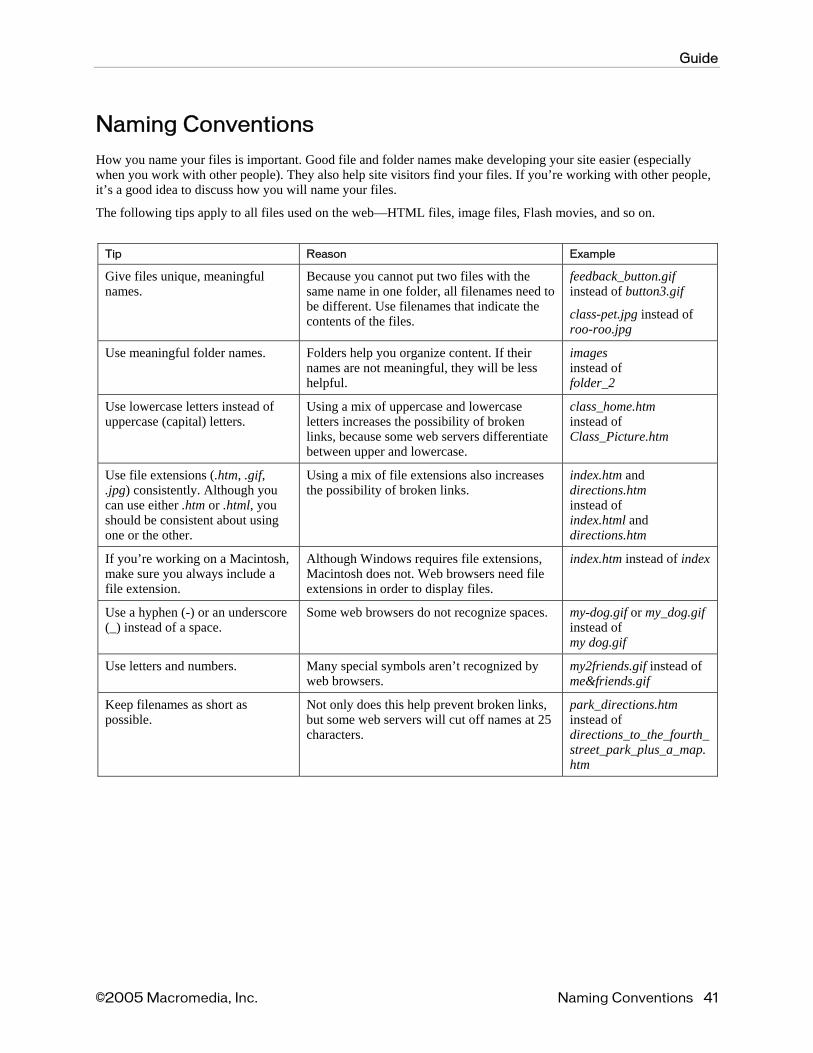
Naming Conventions
How you name your files is important. Good file and folder names make developing your site easier (especially when you work with other people). They also help site visitors find your files. If you’re working with other people, it’s a good idea to discuss how you will name your files.
The following tips apply to all files used on the web—HTML files, image files, Flash movies, and so on.
Tip Reason Example
Give files unique, meaningful names.
Because you cannot put two files with the same name in one folder, all filenames need to be different. Use filenames that indicate the contents of the files.
feedback_button.gif instead of button3.gif
class-pet.jpg instead of roo-roo.jpg
Use meaningful folder names. Folders help you organize content. If their names are not meaningful, they will be less helpful.
images instead of folder_2
Use lowercase letters instead of uppercase (capital) letters.
Using a mix of uppercase and lowercase letters increases the possibility of broken links, because some web servers differentiate between upper and lowercase.
class_home.htm instead of Class_Picture.htm
Use file extensions (.htm, .gif, .jpg) consistently. Although you can use either .htm or .html, you should be consistent about using one or the other.
Using a mix of file extensions also increases the possibility of broken links.
index.htm and directions.htm instead of index.html and directions.htm
If you’re working on a Macintosh, make sure you always include a file extension.
Although Windows requires file extensions, Macintosh does not. Web browsers need file extensions in order to display files.
index.htm instead of index
Use a hyphen (-) or an underscore (_) instead of a space.
Some web browsers do not recognize spaces. my-dog.gif or my_dog.gif instead of my dog.gif
Use letters and numbers. Many special symbols aren’t recognized by web browsers.
my2friends.gif instead of me&friends.gif
Keep filenames as short as possible.
Not only does this help prevent broken links, but some web servers will cut off names at 25 characters.
park_directions.htm instead of directions_to_the_fourth_street_park_plus_a_map.htm
©2005 Macromedia, Inc. Naming Conventions 41

Dreamweaver 8 Guide
How to Create a Basic Table
In Macromedia Dreamweaver 8, you can add text and images to table cells the same way you add text and images to a page. After you create a table, you can easily modify both its appearance and its structure.
Inserting a Table on a Page
You can insert a table anywhere on a page, including within another table. You can quickly insert a standard table with three rows and three columns, or you can modify options to insert a custom table.
When you insert a table, a good idea is to set a header property for a row or column if you will use that row or column to provide labels for the information in the table. A header makes the table more accessible to people with visual impairments, because screen readers can recognize that a header contains labels. (Note that you must set a header row or column to provide such accessibility. It is not sufficient to use bold or centered text.)
To insert a table:
1. Open a document in Macromedia Dreamweaver 8.
2. Place the insertion point in your document where you want the table to appear.
3. Select the Layout category on the Insert bar.
Make sure the Standard mode button is selected (Figure 1).
4. Click the Insert Table button on the Layout Insert bar.
The Table dialog box opens (Figure 2).
5. Enter the number of rows and columns.
6. Make changes to any of the options in the dialog box. For information about the options, click the Help button in the dialog box.
Applying a column header or row header in particular can improve the accessibility of a data table. Though not visible on the page, such headers are read by screen readers.
To set a header row or column:
7. Select one of the options in the Header section.
For example, if you create a table that lists a collection of books, with columns labeled Author, Title, and Year, you should set the top row as a header. By default, header rows or columns are bolded and centered (Figure 3). Screen readers can now read this header.
8. Click OK.
The table appears in your document.
Figure 1 Layout Insert bar with Standard mode selected
Figure 2 Table dialog box
Figure 3 Table with top row set as header
©2005 Macromedia, Inc. How to Create a Basic Table 43
Dreamweaver 8 Guide
Selecting Table Elements
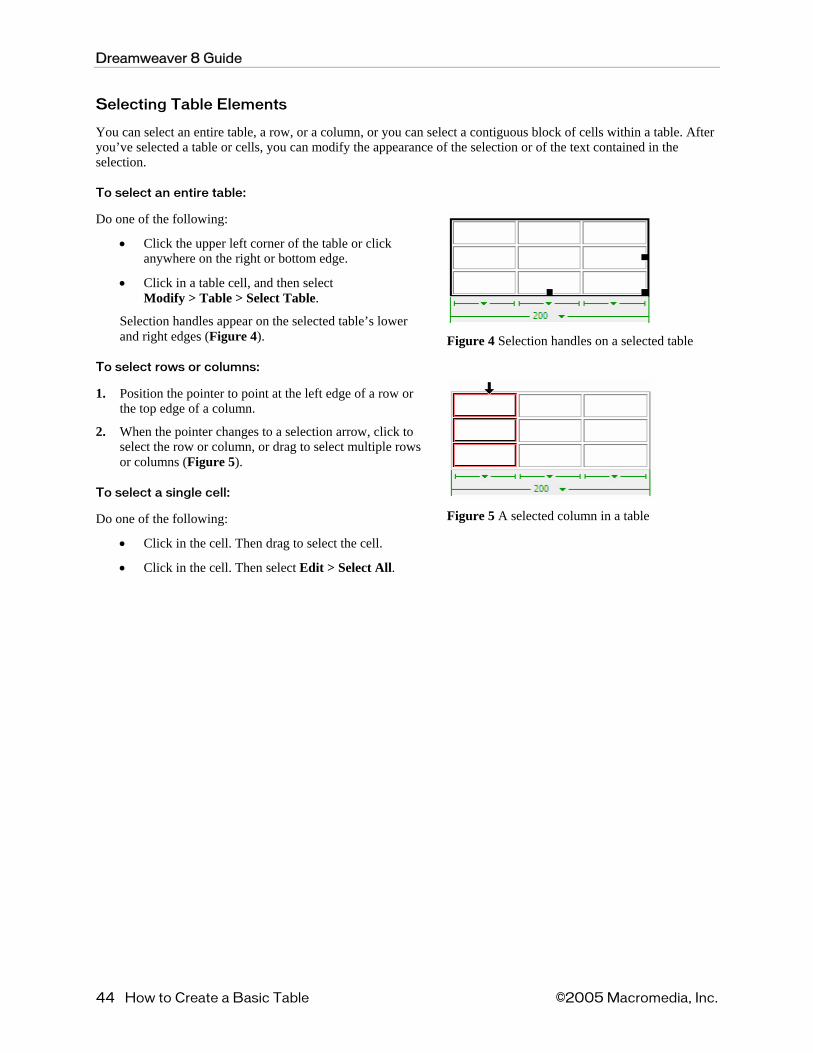
You can select an entire table, a row, or a column, or you can select a contiguous block of cells within a table. After you’ve selected a table or cells, you can modify the appearance of the selection or of the text contained in the selection.
To select an entire table:
Do one of the following:
• Click the upper left corner of the table or click anywhere on the right or bottom edge.
• Click in a table cell, and then select Modify > Table > Select Table.
Selection handles appear on the selected table’s lower and right edges (Figure 4).
To select rows or columns:
1. Position the pointer to point at the left edge of a row or the top edge of a column.
2. When the pointer changes to a selection arrow, click to select the row or column, or drag to select multiple rows or columns (Figure 5).
To select a single cell:
Do one of the following:
• Click in the cell. Then drag to select the cell.
• Click in the cell. Then select Edit > Select All.
Figure 4 Selection handles on a selected table
Figure 5 A selected column in a table
44 How to Create a Basic Table ©2005 Macromedia, Inc.
Dreamweaver 8 Guide
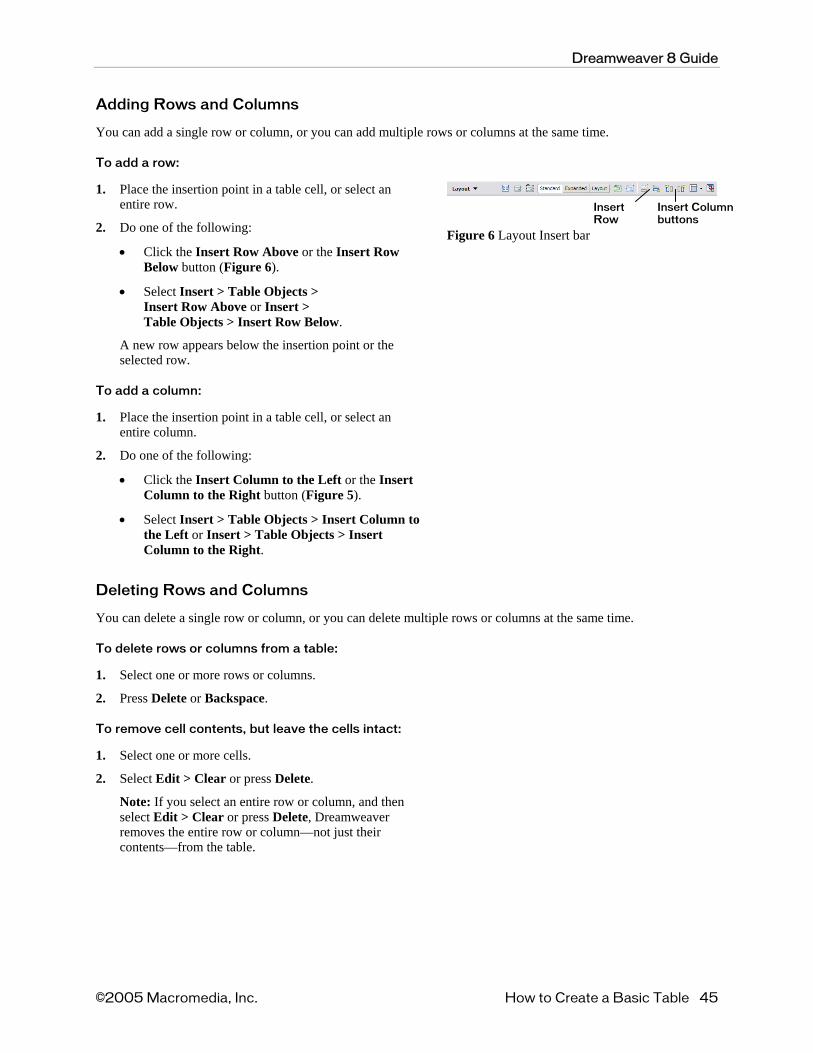
Adding Rows and Columns
You can add a single row or column, or you can add multiple rows or columns at the same time.
To add a row:
1. Place the insertion point in a table cell, or select an entire row.
2. Do one of the following:
• Click the Insert Row Above or the Insert Row Below button (Figure 6).
• Select Insert > Table Objects > Insert Row Above or Insert > Table Objects > Insert Row Below.
A new row appears below the insertion point or the selected row.
To add a column:
1. Place the insertion point in a table cell, or select an entire column.
2. Do one of the following:
• Click the Insert Column to the Left or the Insert Column to the Right button (Figure 5).
• Select Insert > Table Objects > Insert Column to the Left or Insert > Table Objects > Insert Column to the Right.
Insert Row
Insert Column buttons
Figure 6 Layout Insert bar
Deleting Rows and Columns
You can delete a single row or column, or you can delete multiple rows or columns at the same time.
To delete rows or columns from a table:
1. Select one or more rows or columns.
2. Press Delete or Backspace.
To remove cell contents, but leave the cells intact:
1. Select one or more cells.
2. Select Edit > Clear or press Delete.
Note: If you select an entire row or column, and then select Edit > Clear or press Delete, Dreamweaver removes the entire row or column—not just their contents—from the table.
©2005 Macromedia, Inc. How to Create a Basic Table 45
Dreamweaver 8 Guide
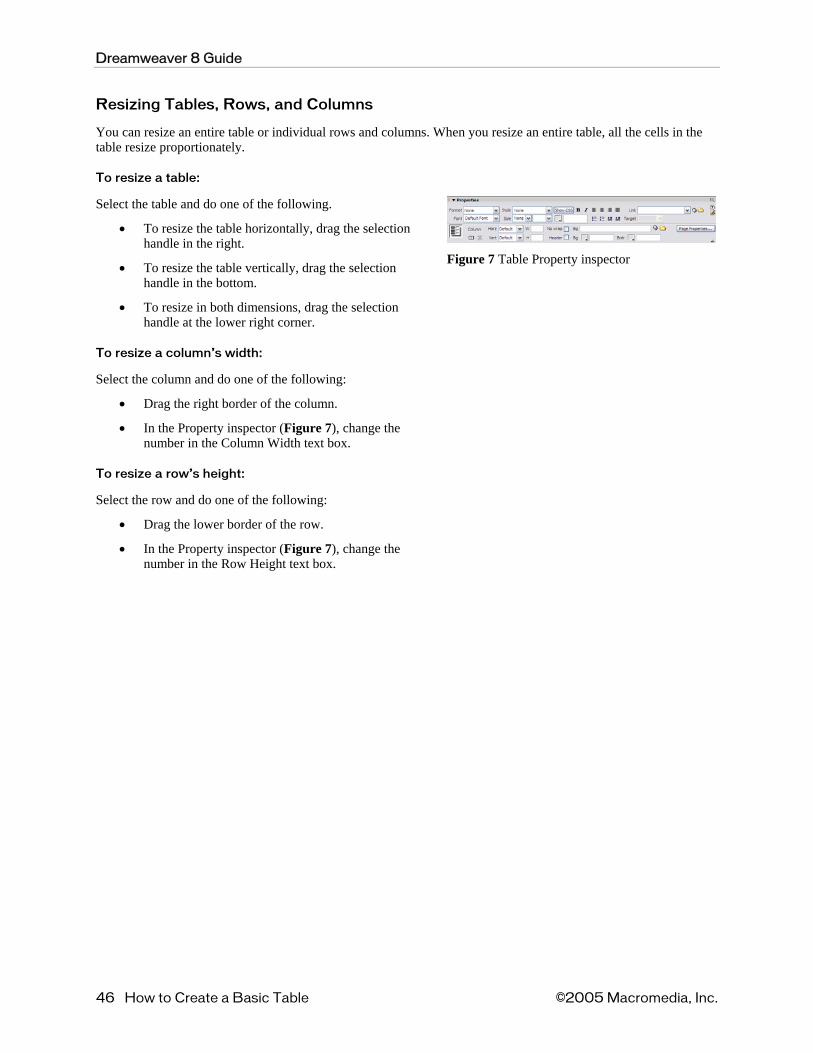
Resizing Tables, Rows, and Columns
You can resize an entire table or individual rows and columns. When you resize an entire table, all the cells in the table resize proportionately.
To resize a table:
Select the table and do one of the following.
• To resize the table horizontally, drag the selection handle in the right.
• To resize the table vertically, drag the selection handle in the bottom.
• To resize in both dimensions, drag the selection handle at the lower right corner.
To resize a column’s width:
Select the column and do one of the following:
• Drag the right border of the column.
• In the Property inspector (Figure 7), change the number in the Column Width text box.
To resize a row’s height:
Select the row and do one of the following:
• Drag the lower border of the row.
• In the Property inspector (Figure 7), change the number in the Row Height text box.
Figure 7 Table Property inspector
46 How to Create a Basic Table ©2005 Macromedia, Inc.
Dreamweaver 8 Guide
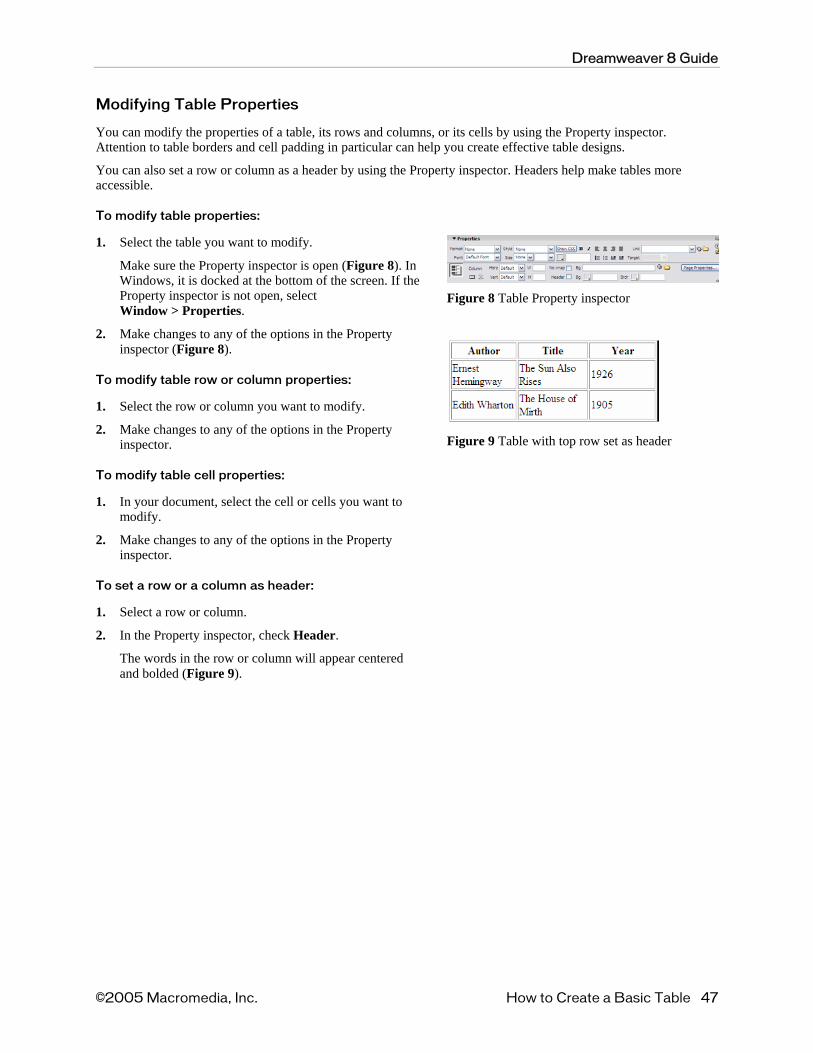
Modifying Table Properties
You can modify the properties of a table, its rows and columns, or its cells by using the Property inspector. Attention to table borders and cell padding in particular can help you create effective table designs.
You can also set a row or column as a header by using the Property inspector. Headers help make tables more accessible.
To modify table properties:
1. Select the table you want to modify.
Make sure the Property inspector is open (Figure 8). In Windows, it is docked at the bottom of the screen. If the Property inspector is not open, select Window > Properties.
2. Make changes to any of the options in the Property inspector (Figure 8).
To modify table row or column properties:
1. Select the row or column you want to modify.
2. Make changes to any of the options in the Property inspector.
To modify table cell properties:
1. In your document, select the cell or cells you want to modify.
2. Make changes to any of the options in the Property inspector.
To set a row or a column as header:
1. Select a row or column.
2. In the Property inspector, check Header.
The words in the row or column will appear centered and bolded (Figure 9).
Figure 8 Table Property inspector
Figure 9 Table with top row set as header
©2005 Macromedia, Inc. How to Create a Basic Table 47

Dreamweaver 8 Guide
How to Create Links
There are several different types of links in Macromedia Dreamweaver 8:
• Internal link (document-relative pathname link or site-root-relative pathname link) goes to another page in your site.
• External link (absolute pathname link) goes to another site.
• Named Anchor link goes to a specific position on a page in your site.
• E-mail link opens a blank e-mail message window instead of linking to a page.
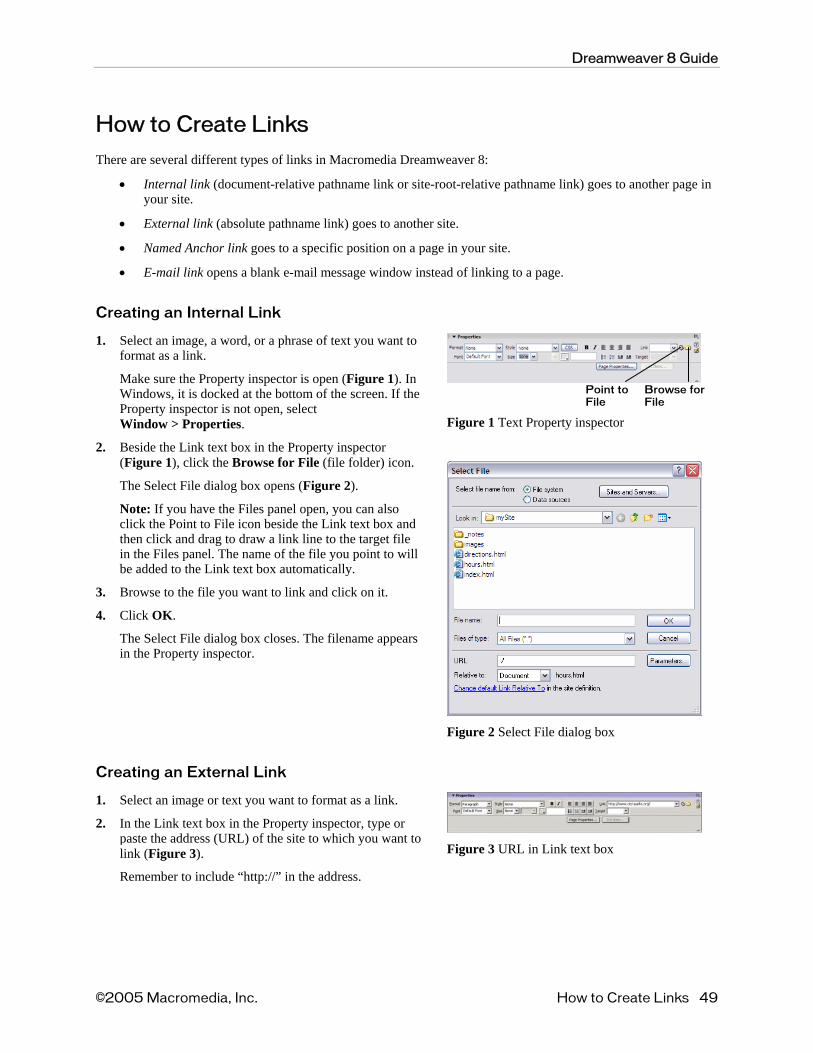
Creating an Internal Link
1. Select an image, a word, or a phrase of text you want to format as a link.
Make sure the Property inspector is open (Figure 1). In Windows, it is docked at the bottom of the screen. If theProperty inspector is not open, select Window > Properties.
2. Beside the Link text box in the Property inspector (Figure 1), click the Browse for File (file folder) icon.
The Select File dialog box opens (Figure 2).
Note: If you have the Files panel open, you can also click the Point to File icon beside the Link text box and then click and drag to draw a link line to the target file in the Files panel. The name of the file you point to will be added to the Link text box automatically.
3. Browse to the file you want to link and click on it.
4. Click OK.
The Select File dialog box closes. The filename appears in the Property inspector.
Figure 1 Text Property inspector
Figure 2 Select File dialog box
Point to File
Browse for File
Creating an External Link
1. Select an image or text you want to format as a link.
2. In the Link text box in the Property inspector, type or paste the address (URL) of the site to which you want to link (Figure 3).
Remember to include “http://” in the address.
Figure 3 URL in Link text box
©2005 Macromedia, Inc. How to Create Links 49
Dreamweaver 8 Guide
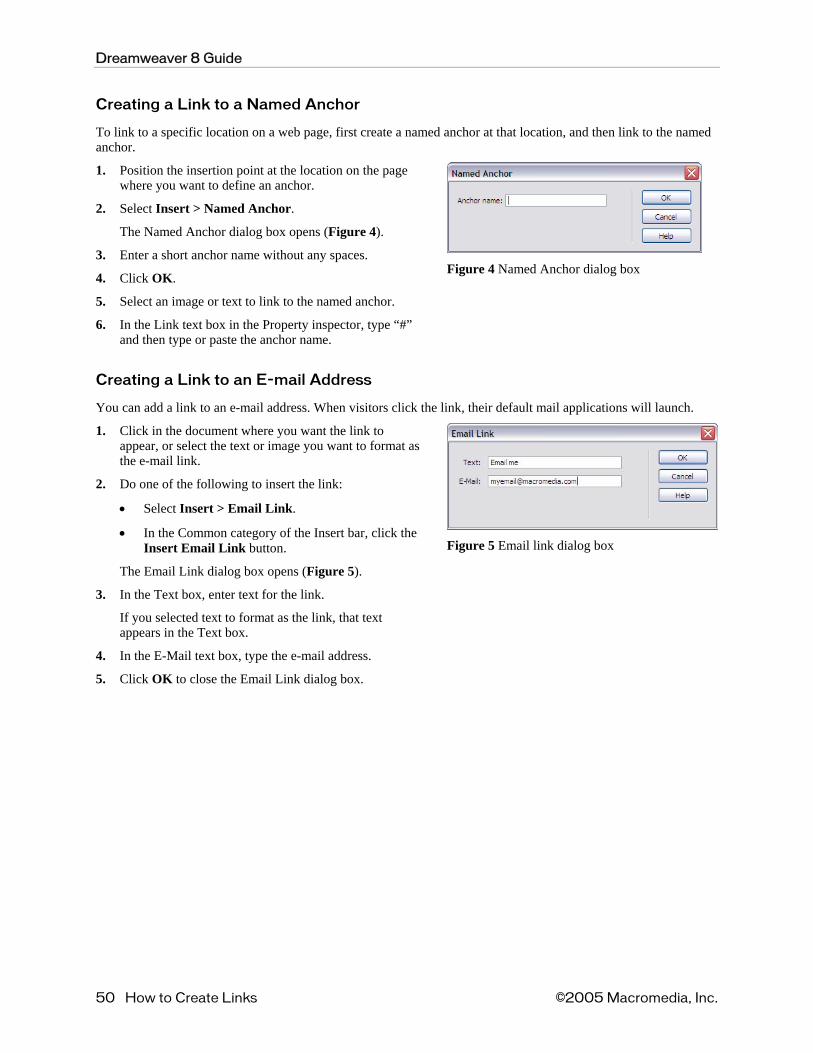
Creating a Link to a Named Anchor
To link to a specific location on a web page, first create a named anchor at that location, and then link to the named anchor.
1. Position the insertion point at the location on the page where you want to define an anchor.
2. Select Insert > Named Anchor.
The Named Anchor dialog box opens (Figure 4).
3. Enter a short anchor name without any spaces.
4. Click OK.
5. Select an image or text to link to the named anchor.
6. In the Link text box in the Property inspector, type “#” and then type or paste the anchor name.
Figure 4 Named Anchor dialog box
Creating a Link to an E-mail Address
You can add a link to an e-mail address. When visitors click the link, their default mail applications will launch.
1. Click in the document where you want the link to appear, or select the text or image you want to format as the e-mail link.
2. Do one of the following to insert the link:
• Select Insert > Email Link.
• In the Common category of the Insert bar, click the Insert Email Link button. Figure 5 Email link dialog box
The Email Link dialog box opens (Figure 5).
3. In the Text box, enter text for the link.
If you selected text to format as the link, that text appears in the Text box.
4. In the E-Mail text box, type the e-mail address.
5. Click OK to close the Email Link dialog box.
50 How to Create Links ©2005 Macromedia, Inc.
Guide
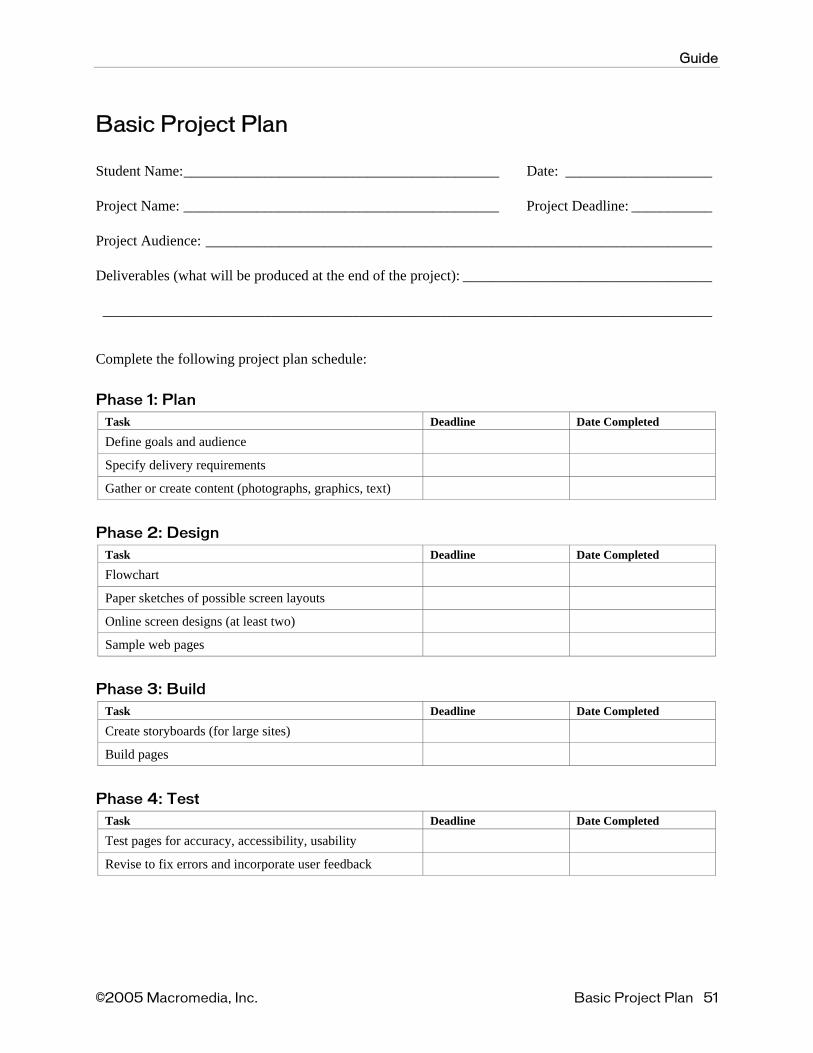
Basic Project Plan
Student Name:___________________________________________ Date: ____________________
Project Name: ___________________________________________ Project Deadline: ___________
Project Audience: _____________________________________________________________________
Deliverables (what will be produced at the end of the project): __________________________________
___________________________________________________________________________________
Complete the following project plan schedule:
Phase 1: Plan Task Deadline Date Completed
Define goals and audience
Specify delivery requirements
Gather or create content (photographs, graphics, text)
Phase 2: Design Task Deadline Date Completed
Flowchart
Paper sketches of possible screen layouts
Online screen designs (at least two)
Sample web pages
Phase 3: Build Task Deadline Date Completed
Create storyboards (for large sites)
Build pages
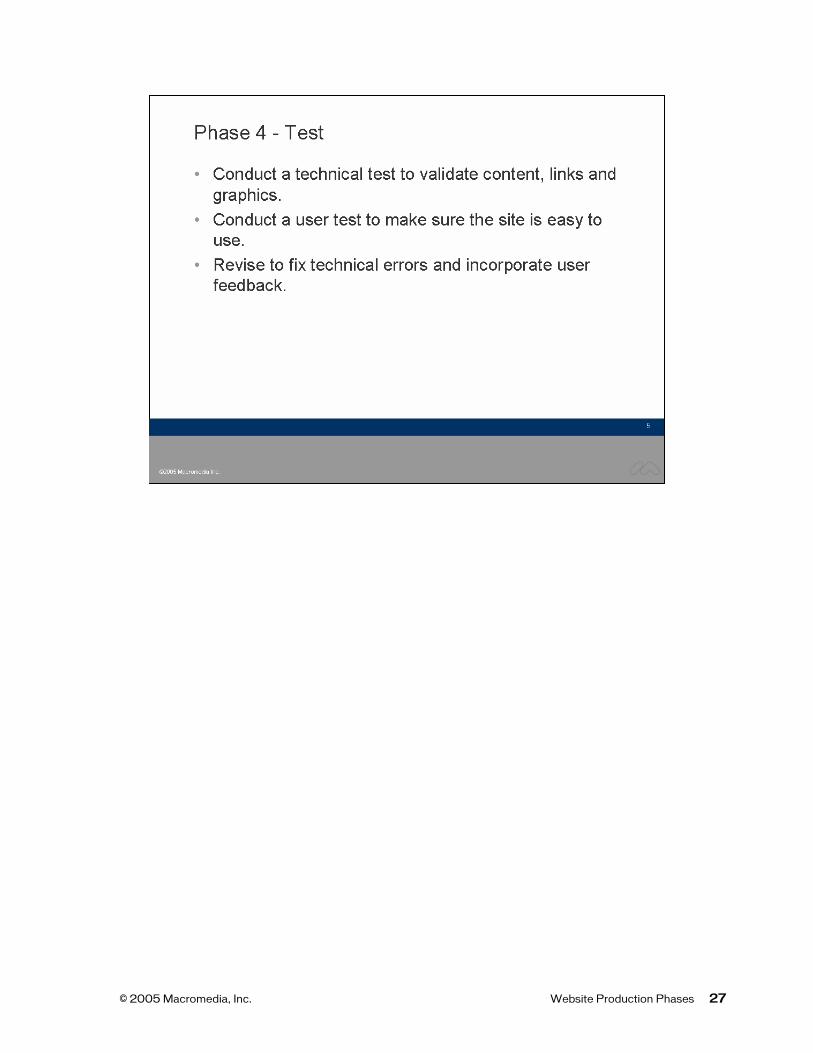
Phase 4: Test Task Deadline Date Completed
Test pages for accuracy, accessibility, usability
Revise to fix errors and incorporate user feedback
©2005 Macromedia, Inc. Basic Project Plan 51

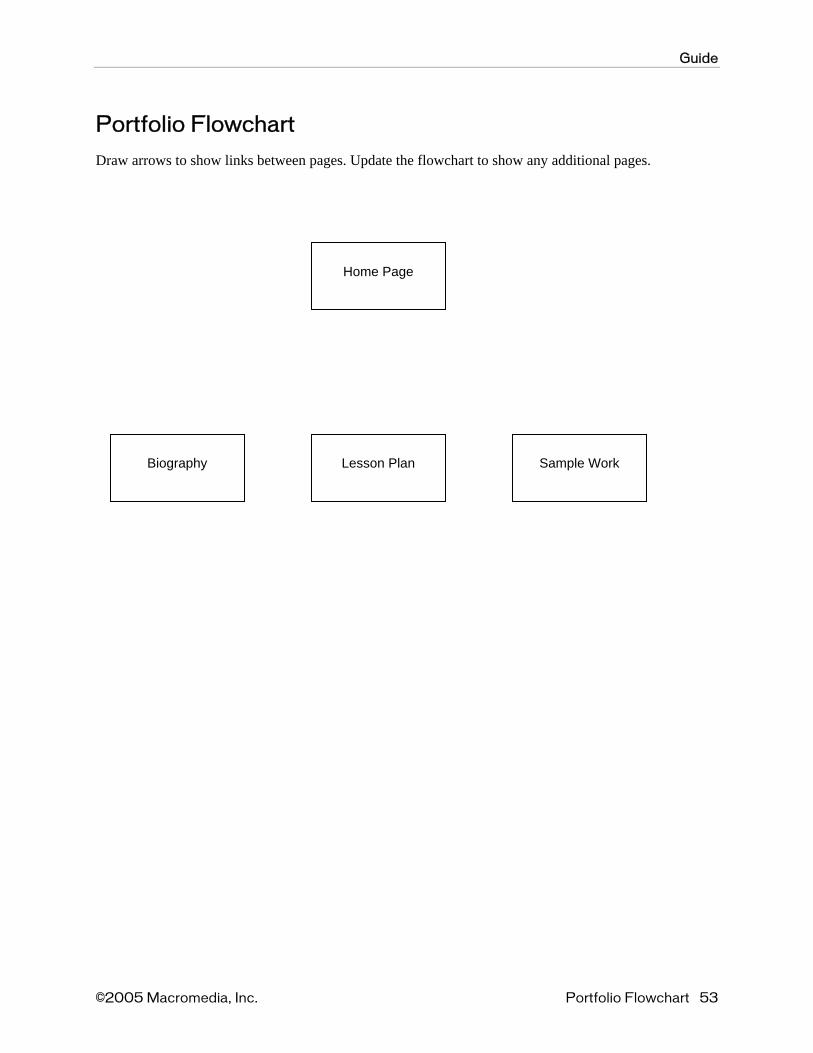
Guide
Portfolio Flowchart
Draw arrows to show links between pages. Update the flowchart to show any additional pages.
Biography Lesson Plan Sample Work
Home Page
©2005 Macromedia, Inc. Portfolio Flowchart 53

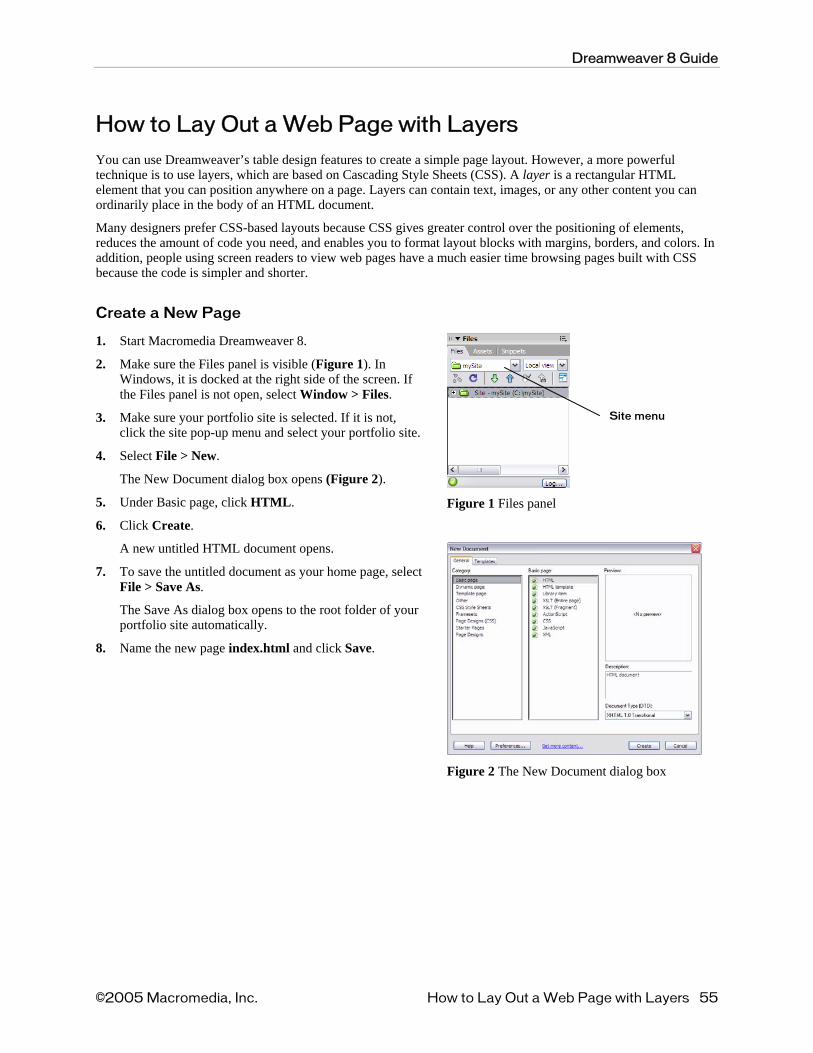
Dreamweaver 8 Guide
How to Lay Out a Web Page with Layers
You can use Dreamweaver’s table design features to create a simple page layout. However, a more powerful technique is to use layers, which are based on Cascading Style Sheets (CSS). A layer is a rectangular HTML element that you can position anywhere on a page. Layers can contain text, images, or any other content you can ordinarily place in the body of an HTML document.
Many designers prefer CSS-based layouts because CSS gives greater control over the positioning of elements, reduces the amount of code you need, and enables you to format layout blocks with margins, borders, and colors. In addition, people using screen readers to view web pages have a much easier time browsing pages built with CSS because the code is simpler and shorter.
Create a New Page
1. Start Macromedia Dreamweaver 8.
2. Make sure the Files panel is visible (Figure 1). In Windows, it is docked at the right side of the screen. If the Files panel is not open, select Window > Files.
3. Make sure your portfolio site is selected. If it is not, click the site pop-up menu and select your portfolio site.
4. Select File > New.
The New Document dialog box opens (Figure 2).
Site menu
5. Under Basic page, click HTML. Figure 1 Files panel
Figure 2 The New Document dialog box
6. Click Create.
A new untitled HTML document opens.
7. To save the untitled document as your home page, select File > Save As.
The Save As dialog box opens to the root folder of your portfolio site automatically.
8. Name the new page index.html and click Save.
©2005 Macromedia, Inc. How to Lay Out a Web Page with Layers 55
Dreamweaver 8 Guide
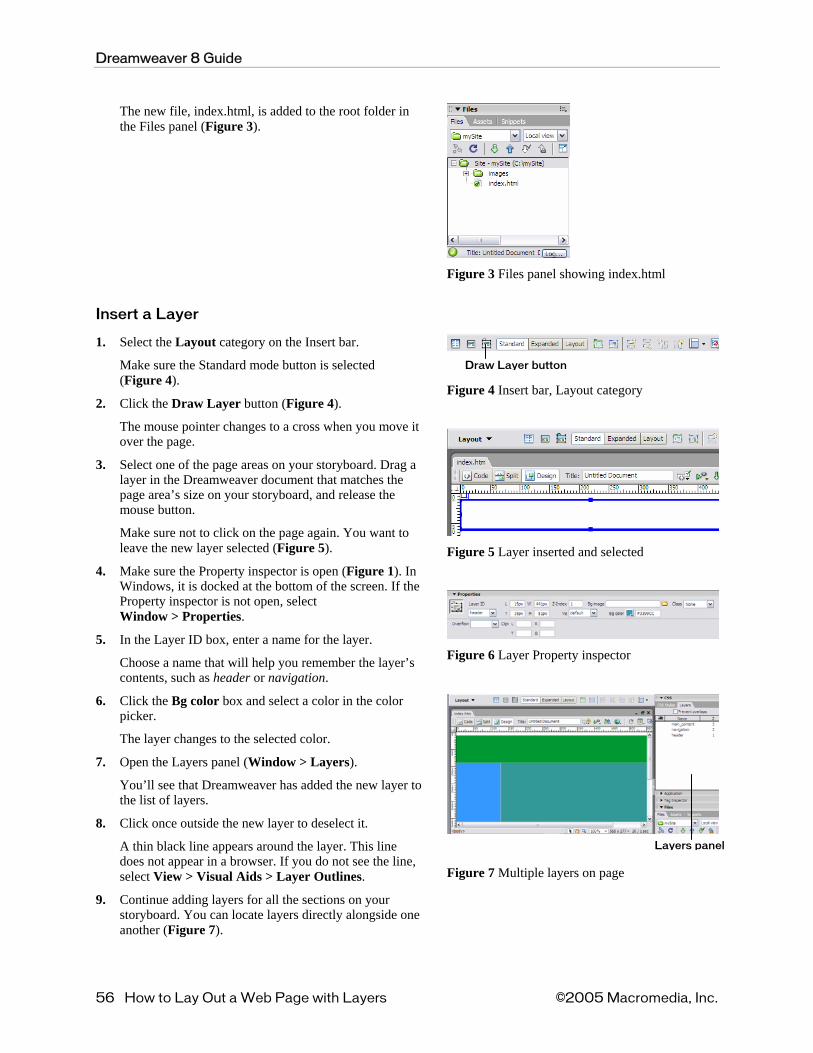
The new file, index.html, is added to the root folder in the Files panel (Figure 3).
Figure 3 Files panel showing index.html
Insert a Layer
1. Select the Layout category on the Insert bar.
Make sure the Standard mode button is selected (Figure 4).
2. Click the Draw Layer button (Figure 4).
The mouse pointer changes to a cross when you move it over the page.
3. Select one of the page areas on your storyboard. Drag a layer in the Dreamweaver document that matches the page area’s size on your storyboard, and release the mouse button.
Make sure not to click on the page again. You want to leave the new layer selected (Figure 5).
4. Make sure the Property inspector is open (Figure 1). In Windows, it is docked at the bottom of the screen. If the Property inspector is not open, select Window > Properties.
5. In the Layer ID box, enter a name for the layer.
Choose a name that will help you remember the layer’s contents, such as header or navigation.
6. Click the Bg color box and select a color in the color picker.
The layer changes to the selected color.
7. Open the Layers panel (Window > Layers).
You’ll see that Dreamweaver has added the new layer to the list of layers.
8. Click once outside the new layer to deselect it.
A thin black line appears around the layer. This line does not appear in a browser. If you do not see the line, select View > Visual Aids > Layer Outlines.
9. Continue adding layers for all the sections on your storyboard. You can locate layers directly alongside one another (Figure 7).
Draw Layer button
Figure 4 Insert bar, Layout category
Figure 5 Layer inserted and selected
Figure 6 Layer Property inspector
Figure 7 Multiple layers on page
Layers panel
56 How to Lay Out a Web Page with Layers ©2005 Macromedia, Inc.
Dreamweaver 8 Guide
10. Save your page.
Resize Layers
You can resize an individual layer or simultaneously resize multiple layers to make them the same width and height.
Note: If the Prevent Overlaps option is checked in the Layers panel, you will not be able to resize a layer so it overlaps with another layer.
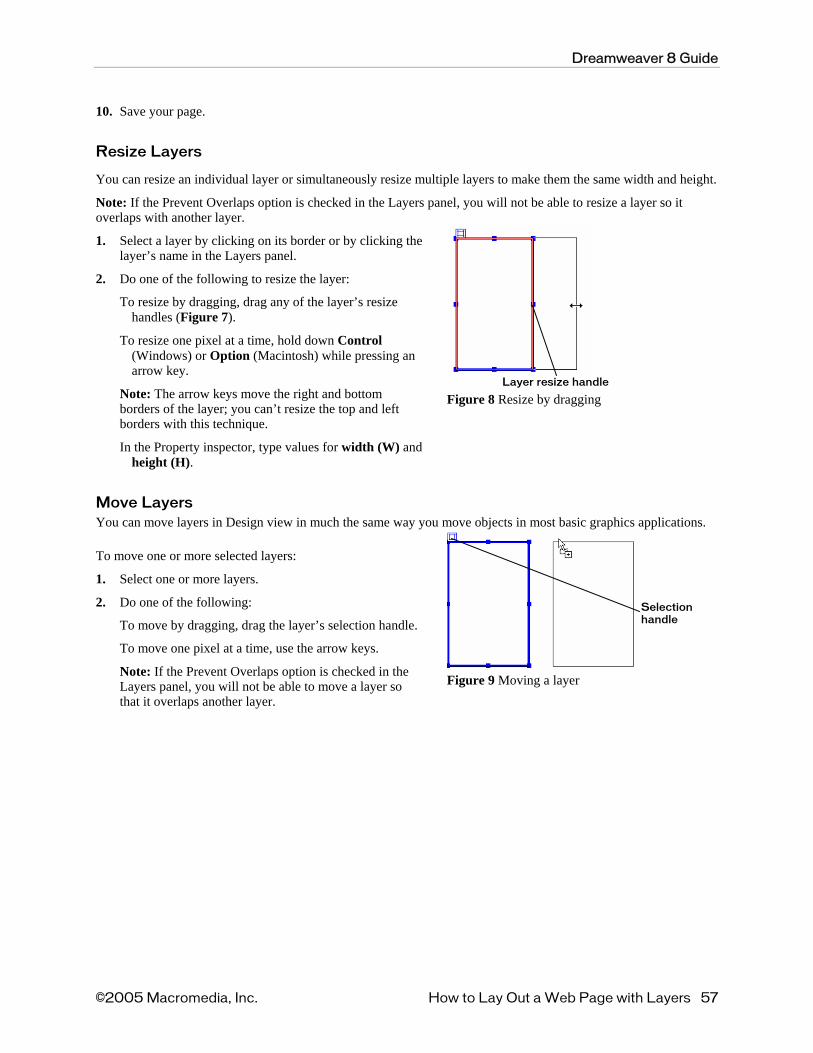
1. Select a layer by clicking on its border or by clicking the layer’s name in the Layers panel.
2. Do one of the following to resize the layer:
To resize by dragging, drag any of the layer’s resize handles (Figure 7).
To resize one pixel at a time, hold down Control (Windows) or Option (Macintosh) while pressing an arrow key.
Note: The arrow keys move the right and bottom borders of the layer; you can’t resize the top and left borders with this technique.
In the Property inspector, type values for width (W) and height (H).
Figure 8 Resize by dragging
Move Layers You can move layers in Design view in much the same way you move objects in most basic graphics applications.
To move one or more selected layers:
1. Select one or more layers.
2. Do one of the following:
Layer resize handle
To move by dragging, drag the layer’s selection handle.
To move one pixel at a time, use the arrow keys.
Note: If the Prevent Overlaps option is checked in the Layers panel, you will not be able to move a layer so that it overlaps another layer.
Figure 9 Moving a layer
Selection handle
©2005 Macromedia, Inc. How to Lay Out a Web Page with Layers 57

Dreamweaver 8 Guide
Add Content to Layers
You can images, text, and other content (such as Flash movies) to your layers just as you would elsewhere in a web page.
1. To insert an image in a layer, click in the layer and select Insert > Image on the menu bar.
Note: Make sure the layer is sized large enough to hold the image or other content. If the layer is sized smaller than the image, the layer may not display correctly in all browsers.
2. In the Select Image Source dialog box, locate and select an image to insert (such as your page banner). Then click OK (Windows) or Choose (Macintosh).
The image appears on the layer (Figure 10).
3. To format the image on the layer, select the image and select formatting elements in the Property inspector.
4. To add text to a layer, click in the layer and type text or paste text copied from another document.
5. To format text, select the text and select formatting elements in the Property inspector, such as font, alignment, and size of the text.
Figure 10 Layer with image added
Preview a Page
To preview the page in a browser (Figure 12), select File > Preview in Browser and then select a browser from the submenu (or press F12).
Note: It is important to preview in a browser to make sure your design fits in a standard browser window. Try resizing the browser window to see the effect on your page.
Figure 12 Web page in browser
58 How to Lay Out a Web Page with Layers ©2005 Macromedia, Inc.
Dreamweaver 8 Guide
How to Add Text from Another Document
Copy Text from Another Document
1. Open the document from which you want to copy text.
2. Select the text and select Edit > Copy.
3. Start Dreamweaver 8.
4. Open the Dreamweaver document in which you want to paste the text.
5. Position the insertion point in the page where you want to paste the copied text.
6. Select Edit > Paste.
The new text appears in the Dreamweaver document.
Note: Copied text may lose some of its original formatting, including line breaks and paragraph breaks. To insert a blank line after a section of text, position the insertion point at the end of the last text line and press Enter (Windows) or Return (Macintosh). To create a line break at the insertion point, press Shift-Enter (Windows) or Shift-Return (Macintosh).
7. To change the format of any new text in the document, select the text and set options in the Property inspector.
Import Word HTML
HTML pages created in Microsoft Word have elements that need to be cleaned up before you can work with these pages in Dreamweaver.
1. Select File > Open.
The Open dialog box opens.
2. Navigate to and select the HTML file you want to open, and click Open.
The Word HTML file is opened in Dreamweaver.
3. Select Commands > Clean Up Word HTML.
The Clean Up Word HTML dialog box opens (Figure 1).
4. Click OK.
You are presented with a summary of the cleanup process.
5. Click OK.
Use the Property inspector to edit the text as necessary. Figure 1 Clean Up Word HTML dialog box
©2005 Macromedia, Inc. How to Add Text from Another Document 59


Dreamweaver 8 Guide
How to Create a Web Photo Album
You can create an interactive catalog of photographs or graphics by using the Create Web Photo Album command in Dreamweaver 8. All you need is a folder of images.
1. Assemble all the images for your album in one folder (preferably outside your local root folder).
2. Start Dreamweaver. Open your portfolio site if it isn’t already open.
3. Open a new HTML page and then choose Commands > Create Web Photo Album.
The Create Web Photo Album dialog box opens (Figure 1).
In the dialog box, provide the following information:
• Photo Album Title: Title to display on the main page of the photo album, which will display thumbnails for the images in your album.
• Subheading Info: Subtitle to display on the main page.
• Other Info: Text to appear below subtitle on main page.
• Source Images Folder: Folder for source images. Click Browse and locate your folder of images.
• Destination Folder: Folder where the HTML and image files for the photo album will be saved. Click Browse and create a folder within the local root folder.
• Thumbnail Size: The size of the thumbnail images on the main page.
• Columns: Number of columns in the table that displays the thumbnails. (If you have six to nine images, three columns would work.)
• Thumbnail Format: GIF or JPEG format for the thumbnail images.
• Photo Format: GIF or JPEG format for the large-size images on the individual album pages. You can use different formats for thumbnails and full-size images.
• Scale: Setting Scale to 100% creates large-size images the same size as the originals. If your images are large, you may need to scale them down.
• Create Navigation Path for Each Photo: Creates an individual web page for each large-size image, containing navigation links labeled Back, Home, and Next. If you select this option, the thumbnails link to the navigation pages. If you don’t select this option, the thumbnails link directly to the large-size images.
Figure 1 Create Web Photo Album dialog box
©2005 Macromedia, Inc. How to Create a Web Photo Album 61
Dreamweaver 8 Guide
4. Click OK in the Create Web Photo Album dialog box.
Macromedia Fireworks 8 starts and creates all the thumbnail and large-size images for the photo album. A message window appears when the album is complete.
5. Click OK.
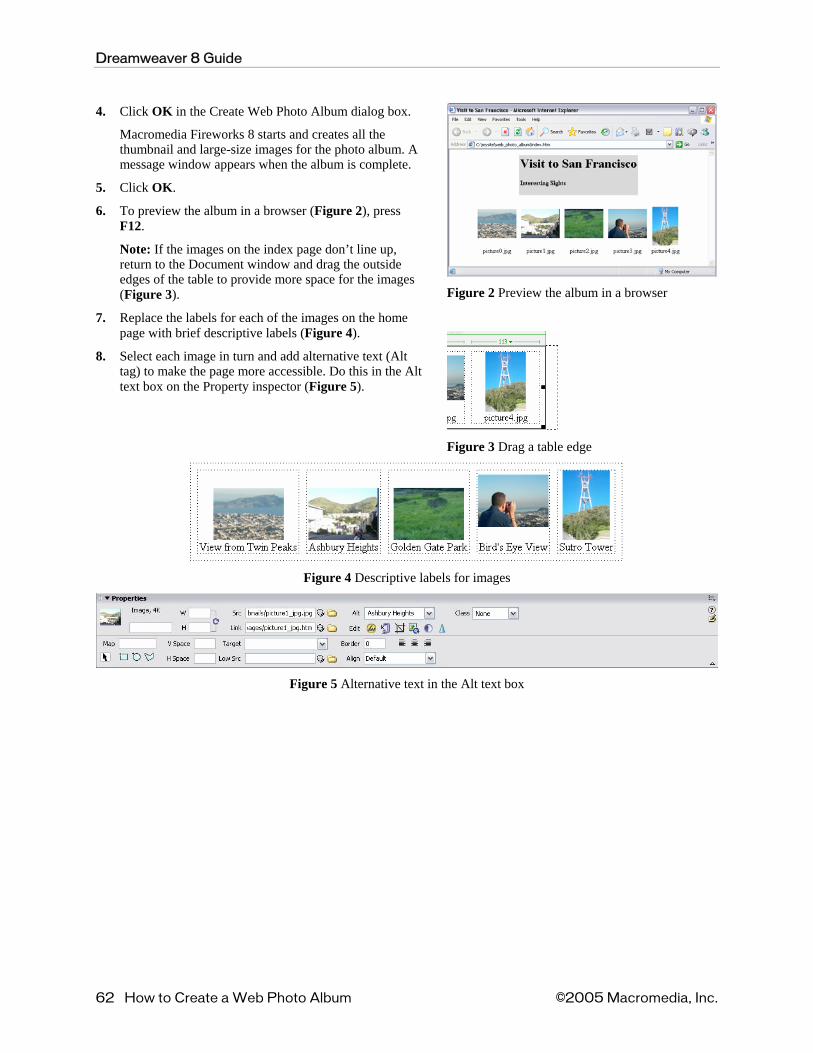
6. To preview the album in a browser (Figure 2), press F12.
Note: If the images on the index page don’t line up, return to the Document window and drag the outside edges of the table to provide more space for the images (Figure 3).
7. Replace the labels for each of the images on the home page with brief descriptive labels (Figure 4).
8. Select each image in turn and add alternative text (Alt tag) to make the page more accessible. Do this in the Alt text box on the Property inspector (Figure 5).
Figure 2 Preview the album in a browser
Figure 3 Drag a table edge
Figure 4 Descriptive labels for images
Figure 5 Alternative text in the Alt text box
62 How to Create a Web Photo Album ©2005 Macromedia, Inc.
Dreamweaver 8 Guide
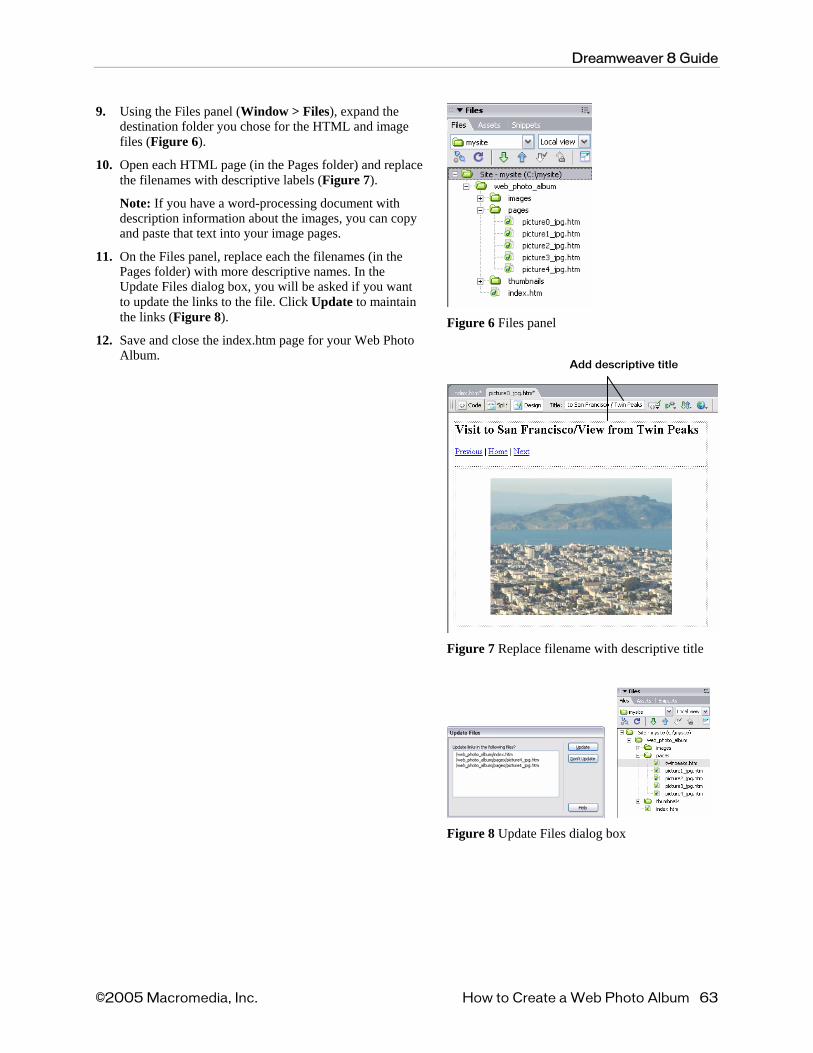
9. Using the Files panel (Window > Files), expand the destination folder you chose for the HTML and image files (Figure 6).
10. Open each HTML page (in the Pages folder) and replace the filenames with descriptive labels (Figure 7).
Note: If you have a word-processing document with description information about the images, you can copy and paste that text into your image pages.
11. On the Files panel, replace each the filenames (in the Pages folder) with more descriptive names. In the Update Files dialog box, you will be asked if you want to update the links to the file. Click Update to maintain the links (Figure 8). Figure 6 Files panel
12. Save and close the index.htm page for your Web Photo Album.
Add descriptive title
Figure 7 Replace filename with descriptive title
Figure 8 Update Files dialog box
©2005 Macromedia, Inc. How to Create a Web Photo Album 63

Dreamweaver 8 Guide
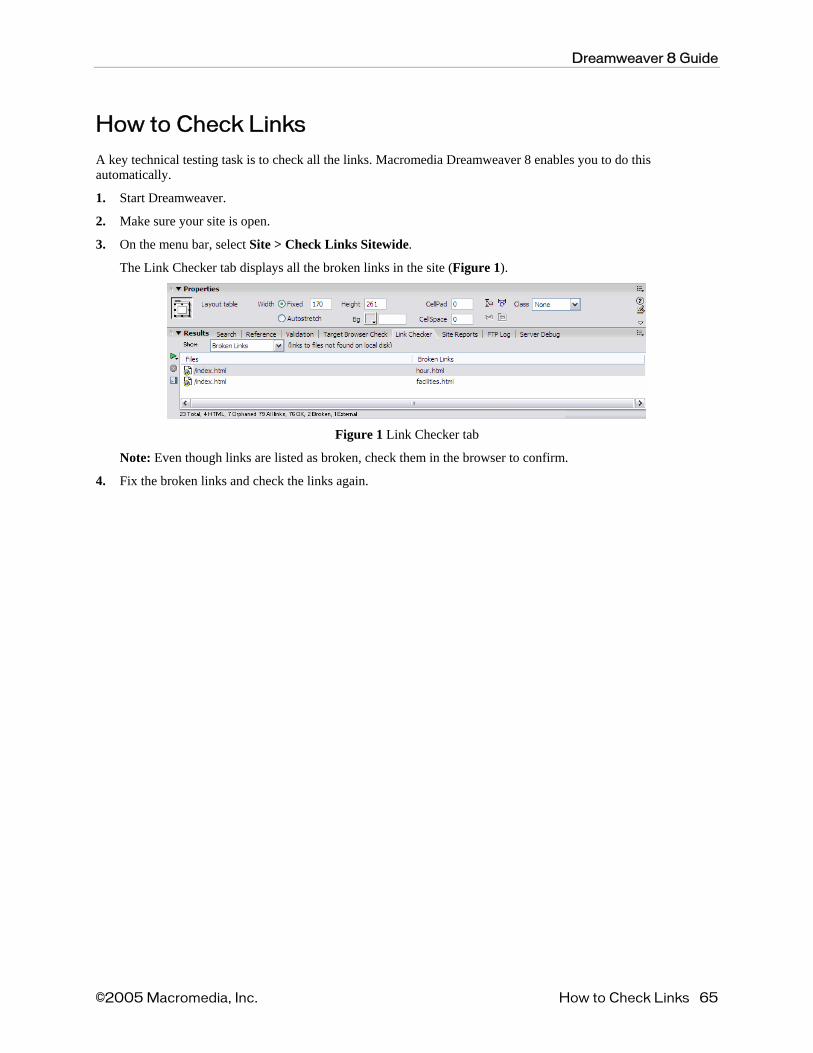
How to Check Links
A key technical testing task is to check all the links. Macromedia Dreamweaver 8 enables you to do this automatically.
1. Start Dreamweaver.
2. Make sure your site is open.
3. On the menu bar, select Site > Check Links Sitewide.
The Link Checker tab displays all the broken links in the site (Figure 1).
Figure 1 Link Checker tab
Note: Even though links are listed as broken, check them in the browser to confirm.
4. Fix the broken links and check the links again.
©2005 Macromedia, Inc. How to Check Links 65

Guide
Project Rubric
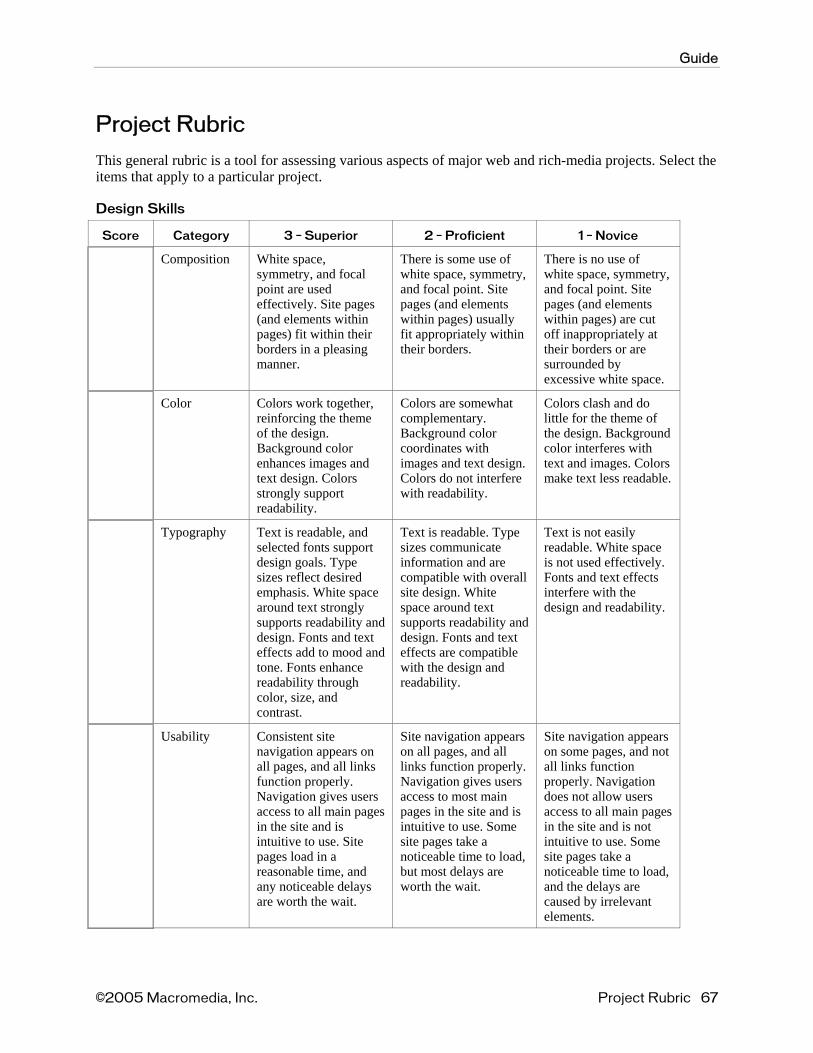
This general rubric is a tool for assessing various aspects of major web and rich-media projects. Select the items that apply to a particular project.
Design Skills
Score Category 3 – Superior 2 – Proficient 1 – Novice
Composition White space, symmetry, and focal point are used effectively. Site pages (and elements within pages) fit within their borders in a pleasing manner.
There is some use of white space, symmetry, and focal point. Site pages (and elements within pages) usually fit appropriately within their borders.
There is no use of white space, symmetry, and focal point. Site pages (and elements within pages) are cut off inappropriately at their borders or are surrounded by excessive white space.
Color Colors work together, reinforcing the theme of the design. Background color enhances images and text design. Colors strongly support readability.
Colors are somewhat complementary. Background color coordinates with images and text design. Colors do not interfere with readability.
Colors clash and do little for the theme of the design. Background color interferes with text and images. Colors make text less readable.
Typography Text is readable. Type sizes communicate information and are compatible with overall site design. White space around text supports readability and design. Fonts and text effects are compatible with the design and readability.
Text is readable, and selected fonts support design goals. Type sizes reflect desired emphasis. White space around text strongly supports readability and design. Fonts and text effects add to mood and tone. Fonts enhance readability through color, size, and contrast.
Text is not easily readable. White space is not used effectively. Fonts and text effects interfere with the design and readability.
Usability Consistent site navigation appears on all pages, and all links function properly. Navigation gives users access to all main pages in the site and is intuitive to use. Site pages load in a reasonable time, and any noticeable delays are worth the wait.
Site navigation appears on all pages, and all links function properly. Navigation gives users access to most main pages in the site and is intuitive to use. Some site pages take a noticeable time to load, but most delays are worth the wait.
Site navigation appears on some pages, and not all links function properly. Navigation does not allow users access to all main pages in the site and is not intuitive to use. Some site pages take a noticeable time to load, and the delays are caused by irrelevant elements.
©2005 Macromedia, Inc. Project Rubric 67
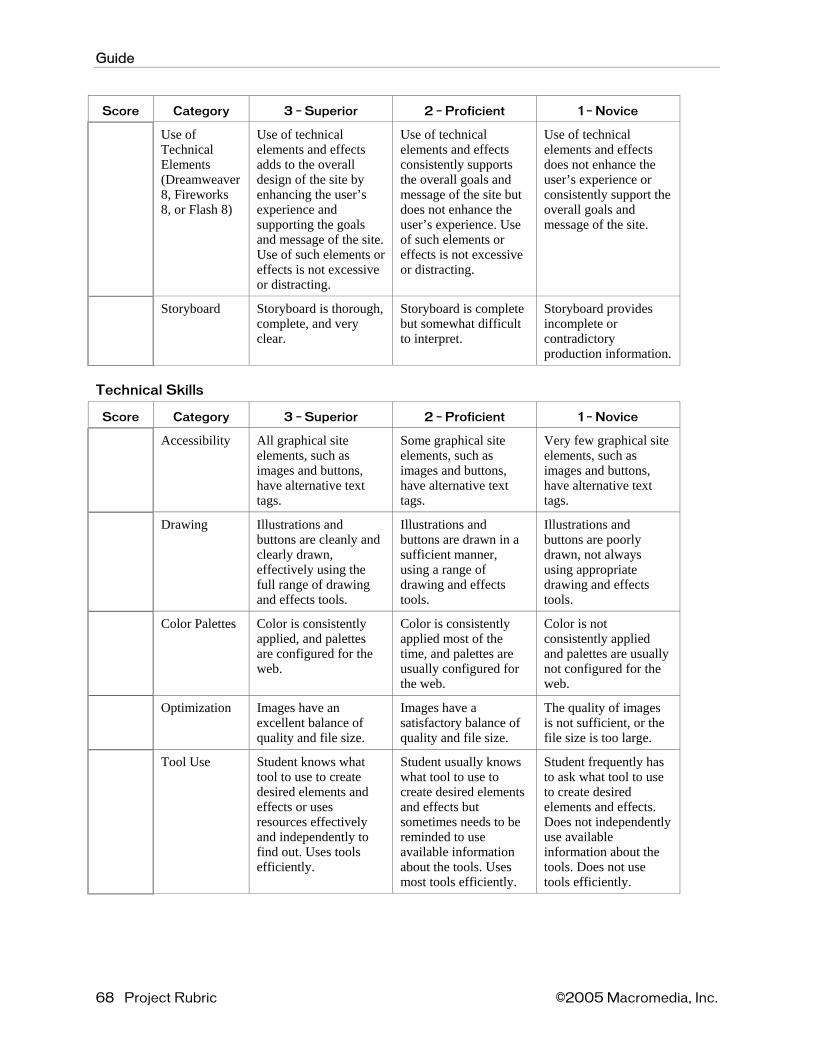
Guide
Score Category 3 – Superior 2 – Proficient 1 – Novice
Use of Technical Elements (Dreamweaver 8, Fireworks 8, or Flash 8)
Use of technical elements and effects adds to the overall design of the site by enhancing the user’s experience and supporting the goals and message of the site. Use of such elements or effects is not excessive or distracting.
Use of technical elements and effects consistently supports the overall goals and message of the site but does not enhance the user’s experience. Use of such elements or effects is not excessive or distracting.
Use of technical elements and effects does not enhance the user’s experience or consistently support the overall goals and message of the site.
Storyboard Storyboard is thorough, complete, and very clear.
Storyboard is complete but somewhat difficult to interpret.
Storyboard provides incomplete or contradictory production information.
Technical Skills
Score Category 3 – Superior 2 – Proficient 1 – Novice
Accessibility All graphical site elements, such as images and buttons, have alternative text tags.
Some graphical site elements, such as images and buttons, have alternative text tags.
Very few graphical site elements, such as images and buttons, have alternative text tags.
Drawing Illustrations and buttons are cleanly and clearly drawn, effectively using the full range of drawing and effects tools.
Illustrations and buttons are drawn in a sufficient manner, using a range of drawing and effects tools.
Illustrations and buttons are poorly drawn, not always using appropriate drawing and effects tools.
Color Palettes Color is consistently applied, and palettes are configured for the web.
Color is consistently applied most of the time, and palettes are usually configured for the web.
Color is not consistently applied and palettes are usually not configured for the web.
Optimization Images have an excellent balance of quality and file size.
Images have a satisfactory balance of quality and file size.
The quality of images is not sufficient, or the file size is too large.
Tool Use Student knows what tool to use to create desired elements and effects or uses resources effectively and independently to find out. Uses tools efficiently.
Student usually knows what tool to use to create desired elements and effects but sometimes needs to be reminded to use available information about the tools. Uses most tools efficiently.
Student frequently has to ask what tool to use to create desired elements and effects. Does not independently use available information about the tools. Does not use tools efficiently.
68 Project Rubric ©2005 Macromedia, Inc.
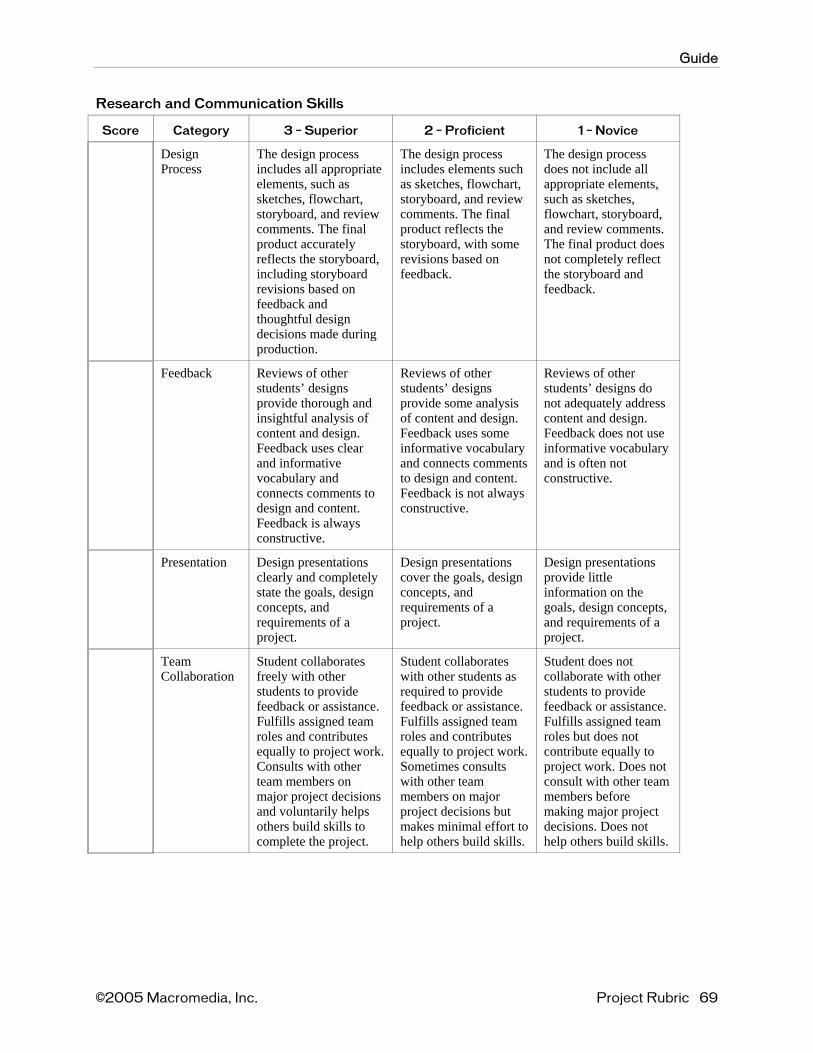
Guide
Research and Communication Skills
Score Category 3 – Superior 2 – Proficient 1 – Novice
Design Process
The design process does not include all appropriate elements, such as sketches, flowchart, storyboard, and review comments. The final product does not completely reflect the storyboard and feedback.
The design process includes elements such as sketches, flowchart, storyboard, and review comments. The final product reflects the storyboard, with some revisions based on feedback.
The design process includes all appropriate elements, such as sketches, flowchart, storyboard, and review comments. The final product accurately reflects the storyboard, including storyboard revisions based on feedback and thoughtful design decisions made during production.
Reviews of other students’ designs do not adequately address content and design. Feedback does not use informative vocabulary and is often not constructive.
Feedback Reviews of other students’ designs provide thorough and insightful analysis of content and design. Feedback uses clear and informative vocabulary and connects comments to design and content. Feedback is always constructive.
Reviews of other students’ designs provide some analysis of content and design. Feedback uses some informative vocabulary and connects comments to design and content. Feedback is not always constructive.
Design presentations provide little information on the goals, design concepts, and requirements of a project.
Presentation Design presentations clearly and completely state the goals, design concepts, and requirements of a project.
Design presentations cover the goals, design concepts, and requirements of a project.
Student does not collaborate with other students to provide feedback or assistance. Fulfills assigned team roles but does not contribute equally to project work. Does not consult with other team members before making major project decisions. Does not help others build skills.
Team Collaboration
Student collaborates freely with other students to provide feedback or assistance. Fulfills assigned team roles and contributes equally to project work. Consults with other team members on major project decisions and voluntarily helps others build skills to complete the project.
Student collaborates with other students as required to provide feedback or assistance. Fulfills assigned team roles and contributes equally to project work. Sometimes consults with other team members on major project decisions but makes minimal effort to help others build skills.
©2005 Macromedia, Inc. Project Rubric 69
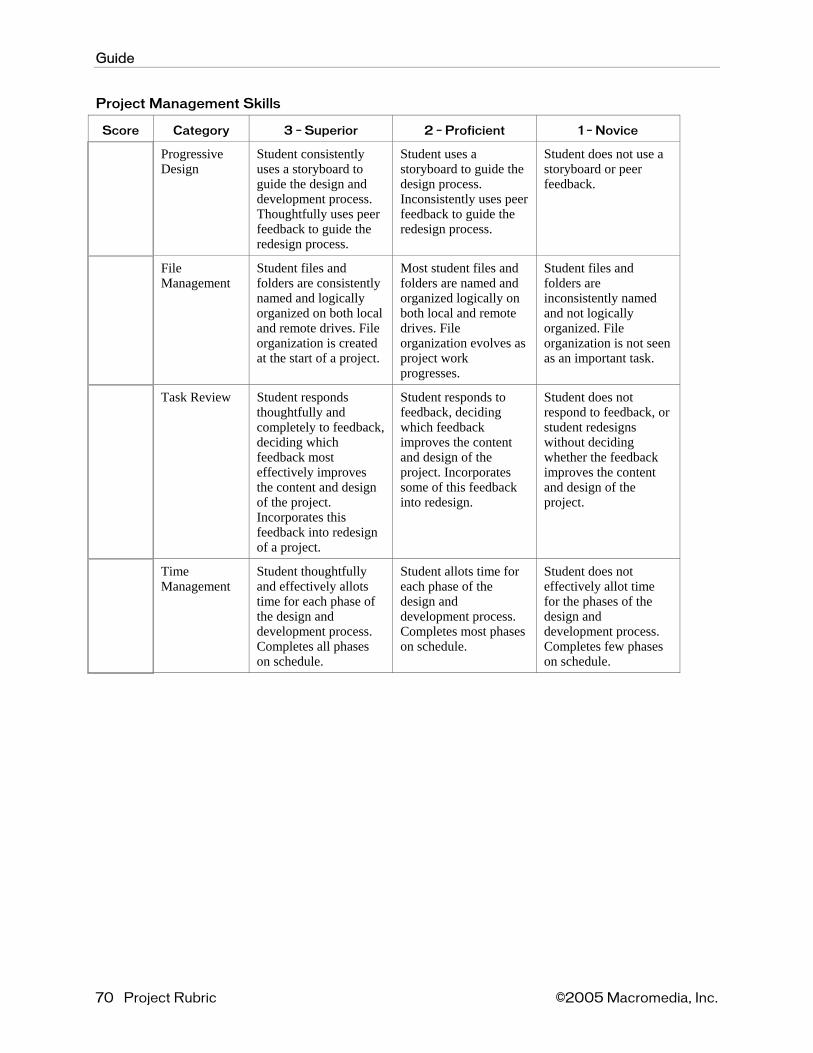
Guide
Project Management Skills
Score Category 3 – Superior 2 – Proficient 1 – Novice
Progressive Design
Student does not use a storyboard or peer feedback.
Student uses a storyboard to guide the design process. Inconsistently uses peer feedback to guide the redesign process.
Student consistently uses a storyboard to guide the design and development process. Thoughtfully uses peer feedback to guide the redesign process.
File Management
Student files and folders are consistently named and logically organized on both local and remote drives. File organization is created at the start of a project.
Most student files and folders are named and organized logically on both local and remote drives. File organization evolves as project work progresses.
Student files and folders are inconsistently named and not logically organized. File organization is not seen as an important task.
Student does not respond to feedback, or student redesigns without deciding whether the feedback improves the content and design of the project.
Student responds to feedback, deciding which feedback improves the content and design of the project. Incorporates some of this feedback into redesign.
Task Review Student responds thoughtfully and completely to feedback, deciding which feedback most effectively improves the content and design of the project. Incorporates this feedback into redesign of a project.
Time Management
Student thoughtfully and effectively allots time for each phase of the design and development process. Completes all phases on schedule.
Student allots time for each phase of the design and development process. Completes most phases on schedule.
Student does not effectively allot time for the phases of the design and development process. Completes few phases on schedule.
70 Project Rubric ©2005 Macromedia, Inc.

Guide
Resources
Design References
• Tutorials on graphic design and examples of web page design www.mundidesign.com
• Topics related to web page design www.webstyleguide.com/index.html
• Articles related to design aspects of web development www.webreference.com/dlab/
• Site-planning basics www.efuse.com/Plan/site_planning_basics.html
• Sources for web-design information and style guides webdesign.about.com/compute/webdesign/msubstyle.htm
Portfolio References
• Discussion of teachers’ professional portfolios www.teachnet.com/how-to/employment/portfolios/index.html
• A lesson plan for career portfolios www.sccis.org/main/educators/lessonplans2.htm
• Using Technology to Frame the Past: Electronic Scrapbooking www.oz.net/~markhow/writing/scrap.htm
• International developments in the use of electronic portfolios www.icponline.org/feature_articles/f2_00.htm
Assessment References
• Kathy Schrock’s Guide for Educators – Assessment Rubrics school.discovery.com/schrockguide/assess.html
• Cooperative Learning Rubric whyfiles.larc.nasa.gov/text/educators/tools/eval/coop_rubric.html
Participant-contributed References
Share any quality references you’ve discovered for learning about design, assessment, or technical skills.
©2005 Macromedia, Inc. Resources 71


Bonus Guides for Quick Learners
• How to Use Templates • How to Use Libraries • How to Import Spreadsheet Tables
©2005 Macromedia, Inc. 73

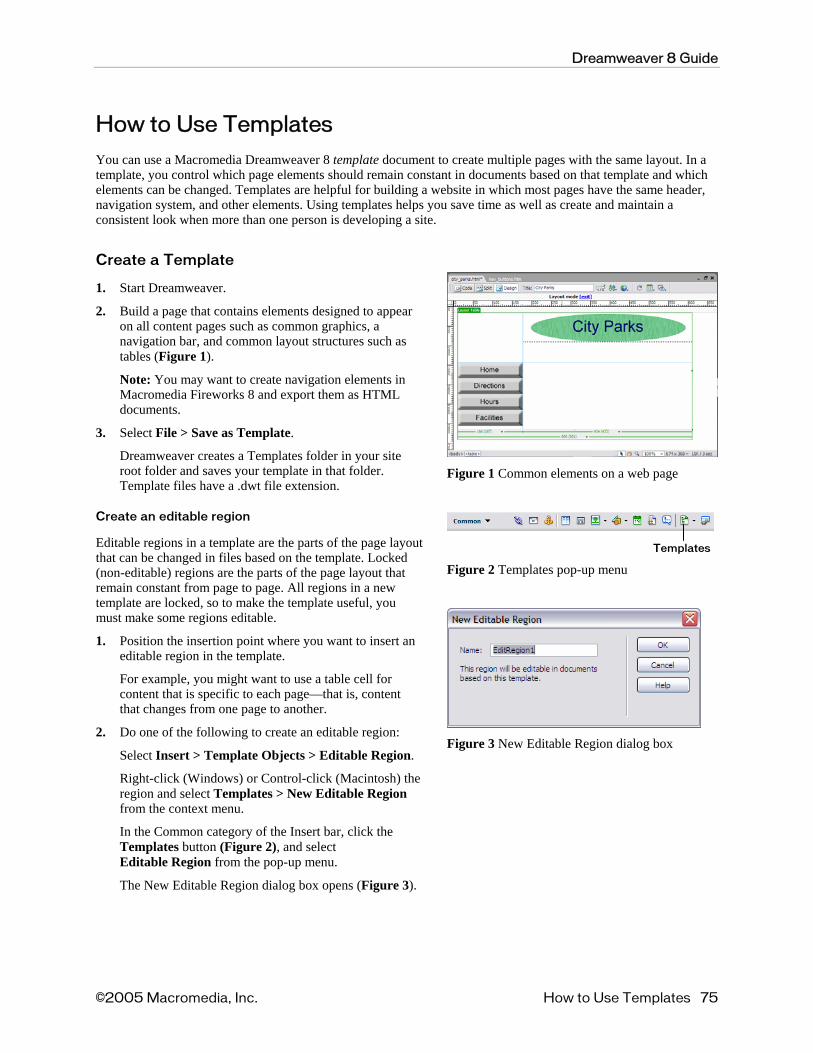
Dreamweaver 8 Guide
How to Use Templates
You can use a Macromedia Dreamweaver 8 template document to create multiple pages with the same layout. In a template, you control which page elements should remain constant in documents based on that template and which elements can be changed. Templates are helpful for building a website in which most pages have the same header, navigation system, and other elements. Using templates helps you save time as well as create and maintain a consistent look when more than one person is developing a site.
Create a Template
1. Start Dreamweaver.
2. Build a page that contains elements designed to appear on all content pages such as common graphics, a navigation bar, and common layout structures such as tables (Figure 1).
Note: You may want to create navigation elements in Macromedia Fireworks 8 and export them as HTML documents.
3. Select File > Save as Template.
Dreamweaver creates a Templates folder in your site root folder and saves your template in that folder. Template files have a .dwt file extension.
Create an editable region
Editable regions in a template are the parts of the page layout that can be changed in files based on the template. Locked (non-editable) regions are the parts of the page layout that remain constant from page to page. All regions in a new template are locked, so to make the template useful, you must make some regions editable.
1. Position the insertion point where you want to insert an editable region in the template.
For example, you might want to use a table cell for content that is specific to each page—that is, content that changes from one page to another.
2. Do one of the following to create an editable region:
Select Insert > Template Objects > Editable Region.
Right-click (Windows) or Control-click (Macintosh) the region and select Templates > New Editable Region from the context menu.
In the Common category of the Insert bar, click the Templates button (Figure 2), and select Editable Region from the pop-up menu.
The New Editable Region dialog box opens (Figure 3).
Figure 1 Common elements on a web page
Templates
Figure 2 Templates pop-up menu
Figure 3 New Editable Region dialog box
©2005 Macromedia, Inc. How to Use Templates 75
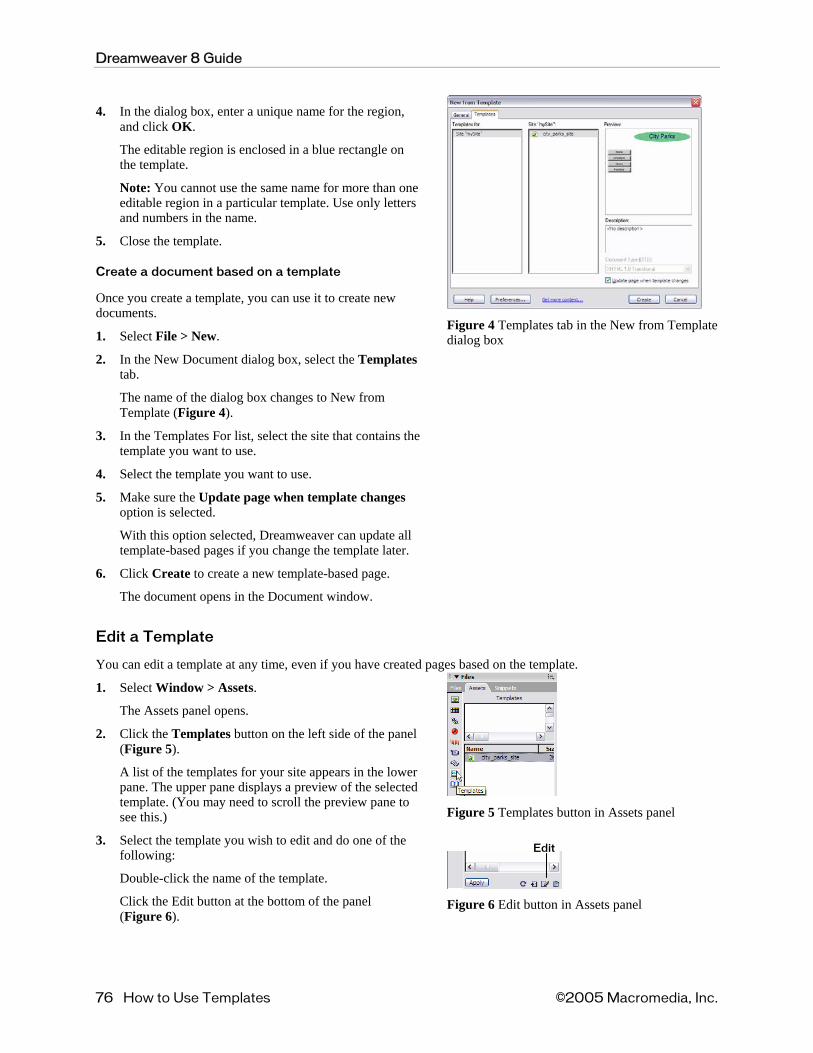
Dreamweaver 8 Guide
4. In the dialog box, enter a unique name for the region, and click OK.
The editable region is enclosed in a blue rectangle on the template.
Note: You cannot use the same name for more than one editable region in a particular template. Use only letters and numbers in the name.
5. Close the template.
Create a document based on a template
Once you create a template, you can use it to create new documents.
1. Select File > New.
2. In the New Document dialog box, select the Templates tab.
The name of the dialog box changes to New from Template (Figure 4).
3. In the Templates For list, select the site that contains the template you want to use.
4. Select the template you want to use.
5. Make sure the Update page when template changes option is selected.
With this option selected, Dreamweaver can update all template-based pages if you change the template later.
6. Click Create to create a new template-based page.
The document opens in the Document window.
Figure 4 Templates tab in the New from Template dialog box
Edit a Template
You can edit a template at any time, even if you have created pages based on the template.
1. Select Window > Assets.
The Assets panel opens.
2. Click the Templates button on the left side of the panel (Figure 5).
A list of the templates for your site appears in the lower pane. The upper pane displays a preview of the selected template. (You may need to scroll the preview pane to see this.)
3. Select the template you wish to edit and do one of the following:
Double-click the name of the template.
Figure 5 Templates button in Assets panel
Figure 6 Edit button in Assets panel
Edit
Click the Edit button at the bottom of the panel (Figure 6).
76 How to Use Templates ©2005 Macromedia, Inc.
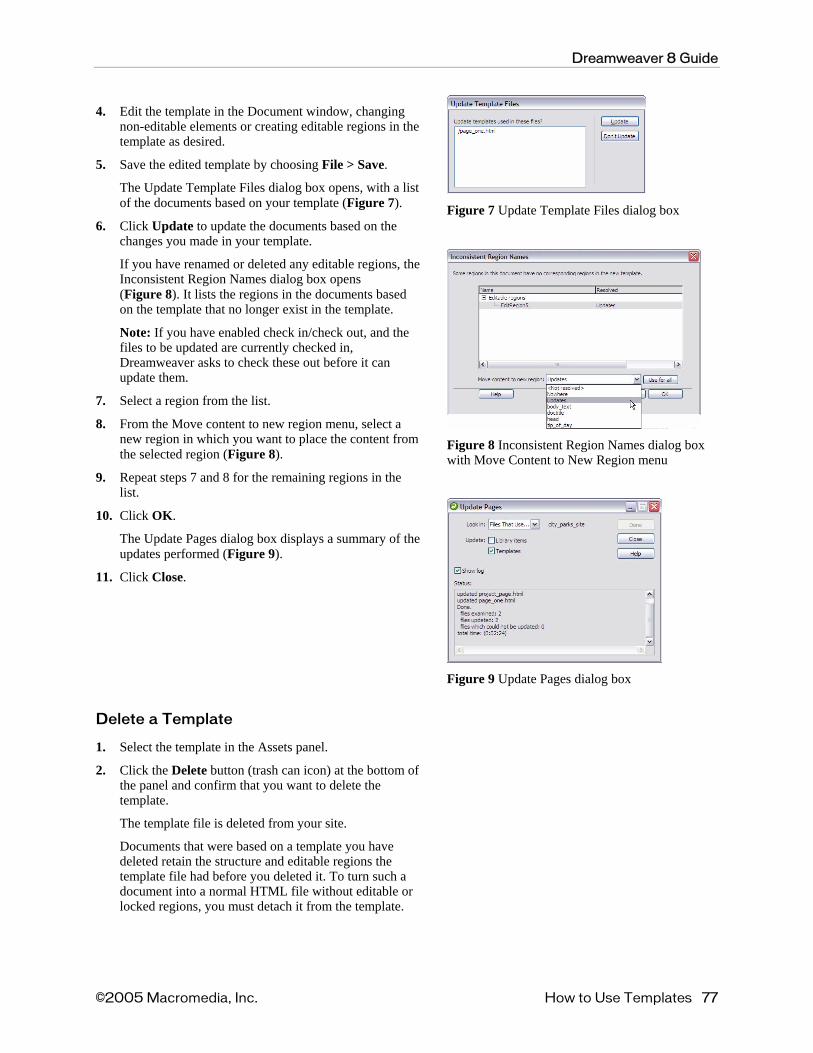
Dreamweaver 8 Guide
4. Edit the template in the Document window, changing non-editable elements or creating editable regions in the template as desired.
5. Save the edited template by choosing File > Save.
The Update Template Files dialog box opens, with a list of the documents based on your template (Figure 7).
6. Click Update to update the documents based on the changes you made in your template.
If you have renamed or deleted any editable regions, the Inconsistent Region Names dialog box opens (Figure 8). It lists the regions in the documents based on the template that no longer exist in the template.
Note: If you have enabled check in/check out, and the files to be updated are currently checked in, Dreamweaver asks to check these out before it can update them.
7. Select a region from the list.
8. From the Move content to new region menu, select a new region in which you want to place the content from the selected region (Figure 8).
9. Repeat steps 7 and 8 for the remaining regions in the list.
10. Click OK.
The Update Pages dialog box displays a summary of the updates performed (Figure 9).
11. Click Close.
Figure 7 Update Template Files dialog box
Figure 8 Inconsistent Region Names dialog box with Move Content to New Region menu
Figure 9 Update Pages dialog box
Delete a Template
1. Select the template in the Assets panel.
2. Click the Delete button (trash can icon) at the bottom of the panel and confirm that you want to delete the template.
The template file is deleted from your site.
Documents that were based on a template you have deleted retain the structure and editable regions the template file had before you deleted it. To turn such a document into a normal HTML file without editable or locked regions, you must detach it from the template.
©2005 Macromedia, Inc. How to Use Templates 77
Dreamweaver 8 Guide
Detach from a Template
To remove the template structure and constraints from a document based on a template, you can detach the document from the template. When a document is detached from its template, you can edit any element, including the regions that were previously locked.
1. To detach a document from a template, open the document.
2. Select Modify > Templates > Detach from Template.
78 How to Use Templates ©2005 Macromedia, Inc.
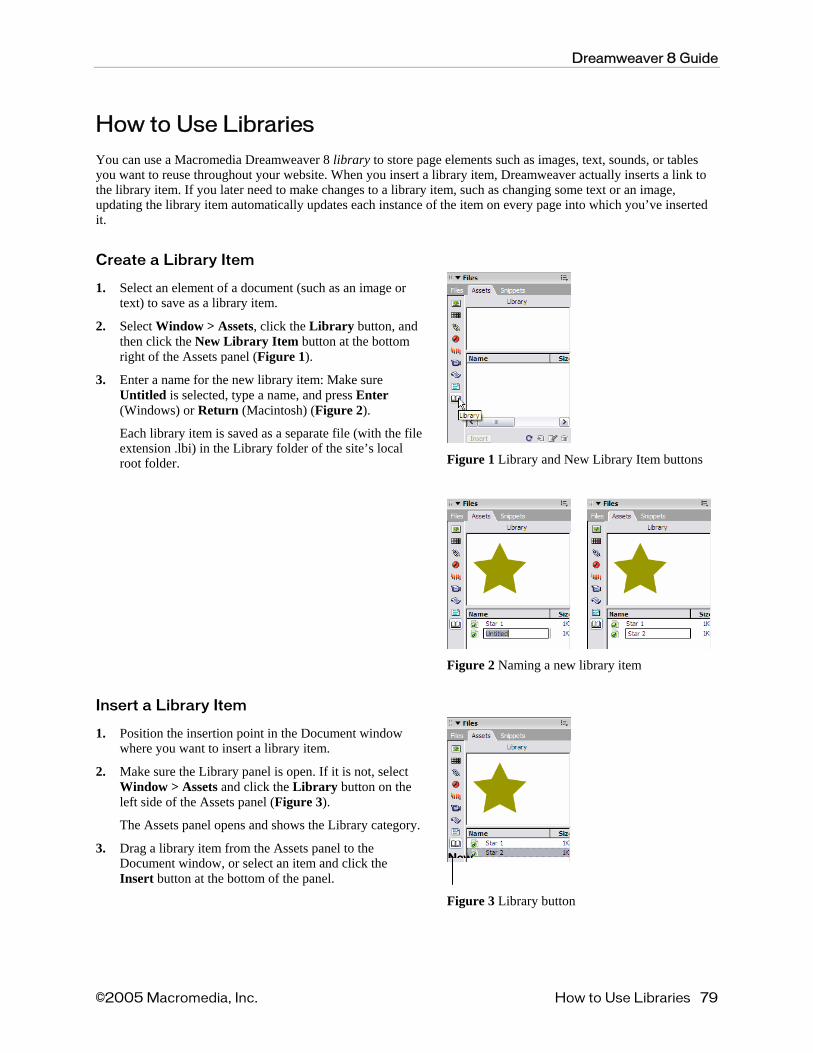
Dreamweaver 8 Guide
How to Use Libraries
You can use a Macromedia Dreamweaver 8 library to store page elements such as images, text, sounds, or tables you want to reuse throughout your website. When you insert a library item, Dreamweaver actually inserts a link to the library item. If you later need to make changes to a library item, such as changing some text or an image, updating the library item automatically updates each instance of the item on every page into which you’ve inserted it.
Create a Library Item
1. Select an element of a document (such as an image or text) to save as a library item.
2. Select Window > Assets, click the Library button, and then click the New Library Item button at the bottom right of the Assets panel (Figure 1).
3. Enter a name for the new library item: Make sure Untitled is selected, type a name, and press Enter (Windows) or Return (Macintosh) (Figure 2).
Each library item is saved as a separate file (with the file extension .lbi) in the Library folder of the site’s local root folder.
Figure 1 Library and New Library Item buttons
Figure 2 Naming a new library item
Insert a Library Item
1. Position the insertion point in the Document window where you want to insert a library item.
2. Make sure the Library panel is open. If it is not, select Window > Assets and click the Library button on the left side of the Assets panel (Figure 3).
The Assets panel opens and shows the Library category.
3. Drag a library item from the Assets panel to the Document window, or select an item and click the Insert button at the bottom of the panel.
Figure 3 Library button
NewNew
©2005 Macromedia, Inc. How to Use Libraries 79
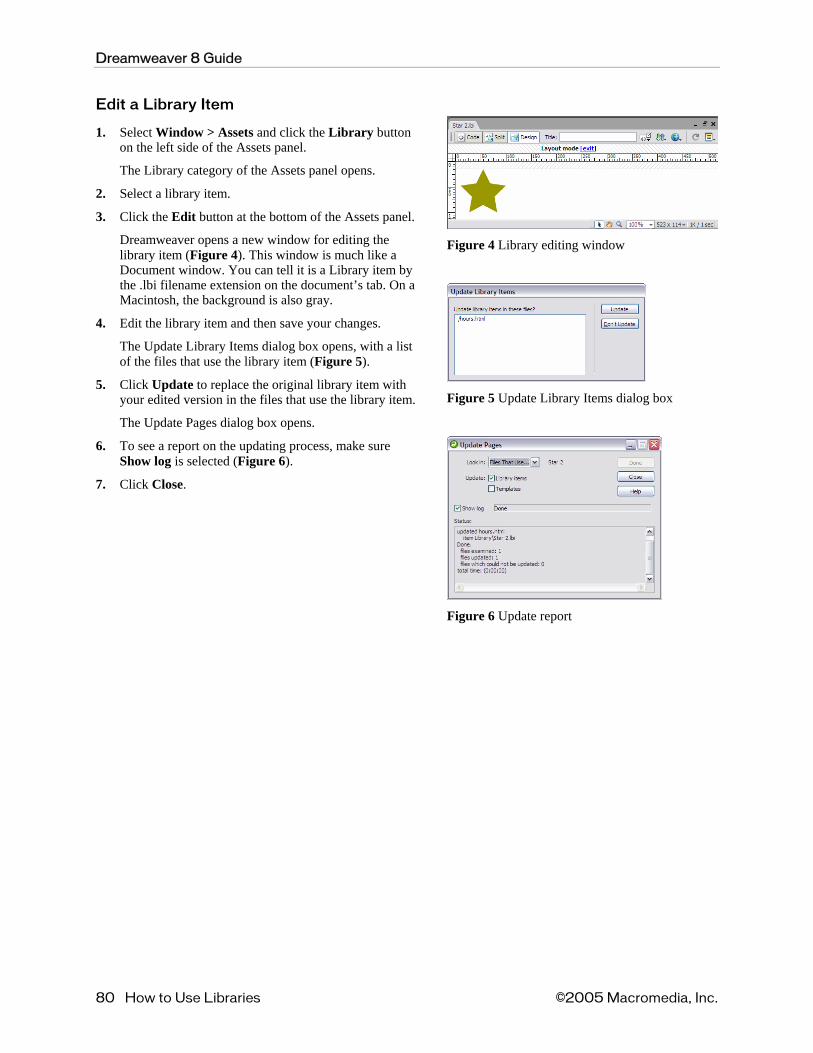
Dreamweaver 8 Guide
Edit a Library Item
1. Select Window > Assets and click the Library button on the left side of the Assets panel.
The Library category of the Assets panel opens.
2. Select a library item.
3. Click the Edit button at the bottom of the Assets panel.
Dreamweaver opens a new window for editing the library item (Figure 4). This window is much like a Document window. You can tell it is a Library item by the .lbi filename extension on the document’s tab. On a Macintosh, the background is also gray.
4. Edit the library item and then save your changes.
The Update Library Items dialog box opens, with a list of the files that use the library item (Figure 5).
5. Click Update to replace the original library item with your edited version in the files that use the library item.
The Update Pages dialog box opens.
6. To see a report on the updating process, make sure Show log is selected (Figure 6).
7. Click Close.
Figure 4 Library editing window
Figure 5 Update Library Items dialog box
Figure 6 Update report
80 How to Use Libraries ©2005 Macromedia, Inc.

Dreamweaver 8 Guide
Update All Documents to Use Current Library Items
If you do not choose to update documents that use library items as you edit individual library items, you can later update all pages in the site with the current version of all library items.
1. Make sure the library item with which you want to update documents is open.
2. Select Modify > Library > Update Pages.
The Update Pages dialog box opens (Figure 7).
3. From the Look In pop-up menu, select Entire Site, and then select the site name from the adjacent pop-up menu.
4. Make sure Library Items is selected in the Update section.
5. Click Start.
Dreamweaver updates the documents and provides a report on the updating process (Figure 8). If you have updated documents at the time you edited library items, this report confirms that no additional updating was required.
6. Click Close.
Figure 7 Update Pages dialog box
Figure 8 Update Pages report
©2005 Macromedia, Inc. How to Use Libraries 81

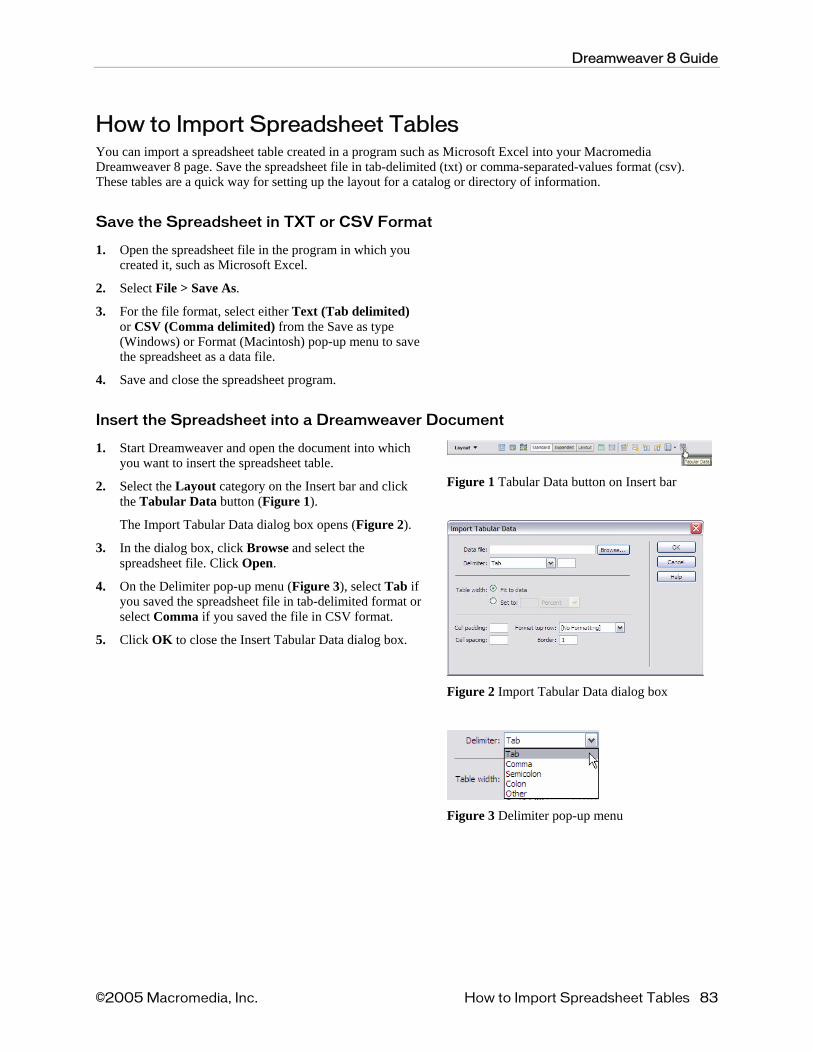
Dreamweaver 8 Guide
How to Import Spreadsheet Tables You can import a spreadsheet table created in a program such as Microsoft Excel into your Macromedia Dreamweaver 8 page. Save the spreadsheet file in tab-delimited (txt) or comma-separated-values format (csv). These tables are a quick way for setting up the layout for a catalog or directory of information.
Save the Spreadsheet in TXT or CSV Format
1. Open the spreadsheet file in the program in which you created it, such as Microsoft Excel.
2. Select File > Save As.
3. For the file format, select either Text (Tab delimited) or CSV (Comma delimited) from the Save as type (Windows) or Format (Macintosh) pop-up menu to save the spreadsheet as a data file.
4. Save and close the spreadsheet program.
Insert the Spreadsheet into a Dreamweaver Document
1. Start Dreamweaver and open the document into which you want to insert the spreadsheet table.
2. Select the Layout category on the Insert bar and click the Tabular Data button (Figure 1).
The Import Tabular Data dialog box opens (Figure 2).
3. In the dialog box, click Browse and select the spreadsheet file. Click Open.
4. On the Delimiter pop-up menu (Figure 3), select Tab if you saved the spreadsheet file in tab-delimited format or select Comma if you saved the file in CSV format.
5. Click OK to close the Insert Tabular Data dialog box.
Figure 1 Tabular Data button on Insert bar
Figure 2 Import Tabular Data dialog box
Figure 3 Delimiter pop-up menu
©2005 Macromedia, Inc. How to Import Spreadsheet Tables 83
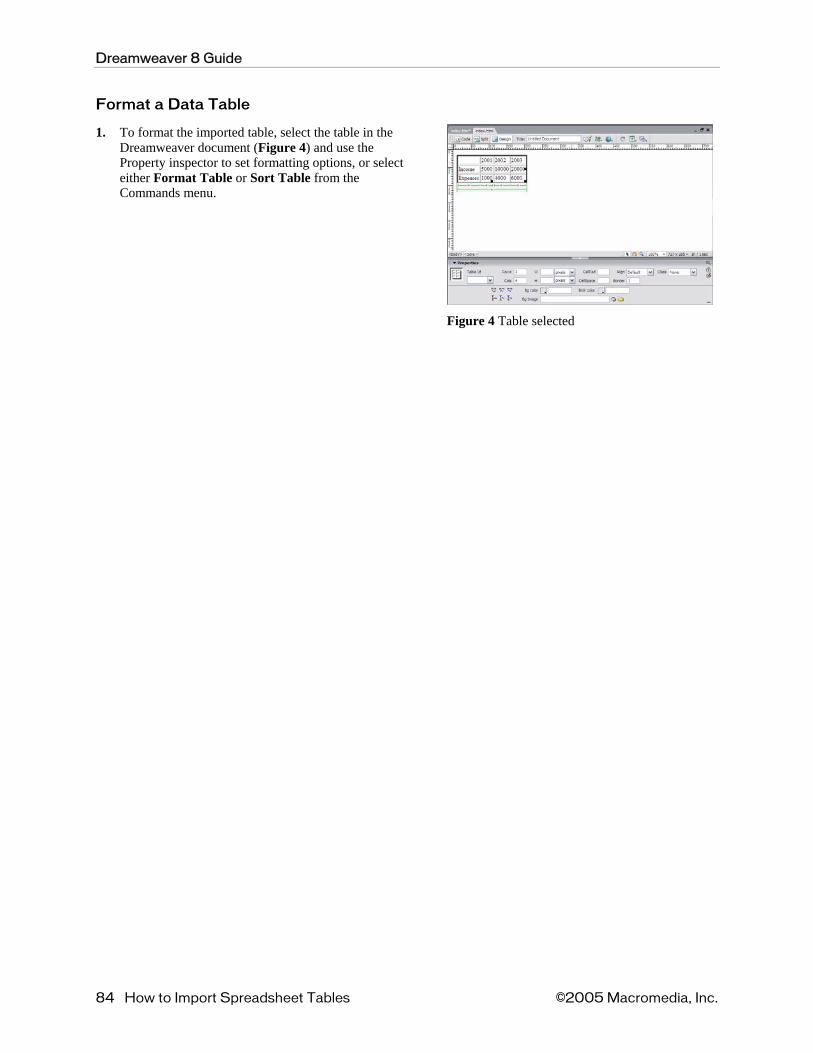
Dreamweaver 8 Guide
Format a Data Table
1. To format the imported table, select the table in the Dreamweaver document (Figure 4) and use the Property inspector to set formatting options, or select either Format Table or Sort Table from the Commands menu.
Figure 4 Table selected
84 How to Import Spreadsheet Tables ©2005 Macromedia, Inc.
Top Related