User Manual, Ascom d41 DECT Handset, TD 92582GB · TD 92582GB 2009-03-19/ Ver. B User Manual Ascom...
48
TD 92582GB 2009-03-19/ Ver. B User Manual Ascom d41 DECT Handset
Transcript of User Manual, Ascom d41 DECT Handset, TD 92582GB · TD 92582GB 2009-03-19/ Ver. B User Manual Ascom...
TD 92582GB
2009-03-19/ Ver. B
User ManualAscom d41 DECT Handset
Dit document wordt u aangeboden door TelecomHunter. Dé zakelijke Telecom webshop.T 088 7463 444 | @ [email protected] | www.TelecomHunter.nl
TD 92582GBUser ManualAscom d41 DECT Handset
Contents
1 Introduction............................................................................................................. 1
1.1 Abbreviations and Glossary ................................................................................ 1
1.2 Functions and Accessories .................................................................................. 1
2 Safety Instructions .................................................................................................. 3
2.1 Precautions ........................................................................................................ 3
2.1.1 Frequency Range ....................................................................................... 4
2.1.2 Warranty Notification ................................................................................. 4
2.2 Regulatory Compliance Statements (EU/EFTA only) ............................................. 4
2.3 Regulatory Compliance Statements (USA and Canada only) ............................... 4
2.4 Environmental Requirements .............................................................................. 5
3 Descriptions ............................................................................................................. 7
3.1 The d41 DECT Handset ...................................................................................... 8
3.2 Chargers ............................................................................................................ 8
3.2.1 Desktop Charger ........................................................................................ 8
3.2.2 Rack Charger ............................................................................................. 9
3.3 Icons and Text in the Display .............................................................................. 9
3.4 Keys and Buttons ............................................................................................. 12
3.4.1 Off-hook Key ........................................................................................... 12
3.4.2 On-hook, and On/Off Key ........................................................................ 12
3.4.3 Navigation Key ......................................................................................... 12
3.4.4 Sound off Key ......................................................................................... 12
3.4.5 Key Lock, and Upper/Lower Case Key ...................................................... 12
3.4.6 Soft Keys ................................................................................................. 12
3.4.7 Volume Button ........................................................................................ 12
3.4.8 Alphanumeric Keys .................................................................................. 13
3.5 Accessories ...................................................................................................... 14
3.5.1 Belt Clips ................................................................................................. 14
3.5.2 Security Cord ........................................................................................... 14
3.5.3 Leather Casing ......................................................................................... 14
3.5.4 Headset ................................................................................................... 14
4 Menu Tree.............................................................................................................. 15
4.1 Calls ............................................................................................................... 15
4.2 Contacts ......................................................................................................... 16
4.3 Settings .......................................................................................................... 17
4.4 In Call .............................................................................................................. 18
5 Basic Operation ..................................................................................................... 19
5.1 Switch the handset On/Off ............................................................................... 19
2009-03-19/ Ver. BDit document wordt u aangeboden door TelecomHunter. Dé zakelijke Telecom webshop.T 088 7463 444 | @ [email protected] | www.TelecomHunter.nl
TD 92582GBUser ManualAscom d41 DECT Handset
5.1.1 Turn the Audible Signal On/Off ................................................................ 19
5.2 Lock/Unlock the Keypad ................................................................................... 19
5.3 Lock/Unlock the Handset ................................................................................. 19
6 Calling .................................................................................................................... 20
6.1 Open the Call List ............................................................................................ 20
6.2 Incoming Call ................................................................................................... 20
6.2.1 Answer a Call .......................................................................................... 20
6.2.2 End a Call ................................................................................................ 20
6.3 Outgoing Call .................................................................................................. 20
6.3.1 Pre-Dial .................................................................................................... 20
6.3.2 Dial a Number from the Call list ............................................................... 20
6.3.3 Dial a Number from the Local Phonebook ................................................ 21
6.3.4 Dial a Name from the Central Phonebook ................................................ 21
6.3.5 Dial a Number from the Company Phonebook1 ....................................... 21
6.4 During a Call .................................................................................................... 22
6.4.1 Adjust the Volume during a Call ............................................................... 22
6.4.2 Open Contacts during the Call ................................................................. 22
6.4.3 Turn the Microphone on/off during a Call ................................................ 22
6.4.4 Start a New Call during Conversation ....................................................... 22
6.4.5 Switch between Calls ............................................................................... 22
6.4.6 End a Call during Conversation ................................................................ 23
6.4.7 Transfer a Call .......................................................................................... 23
6.4.8 Transfer to New Call ................................................................................ 23
6.4.9 Conference Call ....................................................................................... 23
6.4.10 Call Back ............................................................................................... 23
6.4.11 Call Waiting ........................................................................................... 24
6.4.12 DTMF .................................................................................................... 24
6.5 Loudspeaking Function .................................................................................... 24
6.6 Call Diversion ................................................................................................... 24
7 Messaging.............................................................................................................. 25
7.1 Mini Messaging ............................................................................................... 25
7.2 Voice Mail ........................................................................................................ 25
7.2.1 Receive a Voice Mail ................................................................................. 25
7.2.2 Check the Voice Mail inbox ...................................................................... 25
8 Contacts ................................................................................................................. 26
9 Menu Operation.................................................................................................... 27
9.1 Calls ................................................................................................................ 27
9.1.1 Call List .................................................................................................... 27
9.1.2 Missed Calls ............................................................................................. 28
9.1.3 Call Time ................................................................................................. 28
2009-03-19/ Ver. BDit document wordt u aangeboden door TelecomHunter. Dé zakelijke Telecom webshop.T 088 7463 444 | @ [email protected] | www.TelecomHunter.nl
TD 92582GBUser ManualAscom d41 DECT Handset
9.1.4 Call Services ............................................................................................. 28
9.2 Contacts .......................................................................................................... 29
9.2.1 Call Contact ............................................................................................. 29
9.2.2 Edit Contact ............................................................................................. 30
9.2.3 Delete Contact ......................................................................................... 30
9.2.4 Central Phonebook .................................................................................. 30
9.3 Settings ........................................................................................................... 31
9.3.1 Sound and Alert Settings ......................................................................... 31
9.3.2 Select Headset Profile ............................................................................... 32
9.3.3 Display Settings ........................................................................................ 32
9.3.4 Time & Date Settings ............................................................................... 32
9.3.5 Phone Lock settings ................................................................................. 33
9.3.6 Answering ............................................................................................... 35
9.3.7 Change the Menu Language .................................................................... 35
9.3.8 Change Owner ID .................................................................................... 35
9.3.9 In Charger ............................................................................................... 36
9.3.10 System ................................................................................................... 36
10 Advanced Functions............................................................................................ 38
10.1 Admin Menu ................................................................................................. 38
10.2 Clear Lists in Charger ..................................................................................... 38
11 System Handling ................................................................................................. 39
11.1 Software Upgrade and Additional Features .................................................... 39
12 Troubleshooting .................................................................................................. 40
13 Operation Notice................................................................................................. 41
13.1 Accessibility and Voice Quality ........................................................................ 41
14 Maintenance........................................................................................................ 42
14.1 Charge the Battery ......................................................................................... 42
14.2 Replace the Battery ........................................................................................ 42
14.3 Attach the Hinge-type Clip ............................................................................. 43
14.4 Attach the Swivel-type Clip ............................................................................ 43
15 Document History ............................................................................................... 44
2009-03-19/ Ver. BDit document wordt u aangeboden door TelecomHunter. Dé zakelijke Telecom webshop.T 088 7463 444 | @ [email protected] | www.TelecomHunter.nl
TD 92582GBUser ManualAscom d41 DECT Handset
1 Introduction
This document describes features and settings available for the d41 handset. The handset is designed to be used in office environment and has high quality voice.
It is suitable for users dependent of being reachable and/or having a need for mobile voice and messaging features, which makes it ideal for applications where the user needs one way messaging.
Read the 2 Safety Instructions on page 3 before using the handset.
For software download and parameter set up, read the Installation and Operational Manual Portable Device Manager (PDM), Windows version, TD 92325GB, and the Configuration Manual, Ascom d41 DECT Handset, TD 92641GB.
1.1 Abbreviations and Glossary
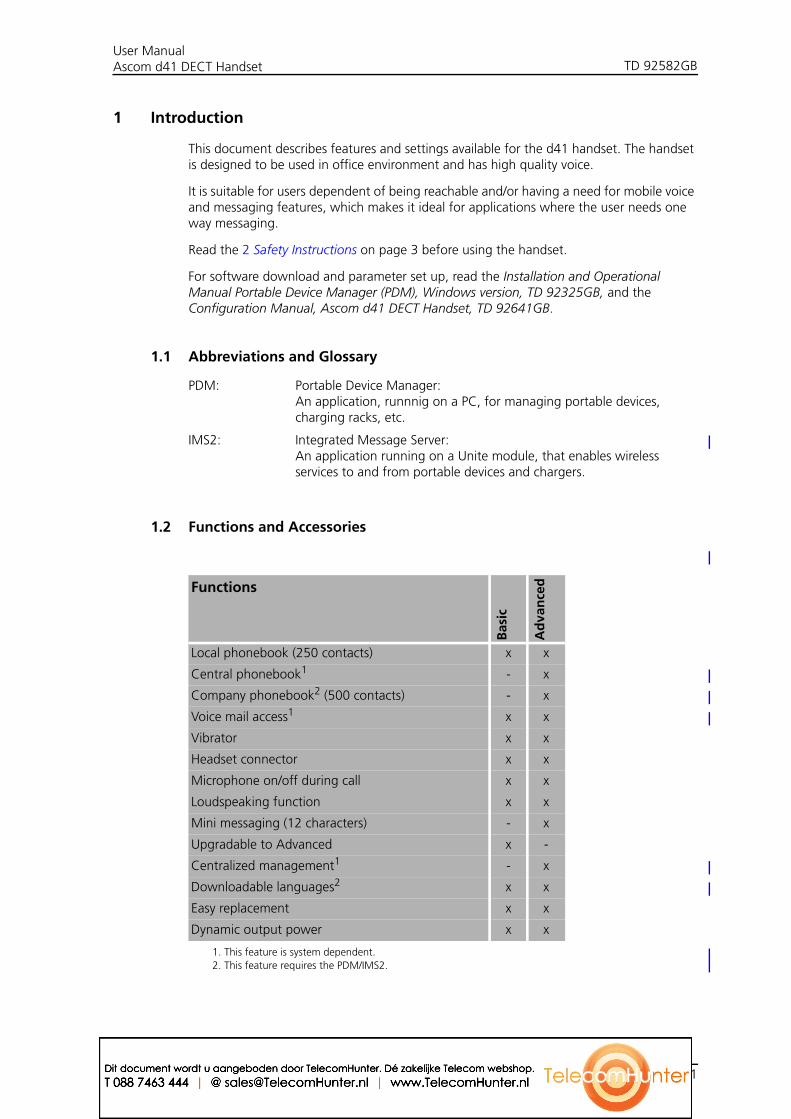
1.2 Functions and Accessories
PDM: Portable Device Manager:An application, runnnig on a PC, for managing portable devices, charging racks, etc.
IMS2: Integrated Message Server:An application running on a Unite module, that enables wireless services to and from portable devices and chargers.
Functions
Bas
ic
Ad
van
ced
Local phonebook (250 contacts) x x
Central phonebook1
1. This feature is system dependent.
- x
Company phonebook2 (500 contacts)
2. This feature requires the PDM/IMS2.
- x
Voice mail access1 x x
Vibrator x x
Headset connector x x
Microphone on/off during call x x
Loudspeaking function x x
Mini messaging (12 characters) - x
Upgradable to Advanced x -
Centralized management1 - x
Downloadable languages2 x x
Easy replacement x x
Dynamic output power x x
2009-03-19/ Ver. B 1Dit document wordt u aangeboden door TelecomHunter. Dé zakelijke Telecom webshop.T 088 7463 444 | @ [email protected] | www.TelecomHunter.nl
TD 92582GBUser ManualAscom d41 DECT Handset
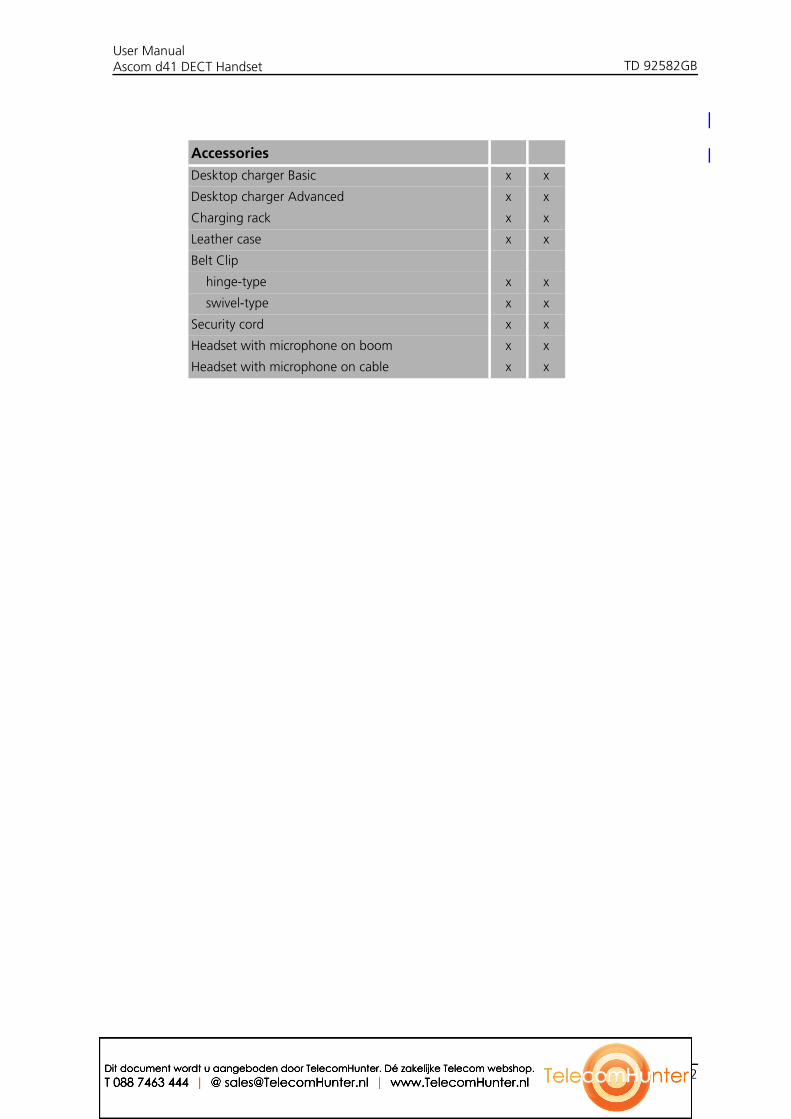
Accessories
Desktop charger Basic x x
Desktop charger Advanced x x
Charging rack x x
Leather case x x
Belt Clip
hinge-type x x
swivel-type x x
Security cord x x
Headset with microphone on boom x x
Headset with microphone on cable x x
2009-03-19/ Ver. B 2Dit document wordt u aangeboden door TelecomHunter. Dé zakelijke Telecom webshop.T 088 7463 444 | @ [email protected] | www.TelecomHunter.nl
TD 92582GBUser ManualAscom d41 DECT Handset
2 Safety Instructions
Read this chapter before using the d41 handset.
For safe and efficient operation of the handset, observe the guidelines given in this manual and all necessary safety precautions when using the handset. Follow the operating instructions and adhere to all warnings and safety precautions located on the product, the Quick Reference Guide and this User Manual.
This product shall only be used with the following batteries:
• Art.No.: 660177 Battery
Single chargers shall only be connected with power adapters supplied by the manufacturer.
Available power adapters (Suppliers Designation) are:
• Art.No.DC3: 130160 Power supply unit AC/5V DC/0.65A - Europe
• Art.No.DC3: 130166 Power supply unit AC/5V DC/1A - USA, Canada, AUS, and UK
• Art.No.DC4: 130161 Power supply unit AC/5V DC/2A
2.1 Precautions
• Save this manual. It includes important safety information and operating instructions. Save all instructions for future reference.
• Connect AC (power supply) to the desktop battery charger only to designated power sources as marked on the product.
Danger: Never alter the AC cord or plug. If the plug will not fit into the outlet, have a proper outlet installed by a qualified electrician. Improper connection increases the risk of electric shock.
• Position the electrical cord to the AC power supply where it is least likely to be subjected to damage or stress.
• Remove the electrical cord from an outlet by pulling gently on the AC adapter, not by pulling the cord.
• Remove the battery before cleaning the handset to reduce risk of electric shock.
• Unplug the battery charger from a power source (or remove the handset from the charger) before cleaning the handset to reduce risk of electric shock.
• Do not use auxiliary equipment with the handset which is not exclusively recommended by the manufacturer, see 3.5 Accessories on page 14. The use of any auxiliary equipment not recommended by the manufacturer may result in fire, electric shock, or injury, and will void the warranty.
• Do not expose the handset to open flame.
• Do not expose the handset and the charger to direct sunlight for long periods. Keep the handset and charger away from excessive heat and moisture.
• Do not allow heavy objects to fall on the handset.
• Do not allow children to play with the product packaging material. Product packaging material is often small and may present a choking hazard.
• Do not allow children to play with the handset. It is not a toy. Children could hurt themselves or others. Children could also damage the handset.
• Do not expose to prolong light
2009-03-19/ Ver. B 3Dit document wordt u aangeboden door TelecomHunter. Dé zakelijke Telecom webshop.T 088 7463 444 | @ [email protected] | www.TelecomHunter.nl
TD 92582GBUser ManualAscom d41 DECT Handset
2.1.1 Frequency Range
The handset is a radio transmitter and receiver. When it is on, it receives and sends out radio frequency (RF) energy. The handset operates on different frequency ranges depending on market and employs commonly used modulation techniques:
2.1.2 Warranty Notification
Do not disassemble the handset. Disassembling the handset voids the warranty. The handset consists of no consumer serviceable components. Service should be performed by Authorized Service centre only.
2.2 Regulatory Compliance Statements (EU/EFTA only)
This equipment is intended to be used in the whole EU & EFTA.
This equipment is in compliance with the essential requirements and other relevant provisions of R&TTE Directive 1999/5/EC. The Declaration of Conformity may be consulted at:
https://www.ascom-ws.com/doc/
The handset is marked with the label
2.3 Regulatory Compliance Statements (USA and Canada only)
FCC compliance statements
This equipment has been tested and found to comply with the limits for a Class B digital device, pursuant to part 15 of the FCC Rules. These limits are designed to provide reasonable protection against harmful interference in a residential installation. This equipment generates, uses and can radiate radio frequency energy and, if not installed and used in accordance with the instructions, may cause harmful interference to radio communications. However, there is no guarantee that interference will not occur in a particular installation. If this equipment does cause harmful interference to radio or television reception, which can be determined by turning the equipment off and on, the user is encouraged to try to correct the interference by one or more of the following measures:
EU 1880-1900 MHz
USA 1920-1930 MHz
LA 1910-1930 MHz
BR 1910-1920 MHz
-- 1900-1920 MHz
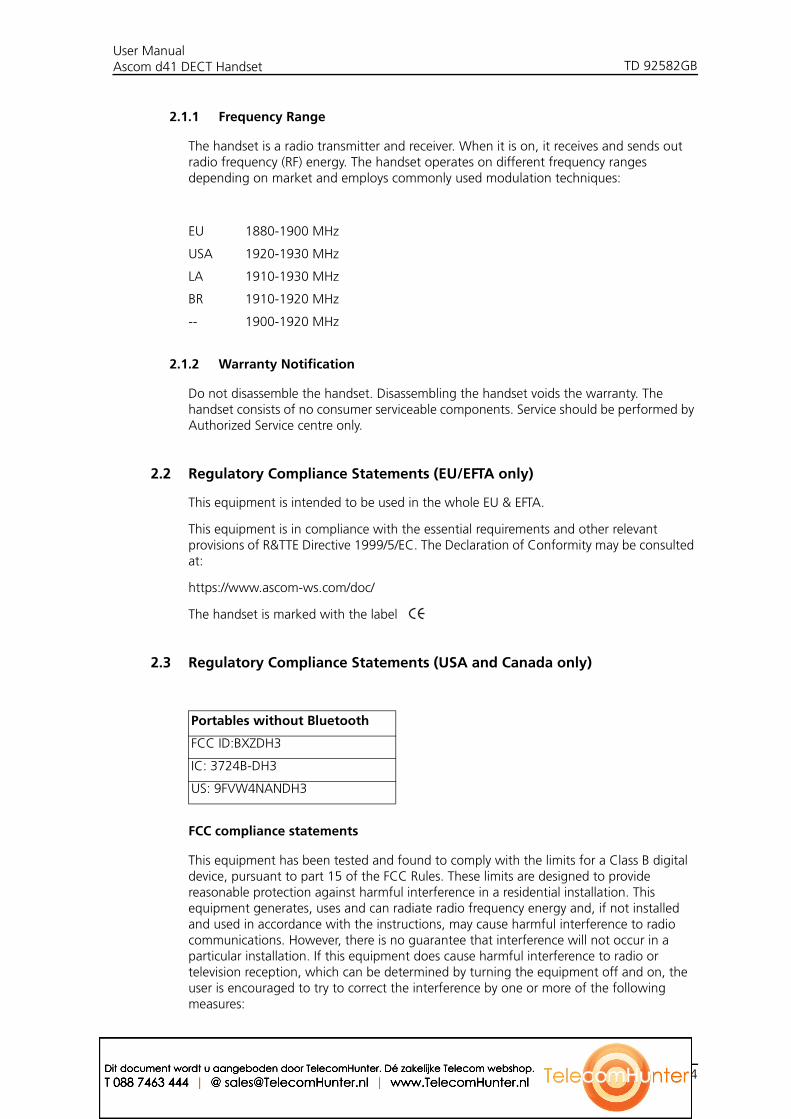
Portables without Bluetooth
FCC ID:BXZDH3
IC: 3724B-DH3
US: 9FVW4NANDH3
2009-03-19/ Ver. B 4Dit document wordt u aangeboden door TelecomHunter. Dé zakelijke Telecom webshop.T 088 7463 444 | @ [email protected] | www.TelecomHunter.nl
TD 92582GBUser ManualAscom d41 DECT Handset
• Reorient or relocate the receiving antenna.
• Increase the separation between the equipment and receiver.
• Connect the equipment into an outlet on a circuit different from that to which the receiver is connected.
• Consult the dealer or an experienced radio/TV technician for help.
Privacy of communications may not be ensured when using this handset.
Exposure to Radio Frequency Signals
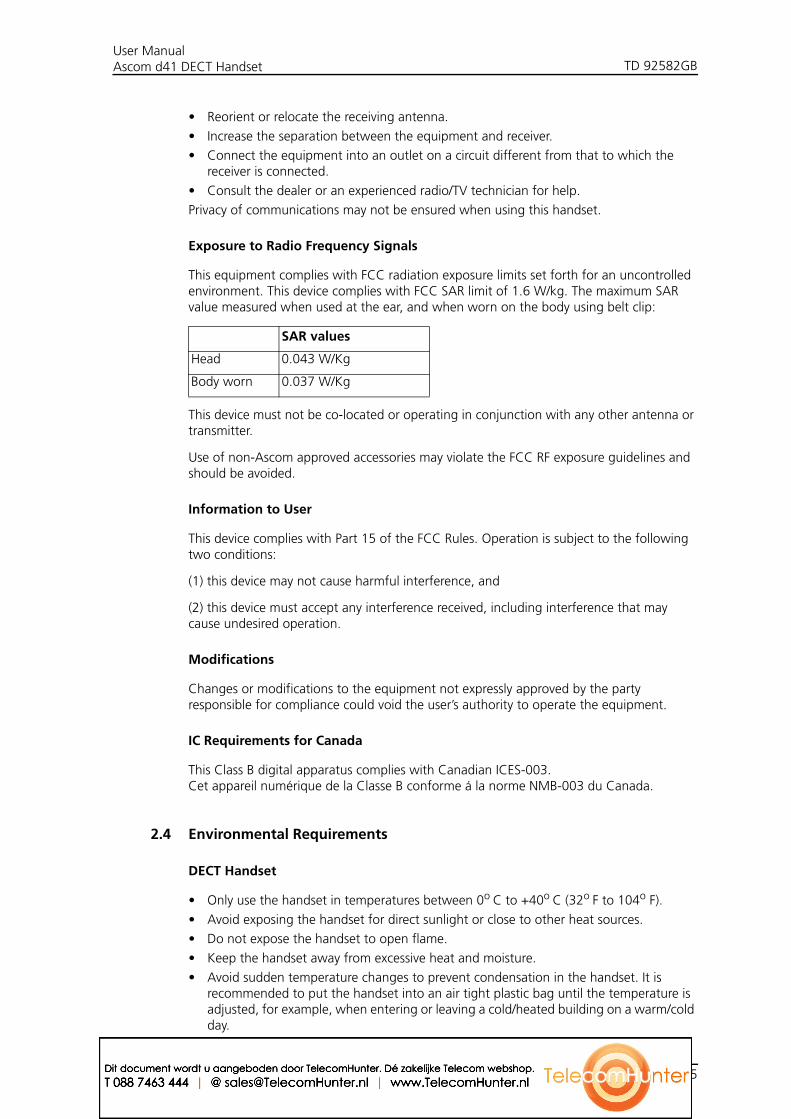
This equipment complies with FCC radiation exposure limits set forth for an uncontrolled environment. This device complies with FCC SAR limit of 1.6 W/kg. The maximum SAR value measured when used at the ear, and when worn on the body using belt clip:
This device must not be co-located or operating in conjunction with any other antenna or transmitter.
Use of non-Ascom approved accessories may violate the FCC RF exposure guidelines and should be avoided.
Information to User
This device complies with Part 15 of the FCC Rules. Operation is subject to the following two conditions:
(1) this device may not cause harmful interference, and
(2) this device must accept any interference received, including interference that may cause undesired operation.
Modifications
Changes or modifications to the equipment not expressly approved by the party responsible for compliance could void the user’s authority to operate the equipment.
IC Requirements for Canada
This Class B digital apparatus complies with Canadian ICES-003.Cet appareil numérique de la Classe B conforme á la norme NMB-003 du Canada.
2.4 Environmental Requirements
DECT Handset
• Only use the handset in temperatures between 0o C to +40o C (32o F to 104o F).
• Avoid exposing the handset for direct sunlight or close to other heat sources.
• Do not expose the handset to open flame.
• Keep the handset away from excessive heat and moisture.
• Avoid sudden temperature changes to prevent condensation in the handset. It is recommended to put the handset into an air tight plastic bag until the temperature is adjusted, for example, when entering or leaving a cold/heated building on a warm/cold day.
SAR values
Head 0.043 W/Kg
Body worn 0.037 W/Kg
2009-03-19/ Ver. B 5Dit document wordt u aangeboden door TelecomHunter. Dé zakelijke Telecom webshop.T 088 7463 444 | @ [email protected] | www.TelecomHunter.nl
TD 92582GBUser ManualAscom d41 DECT Handset
• Protect your handset from aggressive liquids and vapours.
• If the handset has been exposed for water or condense, remove the battery immediately and let it dry completely before re-inserting the battery.
• Keep the handset away from strong electromagnetic fields.
• Do not place a cold handset in a charger.
Battery
• Do not immerse the battery into water. This could short-circuit and damage the battery.
• Do not expose a battery to an open flame. This could cause the battery to explode.
• Do not allow the metal contacts on the battery to touch another metal object. This could short-circuit and damage the battery.
• Do not leave a battery where it could be subjected to extremely high temperatures, such as inside a car on a hot day.
• Use the Desktop Charger or the wall mounted Charging Rack for charging. Charge the battery for at least one hour the first time you use the battery.
• Do not charge a battery when the ambient room temperature is above 40º C or below +5º C (above 104º F or below 41 ºF).
• Do not attempt to take a battery apart.
• Do not disconnect the battery unless it needs to be replaced.
• Do power the handset off before removing the battery.
Battery Disposal
Defective batteries must be returned to a collection point for chemical waste disposal.
Chemical Resistance
The alpha and numeric characters printed on the exterior of the handset have been tested and found resistant to chipping, fading or wearing off when the handset is treated with common cleaners and disinfectants or perspiration. The following chemicals have shown no harmful effect:
• 3% Hydrochloric Acid
• M-alcohol (70% Methylated Ethanol)
• 60% Chlorhexidin 0.5mg/ml
Acetone can be damaging to the plastic casing of the handset and should not be used.
2009-03-19/ Ver. B 6Dit document wordt u aangeboden door TelecomHunter. Dé zakelijke Telecom webshop.T 088 7463 444 | @ [email protected] | www.TelecomHunter.nl
TD 92582GBUser ManualAscom d41 DECT Handset
3 Descriptions
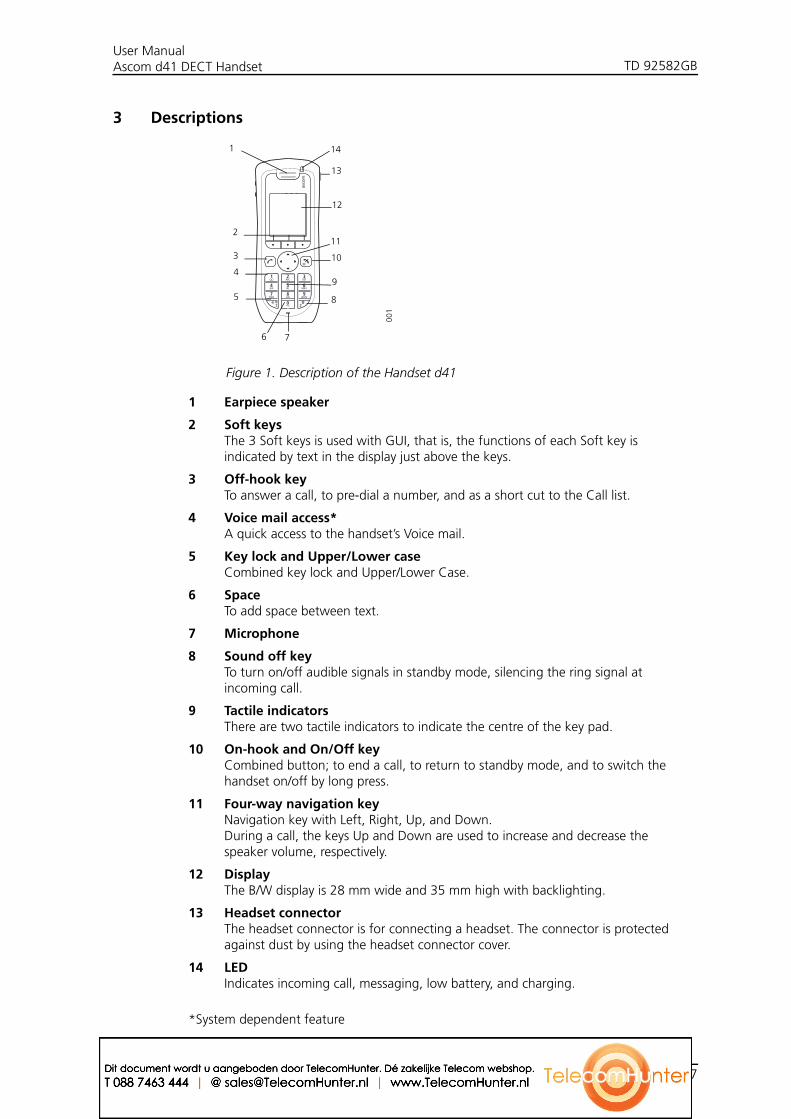
Figure 1. Description of the Handset d41
*System dependent feature
1 Earpiece speaker
2 Soft keysThe 3 Soft keys is used with GUI, that is, the functions of each Soft key is indicated by text in the display just above the keys.
3 Off-hook keyTo answer a call, to pre-dial a number, and as a short cut to the Call list.
4 Voice mail access*A quick access to the handset’s Voice mail.
5 Key lock and Upper/Lower caseCombined key lock and Upper/Lower Case.
6 SpaceTo add space between text.
7 Microphone
8 Sound off keyTo turn on/off audible signals in standby mode, silencing the ring signal at incoming call.
9 Tactile indicatorsThere are two tactile indicators to indicate the centre of the key pad.
10 On-hook and On/Off keyCombined button; to end a call, to return to standby mode, and to switch the handset on/off by long press.
11 Four-way navigation keyNavigation key with Left, Right, Up, and Down.During a call, the keys Up and Down are used to increase and decrease the speaker volume, respectively.
12 DisplayThe B/W display is 28 mm wide and 35 mm high with backlighting.
13 Headset connectorThe headset connector is for connecting a headset. The connector is protected against dust by using the headset connector cover.
14 LEDIndicates incoming call, messaging, low battery, and charging.
001
1
2
3
4
5
6 7
14
13
12
11
10
9
8
2009-03-19/ Ver. B 7Dit document wordt u aangeboden door TelecomHunter. Dé zakelijke Telecom webshop.T 088 7463 444 | @ [email protected] | www.TelecomHunter.nl
TD 92582GBUser ManualAscom d41 DECT Handset
3.1 The d41 DECT Handset
IMPORTANT: The handset may retain small magnetic objects around the mouthcap or earcap region.
Case
The plastic cover parts are made of durable PC/ABS material.
Antenna
The antenna is integrated inside the handset.
Loudspeaker
The handset has a separate loudspeaker for the loudspeaking function. It is placed on the back side of the handset.
Microphone
The microphone is placed on the front bottom side of the handset.
Clip
There are two different belt clip options to the handset; a hinge-type clip (standard) or a swivel-type clip. See 14.3 Attach the Hinge-type Clip on page 43, or 14.4 Attach the Swivel-type Clip on page 43. Use the clip to attach the handset to a belt or similar. It is also possible to use the handset without any clip on.
Battery
The battery is a rechargeable Li-Lon battery, placed under a battery cover. See 14.2 Replace the Battery on page 42.
The battery is fully charged within four hours. See 14.1 Charge the Battery on page 42.
3.2 Chargers
3.2.1 Desktop Charger
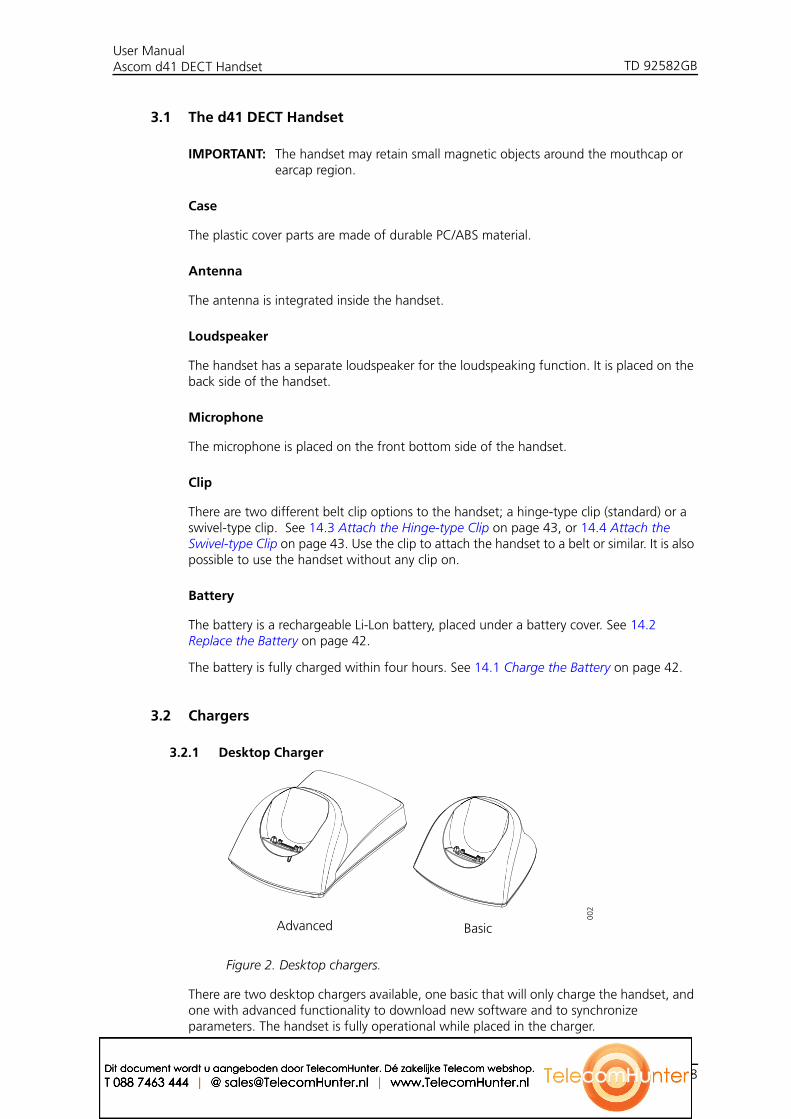
Figure 2. Desktop chargers.
There are two desktop chargers available, one basic that will only charge the handset, and one with advanced functionality to download new software and to synchronize parameters. The handset is fully operational while placed in the charger.
002
Advanced Basic
2009-03-19/ Ver. B 8Dit document wordt u aangeboden door TelecomHunter. Dé zakelijke Telecom webshop.T 088 7463 444 | @ [email protected] | www.TelecomHunter.nl
TD 92582GBUser ManualAscom d41 DECT Handset
The charger is delivered with a plug-in power supply and is connected into an ordinary wall socket. For more information, see Installation and Operation Manual, DC4 Desktop Charger, TD92481GB.
Note: Only use the charger within the temperature range of +5° C – +40° C.
IMPORTANT: Only use the provided power supply, see Installation and Operation Manual, DC4 Desktop Charger, TD92481GB.
3.2.2 Rack Charger
The Charging Rack is used for charging several handsets, to synchronize parameters, and for software download.
See Installation and Operation Manual, CR3 Charging Rack, TD92480GB.
3.3 Icons and Text in the Display
All functions and settings available to the user are shown as icons and text in the display. The icons and text in the display indicate functions and settings to which you have access. The display normally displays date and time, the Owner ID and handset number. The Owner ID can manually be set by the user.
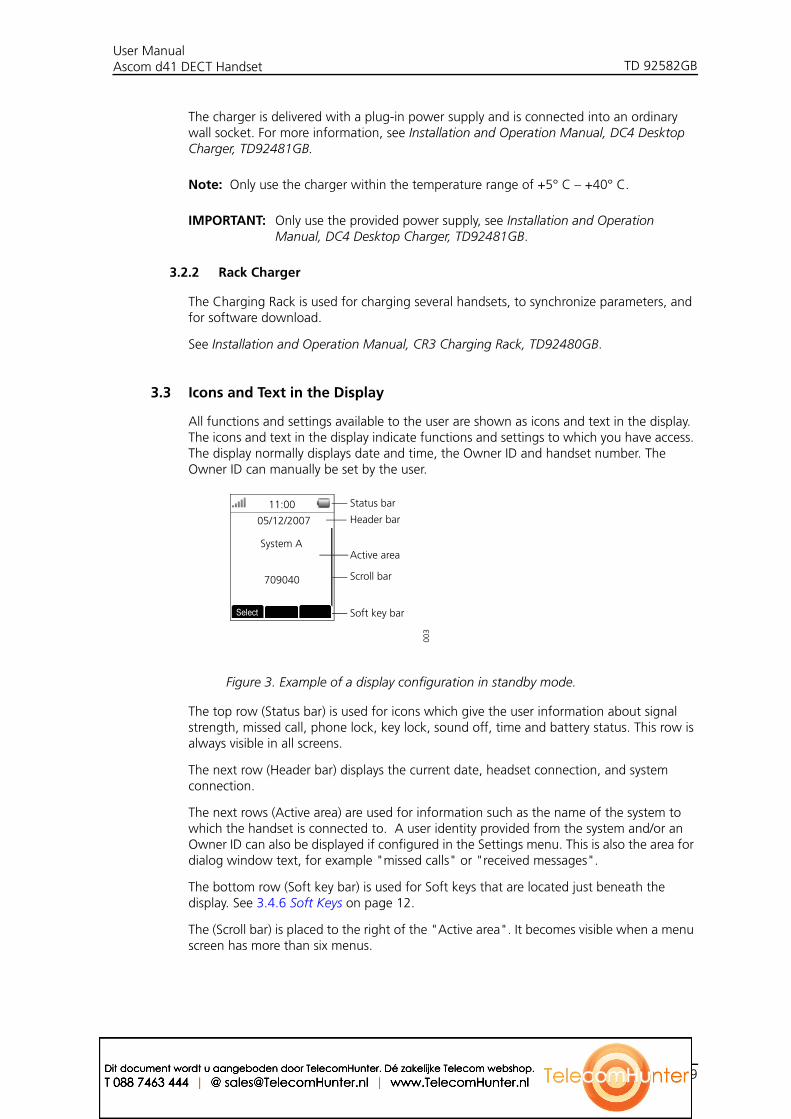
Figure 3. Example of a display configuration in standby mode.
The top row (Status bar) is used for icons which give the user information about signal strength, missed call, phone lock, key lock, sound off, time and battery status. This row is always visible in all screens.
The next row (Header bar) displays the current date, headset connection, and system connection.
The next rows (Active area) are used for information such as the name of the system to which the handset is connected to. A user identity provided from the system and/or an Owner ID can also be displayed if configured in the Settings menu. This is also the area for dialog window text, for example "missed calls" or "received messages".
The bottom row (Soft key bar) is used for Soft keys that are located just beneath the display. See 3.4.6 Soft Keys on page 12.
The (Scroll bar) is placed to the right of the "Active area". It becomes visible when a menu screen has more than six menus.
003
11:00
05/12/2007
709040
System A
Status bar
Header bar
Active area
Soft key bar
Scroll bar
Select
2009-03-19/ Ver. B 9Dit document wordt u aangeboden door TelecomHunter. Dé zakelijke Telecom webshop.T 088 7463 444 | @ [email protected] | www.TelecomHunter.nl
TD 92582GBUser ManualAscom d41 DECT Handset
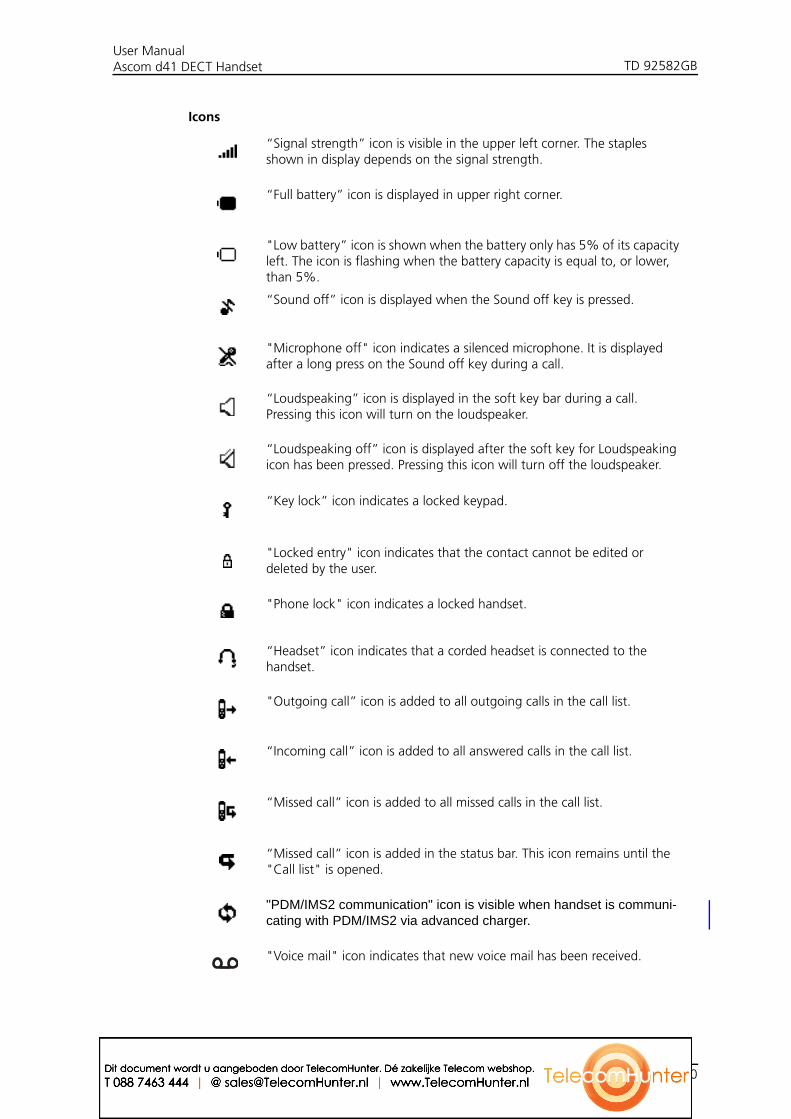
Icons
“Signal strength” icon is visible in the upper left corner. The staples shown in display depends on the signal strength.
“Full battery” icon is displayed in upper right corner.
"Low battery” icon is shown when the battery only has 5% of its capacity left. The icon is flashing when the battery capacity is equal to, or lower, than 5%.
“Sound off” icon is displayed when the Sound off key is pressed.
"Microphone off" icon indicates a silenced microphone. It is displayed after a long press on the Sound off key during a call.
“Loudspeaking” icon is displayed in the soft key bar during a call. Pressing this icon will turn on the loudspeaker.
“Loudspeaking off” icon is displayed after the soft key for Loudspeaking icon has been pressed. Pressing this icon will turn off the loudspeaker.
“Key lock” icon indicates a locked keypad.
"Locked entry" icon indicates that the contact cannot be edited or deleted by the user.
"Phone lock" icon indicates a locked handset.
“Headset” icon indicates that a corded headset is connected to the handset.
"Outgoing call” icon is added to all outgoing calls in the call list.
“Incoming call” icon is added to all answered calls in the call list.
“Missed call” icon is added to all missed calls in the call list.
“Missed call” icon is added in the status bar. This icon remains until the "Call list" is opened.
"PDM/IMS2 communication" icon is visible when handset is communi-cating with PDM/IMS2 via advanced charger.
"Voice mail" icon indicates that new voice mail has been received.
2009-03-19/ Ver. B 10Dit document wordt u aangeboden door TelecomHunter. Dé zakelijke Telecom webshop.T 088 7463 444 | @ [email protected] | www.TelecomHunter.nl

TD 92582GBUser ManualAscom d41 DECT Handset
* This feature is system dependent and only applicable for handset d41 Advanced.
Menu icons
The ”Contacts” menu contains all names/numbers in the local phonebook. In addition, a company phonebook* with up to 500 entries can be downloaded to the phone via the PDM. It is also possible to access a central phonebook* from the "Contact" menu.
The “Calls” menu contains call lists, call time, and call services*. Call services is configured in the PDM.
The “Settings” menu contains personal handset settings such as changing the ringer volume, selecting language, etc.
2009-03-19/ Ver. B 11Dit document wordt u aangeboden door TelecomHunter. Dé zakelijke Telecom webshop.T 088 7463 444 | @ [email protected] | www.TelecomHunter.nl
TD 92582GBUser ManualAscom d41 DECT Handset
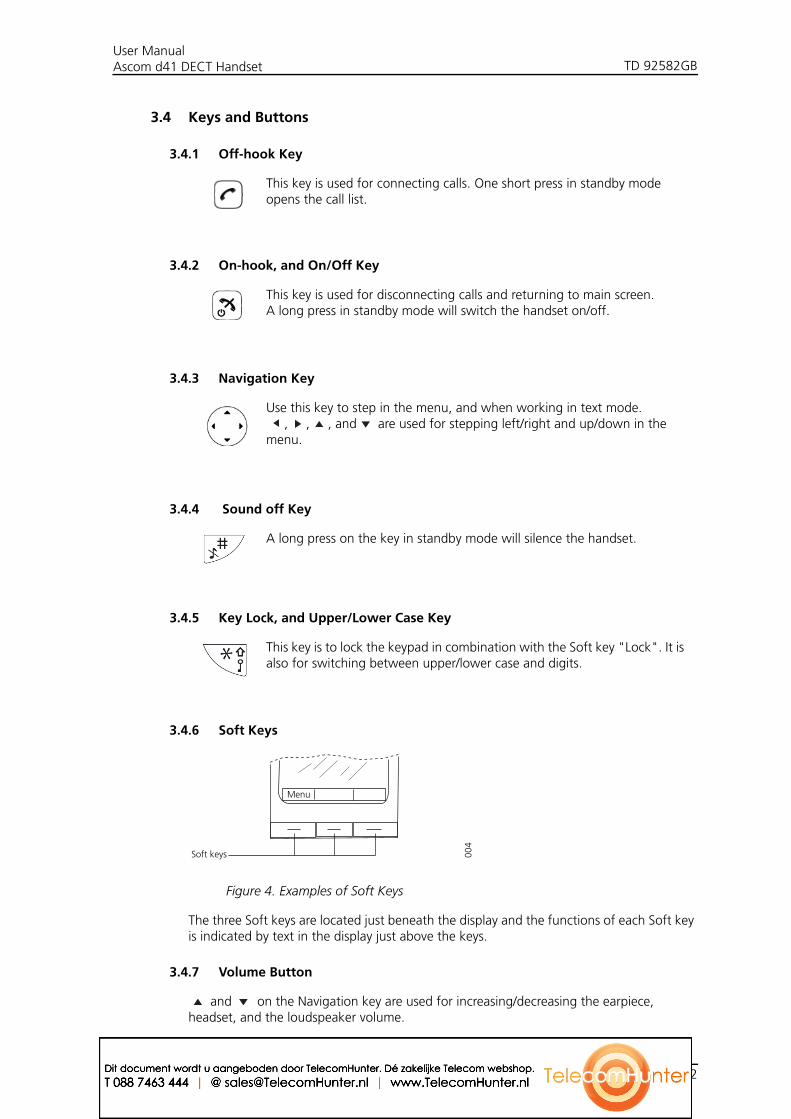
3.4 Keys and Buttons
3.4.1 Off-hook Key
3.4.2 On-hook, and On/Off Key
3.4.3 Navigation Key
3.4.4 Sound off Key
3.4.5 Key Lock, and Upper/Lower Case Key
3.4.6 Soft Keys
Figure 4. Examples of Soft Keys
The three Soft keys are located just beneath the display and the functions of each Soft key is indicated by text in the display just above the keys.
3.4.7 Volume Button
and on the Navigation key are used for increasing/decreasing the earpiece, headset, and the loudspeaker volume.
This key is used for connecting calls. One short press in standby mode opens the call list.
This key is used for disconnecting calls and returning to main screen. A long press in standby mode will switch the handset on/off.
Use this key to step in the menu, and when working in text mode., , , and are used for stepping left/right and up/down in the
menu.
A long press on the key in standby mode will silence the handset.
This key is to lock the keypad in combination with the Soft key "Lock". It is also for switching between upper/lower case and digits.
Menu
Soft keys 004
2009-03-19/ Ver. B 12Dit document wordt u aangeboden door TelecomHunter. Dé zakelijke Telecom webshop.T 088 7463 444 | @ [email protected] | www.TelecomHunter.nl
TD 92582GBUser ManualAscom d41 DECT Handset
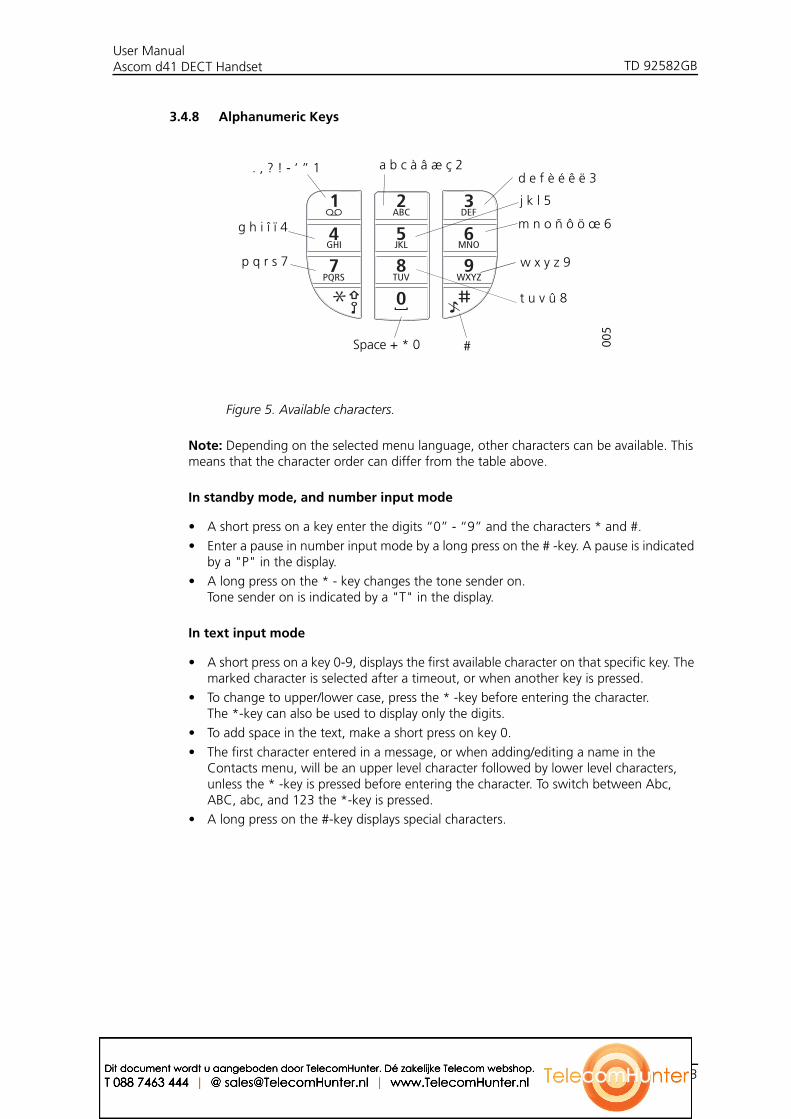
3.4.8 Alphanumeric Keys
Figure 5. Available characters.
Note: Depending on the selected menu language, other characters can be available. This means that the character order can differ from the table above.
In standby mode, and number input mode
• A short press on a key enter the digits “0” - “9” and the characters * and #.
• Enter a pause in number input mode by a long press on the # -key. A pause is indicated by a "P" in the display.
• A long press on the * - key changes the tone sender on.Tone sender on is indicated by a "T" in the display.
In text input mode
• A short press on a key 0-9, displays the first available character on that specific key. The marked character is selected after a timeout, or when another key is pressed.
• To change to upper/lower case, press the * -key before entering the character. The *-key can also be used to display only the digits.
• To add space in the text, make a short press on key 0.
• The first character entered in a message, or when adding/editing a name in the Contacts menu, will be an upper level character followed by lower level characters, unless the * -key is pressed before entering the character. To switch between Abc, ABC, abc, and 123 the *-key is pressed.
• A long press on the #-key displays special characters.
. , ? ! - ‘ ” 1
g h i î ï 4
p q r s 7
Space + * 0 #
t u v û 8
w x y z 9
m n o ñ ô ö œ 6
j k l 5
d e f è é ê ë 3 a b c à â æ ç 2
005
2009-03-19/ Ver. B 13Dit document wordt u aangeboden door TelecomHunter. Dé zakelijke Telecom webshop.T 088 7463 444 | @ [email protected] | www.TelecomHunter.nl
TD 92582GBUser ManualAscom d41 DECT Handset
3.5 Accessories
3.5.1 Belt Clips
Two belt clip options are available:
• Hinge-type clip (standard)The clip on the back of the handset is used to fasten the handset to a belt or similar. It is also possible to change the clip to a swivel-type.
• Swivel-type clipThe ordinary belt clip can be replaced with a special swivel-type belt clip adapted to firmly place your handset onto your belt.
3.5.2 Security Cord
The security cord is 800 mm long. The security cord is attached directly to the handset.
3.5.3 Leather Casing
The leather casing is especially designed for the handset. The casing comes with a swivel type belt clip and the handset is fully operational while placed in the casing.
3.5.4 Headset
A headset is recommended if the handset is frequently used, and/or the user want to have both hands free. The headset comes in two versions; microphone integrated in the cable and microphone on a boom.
In order to achieve optimal audio quality with the different headset types it is recommended to select the corresponding headset profile.
The default setting is microphone on a boom, that is, the audio is optimized for using a headset with microphone on a boom. The headset profile can be changed in the menu by do as follows:
1 Enter the menu by pressing the “Menu” soft key.
2 Select "Settings".
3 Press "Select".
4 Select "Headset".
5 Select the corresponding headset profile from list, that is, "Mic on boom" or "Mic on cable".
6 Press "Select".
If the preconfigured headset profiles do not match the headset in use, or the audio performance is bad, it is possible to configure an own headset profile. This is done in the PDM, see Configuration Manual, Ascom d41 DECT Handset, TD 92641GB. If an own profile is configured in the PDM, it will be selectable in the handset menu.
2009-03-19/ Ver. B 14Dit document wordt u aangeboden door TelecomHunter. Dé zakelijke Telecom webshop.T 088 7463 444 | @ [email protected] | www.TelecomHunter.nl
TD 92582GBUser ManualAscom d41 DECT Handset
4 Menu Tree
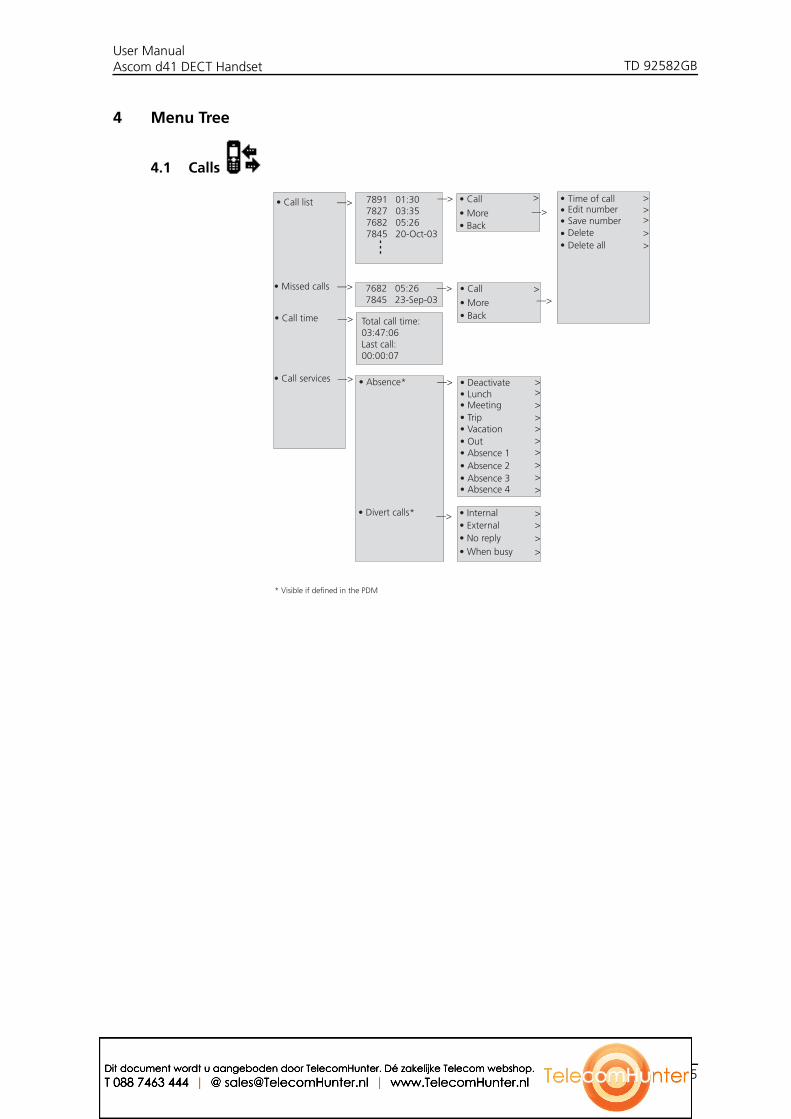
4.1 Calls
• Vacation• Trip
• Absence 1
• Absence 4• Absence 3• Absence 2
• Out
• Missed calls —>
• Call services
7682 05:267845 23-Sep-03
Total call time:03:47:06Last call:00:00:07
7891 01:307827 03:357682 05:267845 20-Oct-03
• Call list —>
• Call time
—> • Absence* • Deactivate• Lunch• Meeting
• Internal• External
—>
—>
—>
• Call
• More
—>—>
• Call
• More
—>—>
>
>
>>>>>>>>>
• Divert calls*
• No reply• When busy
>>>>
• Back
• Back
Edit numberSave numberDeleteDelete all
••••
>>>>
Time of call• >
>
* Visible if defined in the PDM
2009-03-19/ Ver. B 15Dit document wordt u aangeboden door TelecomHunter. Dé zakelijke Telecom webshop.T 088 7463 444 | @ [email protected] | www.TelecomHunter.nl

TD 92582GBUser ManualAscom d41 DECT Handset
4.2 Contacts
• Call contact ——>
• Add contact
• Edit contact
• Central phonebook* ——>
——>
——>
• Name• Work number• Mobile number• Other number >
>>>
• New• From Call list >
——> • Name• Work number• Mobile number• Other number >
>>>
• Search by name• Search by number• Last result
• Search• From contact list >
• Search• From contact list ——>
>• View contact• Add to contacts >
——>
• Delete contact ——> • Search• From contact list >
>
>
>
• Call• More• Back
——>
* System dependent
2009-03-19/ Ver. B 16Dit document wordt u aangeboden door TelecomHunter. Dé zakelijke Telecom webshop.T 088 7463 444 | @ [email protected] | www.TelecomHunter.nl
TD 92582GBUser ManualAscom d41 DECT Handset
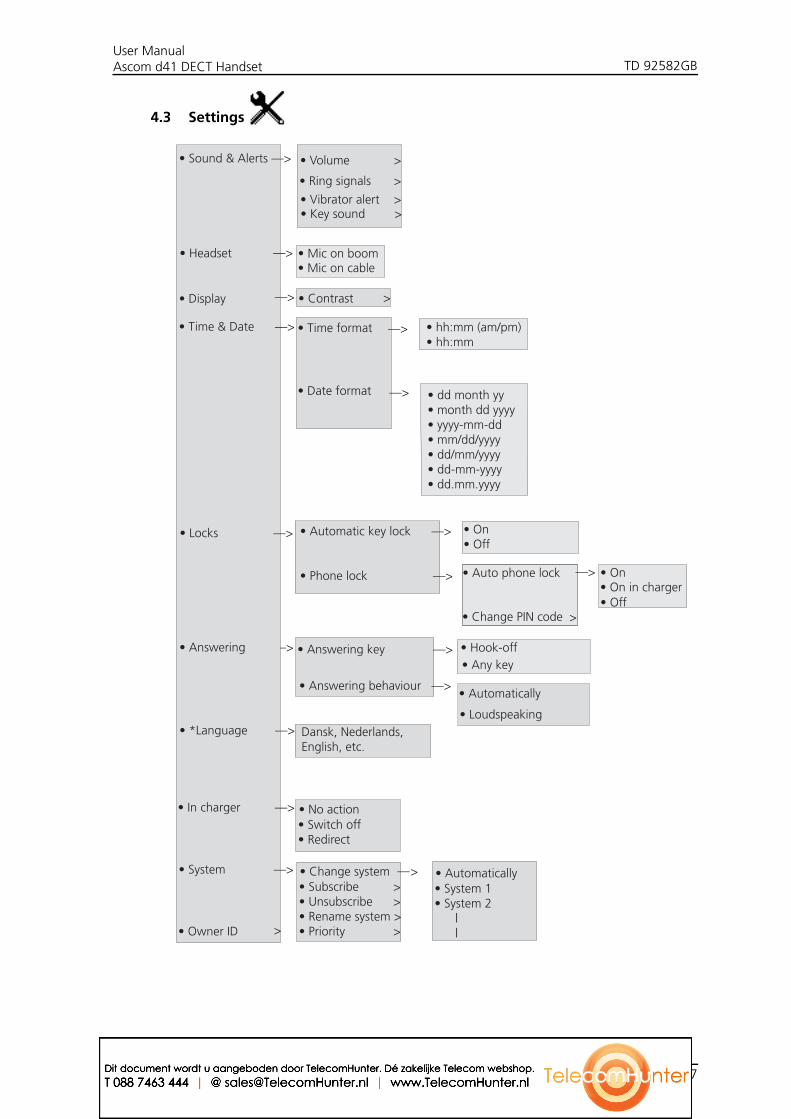
4.3 Settings
• On • Off
• Auto phone lock
• Hook-off
• On • Off• On in charger
• Change PIN code
• Time format
• Automatic key lock —>
• Phone lock —>
Dansk, Nederlands, English, etc.
• Sound & Alerts —>
• Ring signals
• Vibrator alert
• *Language —>
• Locks —>
• Display
• Time & Date —>
• Answering –>
• Owner ID
• Answering behaviour —>
>• Volume
• Key sound
>
>>
—> • Contrast >
• Date format
• Automatically
• Loudspeaking
• Any key• Answering key —>
>
>
—>
• Headset • Mic on boom • Mic on cable
—>
• In charger —>• Switch off • Redirect
• No action
• System —>• Subscribe > • Unsubscribe >• Rename system >• Priority >
• Change system >• System 1 • System 2 | |
• Automatically —
—>
—>
• hh:mm (am/pm) • hh:mm
• dd month yy • month dd yyyy• yyyy-mm-dd• mm/dd/yyyy• dd/mm/yyyy• dd-mm-yyyy• dd.mm.yyyy
2009-03-19/ Ver. B 17Dit document wordt u aangeboden door TelecomHunter. Dé zakelijke Telecom webshop.T 088 7463 444 | @ [email protected] | www.TelecomHunter.nl
TD 92582GBUser ManualAscom d41 DECT Handset
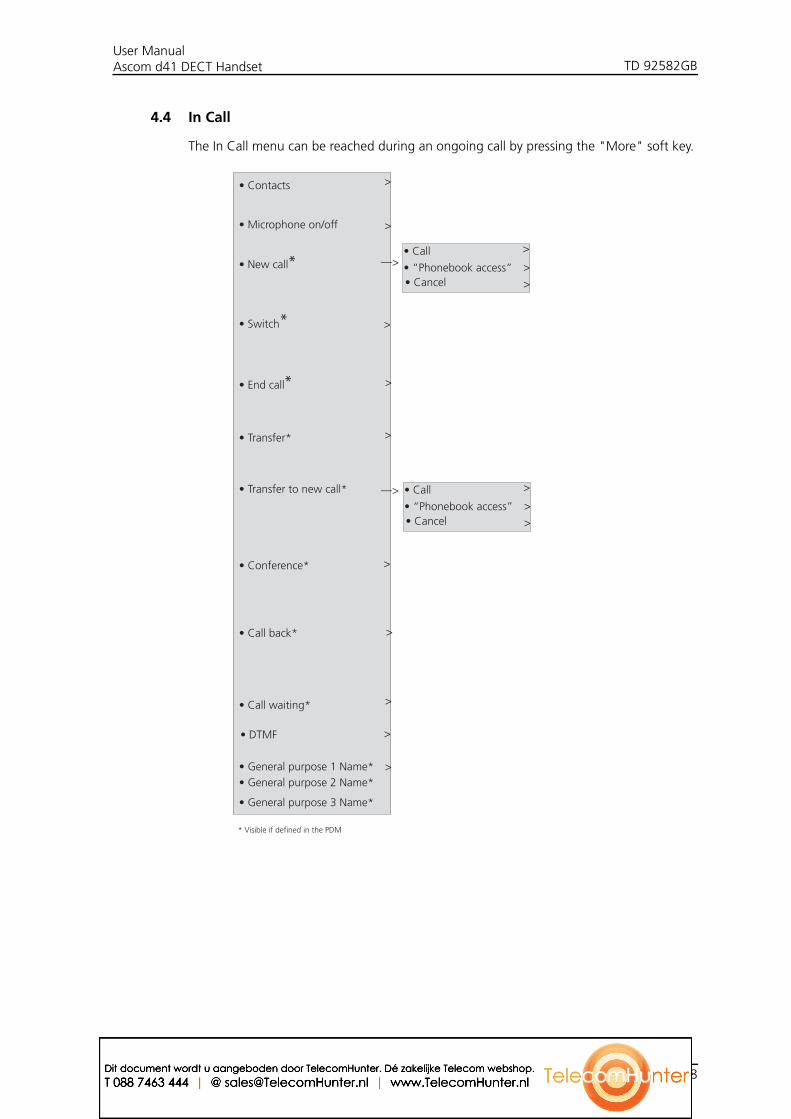
4.4 In Call
The In Call menu can be reached during an ongoing call by pressing the "More" soft key.
• Call back*
• End call
• Call waiting*
• Switch
• Transfer*
• Transfer to new call*
• New call • “Phonebook access”
• Call >—>
>
>
• Conference*
—>
>
>
>
>
• Cancel>
>
• “Phonebook access”
• Call >
• Cancel>
>
• Contacts
• Microphone on/off
• DTMF
>
>
>
• General purpose 1 Name*• General purpose 2 Name*
• General purpose 3 Name*
* Visible if defined in the PDM
*
*
* >
2009-03-19/ Ver. B 18Dit document wordt u aangeboden door TelecomHunter. Dé zakelijke Telecom webshop.T 088 7463 444 | @ [email protected] | www.TelecomHunter.nl
TD 92582GBUser ManualAscom d41 DECT Handset
5 Basic Operation
5.1 Switch the handset On/Off
A long press on will switch the handset on. The handset will vibrate when it is on and the display lights up. A long press in standby mode will switch the handset off. A control question will first be displayed to confirm switch On/Off.
5.1.1 Turn the Audible Signal On/Off
A long press on in standby mode, changes between ring signal on/off.
The icon indicates a silenced handset.
5.2 Lock/Unlock the Keypad
To prevent accidentally pressing keys and making a call, the keys can be locked.
Lock Keypad
Press and then "Lock".
Unlock Keypad
Press and then "Yes".
Note: It is possible to answer/close an incoming call while the keypad is locked. If configured in the PDM, it is also possible to call an emergency call while the keypad is locked. See Configuration Manual, Ascom d41 DECT Handset, TD 92641GB.
5.3 Lock/Unlock the Handset
1 Press "Menu".
2 Select "Settings" .
3 Select “Locks".
4 Select “Phone lock”.
5 Select "Auto phone lock".
6 Select "On", "On in charger", or "Off".
Note: If configured in the PDM, it is possible to call an emergency call while the handset is locked. See Configuration Manual, Ascom d41 DECT Handset, TD 92641GB.
2009-03-19/ Ver. B 19Dit document wordt u aangeboden door TelecomHunter. Dé zakelijke Telecom webshop.T 088 7463 444 | @ [email protected] | www.TelecomHunter.nl
TD 92582GBUser ManualAscom d41 DECT Handset
6 Calling
6.1 Open the Call List
1 Press "Menu".
2 Select "Calls" .
3 Select "Call list".
4 Select a number.
5 Press or "Call" to dial. The number can be edited before the call is dialled. Press "More" and select "Edit number". The 25 last received, dialled, or missed calls are stored in a call list. See 9.1 Calls on page 27.
6.2 Incoming Call
The flashing LED, accompanied by a ring signal and/or a vibrating handset, give you notice of a call. Ring signal and vibrator can be disabled. The calling party’s handset number or name is shown. The name will be shown if the calling party’s handset number is stored in the local phonebook or if calling line information is available. Press the Off-hook key to answer the call. When a headset is connected to the handset, the answering button on the headset can be used to answer the call.
Other answering methods can also be set in the Settings menu, see 9.3 Settings on page 31. The answering methods are; "Automatically" and "Loudspeaking".
When “Automatically” is enabled, all incoming calls will be connected automatically.
6.2.1 Answer a Call
When the signal sounds press to answer the call, or press the soft key to answer the call in loudspeaking mode. The name/number of the calling party is displayed if calling line information is available.
6.2.2 End a Call
Press to end the call. The duration of the call is shown in the display. The total time of
the call can also be retrieved from the Calls menu > Call time.
6.3 Outgoing Call
6.3.1 Pre-Dial
1 Enter the number.
2 Press or "Call" to get the line. The number is shown on the display while dialling.
If needed, press "Clear" to erase the number. By using the Navigation key it is possible to step and add/delete a digit in the middle of a number. It is possible to turn on the tone sender in a pre-dialled number by making a long press on .
6.3.2 Dial a Number from the Call list
1 Press when in stand by mode, or select "Call list" in the menu (see 6.1 Open the Call List on page 20).
2009-03-19/ Ver. B 20Dit document wordt u aangeboden door TelecomHunter. Dé zakelijke Telecom webshop.T 088 7463 444 | @ [email protected] | www.TelecomHunter.nl
TD 92582GBUser ManualAscom d41 DECT Handset
2 Select a number.
3 Press or "Call" to dial. The number can be edited before the call is started. Press "More" and select "Edit number".
6.3.3 Dial a Number from the Local Phonebook
1 Press the "Menu" Soft key.
2 Select "Contacts".
3 Select "Call contact".
4 Select contact from list, or search name/number by entering characters in the "Search" field.
5 Press or "Call" to make the call.
6.3.4 Dial a Name from the Central Phonebook1
1 Press the "Menu" Soft key.
2 Select “Contacts”.
3 Select "Central phonebook".
4 Select "Search by name".
5 Enter the first name and/or last name, the whole name does not have to be entered.
6 Press “Search”.
7 Press or the"Call" key to make the call.
6.3.5 Dial a Number from the Company Phonebook1
1 Press the "Menu" Soft key.
2 Select "Contacts".
3 Select "Call contact".
4 The local and company phonebook appears in the same list but the company names are indicated by a “Locked entry” icon in front of the name. Select contact from list, or search name/number by entering characters in the "Search" field.
5 Press or the "Call" key to make the call.
1.This function is applicable for d41 Advanced only
2009-03-19/ Ver. B 21Dit document wordt u aangeboden door TelecomHunter. Dé zakelijke Telecom webshop.T 088 7463 444 | @ [email protected] | www.TelecomHunter.nl
TD 92582GBUser ManualAscom d41 DECT Handset
6.4 During a Call
Note: Some of these functions are system dependent. The parameters are set up in the Portable Device Manager (PDM), see Configuration Manual, Ascom d41 DECT Handset,TD 92641GB, and Installation and Operational Manual, Portable Device Manager (PDM), Windows version, TD 92325GB.
6.4.1 Adjust the Volume during a Call
On the navigation key, press and to increase and decrease the volume, respectively. The handset will now store and keep the new volume level.
6.4.2 Open Contacts during the Call
1 Press the "More" Soft key during the call.
2 Select "Contacts".
3 Press "Select".
6.4.3 Turn the Microphone on/off during a Call
1 Press the "More" Soft key during the call
2 Select "Microphone off"
3 Press "Select".
The icon indicates a silenced microphone. This means that the other part in an ongoing call cannot hear you. To turn the microphone back on, do as follows:
1 Press the "More" Soft key during the call.
2 Select "Microphone on".
3 Press "Select".
It is also possible to turn the microphone off/on by a long press on .
6.4.4 Start a New Call during Conversation
1 Press the "More" Soft key during the call.
2 Select "New Call"1.
3 Press "Select".
4 Enter the number and press .
6.4.5 Switch between Calls
A new call is started during conversation, the first call is on hold.
1 Press the "More" Soft key.
2 Select "Switch"1.
3 Press "Select". This will switch between the calls.
1.Visible if defined in the PDM.
2009-03-19/ Ver. B 22Dit document wordt u aangeboden door TelecomHunter. Dé zakelijke Telecom webshop.T 088 7463 444 | @ [email protected] | www.TelecomHunter.nl
TD 92582GBUser ManualAscom d41 DECT Handset
6.4.6 End a Call during Conversation
A new call is started during conversation, the first call is on hold.
1 Press the "More" soft key during the call.
2 Select "End Call"1.
3 Press "Select". This will end the current call and the previous call is resumed.
6.4.7 Transfer a Call
A new call is started during conversation, the first call is on hold.
1 Press the "More" soft key.
2 Select "Transfer"1.
3 Press "Select". This will connect the first caller with the new caller.
6.4.8 Transfer to New Call
1 Press the "More" soft key during the call.
2 Select "Transfer to new call1".
3 Press "Select".
4 Enter the number to the person the ongoing call shall be transfered to.
5 Press to transfer the call.
6.4.9 Conference Call
A new call is started during conversation, the first call is on hold. Connect a conference call as follows:
1 Press the "More" soft key.
2 Select "Conference call"1.
3 Press "Select".
The person initiating the conference call is the conference leader, and the other are participant members of the conference call.
6.4.10 Call Back
When a call is made to a busy handset, it is possible to automatically call back when the busy handset is free. When a busy tone louds, do as follows:
1 Press the "More" soft key during the call.
2 Select "Call back"1.
3 Press "Select".
4 Press and wait until the handset alerts.
5 When the handset alerts, press and the call will automatically be started.
1. Only visible if defined in PDM.
2009-03-19/ Ver. B 23Dit document wordt u aangeboden door TelecomHunter. Dé zakelijke Telecom webshop.T 088 7463 444 | @ [email protected] | www.TelecomHunter.nl
TD 92582GBUser ManualAscom d41 DECT Handset
6.4.11 Call Waiting
During a call when the line is busy, do as follows:
1 Press the "More" soft key.
2 Select "Call waiting"1.
3 Press "Select". The other part will get a "Call waiting" signal.
When the line is free it will automatically call the number again. This is system dependent.
6.4.12 DTMF
1 Press the "More" soft key during the call.
2 Select "DTMF".
3 Press "Select". This will enable the use of Dual Tone Multi Frequency (DTMF) signals.
6.5 Loudspeaking Function
How to activate the loudspeaking function is dependent of the choice of answering method. An incoming call can be connected with loudspeaking function active by pressing left soft key. During a call, a press on the left soft key activates the loudspeaking function. Press the left soft key again to turn it off.
6.6 Call Diversion
A soft key button can be preprogrammed with a short cut to the “Call diversion”1 function. Refer to Divert Internal/External Calls on page 29.
All calls; internal calls, external calls, calls when busy, or calls at no answer can be diverted to another handset number. The diversion is made via the Calls menu > Call services > Divert calls. See 9.1.4 Call Services on page 28.
1. Only visible if defined in the PDM
2009-03-19/ Ver. B 24Dit document wordt u aangeboden door TelecomHunter. Dé zakelijke Telecom webshop.T 088 7463 444 | @ [email protected] | www.TelecomHunter.nl
TD 92582GBUser ManualAscom d41 DECT Handset
7 Messaging
7.1 Mini Messaging
Note: This feature is applicable for d41 Advanced only.
The handset d41 Advanced can receive text messages with a maximum of 12 characters. When a text message is received, the LED starts flashing and the message alert signal sounds. The message is displayed in a dialog window.
If the received message contains more than 12 characters, the remaining characters are discarded. Only the last received message is displayed. For example, a first message is received and displayed in the dialog window. Another message is received and will be displayed instead of the prior message, which will be discarded.
Press "Close" when the message has been read. It is not possible to reply to a message or create/send a new message. The message(s) are not stored in the phone.
7.2 Voice Mail
7.2.1 Receive a Voice Mail
When a new voice mail is received, the message alert signal sounds, and the voice mail icon is displayed in the status bar. The new voice mail notification is also displayed in a dialog window.
7.2.2 Check the Voice Mail inbox
Check the voice mail(s) by pressing "Call" from the dialog window. If "Close" is selected, it is possible to dial the Voice Mail by a long press on digit key "1" when in standby mode.
Follow the given instruction in the Voice Mail.
Note: In case the following message is shown: "Voice mail number not defined", the voice mail number needs to be configured to the voice mail button. Contact your system administrator.
2009-03-19/ Ver. B 25Dit document wordt u aangeboden door TelecomHunter. Dé zakelijke Telecom webshop.T 088 7463 444 | @ [email protected] | www.TelecomHunter.nl
TD 92582GBUser ManualAscom d41 DECT Handset
8 Contacts
The handset has a local phonebook with 250 entries, where names and numbers freely can be added, deleted, and edited by the user. The phonebook lists all names in alphabetical order, where three numbers can be added for each contact, that is, work number, mobile number, and other number.
For more informarion on how to add, edit, or delete a contact, see 9.2 Contacts on page 29.
In addition, a company phonebook1 with up to 500 entries can be downloaded to the phone via the PDM, see 11.1 Software Upgrade and Additional Features on page 39. The company phonebook name and numbers cannot be edited or deleted by the user. The phonebook lists all names in alphabetical order.
The local and company phonebook appears in the same list but the company contacts are indicated by a “Locked entry” icon in front of the name. The company contact includes work number only. See 6.3.5 Dial a Number from the Company Phonebook1 on page 21 for more information.
It is also possible to access a central phonebook1, see 6.3.4 Dial a Name from the Central Phonebook on page 21. The user then sends a request to a messaging server with the first characters entered, and the messaging server will return a list of names and numbers that matches the search.
1. This is a system dependent function and is applicable for d41 Advanced only.
2009-03-19/ Ver. B 26Dit document wordt u aangeboden door TelecomHunter. Dé zakelijke Telecom webshop.T 088 7463 444 | @ [email protected] | www.TelecomHunter.nl
TD 92582GBUser ManualAscom d41 DECT Handset
9 Menu Operation
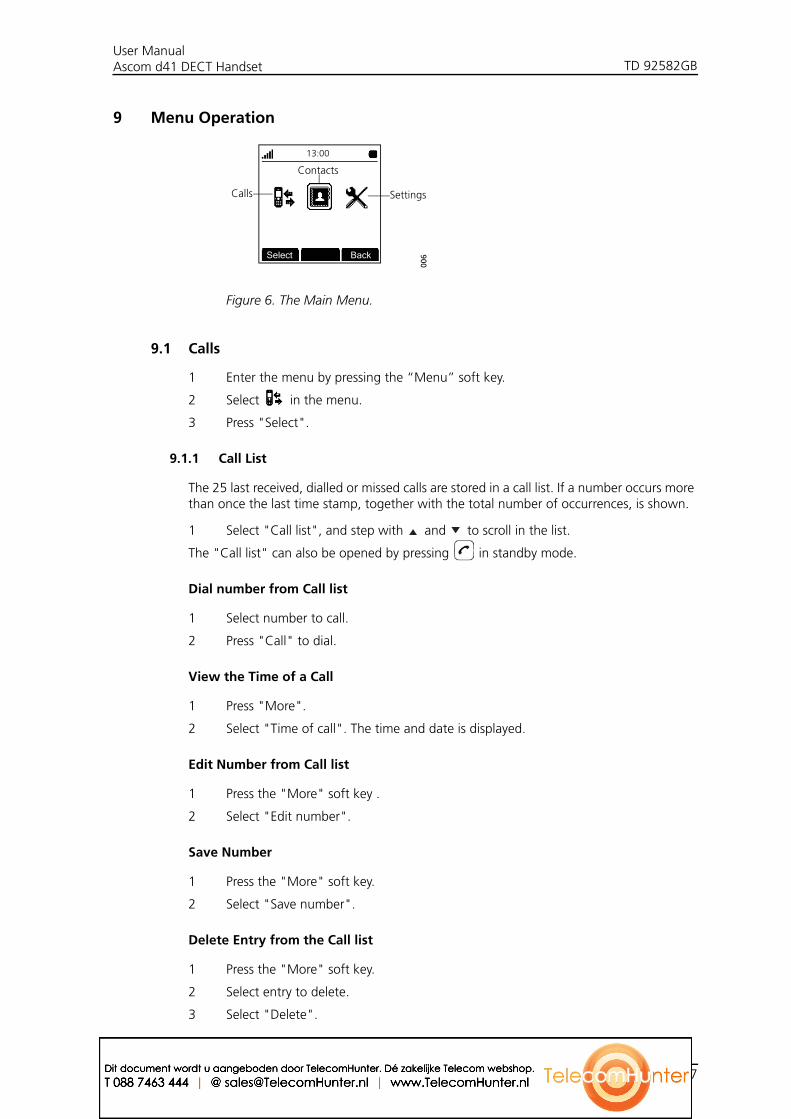
Figure 6. The Main Menu.
9.1 Calls
1 Enter the menu by pressing the “Menu” soft key.
2 Select in the menu.
3 Press "Select".
9.1.1 Call List
The 25 last received, dialled or missed calls are stored in a call list. If a number occurs more than once the last time stamp, together with the total number of occurrences, is shown.
1 Select "Call list", and step with and to scroll in the list.
The "Call list" can also be opened by pressing in standby mode.
Dial number from Call list
1 Select number to call.
2 Press "Call" to dial.
View the Time of a Call
1 Press "More".
2 Select "Time of call". The time and date is displayed.
Edit Number from Call list
1 Press the "More" soft key .
2 Select "Edit number".
Save Number
1 Press the "More" soft key.
2 Select "Save number".
Delete Entry from the Call list
1 Press the "More" soft key.
2 Select entry to delete.
3 Select "Delete".
13:00
Contacts
SettingsCalls
006Select Back
2009-03-19/ Ver. B 27Dit document wordt u aangeboden door TelecomHunter. Dé zakelijke Telecom webshop.T 088 7463 444 | @ [email protected] | www.TelecomHunter.nl
TD 92582GBUser ManualAscom d41 DECT Handset
4 Select "Yes" to delete the entry from the list.
Delete all Entries from the Call list
1 Press the "More" soft key.
2 Select "Delete all".
3 Select "Yes" to delete all the entries from the list.
9.1.2 Missed Calls
1 Select "Missed calls".
2 Step with the and to scroll in the list.
3 Press "Call" to call back.
As in "Call list" there is a "More" soft key which can be used to view the time/date of the call, edit the received number, add to contacts, and delete received numbers. See 9.1.1 Call List on page 27 for information about the functionality in the "More" soft key.
9.1.3 Call Time
The total time of the previous call and last call is displayed by selecting "Call time".
9.1.4 Call Services
Note: These functions are system dependent. The parameters are set up in the Portable Device Manager (PDM), see Configuration Manual, Ascom d41 DECT Handset, TD 92641GB, and Installation and Operational Manual, Portable Device Manager (PDM), Windows version, TD 92325GB.
Absence Handling
The reason for being absent and the return time can be specified here.
1 Select "Call services".
2 Select "Absence".
If the handset is preprogrammed, a number of absence reasons can be displayed, for example “Lunch”, “Meeting”, “Trip” etc.
3 Press "Select"
4 Enter time or date.
Deactivate the Absence Setting
1 Enter “Call service” in the menu.
2 Select “Deactivate”.
3 Press "Select".
Divert Calls
The user can divert calls to another extension by selecting "Divert calls".
2009-03-19/ Ver. B 28Dit document wordt u aangeboden door TelecomHunter. Dé zakelijke Telecom webshop.T 088 7463 444 | @ [email protected] | www.TelecomHunter.nl
TD 92582GBUser ManualAscom d41 DECT Handset
Divert Internal/External Calls
1 Select "Internal/External".
2 Select "Activate".
3 Enter number to divert to.
4 Press the "OK".
To stop diversion select "Deactivate" and press "OK".
Divert Calls if No Reply
1 Select "No reply".
2 Select "Activate" and press the "OK".
3 Enter number to divert to.
4 Press "OK".
To stop diversion select "Deactivate" and press "OK".
Divert Calls When Busy
1 Select "When busy".
2 Select "Activate" and press "OK".
3 Enter number to divert to.
4 Press "OK"
To stop diversion select "Deactivate" and press "OK".
9.2 Contacts
1 Enter the menu by pressing the “Menu” soft key.
2 Select in the menu.
9.2.1 Call Contact
1 Select "Call contact".
2 Select contact from the list, or enter name or number in the search field.
3 Press , or "Call".
It is also possible to edit the contact by selecting "View" > "More". Note that it is not possible to edit a company phonebook contact. The company contacts are indicated by a “Locked entry” icon in front of the name.
Add Contact
1 Select "Add contact".
Add New Contact
1 Select "New".
2 Select "Add", and enter the name of the contact, see 3.4.8 Alphanumeric Keys on page 13.
3 Press "OK".
4 Select "Work number", "Mobile number", or "Other number".
2009-03-19/ Ver. B 29Dit document wordt u aangeboden door TelecomHunter. Dé zakelijke Telecom webshop.T 088 7463 444 | @ [email protected] | www.TelecomHunter.nl
TD 92582GBUser ManualAscom d41 DECT Handset
5 Press "Add".
6 Enter the numbers. It is possible to add tone "T" or paus "P" in phone numbers by pressing the Space key 5 times or 7 times, respectively.
7 Press "OK".
8 Press "Save" and then "Back".
Add from Call List
1 Select "From call list".
2 Select number.
3 Press "Add".
4 Select "Work number", "Mobile number", or "Other number".
5 Press "Select".
6 Press "Add", and enter name for the contact, see 3.4.8 Alphanumeric Keys on page 13.
7 Press "OK".
8 Press "Save".
9.2.2 Edit Contact
Note: It is not possible to edit a company phonebook contact. The company contacts are indicated by a “Locked entry” icon in front of the name.
1 Select "Edit contact".
2 Select contact, and press "Edit" twice.
3 Enter new name/number, see 3.4.8 Alphanumeric Keys on page 13. It is possible to add tone "T" or paus "P" in phone numbers by pressing the Space key 5 times or 7 times, respectively.
4 Press "OK".
5 Press "Save".
9.2.3 Delete Contact
Note: It is not possible to delete a company phonebook contact. The company contacts are indicated by a “Locked entry” icon in front of the name.
1 Select "Delete contact".
2 Select contact.
3 Press "Delete".
4 Press "Yes" to confirm.
9.2.4 Central Phonebook
Note: The central phonebook is applicable for d41 Advanced only.
In the central phonebook it is possible to search by name or number. The last search result can be displayed.
2009-03-19/ Ver. B 30Dit document wordt u aangeboden door TelecomHunter. Dé zakelijke Telecom webshop.T 088 7463 444 | @ [email protected] | www.TelecomHunter.nl
TD 92582GBUser ManualAscom d41 DECT Handset
When the search result is displayed, it is possible to view contact information, and add the number to new contact by pressing the "More" soft key. It is also possible to dial the number by pressing , or the "Call" soft key.
1 Select "Central phonebook".
Search by Name
1 Select "Search by name".
2 Enter first name and/or last name.
3 Press "Search". The search result will be displayed.
Search by Number
1 Select "Search by number".
2 Enter the number.
3 Press "Search". The search result is displayed.
View Last Search Result
Select "Last result". Only the last result will be displayed.
9.3 Settings
1 Enter the menu by pressing the “Menu” soft key.
2 Select in the menu.
9.3.1 Sound and Alert Settings
Adjust the Ringer Volume
1 Select "Sound & Alerts".
2 Select “Volume”.
3 Adjust the volume by using and on the navigation key.
4 Press "Back" to save the setting.
Select Ring Signals
1 Select "Ring signals".
2 Select "Internal call", "External Call", or "Callback"1.
3 Press "Select".
4 Select ring signal. It is possible to listen to the selected ring signal by pressing the "Play" soft key. The ring signal will be repeated until the "Stop" soft key is pressed.
5 Press "Select".
1. "Callback" is only applicable if defined in the PDM/IMS2. See also 6.4.10 Call Back on page 23 for more information.
2009-03-19/ Ver. B 31Dit document wordt u aangeboden door TelecomHunter. Dé zakelijke Telecom webshop.T 088 7463 444 | @ [email protected] | www.TelecomHunter.nl

TD 92582GBUser ManualAscom d41 DECT Handset
Turn the Vibrator on/off
1 Select “Vibrator alert”.
2 Select “On”, “On if silent” (i.e. the vibrator is on when the handset is muted), or “Off”.
3 Press "Select".
4 Press "Back" to save the setting.
Set the Key Sound
This means that every time a key is used, a low sound is heard.
1 Select “Key sound”.
2 Select “Silent, “Click”, or “Tone”.
3 Press "Back".
It is possible to listen to the key sound by pressing the "Play" soft key.
9.3.2 Select Headset Profile
1 Select "Headset".
2 Select "Mic on boom", "Mic on cable", or "Customized headset profile"1
3 Press "Select".
9.3.3 Display Settings
1 Select “Display”.
2 Select “Contrast”.
3 Adjust the contrast by using the and on the navigation key.
4 Press "OK".
5 Press "Back".
9.3.4 Time & Date Settings
Set Time Format
1 Select "Time & Date"
2 Press "Select".
3 Select time format. The actual time format will be displayed. Selectable time formats:
• hh:mm (am/pm) (for example: 1:00pm)• hh:mm (for example 13:00)
4 Press "Select" to save the setting.
1."Customized headset profile" is only visible if the headset profile has been configured in the PDM/IMS2.
2009-03-19/ Ver. B 32Dit document wordt u aangeboden door TelecomHunter. Dé zakelijke Telecom webshop.T 088 7463 444 | @ [email protected] | www.TelecomHunter.nl

TD 92582GBUser ManualAscom d41 DECT Handset
Set Date Format
1 Select “Time & Date”.
2 Press "Select".
3 Select “Date format”
4 Press "Select". Selectable date format:
• DD/MM/YYYY, for example: 17/09/2008 (also called Europe)• MM/DD/YYYY, for example: 9/17/2008 (also called US)• YYYY-MM-DD, for example: 2008-09-17 (ISO 8601)• MMM DD YYYY, for example: Sep 17 2008• DD MMM YY, for example: 17 Sep 08• DD.MM.YYYY, for example: 17.09.2008• DD-MM-YYYY, for example: 17-09-2008
5 Press "Select" to save the setting.
9.3.5 Phone Lock settings
Activate the Automatic Key lock
1 Select “Locks”.
2 Select "Automatic key lock".
3 Select "On" for activation of automatic key lock.
Note: It is possible to answer/close an incoming call while the keypad is locked. If configured in the PDM/IMS2, it is also possible to call an emergency call while the keypad is locked. See Configuration Manual, Ascom d41 DECT Handset, TD 92641GB.
Activate the Phone Lock
The handset can be protected for unauthorized use. If this function is activated, a PIN code has to be entered at power on, or when the handset is placed in a charger - this behaviour will first be activated when the handset is placed in the charger. The default phone lock code (0000) can be changed to any 4-8 digit personalized code.
Note: If configured in the PDM/IMS2, it is possible to call an emergency call while the handset is locked. See Configuration Manual, Ascom d41 DECT Handset, TD 92641GB.
1 Select “Locks”.
2 Select “Auto phone lock”.
3 Select “On”, or "On in charger".
4 Enter PIN code
5 Press "OK".
If the PIN code is forgotten it can be removed by your distributor.
2009-03-19/ Ver. B 33Dit document wordt u aangeboden door TelecomHunter. Dé zakelijke Telecom webshop.T 088 7463 444 | @ [email protected] | www.TelecomHunter.nl
TD 92582GBUser ManualAscom d41 DECT Handset
Deactivate the Phone Lock
1 Select “Locks”.
2 Select “Auto phone lock”.
3 Select “Off”.
4 Enter PIN code
5 Press "OK".
Change PIN Code
1 Select "Change PIN code".
2 Enter the old PIN code.
3 Press "OK".
4 Enter new PIN code twice.
5 Press "Save".
2009-03-19/ Ver. B 34Dit document wordt u aangeboden door TelecomHunter. Dé zakelijke Telecom webshop.T 088 7463 444 | @ [email protected] | www.TelecomHunter.nl
TD 92582GBUser ManualAscom d41 DECT Handset
9.3.6 Answering
The default setting for the handset is to use the Off-hook key when answering a call. The answering behaviour can be configured to answer the call automatically, i.e. without pressing a key, and/or in loudspeaking mode. It is also possible to set the answering behaviour to any key. If "Any key" is selected, any keys except the "On-hook" key and the "Sound off" key can be used to answer a call.
Answering Key
The answering key is by default set to Hook-off.
1 Select "Answering".
2 Select "Answering key".
3 Select "Hook-off" or "Any key".
4 Press "Back" to save the setting.
Answering Behaviour
1 Select "Answering".
2 Select "Answer behaviour".
3 Select "Automatically" and/or "Loudspeaking".
4 Press "Change" to change the setting. The check box will be marked.
5 Press "Back" to save the setting. To remove the setting, press "Change". The check box will be unmarked.
9.3.7 Change the Menu Language
1 Select “Language”. Choose between; Danska (Danish), Deutsch (German), English, Español (Spanish), Français (French), Italiano (Italian), Nederlands (Dutch), Norsk (Norwegian), Português (Portuguese), Soumi (Finnish), and Svenska (Swedish).
2 Press "Back".
Note: It is possible to download one additional language via the PDM/IMS2, see 11.1 Software Upgrade and Additional Features on page 39. 7 languages are available for download; Czech, Greek, Hungarian, Polish, Russian, Slovakian, and Turkish.
9.3.8 Change Owner ID
The Owner ID is set to identify the handset.
1 Select "Owner ID".
2 Enter identity.
3 Press "Save".
2009-03-19/ Ver. B 35Dit document wordt u aangeboden door TelecomHunter. Dé zakelijke Telecom webshop.T 088 7463 444 | @ [email protected] | www.TelecomHunter.nl
TD 92582GBUser ManualAscom d41 DECT Handset
9.3.9 In Charger
Redirect Calls when Placed in Charger
When "Redirect" is enabled and the handset is placed in a charger, the calling part receives a busy tone (default setting). The function is automatically cancelled when the handset is removed from the charger.
1 Select “In charger”.
2 Select “Redirect”.
Note: The settings in the system determines how the incomming calls will be handled. This is a system dependent feature.
Switch off While Charging
When the handset is placed in the charger it can be switched off. When removed from the charger it will switch on again.
1 Select “In charger”.
2 Select “Switch off”.
Deactivate the Charging Mode
1 Select “In charger”.
2 Select “No action”.
9.3.10 System
Change System
Select “Automatic” or a specific system. If the handset is set to “Automatic” it selects a system according to the priority list, see Priority on page 37.
Subscribe System
The handset can subscribe up to eight different systems. To subscribe a new system, the “Park:” (Portable Access Right Key) and “Ac:” (Authentication code) related to the system that will be log on to are needed. Contact your system administrator for more information.
The IPEI code is a unique code which has been assigned to the handset, see also 10.1 Admin Menu on page 38.
1 Enter System name. Press "next".
2 Enter PARK code.
3 Enter AC code. Press "Next".An information text "Protection on?" is displayed.
4 Select "Yes" if the new system needs to be protected. Otherwise, select "No". It is not possible to delete a protected subscription.
5 Press "OK". A searching mode starts.
2009-03-19/ Ver. B 36Dit document wordt u aangeboden door TelecomHunter. Dé zakelijke Telecom webshop.T 088 7463 444 | @ [email protected] | www.TelecomHunter.nl
TD 92582GBUser ManualAscom d41 DECT Handset
Unsubscribe System
1 Select "Unsubscribe".
2 Select the system to unsubscribe in the list.
3 Press "Select".
4 Press "Yes" to unsubscribe the system. Otherwise, press "No".
Rename System
It is possible to change the name of the system in the handset.
1 Select "Rename System".
2 Select system to rename.
3 Press "Edit"
4 Enter new name.
5 Select "Save".
Priority
The default order of priority is the order of entered subscriptions. This means that the first subscribed system has the highest priority. This list can be edited by the user. It is possible to set the systems in priority by moving them up or down in the list.
Note: This is used in combination with system set to be "Automatic", see Change System on page 36.
1 Select "Priority".
2 Change the priority if needed by selecting "Up" or "Down". The priority will be saved when "Back" is selected.
2009-03-19/ Ver. B 37Dit document wordt u aangeboden door TelecomHunter. Dé zakelijke Telecom webshop.T 088 7463 444 | @ [email protected] | www.TelecomHunter.nl
TD 92582GBUser ManualAscom d41 DECT Handset
10 Advanced Functions
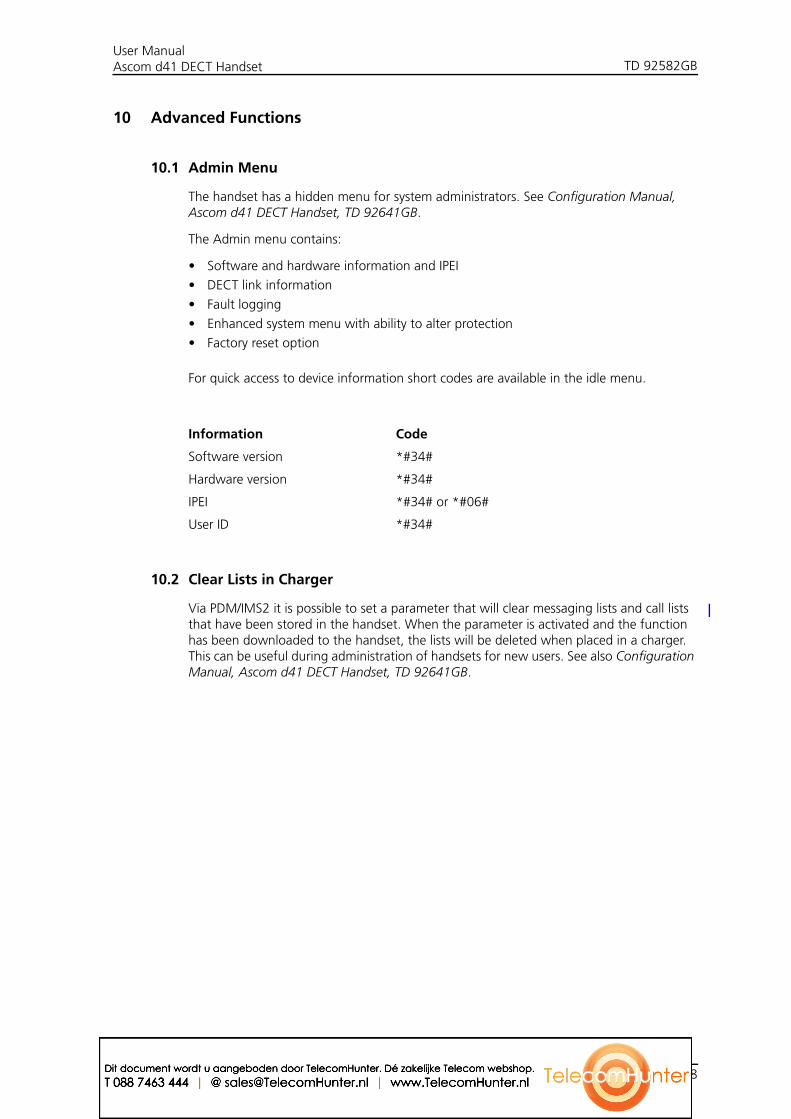
10.1 Admin Menu
The handset has a hidden menu for system administrators. See Configuration Manual, Ascom d41 DECT Handset, TD 92641GB.
The Admin menu contains:
• Software and hardware information and IPEI
• DECT link information
• Fault logging
• Enhanced system menu with ability to alter protection
• Factory reset option
For quick access to device information short codes are available in the idle menu.
10.2 Clear Lists in Charger
Via PDM/IMS2 it is possible to set a parameter that will clear messaging lists and call lists that have been stored in the handset. When the parameter is activated and the function has been downloaded to the handset, the lists will be deleted when placed in a charger. This can be useful during administration of handsets for new users. See also Configuration Manual, Ascom d41 DECT Handset, TD 92641GB.
Information Code
Software version *#34#
Hardware version *#34#
IPEI *#34# or *#06#
User ID *#34#
2009-03-19/ Ver. B 38Dit document wordt u aangeboden door TelecomHunter. Dé zakelijke Telecom webshop.T 088 7463 444 | @ [email protected] | www.TelecomHunter.nl
TD 92582GBUser ManualAscom d41 DECT Handset
11 System Handling
11.1 Software Upgrade and Additional Features
Software and parameters in the handset d41 can be upgraded by using the PDM or the IMS2. See Installation and Operation Manual, Portable Device Manager (PDM) Windows Version, TD92325GB, or Installation and Operation Manual IMS2, TD 92586GB.
Examples of additional features that can be downloaded/configured via PDM/IMS2:
• Company phonebook
• Downloadable languages
Refer to the Configuration Manual, Ascom d41 DECT Handset, TD 92641GB for more information.
To view the handset’s software version, enter *#34# in standby mode.
2009-03-19/ Ver. B 39Dit document wordt u aangeboden door TelecomHunter. Dé zakelijke Telecom webshop.T 088 7463 444 | @ [email protected] | www.TelecomHunter.nl
TD 92582GBUser ManualAscom d41 DECT Handset
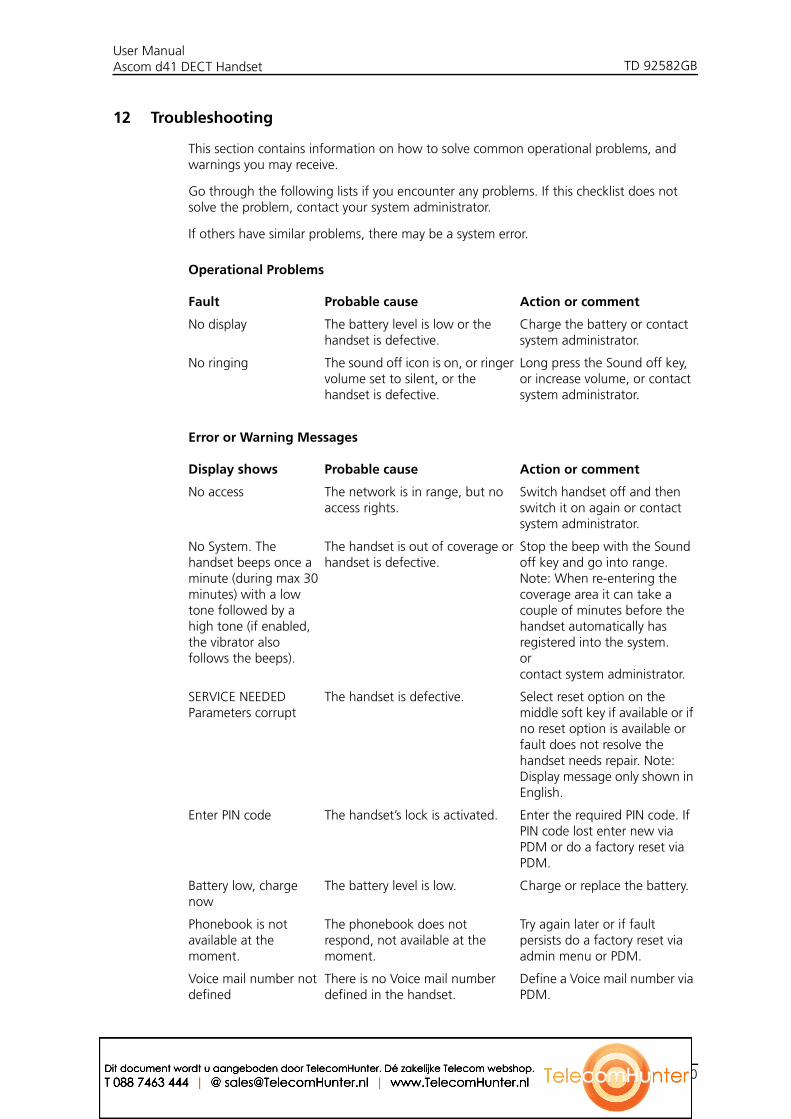
12 Troubleshooting
This section contains information on how to solve common operational problems, and warnings you may receive.
Go through the following lists if you encounter any problems. If this checklist does not solve the problem, contact your system administrator.
If others have similar problems, there may be a system error.
Operational Problems
Error or Warning Messages
Fault Probable cause Action or comment
No display The battery level is low or the handset is defective.
Charge the battery or contact system administrator.
No ringing The sound off icon is on, or ringer volume set to silent, or the handset is defective.
Long press the Sound off key, or increase volume, or contact system administrator.
Display shows Probable cause Action or comment
No access The network is in range, but no access rights.
Switch handset off and then switch it on again or contact system administrator.
No System. The handset beeps once a minute (during max 30 minutes) with a low tone followed by a high tone (if enabled, the vibrator also follows the beeps).
The handset is out of coverage or handset is defective.
Stop the beep with the Sound off key and go into range.Note: When re-entering the coverage area it can take a couple of minutes before the handset automatically has registered into the system.orcontact system administrator.
SERVICE NEEDEDParameters corrupt
The handset is defective. Select reset option on the middle soft key if available or if no reset option is available or fault does not resolve the handset needs repair. Note: Display message only shown in English.
Enter PIN code The handset’s lock is activated. Enter the required PIN code. If PIN code lost enter new via PDM or do a factory reset via PDM.
Battery low, charge now
The battery level is low. Charge or replace the battery.
Phonebook is not available at the moment.
The phonebook does not respond, not available at the moment.
Try again later or if fault persists do a factory reset via admin menu or PDM.
Voice mail number not defined
There is no Voice mail number defined in the handset.
Define a Voice mail number via PDM.
2009-03-19/ Ver. B 40Dit document wordt u aangeboden door TelecomHunter. Dé zakelijke Telecom webshop.T 088 7463 444 | @ [email protected] | www.TelecomHunter.nl
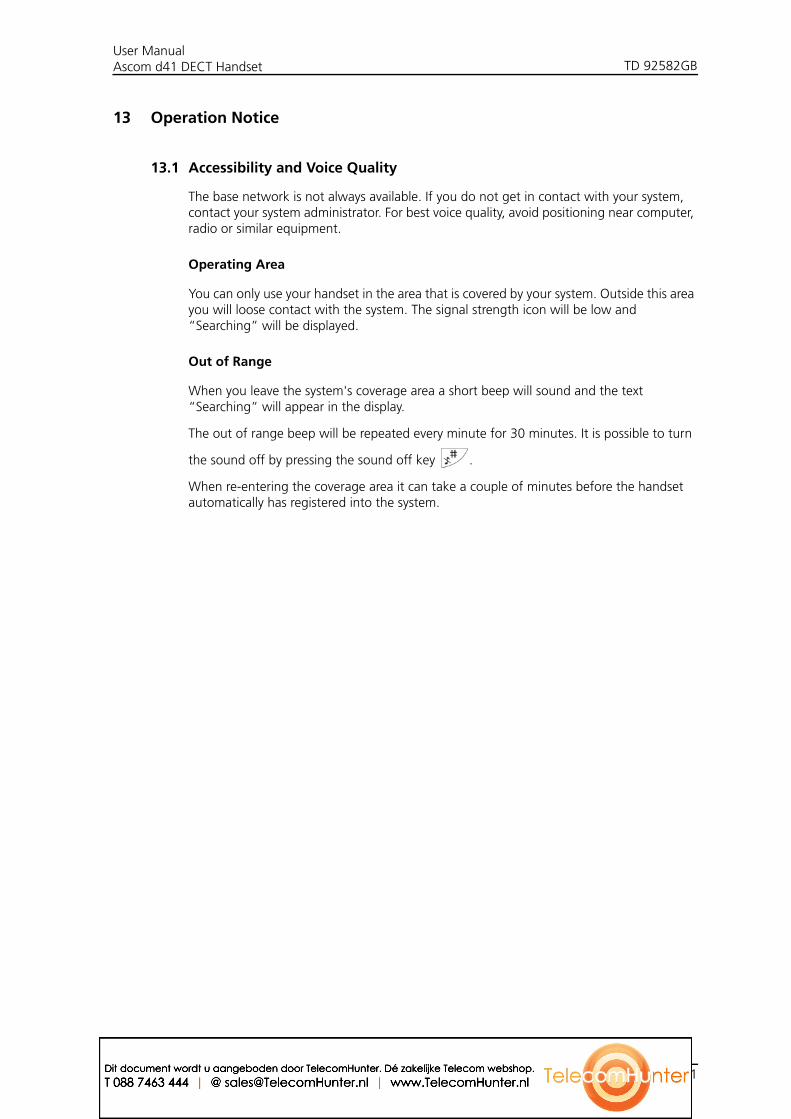
TD 92582GBUser ManualAscom d41 DECT Handset
13 Operation Notice
13.1 Accessibility and Voice Quality
The base network is not always available. If you do not get in contact with your system, contact your system administrator. For best voice quality, avoid positioning near computer, radio or similar equipment.
Operating Area
You can only use your handset in the area that is covered by your system. Outside this area you will loose contact with the system. The signal strength icon will be low and “Searching” will be displayed.
Out of Range
When you leave the system's coverage area a short beep will sound and the text “Searching” will appear in the display.
The out of range beep will be repeated every minute for 30 minutes. It is possible to turn
the sound off by pressing the sound off key .
When re-entering the coverage area it can take a couple of minutes before the handset automatically has registered into the system.
2009-03-19/ Ver. B 41Dit document wordt u aangeboden door TelecomHunter. Dé zakelijke Telecom webshop.T 088 7463 444 | @ [email protected] | www.TelecomHunter.nl
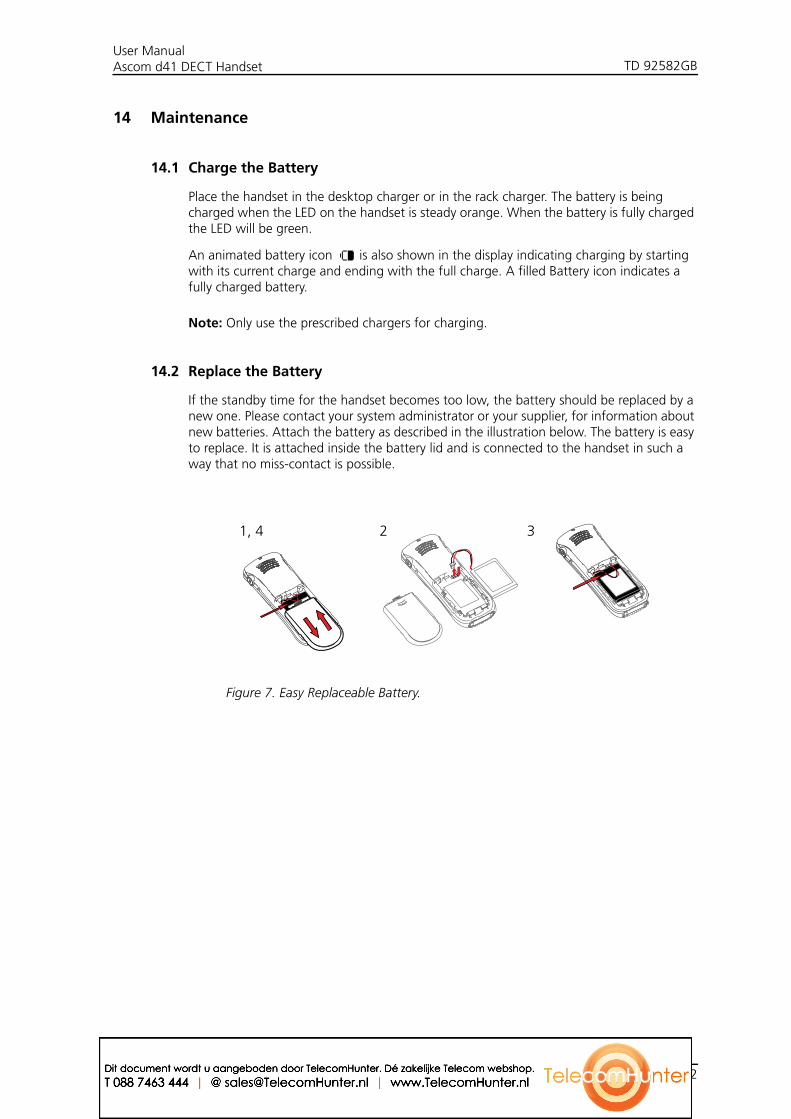
TD 92582GBUser ManualAscom d41 DECT Handset
14 Maintenance
14.1 Charge the Battery
Place the handset in the desktop charger or in the rack charger. The battery is being charged when the LED on the handset is steady orange. When the battery is fully charged the LED will be green.
An animated battery icon is also shown in the display indicating charging by starting with its current charge and ending with the full charge. A filled Battery icon indicates a fully charged battery.
Note: Only use the prescribed chargers for charging.
14.2 Replace the Battery
If the standby time for the handset becomes too low, the battery should be replaced by a new one. Please contact your system administrator or your supplier, for information about new batteries. Attach the battery as described in the illustration below. The battery is easy to replace. It is attached inside the battery lid and is connected to the handset in such a way that no miss-contact is possible.
Figure 7. Easy Replaceable Battery.
1, 4 2 3
2009-03-19/ Ver. B 42Dit document wordt u aangeboden door TelecomHunter. Dé zakelijke Telecom webshop.T 088 7463 444 | @ [email protected] | www.TelecomHunter.nl
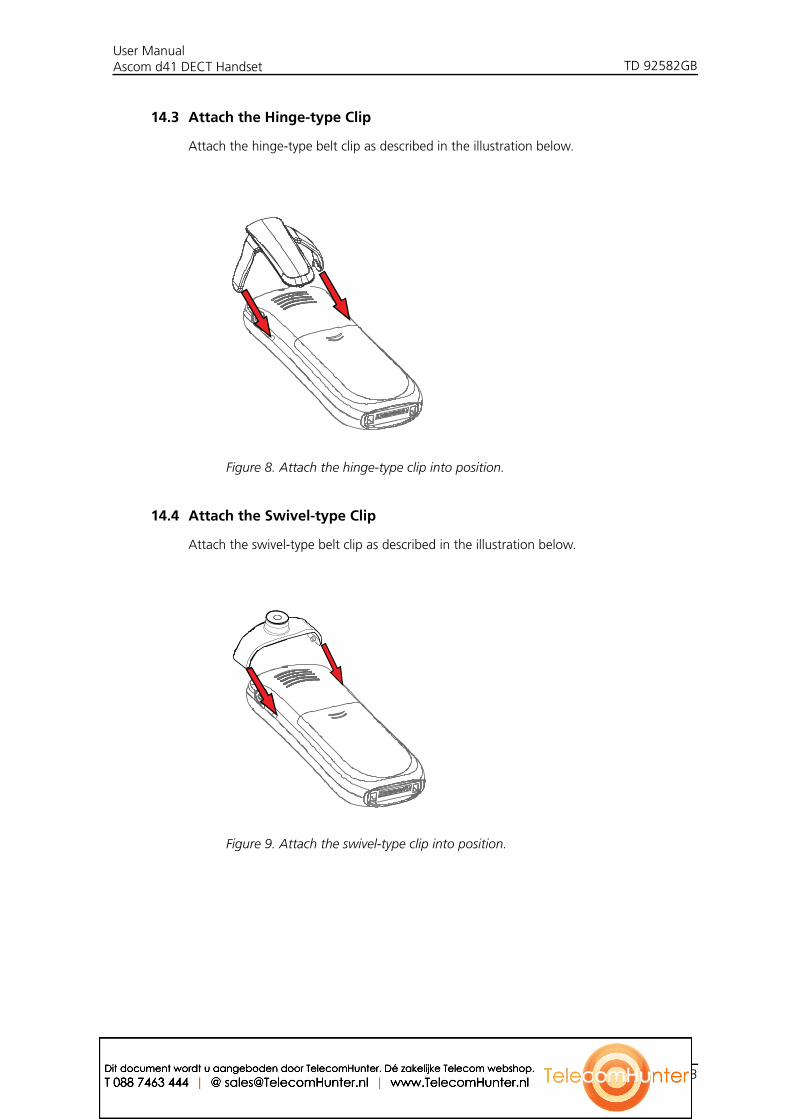
TD 92582GBUser ManualAscom d41 DECT Handset
14.3 Attach the Hinge-type Clip
Attach the hinge-type belt clip as described in the illustration below.
Figure 8. Attach the hinge-type clip into position.
14.4 Attach the Swivel-type Clip
Attach the swivel-type belt clip as described in the illustration below.
Figure 9. Attach the swivel-type clip into position.
Figure 1.
2009-03-19/ Ver. B 43Dit document wordt u aangeboden door TelecomHunter. Dé zakelijke Telecom webshop.T 088 7463 444 | @ [email protected] | www.TelecomHunter.nl
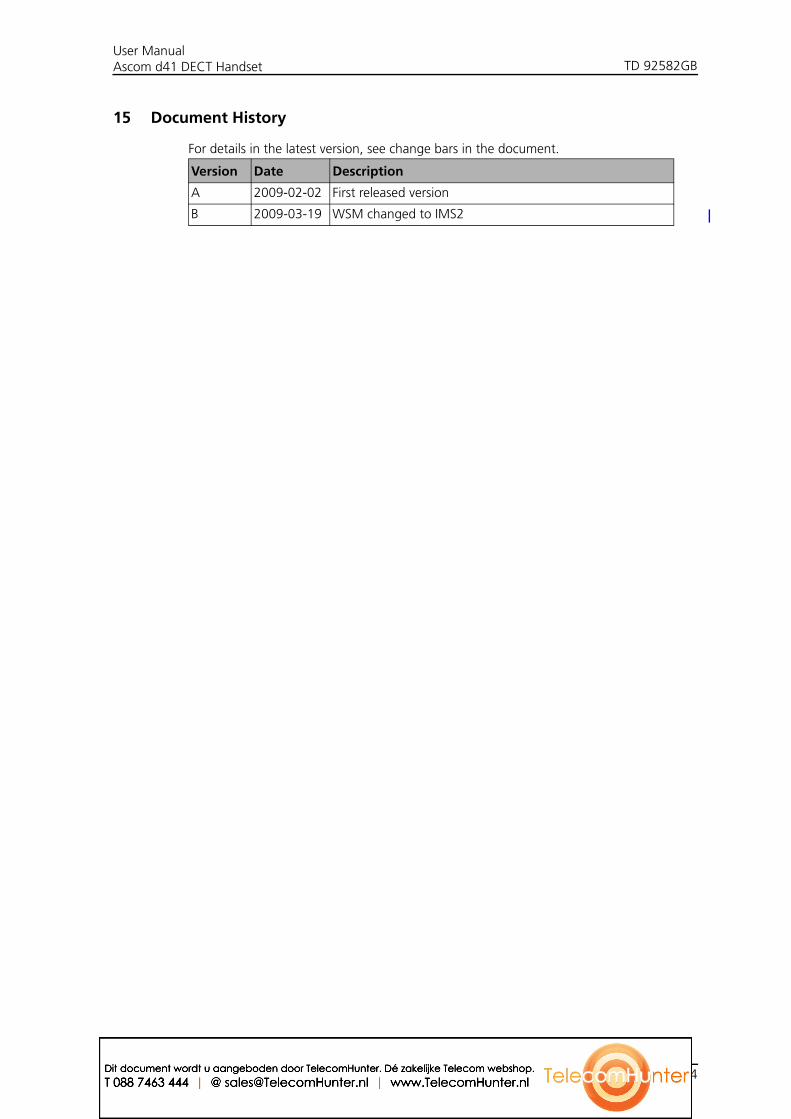
TD 92582GBUser ManualAscom d41 DECT Handset
15 Document History
For details in the latest version, see change bars in the document.
Version Date Description
A 2009-02-02 First released version
B 2009-03-19 WSM changed to IMS2
2009-03-19/ Ver. B 44Dit document wordt u aangeboden door TelecomHunter. Dé zakelijke Telecom webshop.T 088 7463 444 | @ [email protected] | www.TelecomHunter.nl