PrintShop Web
33
PrintShop Web Designer Guide
-
Upload
truongquynh -
Category
Documents
-
view
218 -
download
0
Transcript of PrintShop Web

PrintShop WebDesigner Guide

PrintShop Web Designer GuideDocument version: PSW 2.1 R3250Date: October, 2007
Objectif Lune - Contact InformationObjectif Lune Inc.2030 Pie IX, Suite 500Montréal, QCCanada H1V 2C8Tel.: 514-875-5863Fax: 514-342-5294www.objectiflune.com
To find an Objectif Lune office near you and for more information on our products and services, visit:www.objectiflune.com

PrintShop Web Designer Guide | 3
Table of Contents
Introduction................................................................................................................................................. 4PrintShop Mail............................................................................................................................................. 4Workflow...................................................................................................................................................... 4
PrintShop Mail user interface.............................................................................................................5
Publication settings.................................................................................................................................6Windows Printer Settings............................................................................................................................ 6PrintShop Mail Publication Settings............................................................................................................ 6
Business Cards......................................................................................................................................... 7The Business Card document.....................................................................................................................7Variable Text................................................................................................................................................8Expressions..................................................................................................................................................9Data Field properties................................................................................................................................... 9Crop marks and Repetition settings..........................................................................................................10Print the job............................................................................................................................................... 11Publish to PrintShop Web......................................................................................................................... 11The online document.................................................................................................................................12
Postcards....................................................................................................................................................13Ingredients................................................................................................................................................. 14Layouts.......................................................................................................................................................15Layout conditions.......................................................................................................................................16Repetition on page.................................................................................................................................... 18Printing the document............................................................................................................................... 18Publish the document................................................................................................................................19PrintShop Web...........................................................................................................................................19
Newsletters................................................................................................................................................ 21Variable elements...................................................................................................................................... 22Variable date..............................................................................................................................................23Input Fields................................................................................................................................................ 24Variable images......................................................................................................................................... 25Print the newsletter....................................................................................................................................26Publish to PrintShop Web......................................................................................................................... 27PrintShop Web...........................................................................................................................................28
Creating a custom Watermark......................................................................................................... 29Non Printable Objects............................................................................................................................... 29
How to Continue..................................................................................................................................... 32
PrintShop Web Designer Guide | 4
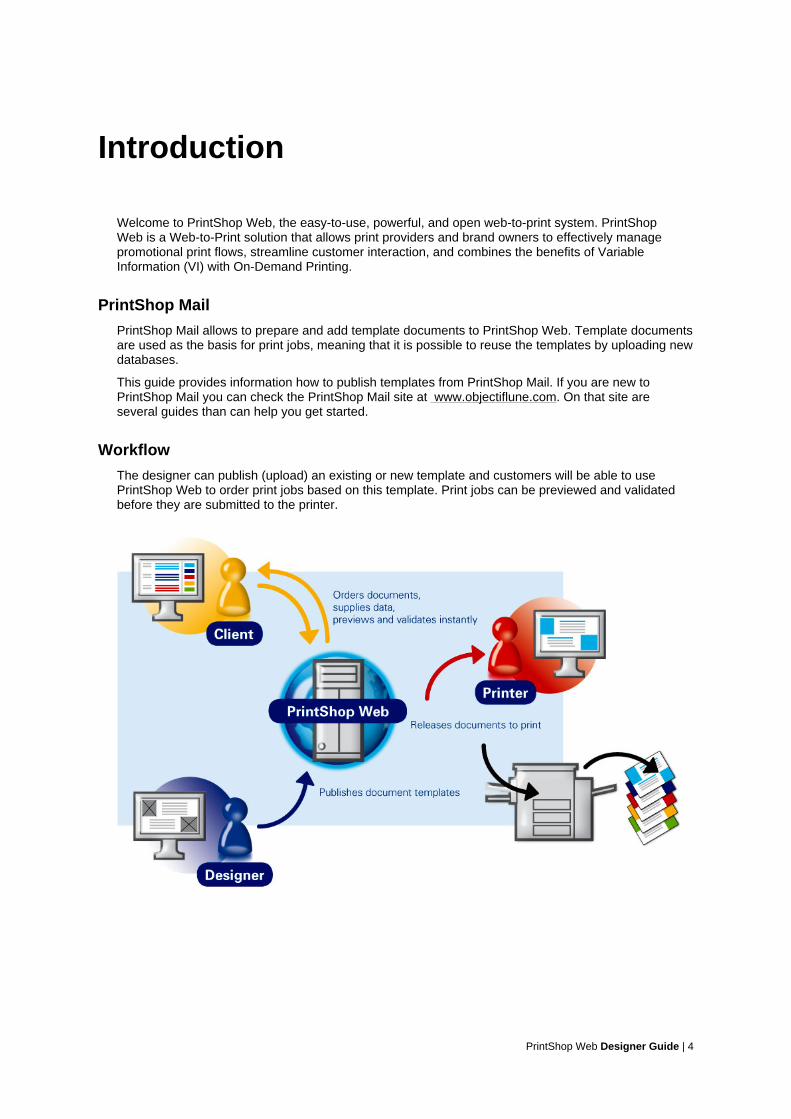
Introduction
Welcome to PrintShop Web, the easy-to-use, powerful, and open web-to-print system. PrintShopWeb is a Web-to-Print solution that allows print providers and brand owners to effectively managepromotional print flows, streamline customer interaction, and combines the benefits of VariableInformation (VI) with On-Demand Printing.
PrintShop Mail
PrintShop Mail allows to prepare and add template documents to PrintShop Web. Template documentsare used as the basis for print jobs, meaning that it is possible to reuse the templates by uploading newdatabases.
This guide provides information how to publish templates from PrintShop Mail. If you are new toPrintShop Mail you can check the PrintShop Mail site at www.objectiflune.com. On that site areseveral guides than can help you get started.
Workflow
The designer can publish (upload) an existing or new template and customers will be able to usePrintShop Web to order print jobs based on this template. Print jobs can be previewed and validatedbefore they are submitted to the printer.

PrintShop Web Designer Guide | 5
PrintShop Mail user interface
Here a global overview of the PrintShop Mail graphical user interface (GUI).
• Tools toolbar: This toolbar allows you to insert (variable) text and images, rotate items and insertPDF files.
• Layout toolbar: This toolbar allows you to skip to the different layouts.• Database toolbar: This toolbar allows you to browse the records and gives a preview of the
variables used in PrintShop Mail.• Layout window: Gives a preview of the current layout.• Properties panel: The Properties Panel is the part of the PrintShop Mail screen that shows the
properties of the currently selected item.• Different toolbars: Here you can change i.e the font, borders around text, paragraph settings,
borders around text- and image boxes and many more features.• Menu: The menu, where you can select different options.
The PrintShop Mail user interface
PrintShop Web Designer Guide | 6
Publication settings
When publishing documents to PrintShop Web, it is important to check the following:
• Windows Printer Settings• PrintShop Mail Publication Settings
Windows Printer Settings
To print documents correctly it is important that the printer set in the PrintShop Mail document matchesthe printers available on the PrintShop Web server. Check the following:
• Printer name• Verify the PPD version
Printer nameThe printer name should match. PrintShop Web verifies if the printer specified in the document isavailable on the web server. If the printer is not available, the default printer will be used for thatdocument. You won’t get a warning when you publish the document and you should check the printername in PrintShop Web after publishing the document.
On the PrintShop Web server you can add, delete and modify printers in the Printers and Faxeswindow of the Microsoft Windows operating system. This window can be accessed via the Start menu.
Verify the PPD versionPostScript printer description (PPD) files describe the fonts, paper sizes, resolution capabilities, andother features that are standard for your PostScript printer. PPD files are used by PostScript printerdrivers to determine how to print your document. If you do not use the correct PPD file, your documentmight not print correctly, or not all of the printer’s features will be available when you print.
Use the same PPD (PostScript Printer Description) on both your PrintShop Mail client machine andPrintShop Web server. Contact your System Administrator which PPD to use.
PrintShop Mail Publication Settings
In order to publish documents to the PrintShop Web server it is required to adjust the settings inPrintShop Mail. To change these settings open the Preferences dialog of the PrintShop Mail (Editmenu). Select the PrintShop Web pane on the left side of the Preferences dialog. Change the settingsfor the URL, Login and Password. Contact the Administrator of the PrintShop Web for the correctsettings.
To test your settings click the Test Connection button.

PrintShop Web Designer Guide | 7
Business Cards
A business card is one of the cost-effective marketing tools a business can have. With PrintShop Mailyou can create business cards in a minute, print them or publish them to PrintShop Web. Publishing toPrintShop Web is a great advantage. Clients can fill in their names and order business cards anytime,anywhere. In this section you will learn how to:
• create a business card with variables• enable repetition on a page• upload the business card to PrintShop Web• how to change the data in PrintShop Web
A business card example
The Business Card document
You need to start PrintShop Mail version 6.0.1 or higher. Open the job Business Card.psmd in theBusiness Card folder. The business card document consists of one layout with crop marks. Thedocument contains three variables and the background image is a PDF file.
The business card document
PrintShop Web Designer Guide | 8
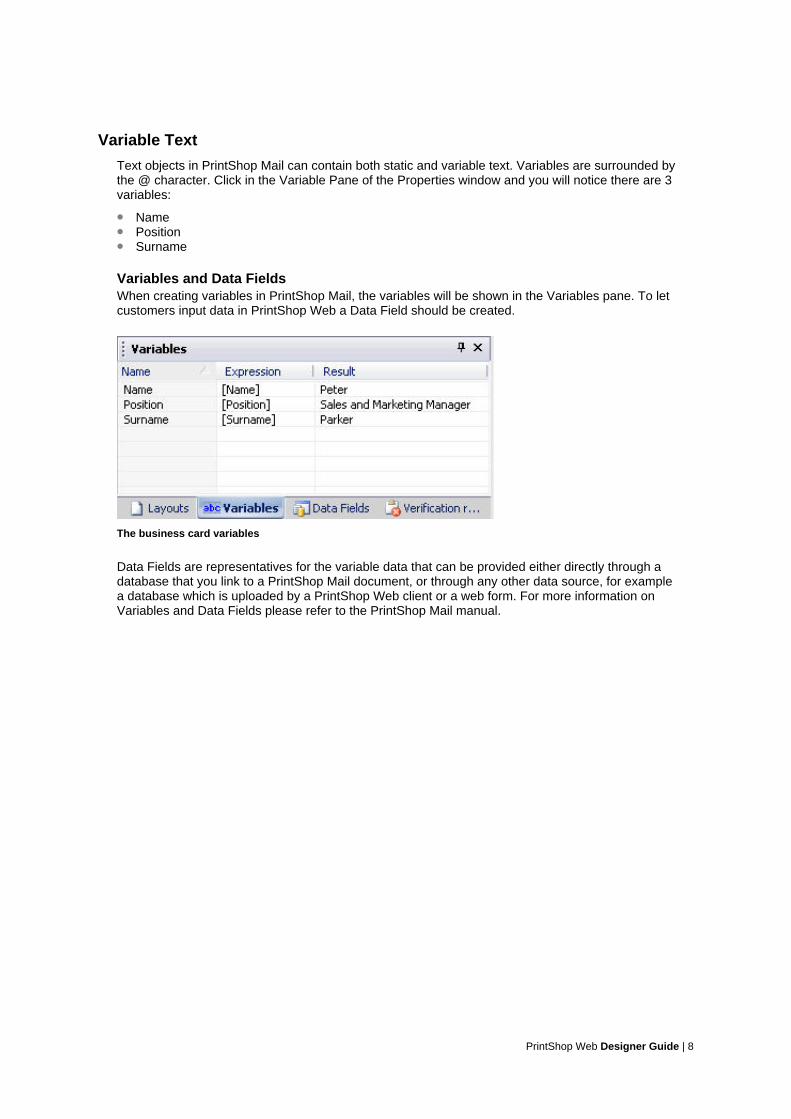
Variable Text
Text objects in PrintShop Mail can contain both static and variable text. Variables are surrounded bythe @ character. Click in the Variable Pane of the Properties window and you will notice there are 3variables:
• Name• Position• Surname
Variables and Data FieldsWhen creating variables in PrintShop Mail, the variables will be shown in the Variables pane. To letcustomers input data in PrintShop Web a Data Field should be created.
The business card variables
Data Fields are representatives for the variable data that can be provided either directly through adatabase that you link to a PrintShop Mail document, or through any other data source, for examplea database which is uploaded by a PrintShop Web client or a web form. For more information onVariables and Data Fields please refer to the PrintShop Mail manual.

PrintShop Web Designer Guide | 9
Expressions
To create a Data Field an expression so should be created for one or multiple variables. Each variablein the business card document has an expression and a result. By double clicking a variable theexpression builder will appear.
The expression builder
Enter the name of the variable or a custom value and place this between square brackets. Theexpression automatically creates a Data Field.
Data Field properties
Select the Data Fields pane. By selecting a Data Field, you can view and edit its properties in theProperties panel. The Data Field properties let you change the following items:
• Default Value: this value will be initial value that the end user will be see in PrintShop Web• Remarks: the information in this field will add a comment to the PrintShop Web user input form.
You can use this to give clients a hint about the information that need to be entered for this field.• Source: this option can be either Database, a database uploaded by the PrintShop Web client, or
User Input, manually entered data using a web form.
The Source options
In the Business Card document we used User Input for the three data fields. In the PrintShop Web website the client should enter data by typing it in a web form.

PrintShop Web Designer Guide | 10
Crop marks and Repetition settings
PrintShop Mail has the ability to print crop marks and print multiple layouts (in this case businesscards) on a paper. These settings can be found in the PrintShop Mail preferences.
Repetition settings in PrintShop Mail
Crop marksTo print crop marks around a layout, select Imposition in the Preferences dialog (Edit menu)
RepetitionThe settings in the Repetition panel allows you to print multiple layouts on a page. The values betweenthe brackets by Horizontal and Vertical are the maximum of repetition for this layout on page.
In this case we used the paper format A4. If you change the paper size in the Page Setup (File menu)to for example A3 the maximum number of repetition will also change. Before you print or upload thejob you may verify the document, which reduces errors. You can find this option in Layout menu (VerifyDocument).

PrintShop Web Designer Guide | 11
Print the job
You may want to verify the output before publishing the document to PrintShop Web. Select Print in theFile menu to output the document to a printer.
Publish to PrintShop Web
Upload the job to PrintShop Web. Before continuing be sure that you have read the instructions in thechapter How to Publish templates from PrintShop Mail in the PrintShop Mail manual.
A business card example

PrintShop Web Designer Guide | 12
Select Publish to Web in the File menu and follow the instructions on-screen. In the Publish toPrintShop Web dialog create a new publication type and click Next. Follow the instructions on-screento publish the document.
The online document
After publishing the template document your customers can start creating jobs using the PrintShopWeb web site.
Open a browser, for instance Internet Explorer and enter the URL of your PrintShop Web web site.Login, navigate to the New Document section and select the Business Card document. The user inputform appears showing three input fields. Change the values of these fields and click Preview to updatethe thumbnail and view your changes.
Click Next to complete the ordering process.
The business card user input form showing the three data fields

PrintShop Web Designer Guide | 13
Postcards
A travel agent wants to inform existing customers that they offer short vacations. They decide to sendeach customer a personalized postcard, based on their vacation interest last year. The interests of thecustomers are divided in:
• a family vacation• a cultural vacation• an active vacation
A business card example
The interest of the customers are stored in a database. That database is going to be used topersonalize the cards, with text and an appropriate image. In this section you will learn how to:
• print pages based on someone’s interest• enable repetition on a page• upload a variable data job to PrintShop Web server• how to handle it in PrintShop Web
PrintShop Web Designer Guide | 14
Ingredients
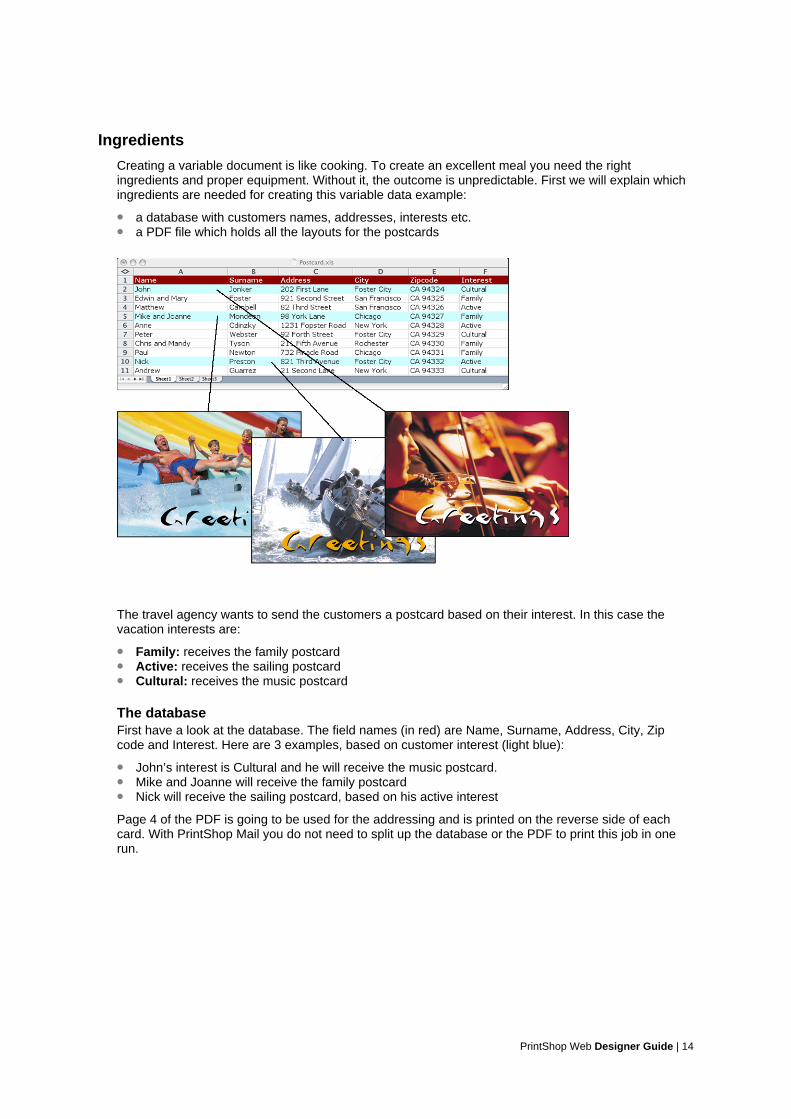
Creating a variable document is like cooking. To create an excellent meal you need the rightingredients and proper equipment. Without it, the outcome is unpredictable. First we will explain whichingredients are needed for creating this variable data example:
• a database with customers names, addresses, interests etc.• a PDF file which holds all the layouts for the postcards
The travel agency wants to send the customers a postcard based on their interest. In this case thevacation interests are:
• Family: receives the family postcard• Active: receives the sailing postcard• Cultural: receives the music postcard
The databaseFirst have a look at the database. The field names (in red) are Name, Surname, Address, City, Zipcode and Interest. Here are 3 examples, based on customer interest (light blue):
• John’s interest is Cultural and he will receive the music postcard.• Mike and Joanne will receive the family postcard• Nick will receive the sailing postcard, based on his active interest
Page 4 of the PDF is going to be used for the addressing and is printed on the reverse side of eachcard. With PrintShop Mail you do not need to split up the database or the PDF to print this job in onerun.
PrintShop Web Designer Guide | 15
Layouts
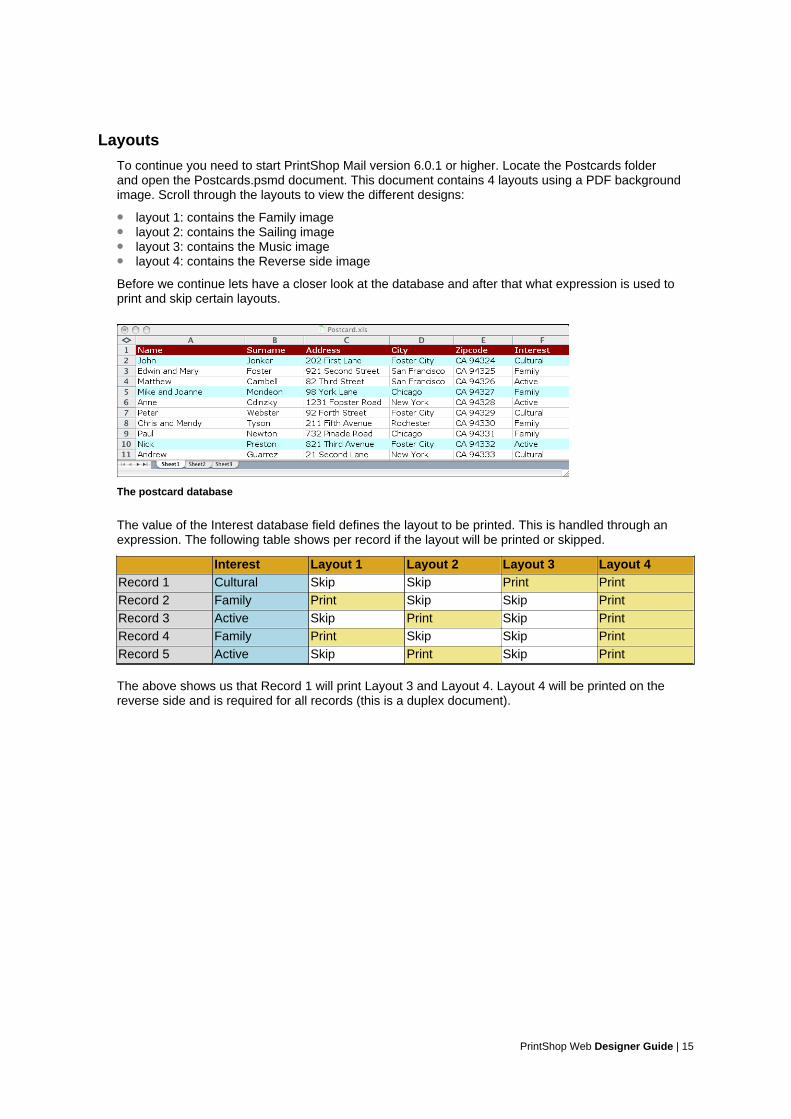
To continue you need to start PrintShop Mail version 6.0.1 or higher. Locate the Postcards folderand open the Postcards.psmd document. This document contains 4 layouts using a PDF backgroundimage. Scroll through the layouts to view the different designs:
• layout 1: contains the Family image• layout 2: contains the Sailing image• layout 3: contains the Music image• layout 4: contains the Reverse side image
Before we continue lets have a closer look at the database and after that what expression is used toprint and skip certain layouts.
The postcard database
The value of the Interest database field defines the layout to be printed. This is handled through anexpression. The following table shows per record if the layout will be printed or skipped.
Interest Layout 1 Layout 2 Layout 3 Layout 4Record 1 Cultural Skip Skip Print PrintRecord 2 Family Print Skip Skip PrintRecord 3 Active Skip Print Skip PrintRecord 4 Family Print Skip Skip PrintRecord 5 Active Skip Print Skip Print
The above shows us that Record 1 will print Layout 3 and Layout 4. Layout 4 will be printed on thereverse side and is required for all records (this is a duplex document).

PrintShop Web Designer Guide | 16
Layout conditions
To print layouts, based on the customers interest, we use a Layout Condition. Layout Condition canskip, print or leave pages blank during the printing process. In this case we have to tell each layout,based on the customer interest, if it should be printed or not (skipped).
A postcard sample
Select Layout 1 in the Layout pane on the right hand side of the PrintShop Mail window. The layoutshows the Family image. We want to print this layout if a customer is interested in a family vacation.The Action item in the Properties pane tells you if the current layout is going to be printed or not.
The Action option in the Properties pane
Scroll through the records using the browse options at the bottom of the screen and you will notice thateach layout has its own condition.
PrintShop Web Designer Guide | 17
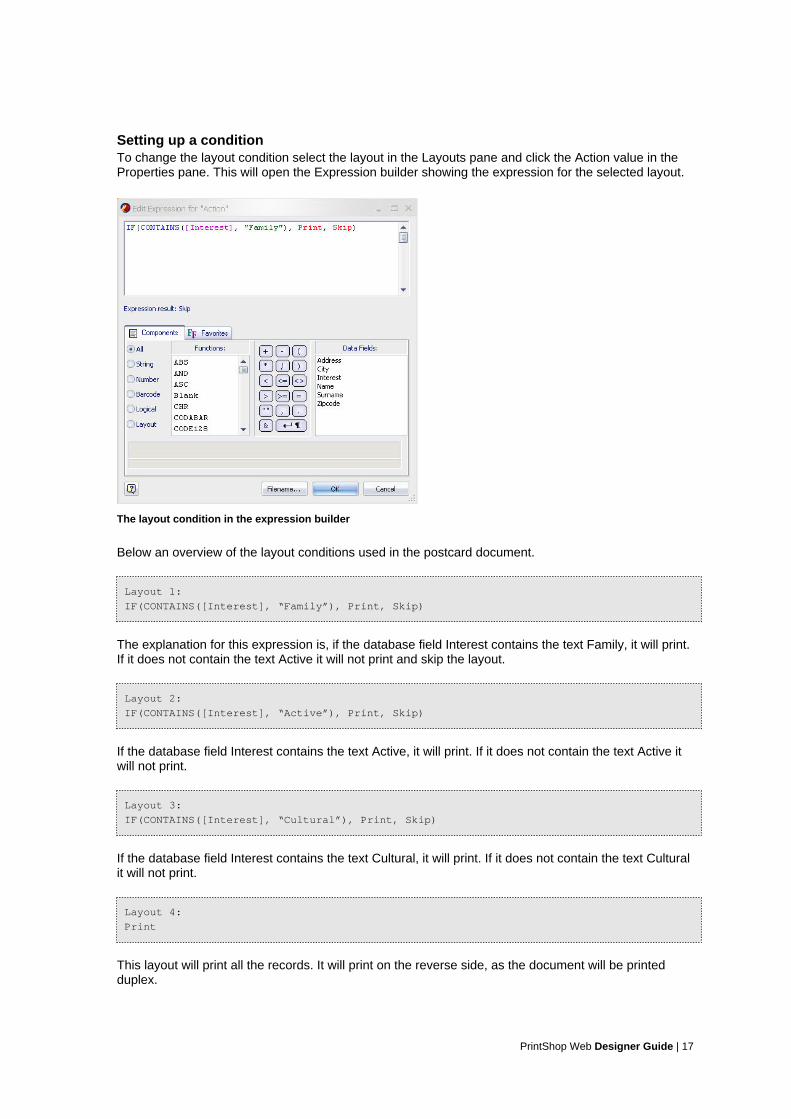
Setting up a conditionTo change the layout condition select the layout in the Layouts pane and click the Action value in theProperties pane. This will open the Expression builder showing the expression for the selected layout.
The layout condition in the expression builder
Below an overview of the layout conditions used in the postcard document.
Layout 1:
IF(CONTAINS([Interest], “Family”), Print, Skip)
The explanation for this expression is, if the database field Interest contains the text Family, it will print.If it does not contain the text Active it will not print and skip the layout.
Layout 2:
IF(CONTAINS([Interest], “Active”), Print, Skip)
If the database field Interest contains the text Active, it will print. If it does not contain the text Active itwill not print.
Layout 3:
IF(CONTAINS([Interest], “Cultural”), Print, Skip)
If the database field Interest contains the text Cultural, it will print. If it does not contain the text Culturalit will not print.
Layout 4:
This layout will print all the records. It will print on the reverse side, as the document will be printedduplex.
PrintShop Web Designer Guide | 18
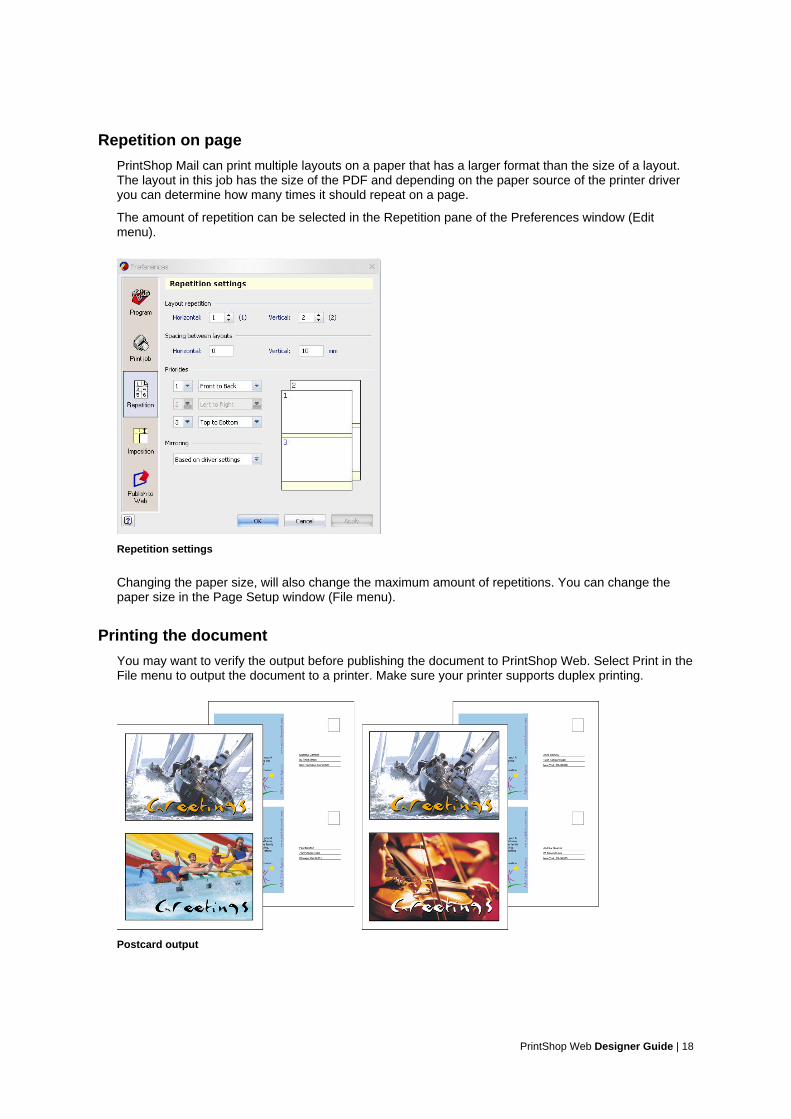
Repetition on page
PrintShop Mail can print multiple layouts on a paper that has a larger format than the size of a layout.The layout in this job has the size of the PDF and depending on the paper source of the printer driveryou can determine how many times it should repeat on a page.
The amount of repetition can be selected in the Repetition pane of the Preferences window (Editmenu).
Repetition settings
Changing the paper size, will also change the maximum amount of repetitions. You can change thepaper size in the Page Setup window (File menu).
Printing the document
You may want to verify the output before publishing the document to PrintShop Web. Select Print in theFile menu to output the document to a printer. Make sure your printer supports duplex printing.
Postcard output

PrintShop Web Designer Guide | 19
Publish the document
Before continuing be sure that you follow the instructions in the chapter How to Publish to PrintShopWeb in the PrintShop Mail manual. From PrintShop Mail select Publish to PrintShop Web in the Filemenu and follow the online instruction. Publish the job to the Marketing publication type.
Select the Marketing publication type
PrintShop Web
Open a browser, for instance Internet Explorer and enter the URL of your PrintShop Web web site.Login, navigate to the New Document section and select the Postcard document.
In this case the document requires you to upload a database file. Click Browse and select thePostcard.xls database file. After uploading the file you can browse the records and update the preview.
Click Next to complete the ordering process.

PrintShop Web Designer Guide | 20
The postcard document in PrintShop Web
PrintShop Web Designer Guide | 21
Newsletters
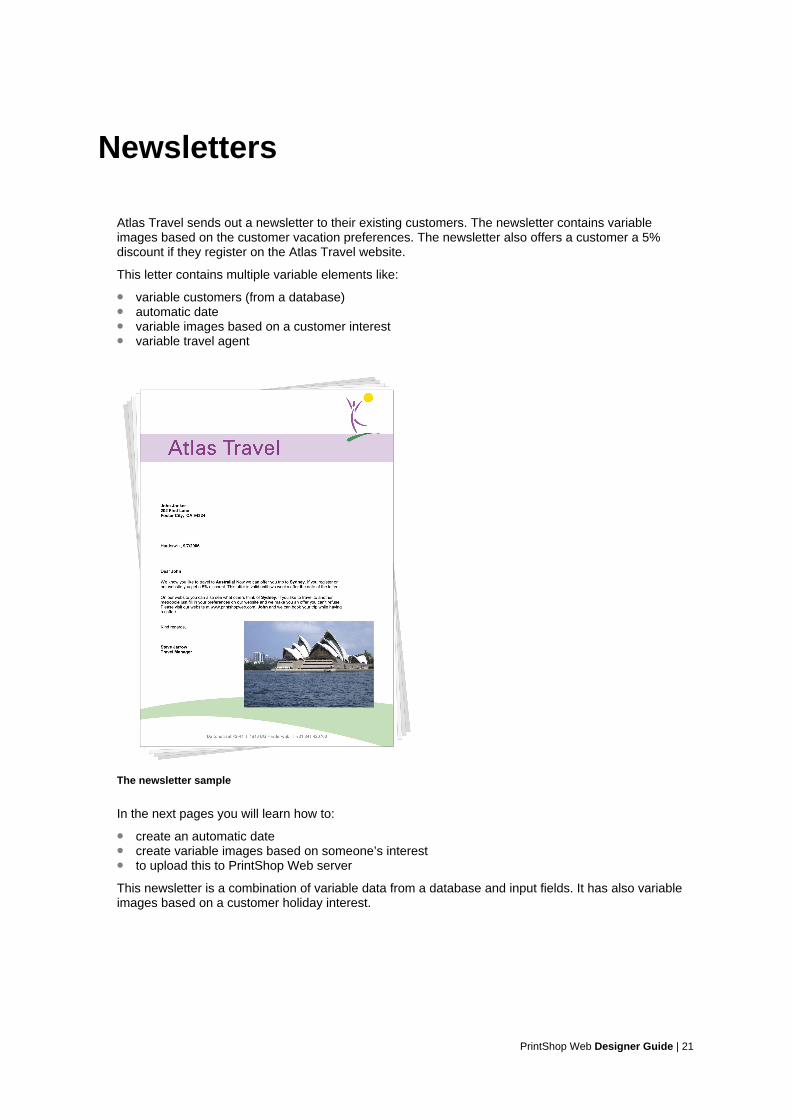
Atlas Travel sends out a newsletter to their existing customers. The newsletter contains variableimages based on the customer vacation preferences. The newsletter also offers a customer a 5%discount if they register on the Atlas Travel website.
This letter contains multiple variable elements like:
• variable customers (from a database)• automatic date• variable images based on a customer interest• variable travel agent
The newsletter sample
In the next pages you will learn how to:
• create an automatic date• create variable images based on someone’s interest• to upload this to PrintShop Web server
This newsletter is a combination of variable data from a database and input fields. It has also variableimages based on a customer holiday interest.
PrintShop Web Designer Guide | 22
Variable elements
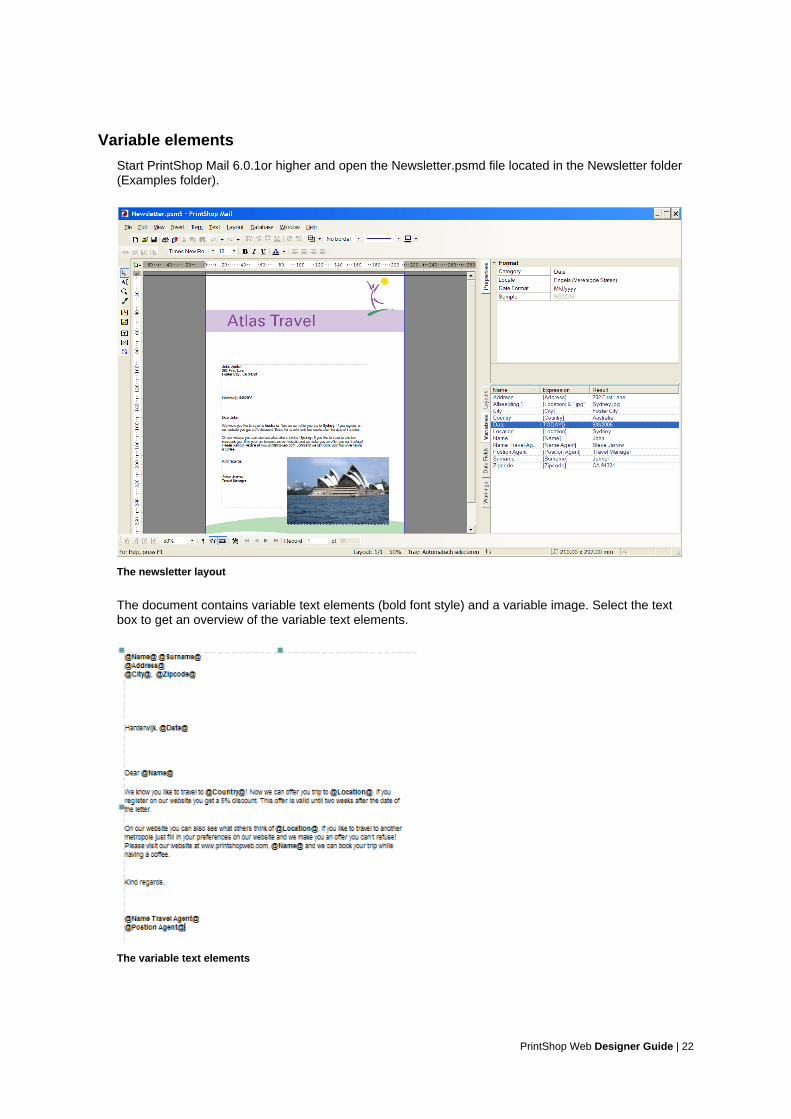
Start PrintShop Mail 6.0.1or higher and open the Newsletter.psmd file located in the Newsletter folder(Examples folder).
The newsletter layout
The document contains variable text elements (bold font style) and a variable image. Select the textbox to get an overview of the variable text elements.
The variable text elements
PrintShop Web Designer Guide | 23
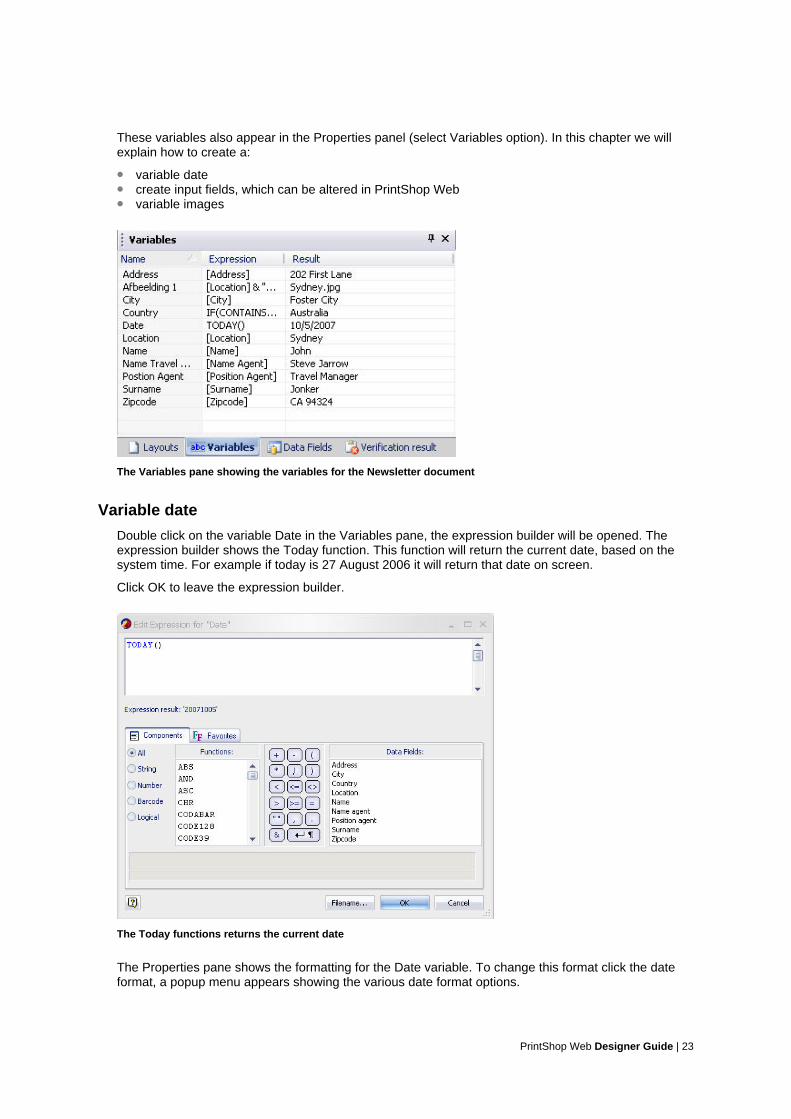
These variables also appear in the Properties panel (select Variables option). In this chapter we willexplain how to create a:
• variable date• create input fields, which can be altered in PrintShop Web• variable images
The Variables pane showing the variables for the Newsletter document
Variable date
Double click on the variable Date in the Variables pane, the expression builder will be opened. Theexpression builder shows the Today function. This function will return the current date, based on thesystem time. For example if today is 27 August 2006 it will return that date on screen.
Click OK to leave the expression builder.
The Today functions returns the current date
The Properties pane shows the formatting for the Date variable. To change this format click the dateformat, a popup menu appears showing the various date format options.

PrintShop Web Designer Guide | 24
The Today functions returns the current date
Input Fields
In the Newsletter document we created two user input fields:
• the Name Travel Agent variable• the Position Agent variable
Double clicking the variable Name Travel Agent will open the expression builder. Between the bracketsyou will see the variable: [Name Agent]
This variable does not come from a database, but was typed in. Click OK to close the expressionbuilder window.
Select Data Fields in the Properties window, and you can change it properties. By clicking the variableName Agent, you have the possibility to alter the source of it. In this case we choose the option UserInput. User Input fields gives end users the possibility to type in data or change its default in thePrintShop Web web site.
Change the Source option to User Input in the Properties pane
PrintShop Web Designer Guide | 25
Variable images
The Newsletter document contains a variable image. Based on the customers interest a specific photois printed. This document makes use of four different images:
• Paris• Barcelona• Amsterdam• Sydney
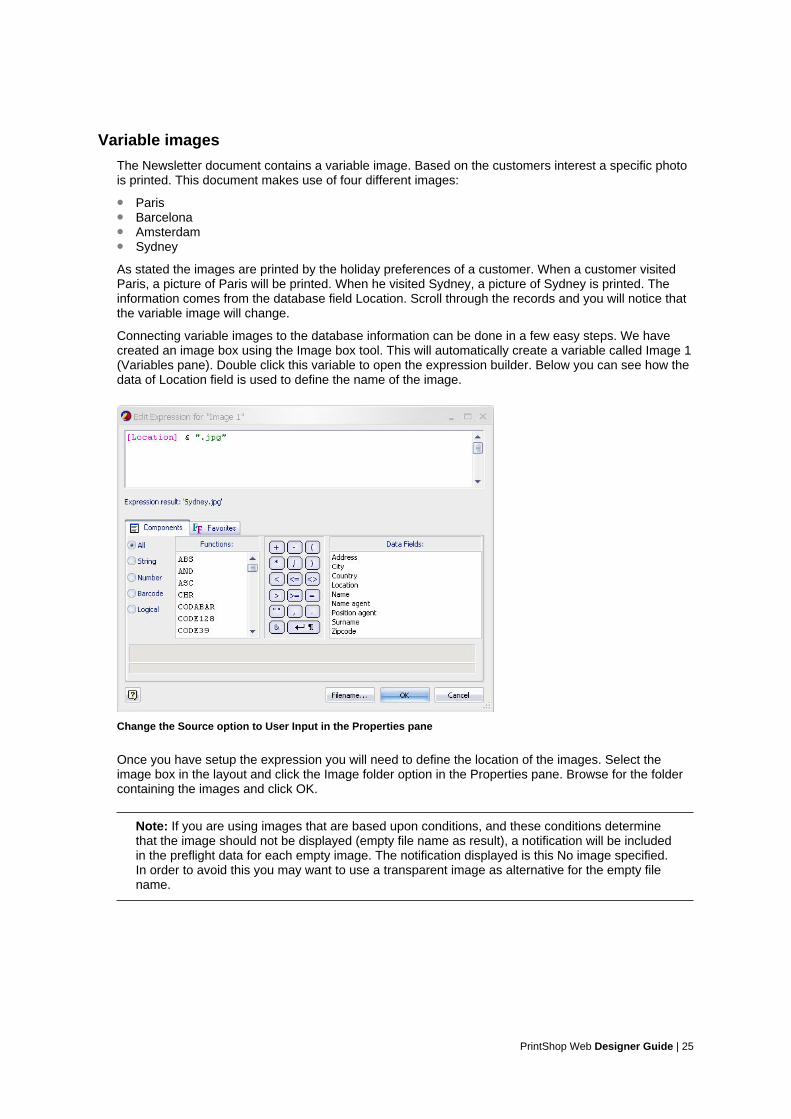
As stated the images are printed by the holiday preferences of a customer. When a customer visitedParis, a picture of Paris will be printed. When he visited Sydney, a picture of Sydney is printed. Theinformation comes from the database field Location. Scroll through the records and you will notice thatthe variable image will change.
Connecting variable images to the database information can be done in a few easy steps. We havecreated an image box using the Image box tool. This will automatically create a variable called Image 1(Variables pane). Double click this variable to open the expression builder. Below you can see how thedata of Location field is used to define the name of the image.
Change the Source option to User Input in the Properties pane
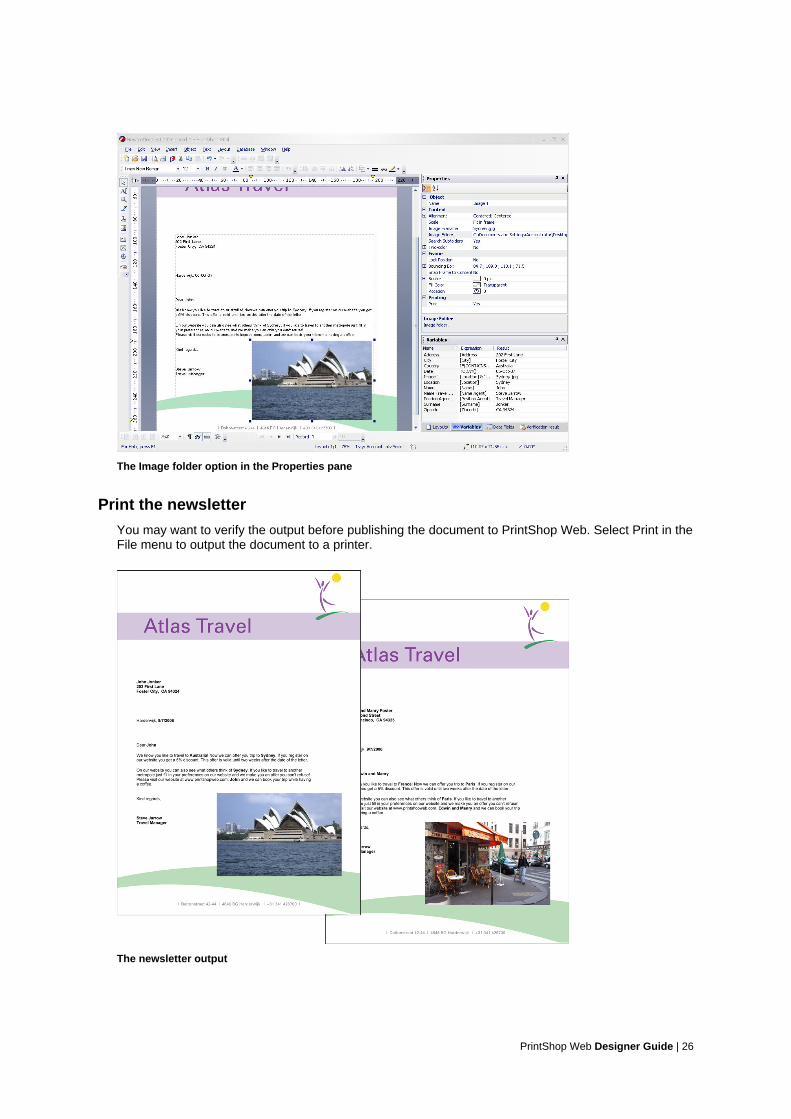
Once you have setup the expression you will need to define the location of the images. Select theimage box in the layout and click the Image folder option in the Properties pane. Browse for the foldercontaining the images and click OK.
Note: If you are using images that are based upon conditions, and these conditions determinethat the image should not be displayed (empty file name as result), a notification will be includedin the preflight data for each empty image. The notification displayed is this No image specified.In order to avoid this you may want to use a transparent image as alternative for the empty filename.
PrintShop Web Designer Guide | 26
The Image folder option in the Properties pane
Print the newsletter
You may want to verify the output before publishing the document to PrintShop Web. Select Print in theFile menu to output the document to a printer.
The newsletter output
PrintShop Web Designer Guide | 27
Publish to PrintShop Web
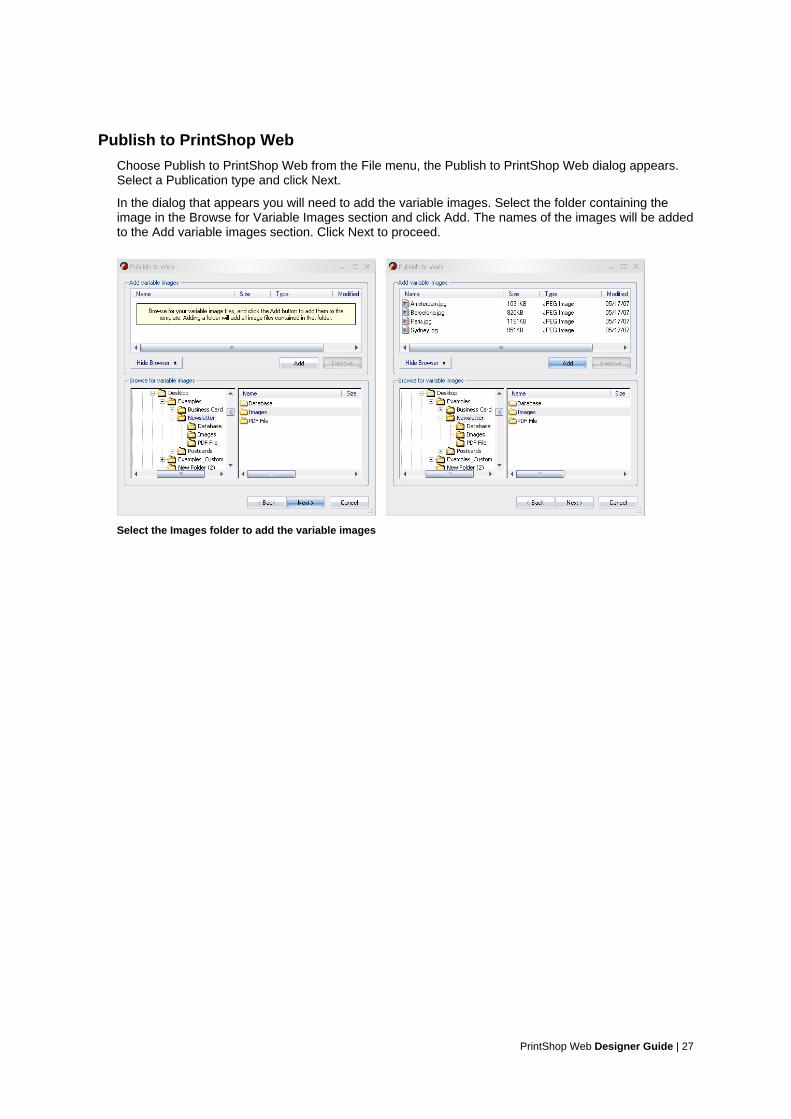
Choose Publish to PrintShop Web from the File menu, the Publish to PrintShop Web dialog appears.Select a Publication type and click Next.
In the dialog that appears you will need to add the variable images. Select the folder containing theimage in the Browse for Variable Images section and click Add. The names of the images will be addedto the Add variable images section. Click Next to proceed.
Select the Images folder to add the variable images
PrintShop Web Designer Guide | 28
PrintShop Web
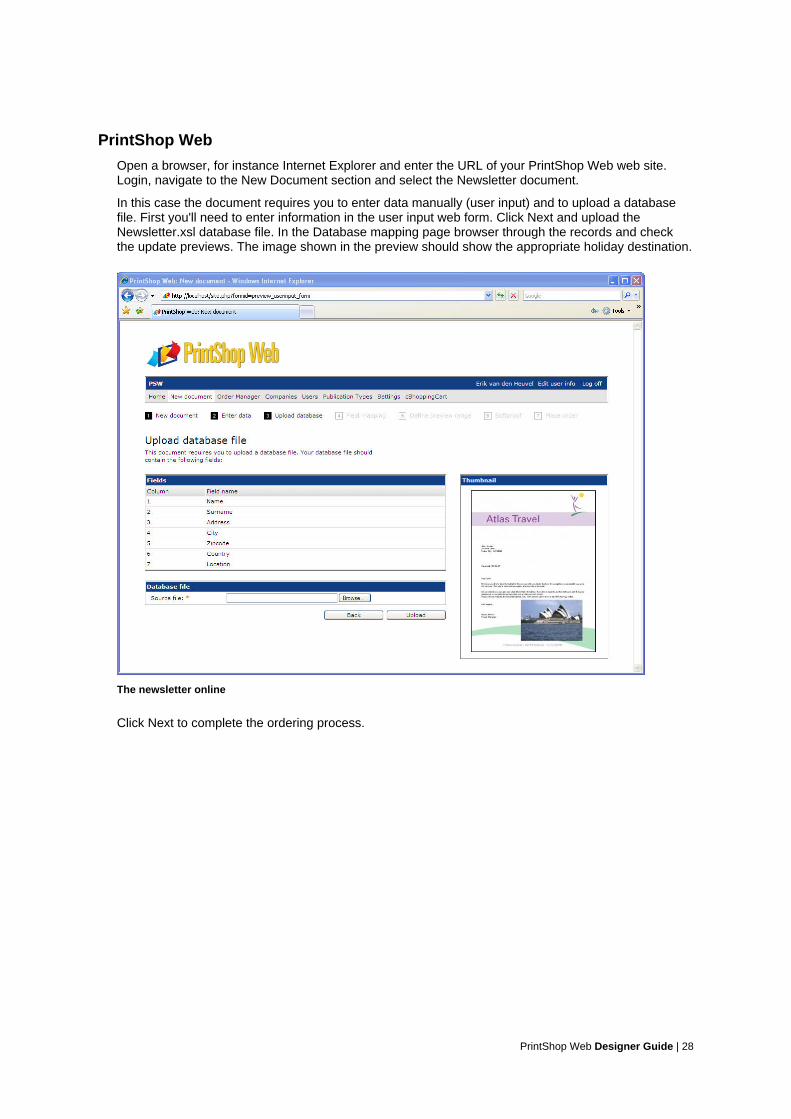
Open a browser, for instance Internet Explorer and enter the URL of your PrintShop Web web site.Login, navigate to the New Document section and select the Newsletter document.
In this case the document requires you to enter data manually (user input) and to upload a databasefile. First you'll need to enter information in the user input web form. Click Next and upload theNewsletter.xsl database file. In the Database mapping page browser through the records and checkthe update previews. The image shown in the preview should show the appropriate holiday destination.
The newsletter online
Click Next to complete the ordering process.

PrintShop Web Designer Guide | 29
Creating a custom Watermark
With the introduction of PrinShop Mail 6.0 you can specifiy objects as non printable. These items willonly be shown in the JPG previews and PDF softproofs of PrintShop Web. Non printable objects canbe used to create custom watermarks and emulate preprinted paper or specific paper types.
Non Printable Objects
Placing a watermark on your documents will discourage people from copying them, claiming themas their own. In PrintShop Mail you can set the non printable property to any kind of object. Here's asimple way to add a custom watermark to your documents:
1 Launch PrintShop Mail and open the Newsletter.psmd file located in the Newsletter folder(Examples folder).
2 Select the Image File option in the Insert menu. The Select Image File dialog appears.
3 Navigate to the Newsletter folder located in the Examples folder. Select the watermark.gif imageand click Open. The image will be placed in the layout.
4 Move the image to a central position on the layout, rotate the image and scale it so it overlaps someimportant/variable areas of the design.
The scaled and rotated watermark image in the layout
5 Make sure that the image is selected and select Preview only in the Printing options section of theProperties panel. By setting this option to Preview only, the image will only be visible in the JPGpreview and PDF softproofs generated by PrintShop Web. Print and PDF output created by anoperator (in-plant status) will not show this object.
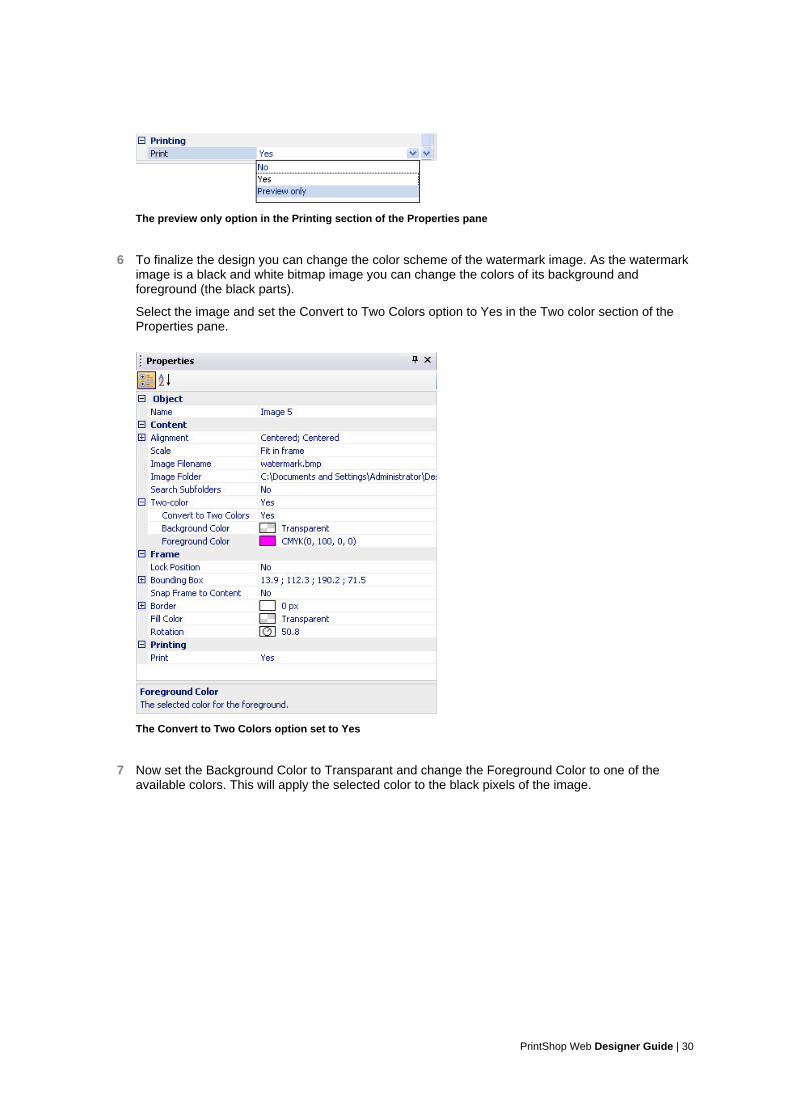
PrintShop Web Designer Guide | 30
The preview only option in the Printing section of the Properties pane
6 To finalize the design you can change the color scheme of the watermark image. As the watermarkimage is a black and white bitmap image you can change the colors of its background andforeground (the black parts).
Select the image and set the Convert to Two Colors option to Yes in the Two color section of theProperties pane.
The Convert to Two Colors option set to Yes
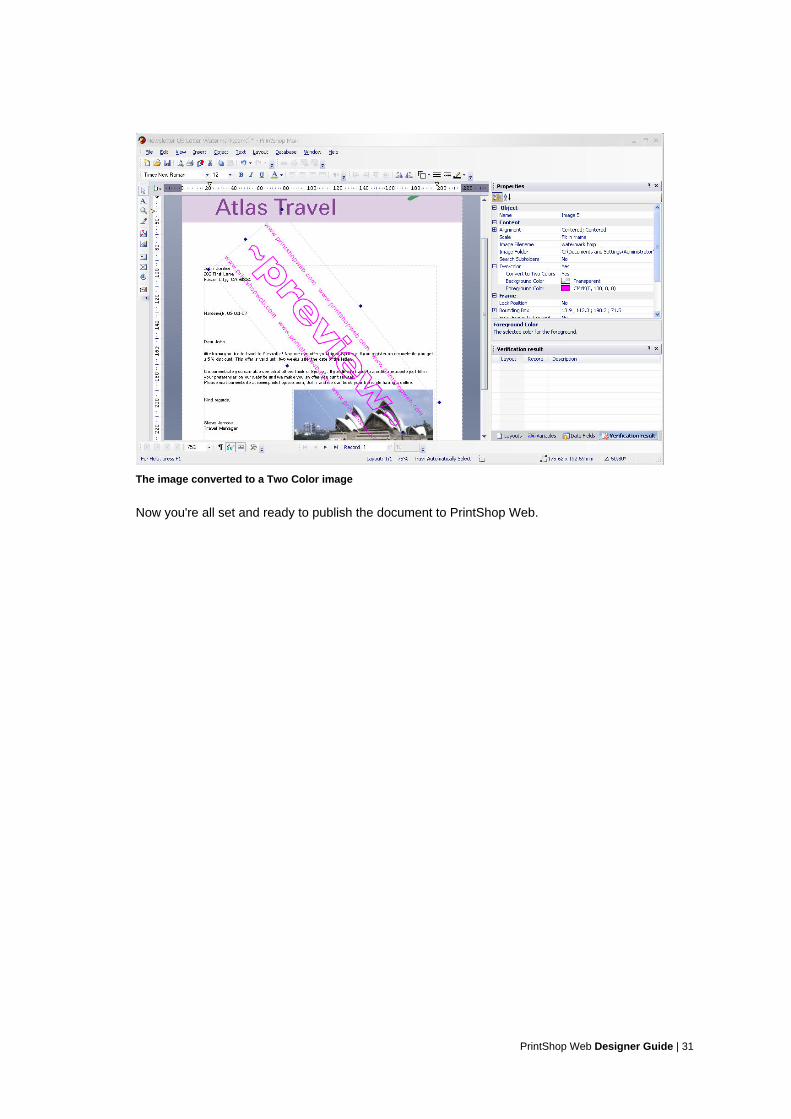
7 Now set the Background Color to Transparant and change the Foreground Color to one of theavailable colors. This will apply the selected color to the black pixels of the image.
PrintShop Web Designer Guide | 31
The image converted to a Two Color image
Now you're all set and ready to publish the document to PrintShop Web.

PrintShop Web Designer Guide | 32
How to Continue
Now you completed this guide you might want to learn more about PrintShop Mail and/or PrintShopWeb.
To serve the world wide variable data needs, we work with a global network of partners, localdistributors and support departments. Check the following website for more information:
• www.objectiflune.com

PrintShop Web Designer Guide | 33
ELECTRONIC END USER LICENSE AGREEMENTFOR PRINTSHOP WEB
NOTICE TO USER: THIS IS A CONTRACT. BY INSTALLING THIS SOFTWARE YOU ACCEPT ALL THETERMS AND CONDITIONS OF THIS AGREEMENT.
This Objectif Lune End User License Agreement accompanies the PrintShop Web product and relatedexplanatory materials ("Software"). The term "Software" also shall include any upgrades, modified versionsor updates of the Software licensed to you by Objectif Lune. Please read this Agreement carefully. Upon youracceptance of this Agreement, Objectif Lune grants to you a nonexclusive license to use the Software, providedthat you agree to the following:
1 Use of the Software.a You may install the Software on a hard disk or other storage device; install and use the Software on a
file server for use on a network for the purposes of:(i) permanent installation onto hard disks or other storage devices or(ii) use of the Software over such network; and make backup copies of the Software.
b You may make and distribute unlimited copies of the Software, including copies for commercialdistribution, as long as each copy that you make and distribute contains this Agreement, thePrintShop Web installer, and the same copyright and other proprietary notices pertaining to thisSoftware that appear in the Software. If you download the Software from the Internet or similaron-line source, you must include the Objectif Lune copyright notice for the Software with any on-linedistribution and on any media you distribute that includes the Software.
c Once you have purchased a licensed dongle, you need to register that dongle to receive technicalsupport.
2 CopyrightThe Software is owned by Objectif Lune and its suppliers, and its structure, organization and code arethe valuable trade secrets of Objectif Lune and its suppliers. The Software also is protected by DutchCopyright Law.
3 Restrictions.You agree not to modify, adapt, translate, reverse engineer, decompile, disassemble or otherwiseattempt to discover the source code of the Software. You may not alter or modify in any way the installerprogram or create a new installer for the Software. The Software is licensed and distributed by Atlas forcreating optimized print jobs.
4 No Warranty.The Software is being delivered to you AS IS and Objectif Lune makes no warranty as to its use orperformance.OBJECTIF LUNE AND ITS SUPPLIERS DO NOT AND CANNOT WARRANT THE PERFORMANCEOR RESULTS YOU MAY OBTAIN BY USING THE SOFTWARE OR DOCUMENTATION.OBJECTIF LUNE AND ITS SUPPLIERS MAKE NO WARRANTIES, EXPRESS OR IMPLIED, AS TONONINFRINGEMENT OF THIRD PARTY RIGHTS, MERCHANTABILITY, OR FITNESS FOR ANYPARTICULAR PURPOSE. IN NO EVENT WILL OBJECTIF LUNE OR ITS SUPPLIERS BE LIABLETO YOU FOR ANY CONSEQUENTIAL, INCIDENTAL OR SPECIAL DAMAGES, INCLUDING ANYLOST PROFITS OR LOST SAVINGS, EVEN IF AN OBJECTIF LUNE REPRESENTATIVE HAS BEENADVISED OF THE POSSIBILITY OF SUCH DAMAGES, OR FOR ANY CLAIM BY ANY THIRD PARTY.Some states or jurisdictions do not allow the exclusion or limitation of incidental, consequential or specialdamages, or the exclusion of implied warranties or limitations on how long an implied warranty may last,so the above limitations may not apply to you.
5 Governing Law and General Provisions.This Agreement will be governed by the laws of the Netherlands, excluding the application of its conflictsof law rules. This Agreement will not be governed by the United Nations Convention on Contracts for theInternational Sale of Goods, the application of which is expressly excluded. If any part of this Agreementis found void and unenforceable, it will not affect the validity of the balance of the Agreement, which shallremain valid and enforceable according to its terms. You agree that the Software will not be shipped,transferred or exported into any country or used in any manner prohibited by any export laws, restrictionsor regulations. This Agreement shall automatically terminate upon failure by you to comply with its terms.This Agreement may only be modified in writing signed by an authorized officer of Objectif Lune.
YOUR ACCEPTANCE OF THE FOREGOING AGREEMENT WAS INDICATED DURING INSTALLATION.


![test_rapport - Wireless Leiden · Web viewEindverslag IRIS-WEB Document ID: IRIS-WEB Versie: 1.0 [4 / 35] Datum: 30-01-2010 Projectcode: IRIS-WEB Datum voltooid: Auteur: Tim Baas](https://static.fdocuments.nl/doc/165x107/60a36378344d2f4a0475c4ee/testrapport-wireless-leiden-web-view-eindverslag-iris-web-document-id-iris-web.jpg)