MODULAR ICE MAKER FM-1000AKE FM-1000AKE-N … fileBraided SS Inlet Hose 1 Outlet Hose 1 ...
14
FM-1000AKE FM-1000AKE-N FM-750AKE FM-750AKE-N FM-600AKE FM-600AKE-N FM-480AKE FM-480AKE-N FM-300AKE FM-300AKE-N FM-170AKE FM-170AKE-N L1F054111 (093014) MODULAR ICE MAKER INSTRUCTION MANUAL FM-480AKE
Transcript of MODULAR ICE MAKER FM-1000AKE FM-1000AKE-N … fileBraided SS Inlet Hose 1 Outlet Hose 1 ...
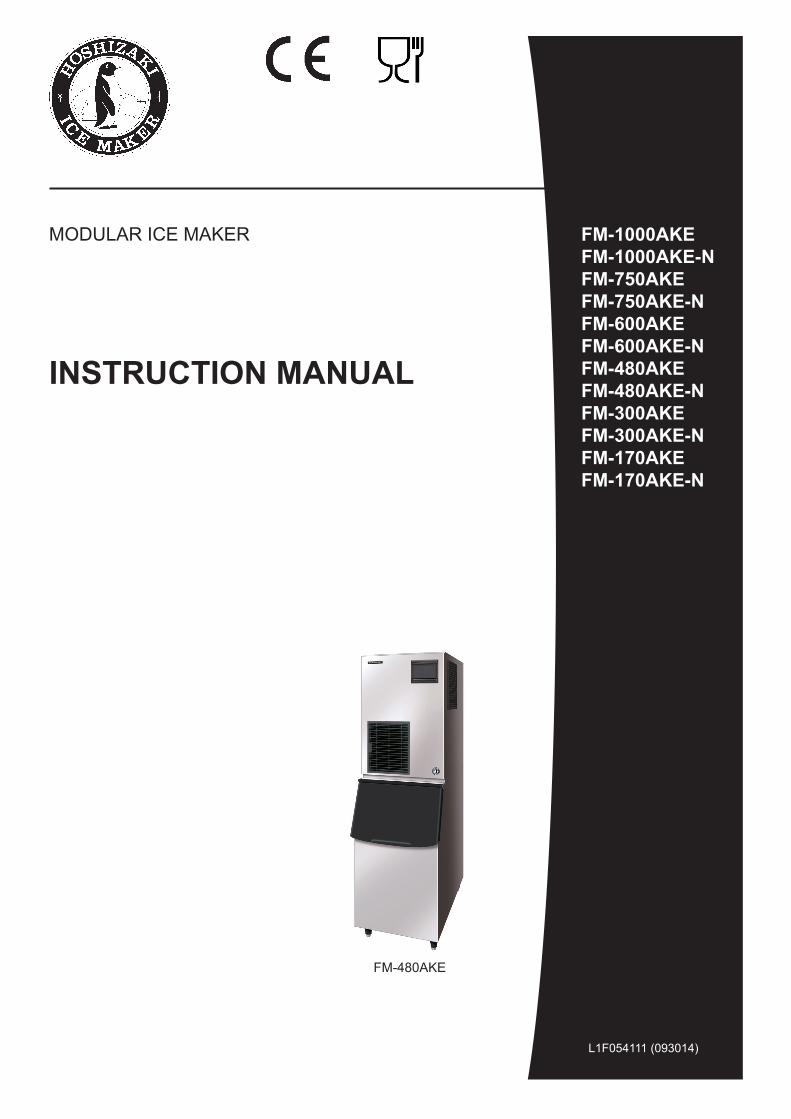
FM-1000AKEFM-1000AKE-NFM-750AKEFM-750AKE-NFM-600AKEFM-600AKE-NFM-480AKEFM-480AKE-NFM-300AKEFM-300AKE-NFM-170AKEFM-170AKE-N
L1F054111 (093014)
MODULAR ICE MAKER
INSTRUCTION MANUAL
FM-480AKE
IMPORTANT SAFETY INFORMATION ..........................................................................................................................................1I. INSTALLATION INSTRUCTIONS ..............................................................................................................................................3 1. CONSTRUCTION ................................................................................................................................................................3 2. ACCESSORIES ...................................................................................................................................................................3 3. UNPACKING ........................................................................................................................................................................3 4. LOCATION ...........................................................................................................................................................................4 5. INSTALLATION ....................................................................................................................................................................4 6. ELECTRICAL CONNECTIONS ............................................................................................................................................5 7. WATER SUPPLY AND DRAIN CONNECTIONS .................................................................................................................5II. OPERATING INSTRUCTIONS ..................................................................................................................................................6 1. START UP ............................................................................................................................................................................7 2. SHUT DOWN .......................................................................................................................................................................7 3. PREPARING THE ICEMAKER FOR LONG STORAGE ......................................................................................................7III. MAINTENANCE .........................................................................................................................................................................8 1. CLEANING ...........................................................................................................................................................................8 2. INSPECTION AND MAINTENANCE ....................................................................................................................................9 3. BEFORE CALLING FOR SERVICE .....................................................................................................................................9 4. DISPOSAL .........................................................................................................................................................................10 5. WARRANTY .......................................................................................................................................................................10SPECIFICATIONS .........................................................................................................................................................................11
1
ENGLISHIMPORTANT SAFETY INFORMATION
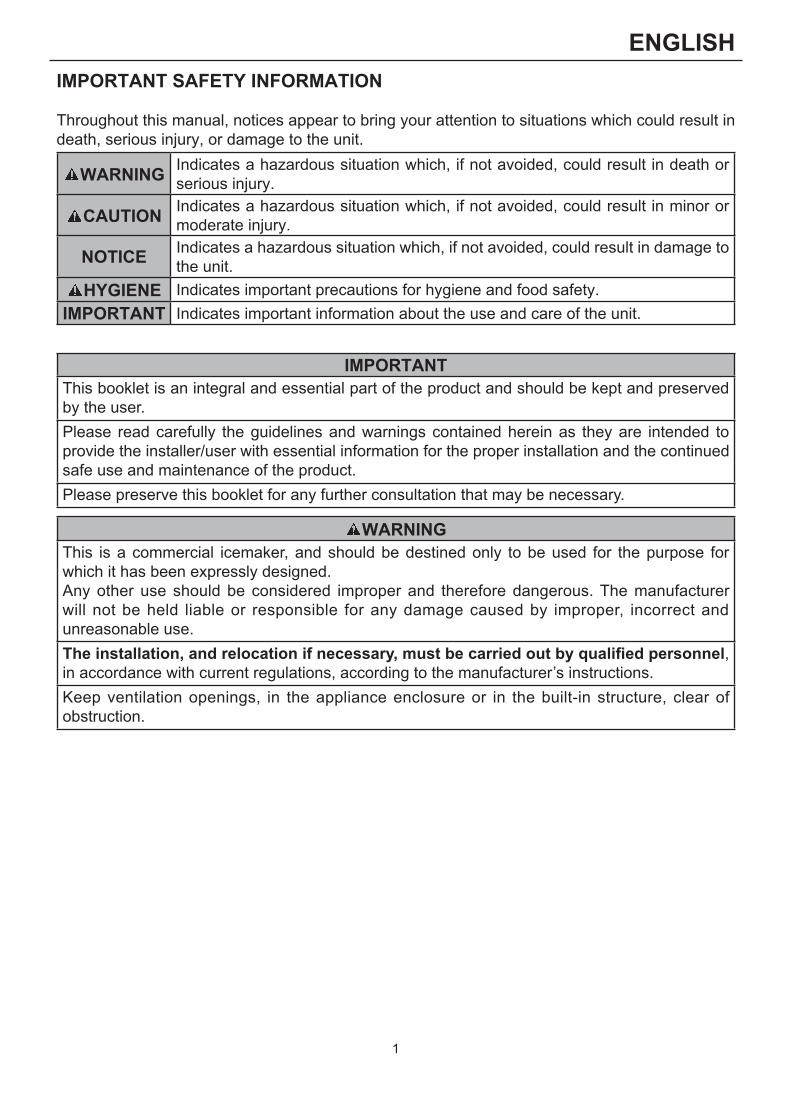
Throughout this manual, notices appear to bring your attention to situations which could result in death, serious injury, or damage to the unit.
WARNING Indicates a hazardous situation which, if not avoided, could result in death or serious injury.
CAUTION Indicates a hazardous situation which, if not avoided, could result in minor or moderate injury.
NOTICE Indicates a hazardous situation which, if not avoided, could result in damage to the unit.
HYGIENE Indicates important precautions for hygiene and food safety.IMPORTANT Indicates important information about the use and care of the unit.
IMPORTANTThis booklet is an integral and essential part of the product and should be kept and preserved by the user. Please read carefully the guidelines and warnings contained herein as they are intended to provide the installer/user with essential information for the proper installation and the continued safe use and maintenance of the product.Please preserve this booklet for any further consultation that may be necessary.
WARNINGThis is a commercial icemaker, and should be destined only to be used for the purpose for which it has been expressly designed.Any other use should be considered improper and therefore dangerous. The manufacturer will not be held liable or responsible for any damage caused by improper, incorrect and unreasonable use.The installation, and relocation if necessary, must be carried out by qualified personnel, in accordance with current regulations, according to the manufacturer’s instructions.Keep ventilation openings, in the appliance enclosure or in the built-in structure, clear of obstruction.
2
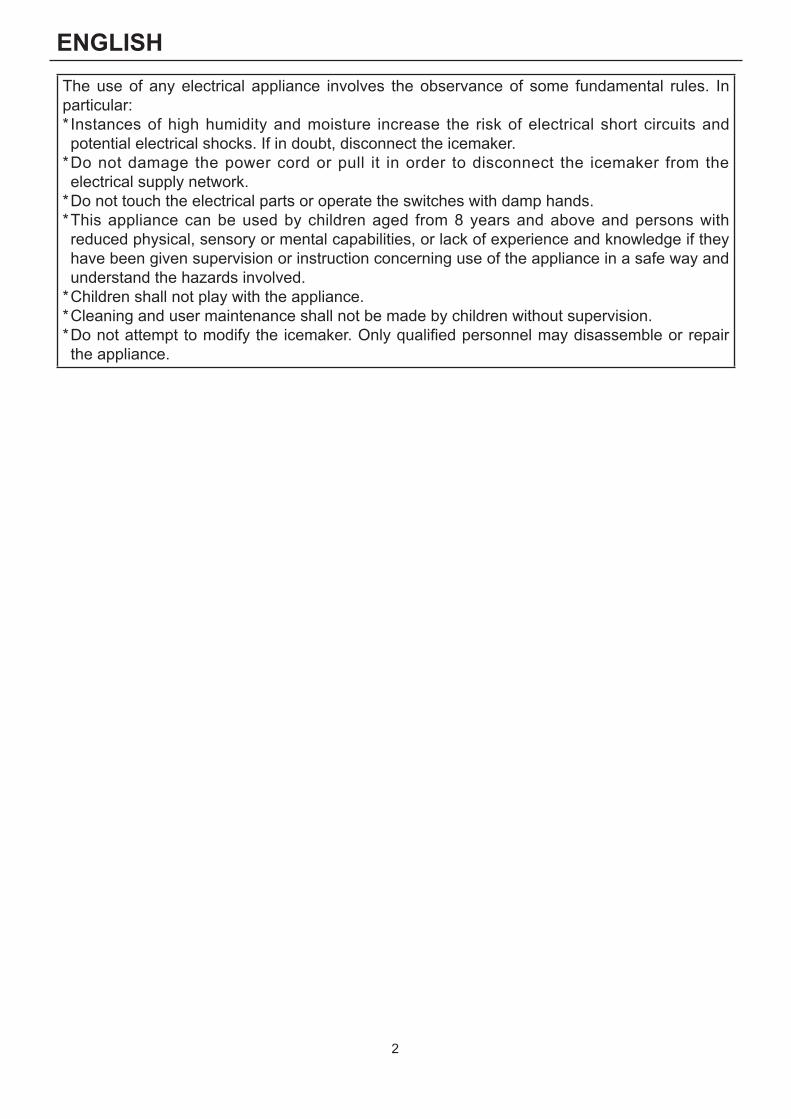
ENGLISHThe use of any electrical appliance involves the observance of some fundamental rules. In particular:* Instances of high humidity and moisture increase the risk of electrical short circuits and potential electrical shocks. If in doubt, disconnect the icemaker.
* Do not damage the power cord or pull it in order to disconnect the icemaker from the electrical supply network.
* Do not touch the electrical parts or operate the switches with damp hands.* This appliance can be used by children aged from 8 years and above and persons with reduced physical, sensory or mental capabilities, or lack of experience and knowledge if they have been given supervision or instruction concerning use of the appliance in a safe way and understand the hazards involved.
* Children shall not play with the appliance.* Cleaning and user maintenance shall not be made by children without supervision.*Donotattempttomodifytheicemaker.Onlyqualifiedpersonnelmaydisassembleorrepairthe appliance.
3
ENGLISHI. INSTALLATION INSTRUCTIONS
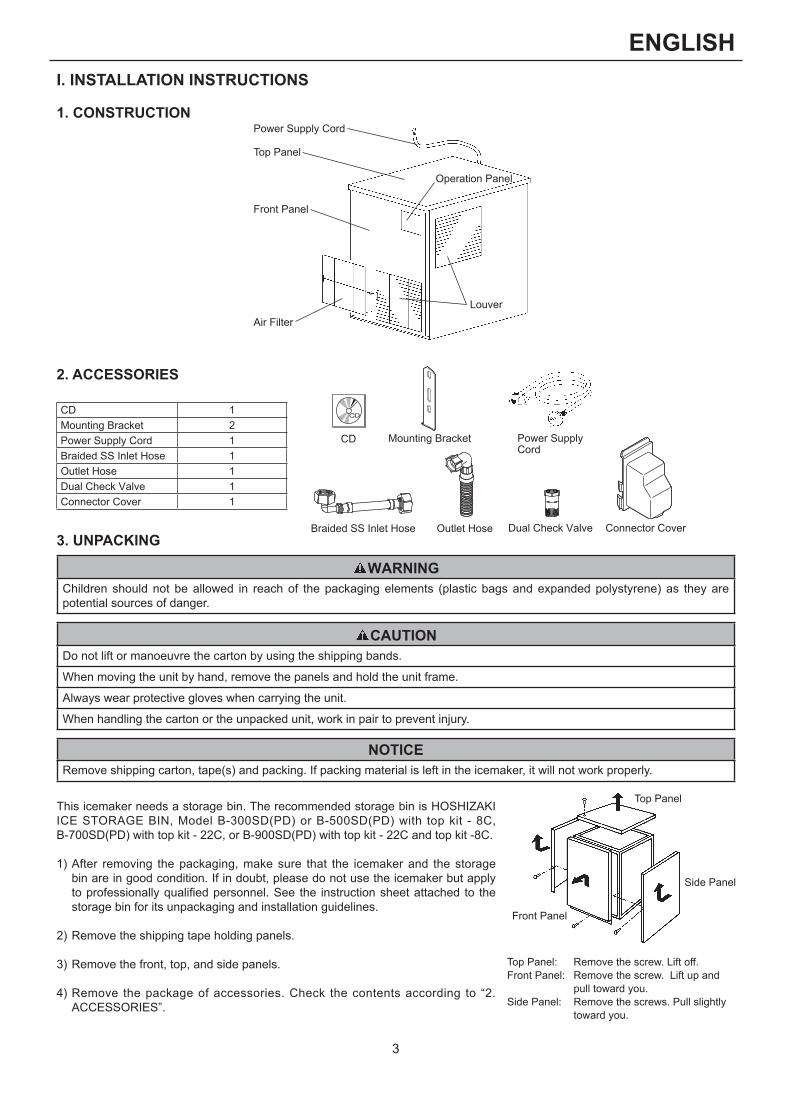
1. CONSTRUCTION
2. ACCESSORIES
CD 1Mounting Bracket 2Power Supply Cord 1Braided SS Inlet Hose 1Outlet Hose 1Dual Check Valve 1Connector Cover 1
3. UNPACKING
WARNINGChildren should not be allowed in reach of the packaging elements (plastic bags and expanded polystyrene) as they are potential sources of danger.
CAUTIONDo not lift or manoeuvre the carton by using the shipping bands.
When moving the unit by hand, remove the panels and hold the unit frame.
Always wear protective gloves when carrying the unit.
When handling the carton or the unpacked unit, work in pair to prevent injury.
NOTICERemove shipping carton, tape(s) and packing. If packing material is left in the icemaker, it will not work properly.
This icemaker needs a storage bin. The recommended storage bin is HOSHIZAKI ICE STORAGE BIN, Model B-300SD(PD) or B-500SD(PD) with top kit - 8C, B-700SD(PD) with top kit - 22C, or B-900SD(PD) with top kit - 22C and top kit -8C.
1) After removing the packaging, make sure that the icemaker and the storage bin are in good condition. If in doubt, please do not use the icemaker but apply to professionally qualified personnel. See the instruction sheet attached to the storage bin for its unpackaging and installation guidelines.
2) Remove the shipping tape holding panels.
3) Remove the front, top, and side panels.
4) Remove the package of accessories. Check the contents according to “2. ACCESSORIES”.
Top Panel: Remove the screw. Lift off.Front Panel: Remove the screw. Lift up and
pull toward you.Side Panel: Remove the screws. Pull slightly
toward you.
Top Panel
Side Panel
Front Panel
Power Supply Cord
Top Panel
Operation Panel
Air Filter
Louver
Front Panel
Power Supply Cord
CD
Connector Cover
Mounting Bracket
Dual Check ValveBraided SS Inlet Hose Outlet Hose
4
ENGLISH5)Removetheprotectiveplasticfilmfromthepanels.Iftheicemakerisexposedtothesunortoheat,removethefilmafterthe
icemaker cools.
4. LOCATION
WARNINGThis icemaker is not intended for outdoor use.
The icemaker should not be located next to ovens, grills or other high heat producing equipment.
This appliance is not suitable for installation in an area where a water jet could be used.
CAUTIONThelocationshouldprovideafirmandlevelfoundationfortheicemaker.
NOTICEDo not place anything on top of the icemaker or in front of the louver.
IMPORTANTNormal operating ambient temperature should be within 5°C to 40°C. Water connection is cold water only. Operation of the icemaker, for extended periods, outside of these normal temperature ranges may affect production capacity.
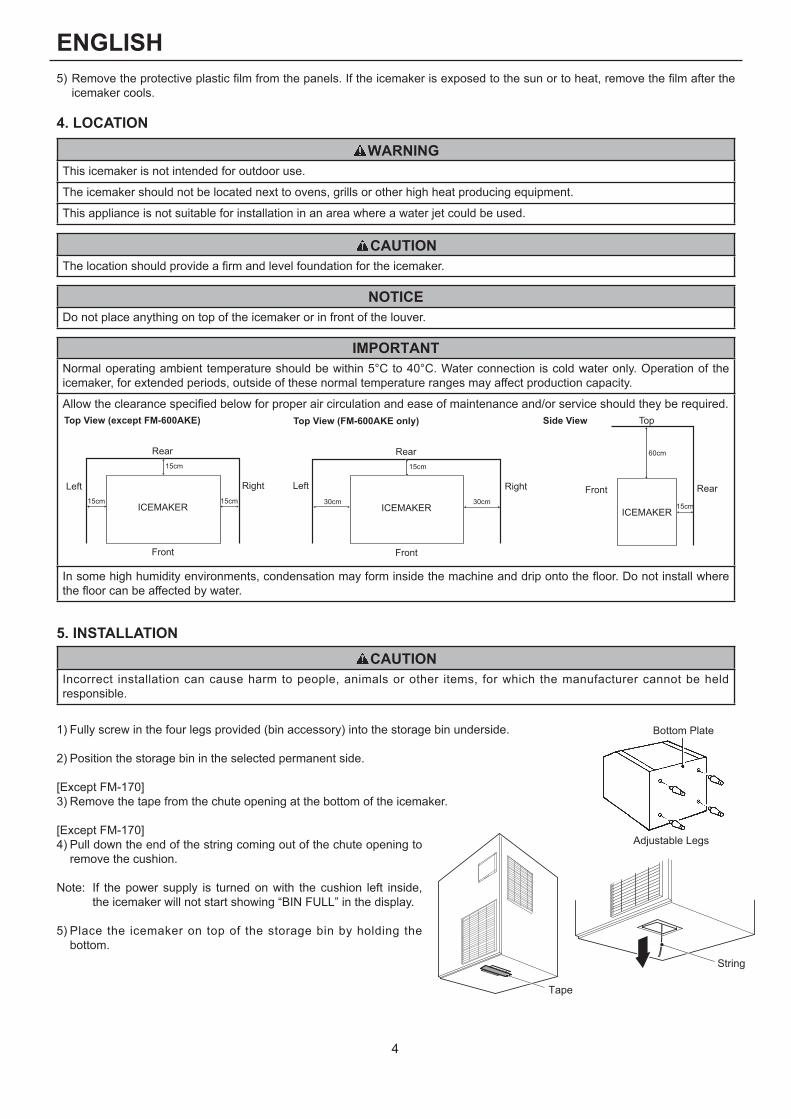
Allowtheclearancespecifiedbelowforproperaircirculationandeaseofmaintenanceand/orserviceshouldtheyberequired.Top View (FM-600AKE only) Side View
Rear
ICEMAKER
Front
Left Right RearFront
Top
ICEMAKER30cm
15cm
30cm 15cm
60cm
Top View (except FM-600AKE)
Rear
ICEMAKER
Front
Left Right15cm
15cm
15cm
Insomehighhumidityenvironments,condensationmayforminsidethemachineanddripontothefloor.Donotinstallwherethefloorcanbeaffectedbywater.
5. INSTALLATION
CAUTIONIncorrect installation can cause harm to people, animals or other items, for which the manufacturer cannot be held responsible.
1) Fully screw in the four legs provided (bin accessory) into the storage bin underside.
2) Position the storage bin in the selected permanent side.
[Except FM-170]3) Remove the tape from the chute opening at the bottom of the icemaker.
[Except FM-170]4) Pull down the end of the string coming out of the chute opening to
remove the cushion.
Note: If the power supply is turned on with the cushion left inside, the icemaker will not start showing “BIN FULL” in the display.
5) Place the icemaker on top of the storage bin by holding the bottom.
Bottom Plate
Adjustable Legs
Tape
String
5
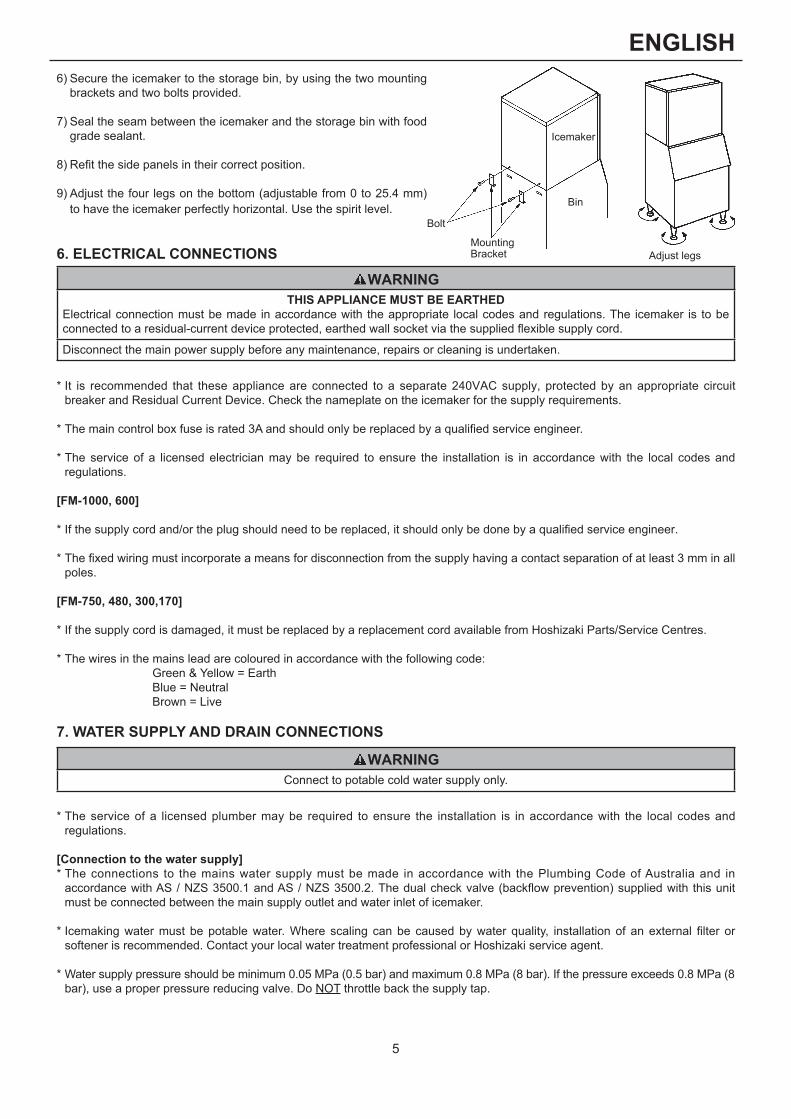
ENGLISH6) Secure the icemaker to the storage bin, by using the two mounting
brackets and two bolts provided.
7) Seal the seam between the icemaker and the storage bin with food grade sealant.
8)Refitthesidepanelsintheircorrectposition.
9) Adjust the four legs on the bottom (adjustable from 0 to 25.4 mm) to have the icemaker perfectly horizontal. Use the spirit level.
Icemaker
MountingBracket
Bin
Bolt
Adjust legs6. ELECTRICAL CONNECTIONS
WARNINGTHIS APPLIANCE MUST BE EARTHED
Electrical connection must be made in accordance with the appropriate local codes and regulations. The icemaker is to be connectedtoaresidual-currentdeviceprotected,earthedwallsocketviathesuppliedflexiblesupplycord.
Disconnect the main power supply before any maintenance, repairs or cleaning is undertaken.
* It is recommended that these appliance are connected to a separate 240VAC supply, protected by an appropriate circuit breaker and Residual Current Device. Check the nameplate on the icemaker for the supply requirements.
*Themaincontrolboxfuseisrated3Aandshouldonlybereplacedbyaqualifiedserviceengineer.
* The service of a licensed electrician may be required to ensure the installation is in accordance with the local codes and regulations.
[FM-1000, 600]
*Ifthesupplycordand/ortheplugshouldneedtobereplaced,itshouldonlybedonebyaqualifiedserviceengineer.
*Thefixedwiringmustincorporateameansfordisconnectionfromthesupplyhavingacontactseparationofatleast3mminallpoles.
[FM-750, 480, 300,170]
* If the supply cord is damaged, it must be replaced by a replacement cord available from Hoshizaki Parts/Service Centres.
* The wires in the mains lead are coloured in accordance with the following code: Green & Yellow = Earth Blue = Neutral Brown = Live
7. WATER SUPPLY AND DRAIN CONNECTIONS
WARNINGConnect to potable cold water supply only.
* The service of a licensed plumber may be required to ensure the installation is in accordance with the local codes and regulations.
[Connection to the water supply]* The connections to the mains water supply must be made in accordance with the Plumbing Code of Australia and in accordancewithAS/NZS3500.1andAS/NZS3500.2.Thedualcheckvalve(backflowprevention)suppliedwiththisunitmust be connected between the main supply outlet and water inlet of icemaker.
*Icemakingwatermust bepotablewater.Where scaling canbe causedbywater quality, installationof anexternal filter orsoftener is recommended. Contact your local water treatment professional or Hoshizaki service agent.
* Water supply pressure should be minimum 0.05 MPa (0.5 bar) and maximum 0.8 MPa (8 bar). If the pressure exceeds 0.8 MPa (8 bar), use a proper pressure reducing valve. Do NOT throttle back the supply tap.
6
ENGLISH
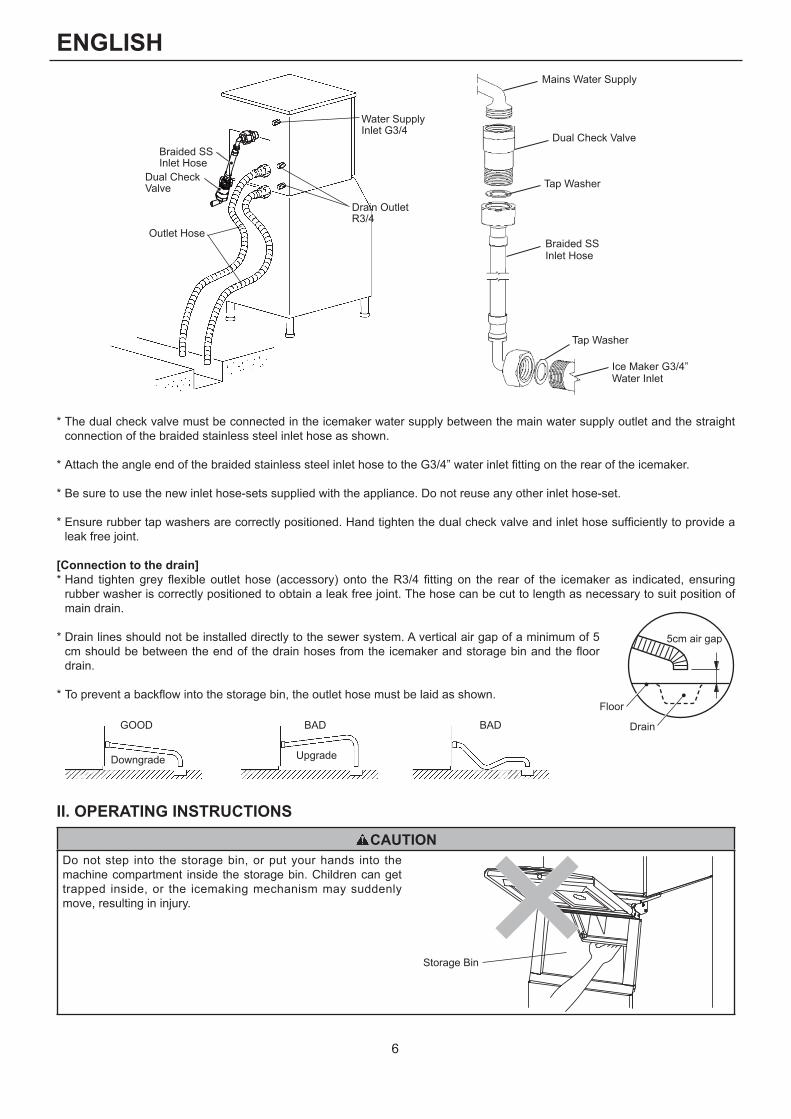
Water Supply Inlet G3/4
Drain Outlet R3/4
Braided SS Inlet Hose
Outlet Hose
Dual Check Valve
* The dual check valve must be connected in the icemaker water supply between the main water supply outlet and the straight connection of the braided stainless steel inlet hose as shown.
*AttachtheangleendofthebraidedstainlesssteelinlethosetotheG3/4”waterinletfittingontherearoftheicemaker.
* Be sure to use the new inlet hose-sets supplied with the appliance. Do not reuse any other inlet hose-set.
*Ensurerubbertapwashersarecorrectlypositioned.Handtightenthedualcheckvalveandinlethosesufficientlytoprovidealeak free joint.
[Connection to the drain]* Hand tightengrey flexible outlet hose (accessory) onto theR3/4 fittingon the rear of the icemaker as indicated, ensuring
rubber washer is correctly positioned to obtain a leak free joint. The hose can be cut to length as necessary to suit position of main drain.
* Drain lines should not be installed directly to the sewer system. A vertical air gap of a minimum of 5 cmshouldbebetweentheendofthedrainhosesfromtheicemakerandstoragebinandthefloordrain.
* Topreventabackflowintothestoragebin,theoutlethosemustbelaidasshown.
II. OPERATING INSTRUCTIONS
CAUTIONDonot step into the storagebin, or put your hands into themachine compartment inside the storage bin. Children can get trapped inside, or the icemakingmechanismmay suddenlymove,resultingininjury.
Mains Water Supply
Dual Check Valve
Tap Washer
Braided SS Inlet Hose
Tap Washer
Ice Maker G3/4” Water Inlet
Downgrade
GOOD BAD
Upgrade
BAD
5cm air gap
Drain
Floor
Storage Bin
7
ENGLISHNOTICE
All parts are factory-adjusted. Improper adjustments may result in failure.If the unit is turned off, wait for at least 3 minutes before restarting the icemaker to prevent damage to the compressor.
HYGIENEThis icemaker is designed to produce edible ice. To keep the icemaker hygienic:* Wash your hands before removing ice. Use the plastic scoop provided (accessory).* The storage bin is for ice use only. Do not store anything else in the bin nor use other electrical appliances in the bin.* Clean the storage bin before use (see “III. 1. CLEANING”).* Keep the scoop clean. Clean it by using a neutral cleaner and rinse thoroughly.* Close the door after removing ice to prevent entrance of dirt, dust or insects into the storage bin.
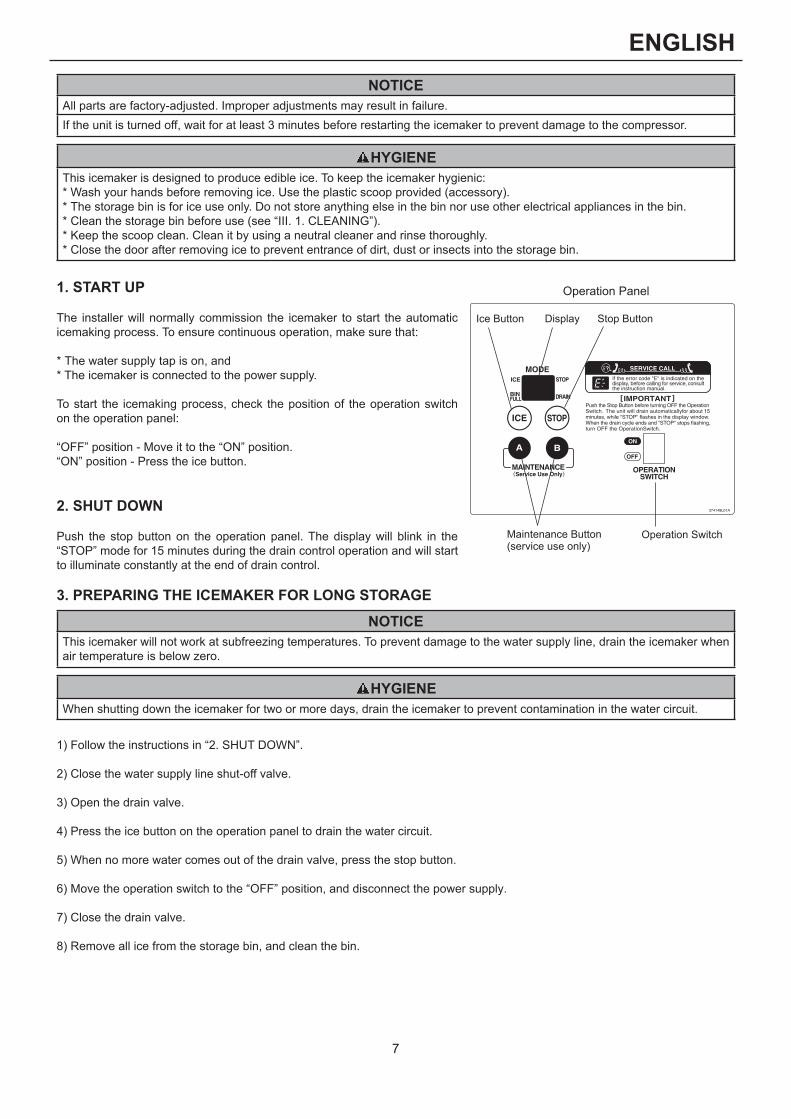
1. START UP
The installer will normally commission the icemaker to start the automatic icemaking process. To ensure continuous operation, make sure that:
* The water supply tap is on, and* The icemaker is connected to the power supply.
To start the icemaking process, check the position of the operation switch on the operation panel:
“OFF” position - Move it to the “ON” position.“ON” position - Press the ice button.
2. SHUT DOWN
Push the stop button on the operation panel. The display will blink in the “STOP” mode for 15 minutes during the drain control operation and will start to illuminate constantly at the end of drain control.
3. PREPARING THE ICEMAKER FOR LONG STORAGE
NOTICEThis icemaker will not work at subfreezing temperatures. To prevent damage to the water supply line, drain the icemaker when air temperature is below zero.
HYGIENEWhen shutting down the icemaker for two or more days, drain the icemaker to prevent contamination in the water circuit.
1) Follow the instructions in “2. SHUT DOWN”.
2) Close the water supply line shut-off valve.
3) Open the drain valve.
4) Press the ice button on the operation panel to drain the water circuit.
5) When no more water comes out of the drain valve, press the stop button.
6) Move the operation switch to the “OFF” position, and disconnect the power supply.
7) Close the drain valve.
8) Remove all ice from the storage bin, and clean the bin.
Operation Panel
Ice Button Display Stop Button
Maintenance Button(service use only)
Operation Switch
8
ENGLISHIII. MAINTENANCE
1. CLEANING
WARNINGBefore carrying out any cleaning or maintenance operations, unplug the icemaker from the electrical supply network.
This appliance must not be cleaned by use of a water jet.
CAUTIONWhen using a neutral cleaner or sodium hypochlorite, thoroughly read and understand the instructions provided to prevent potential health problems.
NOTICEAsk a trained service person to clean and sanitize the icemaker water system at least twice a year and to check and clean the condenser at least once a year.To prevent possible damage, do not clean the plastic parts with water above 40°C or in a dishwasher.
[a] Machine and Bin Exterior
Wipe the exterior at least once per week with a clean, soft cloth. Use a damp cloth containing a neutral cleaner to wipe off grease or dirt.
[b] Scoop and Storage Bin Handle Cleaning/Sanitisation (Daily)
1) Either mix 1 litre of water with 4 ml of 5.25% sodium hypochlorite solution in a suitable container, or the recommended Hoshizaki sanitiser as directed.
2) Soak the scoop in the solution for more than 3 minutes. Rinse thoroughly, and shake to remove surplus liquid.
Note: Using a cloth to dry may re-contaminate.
3) Use a neutral cleaner to wash the storage bin handle. Rinse thoroughly.
4) Soak a clean cloth with the sanitising solution, and wipe the handle. Use fresh water and a clean cloth to rinse/dry.
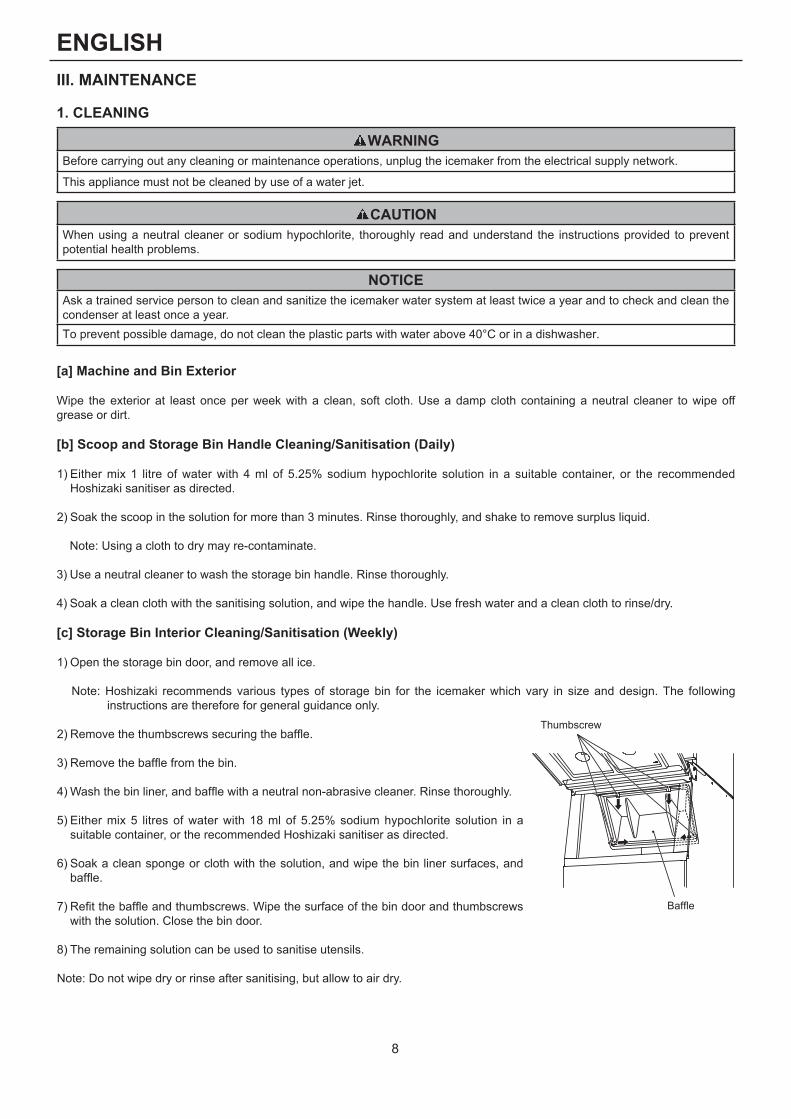
[c] Storage Bin Interior Cleaning/Sanitisation (Weekly)
1) Open the storage bin door, and remove all ice. Note: Hoshizaki recommends various types of storage bin for the icemaker which vary in size and design. The following
instructions are therefore for general guidance only.
2)Removethethumbscrewssecuringthebaffle.
3)Removethebafflefromthebin.
4)Washthebinliner,andbafflewithaneutralnon-abrasivecleaner.Rinsethoroughly.
5) Either mix 5 litres of water with 18 ml of 5.25% sodium hypochlorite solution in a suitable container, or the recommended Hoshizaki sanitiser as directed.
6) Soak a clean sponge or cloth with the solution, and wipe the bin liner surfaces, and baffle.
7)Refitthebaffleandthumbscrews.Wipethesurfaceofthebindoorandthumbscrewswith the solution. Close the bin door.
8) The remaining solution can be used to sanitise utensils.
Note: Do not wipe dry or rinse after sanitising, but allow to air dry.
Thumbscrew
Baffle

9
ENGLISH[d] Storage Bin Door
Clean the storage bin door at least once a week, using a neutral non-abrasive cleaner. Rinse thoroughly after cleaning and sanitise as required.
[e] Air Filter
Plasticmeshairfiltersremovedirtordustfromtheair,andkeepthecondenserfromgettingclogged.Ifthefiltersgetclogged,theicemaker’sperformancewillbereduced.Removeandcleantheairfilter(s)atleasttwicepermonth:
1)Slidetheairfilteroffthelouver.
2)Cleantheairfilterbyusingavacuumcleaner.Whenseverelyclogged,usewarmwaterandaneutralcleanertowashtheairfilter.
3)Rinseanddrytheairfilterthoroughly.
NOTICEAftercleaning,besuretoplacetheairfilterbackinposition.
2. INSPECTION AND MAINTENANCENOTICE
To achieve optimum icemaker performance, the following parts need periodic inspection and maintenance: Extruding head (upper bearing) Housing (lower bearing) Mechanical seal
Thesepartsshouldbeinspectedaftertwoyearsfrominstallationor10,000hoursofoperation,whichevercomesfirst,andoncea year afterwards. Replacement of these parts is required if wear exceeds factory recommendations.
Their service life, however, depends on water quality and environment. More frequent inspection and maintenance are recommended in bad or severe water conditions.
Consult with your local Hoshizaki service agent about inspection and maintenance service.
3. BEFORE CALLING FOR SERVICE
WARNINGDo not damage the refrigerant circuit.
[a] Error Code Indication
If the error code “E” is indicated on the display, before calling for service, check the following.
Code Remedy
E0 Possibility of water leaks. Turn OFF operation switch, and turn it ON again. If error code appears again, call for service.
E1 Low ice production. Turn OFF operation switch, and turn it ON again. If error code appears again, call for service.
E2 Water supply circuit failure. Turn OFF operation switch, and turn it ON again. If error code appears again, call for service.
E3 Gear motor failure. Turn OFF operation switch, and turn it ON again after 10 minutes. If error code appears again, call for service.
E4 Abnormalhighsidepressure.Cleanairfilter.Checkthaticemakerisproperlyinstalledaccordingtoinstallationmanual.Turn OFF operation switch, and turn it ON again. If error code appears again, call for service.
E5 Electric circuit failure. Turn OFF operation switch, and turn it ON again. If error code appears again, call for service.
E8 Compressor could be overheated. Check that icemaker is properly installed according to installation manual. Turn OFF operation switch, and turn it ON again after 10 minutes. If error code appears again, call for service.
Air Filter
Louver
10
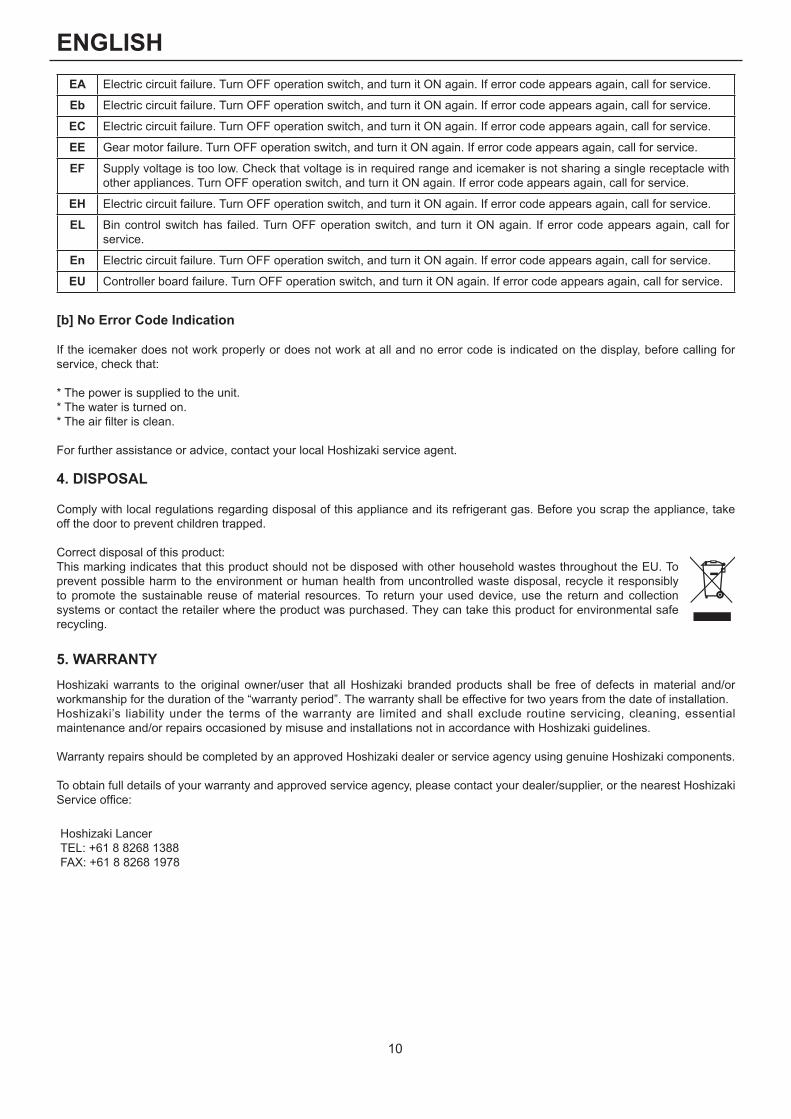
ENGLISHEA Electric circuit failure. Turn OFF operation switch, and turn it ON again. If error code appears again, call for service.
Eb Electric circuit failure. Turn OFF operation switch, and turn it ON again. If error code appears again, call for service.
EC Electric circuit failure. Turn OFF operation switch, and turn it ON again. If error code appears again, call for service.
EE Gear motor failure. Turn OFF operation switch, and turn it ON again. If error code appears again, call for service.
EF Supply voltage is too low. Check that voltage is in required range and icemaker is not sharing a single receptacle with other appliances. Turn OFF operation switch, and turn it ON again. If error code appears again, call for service.
EH Electric circuit failure. Turn OFF operation switch, and turn it ON again. If error code appears again, call for service.
EL Bin control switch has failed. Turn OFF operation switch, and turn it ON again. If error code appears again, call for service.
En Electric circuit failure. Turn OFF operation switch, and turn it ON again. If error code appears again, call for service.
EU Controller board failure. Turn OFF operation switch, and turn it ON again. If error code appears again, call for service.
[b] No Error Code Indication
If the icemaker does not work properly or does not work at all and no error code is indicated on the display, before calling for service, check that:
* The power is supplied to the unit.* The water is turned on.*Theairfilterisclean.
For further assistance or advice, contact your local Hoshizaki service agent.
4. DISPOSAL
Comply with local regulations regarding disposal of this appliance and its refrigerant gas. Before you scrap the appliance, take off the door to prevent children trapped.
Correct disposal of this product:This marking indicates that this product should not be disposed with other household wastes throughout the EU. To prevent possible harm to the environment or human health from uncontrolled waste disposal, recycle it responsibly to promote the sustainable reuse of material resources. To return your used device, use the return and collection systems or contact the retailer where the product was purchased. They can take this product for environmental safe recycling.
5. WARRANTYHoshizaki warrants to the original owner/user that all Hoshizaki branded products shall be free of defects in material and/or workmanship for the duration of the “warranty period”. The warranty shall be effective for two years from the date of installation.Hoshizaki’s liability under the terms of the warranty are limited and shall exclude routine servicing, cleaning, essential maintenance and/or repairs occasioned by misuse and installations not in accordance with Hoshizaki guidelines.
Warranty repairs should be completed by an approved Hoshizaki dealer or service agency using genuine Hoshizaki components.
To obtain full details of your warranty and approved service agency, please contact your dealer/supplier, or the nearest Hoshizaki Serviceoffice:
Hoshizaki LancerTEL: +61 8 8268 1388FAX: +61 8 8268 1978

11
ENGLISHSPECIFICATIONS
Model FM-1000AKE FM-1000AKE-N FM-750AKEType Air-cooled,flakeice Air-cooled, nugget ice Air-cooled,flakeicePower Supply 1 phase 220-240V 50Hz 1 phase 220-240V 50Hz 1 phase 220-240V 50HzElectric Consumption 2490W 2550W 1880WIce Production per 24h 1030kg
(ambient 10°C, water 10°C)860kg(ambient 10°C, water 10°C)
750kg(ambient 10°C, water 10°C)
Dimensions 762mm(W) x 700mm(D) x 780mm(H)
762mm(W) x 700mm(D) x 780mm(H)
762mm(W) x 700mm(D) x 780mm(H)
Refrigerant R404A, 1350g R404A, 1350g R404A, 1200gWeight Net: 146kg (Gross: 156kg) Net: 146kg (Gross: 156kg) Net: 133kg (Gross: 143kg)Ambient Temp 5 - 40°C 5 - 40°C 5 - 40°CWater Supply Temp 5 - 35°C 5 - 35°C 5 - 35°CWater Supply Pressure 0.05 - 0.8 MPa (0.5 - 8 bar) 0.05 - 0.8 MPa (0.5 - 8 bar) 0.05 - 0.8 MPa (0.5 - 8 bar)Voltage Range Rated voltage ± 10% Rated voltage ± 10% Rated voltage ± 10%
Model FM-750AKE-N FM-600AKE FM-600AKE-NType Air-cooled, nugget ice Air-cooled,flakeice Air-cooled, nugget icePower Supply 1 phase 220-240V 50Hz 1 phase 220-240V 50Hz 1 phase 220-240V 50HzElectric Consumption 2010W 1900W 1950WIce Production per 24h 590kg
(ambient 10°C, water 10°C)600kg(ambient 10°C, water 10°C)
530kg(ambient 10°C, water 10°C)
Dimensions 762mm(W) x 700mm(D) x 780mm(H)
560mm(W) x 700mm(D) x 780mm(H)
560mm(W) x 700mm(D) x 780mm(H)
Refrigerant R404A, 1200g R404A, 1300g R404A, 1300gWeight Net: 133kg (Gross: 143kg) Net: 107kg (Gross: 114kg) Net: 107kg (Gross: 114kg)Ambient Temp 5 - 40°C 5 - 40°C 5 - 40°CWater Supply Temp 5 - 35°C 5 - 35°C 5 - 35°CWater Supply Pressure 0.05 - 0.8 MPa (0.5 - 8 bar) 0.05 - 0.8 MPa (0.5 - 8 bar) 0.05 - 0.8 MPa (0.5 - 8 bar)Voltage Range Rated voltage ± 10% Rated voltage ± 10% Rated voltage ± 10%
Model FM-480AKE FM-480AKE-N FM-300AKEType Air-cooled,flakeice Air-cooled, nugget ice Air-cooled,flakeicePower Supply 1 phase 220-240V 50Hz 1 phase 220-240V 50Hz 1 phase 220-240V 50HzElectric Consumption 1650W 1650W 1000WIce Production per 24h 500kg
(ambient 10°C, water 10°C)430kg(ambient 10°C, water 10°C)
320kg(ambient 10°C, water 10°C)
Dimensions 560mm(W) x 700mm(D) x 780mm(H)
560mm(W) x 700mm(D) x 780mm(H)
560mm(W) x 700mm(D) x 780mm(H)
Refrigerant R404A, 600g R404A, 600g R404A, 460gWeight Net: 95kg (Gross: 102kg) Net: 95kg (Gross: 102kg) Net: 80kg (Gross: 87kg)Ambient Temp 5 - 40°C 5 - 40°C 5 - 40°CWater Supply Temp 5 - 35°C 5 - 35°C 5 - 35°CWater Supply Pressure 0.05 - 0.8 MPa (0.5 - 8 bar) 0.05 - 0.8 MPa (0.5 - 8 bar) 0.05 - 0.8 MPa (0.5 - 8 bar)Voltage Range Rated voltage ± 10% Rated voltage ± 10% Rated voltage ± 10%
12
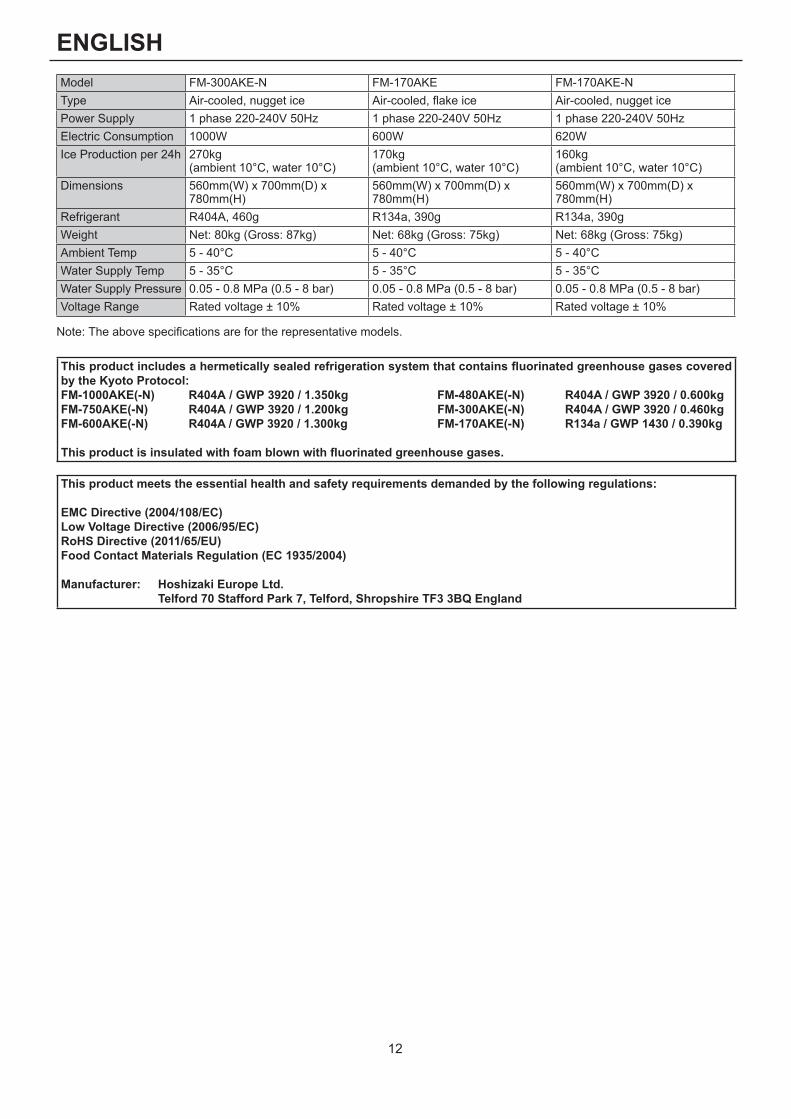
ENGLISHModel FM-300AKE-N FM-170AKE FM-170AKE-NType Air-cooled, nugget ice Air-cooled, flake ice Air-cooled, nugget icePower Supply 1 phase 220-240V 50Hz 1 phase 220-240V 50Hz 1 phase 220-240V 50HzElectric Consumption 1000W 600W 620WIce Production per 24h 270kg
(ambient 10°C, water 10°C)170kg(ambient 10°C, water 10°C)
160kg(ambient 10°C, water 10°C)
Dimensions 560mm(W) x 700mm(D) x 780mm(H)
560mm(W) x 700mm(D) x 780mm(H)
560mm(W) x 700mm(D) x 780mm(H)
Refrigerant R404A, 460g R134a, 390g R134a, 390gWeight Net: 80kg (Gross: 87kg) Net: 68kg (Gross: 75kg) Net: 68kg (Gross: 75kg)Ambient Temp 5 - 40°C 5 - 40°C 5 - 40°CWater Supply Temp 5 - 35°C 5 - 35°C 5 - 35°CWater Supply Pressure 0.05 - 0.8 MPa (0.5 - 8 bar) 0.05 - 0.8 MPa (0.5 - 8 bar) 0.05 - 0.8 MPa (0.5 - 8 bar)Voltage Range Rated voltage ± 10% Rated voltage ± 10% Rated voltage ± 10%
Note: The above specifications are for the representative models.
This product includes a hermetically sealed refrigeration system that contains fluorinated greenhouse gases covered by the Kyoto Protocol:FM-1000AKE(-N) R404A / GWP 3920 / 1.350kg FM-480AKE(-N) R404A / GWP 3920 / 0.600kgFM-750AKE(-N) R404A / GWP 3920 / 1.200kg FM-300AKE(-N) R404A / GWP 3920 / 0.460kgFM-600AKE(-N) R404A / GWP 3920 / 1.300kg FM-170AKE(-N) R134a / GWP 1430 / 0.390kg
This product is insulated with foam blown with fluorinated greenhouse gases.
This product meets the essential health and safety requirements demanded by the following regulations:
EMC Directive (2004/108/EC)Low Voltage Directive (2006/95/EC)RoHS Directive (2011/65/EU)Food Contact Materials Regulation (EC 1935/2004)
Manufacturer: Hoshizaki Europe Ltd. Telford 70 Stafford Park 7, Telford, Shropshire TF3 3BQ England