(De)monteren laden en korven / How to fix and dismantle ... · (De)monteren laden en korven / How...
37
Demontage van het ladefront / To remove the drawer front Afdekkap wegnemen Remove plastic cover cap Wegnemen van het front Remove front Verstelling van het ladefront / To adjust the drawer front Zijdelingse verstelling: naar rechts 1 mm Side adjustment: to the right 1 mm Zijdelingse verstelling: naar links 1 mm Side adjustment: to the left 1 mm Hoogteverstelling: ± 2 mm Height adjustment: ± 2 mm Voorraadlade monteren en demonteren / To fit and remove the (pan) drawer Montage vooraan Front fixing Montage achteraan Rear fixing Demontage achteraan Dismantle rear Demontage vooraan Dismantle in front Lade in- en uitnemen / To replace- and remove the drawer Inhangen To replace drawer, locate on to runners Uitnemen To remove, pull out fully and then pull up at the front (De)monteren laden en korven / How to fix and dismantle (pan) drawers
Transcript of (De)monteren laden en korven / How to fix and dismantle ... · (De)monteren laden en korven / How...

Demontage van het ladefront / To remove the drawer front
Afdekkap wegnemenRemove plastic cover cap
Wegnemen van het frontRemove front
Verstelling van het ladefront / To adjust the drawer front
Zijdelingse verstelling: naar rechts 1 mmSide adjustment: to the right 1 mm
Zijdelingse verstelling: naar links 1 mmSide adjustment: to the left 1 mm
Hoogteverstelling: ± 2 mmHeight adjustment: ± 2 mm
Voorraadlade monteren en demonteren / To fit and remove the (pan) drawer
Montage vooraanFront fixing
Montage achteraanRear fixing
Demontage achteraanDismantle rear
Demontage vooraanDismantle in front
Lade in- en uitnemen / To replace- and remove the drawer
InhangenTo replace drawer, locate on to runners
UitnemenTo remove, pull out fully andthen pull up at the front
(De)monteren laden en korven / How to fix and dismantle (pan) drawers

(De)monteren laden en korven / How to fix and dismantle (pan) drawers
Montage front Space Corner / Fitting the Space Corner front
Montage van de frontenFitting of the fronts
Afstandhouder inklappenFold out distance
Verstelling Space Corner / Space Corner adjustment
Hoogte verstellingHeight adjustment
Zijdelingse verstellingSide adjustment
SchuinteverstellingDiagonal adjustment
Verstelling van de veerkrachtAdjustment of the tension
Brede fronten monteren / How to fit wide fronts
Kasten koppelenConnect the units
Fronten voor de kasten hangen. Fronten zijn voorzien van boringen, bevestigingsmaterialen worden meegeleverd.
Fit the fronts.Fronts are pre-drilled and will be supplied with all fittingmaterials required.
Haakse schroevendraaier wordt meegeleverd om de fronten te kunnnen demontren / afstellen.
Including angled screwdriver for dismantling / adjusting the fronts.
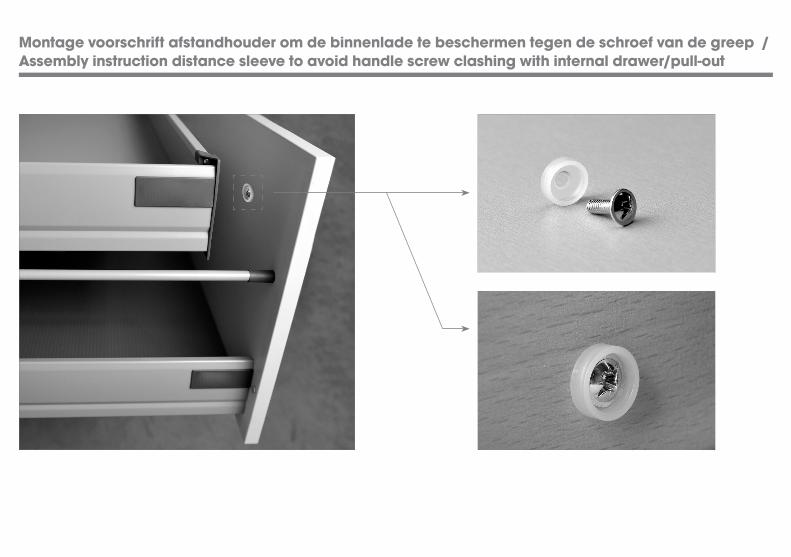
Montage voorschrift afstandhouder om de binnenlade te beschermen tegen de schroef van de greep / Assembly instruction distance sleeve to avoid handle screw clashing with internal drawer/pull-out

Spijker-dop t.b.v. bladondersteuning / nail-button for worktop support
1x 8 mm spijker-dop los meegeleverd.Let op ! Toepassen van deze dop is bij on-derstaande kasten noodzakelijk.
1x 8 mm nail-button supplied loose.Notice ! Using this button is necessary for the cabinets below.
8mm
800 - 900 - 1000 - 1200 800 - 900 - 1000 - 1200
800 - 900 - 1000 - 1200 800 - 900 - 1000 - 1200
800 - 900 - 1000 - 1200 900
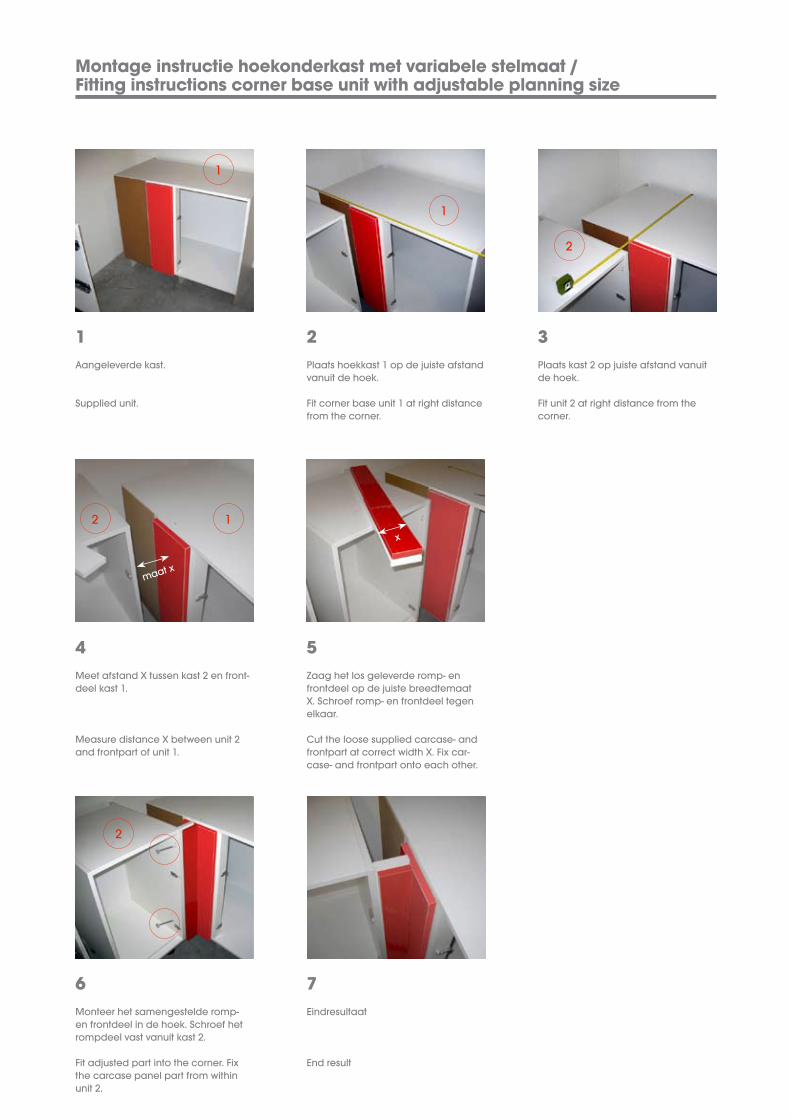
Montage instructie hoekonderkast met variabele stelmaat / Fitting instructions corner base unit with adjustable planning size
4Meet afstand X tussen kast 2 en front-deel kast 1.
Measure distance X between unit 2 and frontpart of unit 1.
12
maat x
5Zaag het los geleverde romp- en frontdeel op de juiste breedtemaat X. Schroef romp- en frontdeel tegen elkaar.
Cut the loose supplied carcase- and frontpart at correct width X. Fix car-case- and frontpart onto each other.
x
6Monteer het samengestelde romp- en frontdeel in de hoek. Schroef het rompdeel vast vanuit kast 2.
Fit adjusted part into the corner. Fix the carcase panel part from within unit 2.
2
7Eindresultaat
End result
1Aangeleverde kast.
Supplied unit.
1
3Plaats kast 2 op juiste afstand vanuit de hoek.
Fit unit 2 at right distance from the corner.
2
2Plaats hoekkast 1 op de juiste afstand vanuit de hoek.
Fit corner base unit 1 at right distance from the corner.
1

Montage instructie LeMans / Fitting instruction LeMans
1Voor het uitdraaien van de plateau’s is het noodzakelijk dat de deur minimaal 90˚ kan openen.BELANGRIJK! Bij het bepalen van de greeppositie zorgdragen dat de openingshoek groot genoeg blijft t.b.v. het uitdraaien van de plateau’s.
To pull out the interior of the unit, it is vital that the door can be opened with a minimum of 90˚.Notice! Be aware on the opening angle when a handle (position) is determined to avoid clashing of handles / doors.
2De uitzwaaibeweging van de draaiplateau’s is afstelbaar door het aanslagblok te verdraaien.
Opening movement adjustable by the stop block.
Aanslagblok / Stop block
3Per plateau max. 20 kg belastbaar.
Max. load per shelf is 20 kg.
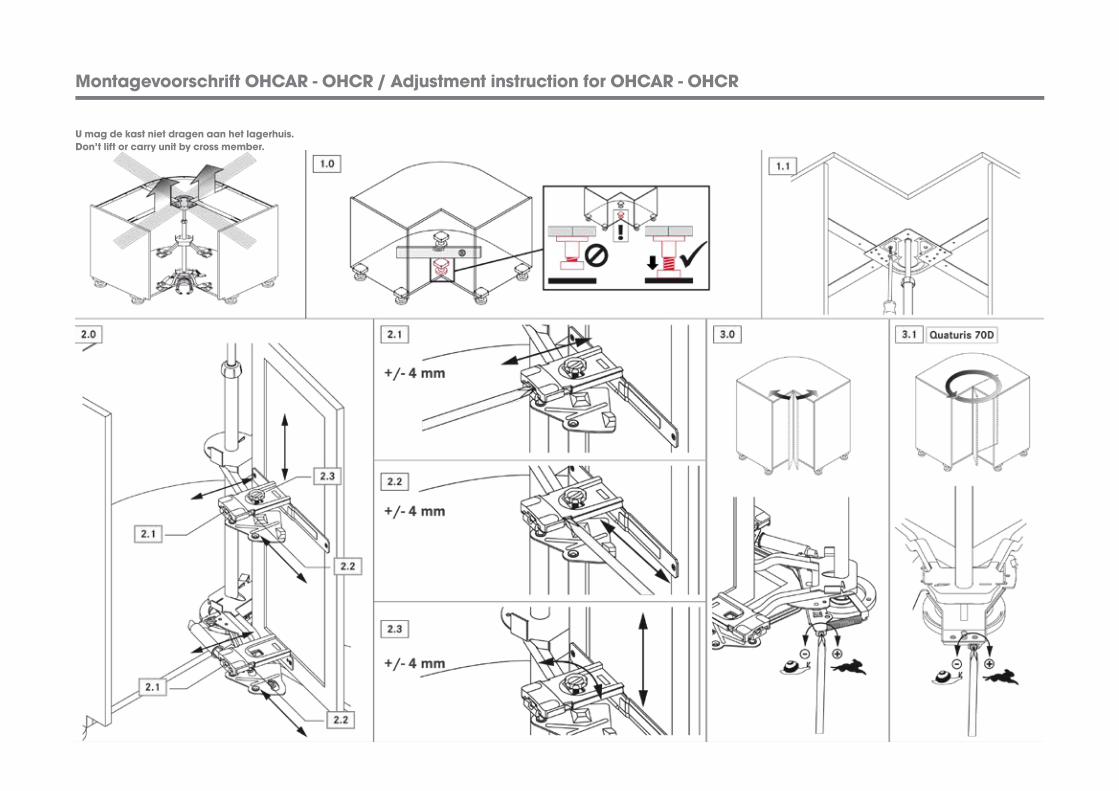
Montagevoorschrift OHCAR - OHCR / Adjustment instruction for OHCAR - OHCR
U mag de kast niet dragen aan het lagerhuis.Don’t lift or carry unit by cross member.

Afstellen front Magic Corner / Adjustment of unit front panel Magic Corner
A
B
kruiskopschroevendraaier GR.2
Pozidriv GR.2
A = verstellen / adjustingB = fixeren & verstellen / fixing & adjusting
kruiskopschroevendraaier GR.2
Pozidriv GR.2C
C = fixeren & verstellen / fixing & adjusting
860 - 968
415
min. 500
295
390
470
470
ma
x. 7
30
450-600
max. 80°a°
0°
Openingshoek a° instellenInstall opening mechanism
GR. 10
Vastzetten van de stang in de achterste geleiderAttachment of lever to rear wall sliding
Jaarlijks smerenTo be greased once a year

Hoekonderkast met draaiplateau / Corner base unit with swing-out shelves
BA
C
D
E
G
F
Tablet (2 stuks)Tray (2 pieces)
steunringsupport ring
verbindingsstuktop connection cap
stangaxle
bevestigingsstuk onderbottom support
bevestigingsstuk bovenupper support
dwarspenlock pin
meeneemstuktray support
Onderdelen / Spare parts

Bevestiging vast voorstuk / How to fix a dummy panel
± 4± 3± 3
± 4
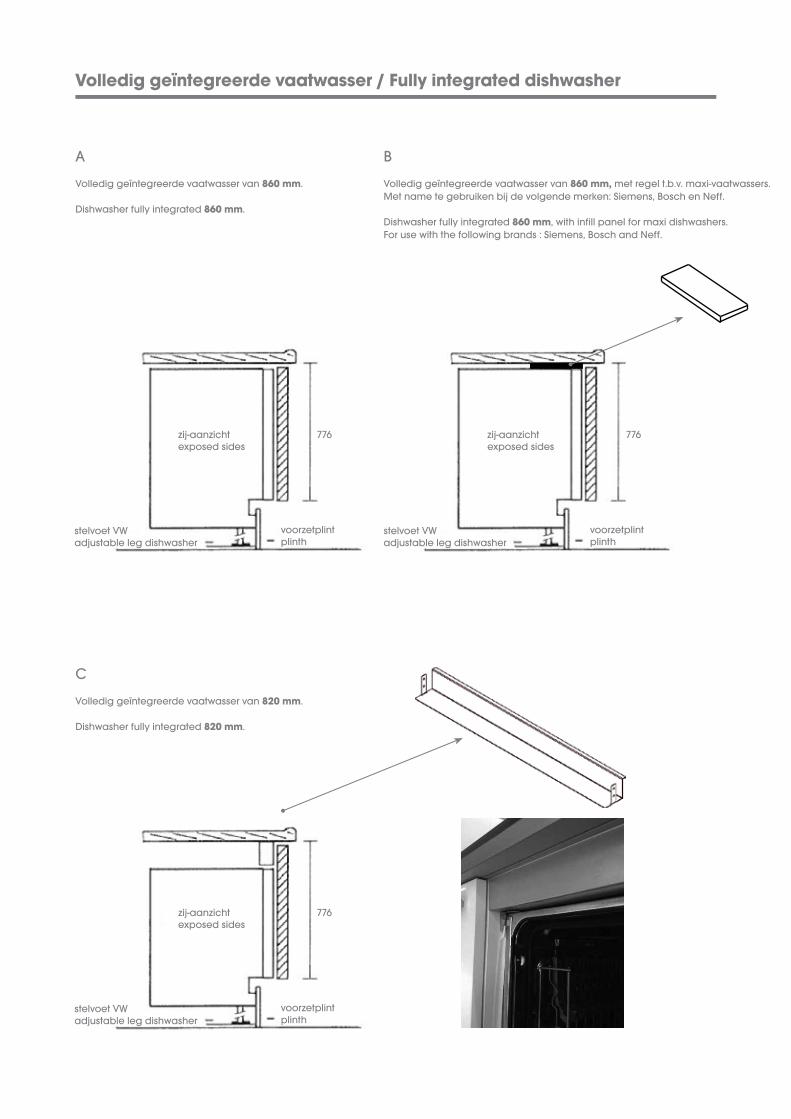
Volledig geïntegreerde vaatwasser / Fully integrated dishwasher
A
Volledig geïntegreerde vaatwasser van 860 mm.
Dishwasher fully integrated 860 mm.
zij-aanzichtexposed sides
stelvoet VWadjustable leg dishwasher
voorzetplintplinth
776
B
Volledig geïntegreerde vaatwasser van 860 mm, met regel t.b.v. maxi-vaatwassers. Met name te gebruiken bij de volgende merken: Siemens, Bosch en Neff.
Dishwasher fully integrated 860 mm, with infill panel for maxi dishwashers.For use with the following brands : Siemens, Bosch and Neff.
zij-aanzichtexposed sides
stelvoet VWadjustable leg dishwasher
voorzetplintplinth
776
C
Volledig geïntegreerde vaatwasser van 820 mm.
Dishwasher fully integrated 820 mm.
zij-aanzichtexposed sides
stelvoet VWadjustable leg dishwasher
voorzetplintplinth
776

B
Geïntegreerde vaatwassers met bedieningspaneel van 820 mm.
Dishwasher semy integrated 820 mm.
A
Geïntegreerde vaatwassers met bedieningspaneel van 860 mm.
Dishwasher semy integrated 860 mm.
Geïntegreerde vaatwasser met bedieningspaneel / Dishwasher semi intergrated
stelvoet VWadjustable leg dishwashervlonderappliance plinth
± 130
± 130
664
stelvoet VWadjustable leg dishwasher
voorzetplintplinth
zij-aanzichtexposed sides
zij-aanzichtexposed sides
558
84
4
voorzetplintplinth

Vaatwasser op hoogte inbouwen / Dishwasher in combination with tall units
860820 2x afstandlijst 60 mm hoog
2x distance profile 60 mm high
820
A
Volledig geïntegreerde vaatwasser 820 mm.
Dishwasher fully integrated 820 mm.
B
Volledig geïntegreerde vaatwasser 860 mm.
Dishwasher fully integrated 860 mm.
C
Volledig geïntegreerde vaatwasser 820 mm bij greeploos.
Dishwasher fully integrated 820 mm in handleless.
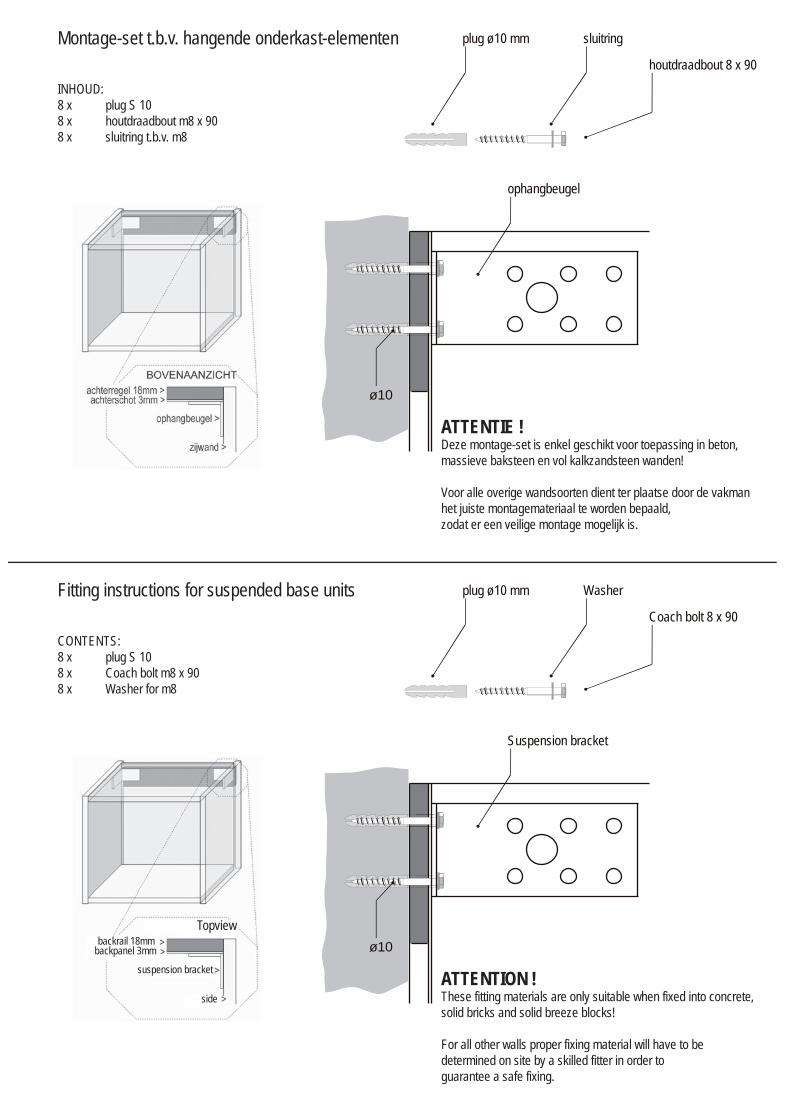
ø10
ophangbeugel
sluitringplug ø10 mm
houtdraadbout 8 x 90
ATTENTIE !Deze montage-set is enkel geschikt voor toepassing in beton, massieve baksteen en vol kalkzandsteen wanden!
Voor alle overige wandsoorten dient ter plaatse door de vakman het juiste montagemateriaal te worden bepaald, zodat er een veilige montage mogelijk is.
INHOUD:8 x plug S 108 x houtdraadbout m8 x 908 x sluitring t.b.v. m8
Montage-set t.b.v. hangende onderkast-elementen
ø10
Suspension bracket
Washerplug ø10 mm
Coach bolt 8 x 90
ATTENTION !These fitting materials are only suitable when fixed into concrete, solid bricks and solid breeze blocks!
For all other walls proper fixing material will have to be determined on site by a skilled fitter in order to guarantee a safe fixing.
CONTENTS:8 x plug S 108 x Coach bolt m8 x 908 x Washer for m8
Fitting instructions for suspended base units
Topviewbackrail 18mm
backpanel 3mm
suspension bracket
side
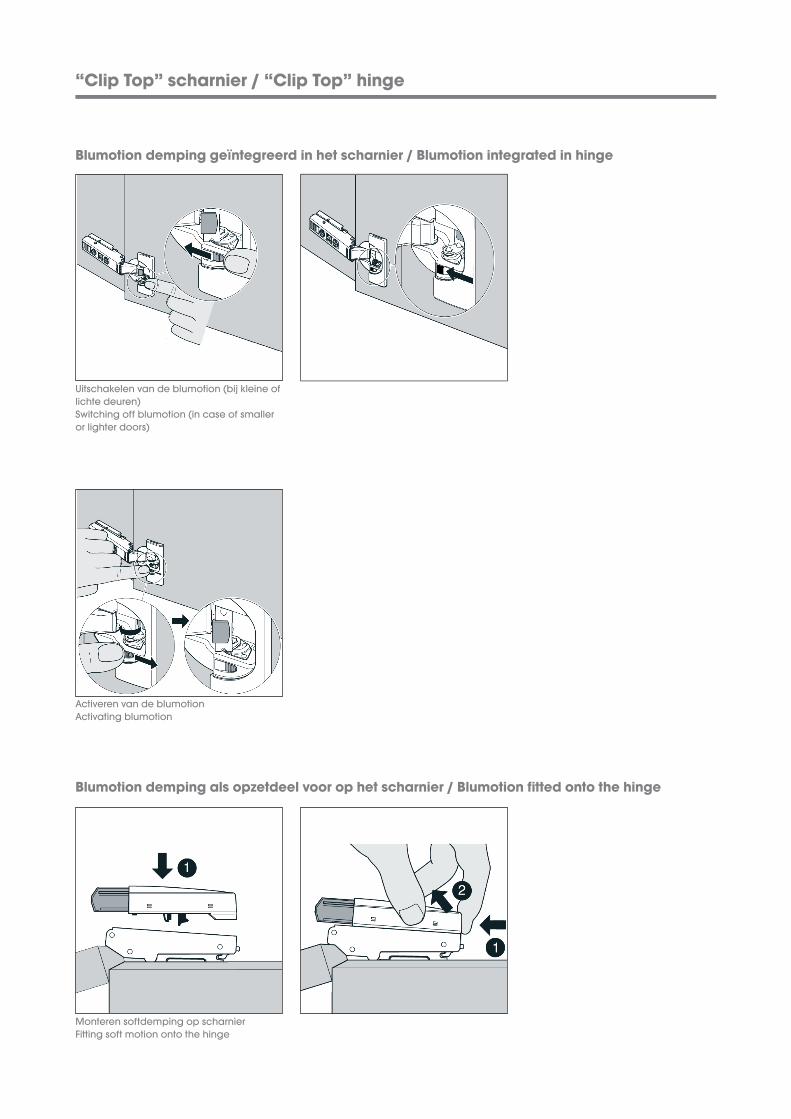
“Clip Top” scharnier / “Clip Top” hinge
Blumotion demping geïntegreerd in het scharnier / Blumotion integrated in hinge
Blumotion demping als opzetdeel voor op het scharnier / Blumotion fi tted onto the hinge
Uitschakelen van de blumotion (bij kleine of lichte deuren)Switching off blumotion (in case of smaller or lighter doors)
Activeren van de blumotion Activating blumotion
Monteren softdemping op scharnier Fitting soft motion onto the hinge
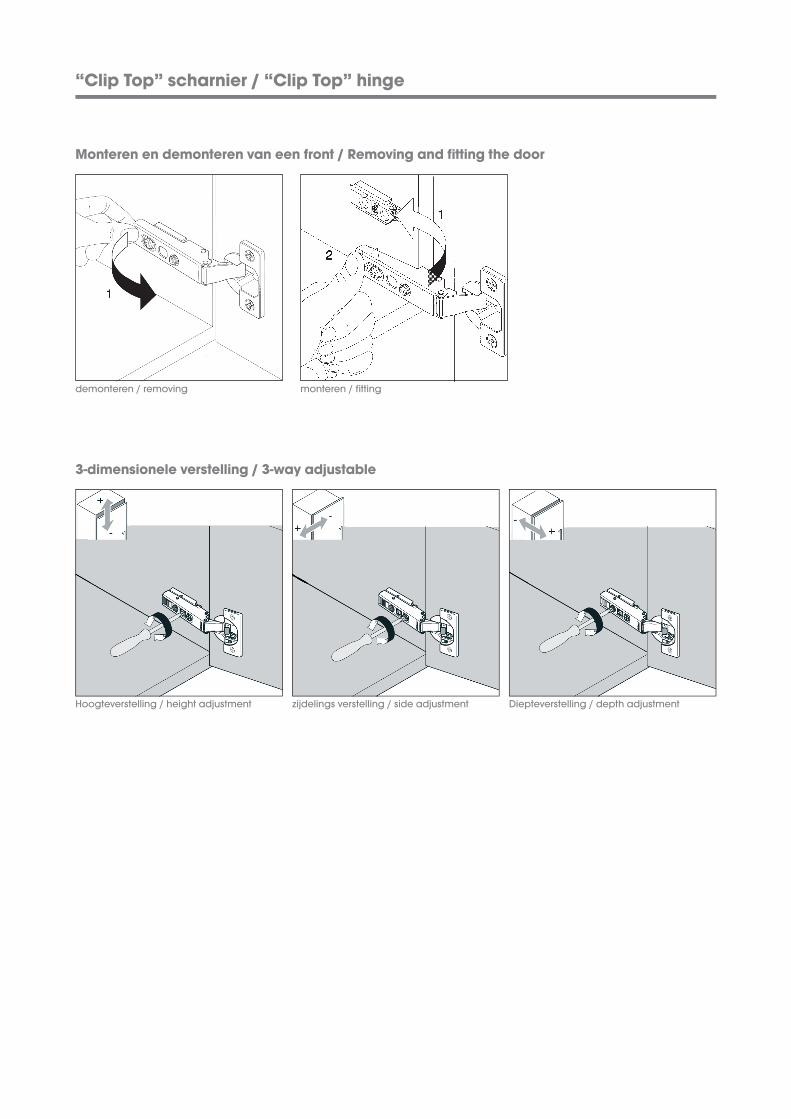
“Clip Top” scharnier / “Clip Top” hinge
Monteren en demonteren van een front / Removing and fi tting the door
3-dimensionele verstelling / 3-way adjustable
Hoogteverstelling / height adjustment zijdelings verstelling / side adjustment Diepteverstelling / depth adjustment
demonteren / removing monteren / fi tting

ATTENTIE !Deze montage-set is enkel geschikt voor toepassing in beton, massieve baksteen en vol kalkzandsteen wanden!
Voor alle overige wandsoorten dient ter plaatse door de vakman het juiste montagemateriaal te worden bepaald, zodat er een veilige montage mogelijk is.
ATTENTIE !Altijd de buitenste sleufgaten gebruiken
ATTENTION !Only use outer slotted holes
INHOUD:2 x speciale schroeven 5,5 x 50 CK, kop ø 13 mm2 x pluggen S 8 mm
35 mm
50 mm
Montage-set t.b.v. ophangregel bovenkasten
ATTENTION !These fixing materials are only suitable when fixed into concrete, solid bricks and solid breeze blocks!
For all other walls proper fixing material will have to be determined on site by a skilled fitter in order to guarantee a safe fixing.
CONTENTS:2 x special screws 5,5 x 50 CK, head ø 13 mm2 x plugs S 8
Fitting instructions for hanging rail wall units
35 mm
50 mm
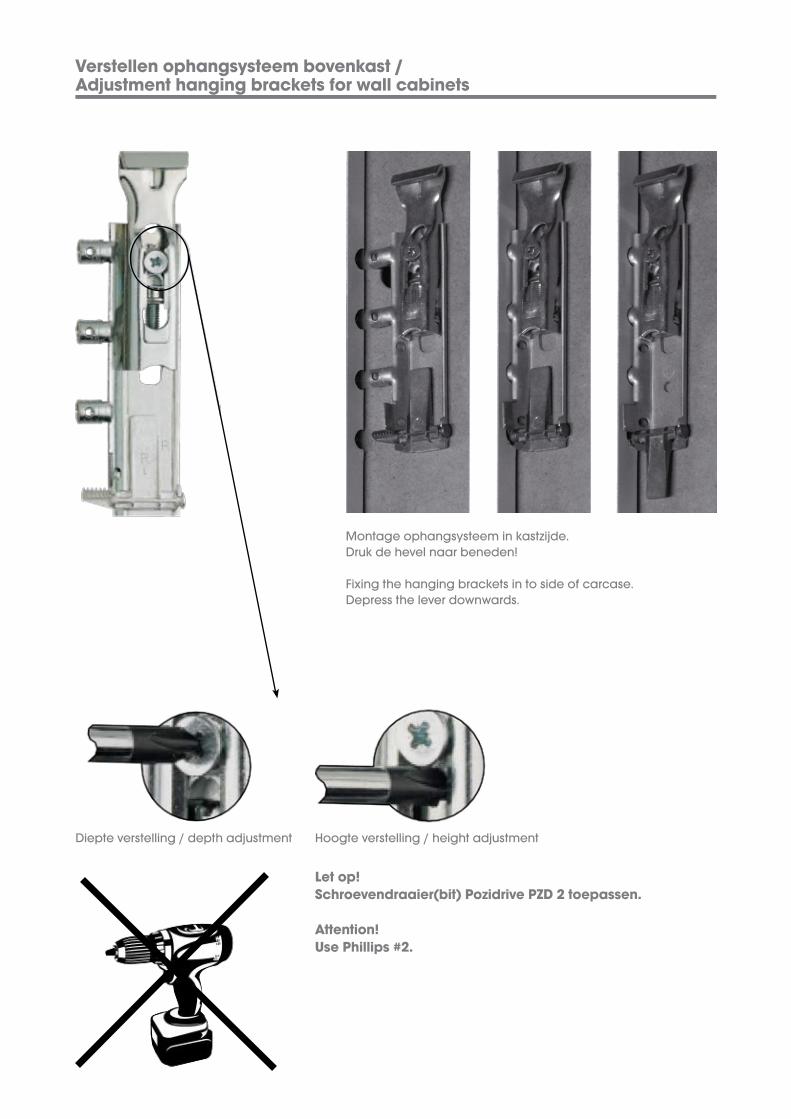
Verstellen ophangsysteem bovenkast / Adjustment hanging brackets for wall cabinets
Diepte verstelling / depth adjustment Hoogte verstelling / height adjustment
Let op! Schroevendraaier(bit) Pozidrive PZD 2 toepassen.
Attention!Use Phillips #2.
Montage ophangsysteem in kastzijde.Druk de hevel naar beneden!
Fixing the hanging brackets in to side of carcase.Depress the lever downwards.
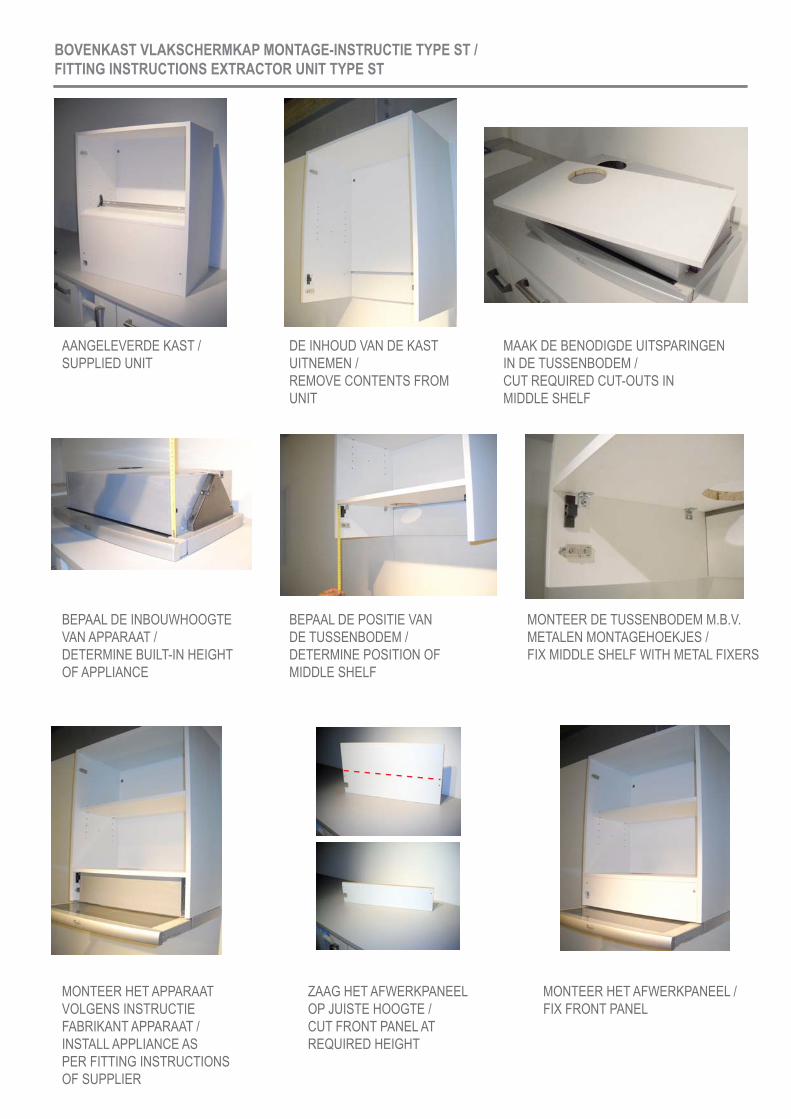
AANGELEVERDE KAST /SUPPLIED UNIT
DE INHOUD VAN DE KASTUITNEMEN /REMOVE CONTENTS FROMUNIT
MAAK DE BENODIGDE UITSPARINGENIN DE TUSSENBODEM / CUT REQUIRED CUT-OUTS IN MIDDLE SHELF
BEPAAL DE INBOUWHOOGTEVAN APPARAAT /DETERMINE BUILT-IN HEIGHT OF APPLIANCE
BEPAAL DE POSITIE VANDE TUSSENBODEM /DETERMINE POSITION OFMIDDLE SHELF
MONTEER DE TUSSENBODEM M.B.V.METALEN MONTAGEHOEKJES /FIX MIDDLE SHELF WITH METAL FIXERS
MONTEER HET APPARAATVOLGENS INSTRUCTIE FABRIKANT APPARAAT /INSTALL APPLIANCE ASPER FITTING INSTRUCTIONSOF SUPPLIER
ZAAG HET AFWERKPANEELOP JUISTE HOOGTE /CUT FRONT PANEL ATREQUIRED HEIGHT
MONTEER HET AFWERKPANEEL /FIX FRONT PANEL
BOVENKAST VLAKSCHERMKAP MONTAGE-INSTRUCTIE TYPE ST / FITTING INSTRUCTIONS EXTRACTOR UNIT TYPE ST
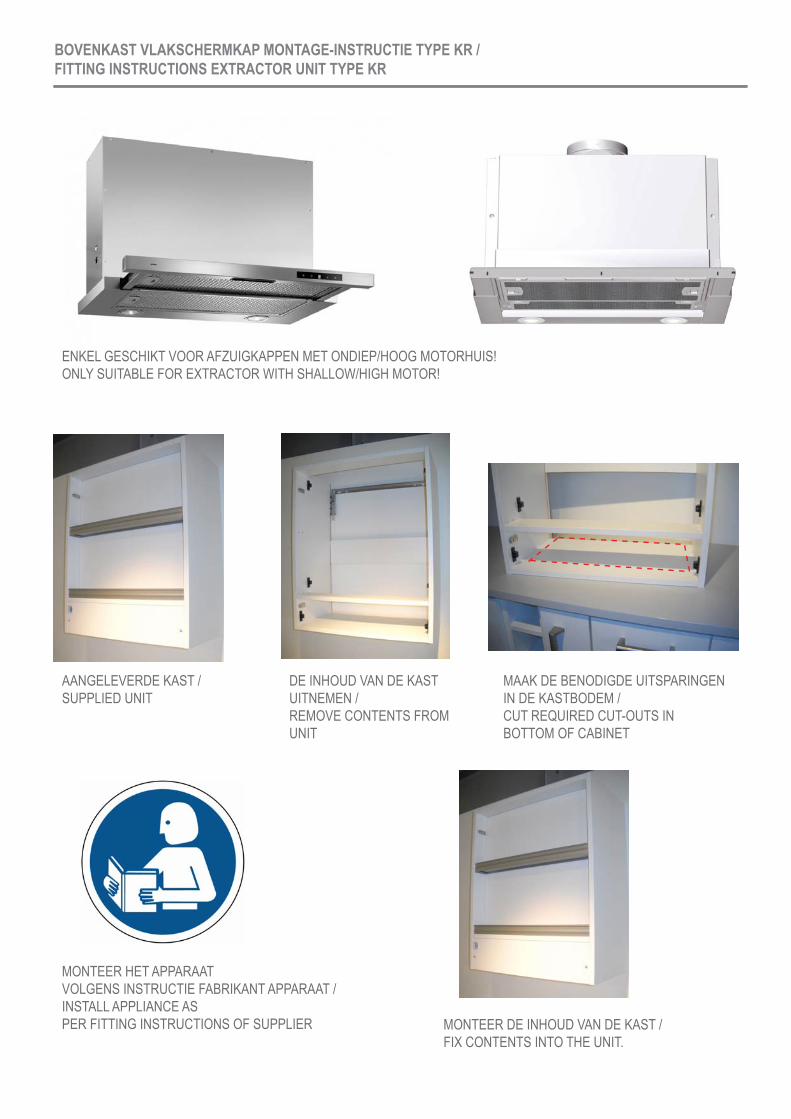
AANGELEVERDE KAST /SUPPLIED UNIT
DE INHOUD VAN DE KASTUITNEMEN /REMOVE CONTENTS FROMUNIT
MAAK DE BENODIGDE UITSPARINGENIN DE KASTBODEM / CUT REQUIRED CUT-OUTS IN BOTTOM OF CABINET
ENKEL GESCHIKT VOOR AFZUIGKAPPEN MET ONDIEP/HOOG MOTORHUIS! ONLY SUITABLE FOR EXTRACTOR WITH SHALLOW/HIGH MOTOR!
MONTEER HET APPARAATVOLGENS INSTRUCTIE FABRIKANT APPARAAT /INSTALL APPLIANCE ASPER FITTING INSTRUCTIONS OF SUPPLIER MONTEER DE INHOUD VAN DE KAST /
FIX CONTENTS INTO THE UNIT.
BOVENKAST VLAKSCHERMKAP MONTAGE-INSTRUCTIE TYPE KR / FITTING INSTRUCTIONS EXTRACTOR UNIT TYPE KR
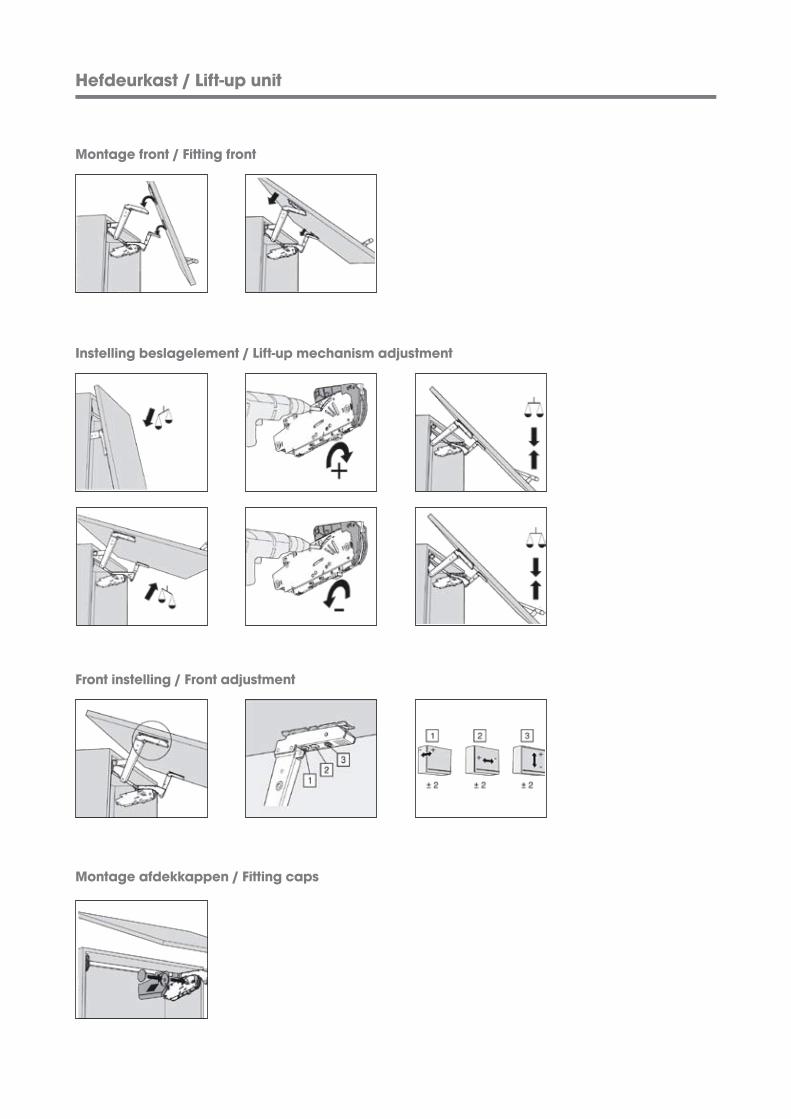
Hefdeurkast / Lift-up unit
Montage front / Fitting front
Instelling beslagelement / Lift-up mechanism adjustment
Front instelling / Front adjustment
Montage afdekkappen / Fitting caps
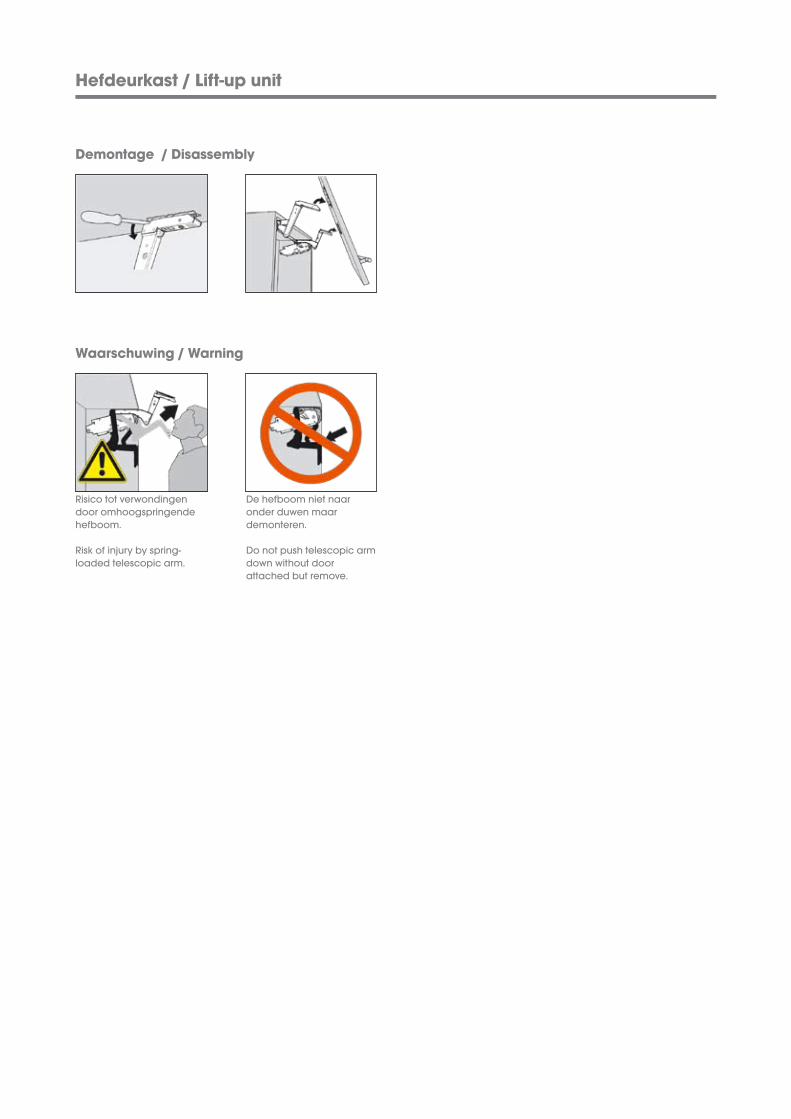
Hefdeurkast / Lift-up unit
Demontage / Disassembly
Waarschuwing / Warning
Risico tot verwondingen door omhoogspringende hefboom.
Risk of injury by spring-loaded telescopic arm.
De hefboom niet naar onder duwen maar demonteren.
Do not push telescopic arm down without door attached but remove.
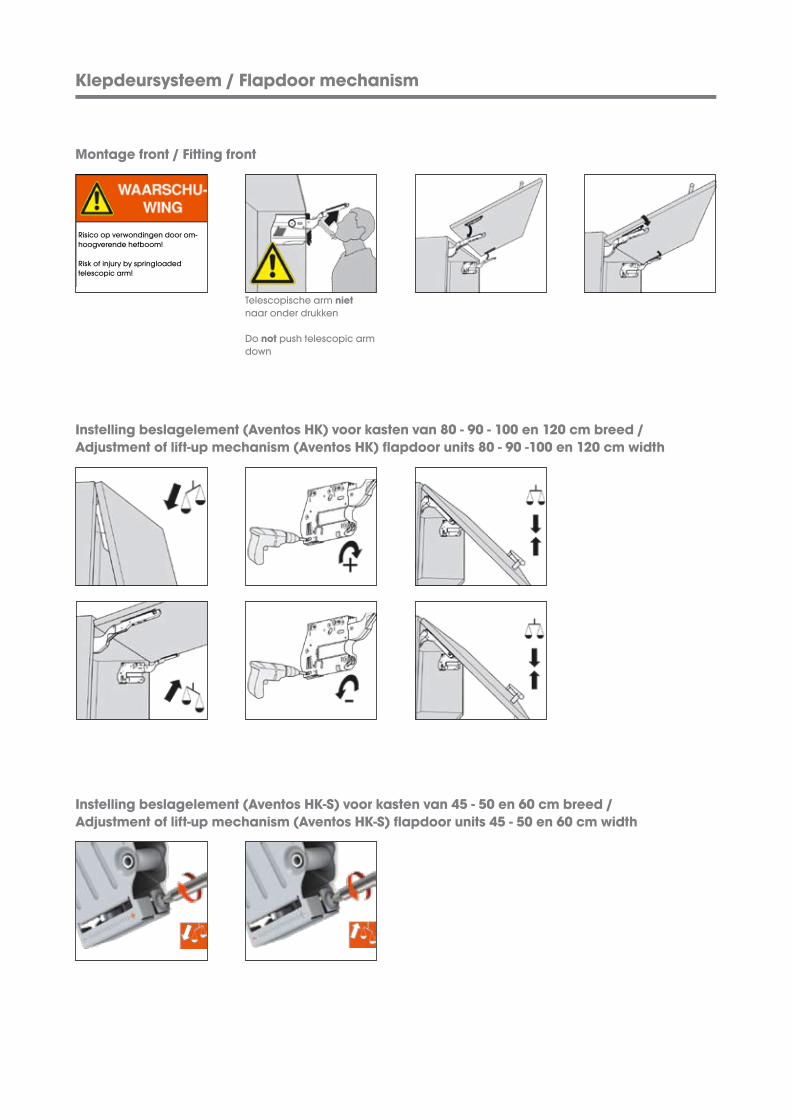
Klepdeursysteem / Flapdoor mechanism
Montage front / Fitting front
Instelling beslagelement (Aventos HK) voor kasten van 80 - 90 - 100 en 120 cm breed / Adjustment of lift-up mechanism (Aventos HK) flapdoor units 80 - 90 -100 en 120 cm width
Risico op verwondingen door om-hoogverende hefboom!
Risk of injury by springloaded telescopic arm!
Telescopische arm niet naar onder drukken
Do not push telescopic armdown
Instelling beslagelement (Aventos HK-S) voor kasten van 45 - 50 en 60 cm breed / Adjustment of lift-up mechanism (Aventos HK-S) flapdoor units 45 - 50 en 60 cm width

Klepdeursysteem / Flapdoor mechanism
Front instelling / Front adjustment
Montage afdekkappen / Fitting caps
Demontage / Disassembly
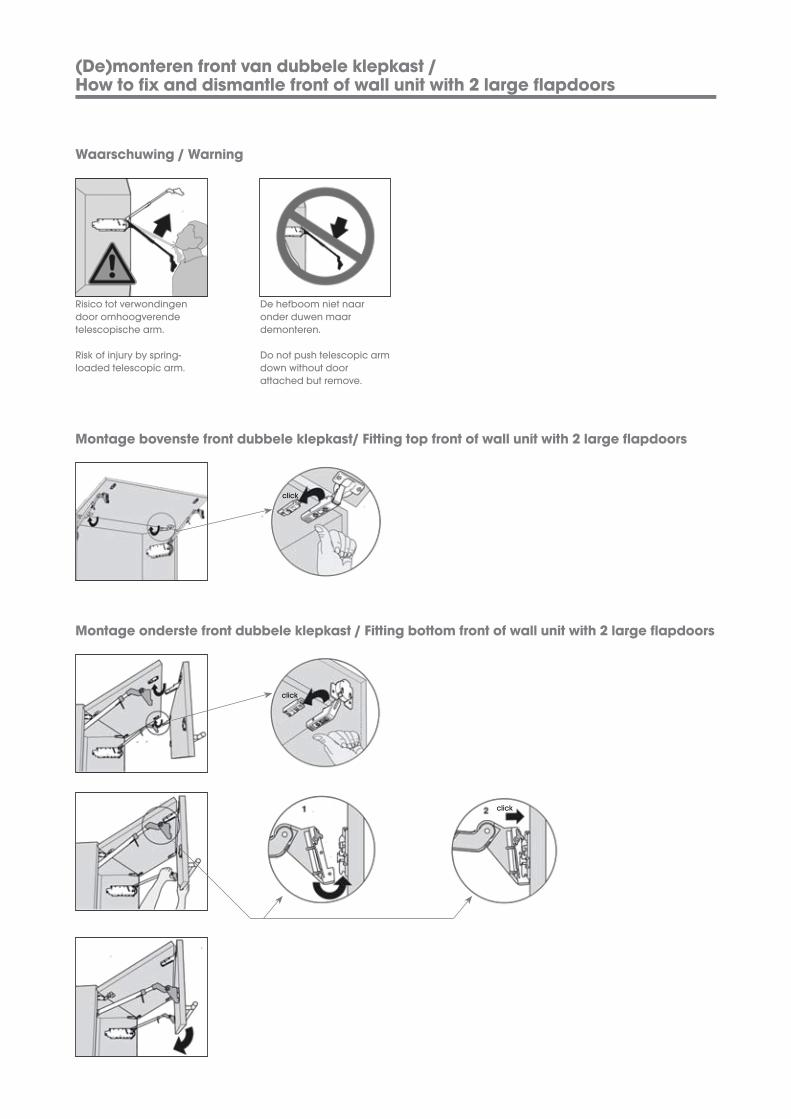
Montage bovenste front dubbele klepkast/ Fitting top front of wall unit with 2 large flapdoors
Montage onderste front dubbele klepkast / Fitting bottom front of wall unit with 2 large flapdoors
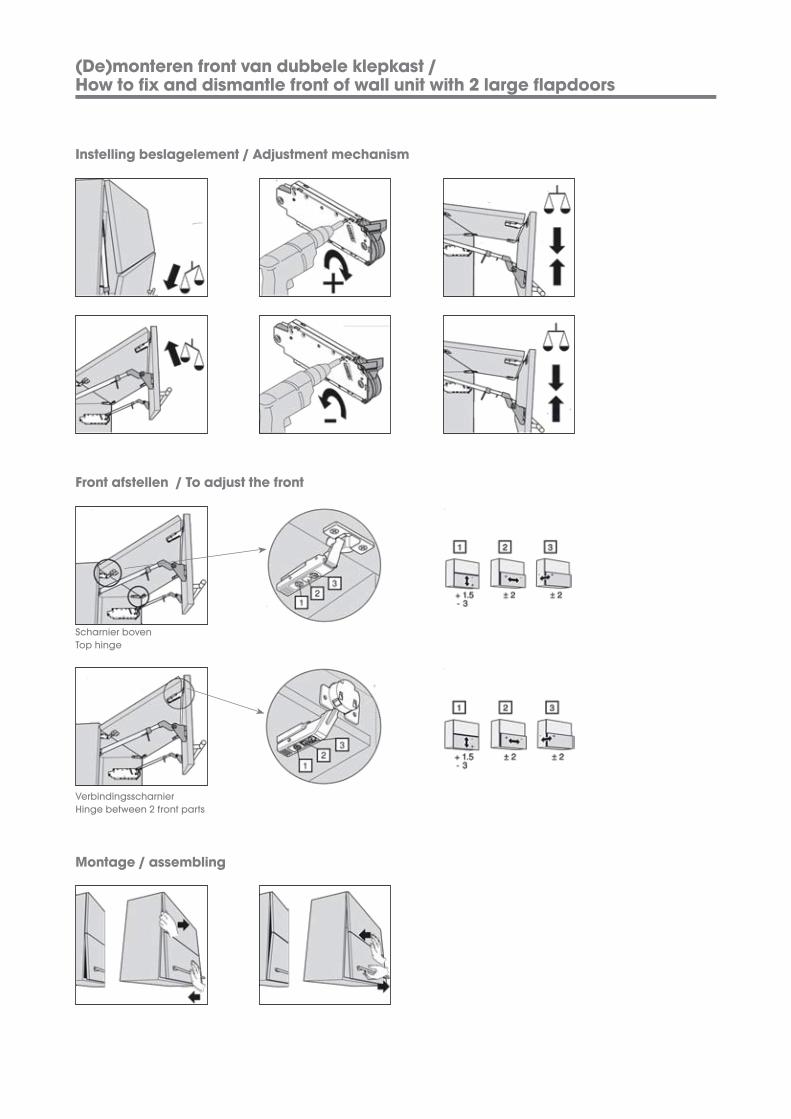
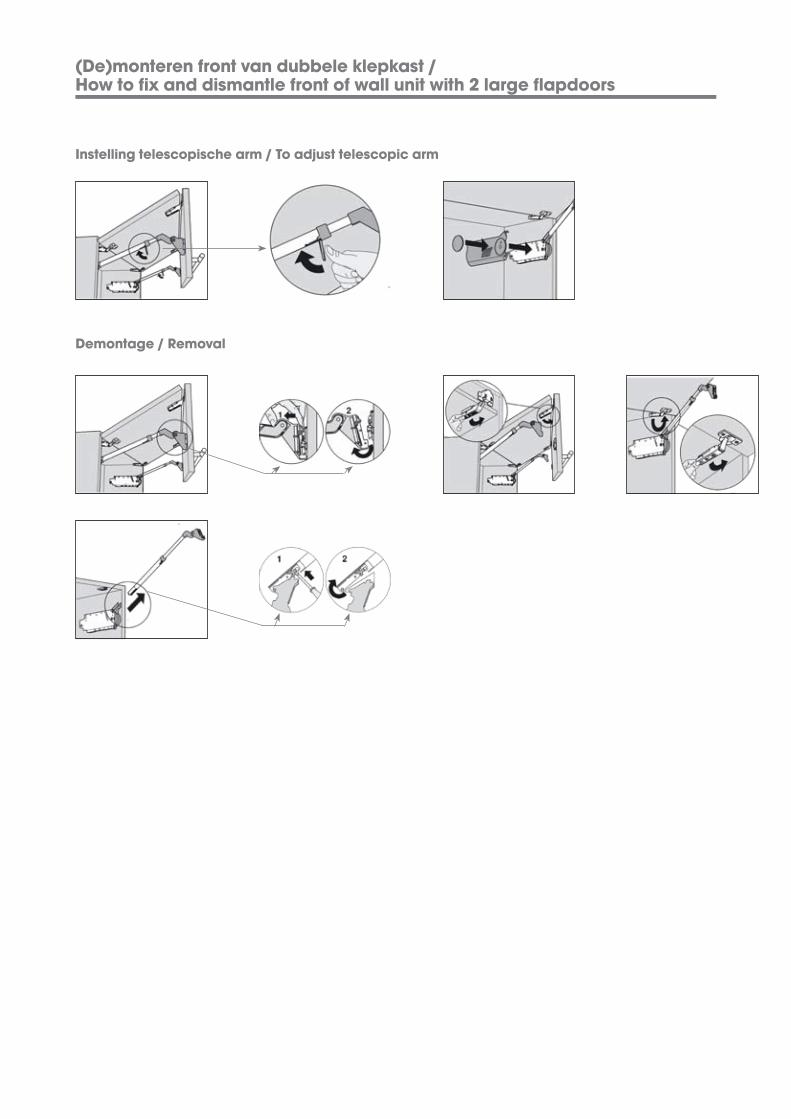
(De)monteren front van dubbele klepkast / How to fix and dismantle front of wall unit with 2 large flapdoors
Waarschuwing / Warning
Risico tot verwondingen door omhoogverende telescopische arm.
Risk of injury by spring-loaded telescopic arm.
De hefboom niet naar onder duwen maar demonteren.
Do not push telescopic arm down without door attached but remove.
click
click
click
(De)monteren front van dubbele klepkast / How to fix and dismantle front of wall unit with 2 large flapdoors
Instelling beslagelement / Adjustment mechanism
Front afstellen / To adjust the front
Montage / assembling
Scharnier bovenTop hinge
VerbindingsscharnierHinge between 2 front parts
(De)monteren front van dubbele klepkast / How to fix and dismantle front of wall unit with 2 large flapdoors
Instelling telescopische arm / To adjust telescopic arm
Demontage / Removal

Lamp vervangen glasbodem / How to replace the tubular lighting
1Om de verlichtingsbodem te openen, verwijder gedeeltelijk beide kunststof schroeven in de onderkant van het aluminium profiel.
To open the lighting bottom, remove partially by screwdriver or similar devices, both plastic locking miniature support from aluminium profile.
2Ongeveer 5 mm zodat u het bovenste glasdeel naar achteren kunt schuiven. Na onderhoud, glasdeel geheel terugplaatsen.
Raise by about 5 mm, just to permit the upper glass to slide back. After maintenance, insert again them completely.
3Draai en verwijder de TL-buis. Vervang de verlichting en draai de TL-buis terug in de juiste positie.
Turn the fluorescent lamp (bulb) and remove it. Replace the bulb with another one, insert and turn it in the right position.
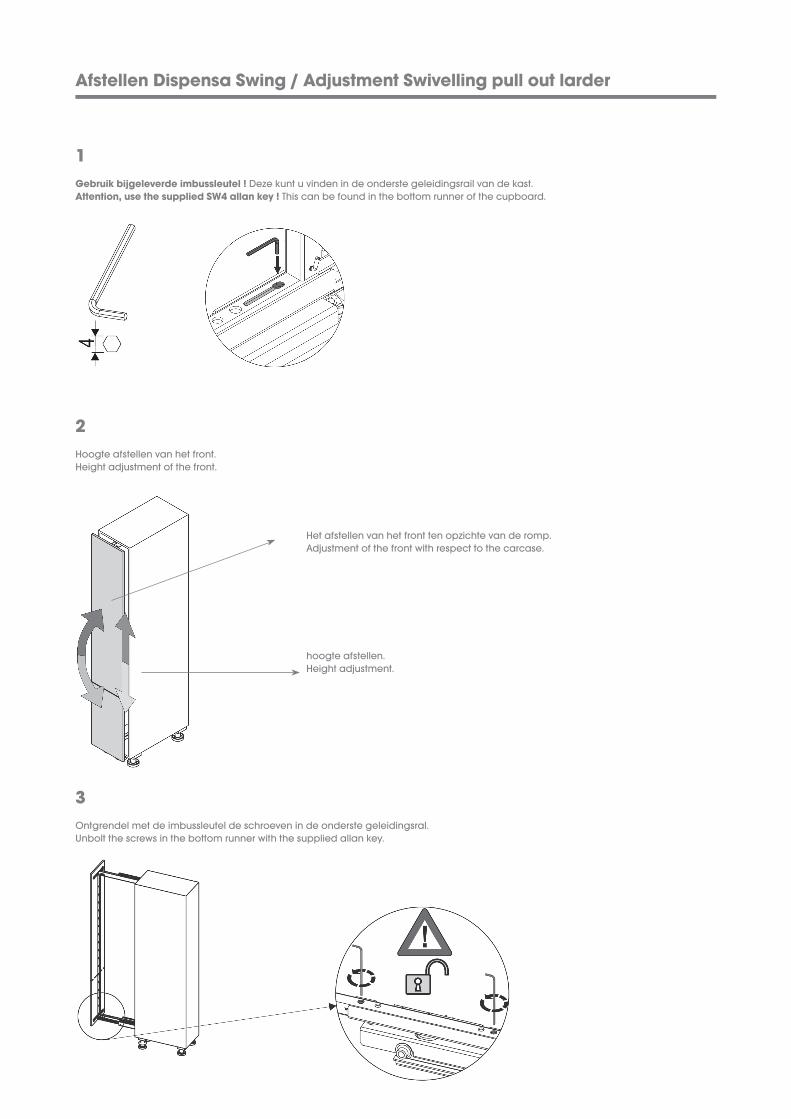
Afstellen Dispensa Swing / Adjustment Swivelling pull out larder
1Gebruik bijgeleverde imbussleutel ! Deze kunt u vinden in de onderste geleidingsrail van de kast.Attention, use the supplied SW4 allan key ! This can be found in the bottom runner of the cupboard.
hoogte afstellen.Height adjustment.
Het afstellen van het front ten opzichte van de romp.Adjustment of the front with respect to the carcase.
2Hoogte afstellen van het front.Height adjustment of the front.
3Ontgrendel met de imbussleutel de schroeven in de onderste geleidingsral.Unbolt the screws in the bottom runner with the supplied allan key.
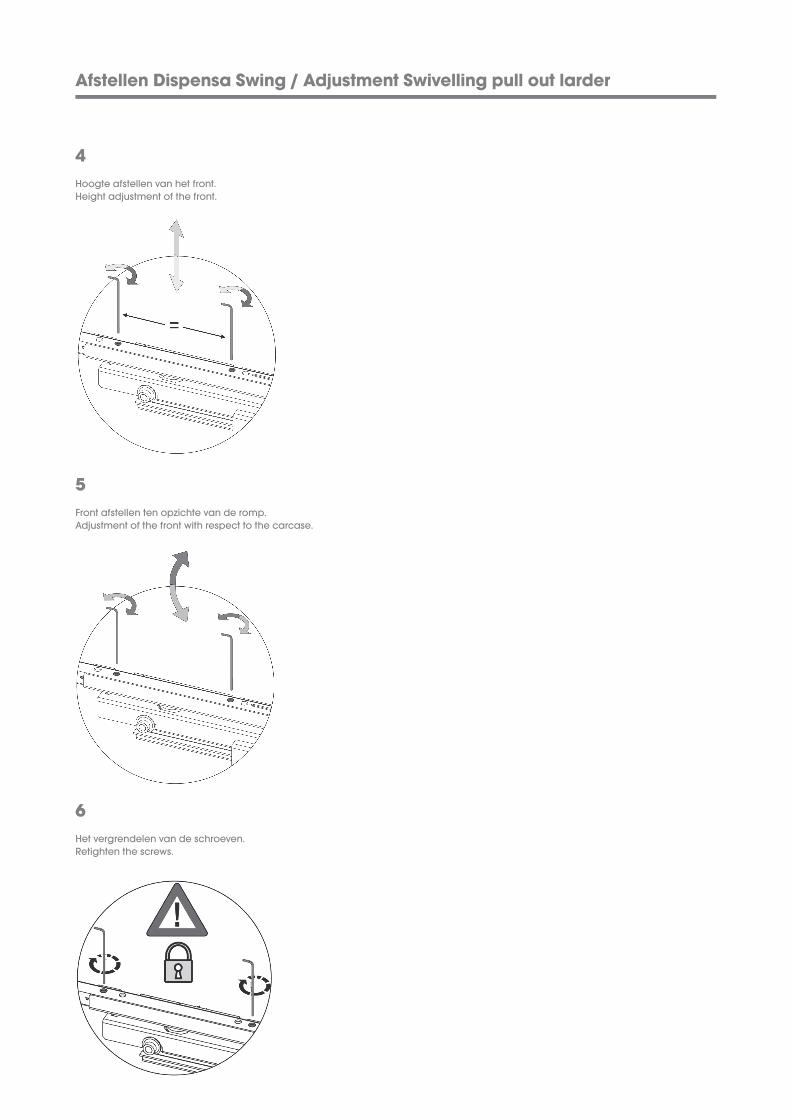
4Hoogte afstellen van het front.Height adjustment of the front.
5Front afstellen ten opzichte van de romp.Adjustment of the front with respect to the carcase.
6Het vergrendelen van de schroeven.Retighten the screws.
Afstellen Dispensa Swing / Adjustment Swivelling pull out larder

7Links en rechts afstellen van het front.Left and right adjustment of the front.
Links en rechts afstellen.Left and right adjustment.
Het afstellen van het front ten opzichte van de romp.Adjustment of the front with respect to the carcase.
8Ontgrendel met de imbussleutel de middelste schroef in de onder en boven geleidingsrail.Unbolt the middle screw in the bottom and top runner with the allan key.
9Front afstellen van links naar rechts.Front adjustment from left to right.
Afstellen Dispensa Swing / Adjustment Swivelling pull out larder
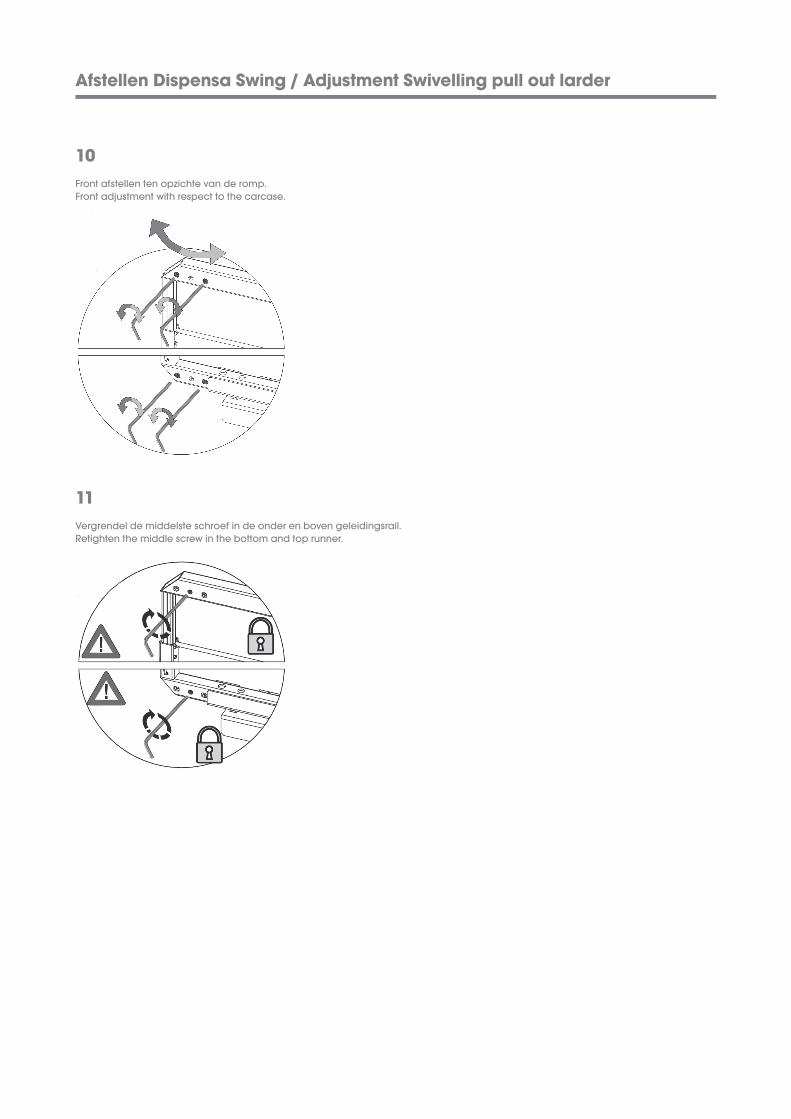
10Front afstellen ten opzichte van de romp.Front adjustment with respect to the carcase.
11Vergrendel de middelste schroef in de onder en boven geleidingsrail.Retighten the middle screw in the bottom and top runner.
Afstellen Dispensa Swing / Adjustment Swivelling pull out larder

Verstelbare drager / adjustable stud
incl. pluggen en schroevenincl. screws and plugs
verstelbare drageradjustable stud 25 mm dik / thick
max. 300
Drager tbv wang 25 mm / Stud for panel 25 mm
Drager tbv stollenplanke 50 mm / Stud for casing panel 50 mm
1
3
2
4
Plint- stelpootconstructie / Plinth-leg construction
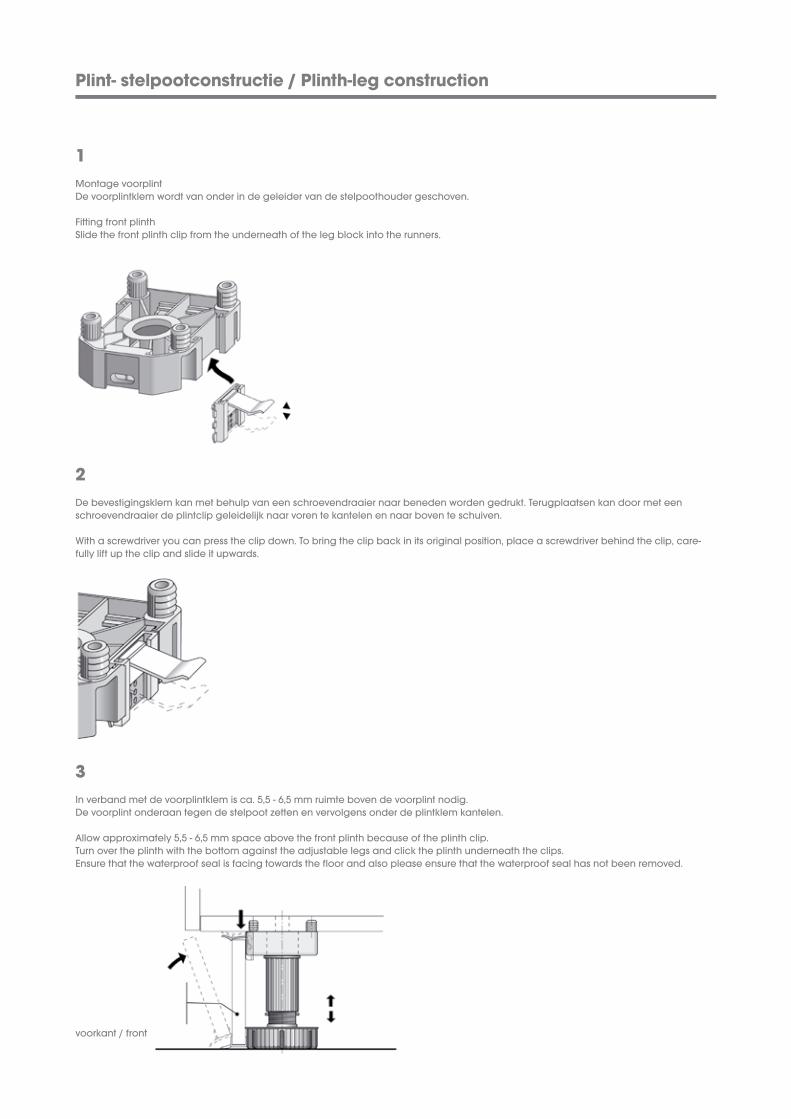
1Montage voorplintDe voorplintklem wordt van onder in de geleider van de stelpoothouder geschoven.
Fitting front plinthSlide the front plinth clip from the underneath of the leg block into the runners.
2De bevestigingsklem kan met behulp van een schroevendraaier naar beneden worden gedrukt. Terugplaatsen kan door met een schroevendraaier de plintclip geleidelijk naar voren te kantelen en naar boven te schuiven.
With a screwdriver you can press the clip down. To bring the clip back in its original position, place a screwdriver behind the clip, care-fully lift up the clip and slide it upwards.
3In verband met de voorplintklem is ca. 5,5 - 6,5 mm ruimte boven de voorplint nodig.De voorplint onderaan tegen de stelpoot zetten en vervolgens onder de plintklem kantelen.
Allow approximately 5,5 - 6,5 mm space above the front plinth because of the plinth clip.Turn over the plinth with the bottom against the adjustable legs and click the plinth underneath the clips.Ensure that the waterproof seal is facing towards the floor and also please ensure that the waterproof seal has not been removed.
voorkant / front
Plint- stelpootconstructie / Plinth-leg construction
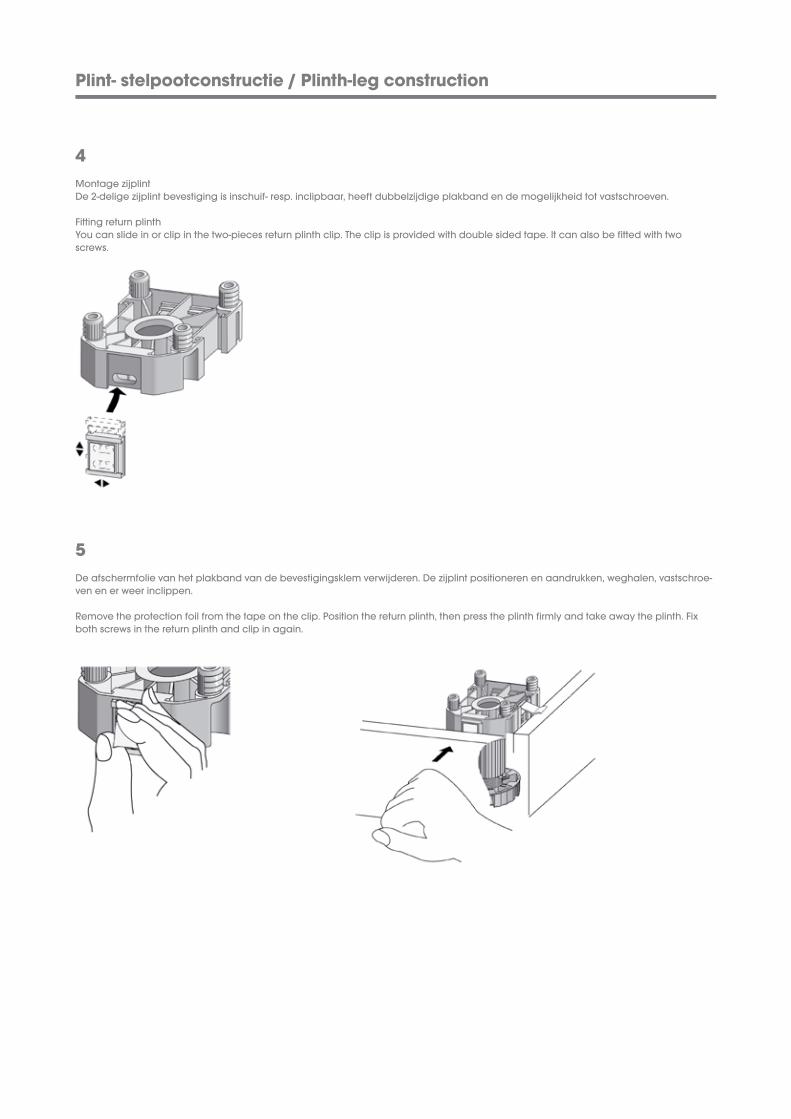
4Montage zijplintDe 2-delige zijplint bevestiging is inschuif- resp. inclipbaar, heeft dubbelzijdige plakband en de mogelijkheid tot vastschroeven.
Fitting return plinthYou can slide in or clip in the two-pieces return plinth clip. The clip is provided with double sided tape. It can also be fitted with two screws.
5De afschermfolie van het plakband van de bevestigingsklem verwijderen. De zijplint positioneren en aandrukken, weghalen, vastschroe-ven en er weer inclippen.
Remove the protection foil from the tape on the clip. Position the return plinth, then press the plinth firmly and take away the plinth. Fix both screws in the return plinth and clip in again.
Onderhoudsvoorschrift
De materialen
• Reiniging van kasten, korven en ladenVoor het reinigen van de binnenkant van uw keukenmeubelen gebruikt u gewoon een doek met een in de handel verkrijgbaar vloeibaar doch mild reinigingsmiddel. U veegt de gereinigde vlakken het beste meteen daarna af met een zachte, droge doek om te verhinderen dat er water in de naden binnendringt, wat tot een zwelling zou kunnen leiden.
• Houten en gelakte fronten Gefineerde of gelakte oppervlakkenHet oppervlak van echt houten elementen ontstaat in ettelijke werkfases met beits en lak. De bescherming krijgt het door een hoogwaardige lagenopbouw van blanke lak met grote weestand.
Verwijder vuil zo mogelijk meteen. Vaak is er dan helemaal geen reinigingsmiddel nodig. Om te voorkomen dat u het vuil in de poriën wrijft in plaats van het te verwijderen, borstelt en wrijft u steeds in de richting van de vezel resp. structuur. Stoomreinigers zijn voor het schoonmaken van keukenmeubelen absoluut ongeschikt. Zorg er vooral voor dat nergens water blijft staan, vooral op voegen en onderkanten van deuren.
• Kunststof en folie fronten Oppervlakken met een coating van melaminehars resp. folieDe kunststof oppervlakken van onze meubelelementen bestaan uit een hoogwaardige coating van melaminehars op kwaliteitsspaanderplaat, of van MDF ondermateriaal met polymere folie.U kunt alle gebruikelijke huishoudsschoonmaakmiddelen nemen die in water oplosbaar zijn. Niet geschikt zijn sanitairreinigers, reinigers met schurende of agressieve inhoudsstoffen zoals salmiak, aceton, nitroverdunning en oplossingen die met tri... of tetra...... beginnen.
Massief houten elementen
Ondanks zorgvuldige afwerking en een optimale oppervlakbescherming reageren massief houten onderdelen op sterke klimaatveranderingen met uitzetten en krimpen. Hout is een natuurlijk materiaal. Kleurveranderingen als gevolg van lichtinvloeden zijn ondanks stralenabsorberende lakeigenschappen niet te voorkomen. De ideale luchtvochtigheid bedraagt 45 - 70%. Zorg met luchtbevochtingsapparaten resp. door goed luchten voor een optimaal kamerklimaat. Gebruik ook steeds uw afzuigkap.
Grepen/knoppen
De grepen en knoppen kunt u met normale, huishoudelijke schoonmaakmiddelen reinigen en met een droge doek nadrogen.
Techniek & onderhoud
• Scharnieren en deurbeslagDankzij de geavanceerde beslagtechniek is het mogelijk functiebeslagen toe te passen die vrijwel geen onderhoud nodig hebben. Het is voldoende als u de meest gebruikte deuren of kleppen eens per jaar met olie behandelt. Een druppeltje olie op het scharnier van het betreffende beslag is genoeg. Gebruik daarvoor conventionele fijne oliën zoals naaimachine-olie. Neem geen dierlijke vetten. De looprollen van de schuifladen en uittrekbare elementen zijn van hoogwaardig kunststof en mogen niet worden geolied.
• VaatwasserDe onderzijde van het werkblad wordt beschermd door de gemonteerde stoomkeerplaat, die bij de vaatwasser hoort. Wacht altijd zo lang als in de gebruiksaanwijzing van uw vaatwasser wordt geadviseerd voordat u de machine opent. Doe de klep in geen geval alleen op een kier open.
• Koel- en vrieskastenDoor een magneetband in de deurafdichting is de sluitfunctie gegarandeerd. Condenswatervorming op meubelelementen en ijsvorming binnenin het apparaat waarschuwen u dat de deur van het koelapparaat niet goed sluit. Controleer de positie van de koelkast en justeer de scharnieren van de deur van het apparaat zodanig dat deze goed sluit.
• OvenDe hitte die bij het bakken ontstaat, moet naar voren worden afgeleid. Houd de ovendeur gesloten als de oven heet is. Zet het deurtje vooral niet op een kier, omdat stoom en hitte die aan de zijkant naar buiten komen, de kunststof of houten onderdelen kunnen beschadigen.
• Waterkokers, koffiezetapparaten en andere kleine apparatenBij het verhitten van water onstaat stoom, die in de regel bij waterkokers en koffiezetapparaten tamelijk ongehinderd naar buiten kan. U mag waterkokers en koffiezetapparaten nooit onder meubelelementen zoals lichtlijsten of bovenkasten plaatsen, omdat opstijgende stoom mettertijd beschadigingen veroorzaakt.

Care instructions
The materials
• Cleaning of cabinets and drawerboxesPlease use a cloth with a regular fluid yet mild cleaner to clean the interiors of your cabinets. Please use a dry cloth just after cleansing the surfaces to avoid water penetrating into the joints, which might lead to swelling.
• Wooden and veneered frontsThe surfaces of parts made of genuine wood are produced in several operations in wich varnish is used. A high-quality highly resistant structure of transparent varnish layers ensures protection of the surfaces.
Remove any dirt and soiling immediately upon occurrence, if possible. In many cases detergents are not required at all. Rub or wipe always along the grain direction in order to remove the dirt out of the pores rather than rubbing it in. Aerosol cleaners are definetely unsuitable for cleaning kitchen furniture. Wet pools should be avoided in any case, specifically on joints and the lower edges of the doors.
• Synthetic and foil laminated frontsThe surfaces of the parts of our furniture consist of a high-quality melamine resin coating applied on a high-quality chipboard, or of an MDF substrate material with a polymer flim.Any water-soluble detergent common in a household is appropriate for application. Sanitary detergents, detergents containing scouring or aggressive ingredients such as salmiac, actone, nitro dilution and solutions whose name begins with ,,tri” or ,,tetra” are unsuitable.
Parts made of solid wood
Despite diligence in manufacture and despite optimum protection of surfaces parts made of solid wood react in response to strong climatic variations - either by swelling or by shrinking. Wood is a natural material. Variations in colour under the influence of light cannot be prevented - despite radiation-absorbing properties of the varnish. The ideal humidity in the air ranges between 45% and 70%. Please maintain optimum environmental conditions by using air humidifiers or by appropriate airing. In such an approach please do not forget to operate always your extractor hood.
Knobs and handles
The knobs and handles can be cleaned with normal, household cleaners except abrasives and dried with a dry cloth.
Mechanical parts and maintenance
• Hinges and folding-door mechanismThe complex and expensive mechanism permits an almost maintenance-free application of the functional mechanism. It is sufficient once a year to oil the doors or folding doors (flaps) moved with a particularly high frequency. One drop of oil on the respective armature joint is sufficient. For oiling please use commercial fine oils such as oils for sewing-machines. Do not use animal greases. The rollers of the drawers and chests of drawers are made of a high-performance synthetic material and must not be oiled.
• DishwashersThe steam deflector mounted on the underside of the working tops ensures protection of the tops, the deflector is part of the scope of supply of your dishwasher. Let the drying period specified by the manufacturer lapse before you open the dishwasher.
• Refrigerators and freezersA magnetic strip in the door seal ensures the closing function. The formation of condensation water on parts of furniture and the formation of ice inside the appliances are signs of an insufficiently sealed closure of the cooling equipment. Check the position of your refrigerator and adjust the hinges on the door of your fridge such that it will be tightly closed.
• OvenThe heat created during the cooking process must be dissipated to the front. When the oven is heated make sure that the oven door will always be completely open or completely closed. Definitely avoid opening of the door by a gap only or else the heat or steam escaping on the sides may cause damage to the synthetic or wooden parts.
• Electric kettles, coffee machines and other small kitchen applianceWhen water is heated steam is produced that can escape, as a rule, from kettles and coffee machines with barely any obstruction. Electric kettles and coffee machines should therefore never be placed underneath parts of furniture such as light shades or top cupboards because the rising steam will cause damage there in the long run. A defect or excessive use of the appliances may result in excessive heating. To avoid damage caused to work surfaces it is recommended that electric appliances should never be placed on combustible bases.