Conceptronic CH3SNAS Snelstart handleidingdownload.conceptronic.net/manuals/C05-321_CH3SNAS... ·...
187
NEDERLANDS 1 Conceptronic CH3SNAS Snelstart handleiding Hartelijk gefeliciteerd met de aanschaf van uw Conceptronic Grab’n’GO Media Store. In de bijgaande Snelstart handleiding wordt stap voor stap uitgelegd hoe u de Conceptronic Grab’n’GO Media Store kunt instellen en gebruiken. In geval van problemen adviseren wij u onze support-site te bezoeken (ga naar: www.conceptronic.net en klik op ‘Support’). Hier vindt u een database met veelgestelde vragen waar u waarschijnlijk de oplossing voor uw probleem kunt vinden. Heeft u andere vragen over uw product die u niet op de website kunt vinden, neem dan contact met ons op via e-mail: [email protected] . Voor meer informatie over Conceptronic producten kunt u terecht op de Conceptronic website: www.conceptronic.net . De software configuratie beschreven in deze handleiding kan afwijken op uw computer. Dit is afhankelijk van het besturingssysteem dat u gebruikt. 1 Pakket Inhoud De volgende onderdelen dienen aanwezig te zijn in de verpakking van de Conceptronic Conceptronic CH3SNAS: • Conceptronic CH3SNAS • Spanningsadapter voor de CH3SNAS (5v, 3A & 12v, 3A) • Netwerk Kabel • Deze meertalige Snelstart handleiding • CD-ROM met software Let op : Deze snelstart handleiding beschrijft alleen de basis hoe u de CH3SNAS werkend kunt krijgen in uw netwerkomgeving. Voor meer gedetailleerde functies en uitleg, zie de Engelstalige Gebruikershandleiding op de meegeleverde CD-ROM.
Transcript of Conceptronic CH3SNAS Snelstart handleidingdownload.conceptronic.net/manuals/C05-321_CH3SNAS... ·...
NEDERLANDS
1
Conceptronic CH3SNAS
Snelstart handleiding
Hartelijk gefeliciteerd met de aanschaf van uw Conceptronic Grab’n’GO Media Store.
In de bijgaande Snelstart handleiding wordt stap voor stap uitgelegd hoe u de Conceptronic Grab’n’GO Media Store kunt instellen en gebruiken. In geval van problemen adviseren wij u onze support-site te bezoeken (ga naar: www.conceptronic.net en klik op ‘Support’). Hier vindt u een database met veelgestelde vragen waar u waarschijnlijk de oplossing voor uw probleem kunt vinden. Heeft u andere vragen over uw product die u niet op de website kunt vinden, neem dan contact met ons op via e-mail: [email protected]. Voor meer informatie over Conceptronic producten kunt u terecht op de Conceptronic website: www.conceptronic.net. De software configuratie beschreven in deze handleiding kan afwijken op uw computer. Dit is afhankelijk van het besturingssysteem dat u gebruikt. 1 Pakket Inhoud
De volgende onderdelen dienen aanwezig te zijn in de verpakking van de Conceptronic Conceptronic CH3SNAS: • Conceptronic CH3SNAS • Spanningsadapter voor de CH3SNAS (5v, 3A & 12v, 3A) • Netwerk Kabel • Deze meertalige Snelstart handleiding • CD-ROM met software Let op: Deze snelstart handleiding beschrijft alleen de basis hoe u de CH3SNAS
werkend kunt krijgen in uw netwerkomgeving. Voor meer gedetailleerde functies en uitleg, zie de Engelstalige Gebruikershandleiding op de meegeleverde CD-ROM.
NEDERLANDS
2
2 Uitleg van de CH3SNAS
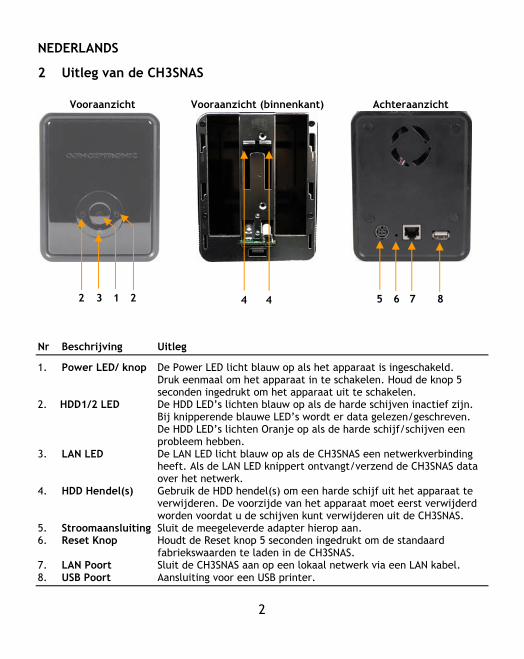
Vooraanzicht Vooraanzicht (binnenkant) Achteraanzicht
Nr Beschrijving Uitleg
1. Power LED/ knop De Power LED licht blauw op als het apparaat is ingeschakeld. Druk eenmaal om het apparaat in te schakelen. Houd de knop 5
seconden ingedrukt om het apparaat uit te schakelen. 2. HDD1/2 LED De HDD LED’s lichten blauw op als de harde schijven inactief zijn.
Bij knipperende blauwe LED’s wordt er data gelezen/geschreven. De HDD LED’s lichten Oranje op als de harde schijf/schijven een probleem hebben.
3. LAN LED De LAN LED licht blauw op als de CH3SNAS een netwerkverbinding heeft. Als de LAN LED knippert ontvangt/verzend de CH3SNAS data over het netwerk.
4. HDD Hendel(s) Gebruik de HDD hendel(s) om een harde schijf uit het apparaat te verwijderen. De voorzijde van het apparaat moet eerst verwijderd worden voordat u de schijven kunt verwijderen uit de CH3SNAS.
5. Stroomaansluiting Sluit de meegeleverde adapter hierop aan. 6. Reset Knop Houdt de Reset knop 5 seconden ingedrukt om de standaard
fabriekswaarden te laden in de CH3SNAS. 7. LAN Poort Sluit de CH3SNAS aan op een lokaal netwerk via een LAN kabel. 8. USB Poort Aansluiting voor een USB printer.
1
2 3
2
4 5 6 7 2 1 4 8
NEDERLANDS
3
3 Hardware Installatie 3.1 De HDD(s) installeren
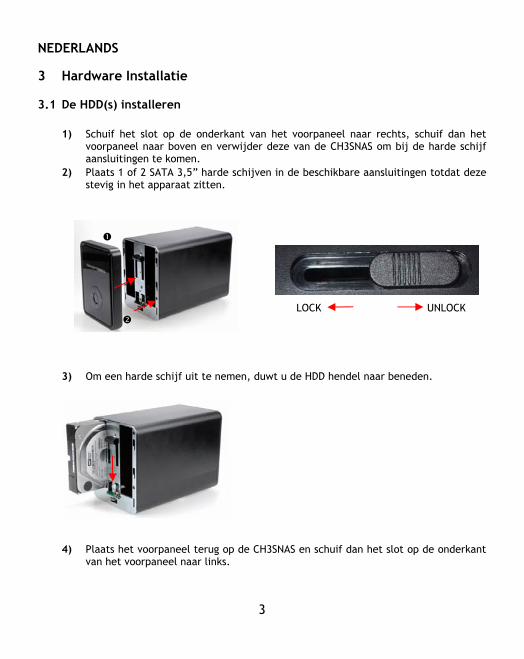
1) Schuif het slot op de onderkant van het voorpaneel naar rechts, schuif dan het voorpaneel naar boven en verwijder deze van de CH3SNAS om bij de harde schijf aansluitingen te komen.
2) Plaats 1 of 2 SATA 3,5” harde schijven in de beschikbare aansluitingen totdat deze stevig in het apparaat zitten.
LOCK UNLOCK
3) Om een harde schijf uit te nemen, duwt u de HDD hendel naar beneden.
4) Plaats het voorpaneel terug op de CH3SNAS en schuif dan het slot op de onderkant van het voorpaneel naar links.
NEDERLANDS
4
3.2 Kabels aansluiten 1) Sluit de meegeleverde adapter aan op de stroom-aansluiting aan de achterzijde
van de CH3SNAS. Verbind deze vervolgens met een vrij stopcontact. 2) Sluit de meegeleverde LAN kabel aan op de LAN poort aan de achterzijde van de
CH3SNAS en verbind deze met uw netwerk of verbind deze direct met een computer.
Let op: Wij adviseren om de CH3SNAS aan te sluiten op een router met DHCP server
voor een eenvoudige configuratie. Als u de CH3SNAS direct op een PC aansluit dient u een statisch IP adres in te stellen op uw PC om de CH3SNAS te kunnen configureren. Zie pagina 10 van de CD-ROM handleiding voor het instellen van een statisch IP adres op uw computer.
NEDERLANDS
5
4 De CH3SNAS configureren
Easy Search applicatie Op de CD-ROM is de Easy Search applicatie aanwezig die het eenvoudiger maakt om de CH3SNAS te benaderen en te configureren. Via de Easy Search applicatie kunt u eenvoudig verbindingen met de CH3SNAS opzetten.
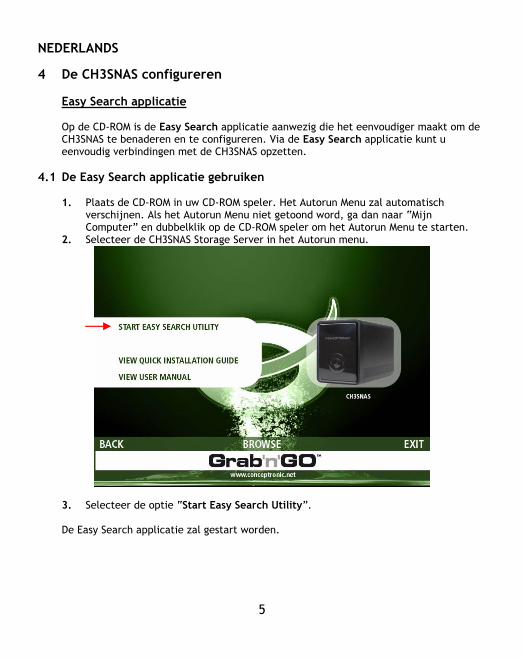
4.1 De Easy Search applicatie gebruiken 1. Plaats de CD-ROM in uw CD-ROM speler. Het Autorun Menu zal automatisch
verschijnen. Als het Autorun Menu niet getoond word, ga dan naar “Mijn Computer” en dubbelklik op de CD-ROM speler om het Autorun Menu te starten.
2. Selecteer de CH3SNAS Storage Server in het Autorun menu.
3. Selecteer de optie “Start Easy Search Utility”. De Easy Search applicatie zal gestart worden.

NEDERLANDS
6
Let op: Als u gebruikt maakt van Windows XP SP2 of een nieuwer besturingssysteem
kan de firewall de onderstaande melding geven. Voor een correcte werking van de Easy Search applicatie dient u deze toe te staan in de firewall.
Als de Easy Search applicatie is gestart zal deze automatisch zoeken naar Storage Servers in uw netwerk. De gevonden servers zullen getoond worden in het “Search Server” scherm.
NEDERLANDS
7
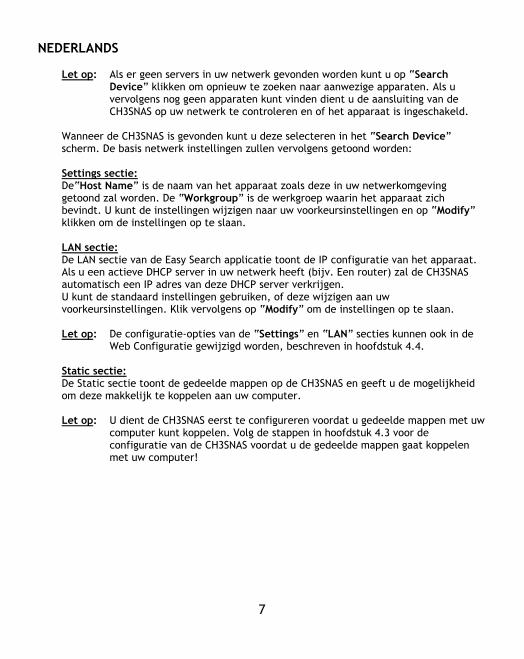
Let op: Als er geen servers in uw netwerk gevonden worden kunt u op “Search
Device” klikken om opnieuw te zoeken naar aanwezige apparaten. Als u vervolgens nog geen apparaten kunt vinden dient u de aansluiting van de CH3SNAS op uw netwerk te controleren en of het apparaat is ingeschakeld.
Wanneer de CH3SNAS is gevonden kunt u deze selecteren in het “Search Device” scherm. De basis netwerk instellingen zullen vervolgens getoond worden: Settings sectie: De“Host Name” is de naam van het apparaat zoals deze in uw netwerkomgeving getoond zal worden. De “Workgroup” is de werkgroep waarin het apparaat zich bevindt. U kunt de instellingen wijzigen naar uw voorkeursinstellingen en op “Modify” klikken om de instellingen op te slaan. LAN sectie: De LAN sectie van de Easy Search applicatie toont de IP configuratie van het apparaat. Als u een actieve DHCP server in uw netwerk heeft (bijv. Een router) zal de CH3SNAS automatisch een IP adres van deze DHCP server verkrijgen. U kunt de standaard instellingen gebruiken, of deze wijzigen aan uw voorkeursinstellingen. Klik vervolgens op “Modify” om de instellingen op te slaan. Let op: De configuratie-opties van de “Settings” en “LAN” secties kunnen ook in de
Web Configuratie gewijzigd worden, beschreven in hoofdstuk 4.4. Static sectie: De Static sectie toont de gedeelde mappen op de CH3SNAS en geeft u de mogelijkheid om deze makkelijk te koppelen aan uw computer. Let op: U dient de CH3SNAS eerst te configureren voordat u gedeelde mappen met uw
computer kunt koppelen. Volg de stappen in hoofdstuk 4.3 voor de configuratie van de CH3SNAS voordat u de gedeelde mappen gaat koppelen met uw computer!
NEDERLANDS
8
4.2 CH3SNAS Web Configuratie
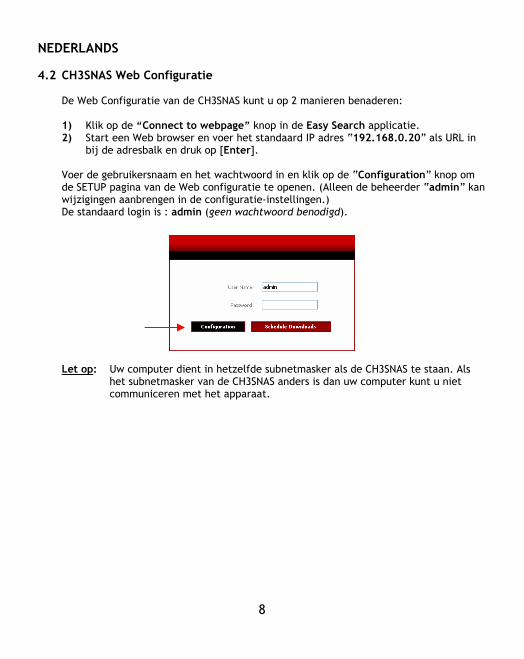
De Web Configuratie van de CH3SNAS kunt u op 2 manieren benaderen: 1) Klik op de “Connect to webpage” knop in de Easy Search applicatie. 2) Start een Web browser en voer het standaard IP adres “192.168.0.20” als URL in
bij de adresbalk en druk op [Enter]. Voer de gebruikersnaam en het wachtwoord in en klik op de “Configuration” knop om de SETUP pagina van de Web configuratie te openen. (Alleen de beheerder “admin” kan wijzigingen aanbrengen in de configuratie-instellingen.) De standaard login is : admin (geen wachtwoord benodigd).
Let op: Uw computer dient in hetzelfde subnetmasker als de CH3SNAS te staan. Als
het subnetmasker van de CH3SNAS anders is dan uw computer kunt u niet communiceren met het apparaat.
NEDERLANDS
9
4.3 Eenmalige HDD Configuratie
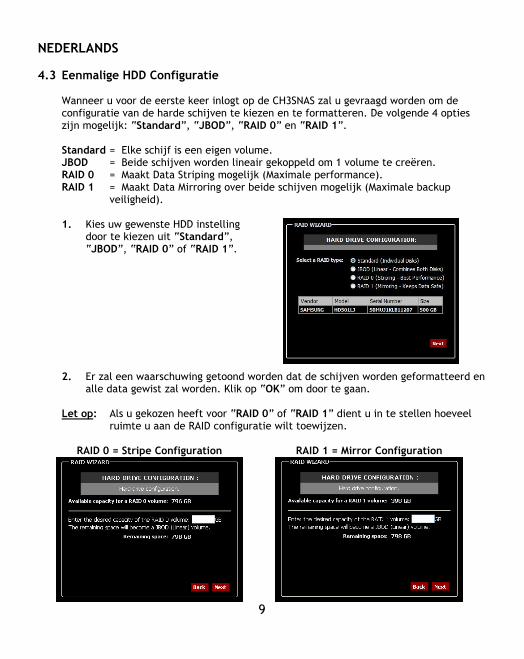
Wanneer u voor de eerste keer inlogt op de CH3SNAS zal u gevraagd worden om de configuratie van de harde schijven te kiezen en te formatteren. De volgende 4 opties zijn mogelijk: “Standard”, “JBOD”, “RAID 0” en “RAID 1”. Standard = Elke schijf is een eigen volume. JBOD = Beide schijven worden lineair gekoppeld om 1 volume te creëren. RAID 0 = Maakt Data Striping mogelijk (Maximale performance). RAID 1 = Maakt Data Mirroring over beide schijven mogelijk (Maximale backup
veiligheid). 1. Kies uw gewenste HDD instelling
door te kiezen uit “Standard”, “JBOD”, “RAID 0” of “RAID 1”.
2. Er zal een waarschuwing getoond worden dat de schijven worden geformatteerd en alle data gewist zal worden. Klik op “OK” om door te gaan.
Let op: Als u gekozen heeft voor “RAID 0” of “RAID 1” dient u in te stellen hoeveel
ruimte u aan de RAID configuratie wilt toewijzen.
RAID 0 = Stripe Configuration
RAID 1 = Mirror Configuration
NEDERLANDS
10
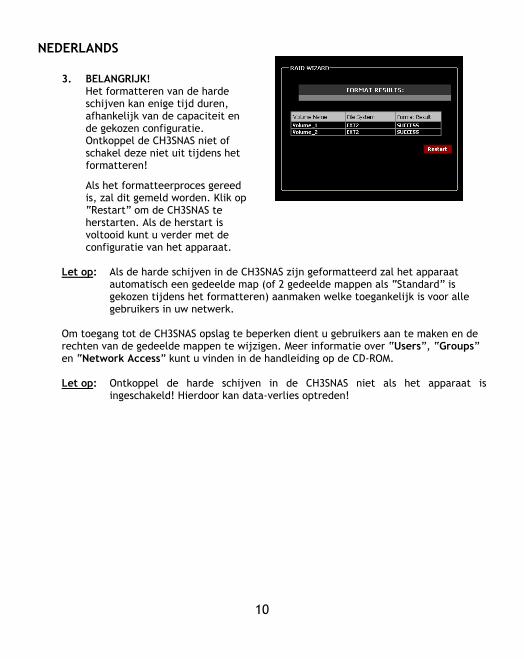
3. BELANGRIJK!
Het formatteren van de harde schijven kan enige tijd duren, afhankelijk van de capaciteit en de gekozen configuratie. Ontkoppel de CH3SNAS niet of schakel deze niet uit tijdens het formatteren!
Als het formatteerproces gereed is, zal dit gemeld worden. Klik op “Restart” om de CH3SNAS te herstarten. Als de herstart is voltooid kunt u verder met de configuratie van het apparaat.
Let op: Als de harde schijven in de CH3SNAS zijn geformatteerd zal het apparaat
automatisch een gedeelde map (of 2 gedeelde mappen als “Standard” is gekozen tijdens het formatteren) aanmaken welke toegankelijk is voor alle gebruikers in uw netwerk.
Om toegang tot de CH3SNAS opslag te beperken dient u gebruikers aan te maken en de rechten van de gedeelde mappen te wijzigen. Meer informatie over “Users”, “Groups” en “Network Access” kunt u vinden in de handleiding op de CD-ROM. Let op: Ontkoppel de harde schijven in de CH3SNAS niet als het apparaat is
ingeschakeld! Hierdoor kan data-verlies optreden!

NEDERLANDS
11
4.4 Wizard Configuratie
Als de configuratie van de harde schijven gereed is en de CH3SNAS opnieuw is gestart, kunt u verder gaan met de Web Configuratie van het apparaat. In de configuratie van de CH3SNAS vindt u een Setup Wizard die de mogelijkheid biedt om snel de basis-instellingen van de CH3SNAS in te stellen. 1. Klik op de knop “Run
Wizard”. 2. Het welkomstscherm toont
de 5 stappen van de Wizard. Klik op “Next” om door te gaan.
3. Het is aanbevolen om een
admin wachtwoord in te stellen. Voer het wachtwoord 2x in in de hiervoor aangegeven vakken.
4. Klik op “Next” om door te gaan.
NEDERLANDS
12
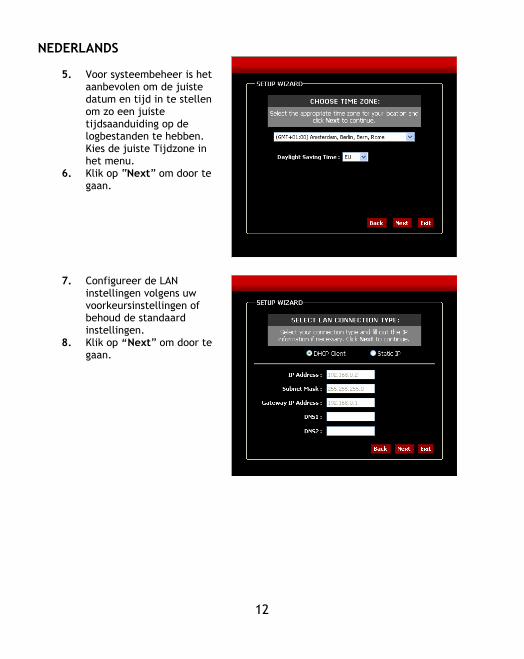
5. Voor systeembeheer is het
aanbevolen om de juiste datum en tijd in te stellen om zo een juiste tijdsaanduiding op de logbestanden te hebben. Kies de juiste Tijdzone in het menu.
6. Klik op “Next” om door te gaan.
7. Configureer de LAN
instellingen volgens uw voorkeursinstellingen of behoud de standaard instellingen.
8. Klik op “Next” om door te gaan.

NEDERLANDS
13
9. Wijzig de Werkgroep,
Apparaatnaam en Beschrijving naar uw voorkeursinstellingen of behoud de standaard instellingen.
10. Klik op “Next” om door te gaan.
11. Als u klaar bent met de
configuratie klikt u op “Restart” om de instellingen op te slaan en de CH3SNAS opnieuw te starten. Klik op “Back” als u nog wijzigingen wilt maken in de Wizard configuratie.
Let op: Na het herstarten zal het login-scherm opnieuw getoond worden. U kunt de
Web Configuratie openen door in te loggen met uw nieuwe administrator wachtwoord.
NEDERLANDS
14
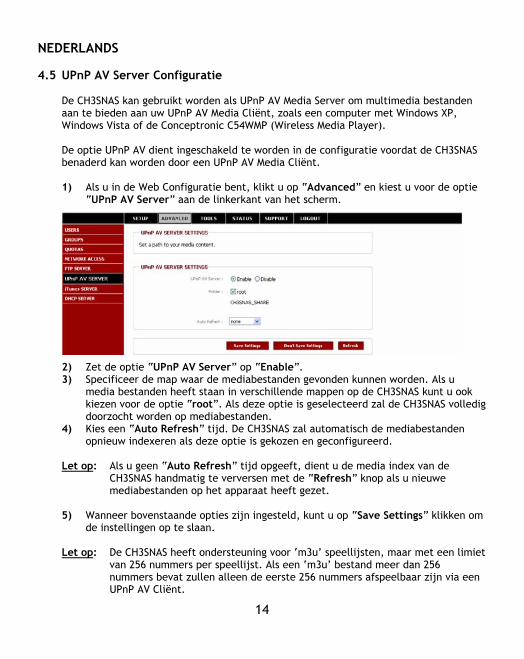
4.5 UPnP AV Server Configuratie
De CH3SNAS kan gebruikt worden als UPnP AV Media Server om multimedia bestanden aan te bieden aan uw UPnP AV Media Cliënt, zoals een computer met Windows XP, Windows Vista of de Conceptronic C54WMP (Wireless Media Player). De optie UPnP AV dient ingeschakeld te worden in de configuratie voordat de CH3SNAS benaderd kan worden door een UPnP AV Media Cliënt. 1) Als u in de Web Configuratie bent, klikt u op “Advanced” en kiest u voor de optie
“UPnP AV Server” aan de linkerkant van het scherm.
2) Zet de optie “UPnP AV Server” op “Enable”. 3) Specificeer de map waar de mediabestanden gevonden kunnen worden. Als u
media bestanden heeft staan in verschillende mappen op de CH3SNAS kunt u ook kiezen voor de optie “root”. Als deze optie is geselecteerd zal de CH3SNAS volledig doorzocht worden op mediabestanden.
4) Kies een “Auto Refresh” tijd. De CH3SNAS zal automatisch de mediabestanden opnieuw indexeren als deze optie is gekozen en geconfigureerd.
Let op: Als u geen “Auto Refresh” tijd opgeeft, dient u de media index van de CH3SNAS handmatig te verversen met de “Refresh” knop als u nieuwe mediabestanden op het apparaat heeft gezet.
5) Wanneer bovenstaande opties zijn ingesteld, kunt u op “Save Settings” klikken om de instellingen op te slaan.
Let op: De CH3SNAS heeft ondersteuning voor ‘m3u’ speellijsten, maar met een limiet
van 256 nummers per speellijst. Als een ‘m3u’ bestand meer dan 256 nummers bevat zullen alleen de eerste 256 nummers afspeelbaar zijn via een UPnP AV Cliënt.
NEDERLANDS
15
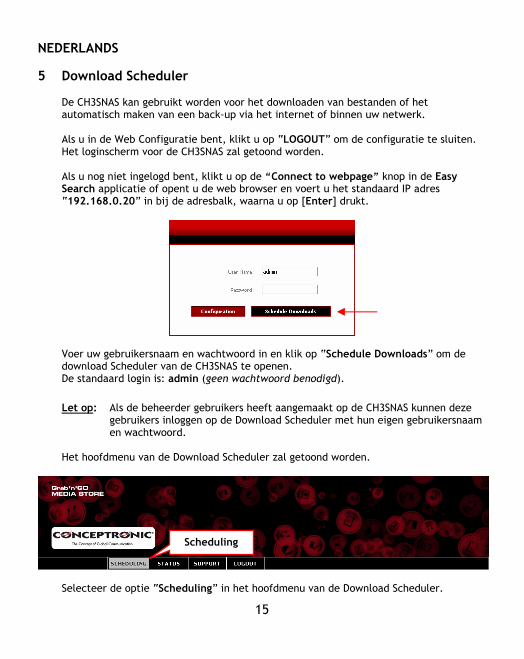
5 Download Scheduler
De CH3SNAS kan gebruikt worden voor het downloaden van bestanden of het automatisch maken van een back-up via het internet of binnen uw netwerk. Als u in de Web Configuratie bent, klikt u op “LOGOUT” om de configuratie te sluiten. Het loginscherm voor de CH3SNAS zal getoond worden. Als u nog niet ingelogd bent, klikt u op de “Connect to webpage” knop in de Easy Search applicatie of opent u de web browser en voert u het standaard IP adres “192.168.0.20” in bij de adresbalk, waarna u op [Enter] drukt.
Voer uw gebruikersnaam en wachtwoord in en klik op “Schedule Downloads” om de download Scheduler van de CH3SNAS te openen. De standaard login is: admin (geen wachtwoord benodigd).
Let op: Als de beheerder gebruikers heeft aangemaakt op de CH3SNAS kunnen deze
gebruikers inloggen op de Download Scheduler met hun eigen gebruikersnaam en wachtwoord.
Het hoofdmenu van de Download Scheduler zal getoond worden.
Selecteer de optie “Scheduling” in het hoofdmenu van de Download Scheduler.
Scheduling
NEDERLANDS
16
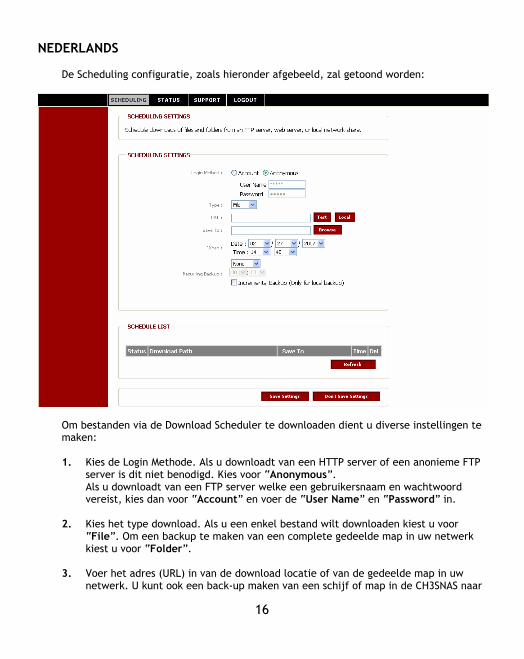
De Scheduling configuratie, zoals hieronder afgebeeld, zal getoond worden:
Om bestanden via de Download Scheduler te downloaden dient u diverse instellingen te maken: 1. Kies de Login Methode. Als u downloadt van een HTTP server of een anonieme FTP
server is dit niet benodigd. Kies voor “Anonymous”. Als u downloadt van een FTP server welke een gebruikersnaam en wachtwoord vereist, kies dan voor “Account” en voer de “User Name” en “Password” in.
2. Kies het type download. Als u een enkel bestand wilt downloaden kiest u voor “File”. Om een backup te maken van een complete gedeelde map in uw netwerk kiest u voor “Folder”.
3. Voer het adres (URL) in van de download locatie of van de gedeelde map in uw netwerk. U kunt ook een back-up maken van een schijf of map in de CH3SNAS naar
NEDERLANDS
17
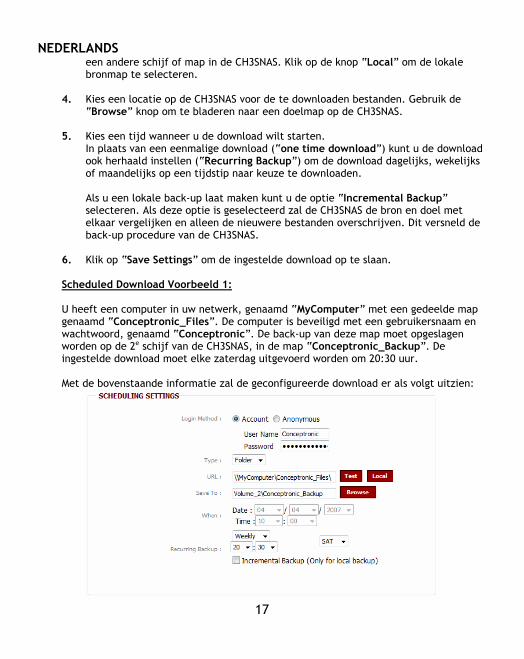
een andere schijf of map in de CH3SNAS. Klik op de knop “Local” om de lokale bronmap te selecteren.
4. Kies een locatie op de CH3SNAS voor de te downloaden bestanden. Gebruik de “Browse” knop om te bladeren naar een doelmap op de CH3SNAS.
5. Kies een tijd wanneer u de download wilt starten. In plaats van een eenmalige download (“one time download”) kunt u de download ook herhaald instellen (“Recurring Backup”) om de download dagelijks, wekelijks of maandelijks op een tijdstip naar keuze te downloaden. Als u een lokale back-up laat maken kunt u de optie “Incremental Backup” selecteren. Als deze optie is geselecteerd zal de CH3SNAS de bron en doel met elkaar vergelijken en alleen de nieuwere bestanden overschrijven. Dit versneld de back-up procedure van de CH3SNAS.
6. Klik op “Save Settings” om de ingestelde download op te slaan. Scheduled Download Voorbeeld 1: U heeft een computer in uw netwerk, genaamd “MyComputer” met een gedeelde map genaamd “Conceptronic_Files”. De computer is beveiligd met een gebruikersnaam en wachtwoord, genaamd “Conceptronic”. De back-up van deze map moet opgeslagen worden op de 2e schijf van de CH3SNAS, in de map “Conceptronic_Backup”. De ingestelde download moet elke zaterdag uitgevoerd worden om 20:30 uur. Met de bovenstaande informatie zal de geconfigureerde download er als volgt uitzien:
NEDERLANDS
18
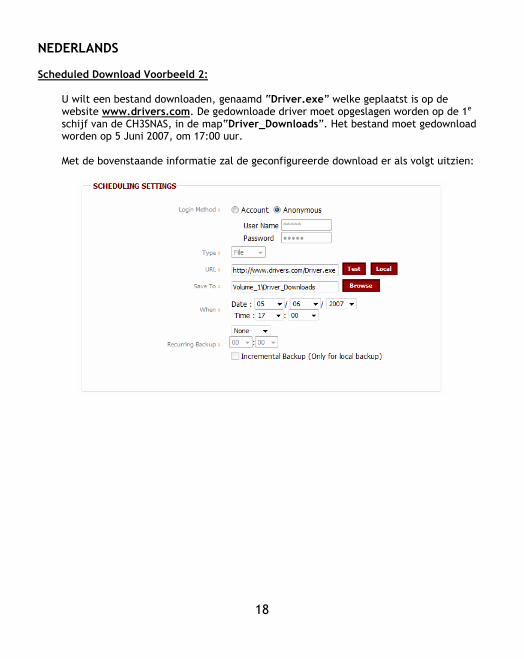
Scheduled Download Voorbeeld 2:
U wilt een bestand downloaden, genaamd “Driver.exe” welke geplaatst is op de website www.drivers.com. De gedownloade driver moet opgeslagen worden op de 1e schijf van de CH3SNAS, in de map“Driver_Downloads”. Het bestand moet gedownload worden op 5 Juni 2007, om 17:00 uur. Met de bovenstaande informatie zal de geconfigureerde download er als volgt uitzien:

NEDERLANDS
19
6 De gedeelde CH3SNAS mappen met uw computer koppelen
Als de CH3SNAS geconfigureerd is kunt u de gedeelde mappen eenvoudig met uw computer koppelen om deze makkelijk te kunnen benaderen. 1. Start de Easy Search applicatie van de CD-ROM. 2. Als de applicatie gestart is kiest u de CH3SNAS in het “Search Device” scherm.
Als de CH3SNAS niet getoond wordt, kunt u op “Search Device” klikken om opnieuw te scannen naar de CH3SNAS.
3. Als de CH3SNAS is geselecteerd, zullen de beschikbare mappen getoond worden in het “Static” gedeelte van de applicatie:
4. Selecteer de map die u wilt verbinden met uw computer. 5. Selecteer de stationsletter die u aan de gekozen map wilt toewijzen. 6. Klik op de “Mount” knop. Let op: Als de gedeelde map is beveiligd met een gebruikersnaam en wachtwoord zult
u een scherm zien die om deze informatie vraagt. Voer de gebruikersnaam en wachtwoord in voor de gekozen map en klik op “OK”.
De gekozen map zal nu verbonden worden met de gekozen stationsletter. U kunt deze nu eenvoudig benaderen via Verkenner of “Mijn Computer”. Als u de verbonden map wilt verbreken kiest u de gekoppelde map uit de lijst met gedeelde mappen en klikt u op “Unmount”. De gekoppelde map zal nu verdwijnen van uw computer.
De CH3SNAS is nu gereed voor gebruik!

Declaration of CE Conformity
20
The manufacturer 2L International BV Address Databankweg 7 3821 AL Amersfoort, the Netherlands Hereby declares that the product Type NETWORK HARDDISK 3.5” Product CH3SNAS Brandname Conceptronic Complies with following directives:
2004/108/EEC EMC directive:
Electromagnetic Compatibility
73/23/EEC Low Voltage Directive: Electrical equipment designed for use within certain voltage limits
The following standards were consulted to assess conformity: EN55022/9.98 Class B EN55024/9.98 EN 50081-1/1994 EN 61000-3-2/3/4/1995 EN 50082-1/1994 EN 60950/1995
The symbol confirms that this product conforms to the above named standards and regulations.
Place and date of issue: Aersfoort, 10/01/2007 (dd/mm/yyyy)
Herman Looijen, Product Marketing Manager
ENGLISH
21
Conceptronic CH3SNAS
Quick Installation Guide
Congratulations on the purchase of your Conceptronic Grab’n’GO Media Store.
The enclosed Hardware Installation Guide gives you a step-by-step explanation of how to install the Conceptronic Grab’n’GO Media Store. When problems occur, we advise you to go to our support-site (go to www.conceptronic.net and click ‘Support’. Here you will find the Frequently Asked Questions Database. When you have other questions about your product and you cannot find it at our website, then contact us by e-mail: [email protected] For more information about Conceptronic products, please visit the Conceptronic Web Site: www.conceptronic.net The Software installation as described below, may be slightly different from the installation on your computer. This depends on the Windows version you are using. 1 Package Contents
The following items are present in the package of the Conceptronic CH3SNAS:
• Conceptronic CH3SNAS • Power Adapter for CH3SNAS (5v, 1.5A & 12v, 1.5A) • Network Cable • Multi Language Quick Installation Guide • CD-ROM with software Note: This Quick Installation Guide only explains the basics of the device to make it
work in your network environment. For more detailed functions and explanation, please view the Full English Manual on the enclosed CD-ROM.

ENGLISH
22
2 The CH3SNAS Explained Front View Front inside view Back view
Nr Description Explanation
1. Power LED/ The steady Blue light indicates the server is powered on. Button Press once to power on. Press and hold the button for 5 seconds to power off 2. HDD1/2 LED The steady Blue light indicates the hard disk drive(s) is connected
but inactive. When it blinks, the hard disk drive(s) is reading/writing data. The steady Orange light indicates the hard disk drive(s) failed.
3. LAN LED The steady Blue light confirms that the server has a good connection to your network. When it blinks, the storage server is receiving/transmitting data from/to the network.
4. HDD Eject Lever Use the lever(s) to eject the installed hard disk drive(s). The front panel must be removed before ejecting the hard disk drive(s).
5. Power Connector Connect the provided AC power adapter. 6. Reset Button Press and hold for 5 seconds to restore the default setting. 7. LAN Port Connect the server to the local network through the Ethernet cable. 8. USB Port Connect a USB printer.
1
2 3
2
4 5 6 7 2 1 4 8
ENGLISH
23
3 Hardware Installation 3.1 Installing the Harddisk(s)
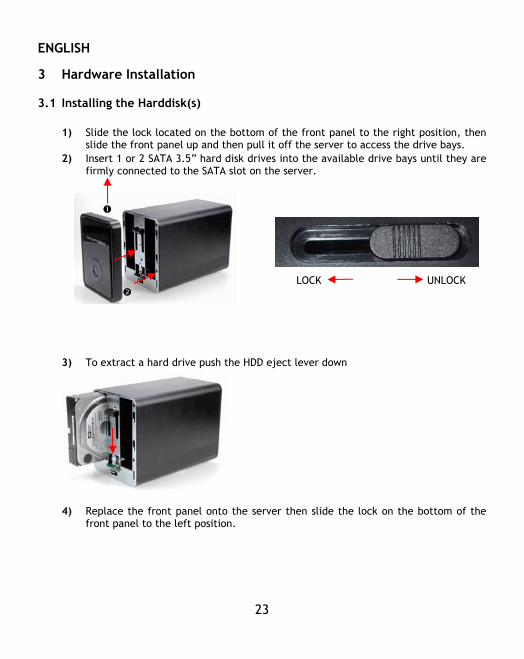
1) Slide the lock located on the bottom of the front panel to the right position, then slide the front panel up and then pull it off the server to access the drive bays.
2) Insert 1 or 2 SATA 3.5” hard disk drives into the available drive bays until they are firmly connected to the SATA slot on the server.
LOCK UNLOCK
3) To extract a hard drive push the HDD eject lever down
4) Replace the front panel onto the server then slide the lock on the bottom of the
front panel to the left position.
ENGLISH
24
3.2 Connecting the cables 1) Plug the AC power adapter to the DC power connector located on the server’s rear
panel, and then connect it to your local power supply.
2) Plug an Ethernet cable to the LAN port located on the server’s rear panel, and then connect it to the network or directly to a computer for configuration.
Note: We advise to connect the CH3SNAS to your DHCP enabled router for easy
configuration. If you connect the device directly to your computer, or to a network without DHCP server, you need to setup a temporary static IP address for your computer to configure the CH3SNAS. See page 10 of the Full Manual (CD-ROM) how to setup a static IP address.
4 Configuring the CH3SNAS
Easy Search Utility To access and manage the storage server easily, the convenient utility Easy Search is provided for you on the Installation CD. Easy Search is a tool that allows you to set up the storage server’s connection.
4.1 How to use the Easy Search Utility
1. Insert the CD-ROM in your CD-ROM Drive. The Autorun should appear automatically. If the Autorun menu does not appear, navigate to “My Computer” and double-click on the CD-ROM drive to start the Autorun menu.
2. Select the CH3SNAS Storage Server from the Autorun menu.
ENGLISH
25
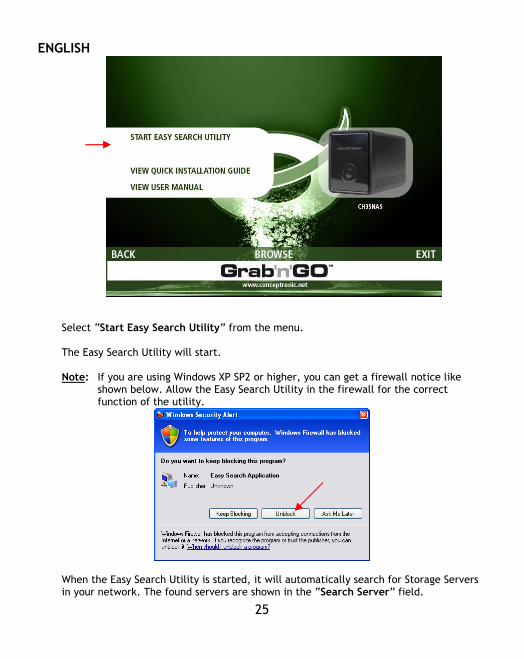
Select “Start Easy Search Utility” from the menu.
The Easy Search Utility will start. Note: If you are using Windows XP SP2 or higher, you can get a firewall notice like
shown below. Allow the Easy Search Utility in the firewall for the correct function of the utility.
When the Easy Search Utility is started, it will automatically search for Storage Servers in your network. The found servers are shown in the “Search Server” field.
ENGLISH
26
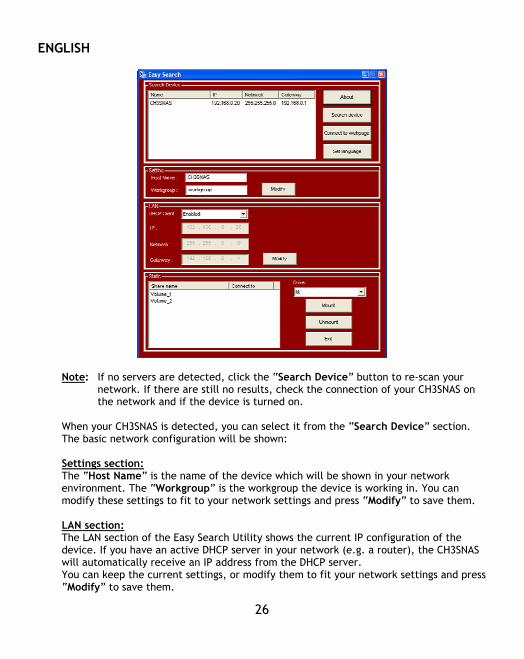
Note: If no servers are detected, click the “Search Device” button to re-scan your
network. If there are still no results, check the connection of your CH3SNAS on the network and if the device is turned on.
When your CH3SNAS is detected, you can select it from the “Search Device” section. The basic network configuration will be shown: Settings section: The “Host Name” is the name of the device which will be shown in your network environment. The “Workgroup” is the workgroup the device is working in. You can modify these settings to fit to your network settings and press “Modify” to save them. LAN section: The LAN section of the Easy Search Utility shows the current IP configuration of the device. If you have an active DHCP server in your network (e.g. a router), the CH3SNAS will automatically receive an IP address from the DHCP server. You can keep the current settings, or modify them to fit your network settings and press “Modify” to save them.

ENGLISH
27
Note: You can change the configuration shown in the “Settings” and “LAN” field also
in the Web configuration wizard, described in chapter 4.4 Static section: The Static field shows the active shares on the CH3SNAS and allows you to easily mount them to your computer. Note: Configuration of the CH3SNAS is required before you can mount your shares.
Please continue to chapter 4.3 for the configuration of the CH3SNAS before you mount any shares on your computer!
4.2 CH3SNAS Web configuration
You can enter the Web configuration of the CH3SNAS in 2 ways: 1) Clicking the “Connect to webpage” button on the Easy Search control panel. 2) Opening the web browser and entering the default IP address “192.168.0.20” in
the address bar and press [Enter]. Enter the username and password and click the “Configuration” button to enter the SETUP page of the Web Configuration Utility. (Only the administration user “admin” is allowed to change or modify the configuration settings.) The default login is: admin (no password is required).
Note: Your computer must be in the same subnet as the storage server. If the subnet of the storage server is different than your computer, you cannot communicate with the device.
ENGLISH
28
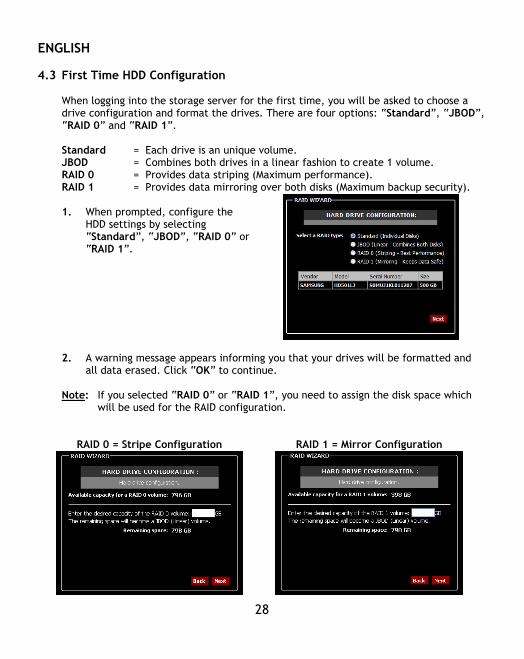
4.3 First Time HDD Configuration
When logging into the storage server for the first time, you will be asked to choose a drive configuration and format the drives. There are four options: “Standard”, “JBOD”, “RAID 0” and “RAID 1”. Standard = Each drive is an unique volume. JBOD = Combines both drives in a linear fashion to create 1 volume. RAID 0 = Provides data striping (Maximum performance). RAID 1 = Provides data mirroring over both disks (Maximum backup security).
1. When prompted, configure the
HDD settings by selecting “Standard”, “JBOD”, “RAID 0” or “RAID 1”.
2. A warning message appears informing you that your drives will be formatted and
all data erased. Click “OK” to continue. Note: If you selected “RAID 0” or “RAID 1”, you need to assign the disk space which
will be used for the RAID configuration.
RAID 0 = Stripe Configuration
RAID 1 = Mirror Configuration
ENGLISH
29
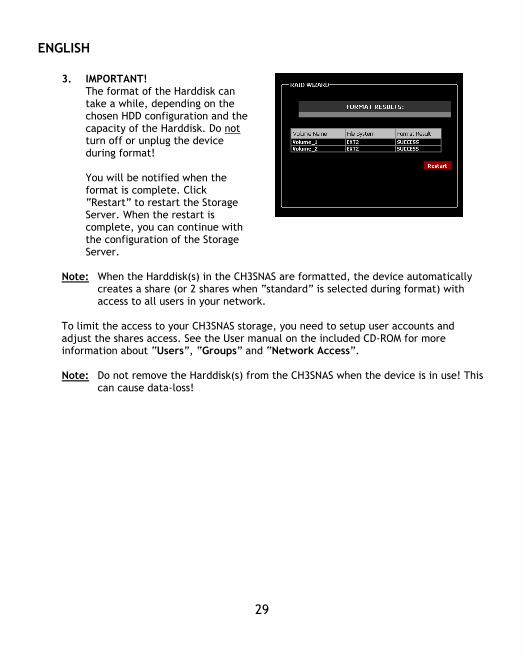
3. IMPORTANT!
The format of the Harddisk can take a while, depending on the chosen HDD configuration and the capacity of the Harddisk. Do not turn off or unplug the device during format! You will be notified when the format is complete. Click “Restart” to restart the Storage Server. When the restart is complete, you can continue with the configuration of the Storage Server.
Note: When the Harddisk(s) in the CH3SNAS are formatted, the device automatically
creates a share (or 2 shares when “standard” is selected during format) with access to all users in your network.
To limit the access to your CH3SNAS storage, you need to setup user accounts and adjust the shares access. See the User manual on the included CD-ROM for more information about “Users”, “Groups” and “Network Access”. Note: Do not remove the Harddisk(s) from the CH3SNAS when the device is in use! This
can cause data-loss!
ENGLISH
30
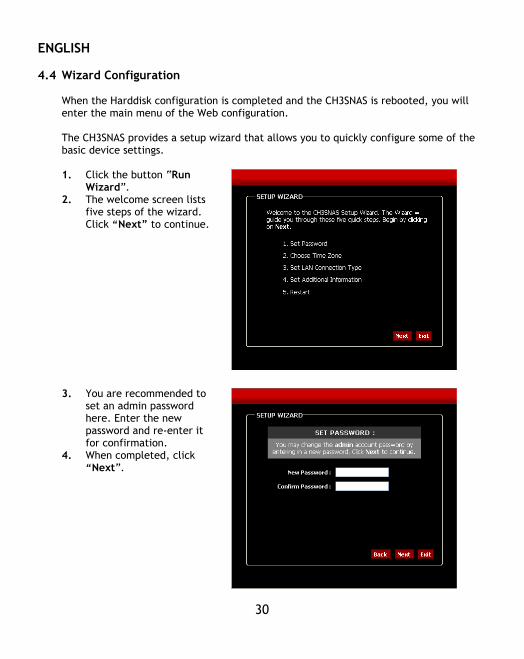
4.4 Wizard Configuration
When the Harddisk configuration is completed and the CH3SNAS is rebooted, you will enter the main menu of the Web configuration. The CH3SNAS provides a setup wizard that allows you to quickly configure some of the basic device settings. 1. Click the button “Run
Wizard”. 2. The welcome screen lists
five steps of the wizard. Click “Next” to continue.
3. You are recommended to
set an admin password here. Enter the new password and re-enter it for confirmation.
4. When completed, click “Next”.
ENGLISH
31
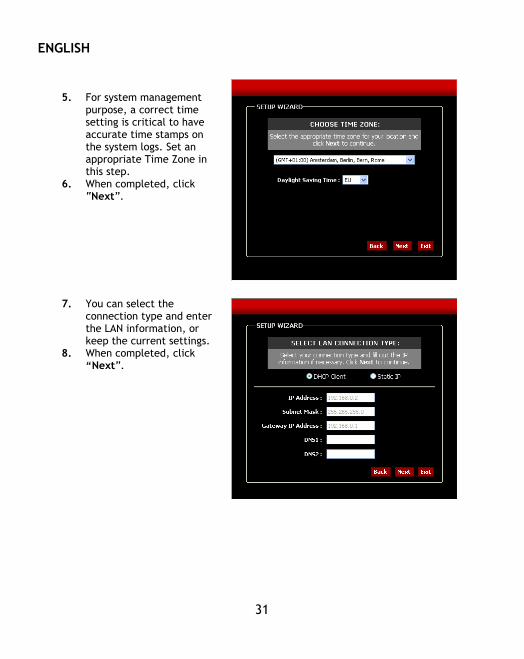
5. For system management
purpose, a correct time setting is critical to have accurate time stamps on the system logs. Set an appropriate Time Zone in this step.
6. When completed, click “Next”.
7. You can select the
connection type and enter the LAN information, or keep the current settings.
8. When completed, click “Next”.
ENGLISH
32
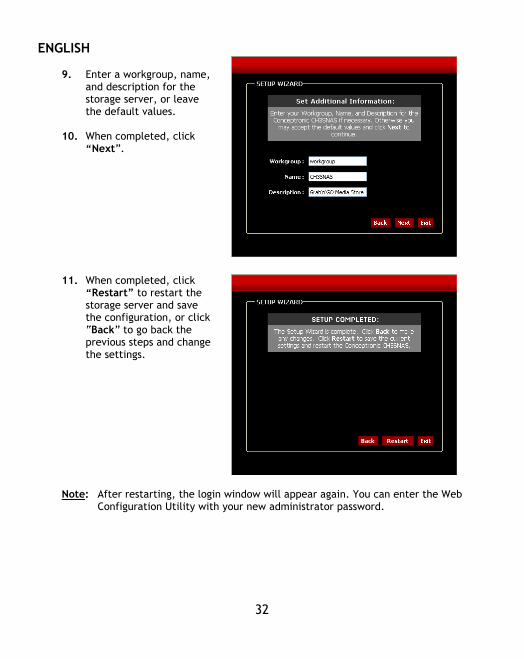
9. Enter a workgroup, name,
and description for the storage server, or leave the default values.
10. When completed, click “Next”.
11. When completed, click
“Restart” to restart the storage server and save the configuration, or click “Back” to go back the previous steps and change the settings.
Note: After restarting, the login window will appear again. You can enter the Web
Configuration Utility with your new administrator password.
ENGLISH
33
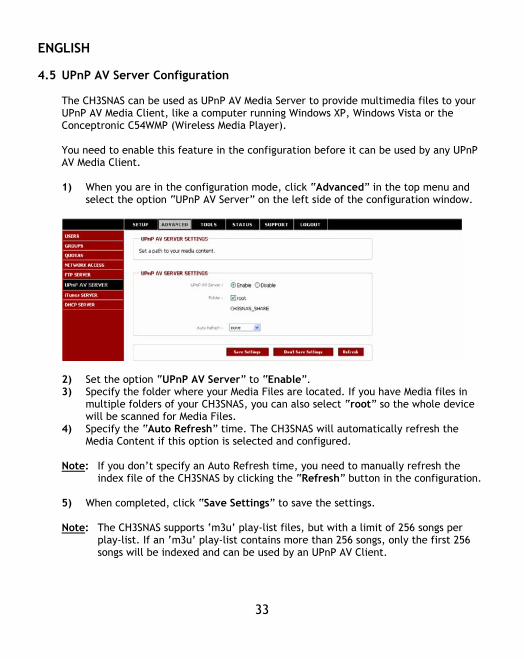
4.5 UPnP AV Server Configuration
The CH3SNAS can be used as UPnP AV Media Server to provide multimedia files to your UPnP AV Media Client, like a computer running Windows XP, Windows Vista or the Conceptronic C54WMP (Wireless Media Player). You need to enable this feature in the configuration before it can be used by any UPnP AV Media Client. 1) When you are in the configuration mode, click “Advanced” in the top menu and
select the option “UPnP AV Server” on the left side of the configuration window.
2) Set the option “UPnP AV Server” to “Enable”. 3) Specify the folder where your Media Files are located. If you have Media files in
multiple folders of your CH3SNAS, you can also select “root” so the whole device will be scanned for Media Files.
4) Specify the “Auto Refresh” time. The CH3SNAS will automatically refresh the Media Content if this option is selected and configured.
Note: If you don’t specify an Auto Refresh time, you need to manually refresh the
index file of the CH3SNAS by clicking the “Refresh” button in the configuration. 5) When completed, click “Save Settings” to save the settings.
Note: The CH3SNAS supports ‘m3u’ play-list files, but with a limit of 256 songs per
play-list. If an ‘m3u’ play-list contains more than 256 songs, only the first 256 songs will be indexed and can be used by an UPnP AV Client.
ENGLISH
34
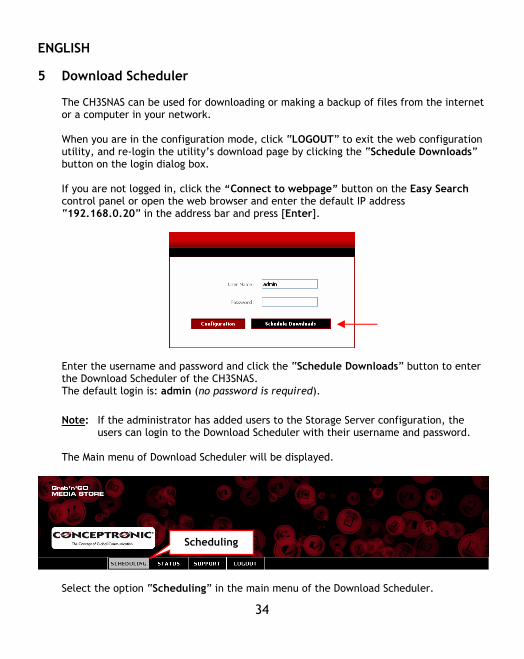
5 Download Scheduler
The CH3SNAS can be used for downloading or making a backup of files from the internet or a computer in your network. When you are in the configuration mode, click “LOGOUT” to exit the web configuration utility, and re-login the utility’s download page by clicking the “Schedule Downloads” button on the login dialog box. If you are not logged in, click the “Connect to webpage” button on the Easy Search control panel or open the web browser and enter the default IP address “192.168.0.20” in the address bar and press [Enter].
Enter the username and password and click the “Schedule Downloads” button to enter the Download Scheduler of the CH3SNAS. The default login is: admin (no password is required).
Note: If the administrator has added users to the Storage Server configuration, the
users can login to the Download Scheduler with their username and password. The Main menu of Download Scheduler will be displayed.
Select the option “Scheduling” in the main menu of the Download Scheduler.
Scheduling
ENGLISH
35
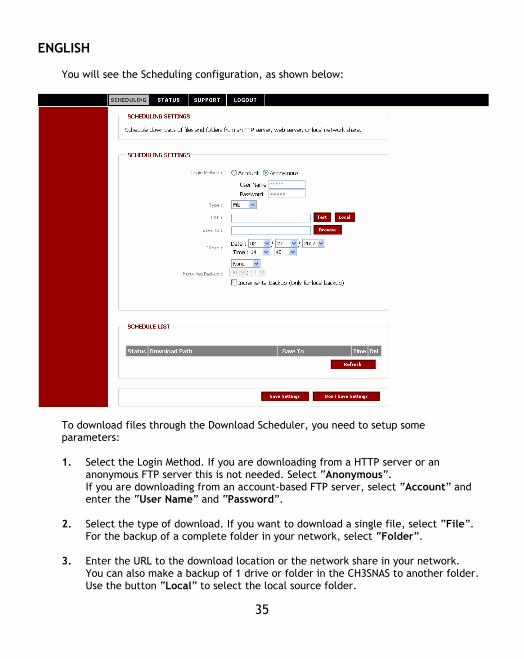
You will see the Scheduling configuration, as shown below:
To download files through the Download Scheduler, you need to setup some parameters: 1. Select the Login Method. If you are downloading from a HTTP server or an
anonymous FTP server this is not needed. Select “Anonymous”. If you are downloading from an account-based FTP server, select “Account” and enter the “User Name” and “Password”.
2. Select the type of download. If you want to download a single file, select “File”. For the backup of a complete folder in your network, select “Folder”.
3. Enter the URL to the download location or the network share in your network. You can also make a backup of 1 drive or folder in the CH3SNAS to another folder. Use the button “Local” to select the local source folder.
ENGLISH
36
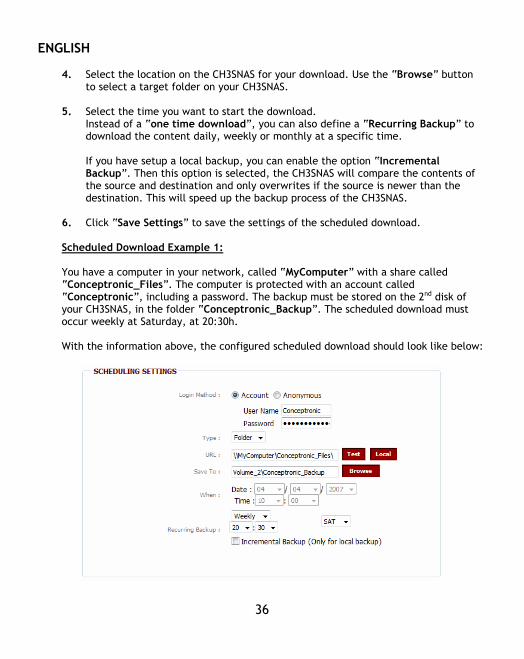
4. Select the location on the CH3SNAS for your download. Use the “Browse” button
to select a target folder on your CH3SNAS.
5. Select the time you want to start the download. Instead of a “one time download”, you can also define a “Recurring Backup” to download the content daily, weekly or monthly at a specific time. If you have setup a local backup, you can enable the option “Incremental Backup”. Then this option is selected, the CH3SNAS will compare the contents of the source and destination and only overwrites if the source is newer than the destination. This will speed up the backup process of the CH3SNAS.
6. Click “Save Settings” to save the settings of the scheduled download. Scheduled Download Example 1: You have a computer in your network, called “MyComputer” with a share called “Conceptronic_Files”. The computer is protected with an account called “Conceptronic”, including a password. The backup must be stored on the 2nd disk of your CH3SNAS, in the folder “Conceptronic_Backup”. The scheduled download must occur weekly at Saturday, at 20:30h. With the information above, the configured scheduled download should look like below:
ENGLISH
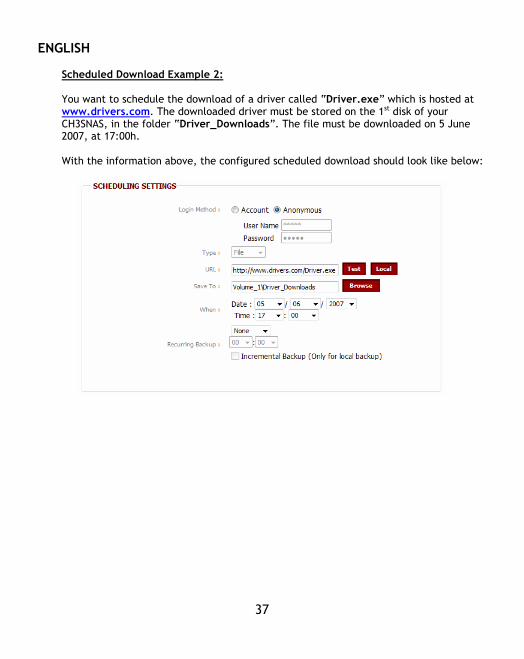
37
Scheduled Download Example 2: You want to schedule the download of a driver called “Driver.exe” which is hosted at www.drivers.com. The downloaded driver must be stored on the 1st disk of your CH3SNAS, in the folder “Driver_Downloads”. The file must be downloaded on 5 June 2007, at 17:00h. With the information above, the configured scheduled download should look like below:
ENGLISH
38
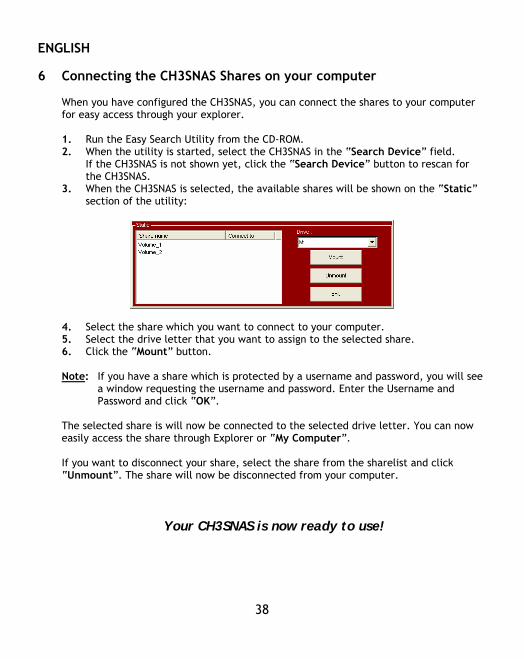
6 Connecting the CH3SNAS Shares on your computer
When you have configured the CH3SNAS, you can connect the shares to your computer for easy access through your explorer. 1. Run the Easy Search Utility from the CD-ROM. 2. When the utility is started, select the CH3SNAS in the “Search Device” field.
If the CH3SNAS is not shown yet, click the “Search Device” button to rescan for the CH3SNAS.
3. When the CH3SNAS is selected, the available shares will be shown on the “Static” section of the utility:
4. Select the share which you want to connect to your computer. 5. Select the drive letter that you want to assign to the selected share. 6. Click the “Mount” button. Note: If you have a share which is protected by a username and password, you will see
a window requesting the username and password. Enter the Username and Password and click “OK”.
The selected share is will now be connected to the selected drive letter. You can now easily access the share through Explorer or “My Computer”. If you want to disconnect your share, select the share from the sharelist and click “Unmount”. The share will now be disconnected from your computer.
Your CH3SNAS is now ready to use!

Declaration of CE Conformity
39
The manufacturer 2L International BV Address Databankweg 7 3821 AL Amersfoort, the Netherlands Hereby declares that the product Type NETWORK HARDDISK 3.5” Product CH3SNAS Brandname Conceptronic Complies with following directives:
2004/108/EEC EMC directive:
Electromagnetic Compatibility
73/23/EEC Low Voltage Directive: Electrical equipment designed for use within certain voltage limits
The following standards were consulted to assess conformity: EN55022/9.98 Class B EN55024/9.98 EN 50081-1/1994 EN 61000-3-2/3/4/1995 EN 50082-1/1994 EN 60950/1995
The symbol confirms that this product conforms to the above named standards and regulations.
Place and date of issue: Aersfoort, 10/01/2007 (dd/mm/yyyy)
Herman Looijen, Product Marketing Manager
ESPAÑOL
40
Conceptronic CH3SNAS
Guía de instalación rápida
Felicidades por la compra de su Servidor de almacenamiento Grab’n’GO de Conceptronic .
La guía de instalación del hardware adjunto le proporcionará una explicación detallada de cómo instalar el servidor de almacenamiento Grab’n’GO de Conceptronic. En caso de que se produzcan problemas, le recomendamos que se dirija a la página Web de Asistencia (www.conceptronic.net) y haga clic en ‘Asistencia’, donde encontrará la Base de Datos con las Preguntas Frecuentes. En caso de que tenga otras preguntas acerca de su producto y no obtenga respuesta en nuestra página Web, póngase en contacto con nosotros a través del correo electrónico: [email protected] Si desea obtener más información acerca de los productos Conceptronic, visite la página Web de Conceptronic: www.conceptronic.net La Instalación del software descrita más abajo, podría ser ligeramente diferente a la instalación en su ordenador, en función de la versión de Windows que esté utilizando. 1 Contenidos del paquete
En el paquete de Conceptronic CH3SNAS se incluyen los siguientes elementos:
• CH3SNAS de Conceptronic • Adaptador eléctrico para CH3SNAS (5 V, 1,5 A y 12 V, 1,5 A) • Cable de red • Manual de instalación rápida en varios idiomas • CD-ROM con software Nota: Esta guía de instalación rápida tan sólo describe las características básicas del
dispositivo para ponerlo en funcionamiento en su entorno de red. Si desea conocer otras funciones y obtener explicaciones más detalladas, deberá consultar el manual completo en inglés, incluido en el CD-ROM.

ESPAÑOL
41
2 Descripción de CH3SNAS
Vista delantera Vista delantera interna Vista trasera
Nº Descripción Explicación
1. LED de encendido La luz azul fija indica que el servidor está encendido. Pulse una vez /Interruptor para encender. Mantenga pulsado durante 5 segundos para apagar. 2. LED de la unidad La luz azul fija indica que la(s) unidad(es) de disco duro está(n) de disco duro 1/2 conectada(s, aunque inactiva(s). Si parpadea, la(s) unidad(es) de
disco duro estará(n) reproduciendo/grabando datos. La luz fija naranja indica que la(s) unidad(es) de disco duro falla(n).
3. LED de LAN La luz azul fija confirma que el servidor presenta una buena conexión para su red. Si parpadea, el servidor de almacenamiento está recibiendo/transmitiendo datos desde/hacia la red.
4. Palanca de expulsión de la Utilice la(s) palanca(s) para expulsar la(s) unidad(es) instalada(s) de unidad de disco duro. La placa delantera deberá retirarse antes de expulsar disco duro la(s) unidad(es) de disco duro. 5. Conector eléctrico Conecte el adaptador eléctrico de CA que se incluye. 6. Botón de reinicio Mantenga pulsado durante 5 segundos a fin de restaurar el
configuración predefinida. 7. Puerto LAN Conecte el servidor a la red local a través del cable de Ethernet. 8. Puerto USB Conecte una impresora USB.
1
2 3
2
4 5 6 7 2 1 4 8
ESPAÑOL
42
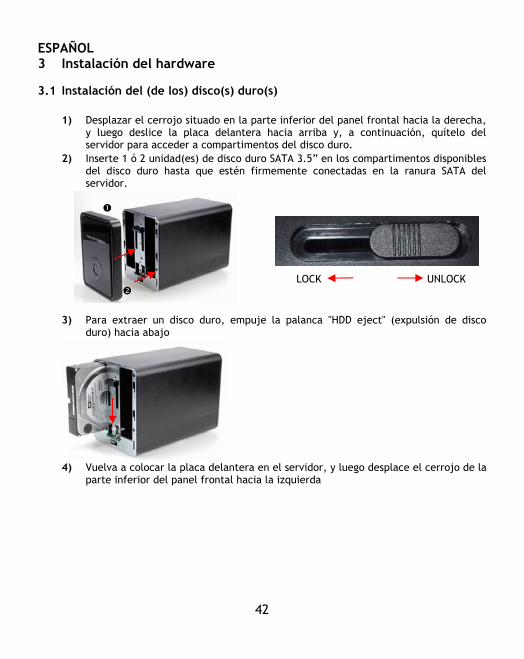
3 Instalación del hardware 3.1 Instalación del (de los) disco(s) duro(s)
1) Desplazar el cerrojo situado en la parte inferior del panel frontal hacia la derecha, y luego deslice la placa delantera hacia arriba y, a continuación, quítelo del servidor para acceder a compartimentos del disco duro.
2) Inserte 1 ó 2 unidad(es) de disco duro SATA 3.5” en los compartimentos disponibles del disco duro hasta que estén firmemente conectadas en la ranura SATA del servidor.
LOCK UNLOCK
3) Para extraer un disco duro, empuje la palanca "HDD eject" (expulsión de disco
duro) hacia abajo
4) Vuelva a colocar la placa delantera en el servidor, y luego desplace el cerrojo de la
parte inferior del panel frontal hacia la izquierda
ESPAÑOL
43
3.2 Conexión de los cables
1) Enchufe el adaptador eléctrico de CA al conector eléctrico de CC situado en la placa trasera del servidor y, a continuación, conéctelo a su fuente de alimentación local.
2) Enchufe un cable de Ethernet al puerto LAN situado en la placa trasera del servidor
y, a continuación, conéctelo a la red o directamente a un ordenador para la configuración.
Nota: Le recomendamos que conecte el CH3SNAS a su router DHCP habilitado a fin de configurarlo de forma más fácil. Si conecta el dispositivo directamente a su ordenador o a una red sin el servidor DHCP, necesitará configurar de forma temporal una dirección IP estática para su ordenador a fin de configurar su CH3SNAS. Consulte la página 10 del manual completo (CD-ROM) para ver cómo configurar una dirección IP estática.
4 Configuración del CH3SNAS Utilidad de búsqueda fácil (Easy search) A fin de acceder y gestionar el servidor de almacenamiento fácilmente, en el CD de instalación se incluye la utilidad de búsqueda fácil. La búsqueda fácil es una herramienta que le permitirá configurar la conexión del servidor de almacenamiento.

ESPAÑOL
44
4.1 Cómo utilizar la utilidad de búsqueda fácil
1. Introduzca el CD-ROM en su unidad de CD-ROM. El disco se iniciará
automáticamente. Si el menú de inicio automático no aparece, vaya a «Mi PC» y haga doble clic en la unidad de CD-ROM a fin de iniciar el menú de inicio automático.
2. Seleccione el servidor de almacenamiento de CH3SNAS del menú de inicio automático.
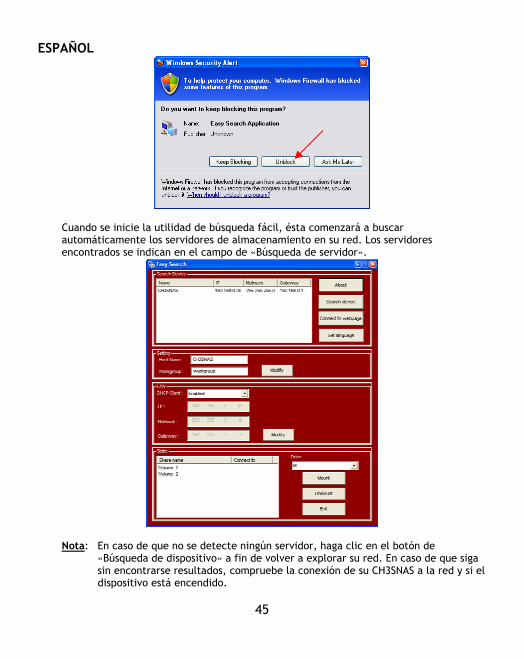
3. Seleccione «Start Easy Search Utility» del menú. Se iniciará la utilidad de búsqueda fácil. Nota: Si utiliza Windows XP SP2 o una versión superior, quizás le aparezca una
notificación de cortafuego tal y como se muestra a continuación. Desbloquee la utilidad de búsqueda fácil en el cortafuego a fin de que ésta funcione correctamente.
ESPAÑOL
45
Cuando se inicie la utilidad de búsqueda fácil, ésta comenzará a buscar automáticamente los servidores de almacenamiento en su red. Los servidores encontrados se indican en el campo de «Búsqueda de servidor».
Nota: En caso de que no se detecte ningún servidor, haga clic en el botón de
«Búsqueda de dispositivo» a fin de volver a explorar su red. En caso de que siga sin encontrarse resultados, compruebe la conexión de su CH3SNAS a la red y si el dispositivo está encendido.
ESPAÑOL
46
Cuando se detecte el CH3SNAS, podrá seleccionarlo de la sección «Búsqueda de dispositivo». Se mostrará la configuración de red básica: Sección de configuraciones: El nombre del servidor (Host Name) es el nombre del dispositivo que se mostrará en su entorno de red. El «grupo de trabajo» es el grupo de trabajo en el que el dispositivo está trabajando. Podrá modificar estas configuraciones para ajustarse a sus configuraciones de red y pulsar «modificar» para guardarlas. Sección LAN: La sección LAN de la utilidad de búsqueda fácil muestra la configuración IP actual del dispositivo. Si dispone de un servidor DHCP activo en su red (por ejemplo, un router), el CH3SNAS recibirá automáticamente una dirección IP del servidor DHCP. Podrá mantener las configuraciones actuales o modificarlas a fin de que se ajusten a sus configuraciones de red y pulsar «modificar» para guardarlas. Nota: Podrá cambiar la configuración indicada en los campos «configuraciones» y
«LAN», así como en el asistente de configuración de Web, descrito en el apartado 4.4.
Sección estática: El campo estático muestra los recursos compartidos activos en CH3SNAS y le permite organizarlos fácilmente en su ordenador. Nota: Se deberá configurar CH3SNAS antes de que pueda introducir sus recursos.
Continúe en el 4.3 para la configuración del CH3SNAS antes de introducir recursos compartidos en su ordenador.
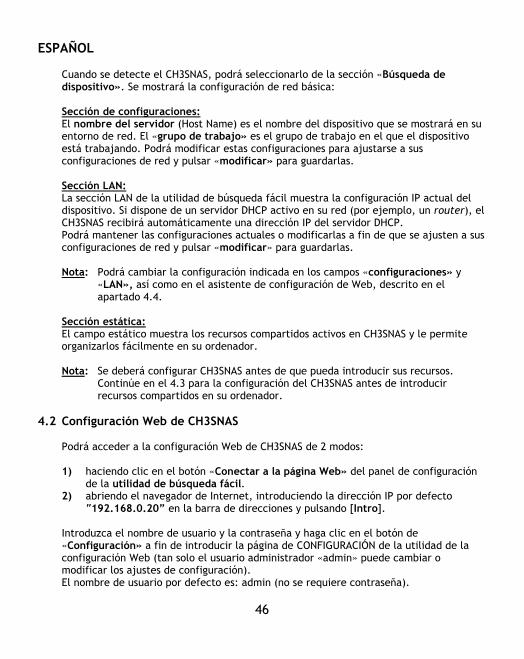
4.2 Configuración Web de CH3SNAS
Podrá acceder a la configuración Web de CH3SNAS de 2 modos: 1) haciendo clic en el botón «Conectar a la página Web» del panel de configuración
de la utilidad de búsqueda fácil. 2) abriendo el navegador de Internet, introduciendo la dirección IP por defecto
“192.168.0.20” en la barra de direcciones y pulsando [Intro]. Introduzca el nombre de usuario y la contraseña y haga clic en el botón de «Configuración» a fin de introducir la página de CONFIGURACIÓN de la utilidad de la configuración Web (tan solo el usuario administrador «admin» puede cambiar o modificar los ajustes de configuración). El nombre de usuario por defecto es: admin (no se requiere contraseña).
ESPAÑOL
47
Nota: Su ordenador debe encontrarse en la misma subred que el servidor de almacenamiento. Si la subred del servidor de almacenamiento es diferente a su ordenador, no podrá comunicarse con el dispositivo.
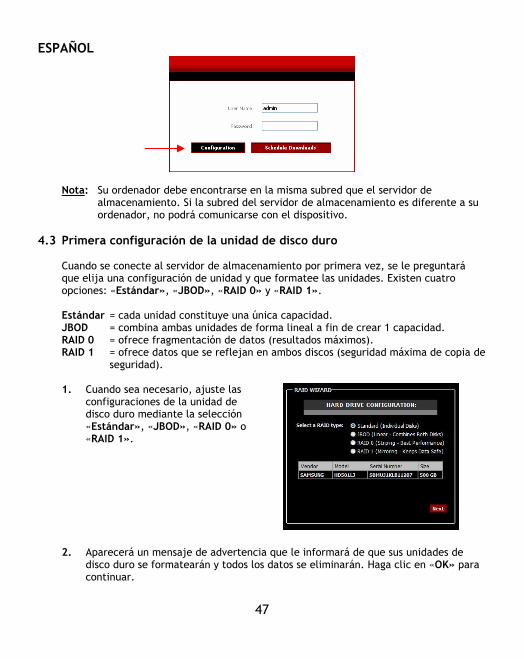
4.3 Primera configuración de la unidad de disco duro
Cuando se conecte al servidor de almacenamiento por primera vez, se le preguntará que elija una configuración de unidad y que formatee las unidades. Existen cuatro opciones: «Estándar», «JBOD», «RAID 0» y «RAID 1». Estándar = cada unidad constituye una única capacidad. JBOD = combina ambas unidades de forma lineal a fin de crear 1 capacidad. RAID 0 = ofrece fragmentación de datos (resultados máximos). RAID 1 = ofrece datos que se reflejan en ambos discos (seguridad máxima de copia de
seguridad). 1. Cuando sea necesario, ajuste las
configuraciones de la unidad de disco duro mediante la selección «Estándar», «JBOD», «RAID 0» o «RAID 1».
2. Aparecerá un mensaje de advertencia que le informará de que sus unidades de
disco duro se formatearán y todos los datos se eliminarán. Haga clic en «OK» para continuar.

ESPAÑOL
48
Nota: Si selecciona «RAID 0» o «RAID 1», necesitará asignar el espacio de disco que se
utilizará para la configuración RAID.
RAID 0 = Configuración de fragmentación
RAID 1 = Configuración de espejo
3. IMPORTANTE El formateo del disco duro puede tardar un tiempo, en función de la configuración de la unidad de disco duro elegida y la capacidad del disco duro. No apague ni desenchufe el dispositivo durante el formateo. Se le notificará la finalización del formateo. Haga clic en «Reiniciar» a fin de reiniciar el servidor de almacenamiento. Cuando el reinicio se complete, podrá seguir con la configuración del servidor de almacenamiento.
Nota: Cuando el (los) disco(s) duro(s) de CH3SNAS se formateen, el dispositivo creará
automáticamente un recurso compartido (o 2 recursos compartidos cuando se seleccione «estándar» durante el formateo) con acceso para todos los usuarios de su red.
Para limitar el acceso a su almacenamiento CH3SNAS, necesitará configurar las cuentas de los usuarios y ajustar el acceso a los recursos compartidos. Consulte el manual del usuario en el CD-ROM incluido a fin de obtener más información acerca de los «Usuarios», «Grupos» y el «Acceso a la red».
ESPAÑOL
49
Nota: No retire el (los) disco(s) duro(s) de CH3SNAS cuando el dispositivo esté en uso,
ya que esto podría provocar una pérdida de datos.
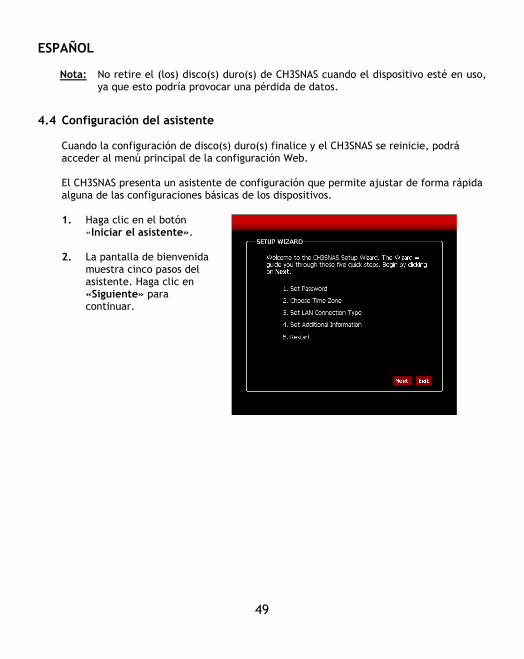
4.4 Configuración del asistente
Cuando la configuración de disco(s) duro(s) finalice y el CH3SNAS se reinicie, podrá acceder al menú principal de la configuración Web. El CH3SNAS presenta un asistente de configuración que permite ajustar de forma rápida alguna de las configuraciones básicas de los dispositivos. 1. Haga clic en el botón
«Iniciar el asistente».
2. La pantalla de bienvenida muestra cinco pasos del asistente. Haga clic en «Siguiente» para continuar.
ESPAÑOL
50
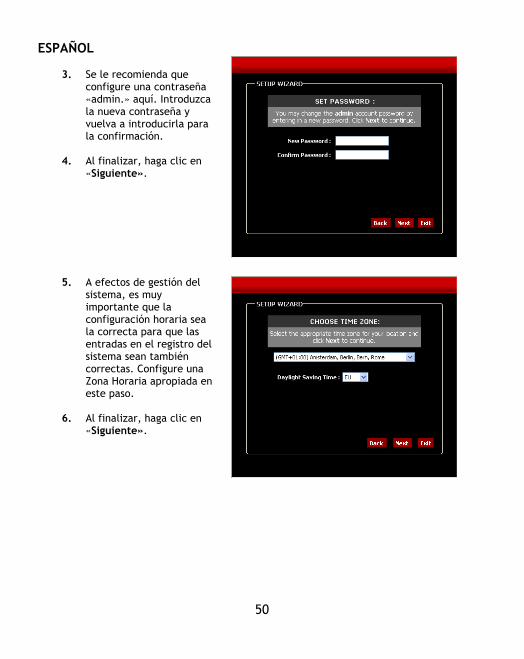
3. Se le recomienda que
configure una contraseña «admin.» aquí. Introduzca la nueva contraseña y vuelva a introducirla para la confirmación.
4. Al finalizar, haga clic en «Siguiente».
5. A efectos de gestión del
sistema, es muy importante que la configuración horaria sea la correcta para que las entradas en el registro del sistema sean también correctas. Configure una Zona Horaria apropiada en este paso.
6. Al finalizar, haga clic en «Siguiente».
ESPAÑOL
51
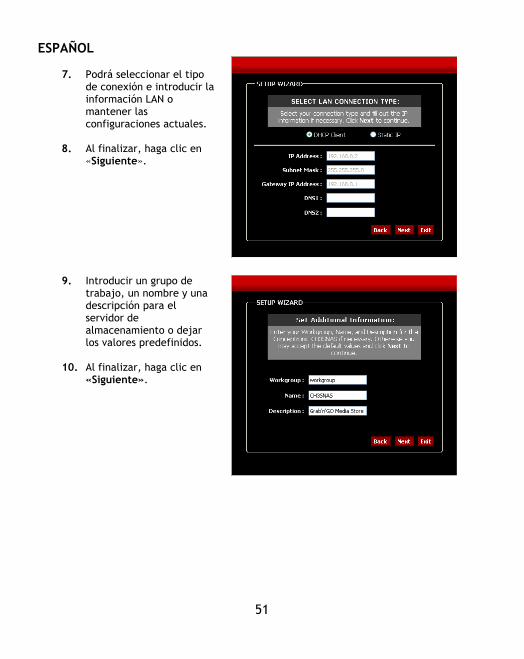
7. Podrá seleccionar el tipo
de conexión e introducir la información LAN o mantener las configuraciones actuales.
8. Al finalizar, haga clic en «Siguiente».
9. Introducir un grupo de
trabajo, un nombre y una descripción para el servidor de almacenamiento o dejar los valores predefinidos.
10. Al finalizar, haga clic en «Siguiente».
ESPAÑOL
52
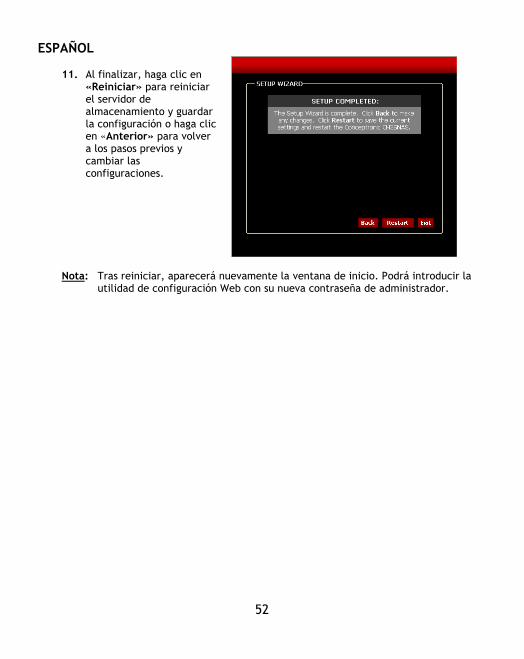
11. Al finalizar, haga clic en
«Reiniciar» para reiniciar el servidor de almacenamiento y guardar la configuración o haga clic en «Anterior» para volver a los pasos previos y cambiar las configuraciones.
Nota: Tras reiniciar, aparecerá nuevamente la ventana de inicio. Podrá introducir la
utilidad de configuración Web con su nueva contraseña de administrador.

ESPAÑOL
53
4.5 Configuración del servidor UPnP AV
El CH3SNAS puede utilizarse como servidor multimedia UPnP AV a fin de ofrecer archivos multimedia a su cliente multimedia UPnP AV, como un ordenador con Windows XP, Windows Vista o el Conceptronic C54WMP (reproductor multimedia inalámbrico). Deberá activar esta característica en la configuración antes de utilizarla con cualquier cliente multimedia UPnP AV. 1) Cuando se encuentren en el modo de configuración, haga clic en «Avanzado» en el
menú superior y seleccione la opción «Servidor UPnP AV» en el lado izquierdo de la ventana de configuración.
2) Ajuste la opción «Servidor UPnP AV» a «Activar».
3) Especifique la carpeta en que se encuentren sus archivos Multimedia. Si dispone de archivos multimedia en varias carpetas de su CH3SNAS, podrá seleccionar también «raíz» para buscar los archivos multimedia en todo el dispositivo .
4) Especifique el tiempo de «actualización automática». El CH3SNAS actualizará automáticamente el contenido multimedia si se selecciona y configura esta opción.
Nota: Si no especifica el tiempo de una actualización automática, necesitará actualizar manualmente el índice de CH3SNAS haciendo clic en el botón «actualizar» en la configuración.
5) Al finalizar, haga clic en «guardar configuraciones» a fin de guardarlas.
Nota: El CH3SNAS es compatible con archivos de lista de reproducción de ‘m3u’, aunque con un límite de 256 canciones por lista de reproducción. Si una lista de
ESPAÑOL
54
reproducción de ‘m3u’ contiene más de 256 canciones, tan solo las 256 primeras canciones se incluirán y podrán ser utilizadas por un cliente UPnP AV.
5 Planificador de tareas de descarga
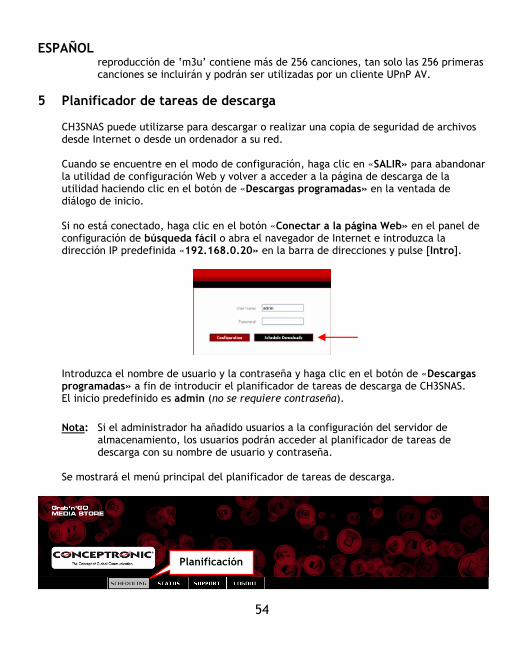
CH3SNAS puede utilizarse para descargar o realizar una copia de seguridad de archivos desde Internet o desde un ordenador a su red. Cuando se encuentre en el modo de configuración, haga clic en «SALIR» para abandonar la utilidad de configuración Web y volver a acceder a la página de descarga de la utilidad haciendo clic en el botón de «Descargas programadas» en la ventada de diálogo de inicio. Si no está conectado, haga clic en el botón «Conectar a la página Web» en el panel de configuración de búsqueda fácil o abra el navegador de Internet e introduzca la dirección IP predefinida «192.168.0.20» en la barra de direcciones y pulse [Intro].
Introduzca el nombre de usuario y la contraseña y haga clic en el botón de «Descargas programadas» a fin de introducir el planificador de tareas de descarga de CH3SNAS. El inicio predefinido es admin (no se requiere contraseña).
Nota: Si el administrador ha añadido usuarios a la configuración del servidor de
almacenamiento, los usuarios podrán acceder al planificador de tareas de descarga con su nombre de usuario y contraseña.
Se mostrará el menú principal del planificador de tareas de descarga.
Planificación
ESPAÑOL
55
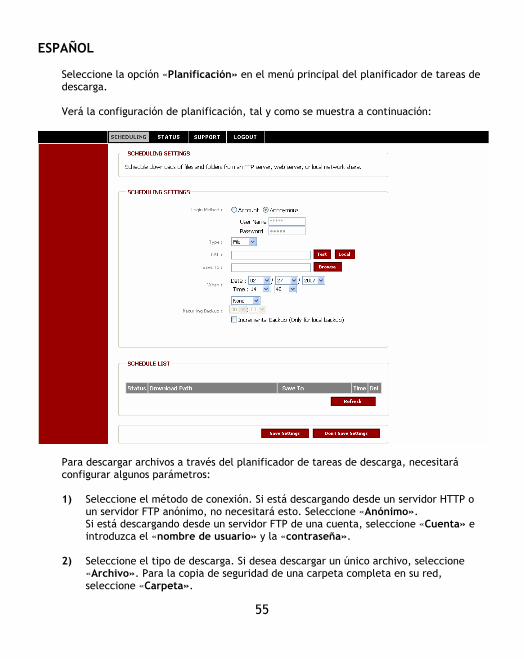
Seleccione la opción «Planificación» en el menú principal del planificador de tareas de descarga. Verá la configuración de planificación, tal y como se muestra a continuación:
Para descargar archivos a través del planificador de tareas de descarga, necesitará configurar algunos parámetros: 1) Seleccione el método de conexión. Si está descargando desde un servidor HTTP o
un servidor FTP anónimo, no necesitará esto. Seleccione «Anónimo». Si está descargando desde un servidor FTP de una cuenta, seleccione «Cuenta» e introduzca el «nombre de usuario» y la «contraseña».
2) Seleccione el tipo de descarga. Si desea descargar un único archivo, seleccione
«Archivo». Para la copia de seguridad de una carpeta completa en su red, seleccione «Carpeta».
ESPAÑOL
56
3) Introduzca la URL para la ubicación de descarga o el recurso compartido de la red
en su red. También podrá realizar una copia de seguridad de 1 unidad o carpeta en el CH3SNAS para otra carpeta. Utilice el botón «Local» para seleccionar la carpeta local de fuente.
4) Seleccione la ubicación en CH3SNAS para su descarga. Utilice el botón de
«navegación» para seleccionar una carpeta final en su CH3SNAS. 5) Seleccione el tiempo en que desea que comience la descarga. En lugar de un «un
tiempo de descarga», también podrá definir una «copia de seguridad periódica» para descargar el contenido diariamente, semanalmente o mensualmente en un momento específico.
Si ha configurado una copia de seguridad local, podrá activar la opción «copia de seguridad diferencial». Tras seleccionar esta opción, CH3SNAS comparará los contenidos de la fuente y el destino y únicamente procederá a borrar si la fuente es más reciente que el destino. Esto acelerará el proceso de la copia de seguridad de CH3SNAS.
6) Haga clic en «Guardar configuraciones» para guardar las configuraciones de la
descarga programada.
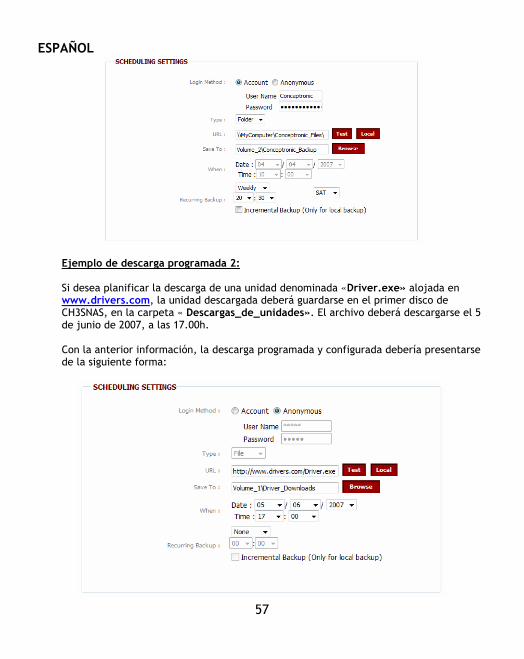
Ejemplo de descarga programada 1: En su red, hay un ordenador llamado «Mi ordenador» con un recurso compartido denominado «Archivos_ Conceptronic». El ordenador está protegido con una cuenta denominada «Conceptronic», que incluye una contraseña. La copia de seguridad deberá almacenarse en el segundo disco de su CH3SNAS, en la carpeta «Copia de seguridad_de_ Conceptronic». La descarga programada deberá realizarse semanalmente los sábados, a las 20. 30 horas. Con la anterior información, la descarga programada y configurada debería presentarse de la siguiente forma:
ESPAÑOL
57
Ejemplo de descarga programada 2: Si desea planificar la descarga de una unidad denominada «Driver.exe» alojada en www.drivers.com, la unidad descargada deberá guardarse en el primer disco de CH3SNAS, en la carpeta « Descargas_de_unidades». El archivo deberá descargarse el 5 de junio de 2007, a las 17.00h. Con la anterior información, la descarga programada y configurada debería presentarse de la siguiente forma:
ESPAÑOL
58
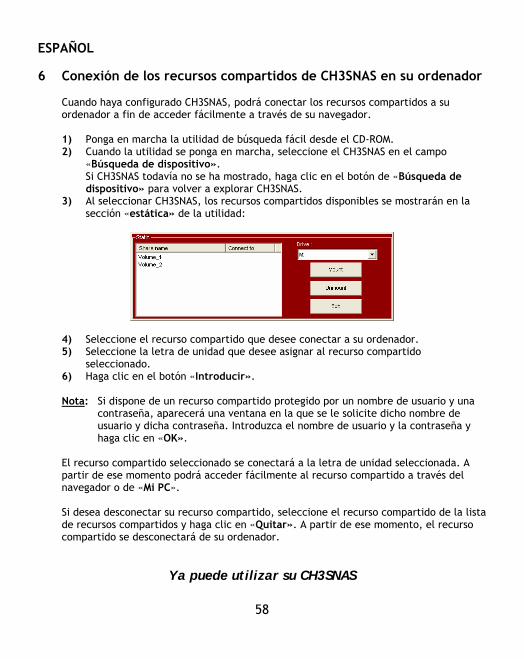
6 Conexión de los recursos compartidos de CH3SNAS en su ordenador
Cuando haya configurado CH3SNAS, podrá conectar los recursos compartidos a su ordenador a fin de acceder fácilmente a través de su navegador. 1) Ponga en marcha la utilidad de búsqueda fácil desde el CD-ROM. 2) Cuando la utilidad se ponga en marcha, seleccione el CH3SNAS en el campo
«Búsqueda de dispositivo». Si CH3SNAS todavía no se ha mostrado, haga clic en el botón de «Búsqueda de dispositivo» para volver a explorar CH3SNAS.
3) Al seleccionar CH3SNAS, los recursos compartidos disponibles se mostrarán en la sección «estática» de la utilidad:
4) Seleccione el recurso compartido que desee conectar a su ordenador. 5) Seleccione la letra de unidad que desee asignar al recurso compartido
seleccionado. 6) Haga clic en el botón «Introducir». Nota: Si dispone de un recurso compartido protegido por un nombre de usuario y una
contraseña, aparecerá una ventana en la que se le solicite dicho nombre de usuario y dicha contraseña. Introduzca el nombre de usuario y la contraseña y haga clic en «OK».
El recurso compartido seleccionado se conectará a la letra de unidad seleccionada. A partir de ese momento podrá acceder fácilmente al recurso compartido a través del navegador o de «Mi PC». Si desea desconectar su recurso compartido, seleccione el recurso compartido de la lista de recursos compartidos y haga clic en «Quitar». A partir de ese momento, el recurso compartido se desconectará de su ordenador.
Ya puede utilizar su CH3SNAS

Declaración de Conformidad
59
El fabricante 2L Internacional BV Dirección: Databankweg 7 3821 AL Amersfoort, Países Bajos, tel. +31 (0)33 4549401
CIF/NIF NL801729877B01
Declara mediante este documento que el producto Tipo NETWORK HARDDISK 3.5” Producto CH3SNAS Marca Conceptronic Cumple con las siguientes directivas:
Directiva EMC 2004/108/CE EMC Directiva 2004/108/EEC EMC (transpuesta a la legislación española mediante RD 1580/2006: Compatibilidad electromagnética.
Directiva 73/23/EEC Directiva sobre bajo voltaje ((transpuesta a la legislación española mediante RD 7/1998): Material eléctrico destinado a utilizarse con determinados límites
de tensión
Este producto ha sido diseñado para su uso sólo en interiores.
La marca CE certifica que este producto se adecua a las especificaciones y regulaciones arriba mencionadas. Este producto es adecuado para todos los países de la UE. Lugar y fecha de emisión: Amersfoort, 10/01/2007 (dd/mm/yy)
Herman Looijen, Director de marketing
DEUTSCH
60
Conceptronic CH3SNAS
Schnellinstallationsanleitung
Wir gratulieren Ihnen zum Kauf Ihres Conceptronic Grab’n’GO Media Store.
In beiliegendem Hardwareinstallationshandbuch finden Sie schrittweise Erklärungen für die Installation Ihres Conceptronic Grab’n’ Go Media Store. Wenn Probleme auftreten sollten, besuchen Sie unsere Support-Seite (unter www.conceptronic.net) und klicken Sie auf ‚Support’. Dort steht Ihnen unsere FAQ-Datenbank mit den häufig gestellten Fragen zur Verfügung. Wenn Sie weitere Fragen zu Ihrem Produkt haben, die Sie auf unserer Webseite nicht beantworten können, kontaktieren Sie uns per E-Mail: [email protected] Detaillierte Informationen über Conceptronic Produkte finden Sie auf unserer Webseite: www.conceptronic.net Möglicherweise weicht die Softwareinstallation auf Ihrem Computer von der im Folgenden beschriebenen etwas ab. Dies hängt vom Windows-Betriebssystem ab, das Sie verwenden. 1 Packungsinhalt
In der Verpackung des Conceptronic CH3SNAS ist Folgendes enthalten:
• Conceptronic CH3SNAS • Netzteil für CH3SNAS (5V, 1,5A und 12V, 1,5A) • Netzwerkkabel • Mehrsprachige Schnellinstallationsanleitung • CD-ROM mit Software Hinweis: In dieser Schnellinstallationsanleitung ist lediglich beschrieben, wie das Gerät
in Ihre Netzwerkumgebung eingebunden werden kann. Detaillierte Funktionen und Erklärungen finden Sie im umfassenden Handbuch (in englischer Sprache) auf der mitgelieferten CD-ROM.
DEUTSCH
61
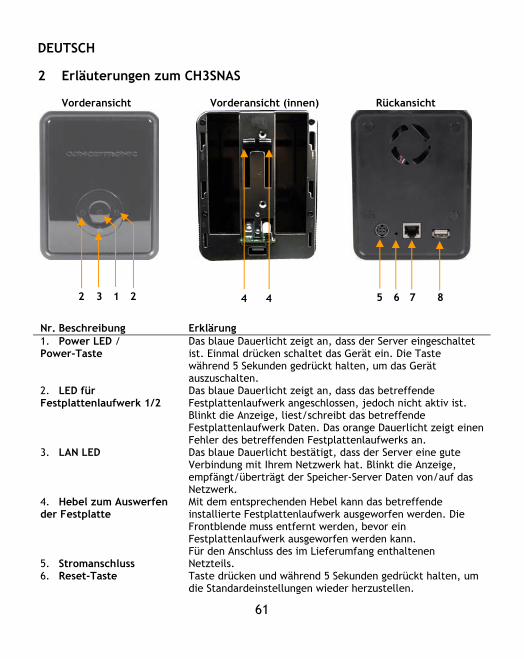
2 Erläuterungen zum CH3SNAS
Vorderansicht Vorderansicht (innen) Rückansicht
Nr. Beschreibung Erklärung 1. Power LED / Power-Taste
Das blaue Dauerlicht zeigt an, dass der Server eingeschaltet ist. Einmal drücken schaltet das Gerät ein. Die Taste während 5 Sekunden gedrückt halten, um das Gerät auszuschalten.
2. LED für Festplattenlaufwerk 1/2
Das blaue Dauerlicht zeigt an, dass das betreffende Festplattenlaufwerk angeschlossen, jedoch nicht aktiv ist. Blinkt die Anzeige, liest/schreibt das betreffende Festplattenlaufwerk Daten. Das orange Dauerlicht zeigt einen Fehler des betreffenden Festplattenlaufwerks an.
3. LAN LED Das blaue Dauerlicht bestätigt, dass der Server eine gute Verbindung mit Ihrem Netzwerk hat. Blinkt die Anzeige, empfängt/überträgt der Speicher-Server Daten von/auf das Netzwerk.
4. Hebel zum Auswerfen der Festplatte
Mit dem entsprechenden Hebel kann das betreffende installierte Festplattenlaufwerk ausgeworfen werden. Die Frontblende muss entfernt werden, bevor ein Festplattenlaufwerk ausgeworfen werden kann.
5. Stromanschluss
Für den Anschluss des im Lieferumfang enthaltenen Netzteils.
6. Reset-Taste Taste drücken und während 5 Sekunden gedrückt halten, um die Standardeinstellungen wieder herzustellen.
1
2 3
2
4 5 6 7 2 1 4 8

DEUTSCH
62
7. LAN-Anschluss Für den Anschluss des Servers an das lokale Netzwerk mit einem Ethernet-Kabel.
8. USB-Port Für den Anschluss eines USB-Druckers. 3 Installation der Hardware 3.1 Installation der Festplatte/-n
1) Schieben Sie die Sperre auf der Unterseite des Frontpanels nach rechts, dann schieben Sie die Frontblende hoch und entfernen Sie diese, um Zugriff zu den Festplattenschächten zu erhalten.
2) Schieben Sie ein oder zwei 3,5“ SATA-Festplattenlaufwerke soweit in die entsprechenden Schächte, bis diese fest mit dem SATA-Steckplatz des Servers verbunden sind.
LOCK UNLOCK 3) Drücken Sie den Hebel zum Auswerfen der Festplatte nach unten
4) Setzen Sie die Frontblende wieder auf, schieben Sie dann die Sperre auf der
Unterseite des Frontpanels nach links. 3.2 Anschluss der Kabel
DEUTSCH
63
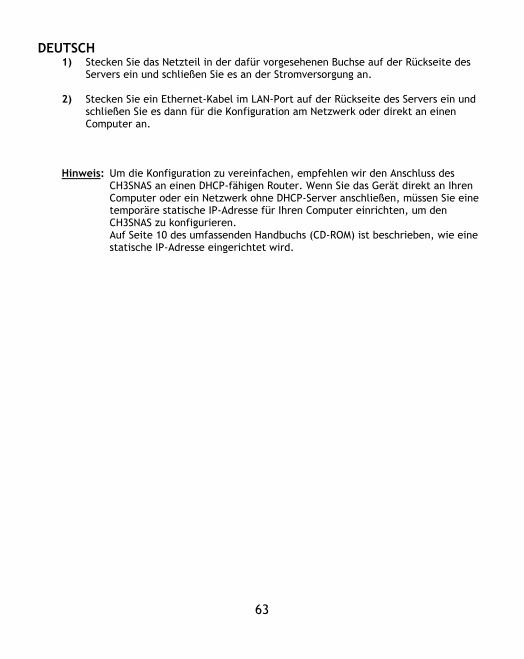
1) Stecken Sie das Netzteil in der dafür vorgesehenen Buchse auf der Rückseite des Servers ein und schließen Sie es an der Stromversorgung an.
2) Stecken Sie ein Ethernet-Kabel im LAN-Port auf der Rückseite des Servers ein und
schließen Sie es dann für die Konfiguration am Netzwerk oder direkt an einen Computer an.
Hinweis: Um die Konfiguration zu vereinfachen, empfehlen wir den Anschluss des
CH3SNAS an einen DHCP-fähigen Router. Wenn Sie das Gerät direkt an Ihren Computer oder ein Netzwerk ohne DHCP-Server anschließen, müssen Sie eine temporäre statische IP-Adresse für Ihren Computer einrichten, um den CH3SNAS zu konfigurieren. Auf Seite 10 des umfassenden Handbuchs (CD-ROM) ist beschrieben, wie eine statische IP-Adresse eingerichtet wird.
DEUTSCH
64
4 Konfiguration des CH3SNAS
Utility-Software Easy Search Die praktische Utility-Software Easy Search ist auf der Installations-CD enthalten, um den Zugriff und die Verwaltung des Speicher-Servers zu vereinfachen. Easy Search ist ein Werkzeug für die Einrichtung der Verbindung des Speicher-Servers.
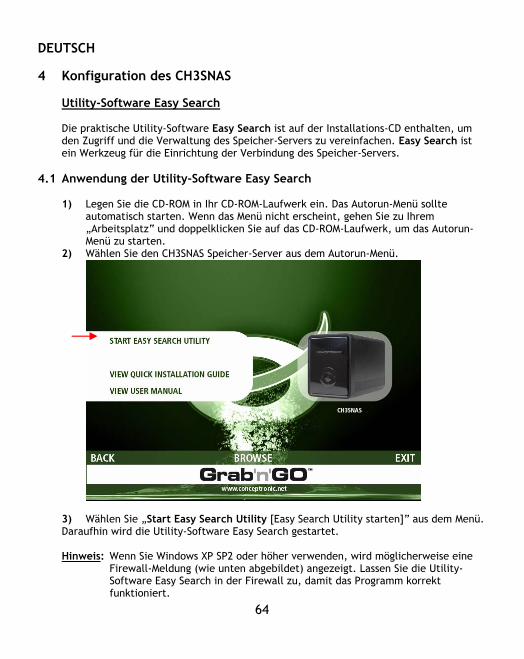
4.1 Anwendung der Utility-Software Easy Search 1) Legen Sie die CD-ROM in Ihr CD-ROM-Laufwerk ein. Das Autorun-Menü sollte
automatisch starten. Wenn das Menü nicht erscheint, gehen Sie zu Ihrem „Arbeitsplatz“ und doppelklicken Sie auf das CD-ROM-Laufwerk, um das Autorun-Menü zu starten.
2) Wählen Sie den CH3SNAS Speicher-Server aus dem Autorun-Menü.
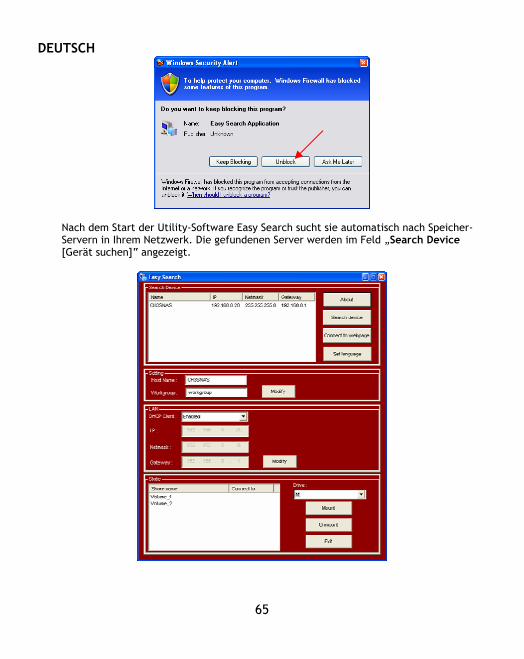
3) Wählen Sie „Start Easy Search Utility [Easy Search Utility starten]” aus dem Menü. Daraufhin wird die Utility-Software Easy Search gestartet. Hinweis: Wenn Sie Windows XP SP2 oder höher verwenden, wird möglicherweise eine
Firewall-Meldung (wie unten abgebildet) angezeigt. Lassen Sie die Utility-Software Easy Search in der Firewall zu, damit das Programm korrekt funktioniert.
DEUTSCH
65
Nach dem Start der Utility-Software Easy Search sucht sie automatisch nach Speicher-Servern in Ihrem Netzwerk. Die gefundenen Server werden im Feld „Search Device [Gerät suchen]“ angezeigt.
DEUTSCH
66
Hinweis: Wenn keine Server erkannt werden, klicken Sie auf die Schaltfläche „Search
Device [Gerät suchen]”, um Ihr Netzwerk erneut zu durchsuchen. Wenn immer noch kein Gerät gefunden wurde, überprüfen Sie die Verbindung Ihres CH3SNAS im Netzwerk und stellen Sie sicher, dass das Gerät eingeschaltet ist.
Wenn Ihr CH3SNAS erkannt wird, können Sie das Gerät im Feld „Search Device [Gerät suchen]” auswählen. Die Grundnetzwerkkonfiguration wird angezeigt: Setting [Einstellungen]: Der „Host Name” ist der Name des Gerätes, das in Ihrer Netzwerkumgebung angezeigt wird. Die „Workgroup [Arbeitsgruppe]” ist die Arbeitsgruppe, in der das Gerät arbeitet. Sie können diese Einstellungen je nach Anforderungen Ihrer Netzwerkeinstellungen ändern und danach auf „Modify [Ändern]” klicken, um diese Einstellungen zu speichern. LAN: Der Abschnitt LAN der Easy Search Utility zeigt die aktuelle IP-Konfiguration des Geräts. Wenn Sie einen aktiven DHCP-Server in Ihrem Netzwerk haben (z.B. einen Router), empfängt der CH3SNAS automatisch eine IP-Adresse vom DHCP-Server. Sie können die gegenwärtigen Einstellungen beibehalten oder an Ihre Netzwerkeinstellungen anpassen und danach auf „Modify [Ändern]“ klicken, um diese Änderungen zu speichern. Hinweis: Sie können die in den Feldern „Setting [Einstellungen]“ und „LAN“ gezeigten
Einstellungen auch im Web-Konfigurationsassistenten ändern (Erklärungen dazu finden Sie im Kapitel 4.4).
Static [Statisch]: Das Feld „Static [Statisch]“ zeigt die aktiven Freigaben auf dem CH3SNAS und ermöglicht Ihnen die einfache Installation derselben auf Ihrem Computer. Hinweis: Vor der Installation Ihrer Freigaben muss der CH3SNAS konfiguriert werden.
Gehen Sie bitte weiter zu Kapitel 4.3, um den CH3SNAS zu konfigurieren, bevor Sie Freigaben auf Ihrem Computer installieren!
DEUTSCH
67
4.2 Web-Konfiguration für den CH3SNAS
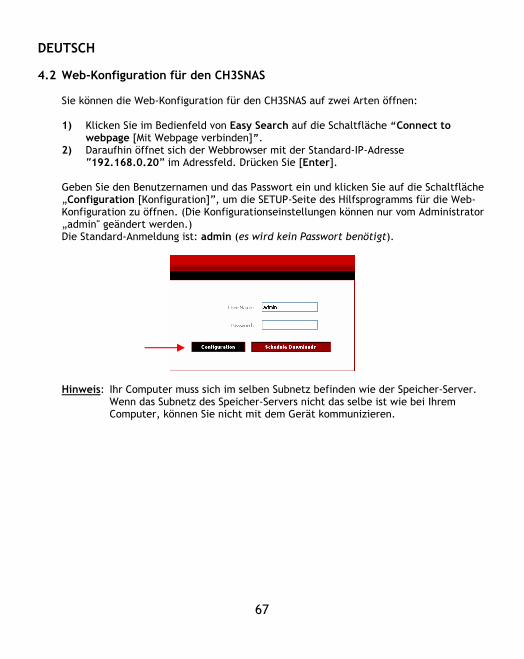
Sie können die Web-Konfiguration für den CH3SNAS auf zwei Arten öffnen: 1) Klicken Sie im Bedienfeld von Easy Search auf die Schaltfläche “Connect to
webpage [Mit Webpage verbinden]”. 2) Daraufhin öffnet sich der Webbrowser mit der Standard-IP-Adresse
“192.168.0.20” im Adressfeld. Drücken Sie [Enter]. Geben Sie den Benutzernamen und das Passwort ein und klicken Sie auf die Schaltfläche „Configuration [Konfiguration]”, um die SETUP-Seite des Hilfsprogramms für die Web-Konfiguration zu öffnen. (Die Konfigurationseinstellungen können nur vom Administrator „admin" geändert werden.) Die Standard-Anmeldung ist: admin (es wird kein Passwort benötigt).
Hinweis: Ihr Computer muss sich im selben Subnetz befinden wie der Speicher-Server.
Wenn das Subnetz des Speicher-Servers nicht das selbe ist wie bei Ihrem Computer, können Sie nicht mit dem Gerät kommunizieren.
DEUTSCH
68
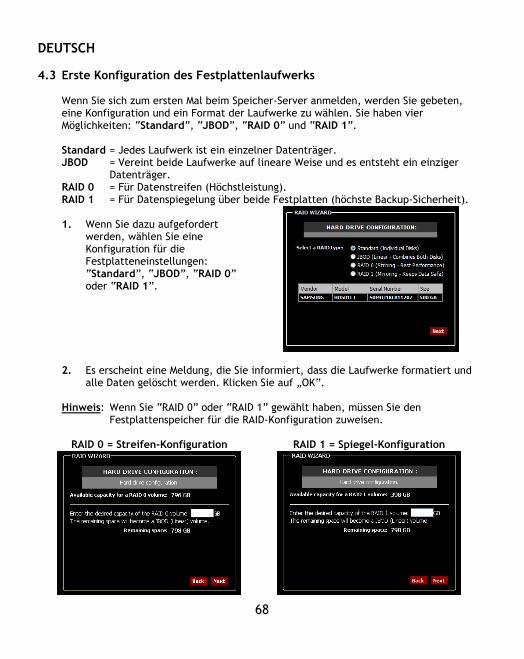
4.3 Erste Konfiguration des Festplattenlaufwerks
Wenn Sie sich zum ersten Mal beim Speicher-Server anmelden, werden Sie gebeten, eine Konfiguration und ein Format der Laufwerke zu wählen. Sie haben vier Möglichkeiten: “Standard”, “JBOD”, “RAID 0” und “RAID 1”. Standard = Jedes Laufwerk ist ein einzelner Datenträger. JBOD = Vereint beide Laufwerke auf lineare Weise und es entsteht ein einziger
Datenträger. RAID 0 = Für Datenstreifen (Höchstleistung). RAID 1 = Für Datenspiegelung über beide Festplatten (höchste Backup-Sicherheit). 1. Wenn Sie dazu aufgefordert
werden, wählen Sie eine Konfiguration für die Festplatteneinstellungen: “Standard”, “JBOD”, “RAID 0” oder “RAID 1”.
2. Es erscheint eine Meldung, die Sie informiert, dass die Laufwerke formatiert und
alle Daten gelöscht werden. Klicken Sie auf „OK“. Hinweis: Wenn Sie “RAID 0” oder “RAID 1” gewählt haben, müssen Sie den
Festplattenspeicher für die RAID-Konfiguration zuweisen.
RAID 0 = Streifen-Konfiguration
RAID 1 = Spiegel-Konfiguration
DEUTSCH
69
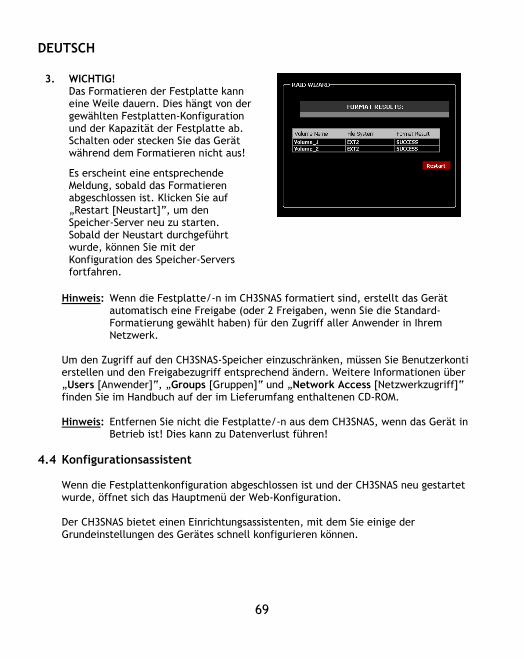
3. WICHTIG!
Das Formatieren der Festplatte kann eine Weile dauern. Dies hängt von der gewählten Festplatten-Konfiguration und der Kapazität der Festplatte ab. Schalten oder stecken Sie das Gerät während dem Formatieren nicht aus!
Es erscheint eine entsprechende Meldung, sobald das Formatieren abgeschlossen ist. Klicken Sie auf „Restart [Neustart]”, um den Speicher-Server neu zu starten. Sobald der Neustart durchgeführt wurde, können Sie mit der Konfiguration des Speicher-Servers fortfahren.
Hinweis: Wenn die Festplatte/-n im CH3SNAS formatiert sind, erstellt das Gerät
automatisch eine Freigabe (oder 2 Freigaben, wenn Sie die Standard-Formatierung gewählt haben) für den Zugriff aller Anwender in Ihrem Netzwerk.
Um den Zugriff auf den CH3SNAS-Speicher einzuschränken, müssen Sie Benutzerkonti erstellen und den Freigabezugriff entsprechend ändern. Weitere Informationen über „Users [Anwender]“, „Groups [Gruppen]“ und „Network Access [Netzwerkzugriff]“ finden Sie im Handbuch auf der im Lieferumfang enthaltenen CD-ROM. Hinweis: Entfernen Sie nicht die Festplatte/-n aus dem CH3SNAS, wenn das Gerät in
Betrieb ist! Dies kann zu Datenverlust führen!
4.4 Konfigurationsassistent Wenn die Festplattenkonfiguration abgeschlossen ist und der CH3SNAS neu gestartet wurde, öffnet sich das Hauptmenü der Web-Konfiguration. Der CH3SNAS bietet einen Einrichtungsassistenten, mit dem Sie einige der Grundeinstellungen des Gerätes schnell konfigurieren können.
DEUTSCH
70
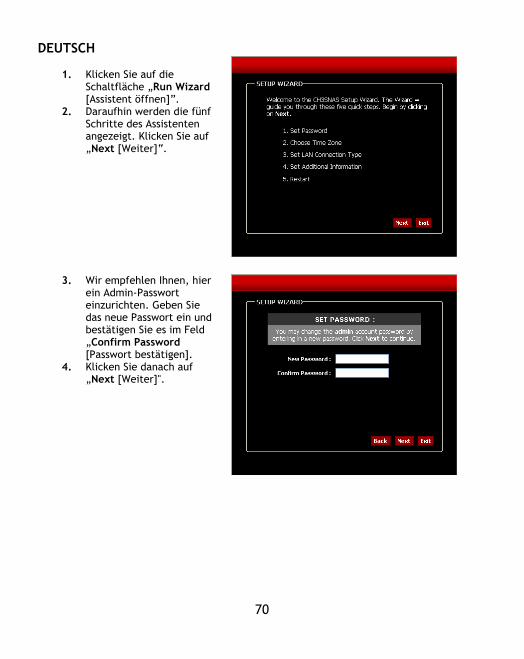
1. Klicken Sie auf die
Schaltfläche „Run Wizard [Assistent öffnen]”.
2. Daraufhin werden die fünf Schritte des Assistenten angezeigt. Klicken Sie auf „Next [Weiter]“.
3. Wir empfehlen Ihnen, hier ein Admin-Passwort einzurichten. Geben Sie das neue Passwort ein und bestätigen Sie es im Feld „Confirm Password [Passwort bestätigen].
4. Klicken Sie danach auf „Next [Weiter]".

DEUTSCH
71
5. Eine korrekte
Zeiteinstellung ist aus Systemverwaltungsgründen unerlässlich, damit die Systemprotokolle die korrekten Zeitstempel enthalten. Stellen Sie die korrekte Zeitzone ein.
6. Klicken Sie danach auf „Next [Weiter]".
7. Sie können die
Verbindungsart auswählen und die LAN-Informationen eingeben oder die gegenwärtigen Einstellungen beibehalten.
8. Klicken Sie danach auf „Next [Weiter]".
DEUTSCH
72
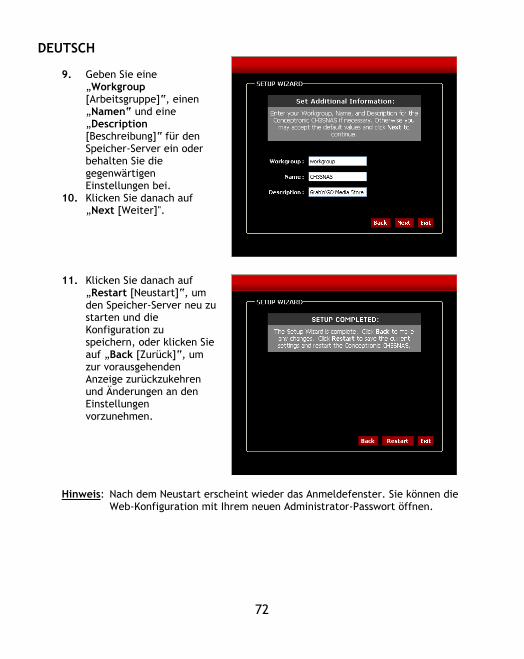
9. Geben Sie eine
„Workgroup [Arbeitsgruppe]“, einen „Namen“ und eine „Description [Beschreibung]“ für den Speicher-Server ein oder behalten Sie die gegenwärtigen Einstellungen bei.
10. Klicken Sie danach auf „Next [Weiter]".
11. Klicken Sie danach auf „Restart [Neustart]“, um den Speicher-Server neu zu starten und die Konfiguration zu speichern, oder klicken Sie auf „Back [Zurück]“, um zur vorausgehenden Anzeige zurückzukehren und Änderungen an den Einstellungen vorzunehmen.
Hinweis: Nach dem Neustart erscheint wieder das Anmeldefenster. Sie können die Web-Konfiguration mit Ihrem neuen Administrator-Passwort öffnen.
DEUTSCH
73
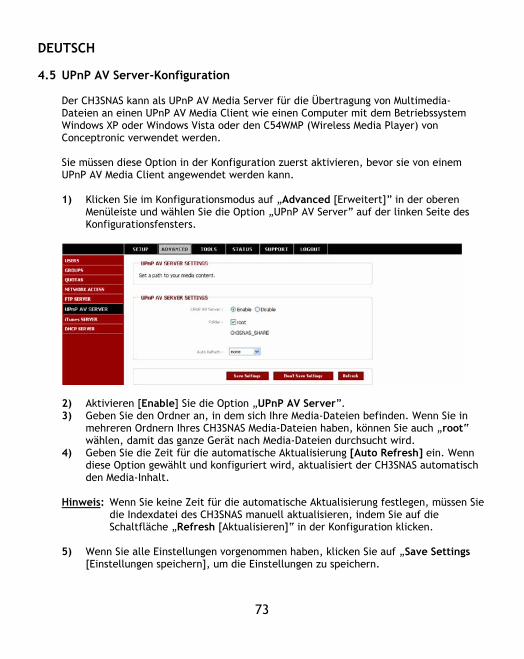
4.5 UPnP AV Server-Konfiguration
Der CH3SNAS kann als UPnP AV Media Server für die Übertragung von Multimedia-Dateien an einen UPnP AV Media Client wie einen Computer mit dem Betriebssystem Windows XP oder Windows Vista oder den C54WMP (Wireless Media Player) von Conceptronic verwendet werden. Sie müssen diese Option in der Konfiguration zuerst aktivieren, bevor sie von einem UPnP AV Media Client angewendet werden kann. 1) Klicken Sie im Konfigurationsmodus auf „Advanced [Erweitert]” in der oberen
Menüleiste und wählen Sie die Option „UPnP AV Server” auf der linken Seite des Konfigurationsfensters.
2) Aktivieren [Enable] Sie die Option „UPnP AV Server”. 3) Geben Sie den Ordner an, in dem sich Ihre Media-Dateien befinden. Wenn Sie in
mehreren Ordnern Ihres CH3SNAS Media-Dateien haben, können Sie auch „root“ wählen, damit das ganze Gerät nach Media-Dateien durchsucht wird.
4) Geben Sie die Zeit für die automatische Aktualisierung [Auto Refresh] ein. Wenn diese Option gewählt und konfiguriert wird, aktualisiert der CH3SNAS automatisch den Media-Inhalt.
Hinweis: Wenn Sie keine Zeit für die automatische Aktualisierung festlegen, müssen Sie
die Indexdatei des CH3SNAS manuell aktualisieren, indem Sie auf die Schaltfläche „Refresh [Aktualisieren]“ in der Konfiguration klicken.
5) Wenn Sie alle Einstellungen vorgenommen haben, klicken Sie auf „Save Settings
[Einstellungen speichern], um die Einstellungen zu speichern.
DEUTSCH
74
Hinweis: Der CH3SNAS unterstützt Wiedergabelisten mit dem Dateiformat .m3u, jedoch
höchstens mit 256 Titeln pro Wiedergabeliste. Wenn eine ‚m3u’-Wiedergabeliste mehr als 256 Titel enthält, werden nur die ersten 256 Titel indiziert und können von einem UPnP AV Client verwendet werden.
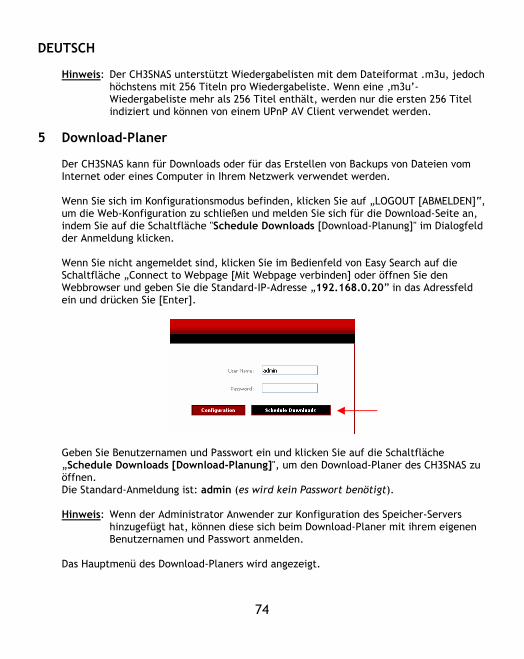
5 Download-Planer
Der CH3SNAS kann für Downloads oder für das Erstellen von Backups von Dateien vom Internet oder eines Computer in Ihrem Netzwerk verwendet werden. Wenn Sie sich im Konfigurationsmodus befinden, klicken Sie auf „LOGOUT [ABMELDEN]“, um die Web-Konfiguration zu schließen und melden Sie sich für die Download-Seite an, indem Sie auf die Schaltfläche "Schedule Downloads [Download-Planung]" im Dialogfeld der Anmeldung klicken. Wenn Sie nicht angemeldet sind, klicken Sie im Bedienfeld von Easy Search auf die Schaltfläche „Connect to Webpage [Mit Webpage verbinden] oder öffnen Sie den Webbrowser und geben Sie die Standard-IP-Adresse „192.168.0.20” in das Adressfeld ein und drücken Sie [Enter].
Geben Sie Benutzernamen und Passwort ein und klicken Sie auf die Schaltfläche „Schedule Downloads [Download-Planung]", um den Download-Planer des CH3SNAS zu öffnen. Die Standard-Anmeldung ist: admin (es wird kein Passwort benötigt). Hinweis: Wenn der Administrator Anwender zur Konfiguration des Speicher-Servers
hinzugefügt hat, können diese sich beim Download-Planer mit ihrem eigenen Benutzernamen und Passwort anmelden.
Das Hauptmenü des Download-Planers wird angezeigt.
DEUTSCH
75
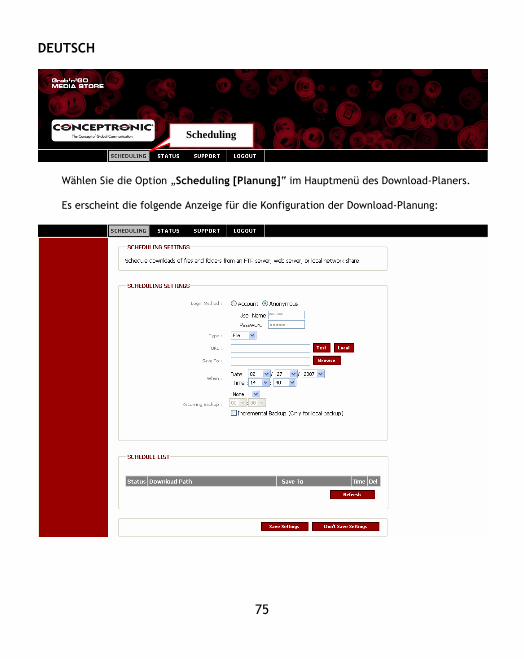
Wählen Sie die Option „Scheduling [Planung]“ im Hauptmenü des Download-Planers. Es erscheint die folgende Anzeige für die Konfiguration der Download-Planung:
Scheduling
DEUTSCH
76
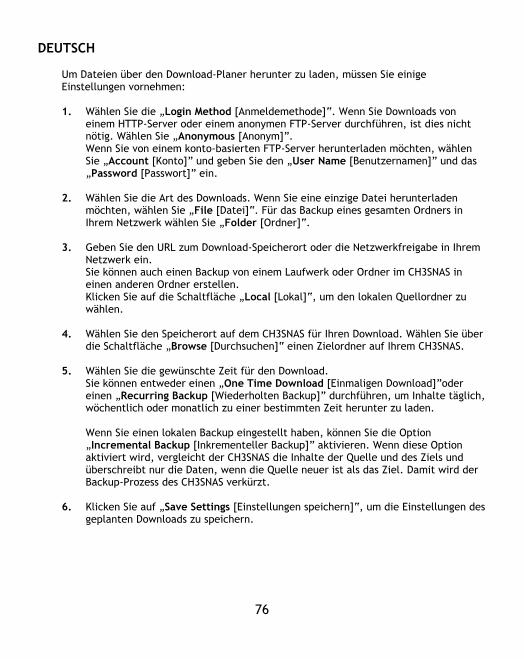
Um Dateien über den Download-Planer herunter zu laden, müssen Sie einige Einstellungen vornehmen: 1. Wählen Sie die „Login Method [Anmeldemethode]“. Wenn Sie Downloads von
einem HTTP-Server oder einem anonymen FTP-Server durchführen, ist dies nicht nötig. Wählen Sie „Anonymous [Anonym]”. Wenn Sie von einem konto-basierten FTP-Server herunterladen möchten, wählen Sie „Account [Konto]” und geben Sie den „User Name [Benutzernamen]” und das „Password [Passwort]” ein.
2. Wählen Sie die Art des Downloads. Wenn Sie eine einzige Datei herunterladen möchten, wählen Sie „File [Datei]“. Für das Backup eines gesamten Ordners in Ihrem Netzwerk wählen Sie „Folder [Ordner]“.
3. Geben Sie den URL zum Download-Speicherort oder die Netzwerkfreigabe in Ihrem Netzwerk ein. Sie können auch einen Backup von einem Laufwerk oder Ordner im CH3SNAS in einen anderen Ordner erstellen. Klicken Sie auf die Schaltfläche „Local [Lokal]“, um den lokalen Quellordner zu wählen.
4. Wählen Sie den Speicherort auf dem CH3SNAS für Ihren Download. Wählen Sie über die Schaltfläche „Browse [Durchsuchen]“ einen Zielordner auf Ihrem CH3SNAS.
5. Wählen Sie die gewünschte Zeit für den Download. Sie können entweder einen „One Time Download [Einmaligen Download]”oder einen „Recurring Backup [Wiederholten Backup]” durchführen, um Inhalte täglich, wöchentlich oder monatlich zu einer bestimmten Zeit herunter zu laden. Wenn Sie einen lokalen Backup eingestellt haben, können Sie die Option „Incremental Backup [Inkrementeller Backup]” aktivieren. Wenn diese Option aktiviert wird, vergleicht der CH3SNAS die Inhalte der Quelle und des Ziels und überschreibt nur die Daten, wenn die Quelle neuer ist als das Ziel. Damit wird der Backup-Prozess des CH3SNAS verkürzt.
6. Klicken Sie auf „Save Settings [Einstellungen speichern]“, um die Einstellungen des geplanten Downloads zu speichern.
DEUTSCH
77
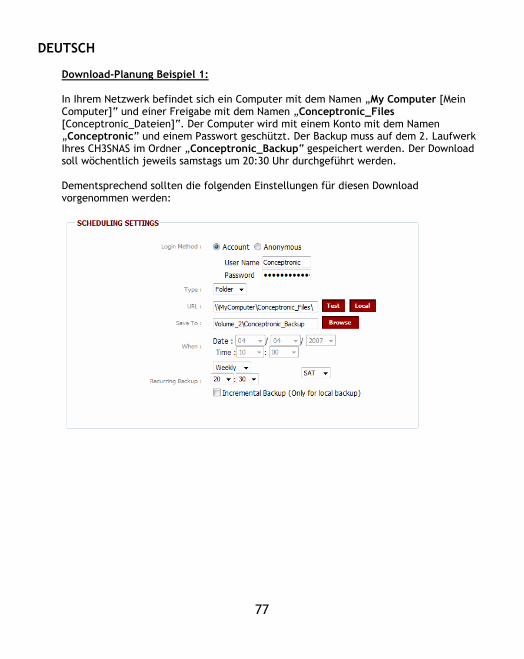
Download-Planung Beispiel 1: In Ihrem Netzwerk befindet sich ein Computer mit dem Namen „My Computer [Mein Computer]“ und einer Freigabe mit dem Namen „Conceptronic_Files [Conceptronic_Dateien]“. Der Computer wird mit einem Konto mit dem Namen „Conceptronic” und einem Passwort geschützt. Der Backup muss auf dem 2. Laufwerk Ihres CH3SNAS im Ordner „Conceptronic_Backup“ gespeichert werden. Der Download soll wöchentlich jeweils samstags um 20:30 Uhr durchgeführt werden. Dementsprechend sollten die folgenden Einstellungen für diesen Download vorgenommen werden:

DEUTSCH
78
Download-Planung Beispiel 2: Es soll ein Download eines Treibers mit dem Namen „Driver.exe“ durchgeführt werden, der sich unter www.drivers.com befindet. Der heruntergeladene Treiber muss auf der 1. Festplatte Ihres CH3SNAS im Ordner „Driver_Downloads” gespeichert werden. Die Datei muss am 5. Juni 2007 um 17:00 Uhr heruntergeladen werden. Dementsprechend sollten die folgenden Einstellungen für diesen Download vorgenommen werden:
DEUTSCH
79
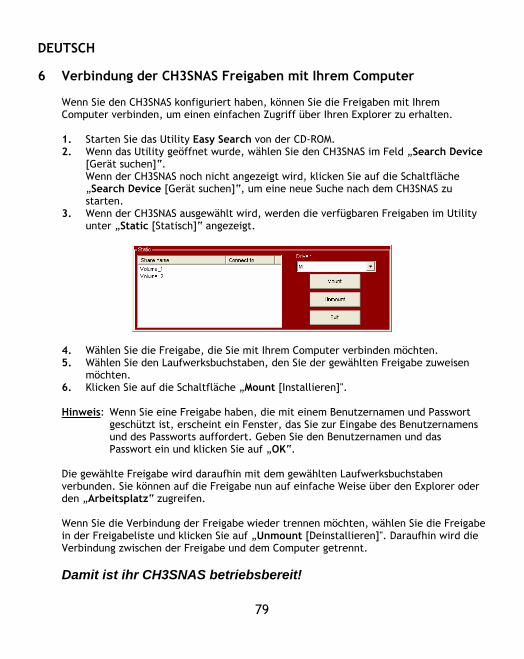
6 Verbindung der CH3SNAS Freigaben mit Ihrem Computer
Wenn Sie den CH3SNAS konfiguriert haben, können Sie die Freigaben mit Ihrem Computer verbinden, um einen einfachen Zugriff über Ihren Explorer zu erhalten. 1. Starten Sie das Utility Easy Search von der CD-ROM. 2. Wenn das Utility geöffnet wurde, wählen Sie den CH3SNAS im Feld „Search Device
[Gerät suchen]“. Wenn der CH3SNAS noch nicht angezeigt wird, klicken Sie auf die Schaltfläche „Search Device [Gerät suchen]“, um eine neue Suche nach dem CH3SNAS zu starten.
3. Wenn der CH3SNAS ausgewählt wird, werden die verfügbaren Freigaben im Utility unter „Static [Statisch]“ angezeigt.
4. Wählen Sie die Freigabe, die Sie mit Ihrem Computer verbinden möchten. 5. Wählen Sie den Laufwerksbuchstaben, den Sie der gewählten Freigabe zuweisen
möchten. 6. Klicken Sie auf die Schaltfläche „Mount [Installieren]". Hinweis: Wenn Sie eine Freigabe haben, die mit einem Benutzernamen und Passwort
geschützt ist, erscheint ein Fenster, das Sie zur Eingabe des Benutzernamens und des Passworts auffordert. Geben Sie den Benutzernamen und das Passwort ein und klicken Sie auf „OK“.
Die gewählte Freigabe wird daraufhin mit dem gewählten Laufwerksbuchstaben verbunden. Sie können auf die Freigabe nun auf einfache Weise über den Explorer oder den „Arbeitsplatz“ zugreifen. Wenn Sie die Verbindung der Freigabe wieder trennen möchten, wählen Sie die Freigabe in der Freigabeliste und klicken Sie auf „Unmount [Deinstallieren]". Daraufhin wird die Verbindung zwischen der Freigabe und dem Computer getrennt. Damit ist ihr CH3SNAS betriebsbereit!

CE - Konformitätserklärung
80
Der Hersteller 2L International BV Adresse Databankweg 7 3821 AL Amersfoort, Niederlande erklärt hiermit, dass das Produkt Typ NETWORK HARDDISK 3.5” Produkt CH3SNAS Markenname Conceptronic den folgenden Richtlinien entspricht:
2004/108/EWG EMV-Richtlinie:
Elektromagnetische Verträglichkeit
73/23/EWG Niederspannungs-Richtlinie Elektrische Betriebsmittel zur Verwendung innerhalb bestimmter Spannungsgrenzen
Für die Beurteilung der Einhaltung der Konformität angewandte Normen: EN55022/9.98 Klasse B EN55024/9.98 EN 50081-1/1994 EN 61000-3-2/3/4/1995 EN 50082-1/1994 EN 60950/1995
Das Zeichen bestätigt, dass dieses Produkt oben aufgeführte Normen und Bestimmungen erfüllt.
Ort und Datum der Ausstellung: Amersfoort, 10/01/2007 (dd/mm/yyyy)
Herman Looijen, Product Marketing Manager
FRANÇAIS
81
CH3SNAS de Conceptronic
Guide d'installation rapide
Nous vous félicitons d'avoir acheté votre Disque de Sauvegarde Multimédia Grab'n'Go de Conceptronic.
Vous trouverez dans le Guide d'Installation du Hardware fourni avec le produit une explication détaillée de l'installation du Disque de Sauvegarde Multimédia de Conceptronic. En cas de problème, nous vous conseillons de vous rendre sur notre site de support technique (adresse :www.conceptronic.net et de cliquer sur ‘"Support". Vous trouverez dans cette section la Base de données de la Foire aux Questions. En cas de questions concernant votre produit et si vous n’obtenez pas de réponse sur notre site web, n’hésitez pas à nous contacter par e-mail : [email protected] Pour plus d'informations concernant les produits Conceptronic, veuillez consulter notre site web : www.conceptronic.net L’installation du Software décrite ci-après peut être légèrement différente de l’installation sur votre ordinateur. Cela dépendra de la version Windows que vous utilisez. 1 Contenu du Coffret
Les éléments suivants sont fournis dans le paquet avec le CH3SNAS de Conceptronic :
• CH3SNAS de Conceptronic • Adaptateur électrique pour CH3SNAS (5v, 1.5A & 12v, 1.5A) • Câble de Réseau • Guide d'installation rapide en plusieurs langues • Cd-Rom avec logiciel Remarque: Ce Guide d'installation rapide ne détaille que les fonctions de base du
dispositif pour le faire travailler dans votre environnement de réseau. Pour plus de détails concernant les fonctions et si vous souhaitez d'autres explications, consultez le Manuel Complet en Anglais fourni sur le CD.
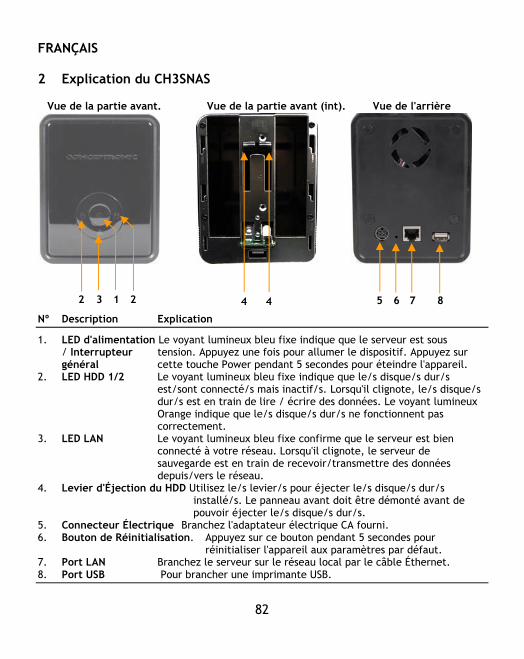
FRANÇAIS
82
2 Explication du CH3SNAS
Vue de la partie avant. Vue de la partie avant (int). Vue de l'arrière
Nº Description Explication
1. LED d'alimentation Le voyant lumineux bleu fixe indique que le serveur est sous / Interrupteur tension. Appuyez une fois pour allumer le dispositif. Appuyez sur général cette touche Power pendant 5 secondes pour éteindre l'appareil. 2. LED HDD 1/2 Le voyant lumineux bleu fixe indique que le/s disque/s dur/s
est/sont connecté/s mais inactif/s. Lorsqu'il clignote, le/s disque/s dur/s est en train de lire / écrire des données. Le voyant lumineux Orange indique que le/s disque/s dur/s ne fonctionnent pas correctement.
3. LED LAN Le voyant lumineux bleu fixe confirme que le serveur est bien connecté à votre réseau. Lorsqu'il clignote, le serveur de sauvegarde est en train de recevoir/transmettre des données depuis/vers le réseau.
4. Levier d'Éjection du HDD Utilisez le/s levier/s pour éjecter le/s disque/s dur/s installé/s. Le panneau avant doit être démonté avant de pouvoir éjecter le/s disque/s dur/s.
5. Connecteur Électrique Branchez l'adaptateur électrique CA fourni. 6. Bouton de Réinitialisation. Appuyez sur ce bouton pendant 5 secondes pour
réinitialiser l'appareil aux paramètres par défaut. 7. Port LAN Branchez le serveur sur le réseau local par le câble Éthernet. 8. Port USB Pour brancher une imprimante USB.
1
2 3
2
4 5 6 7 2 1 4 8
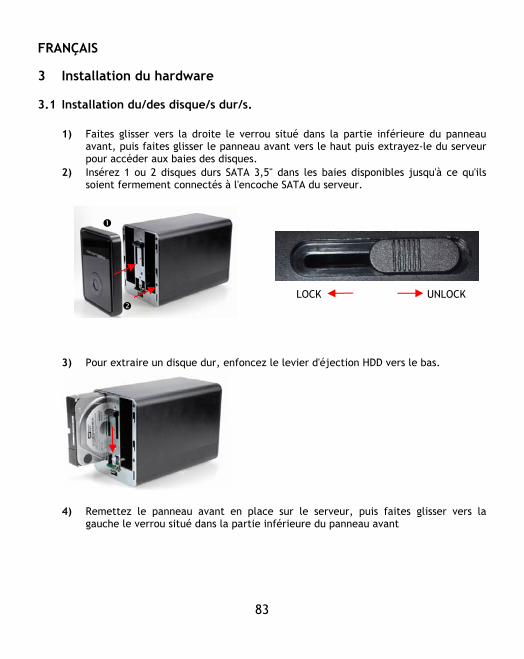
FRANÇAIS
83
3 Installation du hardware 3.1 Installation du/des disque/s dur/s.
1) Faites glisser vers la droite le verrou situé dans la partie inférieure du panneau avant, puis faites glisser le panneau avant vers le haut puis extrayez-le du serveur pour accéder aux baies des disques.
2) Insérez 1 ou 2 disques durs SATA 3,5" dans les baies disponibles jusqu'à ce qu'ils soient fermement connectés à l'encoche SATA du serveur.
LOCK UNLOCK
3) Pour extraire un disque dur, enfoncez le levier d'éjection HDD vers le bas.
4) Remettez le panneau avant en place sur le serveur, puis faites glisser vers la
gauche le verrou situé dans la partie inférieure du panneau avant
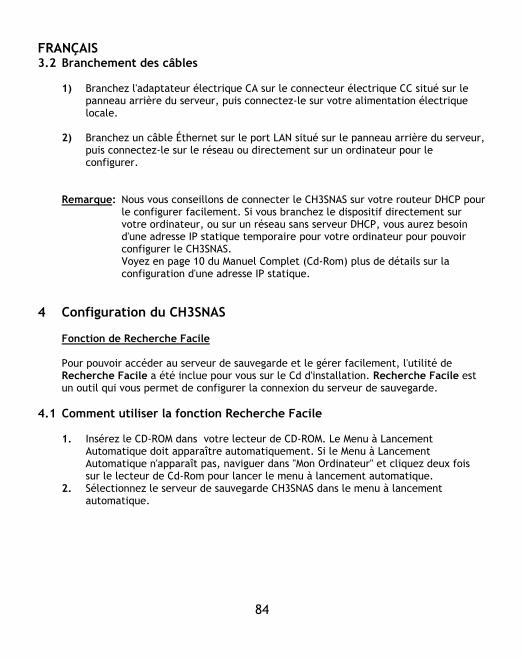
FRANÇAIS
84
3.2 Branchement des câbles
1) Branchez l'adaptateur électrique CA sur le connecteur électrique CC situé sur le panneau arrière du serveur, puis connectez-le sur votre alimentation électrique locale.
2) Branchez un câble Éthernet sur le port LAN situé sur le panneau arrière du serveur,
puis connectez-le sur le réseau ou directement sur un ordinateur pour le configurer.
Remarque: Nous vous conseillons de connecter le CH3SNAS sur votre routeur DHCP pour le configurer facilement. Si vous branchez le dispositif directement sur votre ordinateur, ou sur un réseau sans serveur DHCP, vous aurez besoin d'une adresse IP statique temporaire pour votre ordinateur pour pouvoir configurer le CH3SNAS. Voyez en page 10 du Manuel Complet (Cd-Rom) plus de détails sur la configuration d'une adresse IP statique.
4 Configuration du CH3SNAS
Fonction de Recherche Facile Pour pouvoir accéder au serveur de sauvegarde et le gérer facilement, l'utilité de Recherche Facile a été inclue pour vous sur le Cd d'installation. Recherche Facile est un outil qui vous permet de configurer la connexion du serveur de sauvegarde.
4.1 Comment utiliser la fonction Recherche Facile
1. Insérez le CD-ROM dans votre lecteur de CD-ROM. Le Menu à Lancement Automatique doit apparaître automatiquement. Si le Menu à Lancement Automatique n'apparaît pas, naviguer dans "Mon Ordinateur" et cliquez deux fois sur le lecteur de Cd-Rom pour lancer le menu à lancement automatique.
2. Sélectionnez le serveur de sauvegarde CH3SNAS dans le menu à lancement automatique.
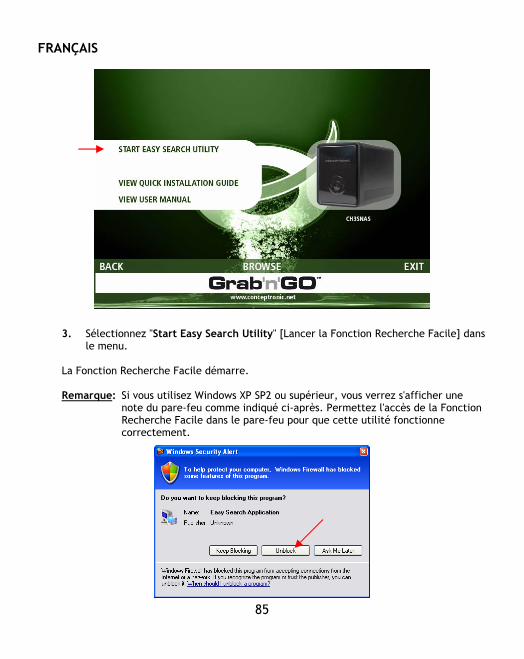
FRANÇAIS
85
3. Sélectionnez "Start Easy Search Utility" [Lancer la Fonction Recherche Facile] dans le menu.
La Fonction Recherche Facile démarre. Remarque: Si vous utilisez Windows XP SP2 ou supérieur, vous verrez s'afficher une
note du pare-feu comme indiqué ci-après. Permettez l'accès de la Fonction Recherche Facile dans le pare-feu pour que cette utilité fonctionne correctement.
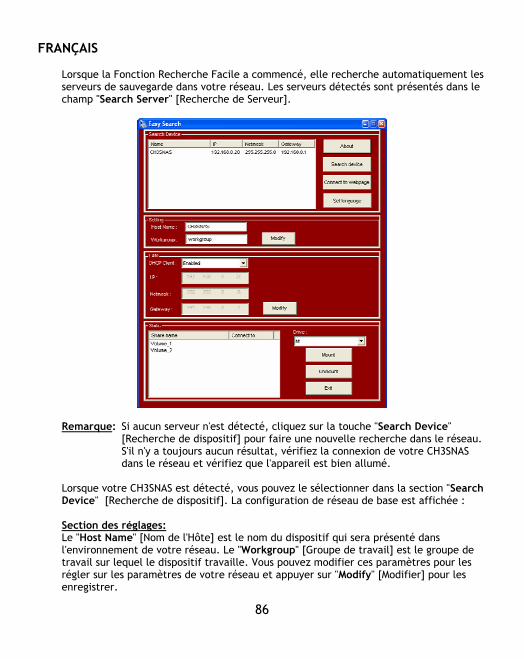
FRANÇAIS
86
Lorsque la Fonction Recherche Facile a commencé, elle recherche automatiquement les serveurs de sauvegarde dans votre réseau. Les serveurs détectés sont présentés dans le champ "Search Server" [Recherche de Serveur].
Remarque: Si aucun serveur n'est détecté, cliquez sur la touche "Search Device" [Recherche de dispositif] pour faire une nouvelle recherche dans le réseau. S'il n'y a toujours aucun résultat, vérifiez la connexion de votre CH3SNAS dans le réseau et vérifiez que l'appareil est bien allumé.
Lorsque votre CH3SNAS est détecté, vous pouvez le sélectionner dans la section "Search Device" [Recherche de dispositif]. La configuration de réseau de base est affichée : Section des réglages: Le "Host Name" [Nom de l'Hôte] est le nom du dispositif qui sera présenté dans l'environnement de votre réseau. Le "Workgroup" [Groupe de travail] est le groupe de travail sur lequel le dispositif travaille. Vous pouvez modifier ces paramètres pour les régler sur les paramètres de votre réseau et appuyer sur "Modify" [Modifier] pour les enregistrer.
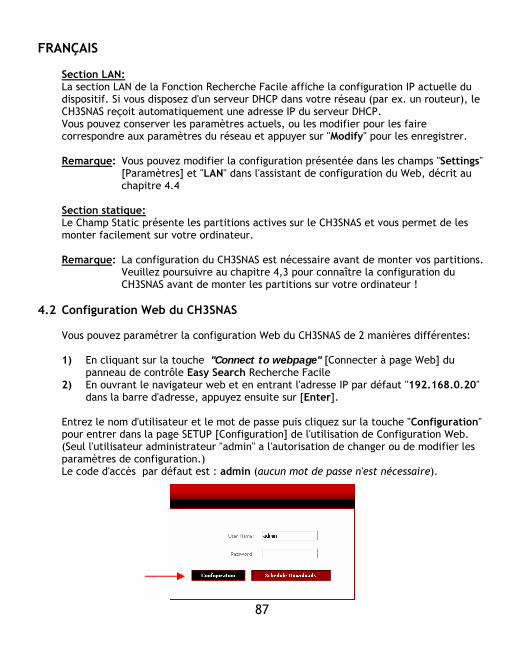
FRANÇAIS
87
Section LAN: La section LAN de la Fonction Recherche Facile affiche la configuration IP actuelle du dispositif. Si vous disposez d'un serveur DHCP dans votre réseau (par ex. un routeur), le CH3SNAS reçoit automatiquement une adresse IP du serveur DHCP. Vous pouvez conserver les paramètres actuels, ou les modifier pour les faire correspondre aux paramètres du réseau et appuyer sur "Modify" pour les enregistrer. Remarque: Vous pouvez modifier la configuration présentée dans les champs "Settings"
[Paramètres] et "LAN" dans l'assistant de configuration du Web, décrit au chapitre 4.4
Section statique: Le Champ Static présente les partitions actives sur le CH3SNAS et vous permet de les monter facilement sur votre ordinateur. Remarque: La configuration du CH3SNAS est nécessaire avant de monter vos partitions.
Veuillez poursuivre au chapitre 4,3 pour connaître la configuration du CH3SNAS avant de monter les partitions sur votre ordinateur !
4.2 Configuration Web du CH3SNAS
Vous pouvez paramétrer la configuration Web du CH3SNAS de 2 manières différentes: 1) En cliquant sur la touche "Connect to webpage" [Connecter à page Web] du
panneau de contrôle Easy Search Recherche Facile 2) En ouvrant le navigateur web et en entrant l'adresse IP par défaut "192.168.0.20"
dans la barre d'adresse, appuyez ensuite sur [Enter]. Entrez le nom d'utilisateur et le mot de passe puis cliquez sur la touche "Configuration" pour entrer dans la page SETUP [Configuration] de l'utilisation de Configuration Web. (Seul l'utilisateur administrateur "admin" a l'autorisation de changer ou de modifier les paramètres de configuration.) Le code d'accès par défaut est : admin (aucun mot de passe n'est nécessaire).
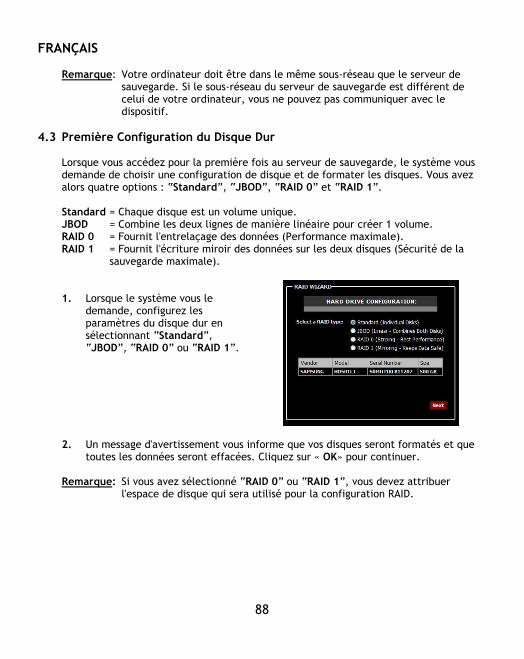
FRANÇAIS
88
Remarque: Votre ordinateur doit être dans le même sous-réseau que le serveur de
sauvegarde. Si le sous-réseau du serveur de sauvegarde est différent de celui de votre ordinateur, vous ne pouvez pas communiquer avec le dispositif.
4.3 Première Configuration du Disque Dur
Lorsque vous accédez pour la première fois au serveur de sauvegarde, le système vous demande de choisir une configuration de disque et de formater les disques. Vous avez alors quatre options : “Standard”, “JBOD”, “RAID 0” et “RAID 1”. Standard = Chaque disque est un volume unique. JBOD = Combine les deux lignes de manière linéaire pour créer 1 volume. RAID 0 = Fournit l'entrelaçage des données (Performance maximale). RAID 1 = Fournit l'écriture miroir des données sur les deux disques (Sécurité de la
sauvegarde maximale).
1. Lorsque le système vous le
demande, configurez les paramètres du disque dur en sélectionnant “Standard”, “JBOD”, “RAID 0” ou “RAID 1”.
2. Un message d'avertissement vous informe que vos disques seront formatés et que
toutes les données seront effacées. Cliquez sur « OK» pour continuer. Remarque: Si vous avez sélectionné “RAID 0” ou “RAID 1”, vous devez attribuer
l'espace de disque qui sera utilisé pour la configuration RAID.

FRANÇAIS
89
RAID 0 = Configuration d'Entrelaçage
RAID 1 = Configuration d'Écriture miroir
3. IMPORTANT! Le formatage du disque dur peut prendre un moment, en fonction de la configuration du disque dur choisi et la capacité du disque dur. N'éteignez pas et ne débranchez pas le dispositif pendant le formatage ! Le système vous indiquera quand le formatage sera terminé. Cliquez sur "Restart" [Redémarrer] pour faire redémarrer le serveur de sauvegarde. Lorsque le redémarrage est terminé, vous pouvez poursuivre la configuration du serveur de sauvegarde.
Remarque: Lorsque le/s disque/s dur/s du CH3SNAS est/sont formaté/s, le dispositif
crée automatique une partition (ou 2 partitions lorsque "standard" est sélectionné pendant le formatage), avec un accès pour tous les utilisateurs du réseau.
Pour limiter l'accès à votre sauvegarde CH3SNAS, vous devez configurer des comptes d'utilisateur et régler l'accès aux partitions. Voyez le manuel d'utilisateur sur le Cd-Rom inclus pour plus d'informations sur “Users”, “Groups” et “Network Access”.[Utilisateurs, Groupes et Accès Réseau].
Remarque: N'enlevez pas le/s disque/s dur/s du CH3SNAS lorsque l'appareil est
utilisé ! Ceci pourrait entraîner une perte des données !
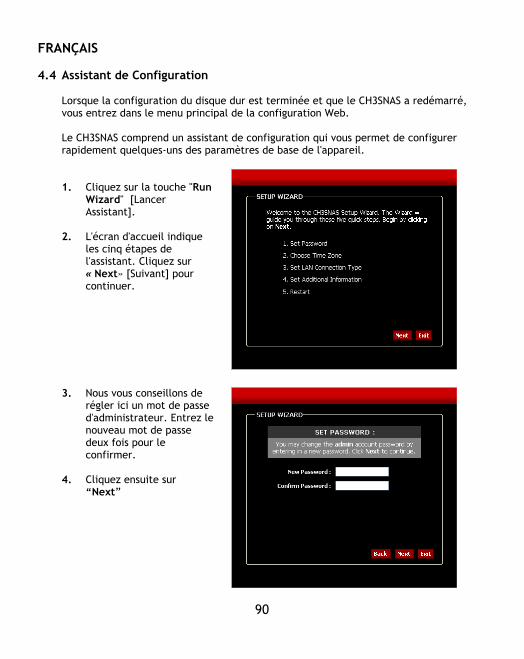
FRANÇAIS
90
4.4 Assistant de Configuration
Lorsque la configuration du disque dur est terminée et que le CH3SNAS a redémarré, vous entrez dans le menu principal de la configuration Web. Le CH3SNAS comprend un assistant de configuration qui vous permet de configurer rapidement quelques-uns des paramètres de base de l'appareil. 1. Cliquez sur la touche "Run
Wizard" [Lancer Assistant].
2. L'écran d'accueil indique les cinq étapes de l'assistant. Cliquez sur « Next» [Suivant] pour continuer.
3. Nous vous conseillons de
régler ici un mot de passe d'administrateur. Entrez le nouveau mot de passe deux fois pour le confirmer.
4. Cliquez ensuite sur “Next”
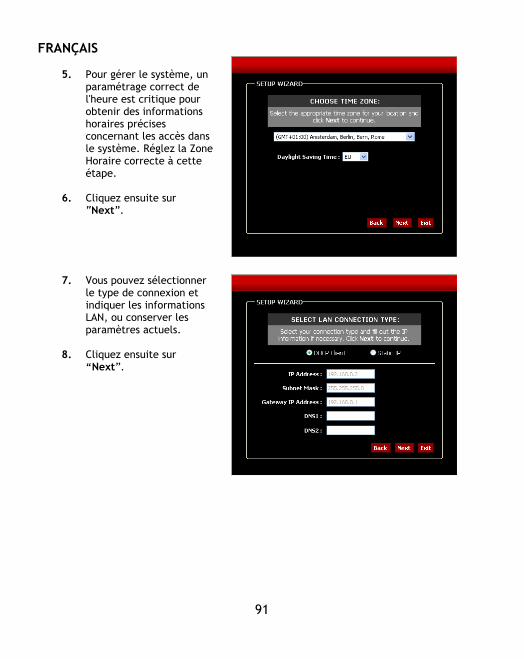
FRANÇAIS
91
5. Pour gérer le système, un
paramétrage correct de l'heure est critique pour obtenir des informations horaires précises concernant les accès dans le système. Réglez la Zone Horaire correcte à cette étape.
6. Cliquez ensuite sur “Next”.
7. Vous pouvez sélectionner
le type de connexion et indiquer les informations LAN, ou conserver les paramètres actuels.
8. Cliquez ensuite sur “Next”.
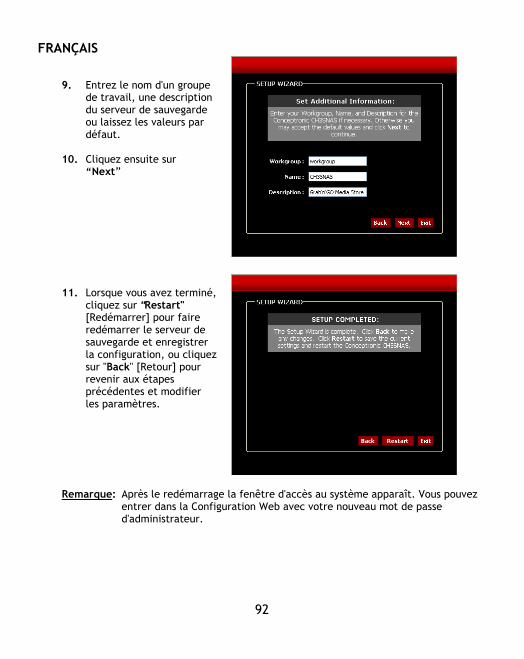
FRANÇAIS
92
9. Entrez le nom d'un groupe de travail, une description du serveur de sauvegarde ou laissez les valeurs par défaut.
10. Cliquez ensuite sur “Next”
11. Lorsque vous avez terminé, cliquez sur "Restart" [Redémarrer] pour faire redémarrer le serveur de sauvegarde et enregistrer la configuration, ou cliquez sur "Back" [Retour] pour revenir aux étapes précédentes et modifier les paramètres.
Remarque: Après le redémarrage la fenêtre d'accès au système apparaît. Vous pouvez
entrer dans la Configuration Web avec votre nouveau mot de passe d'administrateur.
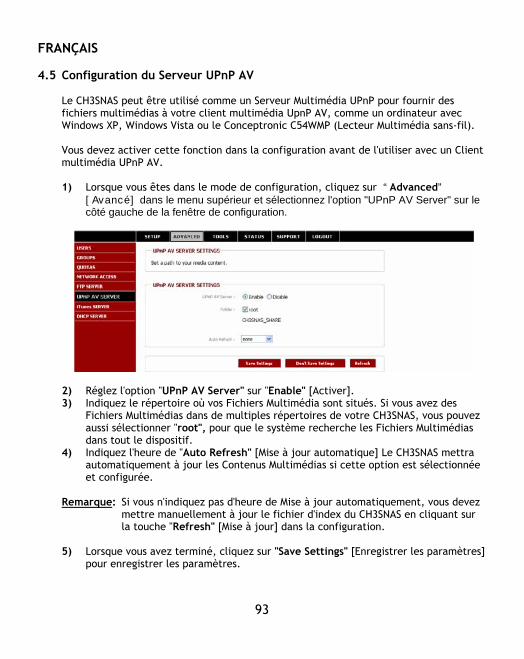
FRANÇAIS
93
4.5 Configuration du Serveur UPnP AV
Le CH3SNAS peut être utilisé comme un Serveur Multimédia UPnP pour fournir des fichiers multimédias à votre client multimédia UpnP AV, comme un ordinateur avec Windows XP, Windows Vista ou le Conceptronic C54WMP (Lecteur Multimédia sans-fil). Vous devez activer cette fonction dans la configuration avant de l'utiliser avec un Client multimédia UPnP AV.
1) Lorsque vous êtes dans le mode de configuration, cliquez sur “Advanced”
[Avancé] dans le menu supérieur et sélectionnez l'option "UPnP AV Server" sur le côté gauche de la fenêtre de configuration.
2) Réglez l'option "UPnP AV Server" sur "Enable" [Activer]. 3) Indiquez le répertoire où vos Fichiers Multimédia sont situés. Si vous avez des
Fichiers Multimédias dans de multiples répertoires de votre CH3SNAS, vous pouvez aussi sélectionner "root", pour que le système recherche les Fichiers Multimédias dans tout le dispositif.
4) Indiquez l'heure de "Auto Refresh" [Mise à jour automatique] Le CH3SNAS mettra automatiquement à jour les Contenus Multimédias si cette option est sélectionnée et configurée.
Remarque: Si vous n'indiquez pas d'heure de Mise à jour automatiquement, vous devez mettre manuellement à jour le fichier d'index du CH3SNAS en cliquant sur la touche "Refresh" [Mise à jour] dans la configuration.
5) Lorsque vous avez terminé, cliquez sur "Save Settings" [Enregistrer les paramètres]
pour enregistrer les paramètres.
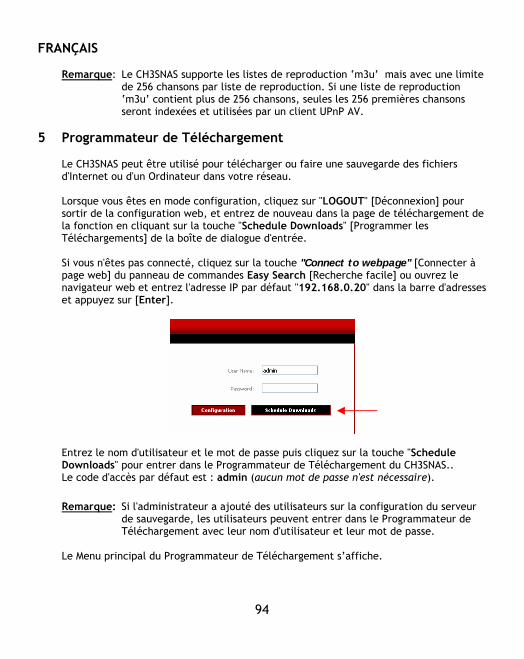
FRANÇAIS
94
Remarque: Le CH3SNAS supporte les listes de reproduction ‘m3u’ mais avec une limite
de 256 chansons par liste de reproduction. Si une liste de reproduction ‘m3u’ contient plus de 256 chansons, seules les 256 premières chansons seront indexées et utilisées par un client UPnP AV.
5 Programmateur de Téléchargement
Le CH3SNAS peut être utilisé pour télécharger ou faire une sauvegarde des fichiers d'Internet ou d'un Ordinateur dans votre réseau. Lorsque vous êtes en mode configuration, cliquez sur "LOGOUT" [Déconnexion] pour sortir de la configuration web, et entrez de nouveau dans la page de téléchargement de la fonction en cliquant sur la touche "Schedule Downloads" [Programmer les Téléchargements] de la boîte de dialogue d'entrée. Si vous n'êtes pas connecté, cliquez sur la touche "Connect to webpage" [Connecter à page web] du panneau de commandes Easy Search [Recherche facile] ou ouvrez le navigateur web et entrez l'adresse IP par défaut "192.168.0.20" dans la barre d'adresses et appuyez sur [Enter].
Entrez le nom d'utilisateur et le mot de passe puis cliquez sur la touche "Schedule Downloads" pour entrer dans le Programmateur de Téléchargement du CH3SNAS.. Le code d'accès par défaut est : admin (aucun mot de passe n'est nécessaire).
Remarque: Si l'administrateur a ajouté des utilisateurs sur la configuration du serveur
de sauvegarde, les utilisateurs peuvent entrer dans le Programmateur de Téléchargement avec leur nom d'utilisateur et leur mot de passe.
Le Menu principal du Programmateur de Téléchargement s’affiche.

FRANÇAIS
95
Sélectionnez l'option "Scheduling" [Programmation] dans le menu principal du Programmateur de Téléchargement. Vous voyez la configuration de la Programmation illustrée ci-après :
Programmation
FRANÇAIS
96
Pour télécharger des fichiers par le Programmateur de Téléchargement, vous devez régler quelques paramètres : 1. Sélectionnez la Méthode de Connexion. Si vous téléchargez à partir d'un serveur
HTTP ou d'un serveur anonyme FTP, cela n'est pas nécessaire. Sélectionnez Anonymous" [Anonyme]. Si vous téléchargez d'un compte de serveur FTP, sélectionnez "Account" [Compte] et entrez le "User Name" [Nom d'utilisateur] et "Password" [Mot de passe].
2. Sélectionnez le type de téléchargement. Si vous voulez télécharger un seul fichier, sélectionnez "File" [Fichier] : Pour sauvegarder un répertoire entier dans votre réseau, sélectionnez "Folder" [Répertoire].
3. Entrez l'URL ou l'emplacement du téléchargement ou la partition de réseau dans votre réseau. Vous pouvez aussi faire la sauvegarde d'un disque ou d'un répertoire dans le CH3SNAS sur un autre répertoire. Utilisez la touche "Local" pour sélectionner le répertoire de source local.
4. Sélectionnez l'emplacement sur le CH3SNAS pour votre téléchargement. Utilisez la touche "Browse" [Naviguer] pour sélectionner un répertoire cible sur votre CH3SNAS.
5. Sélectionnez l'heure à laquelle vous voulez que le téléchargement démarre. Au lieu de "one time download" [Téléchargement une fois], vous pouvez aussi définir un "Recurring Backup" [Sauvegarde récurrente] pour télécharger le contenu tous les jours, toutes les semaines ou tous les mois à une heure déterminée. Si vous avez configuré une sauvegarde locale, vous pouvez activer l'option "Incremental Backup" [Sauvegarde par Incréments]. Cette option est alors sélectionnée, le CH3SNAS compare les contenus de la source et de la destination et ne les efface que si la source est plus récente que la destination. Ceci vous permet d'accroître la vitesse de l'opération de sauvegarde du CH3SNAS.
6. Cliquez sur "Save Settings" [Enregistrer Paramètres] pour enregistrer les paramètres du téléchargement programmé.
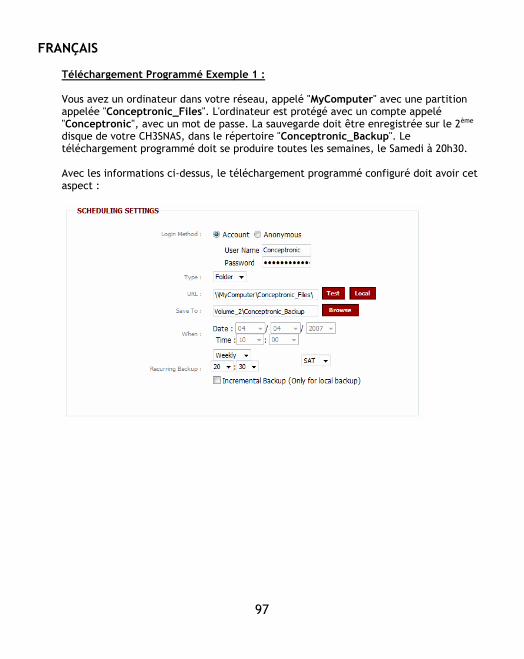
FRANÇAIS
97
Téléchargement Programmé Exemple 1 : Vous avez un ordinateur dans votre réseau, appelé "MyComputer" avec une partition appelée "Conceptronic_Files". L'ordinateur est protégé avec un compte appelé "Conceptronic", avec un mot de passe. La sauvegarde doit être enregistrée sur le 2ème disque de votre CH3SNAS, dans le répertoire "Conceptronic_Backup". Le téléchargement programmé doit se produire toutes les semaines, le Samedi à 20h30. Avec les informations ci-dessus, le téléchargement programmé configuré doit avoir cet aspect :
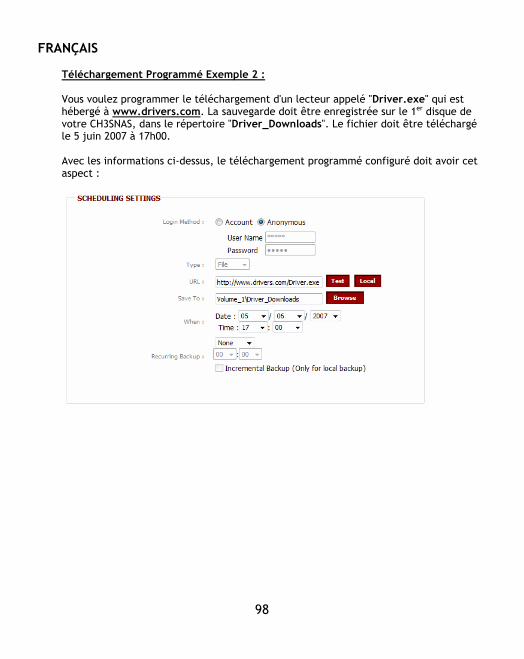
FRANÇAIS
98
Téléchargement Programmé Exemple 2 : Vous voulez programmer le téléchargement d'un lecteur appelé "Driver.exe" qui est hébergé à www.drivers.com. La sauvegarde doit être enregistrée sur le 1er disque de votre CH3SNAS, dans le répertoire "Driver_Downloads". Le fichier doit être téléchargé le 5 juin 2007 à 17h00. Avec les informations ci-dessus, le téléchargement programmé configuré doit avoir cet aspect :
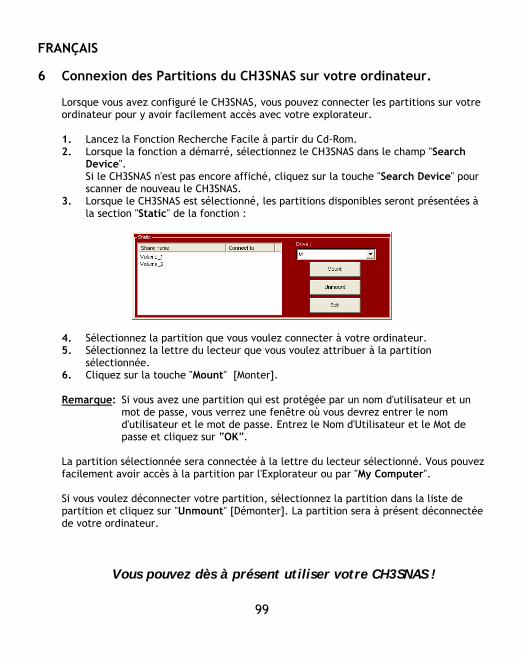
FRANÇAIS
99
6 Connexion des Partitions du CH3SNAS sur votre ordinateur.
Lorsque vous avez configuré le CH3SNAS, vous pouvez connecter les partitions sur votre ordinateur pour y avoir facilement accès avec votre explorateur. 1. Lancez la Fonction Recherche Facile à partir du Cd-Rom. 2. Lorsque la fonction a démarré, sélectionnez le CH3SNAS dans le champ "Search
Device". Si le CH3SNAS n'est pas encore affiché, cliquez sur la touche "Search Device" pour scanner de nouveau le CH3SNAS.
3. Lorsque le CH3SNAS est sélectionné, les partitions disponibles seront présentées à la section "Static" de la fonction :
4. Sélectionnez la partition que vous voulez connecter à votre ordinateur. 5. Sélectionnez la lettre du lecteur que vous voulez attribuer à la partition
sélectionnée. 6. Cliquez sur la touche "Mount" [Monter]. Remarque: Si vous avez une partition qui est protégée par un nom d'utilisateur et un
mot de passe, vous verrez une fenêtre où vous devrez entrer le nom d'utilisateur et le mot de passe. Entrez le Nom d'Utilisateur et le Mot de passe et cliquez sur “OK”.
La partition sélectionnée sera connectée à la lettre du lecteur sélectionné. Vous pouvez facilement avoir accès à la partition par l'Explorateur ou par "My Computer". Si vous voulez déconnecter votre partition, sélectionnez la partition dans la liste de partition et cliquez sur "Unmount" [Démonter]. La partition sera à présent déconnectée de votre ordinateur.
Vous pouvez dès à présent utiliser votre CH3SNAS !
Déclaration de Conformité CE
100
Le fabricant 2L International BV Adresse Databankweg 7 3821 AL Amersfoort, the Netherlands (Pays-Bas) Déclare, par la présente, que le produit Type NETWORK HARDDISK 3.5” Produit CH3SNAS Enseigne Conceptronic Observe les directives suivantes:
2004/108/EEC Directive EMC relative à la:
Compatibilité Électromagnétique (Electromagnetic Compatibility)
73/23/EEC Directive Basse Tension (Low Voltage Directive) relative aux: Équipements Électriques conçus pour un usage dans certaines
limites de tension Les normes suivantes ont été considérées pour en déterminer la bonne conformité: EN55022/9.98 Catégorie B EN55024/9.98 EN 50081-1/1994 EN 61000-3-2/3/4/1995 EN 50082-1/1994 EN 60950/1995
L’apposition du marquage garantit la conformité de ce produit aux normes et à la réglementation susmentionnées.
Lieu et date de publication: Amersfoort, 10/01/2007 (dd/mm/yyyy)
Herman Looijen, Responsable Marketing Produit
ITALIANO
101
Conceptronic CH3SNAS
Guida d’installazione rapida
Vi ringraziamo per aver acquistato il Grab’n’GO Media Store di Conceptronic.
La presente Guida d’installazione hardware spiega passo a passo come installare il Conceptronic Grab’n’GO Media Store. In caso di problemi, si consiglia di consultare la pagina web di supporto (collegandovi con
www.conceptronic.net e facendo clic su “Support”), dove troverete la banca dati con le
domande e i quesiti più frequenti, accompagnati dalle relative risposte. In caso di domande e dubbi di altra natura riguardanti il prodotto e che non appariranno nel nostro sito web, potete contattarci via e-mail al seguente indirizzo: [email protected] Per maggiori informazioni sui prodotti di Conceptronic potete consultare la pagina web di Conceptronic: www.conceptronic.net L’installazione del software descritta qui di seguito potrebbe essere leggermente diversa da quella del vostro computer, poiché dipenderà dalla versione di Windows in uso. 1 Contenuto della confezione
La confezione contenente il CH3SNAS di Conceptronic deve essere composta dai seguenti elementi:
• CH3SNAS di Conceptronic • Adattatore di corrente per CH3SNAS (5v, 1.5A & 12v, 1.5A) • Cavo di rete • Guida d’installazione rapida multilingue • CD-ROM con software Nota: questa Guida d’installazione rapida spiega esclusivamente gli aspetti principali
del dispositivo affinché esso possa funzionare nell’ambiente di rete in uso. Per funzioni più dettagliate con maggiori spiegazioni, consultare il Manuale completo, in inglese, contenuto nel CD-ROM.
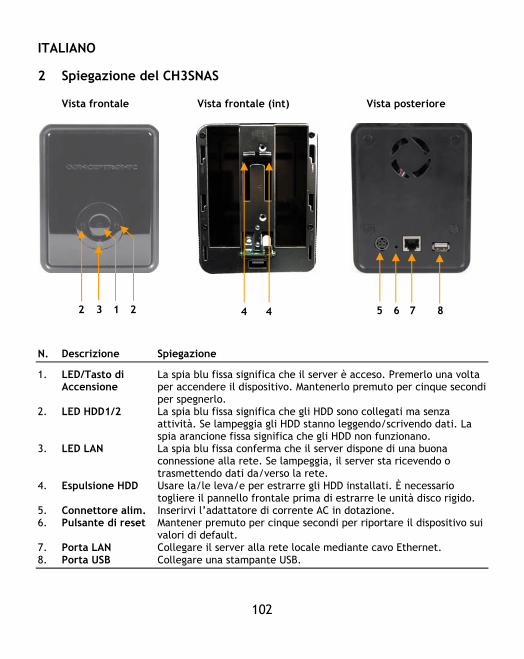
ITALIANO
102
2 Spiegazione del CH3SNAS
Vista frontale Vista frontale (int) Vista posteriore
N. Descrizione Spiegazione
1. LED/Tasto di La spia blu fissa significa che il server è acceso. Premerlo una volta Accensione per accendere il dispositivo. Mantenerlo premuto per cinque secondi
per spegnerlo. 2. LED HDD1/2 La spia blu fissa significa che gli HDD sono collegati ma senza
attività. Se lampeggia gli HDD stanno leggendo/scrivendo dati. La spia arancione fissa significa che gli HDD non funzionano.
3. LED LAN La spia blu fissa conferma che il server dispone di una buona connessione alla rete. Se lampeggia, il server sta ricevendo o trasmettendo dati da/verso la rete.
4. Espulsione HDD Usare la/le leva/e per estrarre gli HDD installati. È necessario togliere il pannello frontale prima di estrarre le unità disco rigido.
5. Connettore alim. Inserirvi l’adattatore di corrente AC in dotazione. 6. Pulsante di reset Mantener premuto per cinque secondi per riportare il dispositivo sui
valori di default. 7. Porta LAN Collegare il server alla rete locale mediante cavo Ethernet. 8. Porta USB Collegare una stampante USB.
1
2 3
2
4 5 6 7 2 1 4 8
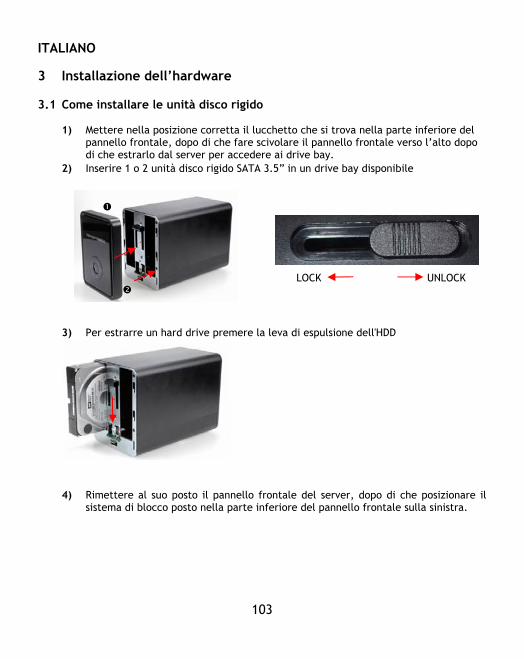
ITALIANO
103
3 Installazione dell’hardware 3.1 Come installare le unità disco rigido
1) Mettere nella posizione corretta il lucchetto che si trova nella parte inferiore del pannello frontale, dopo di che fare scivolare il pannello frontale verso l’alto dopo di che estrarlo dal server per accedere ai drive bay.
2) Inserire 1 o 2 unità disco rigido SATA 3.5” in un drive bay disponibile LOCK UNLOCK 3) Per estrarre un hard drive premere la leva di espulsione dell'HDD
4) Rimettere al suo posto il pannello frontale del server, dopo di che posizionare il
sistema di blocco posto nella parte inferiore del pannello frontale sulla sinistra.
ITALIANO
104
3.2 Connessione dei cavi
1) Inserire l’adattatore di corrente AC al connettore DC posto sulla parte posteriore del server, dopo di che collegarlo a una presa a muro.
2) Inserire un cavo Ethernet alla porta LAN posta sulla parte posteriore del server, e
poi collegarlo alla rete o direttamente a un computer per realizzare la configurazione.
Nota: si consiglia di collegare il CH3SNAS al router con DHCP abilitato per una configurazione più semplice. Se si collega il dispositivo direttamente al computer, o a una rete priva di server DHCP, sarà necessario impostare temporaneamente un indirizzo IP statico per il computer per poter così configurare il CH3SNAS. Vedi pagina 10 del Manuale completo (CD-ROM) per sapere come impostare un indirizzo IP statico.
4 Configurazione del CH3SNAS
Utilità di ricerca facile Easy Search Per poter accedere e gestire facilmente il server, il CD di installazione è dotato della pratica utilità Easy Search, uno strumento grazie al quale è possibile configurare la connessione del server.
4.1 Come usare l’utilità Easy Search 1. Inserire il CD-ROM nell’unità CD-ROM. Dovrebbe apparire direttamente il Menu di
avvio automatico. In caso contrario, aprire “Risorse del computer” e fare doppio clic sull’unità CD-ROM per aprire manualmente il Menu di avvio automatico.
2. Selezionare il server CH3SNAS dal Menu di avvio automatico.
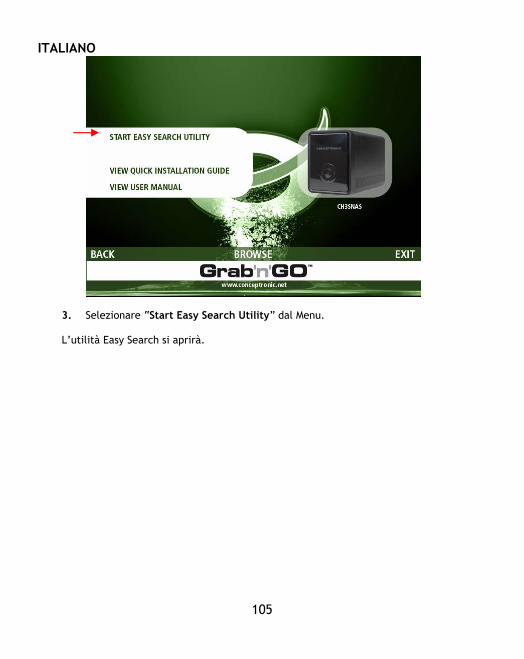
ITALIANO
105
3. Selezionare “Start Easy Search Utility” dal Menu.
L’utilità Easy Search si aprirà.
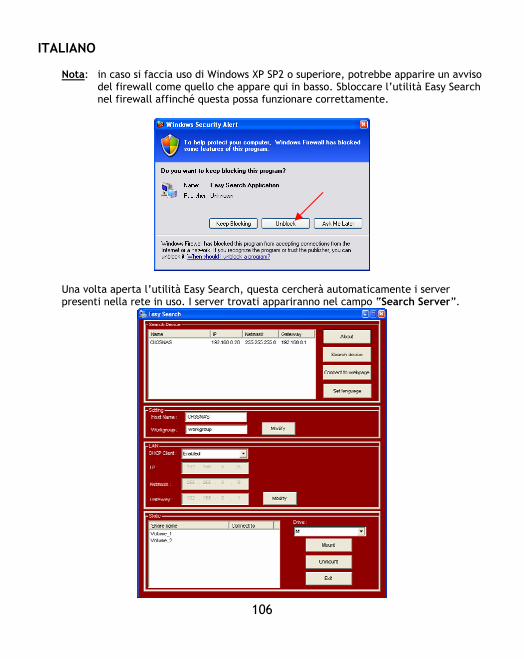
ITALIANO
106
Nota: in caso si faccia uso di Windows XP SP2 o superiore, potrebbe apparire un avviso
del firewall come quello che appare qui in basso. Sbloccare l’utilità Easy Search nel firewall affinché questa possa funzionare correttamente.
Una volta aperta l’utilità Easy Search, questa cercherà automaticamente i server presenti nella rete in uso. I server trovati appariranno nel campo “Search Server”.
ITALIANO
107
Nota: se non viene rilevato nessun server, fare clic sul pulsante “Search Device” per
realizzare di nuovo una ricerca nella rete. Se nemmeno così appare nessun risultato, verificare la connessione del CH3SNAS alla rete, e accertarsi che questo sia acceso.
Una volta rilevato il CH3SNAS, sarà possibile selezionarlo dalla sezione “Search Device”. Apparirà la configurazione rete di base:
Sezione parametri di configurazione: Il campo “Host Name” fa riferimento al nome dell’host che verrà mostrato nell’ambiente di rete. “Workgroup” è il gruppo di lavoro sul quale sta lavorando il dispositivo. È possibile modificare tali parametri per adattarli a quelli della rete, dopo di che premere “Modify” per memorizzarli.
Sezione LAN: La sezione LAN dell’utilità Easy Search mostra la configurazione IP attuale del dispositivo. Nel caso in cui si disponga di un server DHCP attivo nella rete (ad esempio un router), il CH3SNAS riceverà automaticamente un indirizzo IP dal server DHCP. È possibile conservare i parametri di configurazione già introdotti, o modificarli per adattarli a quelli di rete, dopo di che premere “Modify” per memorizzarli. Nota: è possibile cambiare la configurazione che appare nei campi “Settings” e “LAN”
anche attraverso il programma di configurazione web assistita, come descritto nel capitolo 4.4
Sezione Static: Il campo “Static” mostra le risorse attive del CH3SNAS e consente di montarle facilmente sul computer. Nota: è necessario realizzare la configurazione del CH3SNAS prima di montare le
risorse. Procedere al punto 4.3 per poter configurare il CH3SNAS prima di montare le risorse sul computer!
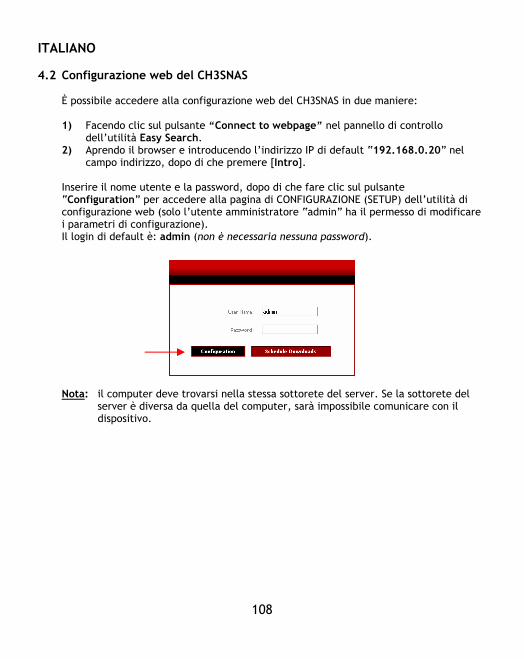
ITALIANO
108
4.2 Configurazione web del CH3SNAS
È possibile accedere alla configurazione web del CH3SNAS in due maniere: 1) Facendo clic sul pulsante “Connect to webpage” nel pannello di controllo
dell’utilità Easy Search. 2) Aprendo il browser e introducendo l’indirizzo IP di default “192.168.0.20” nel
campo indirizzo, dopo di che premere [Intro]. Inserire il nome utente e la password, dopo di che fare clic sul pulsante “Configuration” per accedere alla pagina di CONFIGURAZIONE (SETUP) dell’utilità di configurazione web (solo l’utente amministratore “admin” ha il permesso di modificare i parametri di configurazione). Il login di default è: admin (non è necessaria nessuna password).
Nota: il computer deve trovarsi nella stessa sottorete del server. Se la sottorete del
server è diversa da quella del computer, sarà impossibile comunicare con il dispositivo.
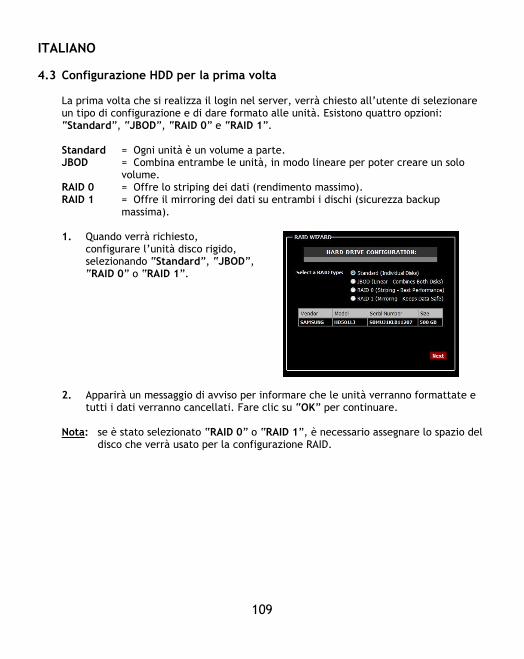
ITALIANO
109
4.3 Configurazione HDD per la prima volta
La prima volta che si realizza il login nel server, verrà chiesto all’utente di selezionare un tipo di configurazione e di dare formato alle unità. Esistono quattro opzioni: “Standard”, “JBOD”, “RAID 0” e “RAID 1”. Standard = Ogni unità è un volume a parte. JBOD = Combina entrambe le unità, in modo lineare per poter creare un solo
volume. RAID 0 = Offre lo striping dei dati (rendimento massimo). RAID 1 = Offre il mirroring dei dati su entrambi i dischi (sicurezza backup
massima). 1. Quando verrà richiesto,
configurare l’unità disco rigido, selezionando “Standard”, “JBOD”, “RAID 0” o “RAID 1”.
2. Apparirà un messaggio di avviso per informare che le unità verranno formattate e
tutti i dati verranno cancellati. Fare clic su “OK” per continuare. Nota: se è stato selezionato “RAID 0” o “RAID 1”, è necessario assegnare lo spazio del
disco che verrà usato per la configurazione RAID.
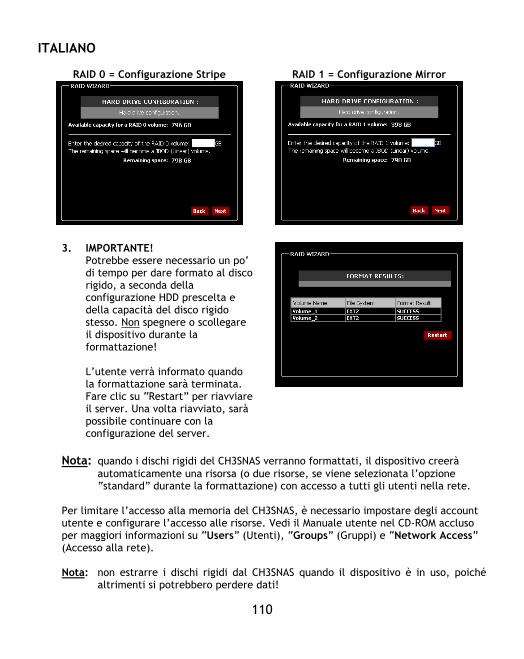
ITALIANO
110
RAID 0 = Configurazione Stripe
RAID 1 = Configurazione Mirror
3. IMPORTANTE! Potrebbe essere necessario un po’ di tempo per dare formato al disco rigido, a seconda della configurazione HDD prescelta e della capacità del disco rigido stesso. Non spegnere o scollegare il dispositivo durante la formattazione! L’utente verrà informato quando la formattazione sarà terminata. Fare clic su “Restart” per riavviare il server. Una volta riavviato, sarà possibile continuare con la configurazione del server.
Nota: quando i dischi rigidi del CH3SNAS verranno formattati, il dispositivo creerà
automaticamente una risorsa (o due risorse, se viene selezionata l’opzione “standard” durante la formattazione) con accesso a tutti gli utenti nella rete.
Per limitare l’accesso alla memoria del CH3SNAS, è necessario impostare degli account utente e configurare l’accesso alle risorse. Vedi il Manuale utente nel CD-ROM accluso per maggiori informazioni su “Users” (Utenti), “Groups” (Gruppi) e “Network Access” (Accesso alla rete).
Nota: non estrarre i dischi rigidi dal CH3SNAS quando il dispositivo è in uso, poiché
altrimenti si potrebbero perdere dati!

ITALIANO
111
4.4 Configurazione assistita
Una volta terminata la configurazione del disco rigido e dopo avere riavviato il CH3SNAS, si accederà al menu principale della configurazione web. Il CH3SNAS è dotato di un programma di configurazione assistita grazie al quale è possibile impostare velocemente alcuni dei parametri principali del dispositivo. 1. Fare clic sul pulsante “Run
Wizard” per aprire l’assistente alla configurazione.
2. Apparirà la videata di benvenuto dove appaiono cinque opzioni. Fare clic su “Next” per continuare.
3. Si consiglia di introdurre
una password admin in questo campo. Introdurre la nuova password e introdurla ancora una volta per confermarla.
4. Una volta terminato, fare clic su “Next”.
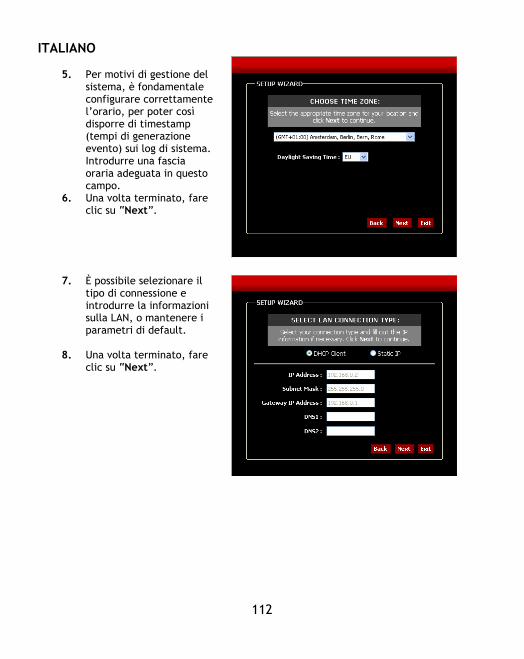
ITALIANO
112
5. Per motivi di gestione del
sistema, è fondamentale configurare correttamente l’orario, per poter così disporre di timestamp (tempi di generazione evento) sui log di sistema. Introdurre una fascia oraria adeguata in questo campo.
6. Una volta terminato, fare clic su “Next”.
7. È possibile selezionare il
tipo di connessione e introdurre la informazioni sulla LAN, o mantenere i parametri di default.
8. Una volta terminato, fare clic su “Next”.
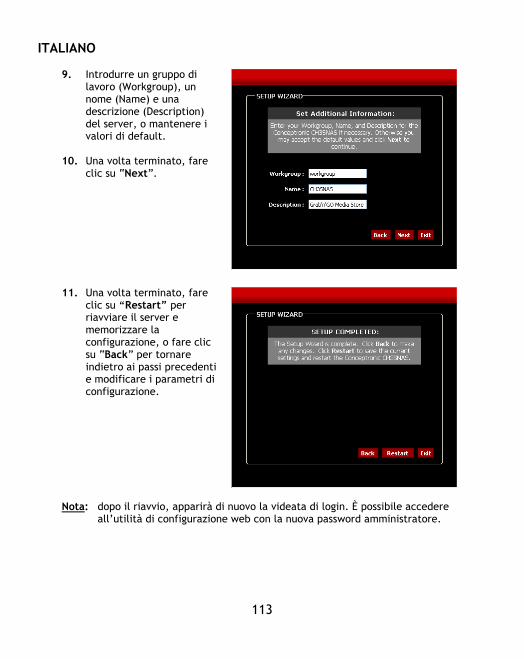
ITALIANO
113
9. Introdurre un gruppo di
lavoro (Workgroup), un nome (Name) e una descrizione (Description) del server, o mantenere i valori di default.
10. Una volta terminato, fare clic su “Next”.
11. Una volta terminato, fare
clic su “Restart” per riavviare il server e memorizzare la configurazione, o fare clic su “Back” per tornare indietro ai passi precedenti e modificare i parametri di configurazione.
Nota: dopo il riavvio, apparirà di nuovo la videata di login. È possibile accedere
all’utilità di configurazione web con la nuova password amministratore.
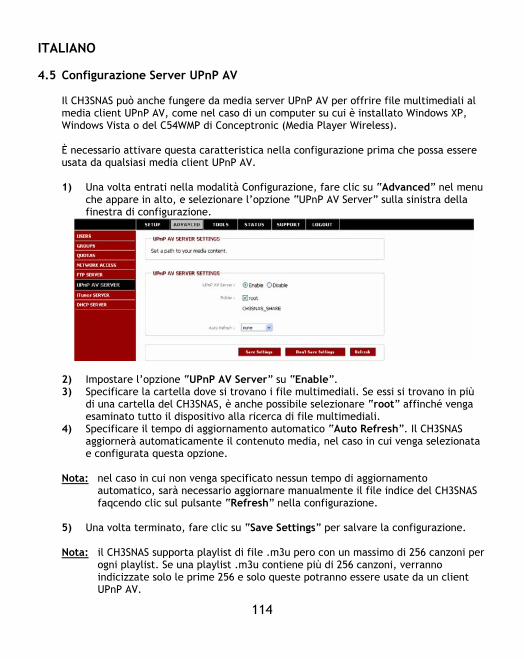
ITALIANO
114
4.5 Configurazione Server UPnP AV
Il CH3SNAS può anche fungere da media server UPnP AV per offrire file multimediali al media client UPnP AV, come nel caso di un computer su cui è installato Windows XP, Windows Vista o del C54WMP di Conceptronic (Media Player Wireless). È necessario attivare questa caratteristica nella configurazione prima che possa essere usata da qualsiasi media client UPnP AV. 1) Una volta entrati nella modalità Configurazione, fare clic su “Advanced” nel menu
che appare in alto, e selezionare l’opzione “UPnP AV Server” sulla sinistra della finestra di configurazione.
2) Impostare l’opzione “UPnP AV Server” su “Enable”. 3) Specificare la cartella dove si trovano i file multimediali. Se essi si trovano in più
di una cartella del CH3SNAS, è anche possibile selezionare “root” affinché venga esaminato tutto il dispositivo alla ricerca di file multimediali.
4) Specificare il tempo di aggiornamento automatico “Auto Refresh”. Il CH3SNAS aggiornerà automaticamente il contenuto media, nel caso in cui venga selezionata e configurata questa opzione.
Nota: nel caso in cui non venga specificato nessun tempo di aggiornamento automatico, sarà necessario aggiornare manualmente il file indice del CH3SNAS faqcendo clic sul pulsante “Refresh” nella configurazione.
5) Una volta terminato, fare clic su “Save Settings” per salvare la configurazione.
Nota: il CH3SNAS supporta playlist di file .m3u pero con un massimo di 256 canzoni per ogni playlist. Se una playlist .m3u contiene più di 256 canzoni, verranno indicizzate solo le prime 256 e solo queste potranno essere usate da un client UPnP AV.

ITALIANO
115
5 Download Scheduler
È possibile usare il CH3SNAS per realizzare download o backup di file da Internet o da un computer della rete in uso. Quando si è in modalità configurazione, fare clic su “LOGOUT” per uscire dall’utilità di configurazione, e realizzare nuovamente il login della pagina di download dell’utilità, facendo clic sul pulsante “Schedule Downloads” nella finestra di dialogo di login. Se non è stato ancora realizzato il login, fare clic sul pulsante “Connect to webpage” nel pannello di controllo di Easy Search o aprire il browser e introdurre l’indirizzo IP di default “192.168.0.20” nel campo indirizzo, dopo di che premere [Intro].
Introdurre il nome utente e la password dopo di che fare clic sul pulsante “Schedule Downloads” per accedere al Download Scheduler del CH3SNAS. Il login di default è: admin (non è necessaria nessuna password). Nota: se l’amministratore ha aggiunto utenti alla configurazione del server, gli utenti
potranno realizzare il login al Download Scheduler introducendo il loro nome utente e la corrispondente password.
Apparirà il Menu principale del Download Scheduler, (Programmazione download).
Scheduling

ITALIANO
116
Selezionare l’opzione “Scheduling” nel menu principale del Download Scheduler. Apparirà la configurazione della programmazione come da immagine:
Per scaricare file attraverso il Download Scheduler, è necessario configurare alcuni parametri: 1) Selezionare il metodo di login (Login Method). Se il download viene realizzato da
un server HTTP o un server FTP anonimo, questo campo non è necessario. Selezionare “Anonymous”. Se invece il download si realizza da un server FTP basato su account, selezionare “Account” e introdurre il nome utente “User Name” e la “Password”.
2) Selezionare un tipo di download. Se si desidera scaricare un solo file, selezionare
“File”. Per il backup di una cartella intera contenuta in rete, selezionare “Folder”.
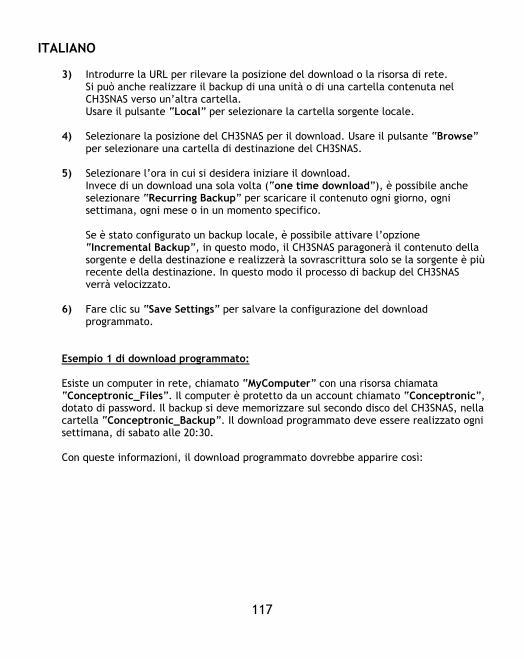
ITALIANO
117
3) Introdurre la URL per rilevare la posizione del download o la risorsa di rete.
Si può anche realizzare il backup di una unità o di una cartella contenuta nel CH3SNAS verso un’altra cartella. Usare il pulsante “Local” per selezionare la cartella sorgente locale.
4) Selezionare la posizione del CH3SNAS per il download. Usare il pulsante “Browse”
per selezionare una cartella di destinazione del CH3SNAS. 5) Selezionare l’ora in cui si desidera iniziare il download.
Invece di un download una sola volta (“one time download”), è possibile anche selezionare “Recurring Backup” per scaricare il contenuto ogni giorno, ogni settimana, ogni mese o in un momento specifico. Se è stato configurato un backup locale, è possibile attivare l’opzione “Incremental Backup”, in questo modo, il CH3SNAS paragonerà il contenuto della sorgente e della destinazione e realizzerà la sovrascrittura solo se la sorgente è più recente della destinazione. In questo modo il processo di backup del CH3SNAS verrà velocizzato.
6) Fare clic su “Save Settings” per salvare la configurazione del download
programmato. Esempio 1 di download programmato: Esiste un computer in rete, chiamato “MyComputer” con una risorsa chiamata “Conceptronic_Files”. Il computer è protetto da un account chiamato “Conceptronic”, dotato di password. Il backup si deve memorizzare sul secondo disco del CH3SNAS, nella cartella “Conceptronic_Backup”. Il download programmato deve essere realizzato ogni settimana, di sabato alle 20:30. Con queste informazioni, il download programmato dovrebbe apparire così:
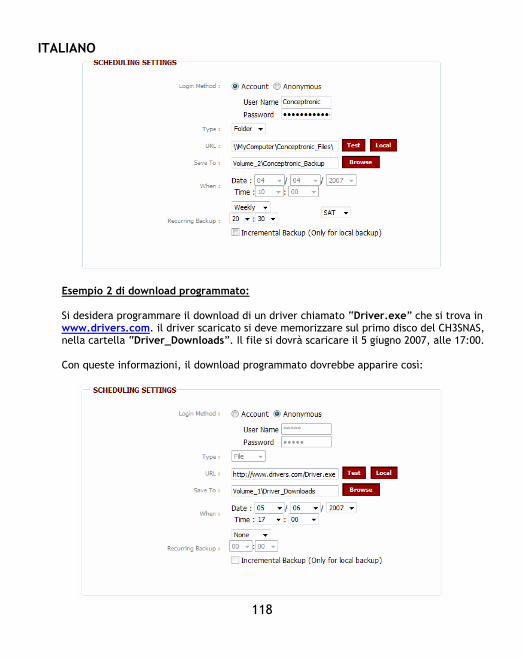
ITALIANO
118
Esempio 2 di download programmato: Si desidera programmare il download di un driver chiamato “Driver.exe” che si trova in www.drivers.com. il driver scaricato si deve memorizzare sul primo disco del CH3SNAS, nella cartella “Driver_Downloads”. Il file si dovrà scaricare il 5 giugno 2007, alle 17:00. Con queste informazioni, il download programmato dovrebbe apparire così:
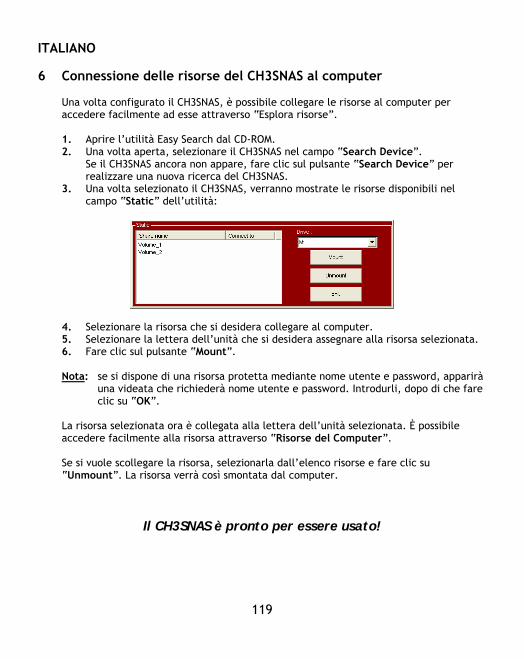
ITALIANO
119
6 Connessione delle risorse del CH3SNAS al computer
Una volta configurato il CH3SNAS, è possibile collegare le risorse al computer per accedere facilmente ad esse attraverso “Esplora risorse”. 1. Aprire l’utilità Easy Search dal CD-ROM. 2. Una volta aperta, selezionare il CH3SNAS nel campo “Search Device”.
Se il CH3SNAS ancora non appare, fare clic sul pulsante “Search Device” per realizzare una nuova ricerca del CH3SNAS.
3. Una volta selezionato il CH3SNAS, verranno mostrate le risorse disponibili nel campo “Static” dell’utilità:
4. Selezionare la risorsa che si desidera collegare al computer. 5. Selezionare la lettera dell’unità che si desidera assegnare alla risorsa selezionata. 6. Fare clic sul pulsante “Mount”. Nota: se si dispone di una risorsa protetta mediante nome utente e password, apparirà
una videata che richiederà nome utente e password. Introdurli, dopo di che fare clic su “OK”.
La risorsa selezionata ora è collegata alla lettera dell’unità selezionata. È possibile accedere facilmente alla risorsa attraverso “Risorse del Computer”. Se si vuole scollegare la risorsa, selezionarla dall’elenco risorse e fare clic su “Unmount”. La risorsa verrà così smontata dal computer.
Il CH3SNAS è pronto per essere usato!
Dichiarazione di conformità CE
120
In fabbricante 2L International BV Indirizzo Databankweg 7 3821 AL Amersfoort, Paesi Bassi Dichiara qui di seguito che il prodotto Tipo NETWORK HARDDISK 3.5” Prodotto CH3SNAS Nome marca Conceptronic Risulta in conformità a quanto previsto dalle seguenti direttive comunitarie:
2004/108/CE Direttiva CEM:
Compatibilità elettromagnetica
73/23/CE Direttiva Bassa Tensione: Materiale elettrico destinato ad essere adoperato entro taluni limiti di tensione
Sono stati applicati i seguenti standard per assicurarne la conformità: EN55022/9.98 Class B EN55024/9.98 EN 50081-1/1994 EN 61000-3-2/3/4/1995 EN 50082-1/1994 EN 60950/1995
Il simbolo CE conferma che questo prodotto è conforme ai suddetti standard e regolamentazioni.
Luogo e data di rilascio: Amersfoort, 10/01/2007 (dd/mm/yyyy)
Herman Looijen, Product Marketing Manager
PORTUGUÊS
121
Conceptronic CH3SNAS
Manual de Instalação Rápida
Parabéns pela compra do Conceptronic Grab’n’GO Media Store.
O Manual de Instalação de Hardware incluído fornece-lhe uma explicação passo a passo sobre como instalar o Conceptronic Grab’n’GO Media Store. Quando tiver algum problema, aconselhamo-lo a consultar a nossa página de suporte (vá a www.conceptronic.net) e clicar em ‘Support’ (Suporte). Aí vai encontrar a Base de Dados das Perguntas Mais Frequentes. Quando tiver outras questões sobre o seu produto e não encontrar resposta para elas na nossa página, então contacte-nos por e-mail: [email protected] Para mais informações sobre os produtos da Conceptronic, visite a página web da Conceptronic em: www.conceptronic.net A instalação do software tal como se descreve a seguir pode ser ligeiramente diferente da instalação no seu computador. Depende da versão do Windows que estiver a usar. 1 Conteúdo da Embalagem
Existem os seguintes elementos na embalagem do Conceptronic CH3SNAS:
• Conceptronic CH3SNAS • Adaptador de corrente para o CH3SNAS (5v, 1,5A e 12v, 1,5A) • Cabo de rede • Guia de Instalação Rápida Multilingue • CD-ROM com software
Nota: Este Manual de Instalação Rápida só explica a parte básica do dispositivo de
modo a pô-lo a funcionar na sua rede. Para mais funções e explicações detalhadas, consulte o Manual Completo em inglês incluído no CD-ROM.

PORTUGUÊS
122
2 Explicação do CH3SNAS
Parte da frente Parte da frente (int) Parte de trás
Nº Descrição Explicação
1. Luz Power A luz azul constante indica que o servidor está ligado. / Botão de Carregue uma vez para ligar. Pressione e segure o botão Alimentação durante 5 segundos para desligar. 2. LED HDD1/2 A luz azul constante indica que a/s unidade/s de disco rígido estão
ligadas mas inactivas. Quando pisca, significa que a/s unidade/s de disco rígido estão a ler/gravar dados. A luz laranja constante indica que a/s unidade/s de disco rígido falharam.
3. LED LAN A luz azul constante confirma que o servidor tem uma boa ligação à sua rede. Quando pisca, significa que o servidor de armazenamento está a receber/transmitir dados de/para a rede.
4. Alavanca de Use a/s alavanca/s para ejectar as unidades de disco rígido ejecção HDD instaladas. O painel frontal deve ser retirado antes de ejectar as
unidades de disco rígido. 5. Ficha de alimentação Para ligar o adaptador de corrente AC fornecido. 6. Botão de reiniciar Pressione e segure o botão durante 5 segundos para restaurar as
predefinições. 7. Porta LAN Ligue o servidor à rede local através do cabo Ethernet. 8. Porta USB Para ligar uma impressora USB.
1
2 3
2
4 5 6 7 2 1 4 8
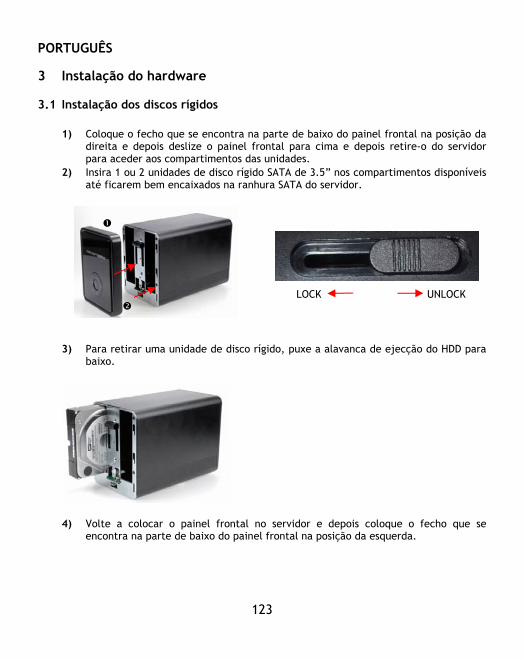
PORTUGUÊS
123
3 Instalação do hardware 3.1 Instalação dos discos rígidos
1) Coloque o fecho que se encontra na parte de baixo do painel frontal na posição da direita e depois deslize o painel frontal para cima e depois retire-o do servidor para aceder aos compartimentos das unidades.
2) Insira 1 ou 2 unidades de disco rígido SATA de 3.5” nos compartimentos disponíveis até ficarem bem encaixados na ranhura SATA do servidor.
LOCK UNLOCK
3) Para retirar uma unidade de disco rígido, puxe a alavanca de ejecção do HDD para
baixo.
4) Volte a colocar o painel frontal no servidor e depois coloque o fecho que se
encontra na parte de baixo do painel frontal na posição da esquerda.
PORTUGUÊS
124
3.2 Ligação dos cabos
1) Ligue o adaptador de corrente AC à ficha de alimentação DC na parte de trás do servidor, e depois ligue-o à sua fonte de alimentação local.
2) Ligue o cabo Ethernet à porta LAN localizada na parte de trás do servidor e depois
ligue-o à rede ou directamente a um computador para fazer a configuração.
Nota: Aconselhamos ligar o CH3SNAS ao seu router DHCP activo para uma configuração
mais fácil. Se ligar o dispositivo directamente ao seu computador ou a uma rede sem servidor DHCP, precisa de configurar um endereço IP estático temporário para o seu computador de modo a configurar o CH3SNAS. Consulte a página 10 do Manual Completo (no CD-ROM) para saber como configurar um endereço IP estático.
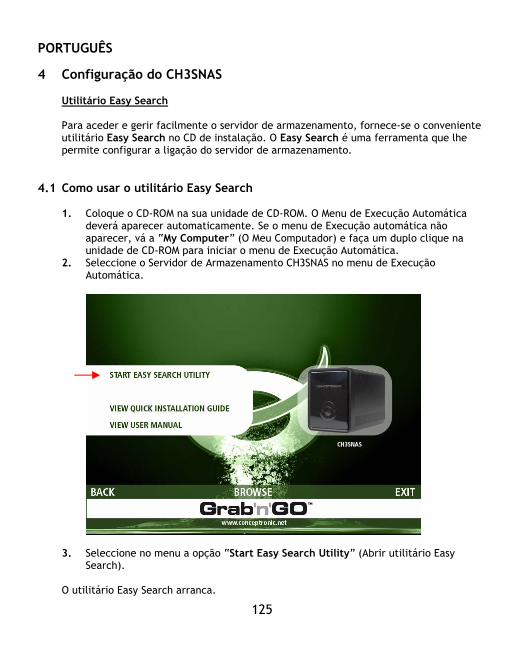
PORTUGUÊS
125
4 Configuração do CH3SNAS Utilitário Easy Search Para aceder e gerir facilmente o servidor de armazenamento, fornece-se o conveniente utilitário Easy Search no CD de instalação. O Easy Search é uma ferramenta que lhe permite configurar a ligação do servidor de armazenamento.
4.1 Como usar o utilitário Easy Search 1. Coloque o CD-ROM na sua unidade de CD-ROM. O Menu de Execução Automática
deverá aparecer automaticamente. Se o menu de Execução automática não aparecer, vá a “My Computer” (O Meu Computador) e faça um duplo clique na unidade de CD-ROM para iniciar o menu de Execução Automática.
2. Seleccione o Servidor de Armazenamento CH3SNAS no menu de Execução Automática.
3. Seleccione no menu a opção “Start Easy Search Utility” (Abrir utilitário Easy Search).
O utilitário Easy Search arranca.
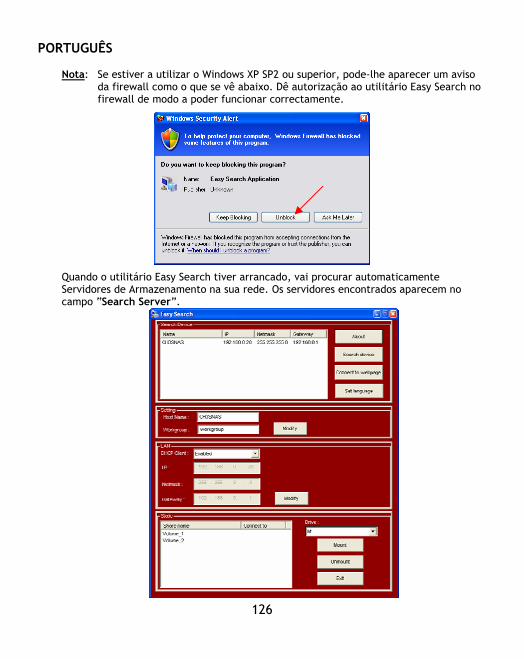
PORTUGUÊS
126
Nota: Se estiver a utilizar o Windows XP SP2 ou superior, pode-lhe aparecer um aviso
da firewall como o que se vê abaixo. Dê autorização ao utilitário Easy Search no firewall de modo a poder funcionar correctamente.
Quando o utilitário Easy Search tiver arrancado, vai procurar automaticamente Servidores de Armazenamento na sua rede. Os servidores encontrados aparecem no campo “Search Server”.
PORTUGUÊS
127
Nota: Se não forem detectados servidores, clique no botão “Search Device” (Procurar
dispositivo) para voltar a pesquisar a sua rede. Se mesmo assim não houver resultados, verifique a ligação do seu CH3SNAS na rede e se o dispositivo está ligado.
Quando o CH3SNAS for detectado, pode seleccioná-lo na secção “Search Device”. A configuração de rede básica aparece: Secção de configurações: O “Host Name” é o nome do dispositivo que vai aparecer no seu ambiente de rede. O “Workgroup” é o grupo de trabalho a que o dispositivo pertence. Pode alterar estas configurações para condizerem com as suas configurações de rede e carregue em “Modify” (Alterar) para gravá-las. Secção LAN: A secção LAN do utilitário Easy Search mostra a actual configuração IP do dispositivo. Se tiver um servidor DHCP activo na sua rede (por ex., um router), o CH3SNAS vai receber automaticamente um endereço IP do servidor DHCP. Pode manter as configurações actuais ou alterá-las para condizerem com as suas configurações de rede e carregue em “Modify” (Alterar) para gravá-las. Nota: Também pode alterar a configuração mostrada nos campos “Settings”
(Configurações) e “LAN” no assistente de configuração Web que se descreve no capítulo 4.4.
Secção Static: O campo “Static” mostra as partilhas activas do CH3SNAS e permite-lhe montá-las facilmente no seu computador. Nota: É necessário fazer a configuração do CH3SNAS antes de poder montar as suas
partilhas. Avance até ao capítulo 4.3 para mais informações sobre a configuração do CH3SNAS antes de montar as partilhas no seu computador!
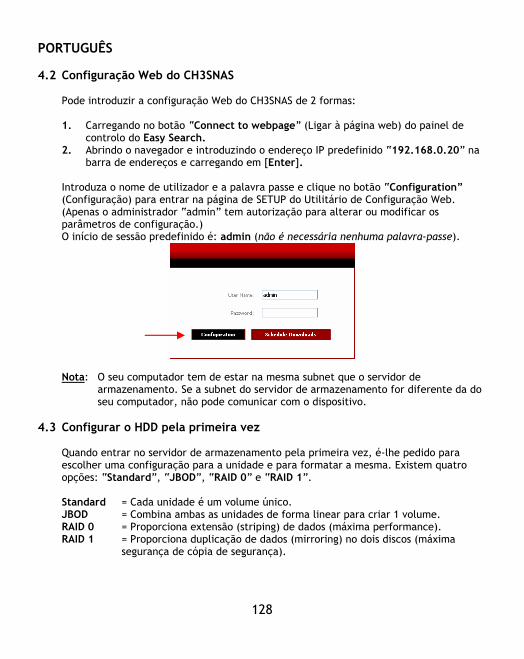
PORTUGUÊS
128
4.2 Configuração Web do CH3SNAS
Pode introduzir a configuração Web do CH3SNAS de 2 formas: 1. Carregando no botão “Connect to webpage” (Ligar à página web) do painel de
controlo do Easy Search. 2. Abrindo o navegador e introduzindo o endereço IP predefinido “192.168.0.20” na
barra de endereços e carregando em [Enter]. Introduza o nome de utilizador e a palavra passe e clique no botão “Configuration” (Configuração) para entrar na página de SETUP do Utilitário de Configuração Web. (Apenas o administrador “admin” tem autorização para alterar ou modificar os parâmetros de configuração.) O início de sessão predefinido é: admin (não é necessária nenhuma palavra-passe).
Nota: O seu computador tem de estar na mesma subnet que o servidor de armazenamento. Se a subnet do servidor de armazenamento for diferente da do seu computador, não pode comunicar com o dispositivo.
4.3 Configurar o HDD pela primeira vez
Quando entrar no servidor de armazenamento pela primeira vez, é-lhe pedido para escolher uma configuração para a unidade e para formatar a mesma. Existem quatro opções: “Standard”, “JBOD”, “RAID 0” e “RAID 1”. Standard = Cada unidade é um volume único. JBOD = Combina ambas as unidades de forma linear para criar 1 volume. RAID 0 = Proporciona extensão (striping) de dados (máxima performance). RAID 1 = Proporciona duplicação de dados (mirroring) no dois discos (máxima
segurança de cópia de segurança).
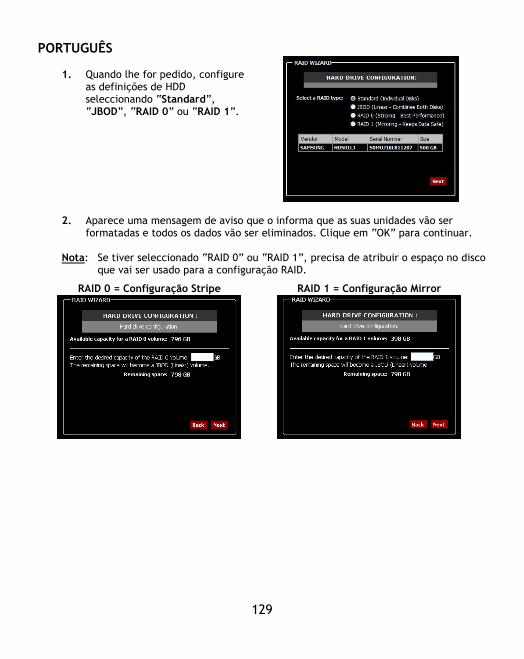
PORTUGUÊS
129
1. Quando lhe for pedido, configure
as definições de HDD seleccionando “Standard”, “JBOD”, “RAID 0” ou “RAID 1”.
2. Aparece uma mensagem de aviso que o informa que as suas unidades vão ser formatadas e todos os dados vão ser eliminados. Clique em “OK” para continuar.
Nota: Se tiver seleccionado “RAID 0” ou “RAID 1”, precisa de atribuir o espaço no disco
que vai ser usado para a configuração RAID.
RAID 0 = Configuração Stripe
RAID 1 = Configuração Mirror
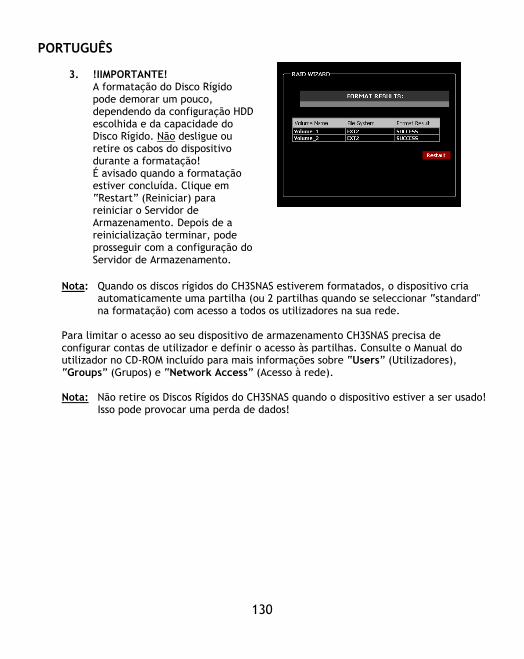
PORTUGUÊS
130
3. !IIMPORTANTE! A formatação do Disco Rígido pode demorar um pouco, dependendo da configuração HDD escolhida e da capacidade do Disco Rígido. Não desligue ou retire os cabos do dispositivo durante a formatação! É avisado quando a formatação estiver concluída. Clique em “Restart” (Reiniciar) para reiniciar o Servidor de Armazenamento. Depois de a reinicialização terminar, pode prosseguir com a configuração do Servidor de Armazenamento.
Nota: Quando os discos rígidos do CH3SNAS estiverem formatados, o dispositivo cria
automaticamente uma partilha (ou 2 partilhas quando se seleccionar “standard" na formatação) com acesso a todos os utilizadores na sua rede.
Para limitar o acesso ao seu dispositivo de armazenamento CH3SNAS precisa de configurar contas de utilizador e definir o acesso às partilhas. Consulte o Manual do utilizador no CD-ROM incluído para mais informações sobre “Users” (Utilizadores), “Groups” (Grupos) e “Network Access” (Acesso à rede).
Nota: Não retire os Discos Rígidos do CH3SNAS quando o dispositivo estiver a ser usado!
Isso pode provocar uma perda de dados!
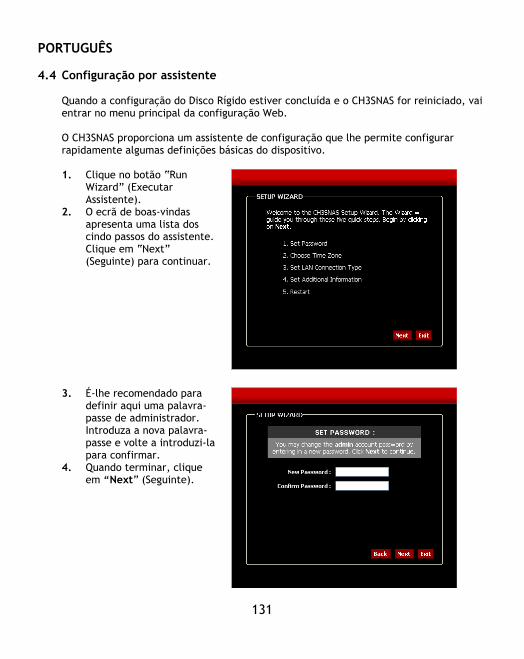
PORTUGUÊS
131
4.4 Configuração por assistente
Quando a configuração do Disco Rígido estiver concluída e o CH3SNAS for reiniciado, vai entrar no menu principal da configuração Web. O CH3SNAS proporciona um assistente de configuração que lhe permite configurar rapidamente algumas definições básicas do dispositivo. 1. Clique no botão “Run
Wizard” (Executar Assistente).
2. O ecrã de boas-vindas apresenta uma lista dos cindo passos do assistente. Clique em “Next” (Seguinte) para continuar.
3. É-lhe recomendado para definir aqui uma palavra-passe de administrador. Introduza a nova palavra-passe e volte a introduzi-la para confirmar.
4. Quando terminar, clique em “Next” (Seguinte).
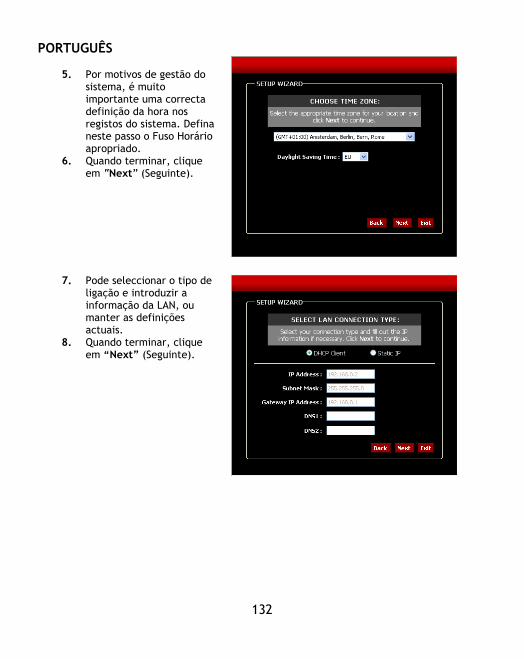
PORTUGUÊS
132
5. Por motivos de gestão do
sistema, é muito importante uma correcta definição da hora nos registos do sistema. Defina neste passo o Fuso Horário apropriado.
6. Quando terminar, clique em “Next” (Seguinte).
7. Pode seleccionar o tipo de ligação e introduzir a informação da LAN, ou manter as definições actuais.
8. Quando terminar, clique em “Next” (Seguinte).
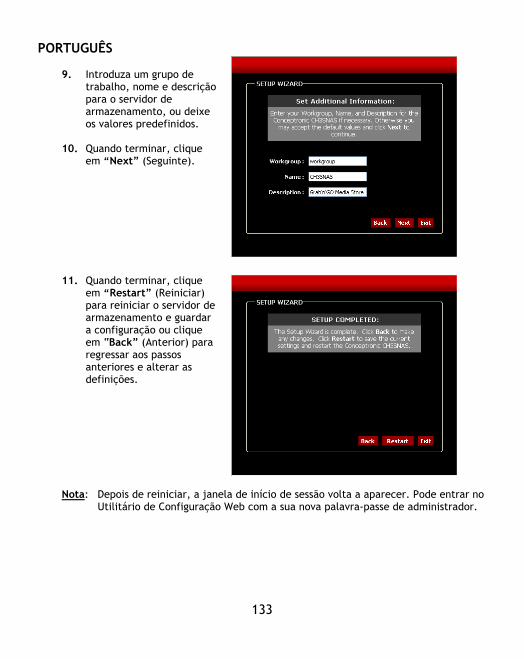
PORTUGUÊS
133
9. Introduza um grupo de
trabalho, nome e descrição para o servidor de armazenamento, ou deixe os valores predefinidos.
10. Quando terminar, clique em “Next” (Seguinte).
11. Quando terminar, clique em “Restart” (Reiniciar) para reiniciar o servidor de armazenamento e guardar a configuração ou clique em “Back” (Anterior) para regressar aos passos anteriores e alterar as definições.
Nota: Depois de reiniciar, a janela de início de sessão volta a aparecer. Pode entrar no Utilitário de Configuração Web com a sua nova palavra-passe de administrador.
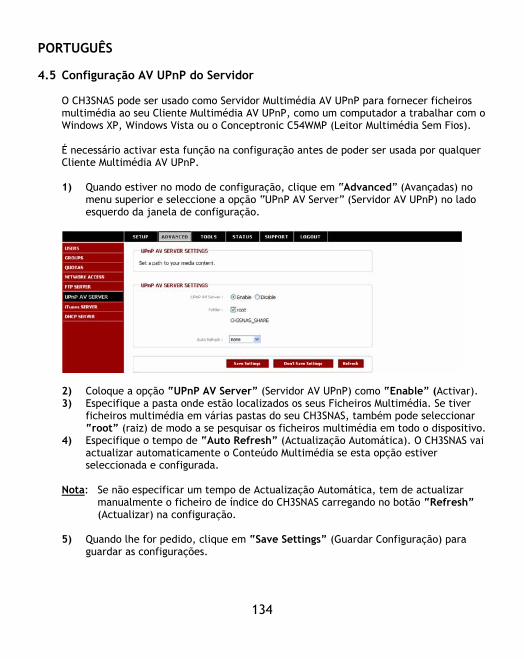
PORTUGUÊS
134
4.5 Configuração AV UPnP do Servidor
O CH3SNAS pode ser usado como Servidor Multimédia AV UPnP para fornecer ficheiros multimédia ao seu Cliente Multimédia AV UPnP, como um computador a trabalhar com o Windows XP, Windows Vista ou o Conceptronic C54WMP (Leitor Multimédia Sem Fios). É necessário activar esta função na configuração antes de poder ser usada por qualquer Cliente Multimédia AV UPnP. 1) Quando estiver no modo de configuração, clique em “Advanced” (Avançadas) no
menu superior e seleccione a opção “UPnP AV Server” (Servidor AV UPnP) no lado esquerdo da janela de configuração.
2) Coloque a opção “UPnP AV Server” (Servidor AV UPnP) como “Enable” (Activar). 3) Especifique a pasta onde estão localizados os seus Ficheiros Multimédia. Se tiver
ficheiros multimédia em várias pastas do seu CH3SNAS, também pode seleccionar “root” (raiz) de modo a se pesquisar os ficheiros multimédia em todo o dispositivo.
4) Especifique o tempo de “Auto Refresh” (Actualização Automática). O CH3SNAS vai actualizar automaticamente o Conteúdo Multimédia se esta opção estiver seleccionada e configurada.
Nota: Se não especificar um tempo de Actualização Automática, tem de actualizar manualmente o ficheiro de índice do CH3SNAS carregando no botão “Refresh” (Actualizar) na configuração.
5) Quando lhe for pedido, clique em “Save Settings” (Guardar Configuração) para guardar as configurações.
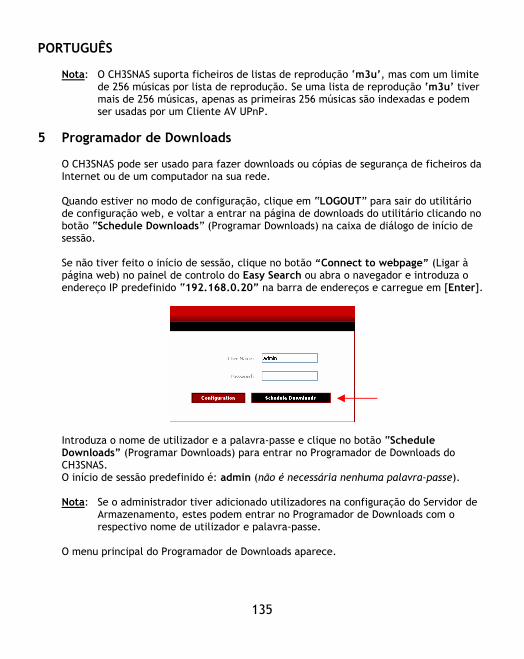
PORTUGUÊS
135
Nota: O CH3SNAS suporta ficheiros de listas de reprodução ‘m3u’, mas com um limite
de 256 músicas por lista de reprodução. Se uma lista de reprodução ‘m3u’ tiver mais de 256 músicas, apenas as primeiras 256 músicas são indexadas e podem ser usadas por um Cliente AV UPnP.
5 Programador de Downloads
O CH3SNAS pode ser usado para fazer downloads ou cópias de segurança de ficheiros da Internet ou de um computador na sua rede. Quando estiver no modo de configuração, clique em “LOGOUT” para sair do utilitário de configuração web, e voltar a entrar na página de downloads do utilitário clicando no botão “Schedule Downloads” (Programar Downloads) na caixa de diálogo de início de sessão. Se não tiver feito o início de sessão, clique no botão “Connect to webpage” (Ligar à página web) no painel de controlo do Easy Search ou abra o navegador e introduza o endereço IP predefinido “192.168.0.20” na barra de endereços e carregue em [Enter].
Introduza o nome de utilizador e a palavra-passe e clique no botão “Schedule Downloads” (Programar Downloads) para entrar no Programador de Downloads do CH3SNAS. O início de sessão predefinido é: admin (não é necessária nenhuma palavra-passe). Nota: Se o administrador tiver adicionado utilizadores na configuração do Servidor de
Armazenamento, estes podem entrar no Programador de Downloads com o respectivo nome de utilizador e palavra-passe.
O menu principal do Programador de Downloads aparece.

PORTUGUÊS
136
Seleccione a opção “Scheduling” (Programação) no menu principal do Programador de Downloads. Vai ver a configuração da Programação como se mostra a seguir:
Para fazer o download através do Programador de Downloads, é necessário configurar alguns parâmetros:
Programação
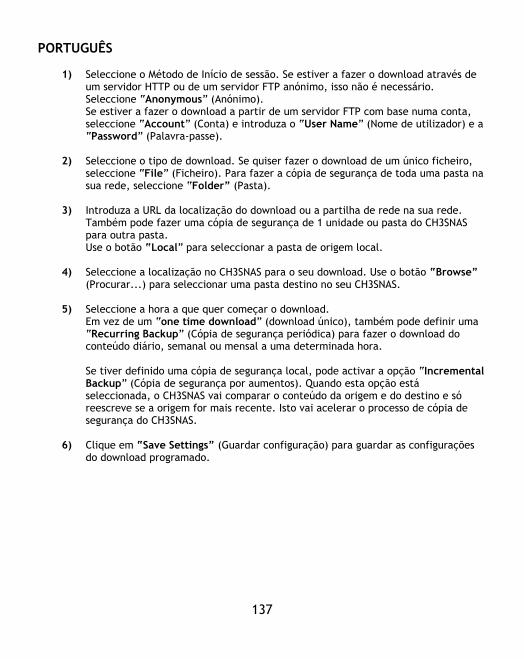
PORTUGUÊS
137
1) Seleccione o Método de Início de sessão. Se estiver a fazer o download através de
um servidor HTTP ou de um servidor FTP anónimo, isso não é necessário. Seleccione “Anonymous” (Anónimo). Se estiver a fazer o download a partir de um servidor FTP com base numa conta, seleccione “Account” (Conta) e introduza o “User Name” (Nome de utilizador) e a “Password” (Palavra-passe).
2) Seleccione o tipo de download. Se quiser fazer o download de um único ficheiro,
seleccione “File” (Ficheiro). Para fazer a cópia de segurança de toda uma pasta na sua rede, seleccione “Folder” (Pasta).
3) Introduza a URL da localização do download ou a partilha de rede na sua rede.
Também pode fazer uma cópia de segurança de 1 unidade ou pasta do CH3SNAS para outra pasta. Use o botão “Local” para seleccionar a pasta de origem local.
4) Seleccione a localização no CH3SNAS para o seu download. Use o botão “Browse”
(Procurar...) para seleccionar uma pasta destino no seu CH3SNAS. 5) Seleccione a hora a que quer começar o download.
Em vez de um “one time download” (download único), também pode definir uma “Recurring Backup” (Cópia de segurança periódica) para fazer o download do conteúdo diário, semanal ou mensal a uma determinada hora. Se tiver definido uma cópia de segurança local, pode activar a opção “Incremental Backup” (Cópia de segurança por aumentos). Quando esta opção está seleccionada, o CH3SNAS vai comparar o conteúdo da origem e do destino e só reescreve se a origem for mais recente. Isto vai acelerar o processo de cópia de segurança do CH3SNAS.
6) Clique em “Save Settings” (Guardar configuração) para guardar as configurações
do download programado.
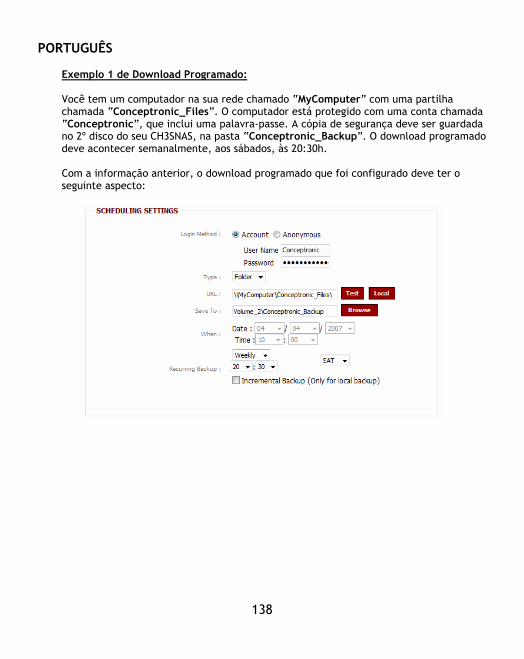
PORTUGUÊS
138
Exemplo 1 de Download Programado: Você tem um computador na sua rede chamado “MyComputer” com uma partilha chamada “Conceptronic_Files”. O computador está protegido com uma conta chamada “Conceptronic”, que inclui uma palavra-passe. A cópia de segurança deve ser guardada no 2º disco do seu CH3SNAS, na pasta “Conceptronic_Backup”. O download programado deve acontecer semanalmente, aos sábados, às 20:30h. Com a informação anterior, o download programado que foi configurado deve ter o seguinte aspecto:
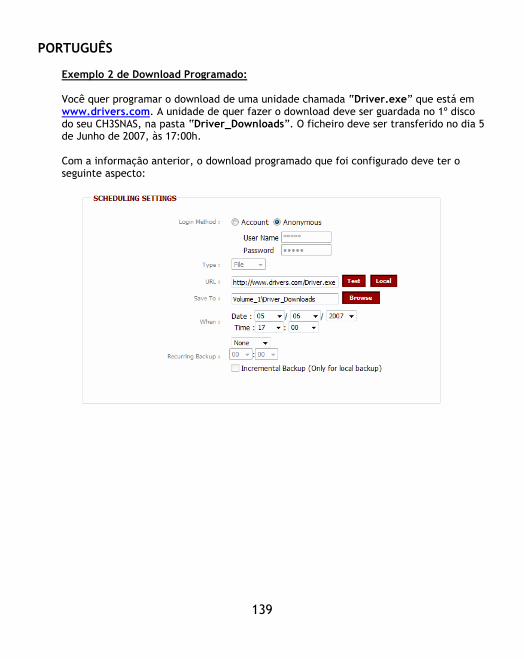
PORTUGUÊS
139
Exemplo 2 de Download Programado: Você quer programar o download de uma unidade chamada “Driver.exe” que está em www.drivers.com. A unidade de quer fazer o download deve ser guardada no 1º disco do seu CH3SNAS, na pasta “Driver_Downloads”. O ficheiro deve ser transferido no dia 5 de Junho de 2007, às 17:00h. Com a informação anterior, o download programado que foi configurado deve ter o seguinte aspecto:

PORTUGUÊS
140
6 Ligar as partilhas do CH3SNAS ao seu computador
Quando tiver configurado o CH3SNAS, pode ligar as partilhas ao seu computador para ter um acesso mais fácil através do explorador. 1. Execute o Utilitário Easy Search no CD-ROM. 2. Quando o utilitário tiver arrancado, seleccione o CH3SNAS no campo “Search
Device” (Procurar Dispositivo). Se o CH3SNAS ainda não aparecer, clique no botão “Search Device” (Procurar Dispositivo) para voltar a procurar o CH3SNAS.
3. Quando o CH3SNAS estiver seleccionado, as partilhas disponíveis aparecem na secção “Static” do utilitário:
4. Seleccione a partilha que quer ligar ao seu computador. 5. Seleccione a letra de unidade que quer atribuir à partilha seleccionada. 6. Clique no botão “Mount” (Montar). Nota: Se tiver uma partilha que esteja protegida por nome de utilizador e palavra-
passe, vai ver uma janela que lhe pede estes dados. Introduza o Nome de utilizador e a Palavra-passe e clique em “OK”.
A partilha seleccionada vai agora ser ligada à letra de unidade seleccionada. Agora pode aceder facilmente à partilha através do Explorador ou de “My Computer” (O Meu Computador). Se quiser desligar a sua partilha, seleccione-a na lista de partilhas e clique em “Unmount” (Desmontar). A partilha vai ser desligada do seu computador.
O seu CH3SNAS já está pronto a usar!
Declaração de Conformidade CE
141
O fabricante 2L International BV Morada Databankweg 7 3821 AL Amersfoort, Países Baixos Declara que o produto Tipo NETWORK HARDDISK 3.5” Produto CH3SNAS Nome de marca Conceptronic Cumpre as seguintes directivas:
2004/108/EEC Directiva CEM:
Compatibilidade Electromagnética
73/23/EEC Directiva de Baixa Tensão: Equipamento eléctrico desenhado para ser usado dentro de determinados limites de tensão
Os seguintes standards foram consultados para avaliar a conformidade: EN55022/9.98 Classe B EN55024/9.98 EN 50081-1/1994 EN 61000-3-2/3/4/1995 EN 50082-1/1994 EN 60950/1995
O símbolo confirma que este produto está conforme os padrões e regulamentações acima referidos.
Local e data de emissão: Amersfoort, 10/01/2007 (dd/mm/yyyy)
Herman Looijen, Gestor de Marketing de Produto
MAGYAR
142
Conceptronic CH3SNAS
Gyorstelepítési útmutató
Köszönjük, hogy a Conceptronic Grab’n’GO Media Store-t választotta.
A mellékelt hardvertelepítési útmutató lépésről-lépésre elmagyarázza, miként kell a Conceptronic Grab’n’GO Media Store-t telepítenie. Ha problémával szembesülne, keresse fel tanácsadó szolgálatunk webhelyét (menjen a www.conceptronic.net webhelyre, majd kattintson a „Support”-ra). Ott pedig keresse a gyakran ismételt kérdések (GYIK) adatbázisát. Ha a termékkel kapcsolatban további kérdése volna és arra nézve választ webhelyünkön nem talál, akkor küldjön e-mailt a következő címre: [email protected]. A Conceptronic termékekkel kapcsolatos további tájékozódás végett keresse fel a Conceptronic webhelyét: www.conceptronic.net. Az alább ismertetett szoftvertelepítés akár kicsit el is térhet a számítógépen alkalmazott telepítéstől. Mindez az éppen használt Windows-verziótól függ. 1 A csomag tartalma
A CH3SNAS csomag az alábbiakat tartalmazza:
• Conceptronic CH3SNAS • Hálózati adapter a CH3SNAS-hez (5 V, 1,5 A és 12 V, 1,5 A) • Hálózati kábel • Többnyelvű gyorstelepítési útmutató • A programot tartalmazó CD-ROM Megjegyzés: Ez a gyorstelepítési útmutató az eszköznek kizárólag olyan alapelemeit
magyarázza el, amelyek arra szolgálnak, hogy a szóban forgó eszköz az adott hálózati környezetben működjön. A részletesebb funkciókkal és a részletesebb magyarázattal kapcsolatban lásd a teljes angol nyelvű kézikönyvet a mellékelt CD-ROM-on.
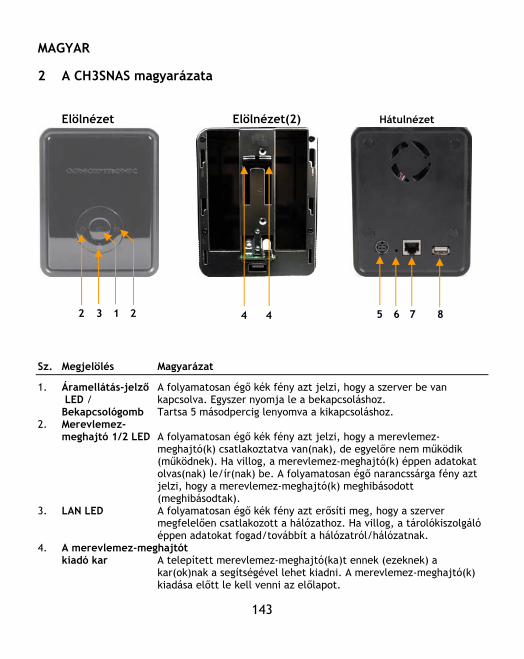
MAGYAR
143
2 A CH3SNAS magyarázata
Elölnézet Elölnézet(2) Hátulnézet
Sz. Megjelölés Magyarázat
1. Áramellátás-jelző A folyamatosan égő kék fény azt jelzi, hogy a szerver be van LED / kapcsolva. Egyszer nyomja le a bekapcsoláshoz. Bekapcsológomb Tartsa 5 másodpercig lenyomva a kikapcsoláshoz. 2. Merevlemez- meghajtó 1/2 LED A folyamatosan égő kék fény azt jelzi, hogy a merevlemez-
meghajtó(k) csatlakoztatva van(nak), de egyelőre nem működik (működnek). Ha villog, a merevlemez-meghajtó(k) éppen adatokat olvas(nak) le/ír(nak) be. A folyamatosan égő narancssárga fény azt jelzi, hogy a merevlemez-meghajtó(k) meghibásodott (meghibásodtak).
3. LAN LED A folyamatosan égő kék fény azt erősíti meg, hogy a szerver megfelelően csatlakozott a hálózathoz. Ha villog, a tárolókiszolgáló éppen adatokat fogad/továbbít a hálózatról/hálózatnak.
4. A merevlemez-meghajtót kiadó kar A telepített merevlemez-meghajtó(ka)t ennek (ezeknek) a
kar(ok)nak a segítségével lehet kiadni. A merevlemez-meghajtó(k) kiadása előtt le kell venni az előlapot.
1
2 3
2
4 5 6 7 2 1 4 8
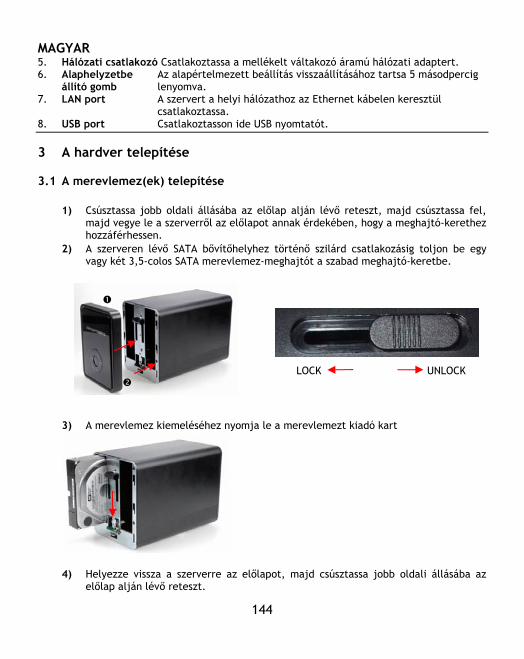
MAGYAR
144
5. Hálózati csatlakozó Csatlakoztassa a mellékelt váltakozó áramú hálózati adaptert. 6. Alaphelyzetbe Az alapértelmezett beállítás visszaállításához tartsa 5 másodpercig állító gomb lenyomva. 7. LAN port A szervert a helyi hálózathoz az Ethernet kábelen keresztül
csatlakoztassa. 8. USB port Csatlakoztasson ide USB nyomtatót. 3 A hardver telepítése 3.1 A merevlemez(ek) telepítése
1) Csúsztassa jobb oldali állásába az előlap alján lévő reteszt, majd csúsztassa fel, majd vegye le a szerverről az előlapot annak érdekében, hogy a meghajtó-kerethez hozzáférhessen.
2) A szerveren lévő SATA bővítőhelyhez történő szilárd csatlakozásig toljon be egy vagy két 3,5-colos SATA merevlemez-meghajtót a szabad meghajtó-keretbe.
LOCK UNLOCK
3) A merevlemez kiemeléséhez nyomja le a merevlemezt kiadó kart
4) Helyezze vissza a szerverre az előlapot, majd csúsztassa jobb oldali állásába az
előlap alján lévő reteszt.
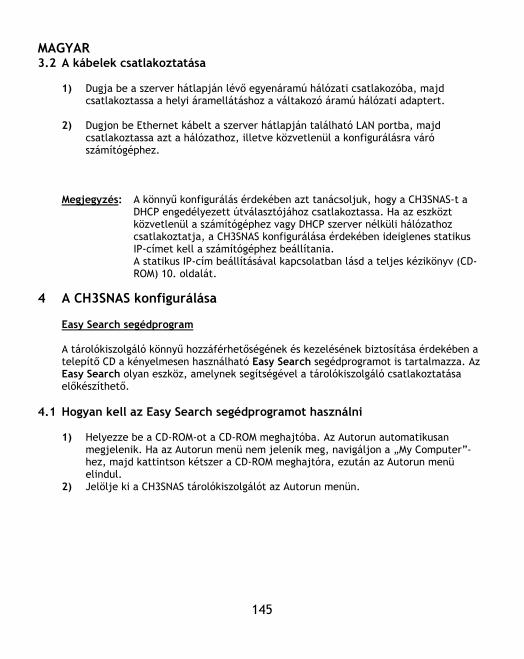
MAGYAR
145
3.2 A kábelek csatlakoztatása
1) Dugja be a szerver hátlapján lévő egyenáramú hálózati csatlakozóba, majd csatlakoztassa a helyi áramellátáshoz a váltakozó áramú hálózati adaptert.
2) Dugjon be Ethernet kábelt a szerver hátlapján található LAN portba, majd
csatlakoztassa azt a hálózathoz, illetve közvetlenül a konfigurálásra váró számítógéphez.
Megjegyzés: A könnyű konfigurálás érdekében azt tanácsoljuk, hogy a CH3SNAS-t a
DHCP engedélyezett útválasztójához csatlakoztassa. Ha az eszközt közvetlenül a számítógéphez vagy DHCP szerver nélküli hálózathoz csatlakoztatja, a CH3SNAS konfigurálása érdekében ideiglenes statikus IP-címet kell a számítógéphez beállítania. A statikus IP-cím beállításával kapcsolatban lásd a teljes kézikönyv (CD-ROM) 10. oldalát.
4 A CH3SNAS konfigurálása
Easy Search segédprogram A tárolókiszolgáló könnyű hozzáférhetőségének és kezelésének biztosítása érdekében a telepítő CD a kényelmesen használható Easy Search segédprogramot is tartalmazza. Az Easy Search olyan eszköz, amelynek segítségével a tárolókiszolgáló csatlakoztatása előkészíthető.
4.1 Hogyan kell az Easy Search segédprogramot használni 1) Helyezze be a CD-ROM-ot a CD-ROM meghajtóba. Az Autorun automatikusan
megjelenik. Ha az Autorun menü nem jelenik meg, navigáljon a „My Computer”-hez, majd kattintson kétszer a CD-ROM meghajtóra, ezután az Autorun menü elindul.
2) Jelölje ki a CH3SNAS tárolókiszolgálót az Autorun menün.
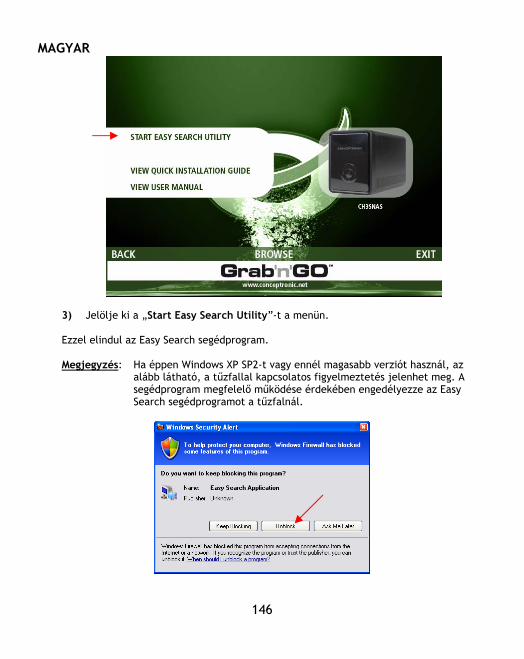
MAGYAR
146
3) Jelölje ki a „Start Easy Search Utility”-t a menün. Ezzel elindul az Easy Search segédprogram. Megjegyzés: Ha éppen Windows XP SP2-t vagy ennél magasabb verziót használ, az
alább látható, a tűzfallal kapcsolatos figyelmeztetés jelenhet meg. A segédprogram megfelelő működése érdekében engedélyezze az Easy Search segédprogramot a tűzfalnál.
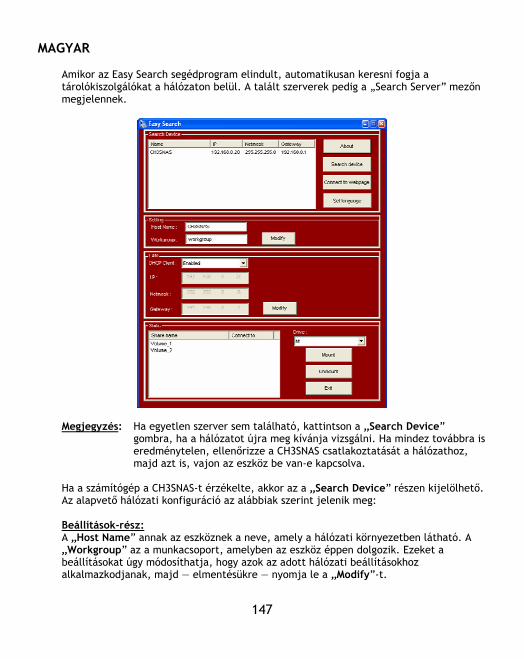
MAGYAR
147
Amikor az Easy Search segédprogram elindult, automatikusan keresni fogja a tárolókiszolgálókat a hálózaton belül. A talált szerverek pedig a „Search Server” mezőn megjelennek.
Megjegyzés: Ha egyetlen szerver sem található, kattintson a „Search Device”
gombra, ha a hálózatot újra meg kívánja vizsgálni. Ha mindez továbbra is eredménytelen, ellenőrizze a CH3SNAS csatlakoztatását a hálózathoz, majd azt is, vajon az eszköz be van-e kapcsolva.
Ha a számítógép a CH3SNAS-t érzékelte, akkor az a „Search Device” részen kijelölhető. Az alapvető hálózati konfiguráció az alábbiak szerint jelenik meg: Beállítások-rész: A „Host Name” annak az eszköznek a neve, amely a hálózati környezetben látható. A „Workgroup” az a munkacsoport, amelyben az eszköz éppen dolgozik. Ezeket a beállításokat úgy módosíthatja, hogy azok az adott hálózati beállításokhoz alkalmazkodjanak, majd — elmentésükre — nyomja le a „Modify”-t.
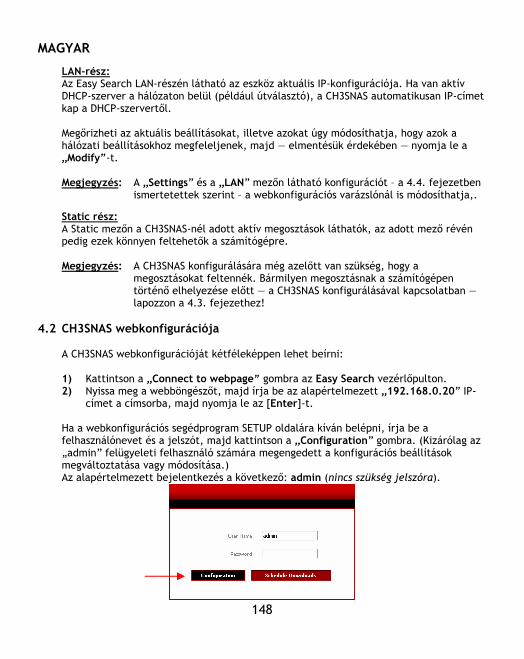
MAGYAR
148
LAN-rész: Az Easy Search LAN-részén látható az eszköz aktuális IP-konfigurációja. Ha van aktív DHCP-szerver a hálózaton belül (például útválasztó), a CH3SNAS automatikusan IP-címet kap a DHCP-szervertől. Megőrizheti az aktuális beállításokat, illetve azokat úgy módosíthatja, hogy azok a hálózati beállításokhoz megfeleljenek, majd — elmentésük érdekében — nyomja le a „Modify”-t. Megjegyzés: A „Settings” és a „LAN” mezőn látható konfigurációt – a 4.4. fejezetben
ismertetettek szerint – a webkonfigurációs varázslónál is módosíthatja,. Static rész: A Static mezőn a CH3SNAS-nél adott aktív megosztások láthatók, az adott mező révén pedig ezek könnyen feltehetők a számítógépre. Megjegyzés: A CH3SNAS konfigurálására még azelőtt van szükség, hogy a
megosztásokat feltennék. Bármilyen megosztásnak a számítógépen történő elhelyezése előtt — a CH3SNAS konfigurálásával kapcsolatban — lapozzon a 4.3. fejezethez!
4.2 CH3SNAS webkonfigurációja
A CH3SNAS webkonfigurációját kétféleképpen lehet beírni: 1) Kattintson a „Connect to webpage” gombra az Easy Search vezérlőpulton. 2) Nyissa meg a webböngészőt, majd írja be az alapértelmezett „192.168.0.20” IP-
címet a címsorba, majd nyomja le az [Enter]-t. Ha a webkonfigurációs segédprogram SETUP oldalára kíván belépni, írja be a felhasználónevet és a jelszót, majd kattintson a „Configuration” gombra. (Kizárólag az „admin” felügyeleti felhasználó számára megengedett a konfigurációs beállítások megváltoztatása vagy módosítása.) Az alapértelmezett bejelentkezés a következő: admin (nincs szükség jelszóra).
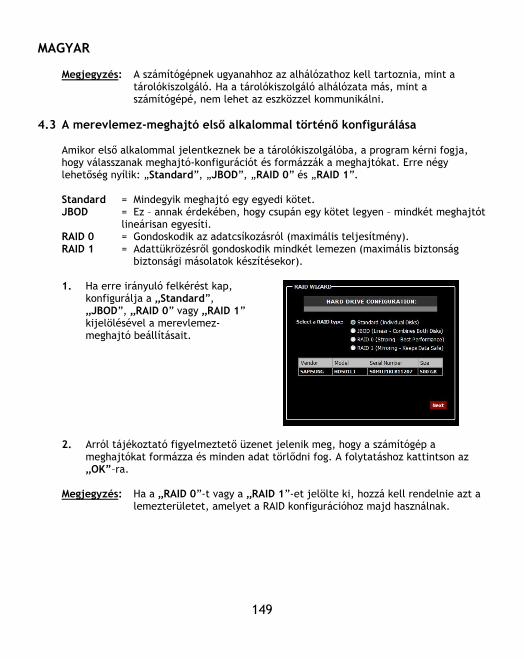
MAGYAR
149
Megjegyzés: A számítógépnek ugyanahhoz az alhálózathoz kell tartoznia, mint a
tárolókiszolgáló. Ha a tárolókiszolgáló alhálózata más, mint a számítógépé, nem lehet az eszközzel kommunikálni.
4.3 A merevlemez-meghajtó első alkalommal történő konfigurálása
Amikor első alkalommal jelentkeznek be a tárolókiszolgálóba, a program kérni fogja, hogy válasszanak meghajtó-konfigurációt és formázzák a meghajtókat. Erre négy lehetőség nyílik: „Standard”, „JBOD”, „RAID 0” és „RAID 1”. Standard = Mindegyik meghajtó egy egyedi kötet. JBOD = Ez – annak érdekében, hogy csupán egy kötet legyen – mindkét meghajtót
lineárisan egyesíti. RAID 0 = Gondoskodik az adatcsíkozásról (maximális teljesítmény). RAID 1 = Adattükrözésről gondoskodik mindkét lemezen (maximális biztonság biztonsági másolatok készítésekor). 1. Ha erre irányuló felkérést kap,
konfigurálja a „Standard”, „JBOD”, „RAID 0” vagy „RAID 1” kijelölésével a merevlemez-meghajtó beállításait.
2. Arról tájékoztató figyelmeztető üzenet jelenik meg, hogy a számítógép a
meghajtókat formázza és minden adat törlődni fog. A folytatáshoz kattintson az „OK”–ra.
Megjegyzés: Ha a „RAID 0”-t vagy a „RAID 1”-et jelölte ki, hozzá kell rendelnie azt a lemezterületet, amelyet a RAID konfigurációhoz majd használnak.
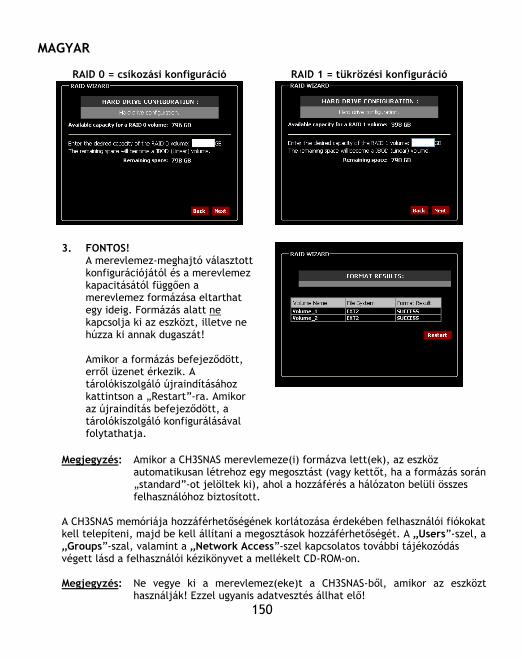
MAGYAR
150
RAID 0 = csíkozási konfiguráció
RAID 1 = tükrözési konfiguráció
3. FONTOS! A merevlemez-meghajtó választott konfigurációjától és a merevlemez kapacitásától függően a merevlemez formázása eltarthat egy ideig. Formázás alatt ne kapcsolja ki az eszközt, illetve ne húzza ki annak dugaszát! Amikor a formázás befejeződött, erről üzenet érkezik. A tárolókiszolgáló újraindításához kattintson a „Restart”-ra. Amikor az újraindítás befejeződött, a tárolókiszolgáló konfigurálásával folytathatja.
Megjegyzés: Amikor a CH3SNAS merevlemeze(i) formázva lett(ek), az eszköz
automatikusan létrehoz egy megosztást (vagy kettőt, ha a formázás során „standard”-ot jelöltek ki), ahol a hozzáférés a hálózaton belüli összes felhasználóhoz biztosított.
A CH3SNAS memóriája hozzáférhetőségének korlátozása érdekében felhasználói fiókokat kell telepíteni, majd be kell állítani a megosztások hozzáférhetőségét. A „Users”-szel, a „Groups”-szal, valamint a „Network Access”-szel kapcsolatos további tájékozódás végett lásd a felhasználói kézikönyvet a mellékelt CD-ROM-on. Megjegyzés: Ne vegye ki a merevlemez(eke)t a CH3SNAS-ből, amikor az eszközt
használják! Ezzel ugyanis adatvesztés állhat elő!

MAGYAR
151
4.4 Konfigurálás varázslóval
Amikor a merevlemez konfigurálása befejeződött és a CH3SNAS-t újraindítják, a webkonfiguráció főmenüje látható. A CH3SNAS telepítővarázslót is kínál, amelynek segítségével gyorsan konfigurálni lehet néhányat az eszköz alapvető beállításaiból. 1. Kattintson a „Run Wizard”
gombra. 2. Az üdvözlőképernyő a
varázslóhoz tartozó öt lépést sorolja fel. A folytatáshoz kattintson a „Next”-re.
3. Javasoljuk, hogy írjon be
ide egy új rendszergazda-jelszót. Írja be az új jelszót, majd írja be újból megerősítés végett.
4. Amikor végzett, kattintson a „Next”-re.
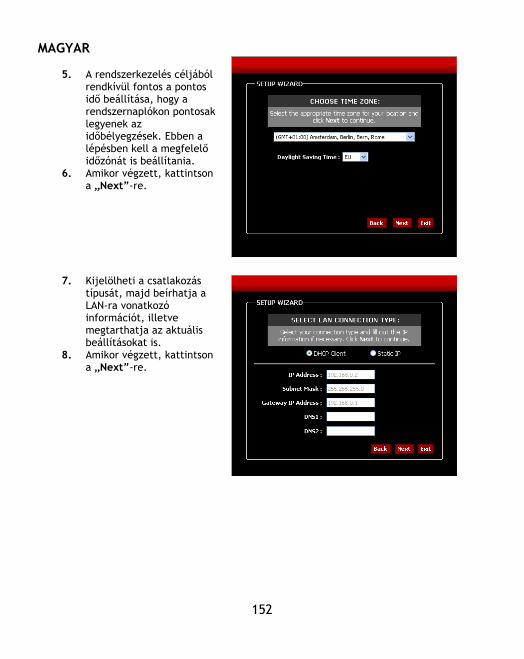
MAGYAR
152
5. A rendszerkezelés céljából
rendkívül fontos a pontos idő beállítása, hogy a rendszernaplókon pontosak legyenek az időbélyegzések. Ebben a lépésben kell a megfelelő időzónát is beállítania.
6. Amikor végzett, kattintson a „Next”-re.
7. Kijelölheti a csatlakozás
típusát, majd beírhatja a LAN-ra vonatkozó információt, illetve megtarthatja az aktuális beállításokat is.
8. Amikor végzett, kattintson a „Next”-re.

MAGYAR
153
9. Írjon be egy
munkacsoportot, egy nevet és írja be a tárolókiszolgáló leírását, vagy hagyja meg az alapértelmezett értékeket.
10. Amikor végzett, kattintson a „Next”-re.
11. Amikor végzett, kattintson
a „Restart”-ra, hogy a tárolókiszolgálót újraindíthassa, majd mentse el a konfigurációt, illetve kattintson a „Back”-re, ha vissza kíván menni az előző lépésekhez és meg akarja változtatni a beállításokat.
Megjegyzés: Újraindítás után megint a bejelentkezési ablak látható. Az új
rendszergazda-jelszó segítségével beléphet a webkonfigurációs segédprogramba.
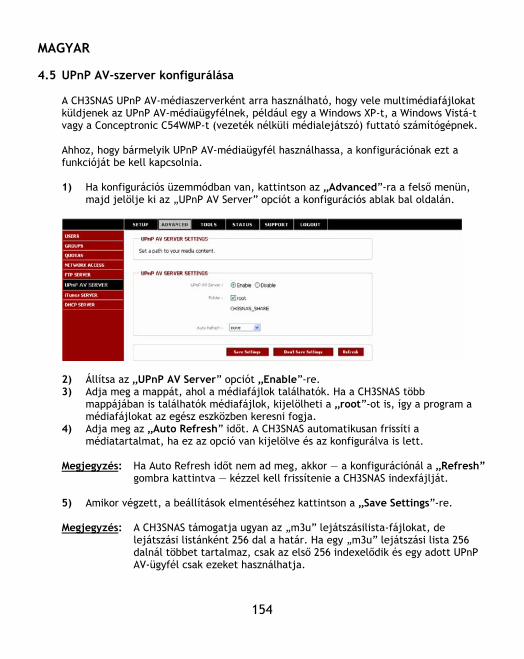
MAGYAR
154
4.5 UPnP AV-szerver konfigurálása
A CH3SNAS UPnP AV-médiaszerverként arra használható, hogy vele multimédiafájlokat küldjenek az UPnP AV-médiaügyfélnek, például egy a Windows XP-t, a Windows Vistá-t vagy a Conceptronic C54WMP-t (vezeték nélküli médialejátszó) futtató számítógépnek. Ahhoz, hogy bármelyik UPnP AV-médiaügyfél használhassa, a konfigurációnak ezt a funkcióját be kell kapcsolnia. 1) Ha konfigurációs üzemmódban van, kattintson az „Advanced”-ra a felső menün,
majd jelölje ki az „UPnP AV Server” opciót a konfigurációs ablak bal oldalán.
2) Állítsa az „UPnP AV Server” opciót „Enable”-re. 3) Adja meg a mappát, ahol a médiafájlok találhatók. Ha a CH3SNAS több
mappájában is találhatók médiafájlok, kijelölheti a „root”-ot is, így a program a médiafájlokat az egész eszközben keresni fogja.
4) Adja meg az „Auto Refresh” időt. A CH3SNAS automatikusan frissíti a médiatartalmat, ha ez az opció van kijelölve és az konfigurálva is lett.
Megjegyzés: Ha Auto Refresh időt nem ad meg, akkor — a konfigurációnál a „Refresh” gombra kattintva — kézzel kell frissítenie a CH3SNAS indexfájlját.
5) Amikor végzett, a beállítások elmentéséhez kattintson a „Save Settings”-re. Megjegyzés: A CH3SNAS támogatja ugyan az „m3u” lejátszásilista-fájlokat, de
lejátszási listánként 256 dal a határ. Ha egy „m3u” lejátszási lista 256 dalnál többet tartalmaz, csak az első 256 indexelődik és egy adott UPnP AV-ügyfél csak ezeket használhatja.
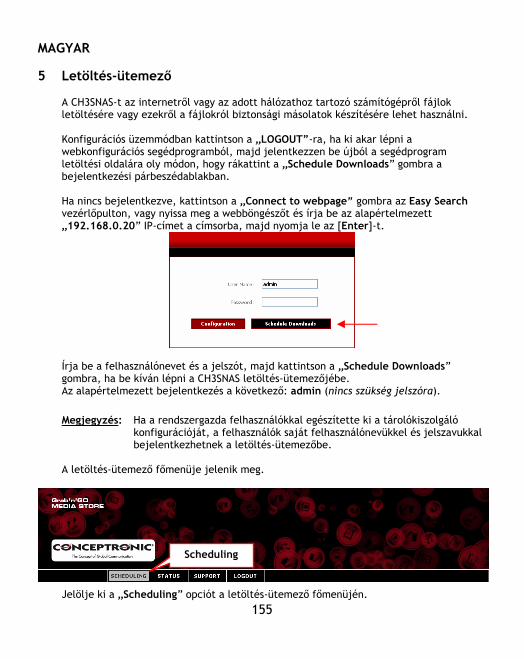
MAGYAR
155
5 Letöltés-ütemező
A CH3SNAS-t az internetről vagy az adott hálózathoz tartozó számítógépről fájlok letöltésére vagy ezekről a fájlokról biztonsági másolatok készítésére lehet használni. Konfigurációs üzemmódban kattintson a „LOGOUT”-ra, ha ki akar lépni a webkonfigurációs segédprogramból, majd jelentkezzen be újból a segédprogram letöltési oldalára oly módon, hogy rákattint a „Schedule Downloads” gombra a bejelentkezési párbeszédablakban. Ha nincs bejelentkezve, kattintson a „Connect to webpage” gombra az Easy Search vezérlőpulton, vagy nyissa meg a webböngészőt és írja be az alapértelmezett „192.168.0.20” IP-címet a címsorba, majd nyomja le az [Enter]-t.
Írja be a felhasználónevet és a jelszót, majd kattintson a „Schedule Downloads” gombra, ha be kíván lépni a CH3SNAS letöltés-ütemezőjébe. Az alapértelmezett bejelentkezés a következő: admin (nincs szükség jelszóra).
Megjegyzés: Ha a rendszergazda felhasználókkal egészítette ki a tárolókiszolgáló
konfigurációját, a felhasználók saját felhasználónevükkel és jelszavukkal bejelentkezhetnek a letöltés-ütemezőbe.
A letöltés-ütemező főmenüje jelenik meg.
Jelölje ki a „Scheduling” opciót a letöltés-ütemező főmenüjén.
Scheduling
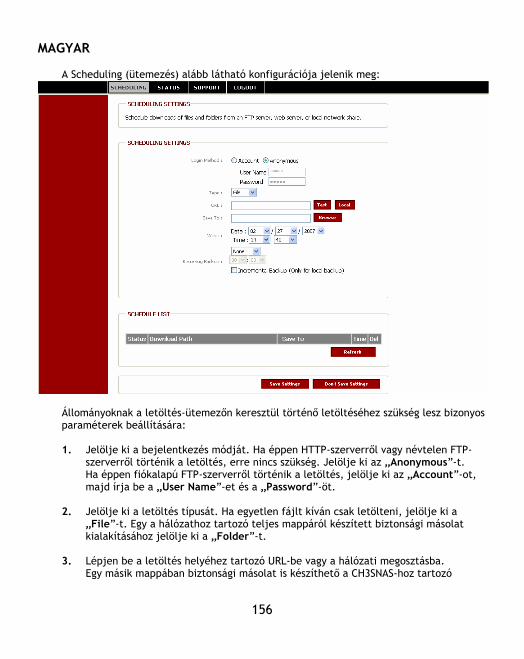
MAGYAR
156
A Scheduling (ütemezés) alább látható konfigurációja jelenik meg:
Állományoknak a letöltés-ütemezőn keresztül történő letöltéséhez szükség lesz bizonyos paraméterek beállítására:
1. Jelölje ki a bejelentkezés módját. Ha éppen HTTP-szerverről vagy névtelen FTP-
szerverről történik a letöltés, erre nincs szükség. Jelölje ki az „Anonymous”-t. Ha éppen fiókalapú FTP-szerverről történik a letöltés, jelölje ki az „Account”-ot, majd írja be a „User Name”-et és a „Password”-öt.
2. Jelölje ki a letöltés típusát. Ha egyetlen fájlt kíván csak letölteni, jelölje ki a „File”-t. Egy a hálózathoz tartozó teljes mappáról készített biztonsági másolat kialakításához jelölje ki a „Folder”-t.
3. Lépjen be a letöltés helyéhez tartozó URL-be vagy a hálózati megosztásba. Egy másik mappában biztonsági másolat is készíthető a CH3SNAS-hoz tartozó
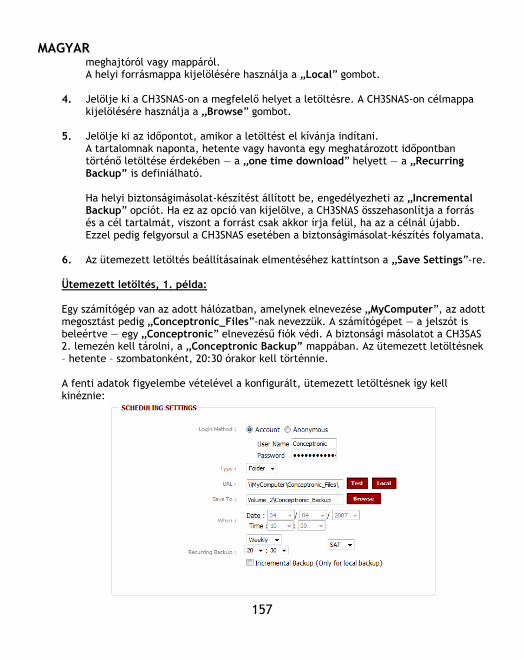
MAGYAR
157
meghajtóról vagy mappáról. A helyi forrásmappa kijelölésére használja a „Local” gombot.
4. Jelölje ki a CH3SNAS-on a megfelelő helyet a letöltésre. A CH3SNAS-on célmappa kijelölésére használja a „Browse” gombot.
5. Jelölje ki az időpontot, amikor a letöltést el kívánja indítani. A tartalomnak naponta, hetente vagy havonta egy meghatározott időpontban történő letöltése érdekében — a „one time download” helyett — a „Recurring Backup” is definiálható. Ha helyi biztonságimásolat-készítést állított be, engedélyezheti az „Incremental Backup” opciót. Ha ez az opció van kijelölve, a CH3SNAS összehasonlítja a forrás és a cél tartalmát, viszont a forrást csak akkor írja felül, ha az a célnál újabb. Ezzel pedig felgyorsul a CH3SNAS esetében a biztonságimásolat-készítés folyamata.
6. Az ütemezett letöltés beállításainak elmentéséhez kattintson a „Save Settings”-re.
Ütemezett letöltés, 1. példa: Egy számítógép van az adott hálózatban, amelynek elnevezése „MyComputer”, az adott megosztást pedig „Conceptronic_Files”-nak nevezzük. A számítógépet — a jelszót is beleértve — egy „Conceptronic” elnevezésű fiók védi. A biztonsági másolatot a CH3SAS 2. lemezén kell tárolni, a „Conceptronic Backup” mappában. Az ütemezett letöltésnek – hetente – szombatonként, 20:30 órakor kell történnie. A fenti adatok figyelembe vételével a konfigurált, ütemezett letöltésnek így kell kinéznie:

MAGYAR
158
Ütemezett letöltés, 2. példa: A „Driver.exe”-nek nevezett illesztőprogram letöltését kívánjuk ütemezni, amely a következő webhelyen található: www.drivers.com. A letöltött illesztőprogramot a CH3SNAS 1. lemezén kell tárolni, mégpedig a „Driver_Downloads” mappában. A fájlt 2007. június 5-én 17:00 órakor kell letölteni. A fenti adatok figyelembe vételével a konfigurált, ütemezett letöltésnek a következőképpen kell kinéznie:
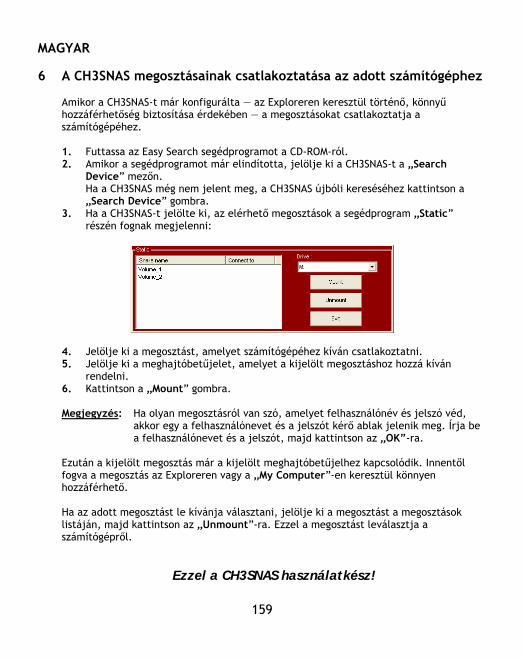
MAGYAR
159
6 A CH3SNAS megosztásainak csatlakoztatása az adott számítógéphez
Amikor a CH3SNAS-t már konfigurálta — az Exploreren keresztül történő, könnyű hozzáférhetőség biztosítása érdekében — a megosztásokat csatlakoztatja a számítógépéhez. 1. Futtassa az Easy Search segédprogramot a CD-ROM-ról. 2. Amikor a segédprogramot már elindította, jelölje ki a CH3SNAS-t a „Search
Device” mezőn. Ha a CH3SNAS még nem jelent meg, a CH3SNAS újbóli kereséséhez kattintson a „Search Device” gombra.
3. Ha a CH3SNAS-t jelölte ki, az elérhető megosztások a segédprogram „Static” részén fognak megjelenni:
4. Jelölje ki a megosztást, amelyet számítógépéhez kíván csatlakoztatni. 5. Jelölje ki a meghajtóbetűjelet, amelyet a kijelölt megosztáshoz hozzá kíván
rendelni. 6. Kattintson a „Mount” gombra. Megjegyzés: Ha olyan megosztásról van szó, amelyet felhasználónév és jelszó véd,
akkor egy a felhasználónevet és a jelszót kérő ablak jelenik meg. Írja be a felhasználónevet és a jelszót, majd kattintson az „OK”-ra.
Ezután a kijelölt megosztás már a kijelölt meghajtóbetűjelhez kapcsolódik. Innentől fogva a megosztás az Exploreren vagy a „My Computer”-en keresztül könnyen hozzáférhető. Ha az adott megosztást le kívánja választani, jelölje ki a megosztást a megosztások listáján, majd kattintson az „Unmount”-ra. Ezzel a megosztást leválasztja a számítógépről.
Ezzel a CH3SNAS használatkész!
Declaration of CE Conformity
160
The manufacturer 2L International BV Address Databankweg 7 3821 AL Amersfoort, the Netherlands Hereby declares that the product Type NETWORK HARDDISK 3.5” Product CH3SNAS Brandname Conceptronic Complies with following directives:
2004/108/EEC EMC directive:
Electromagnetic Compatibility
73/23/EEC Low Voltage Directive: Electrical equipment designed for use within certain voltage limits
The following standards were consulted to assess conformity: EN55022/9.98 Class B EN55024/9.98 EN 50081-1/1994 EN 61000-3-2/3/4/1995 EN 50082-1/1994 EN 60950/1995
The symbol confirms that this product conforms to the above named standards and regulations.
Place and date of issue: Aersfoort, 10/01/2007 (dd/mm/yyyy)
Herman Looijen, Product Marketing Manager

TÜRKÇE
161
Conceptronic CH3SNAS
Hızlı Kurulum Kılavuzu
Conceptronic Grab’n’GO Ortam Depolama Cihazını satın aldığınız için tebrik ederiz.
Ekteki Donanım Kurulum Kılavuzu, Conceptronic Grab’n’GO Ortam Depolama Cihazının kurulumu hakkında adım adım açıklamalar vermektedir. Herhangi bir sorun ortaya çıkarsa, destek sitemize www.conceptronic.net giderek 'Support' tuşuna tıklamanızı tavsiye ederiz. Burada, Sıkça Sorulan Sorular Veri Tabanı bulunmaktadır. Ürününüz hakkında başka sorularınız olması ve web sitemizde yanıt bulamamanız halinde, bize e-posta yoluyla ulaşabilirsiniz: [email protected] Conceptronic ürünleri hakkında daha fazla bilgi için, lütfen Conceptronic Web Sitesini ziyaret edin: www.conceptronic.net Aşağıda açıklanan Yazılım kurulumu, bilgisayarınızdaki kurulumdan biraz farklı olabilir. Bu durum kullanmakta olduğunuz Windows sürümüne göre değişir. 1 Paket İçerikleri
Conceptronic CH3SNAS paketinde aşağıdaki malzemeler bulunmaktadır:
• Conceptronic CH3SNAS • CH3SNAS Güç Adaptörü (5v, 1.5A & 12v, 1.5A) • Ağ Kablosu • Çok Dilde Hazırlanmış Hızlı Kurulum Kılavuzu • Yazılım içeren CD-ROM Not: Bu Hızlı Kurulum Kılavuzu, aygıtın sizin ağ ortamınızda çalışmasına yönelik olarak
sadece temel unsurları açıklamaktadır. Daha ayrıntılı işlevler ve açıklama için, lütfen ekteki CD-ROM'da bulunan Tam İngilizce Kılavuzu inceleyin.
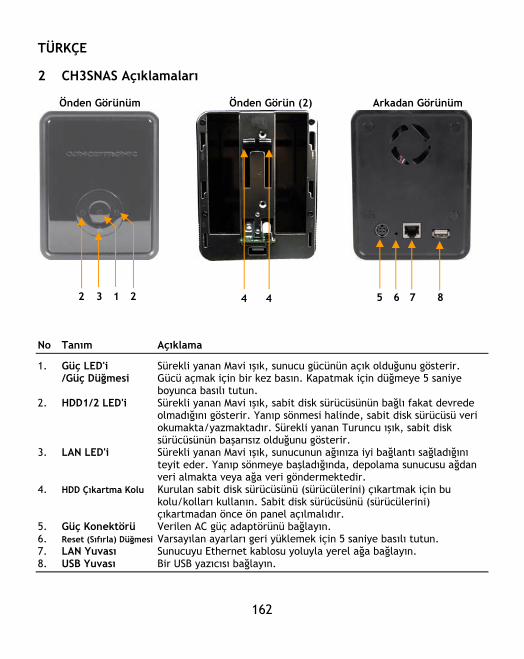
TÜRKÇE
162
2 CH3SNAS Açıklamaları Önden Görünüm Önden Görün (2) Arkadan Görünüm
No Tanım Açıklama
1. Güç LED'i Sürekli yanan Mavi ışık, sunucu gücünün açık olduğunu gösterir. /Güç Düğmesi Gücü açmak için bir kez basın. Kapatmak için düğmeye 5 saniye
boyunca basılı tutun. 2. HDD1/2 LED'i Sürekli yanan Mavi ışık, sabit disk sürücüsünün bağlı fakat devrede
olmadığını gösterir. Yanıp sönmesi halinde, sabit disk sürücüsü veri okumakta/yazmaktadır. Sürekli yanan Turuncu ışık, sabit disk sürücüsünün başarısız olduğunu gösterir.
3. LAN LED'i Sürekli yanan Mavi ışık, sunucunun ağınıza iyi bağlantı sağladığını teyit eder. Yanıp sönmeye başladığında, depolama sunucusu ağdan veri almakta veya ağa veri göndermektedir.
4. HDD Çıkartma Kolu Kurulan sabit disk sürücüsünü (sürücülerini) çıkartmak için bu kolu/kolları kullanın. Sabit disk sürücüsünü (sürücülerini) çıkartmadan önce ön panel açılmalıdır.
5. Güç Konektörü Verilen AC güç adaptörünü bağlayın. 6. Reset (Sıfırla) Düğmesi Varsayılan ayarları geri yüklemek için 5 saniye basılı tutun. 7. LAN Yuvası Sunucuyu Ethernet kablosu yoluyla yerel ağa bağlayın. 8. USB Yuvası Bir USB yazıcısı bağlayın.
1
2 3
2
4 5 6 7 2 1 4 8
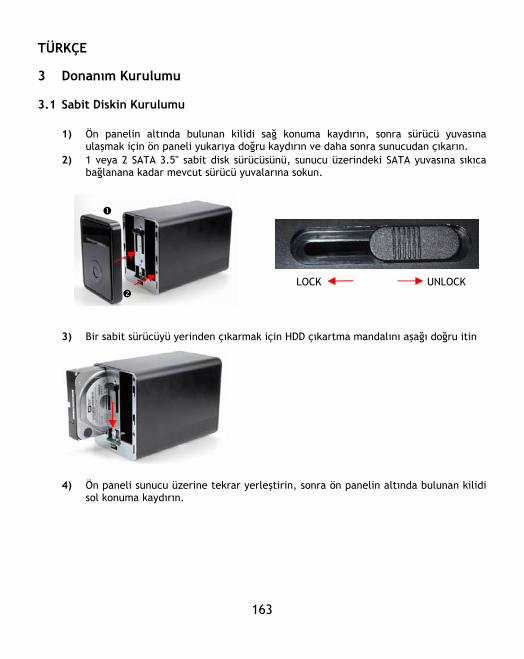
TÜRKÇE
163
3 Donanım Kurulumu 3.1 Sabit Diskin Kurulumu
1) Ön panelin altında bulunan kilidi sağ konuma kaydırın, sonra sürücü yuvasına ulaşmak için ön paneli yukarıya doğru kaydırın ve daha sonra sunucudan çıkarın.
2) 1 veya 2 SATA 3.5" sabit disk sürücüsünü, sunucu üzerindeki SATA yuvasına sıkıca bağlanana kadar mevcut sürücü yuvalarına sokun.
LOCK UNLOCK
3) Bir sabit sürücüyü yerinden çıkarmak için HDD çıkartma mandalını aşağı doğru itin
4) Ön paneli sunucu üzerine tekrar yerleştirin, sonra ön panelin altında bulunan kilidi
sol konuma kaydırın.
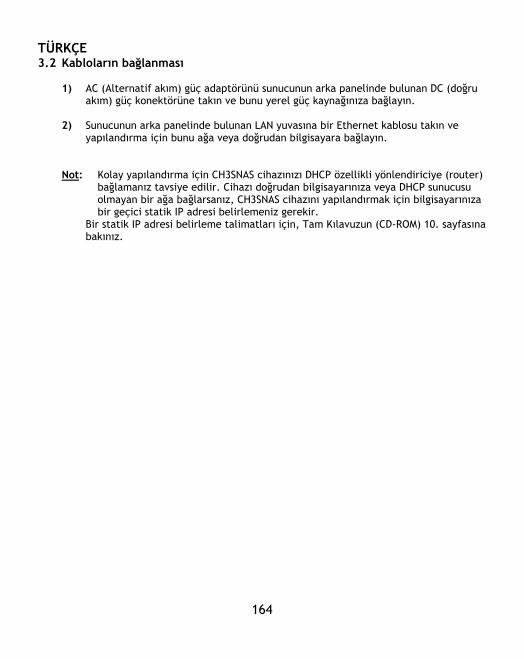
TÜRKÇE
164
3.2 Kabloların bağlanması
1) AC (Alternatif akım) güç adaptörünü sunucunun arka panelinde bulunan DC (doğru akım) güç konektörüne takın ve bunu yerel güç kaynağınıza bağlayın.
2) Sunucunun arka panelinde bulunan LAN yuvasına bir Ethernet kablosu takın ve
yapılandırma için bunu ağa veya doğrudan bilgisayara bağlayın.
Not: Kolay yapılandırma için CH3SNAS cihazınızı DHCP özellikli yönlendiriciye (router)
bağlamanız tavsiye edilir. Cihazı doğrudan bilgisayarınıza veya DHCP sunucusu olmayan bir ağa bağlarsanız, CH3SNAS cihazını yapılandırmak için bilgisayarınıza bir geçici statik IP adresi belirlemeniz gerekir.
Bir statik IP adresi belirleme talimatları için, Tam Kılavuzun (CD-ROM) 10. sayfasına bakınız.
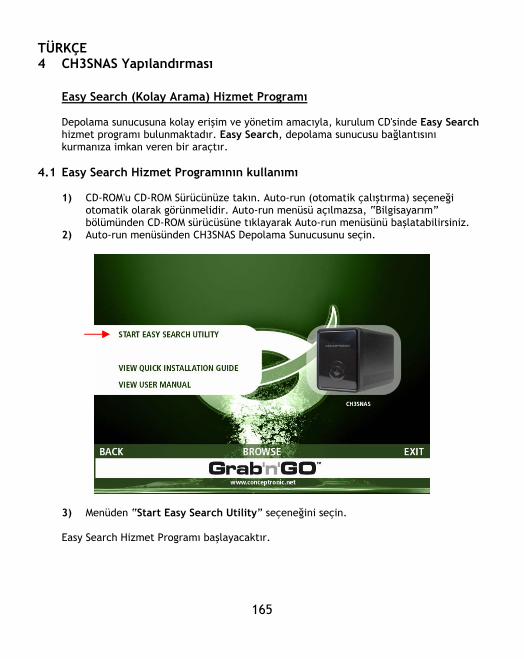
TÜRKÇE
165
4 CH3SNAS Yapılandırması Easy Search (Kolay Arama) Hizmet Programı Depolama sunucusuna kolay erişim ve yönetim amacıyla, kurulum CD'sinde Easy Search hizmet programı bulunmaktadır. Easy Search, depolama sunucusu bağlantısını kurmanıza imkan veren bir araçtır.
4.1 Easy Search Hizmet Programının kullanımı
1) CD-ROM'u CD-ROM Sürücünüze takın. Auto-run (otomatik çalıştırma) seçeneği
otomatik olarak görünmelidir. Auto-run menüsü açılmazsa, “Bilgisayarım” bölümünden CD-ROM sürücüsüne tıklayarak Auto-run menüsünü başlatabilirsiniz.
2) Auto-run menüsünden CH3SNAS Depolama Sunucusunu seçin.
3) Menüden “Start Easy Search Utility” seçeneğini seçin. Easy Search Hizmet Programı başlayacaktır.
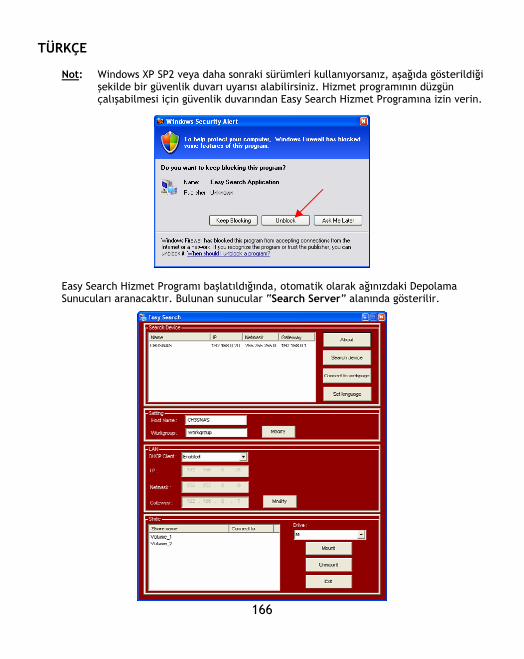
TÜRKÇE
166
Not: Windows XP SP2 veya daha sonraki sürümleri kullanıyorsanız, aşağıda gösterildiği
şekilde bir güvenlik duvarı uyarısı alabilirsiniz. Hizmet programının düzgün çalışabilmesi için güvenlik duvarından Easy Search Hizmet Programına izin verin.
Easy Search Hizmet Programı başlatıldığında, otomatik olarak ağınızdaki Depolama Sunucuları aranacaktır. Bulunan sunucular “Search Server” alanında gösterilir.
TÜRKÇE
167
Not: Herhangi bir sunucu bulunamazsa, ağınızı tekrar taramak için “Search Device”
düğmesine tıklayın. Hala sonuç alamazsanız, CH3SNAS cihazınızın ağdaki bağlantısını ve cihazın açık olup olmadığını kontrol edin.
CH3SNAS cihazı bulunduğunda, bunu "Search Device” bölümünden seçebilirsiniz. Temel ağ konfigürasyonu gösterilecektir: Settings bölümü: "Host Name”, ağ ortamınızda gösterilecek olan cihazın adıdır. "Workgroup”, cihazın, içinde çalışmakta olduğu çalışma grubudur. Bu ayarları ağ ayarlarınıza uygun olarak değiştirebilir ve bunları kaydetmek için “Modify” tuşuna basabilirsiniz. LAN bölümü: Easy Search Hizmet Programının LAN bölümü, cihazın mevcut IP konfigürasyonunu gösterir. Ağınızda bir aktif DHCP sunucusu (örn, bir router) varsa, CH3SNAS cihazı, DHCP sunucusundan IP adresini otomatik olarak alacaktır. Mevcut ayarları koruyabilir veya ağ ayarlarınıza uygun olarak değiştirebilir ve bunları kaydetmek için “Modify” tuşuna basabilirsiniz. Not: "Settings” ve “LAN” alanında gösterilen konfigürasyonu ayrıca 4.4 bölümünde
açıklanan Web yapılandırma sihirbazında değiştirebilirsiniz. Static bölümü: ‘Static’ alanı CH3SNAS cihazı üzerindeki aktif paylaşımları gösterir ve bunları bilgisayarınıza kolayca tanıtmanıza imkan verir. Not: Paylaşımlarınızı tanıtmadan önce CH3SNAS cihazının yapılandırılması gerekir.
Bilgisayarınıza herhangi bir paylaşım tanıtmadan önce lütfen CH3SNAS cihazının yapılandırılması için 4.3 bölümüne bakınız!
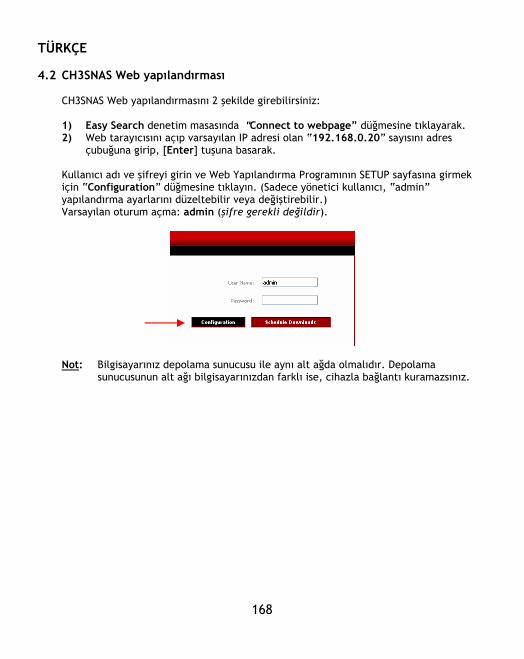
TÜRKÇE
168
4.2 CH3SNAS Web yapılandırması
CH3SNAS Web yapılandırmasını 2 şekilde girebilirsiniz: 1) Easy Search denetim masasında "Connect to webpage” düğmesine tıklayarak. 2) Web tarayıcısını açıp varsayılan IP adresi olan “192.168.0.20” sayısını adres
çubuğuna girip, [Enter] tuşuna basarak. Kullanıcı adı ve şifreyi girin ve Web Yapılandırma Programının SETUP sayfasına girmek için “Configuration” düğmesine tıklayın. (Sadece yönetici kullanıcı, “admin” yapılandırma ayarlarını düzeltebilir veya değiştirebilir.) Varsayılan oturum açma: admin (şifre gerekli değildir).
Not: Bilgisayarınız depolama sunucusu ile aynı alt ağda olmalıdır. Depolama
sunucusunun alt ağı bilgisayarınızdan farklı ise, cihazla bağlantı kuramazsınız.

TÜRKÇE
169
4.3 Sabit Diskin İlk Defa Yapılandırılması
Depolama sunucusunda ilk defa oturum açarken, bir sürücü konfigürasyonu seçerek sürücüleri biçimlendirmeniz (formatlama) istenecektir. Burada dört seçenek vardır: “Standard”, “JBOD”, “RAID 0” ve “RAID 1”. Standard = Her sürücü başlı başına bir birimdir. JBOD = 1 birim oluşturacak şekilde her iki sürücüyü doğrusal olarak birleştirir. RAID 0 = Verilerin ayıklanmasını sağlar (Maksimum performans). RAID 1 = Her iki disk üzerinde veri ikizlemesi sağlar (Maksimum yedekleme
güvenliği). 1. Uyarı geldiğinde, “Standard”,
“JBOD”, “RAID 0” veya “RAID 1” seçeneklerinden birini seçerek HDD ayarlarını yapılandırın.
2. Bir uyarı iletisi belirecek ve sürücülerinizin biçimlendirildiğini ve tüm verilerin
silindiğini bildirecektir. Devam etmek için "OK" tuşuna tıklayın. Not: “RAID 0” veya “RAID 1” seçerseniz, RAID konfigürasyonu için kullanılacak olan
disk alanını tahsis etmeniz gerekir.
RAID 0 = Ayıklama Konfigürasyonu
RAID 1 = İkizleme Konfigürasyonu
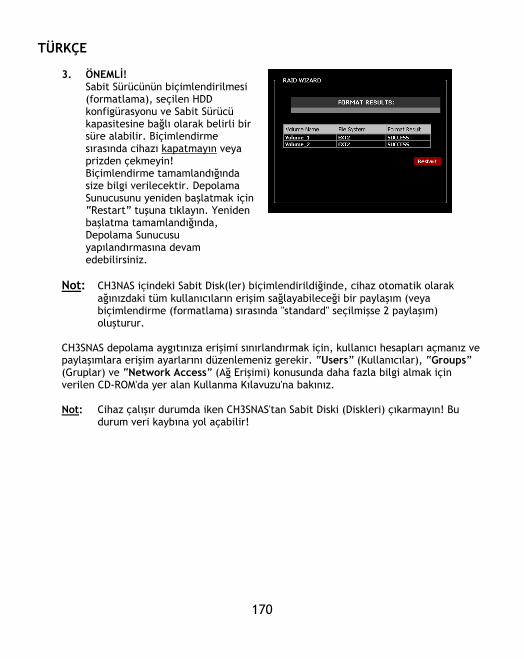
TÜRKÇE
170
3. ÖNEMLİ!
Sabit Sürücünün biçimlendirilmesi (formatlama), seçilen HDD konfigürasyonu ve Sabit Sürücü kapasitesine bağlı olarak belirli bir süre alabilir. Biçimlendirme sırasında cihazı kapatmayın veya prizden çekmeyin! Biçimlendirme tamamlandığında size bilgi verilecektir. Depolama Sunucusunu yeniden başlatmak için “Restart” tuşuna tıklayın. Yeniden başlatma tamamlandığında, Depolama Sunucusu yapılandırmasına devam edebilirsiniz.
Not: CH3NAS içindeki Sabit Disk(ler) biçimlendirildiğinde, cihaz otomatik olarak
ağınızdaki tüm kullanıcıların erişim sağlayabileceği bir paylaşım (veya biçimlendirme (formatlama) sırasında "standard" seçilmişse 2 paylaşım) oluşturur.
CH3SNAS depolama aygıtınıza erişimi sınırlandırmak için, kullanıcı hesapları açmanız ve paylaşımlara erişim ayarlarını düzenlemeniz gerekir. “Users” (Kullanıcılar), “Groups” (Gruplar) ve “Network Access” (Ağ Erişimi) konusunda daha fazla bilgi almak için verilen CD-ROM'da yer alan Kullanma Kılavuzu'na bakınız. Not: Cihaz çalışır durumda iken CH3SNAS'tan Sabit Diski (Diskleri) çıkarmayın! Bu
durum veri kaybına yol açabilir!
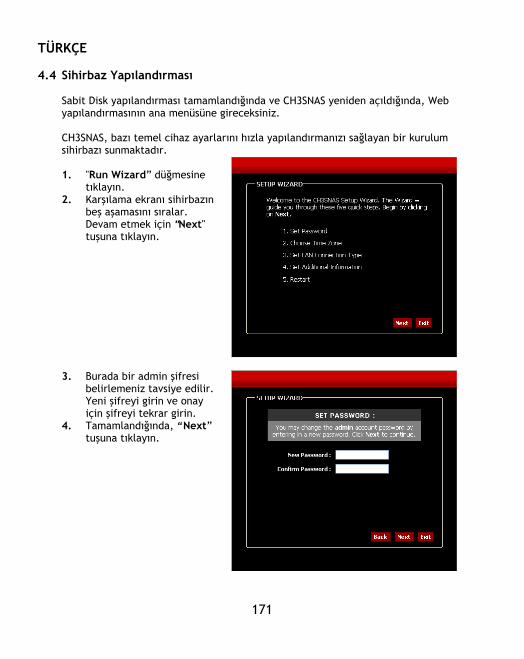
TÜRKÇE
171
4.4 Sihirbaz Yapılandırması
Sabit Disk yapılandırması tamamlandığında ve CH3SNAS yeniden açıldığında, Web yapılandırmasının ana menüsüne gireceksiniz. CH3SNAS, bazı temel cihaz ayarlarını hızla yapılandırmanızı sağlayan bir kurulum sihirbazı sunmaktadır. 1. "Run Wizard” düğmesine
tıklayın. 2. Karşılama ekranı sihirbazın
beş aşamasını sıralar. Devam etmek için "Next" tuşuna tıklayın.
3. Burada bir admin şifresi belirlemeniz tavsiye edilir. Yeni şifreyi girin ve onay için şifreyi tekrar girin.
4. Tamamlandığında, “Next” tuşuna tıklayın.
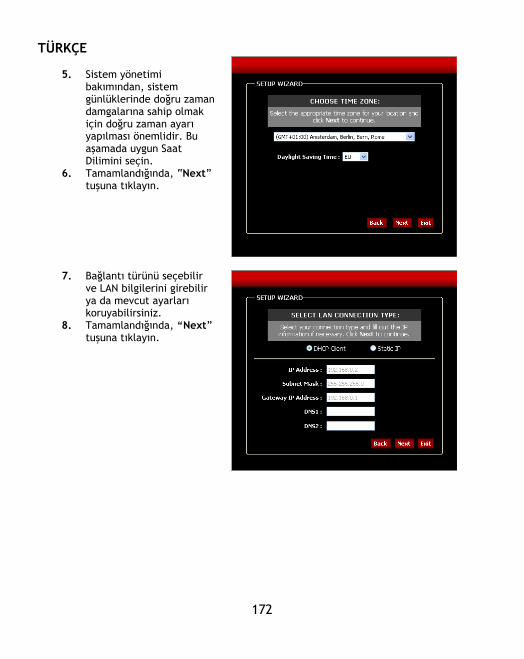
TÜRKÇE
172
5. Sistem yönetimi
bakımından, sistem günlüklerinde doğru zaman damgalarına sahip olmak için doğru zaman ayarı yapılması önemlidir. Bu aşamada uygun Saat Dilimini seçin.
6. Tamamlandığında, “Next” tuşuna tıklayın.
7. Bağlantı türünü seçebilir ve LAN bilgilerini girebilir ya da mevcut ayarları koruyabilirsiniz.
8. Tamamlandığında, “Next” tuşuna tıklayın.
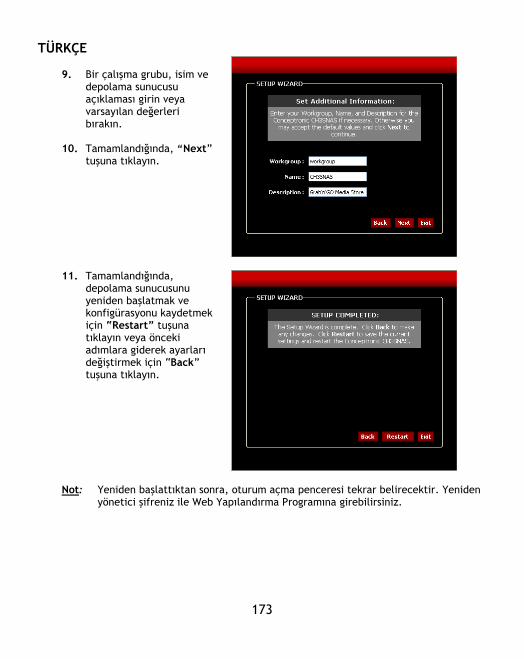
TÜRKÇE
173
9. Bir çalışma grubu, isim ve
depolama sunucusu açıklaması girin veya varsayılan değerleri bırakın.
10. Tamamlandığında, “Next” tuşuna tıklayın.
11. Tamamlandığında, depolama sunucusunu yeniden başlatmak ve konfigürasyonu kaydetmek için “Restart” tuşuna tıklayın veya önceki adımlara giderek ayarları değiştirmek için “Back” tuşuna tıklayın.
Not: Yeniden başlattıktan sonra, oturum açma penceresi tekrar belirecektir. Yeniden
yönetici şifreniz ile Web Yapılandırma Programına girebilirsiniz.
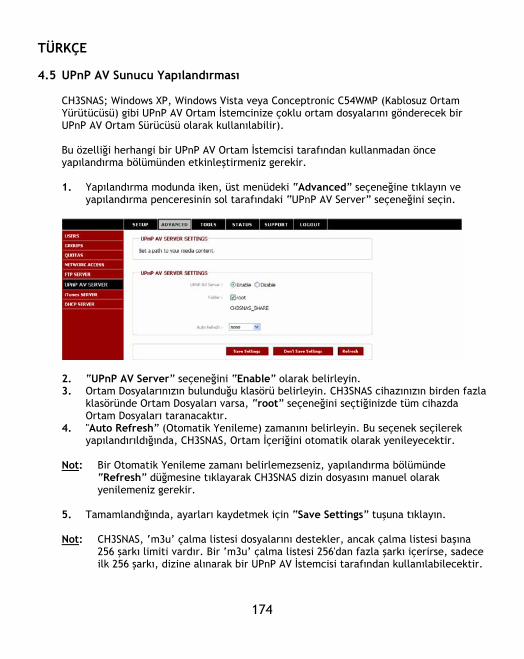
TÜRKÇE
174
4.5 UPnP AV Sunucu Yapılandırması
CH3SNAS; Windows XP, Windows Vista veya Conceptronic C54WMP (Kablosuz Ortam Yürütücüsü) gibi UPnP AV Ortam İstemcinize çoklu ortam dosyalarını gönderecek bir UPnP AV Ortam Sürücüsü olarak kullanılabilir). Bu özelliği herhangi bir UPnP AV Ortam İstemcisi tarafından kullanmadan önce yapılandırma bölümünden etkinleştirmeniz gerekir. 1. Yapılandırma modunda iken, üst menüdeki “Advanced” seçeneğine tıklayın ve
yapılandırma penceresinin sol tarafındaki “UPnP AV Server” seçeneğini seçin.
2. “UPnP AV Server” seçeneğini “Enable” olarak belirleyin. 3. Ortam Dosyalarınızın bulunduğu klasörü belirleyin. CH3SNAS cihazınızın birden fazla
klasöründe Ortam Dosyaları varsa, “root” seçeneğini seçtiğinizde tüm cihazda Ortam Dosyaları taranacaktır.
4. "Auto Refresh” (Otomatik Yenileme) zamanını belirleyin. Bu seçenek seçilerek yapılandırıldığında, CH3SNAS, Ortam İçeriğini otomatik olarak yenileyecektir.
Not: Bir Otomatik Yenileme zamanı belirlemezseniz, yapılandırma bölümünde
“Refresh” düğmesine tıklayarak CH3SNAS dizin dosyasını manuel olarak yenilemeniz gerekir.
5. Tamamlandığında, ayarları kaydetmek için “Save Settings” tuşuna tıklayın. Not: CH3SNAS, ‘m3u’ çalma listesi dosyalarını destekler, ancak çalma listesi başına
256 şarkı limiti vardır. Bir ‘m3u’ çalma listesi 256'dan fazla şarkı içerirse, sadece ilk 256 şarkı, dizine alınarak bir UPnP AV İstemcisi tarafından kullanılabilecektir.

TÜRKÇE
175
5 Karşıdan Yükleme (Download) Programcısı
CH3SNAS, İnternetten veya ağınızdaki bir bilgisayardan karşıdan yükleme veya dosyaları yedekleme amacıyla kullanılabilir. Yapılandırma modunda iken, web yapılandırma programından çıkmak için “LOGOUT” tuşuna tıklayın ve oturum açma iletişim kutusundaki “Schedule Downloads” düğmesine tıklayarak hizmet programının karşıdan yükleme sayfasına yeniden girin. Oturum açmadıysanız, Easy Search denetim masasından “Connect to webpage” düğmesine tıklayın veya web tarayıcıyı açarak varsayılan IP adresi olan “192.168.0.20” sayısını adres çubuğuna girin ve [Enter] tuşuna basın.
Kullanıcı adını ve şifreyi girdikten sonra CH3SNAS Karşıdan Yükleme Programcısına girmek için “Schedule Downloads” düğmesine tıklayın. Varsayılan oturum açma: admin (şifre gerekli değildir). Not: Yönetici, Depolama Sunucusu yapılandırmasına kullanıcı eklediyse, kullanıcılar
kendi kullanıcı adları ve şifreleri ile Karşıdan Yükleme Programcısında oturum açabilir.
Karşıdan Yükleme Programcısının Ana menüsü görüntülenecektir.
Programlama

TÜRKÇE
176
Karşıdan Yükleme Programcısının ana sayfasından “Scheduling” seçeneğini seçin. Aşağıda gösterildiği şekilde Programlama konfigürasyonunu göreceksiniz:
Karşıdan Yükleme Programcısı yoluyla dosya yüklemek için, bazı parametreleri belirlemeniz gerekir: 1. Oturum Açma Yöntemini seçin. Bir HTTP sunucusu veya bir anonim FTP
sunucusundan yükleme yapacaksanız, buna gerek yoktur. “Anonymous” seçeneğini seçin. Bir hesap tabanlı FTP sunucusundan yükleme yapacaksanız, “Account” seçeneğini seçin ve “User Name” (Kullanıcı Adı) ve “Password” (Şifre) alanlarını doldurun.
2. Karşıdan yükleme türünü seçin. Tek bir dosya yüklemek isterseniz, “File”
seçeneğini tıklayın. Ağınızdaki bir komple klasörün yedeklemesi için, “Folder” seçeneğini seçin.
TÜRKÇE
177
Karşıdan yükleme konumunun URL'sini veya ağınızdaki ağ paylaşımını girin. Ayrıca CH3SNAS bünyesinde 1 sürücü veya klasörün yedeğini başka bir klasöre çıkarabilirsiniz. Yerel kaynak klasörünü seçmek için “Local” tuşunu kullanın.
3. Karşıdan yüklemeniz için CH3SNAS üzerindeki konumu seçin. CH3SNAS üzerinde
hedef klasörü seçmek için “Browse” düğmesini kullanın. 4. Karşıdan yüklemeyi başlatmak istediğiniz saati seçin.
Bir “one time download” (tek seferlik yükleme) yerine, içeriği günlük, haftalık veya aylık olarak belirli bir saatte yüklemek üzere bir “Recurring Backup” (Yinelenen Yedekleme) tanımlayabilirsiniz. Bir yerel yedek belirlediyseniz, “Incremental Backup” seçeneğini etkin hale getirebilirsiniz. Bu seçenek seçildiğinde, CH3SNAS, kaynak ve hedef içerikleri karşılaştıracak ve ancak kaynak hedeften daha yeni ise üstüne yazacaktır. Bu durum CH3SNAS yedekleme sürecini hızlandıracaktır.
5. Programlanmış karşıdan yükleme ayarlarını kaydetmek için “Save Settings” tuşuna
tıklayın.

TÜRKÇE
178
Programlanmış Karşıdan Yükleme Örnek 1: Ağınızda “MyComputer” adında bir bilgisayar ve “Conceptronic_Files” adında bir paylaşımı vardır. Bilgisayar, şifresi olan “Conceptronic” adlı bir hesapla korunmaktadır. Yedek, CH3SNAS cihazınızın diskinde, “Conceptronic_Backup” dosyasına kaydedilmiş olmalıdır. Programlanmış karşıdan yükleme haftalık olarak Cumartesi günü saat 20:30'da gerçekleşmelidir. Yukarıdaki bilgilere göre, yapılandırılan programlanmış karşıdan yükleme aşağıdaki gibi görünmelidir:
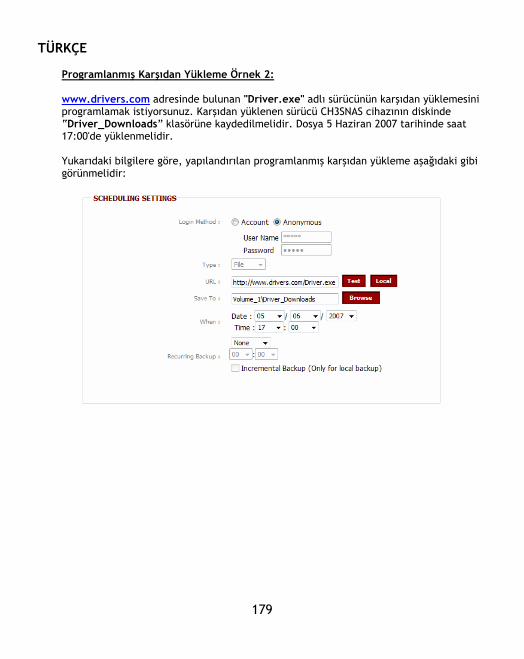
TÜRKÇE
179
Programlanmış Karşıdan Yükleme Örnek 2: www.drivers.com adresinde bulunan "Driver.exe" adlı sürücünün karşıdan yüklemesini programlamak istiyorsunuz. Karşıdan yüklenen sürücü CH3SNAS cihazının diskinde “Driver_Downloads” klasörüne kaydedilmelidir. Dosya 5 Haziran 2007 tarihinde saat 17:00'de yüklenmelidir. Yukarıdaki bilgilere göre, yapılandırılan programlanmış karşıdan yükleme aşağıdaki gibi görünmelidir:
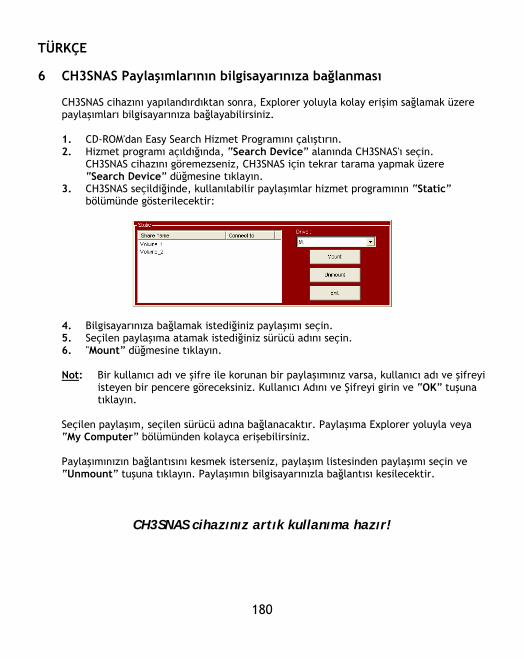
TÜRKÇE
180
6 CH3SNAS Paylaşımlarının bilgisayarınıza bağlanması
CH3SNAS cihazını yapılandırdıktan sonra, Explorer yoluyla kolay erişim sağlamak üzere paylaşımları bilgisayarınıza bağlayabilirsiniz. 1. CD-ROM'dan Easy Search Hizmet Programını çalıştırın. 2. Hizmet programı açıldığında, “Search Device” alanında CH3SNAS'ı seçin.
CH3SNAS cihazını göremezseniz, CH3SNAS için tekrar tarama yapmak üzere “Search Device” düğmesine tıklayın.
3. CH3SNAS seçildiğinde, kullanılabilir paylaşımlar hizmet programının “Static” bölümünde gösterilecektir:
4. Bilgisayarınıza bağlamak istediğiniz paylaşımı seçin. 5. Seçilen paylaşıma atamak istediğiniz sürücü adını seçin. 6. "Mount” düğmesine tıklayın. Not: Bir kullanıcı adı ve şifre ile korunan bir paylaşımınız varsa, kullanıcı adı ve şifreyi
isteyen bir pencere göreceksiniz. Kullanıcı Adını ve Şifreyi girin ve “OK” tuşuna tıklayın.
Seçilen paylaşım, seçilen sürücü adına bağlanacaktır. Paylaşıma Explorer yoluyla veya “My Computer” bölümünden kolayca erişebilirsiniz. Paylaşımınızın bağlantısını kesmek isterseniz, paylaşım listesinden paylaşımı seçin ve “Unmount” tuşuna tıklayın. Paylaşımın bilgisayarınızla bağlantısı kesilecektir.
CH3SNAS cihazınız artık kullanıma hazır!

Declaration of CE Conformity
181
The manufacturer 2L International BV Address Databankweg 7 3821 AL Amersfoort, the Netherlands Hereby declares that the product Type NETWORK HARDDISK 3.5” Product CH3SNAS Brandname Conceptronic Complies with following directives:
2004/108/EEC EMC directive:
Electromagnetic Compatibility
73/23/EEC Low Voltage Directive: Electrical equipment designed for use within certain voltage limits
The following standards were consulted to assess conformity: EN55022/9.98 Class B EN55024/9.98 EN 50081-1/1994 EN 61000-3-2/3/4/1995 EN 50082-1/1994 EN 60950/1995
The symbol confirms that this product conforms to the above named standards and regulations.
Place and date of issue: Aersfoort, 10/01/2007 (dd/mm/yyyy)
Herman Looijen, Product Marketing Manager
LICENCE AGREEMENT
182
Licensing Information
This Conceptronic product CH3SNAS includes copyrighted third-party software licensed under the terms of the GNU General Public License. Please see The GNU General Public License for the exact terms and conditions of this license. Specially, the following parts of this product are subject to the GNU GPL: 1.Linux kernel 2.6.12.6 2.uclibc-toolchain-src-20040609 3.at-3.1.8 4.busybox-1.00-pre1 5.confuse 6.dosfstools-2.10 7.e2fsprogs-1.32 8.goahead 9.imgconvert 10.mac-fdisk-0.1.org 11.zlib-1.2.2 12.libid3tag-0.15.1b 13.gdbm-1.8.3 14.mt-daapd-0.2.4 15.LPRng-3.8.10 16.mdadm-2.2 17.module-init-tools-3.3-pre1 18.ntp-4.2.0 19.openssl-0.7.i 20.quota-tools 21.samba-2.2.8a 22.tinylogin-1.4 23.u-boot-1.7.3 24.util-linux-2.12r 25.wget-LFS 26.wu-ftpd-2.6.2 27.jpegsr6 28.libiconv-1.9.2 29.sqlite-3.3.7
DECLARATION OF CE CONFIRMITY
183
All listed software packages are copyright by their respective authors. Please see the source code for detailed information.
Availability of source code
Conceptronic has exposed the full source code of the GPL licensed software, including any scripts to control compilation and installation of the object code. All future firmware updates will also be accompanied with their respective source code. For more information on how you can obtain our open source code, please visit our web site.
LICENCE AGREEMENT
184
GNU GENERAL PUBLIC LICENSE
Version 2, June 1991
Copyright (C) 1989, 1991 Free Software Foundation, Inc. Temple Place, Suite 330, Boston, MA 02111-1307 USA
Everyone is permitted to copy and distribute verbatim copies of this license document, but changing it is not allowed.
Preamble
The licenses for most software are designed to take away your freedom to share and change it. By contrast, the GNU General Public License is intended to guarantee your freedom to share and change free software--to make sure the software is free for all its users. This General Public License applies to most of the Free Software Foundation's software and to any other program whose authors commit to using it. (Some other Free Software Foundation software is covered by the GNU Library General Public License instead.) You can apply it to your programs, too. When we speak of free software, we are referring to freedom, not price. Our General Public Licenses are designed to make sure that you have the freedom to distribute copies of free software (and charge for this service if you wish), that you receive source code or can get it if you want it, that you can change the software or use pieces of it in new free programs; and that you know you can do these things. To protect your rights, we need to make restrictions that forbid anyone to deny you these rights or to ask you to surrender the rights. These restrictions translate to certain responsibilities for you if you distribute copies of the software, or if you modify it. For example, if you distribute copies of such a program, whether gratis or for a fee, you must give the recipients all the rights that you have. You must make sure that they, too, receive or can get the source code. And you must show them these terms so they know their rights. We protect your rights with two steps: (1) copyright the software, and (2) offer you this license which gives you legal permission to copy, distribute and/or modify the software. Also, for each author's protection and ours, we want to make certain that everyone understands that there is no warranty for this free software. If the software is modified by someone else and passed on, we want its recipients to know that what they have is not the original, so that any problems introduced by others will not reflect on the original authors' reputations. Finally, any free program is threatened constantly by software patents. We wish to avoid the danger that redistributors of a free program will individually obtain patent licenses, in effect making the program proprietary. To prevent this, we have made it clear that any patent must be licensed for everyone's free use or not licensed at all. The precise terms and conditions for copying, distribution and modification follow.
GNU GENERAL PUBLIC LICENSE TERMS AND CONDITIONS FOR COPYING, DISTRIBUTION AND MODIFICATION
0. This License applies to any program or other work which contains a notice placed by the copyright holder saying it may be distributed under the terms of this General Public License. The "Program", below, refers to any such program or work, and a "work based on the Program" means either the Program or any derivative work under copyright law: that is to say, a work containing the Program or a portion of it, either verbatim or with modifications and/or translated into another language. (Hereinafter, translation is included without limitation in the term "modification".) Each licensee is addressed as "you". Activities other than copying, distribution and modification are not covered by this License; they are outside its scope. The act of running the Program is not restricted, and the output from the Program is covered only if its contents constitute a work based on the Program (independent of having been made by running the Program). Whether that is true depends on what the Program does.

LICENCE AGREEMENT
185
1. You may copy and distribute verbatim copies of the Program's source code as you receive it, in any medium, provided that you conspicuously and appropriately publish on each copy an appropriate copyright notice and disclaimer of warranty; keep intact all the notices that refer to this License and to the absence of any warranty; and give any other recipients of the Program a copy of this License along with the Program. You may charge a fee for the physical act of transferring a copy, and you may at your option offer warranty protection in exchange for a fee. 2. You may modify your copy or copies of the Program or any portion of it, thus forming a work based on the Program, and copy and distribute such modifications or work under the terms of Section 1 above, provided that you also meet all of these conditions: a) You must cause the modified files to carry prominent notices stating that you changed the files and the date of any change. b) You must cause any work that you distribute or publish, that in whole or in part contains or is derived from the Program or any part thereof, to be licensed as a whole at no charge to all third parties under the terms of this License. c) If the modified program normally reads commands interactively when run, you must cause it, when started running for such interactive use in the most ordinary way, to print or display an announcement including an appropriate copyright notice and a notice that there is no warranty (or else, saying that you provide a warranty) and that users may redistribute the program under these conditions, and telling the user how to view a copy of this License. (Exception: if the Program itself is interactive but does not normally print such an announcement, your work based on the Program is not required to print an announcement.) These requirements apply to the modified work as a whole. If identifiable sections of that work are not derived from the Program, and can be reasonably considered independent and separate works in themselves, then this License, and its terms, do not apply to those sections when you distribute them as separate works. But when you distribute the same sections as part of a whole which is a work based on the Program, the distribution of the whole must be on the terms of this License, whose permissions for other licensees extend to the entire whole, and thus to each and every part regardless of who wrote it. Thus, it is not the intent of this section to claim rights or contest your rights to work written entirely by you; rather, the intent is to exercise the right to control the distribution of derivative or collective works based on the Program. In addition, mere aggregation of another work not based on the Program with the Program (or with a work based on the Program) on a volume of a storage or distribution medium does not bring the other work under the scope of this License. 3. You may copy and distribute the Program (or a work based on it, under Section 2) in object code or executable form under the terms of Sections 1 and 2 above provided that you also do one of the following: a) Accompany it with the complete corresponding machine-readable source code, which must be distributed under the terms of Sections 1 and 2 above on a medium customarily used for software interchange; or, b) Accompany it with a written offer, valid for at least three years, to give any third party, for a charge no more than your cost of physically performing source distribution, a complete machine-readable copy of the corresponding source code, to be distributed under the terms of Sections 1 and 2 above on a medium customarily used for software interchange; or, c) Accompany it with the information you received as to the offer to distribute corresponding source code. (This alternative is allowed only for noncommercial distribution and only if you received the program in object code or executable form with such an offer, in accord with Subsection b above.) The source code for a work means the preferred form of the work for making modifications to it. For an executable work, complete source code means all the source code for all modules it contains, plus any associated interface definition files, plus the scripts used to control compilation and installation of the executable. However, as a special exception, the source code distributed need not include anything that is normally distributed (in either source or binary form) with the major components (compiler, kernel, and so on) of the operating system on which the executable runs, unless that component itself accompanies the executable. If distribution of executable or object code is made by offering access to copy from a designated place, then offering equivalent access to copy the source code from the same place counts as distribution of the source code, even though third parties are not compelled to copy the source along with the object code.

LICENCE AGREEMENT
186
4. You may not copy, modify, sublicense, or distribute the Program except as expressly provided under this License. Any attempt otherwise to copy, modify, sublicense or distribute the Program is void, and will automatically terminate your rights under this License. However, parties who have received copies, or rights, from you under this License will not have their licenses terminated so long as such parties remain in full compliance. 5. You are not required to accept this License, since you have not signed it. However, nothing else grants you permission to modify or distribute the Program or its derivative works. These actions are prohibited by law if you do not accept this License. Therefore, by modifying or distributing the Program (or any work based on the Program), you indicate your acceptance of this License to do so, and all its terms and conditions for copying, distributing or modifying the Program or works based on it. 6. Each time you redistribute the Program (or any work based on the Program), the recipient automatically receives a license from the original licensor to copy, distribute or modify the Program subject to these terms and conditions. You may not impose any further restrictions on the recipients' exercise of the rights granted herein. You are not responsible for enforcing compliance by third parties to this License. 7. If, as a consequence of a court judgment or allegation of patent infringement or for any other reason (not limited to patent issues), conditions are imposed on you (whether by court order, agreement or otherwise) that contradict the conditions of this License, they do not excuse you from the conditions of this License. If you cannot distribute so as to satisfy simultaneously your obligations under this License and any other pertinent obligations, then as a consequence you may not distribute the Program at all. For example, if a patent license would not permit royalty-free redistribution of the Program by all those who receive copies directly or indirectly through you, then the only way you could satisfy both it and this License would be to refrain entirely from distribution of the Program. If any portion of this section is held invalid or unenforceable under any particular circumstance, the balance of the section is intended to apply and the section as a whole is intended to apply in other circumstances. It is not the purpose of this section to induce you to infringe any patents or other property right claims or to contest validity of any such claims; this section has the sole purpose of protecting the integrity of the free software distribution system, which is implemented by public license practices. Many people have made generous contributions to the wide range of software distributed through that system in reliance on consistent application of that system; it is up to the author/donor to decide if he or she is willing to distribute software through any other system and a licensee cannot impose that choice. This section is intended to make thoroughly clear what is believed to be a consequence of the rest of this License. 8. If the distribution and/or use of the Program is restricted in certain countries either by patents or by copyrighted interfaces, the original copyright holder who places the Program under this License may add an explicit geographical distribution limitation excluding those countries, so that distribution is permitted only in or among countries not thus excluded. In such case, this License incorporates the limitation as if written in the body of this License. 9. The Free Software Foundation may publish revised and/or new versions of the General Public License from time to time. Such new versions will be similar in spirit to the present version, but may differ in detail to address new problems or concerns. Each version is given a distinguishing version number. If the Program specifies a version number of this License which applies to it and "any later version", you have the option of following the terms and conditions either of that version or of any later version published by the Free Software Foundation. If the Program does not specify a version number of this License, you may choose any version ever published by the Free Software Foundation. 10. If you wish to incorporate parts of the Program into other free programs whose distribution conditions are different, write to the author to ask for permission. For software which is copyrighted by the Free Software Foundation, write to the Free Software Foundation; we sometimes make exceptions for this. Our decision will be guided by the two goals of preserving the free status of all derivatives of our free software and of promoting the sharing and reuse of software generally.

LICENCE AGREEMENT
187
NO WARRANTY 11. BECAUSE THE PROGRAM IS LICENSED FREE OF CHARGE, THERE IS NO WARRANTY FOR THE PROGRAM, TO THE EXTENT PERMITTED BY APPLICABLE LAW. EXCEPT WHEN OTHERWISE STATED IN WRITING THE COPYRIGHT HOLDERS AND/OR OTHER PARTIES PROVIDE THE PROGRAM "AS IS" WITHOUT WARRANTY OF ANY KIND, EITHER EXPRESSED OR IMPLIED, INCLUDING, BUT NOT LIMITED TO, THE IMPLIED WARRANTIES OF MERCHANTABILITY AND FITNESS FOR A PARTICULAR PURPOSE. THE ENTIRE RISK AS TO THE QUALITY AND PERFORMANCE OF THE PROGRAM IS WITH YOU. SHOULD THE PROGRAM PROVE DEFECTIVE, YOU ASSUME THE COST OF ALL NECESSARY SERVICING, REPAIR OR CORRECTION. 12. IN NO EVENT UNLESS REQUIRED BY APPLICABLE LAW OR AGREED TO IN WRITING WILL ANY COPYRIGHT HOLDER, OR ANY OTHER PARTY WHO MAY MODIFY AND/OR REDISTRIBUTE THE PROGRAM AS PERMITTED ABOVE, BE LIABLE TO YOU FOR DAMAGES, INCLUDING ANY GENERAL, SPECIAL, INCIDENTAL OR CONSEQUENTIAL DAMAGES ARISING OUT OF THE USE OR INABILITY TO USE THE PROGRAM (INCLUDING BUT NOT LIMITED TO LOSS OF DATA OR DATA BEING RENDERED INACCURATE OR LOSSES SUSTAINED BY YOU OR THIRD PARTIES OR A FAILURE OF THE PROGRAM TO OPERATE WITH ANY OTHER PROGRAMS), EVEN IF SUCH HOLDER OR OTHER PARTY HAS BEEN ADVISED OF THE POSSIBILITY OF SUCH DAMAGES.
END OF TERMS AND CONDITIONS
How to Apply These Terms to Your New Programs If you develop a new program, and you want it to be of the greatest possible use to the public, the best way to achieve this is to make it free software which everyone can redistribute and change under these terms. To do so, attach the following notices to the program. It is safest to attach them to the start of each source file to most effectively convey the exclusion of warranty; and each file should have at least the "copyright" line and a pointer to where the full notice is found.
, 1 April 1989 Ty Coon, President of Vice
This General Public License does not permit incorporating your program into proprietary programs. If your program is a subroutine library, you may consider it more useful to permit linking proprietary applications with the library. If this is what you want to do, use the GNU Library General Public License instead of this License.