
Administrator Guide - Palmetto Microfilm & Imaging Systems
34
ADMINISTRATOR’S GUIDE 0 PALMETTO MICROFILM AND IMAGING SYSTEMS AX Universal Integrator AXUI Administrator’sGuide
Transcript of Administrator Guide - Palmetto Microfilm & Imaging Systems

A D M I N I S T R A T O R ’ S G U I D E
0
PALMETTO MICROFILM AND IMAGING SYSTEMS AX Universal Integrator
AX UI Administrator’s Guide

A D M I N I S T R A T O R ’ S G U I D E
i
T H I S P A G E L E F T B L A N K

A X U N I V E R S A L I N T E G R A T O R
ii
P A L M E T T O M I C R O F I L M A N D I M A G I N G S Y S T E M S
Administrator’s Guide
Palmetto Microfilm and Imaging Systems 202 N. Lake Drive • Lexington, SC 29072 Phone 803.359.3703 • Fax 803.359.1217
Rev. 03.14.05
A D M I N I S T R A T O R ’ S G U I D E
iii
Table of ContentsInstallation Requirements 1 License Server 2 Concepts and Terms 2 Integration Methods 3 Installing AXUI 5 Configuring AXUI 7 Configuring AXUI Specifications 7 General Tab 7 DSN/Apps Tab 9 Client Type Tab 9 DB Connections Tab 10 Login Tab 11 Fields Tab 12 Hot Keys Tab 17 Spec Rules Tab 17 Options Tab 18 Appendix A: AXToolbar.ini 19 Appendix B: Filter Expressions 20 Appendix C: Data Formats 21 Appendix D: HLLAPI Setup 23

A X U N I V E R S A L I N T E G R A T O R
iv
Licensed Product: PMSI AX Universal Integrator This is a legal agreement between you (individually or on behalf of your company) and PALMETTO MICROFILM SYSTEM INC. ("PMSI") for the use of the Licensed Product described above. By pressing the "Yes" button below and proceeding with the installation, You confirm that (i) You have read this License Agreement, and (ii) You agree to be bound by its terms and conditions. If You disagree with or do not accept any of the terms of this License Agreement, You may cancel this transaction by pressing the "No" button below and returning the product with your receipt to the authorized supplier of PMSI products within thirty (30) days from the date of purchase. Use You are granted a personal, nontransferable, nonexclusive license to install and use the Licensed Product on a personal computer or workstation that is not used as a server. If you have purchased a User Pack that entitles you to multiple users, you may only use up to the number of copies of the Licensed Product indicated at any one time. You may also make one copy of the Licensed Product for archival purposes. Right to Audit In light of the nature of this License Agreement, PMSI reserves the right for it or its independent auditors to inspect your records from time to time in order to assure compliance with the terms of this License Agreement. Intellectual Property Rights The Licensed Product and accompanying documentation are protected by both copyright law and international treaties. PMSI owns all intellectual property rights in the Licensed Product and accompanying documentation, and the structure, organization and code contain valuable trade secrets of PMSI. PMSI retains all rights not expressly granted hereunder. Restrictions Except as expressly authorized by this License Agreement, You may not copy, modify, translate, reverse engineer, decompile or disassemble (except as applicable law expressly prohibits this restriction) the Licensed Product. Limited Warranty For a period of thirty (30) days following the date of purchase, PMSI warrants to the original Licensee that (i) the Licensed Product will perform substantially in accordance with the accompanying documentation and (ii) the documentation and media are free from defects in materials and workmanship. This limited warranty does not cover failures caused by accident, abuse or misapplication. In the event of a failure of the Licensed Product or documentation to meet this limited warranty, the entire liability of PMSI and your exclusive remedy shall be, at PMSI’s sole discretion, either: (a) replacement of the Licensed Product or documentation not meeting the limited warranty, or (b) return of the fee paid, provided the Licensed Product and accompanying materials are returned to PMSI with a copy of your receipt from an authorized source. Any replacement product or documentation will be warranted for the remainder of the original warranty period or ten (10) days, whichever is longer. EXCEPT AS SPECIFICALLY PROVIDED HEREIN, PMSI MAKES NO WARRANTY, EITHER EXPRESS OR IMPLIED, RELATING TO THE LICENSED PRODUCT, INCLUDING BUT NOT LIMITED TO WARRANTIES OF MERCHANTABILITY, NONINFRINGEMENT OR FITNESS FOR A PARTICULAR PURPOSE. NEITHER PMSI NOR ITS SUPPLIERS WARRANTS THAT THE LICENSED PRODUCT IS ERROR-FREE, WILL OPERATE WITHOUT INTERRUPTION OR WILL WORK IN ALL COMBINATIONS SELECTED BY YOU. This limited warranty gives You specific legal rights, and You may have other rights, which vary from jurisdiction to jurisdiction. Limitation of Liability IN NO EVENT SHALL PMSI OR ANY OF ITS SUPPLIERS BE LIABLE FOR SPECIAL, INCIDENTAL, CONSEQUENTIAL OR INDIRECT DAMAGES (INCLUDING, BUT NOT LIMITED TO, COSTS OF PROCURING SUBSTITUTE PRODUCTS OR SERVICES, DAMAGES FOR LOSS OF PROFITS OR REVENUE, BUSINESS INTERRUPTION, LOSS OF INFORMATION OR OTHER PECUNIARY LOSS) ARISING OUT OF THE USE OR INABILITY TO USE THE LICENSED PRODUCT, HOWEVER CAUSED AND UNDER ANY THEORY OF LIABILITY, EVEN IF PMSI HAS BEEN ADVISED OF THE POSSIBILITY OF SUCH DAMAGES. IN NO EVENT SHALL PMSI’S LIABILITY FOR MONEY DAMAGES EXCEED THE AMOUNT PAID BY YOU FOR THE LICENSED PRODUCT FROM WHICH THE CLAIM AROSE. Some jurisdictions do not allow the exclusion or limitation of liability for consequential or incidental damages, so the above limitation may not apply to You. Right of Termination PMSI has the right to terminate this License Agreement if You fail to adhere to the terms and conditions of this License Agreement. Upon termination for any reason, You must destroy all copies of the Licensed Product in your possession.
A D M I N I S T R A T O R ’ S G U I D E
v
Table of Figures: Figure 1: License Server .......................................................................................................................................................................................................... 2 Figure 2: AXUI Language Selection...................................................................................................................................................................................... 5 Figure 3: Destination Folder .................................................................................................................................................................................................. 6 Figure 4: File Version Conflict............................................................................................................................................................................................... 6 Figure 5: General Tab.............................................................................................................................................................................................................. 7 Figure 6: DSN/APPS Tab...................................................................................................................................................................................................... 9 Figure 7: Client Type Tab ....................................................................................................................................................................................................... 9 Figure 8: DB Connections Tab............................................................................................................................................................................................ 10 Figure 9: Login Tab................................................................................................................................................................................................................ 11 Figure 10: Fields Tab ............................................................................................................................................................................................................. 12 Figure 11: Database Fields options ..................................................................................................................................................................................... 13 Figure 12: Field Formatting Tab.......................................................................................................................................................................................... 13 Figure 13: Field Options Tab ............................................................................................................................................................................................... 14 Figure 14: Terminal Emulator Data Tab............................................................................................................................................................................ 14 Figure 15: Screen Scrape Data Tab ..................................................................................................................................................................................... 15 Figure 16: Screen Scrape Example ...................................................................................................................................................................................... 15 Figure 17: Wep page Example ............................................................................................................................................................................................. 16 Figure 18: Hot Keys Tab....................................................................................................................................................................................................... 17 Figure 19: Spec Rules Tab .................................................................................................................................................................................................... 17 Figure 20: Options Tab ......................................................................................................................................................................................................... 18

A D M I N I S T R A T O R ’ S G U I D E
1
Getting Started The AX Universal Integrator (AXUI) is the most comprehensive AX and WX integration toolbar on the market. An almost seamless integration can be established between virtually any legacy application and the EMC Documentum® products, with no programming experience.
Installation Requirements • EMC Documentum® ApplicationXtender or access to EMC Documentum® WebXtender
Server
• MDAC 2.6 or above
Chapter
1
A X U N I V E R S A L I N T E G R A T O R
2
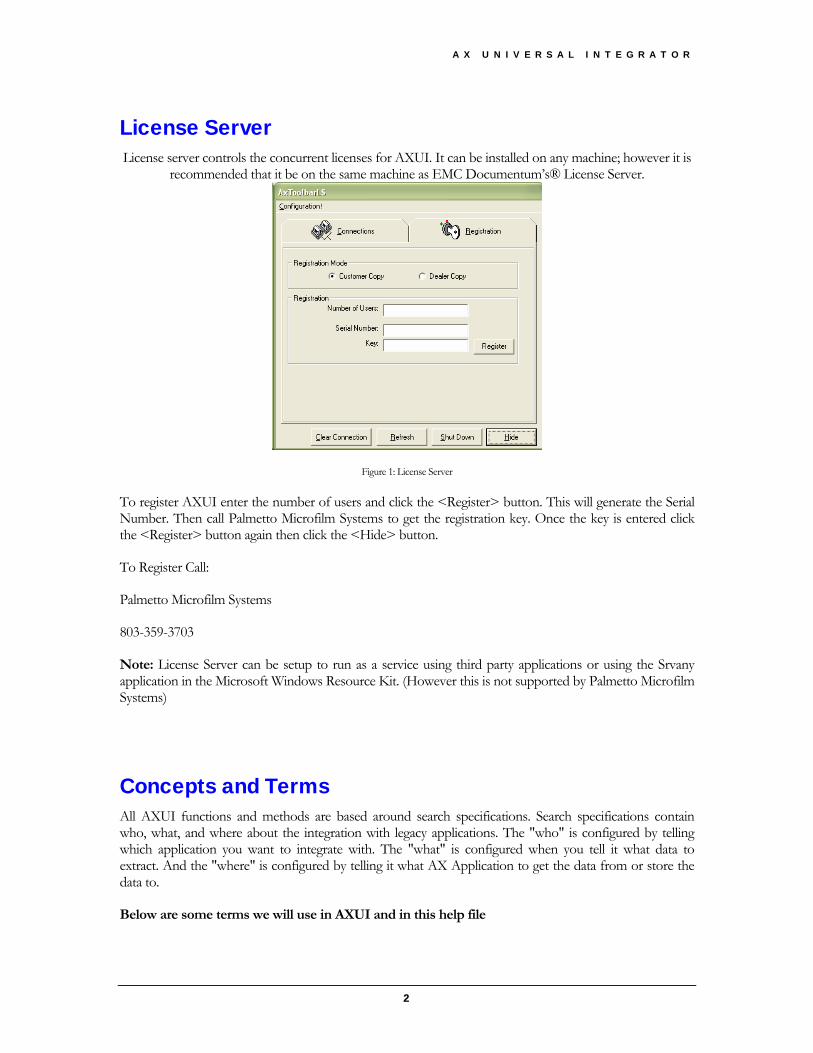
License Server License server controls the concurrent licenses for AXUI. It can be installed on any machine; however it is
recommended that it be on the same machine as EMC Documentum’s® License Server.
Figure 1: License Server
To register AXUI enter the number of users and click the <Register> button. This will generate the Serial Number. Then call Palmetto Microfilm Systems to get the registration key. Once the key is entered click the <Register> button again then click the <Hide> button.
To Register Call:
Palmetto Microfilm Systems
803-359-3703
Note: License Server can be setup to run as a service using third party applications or using the Srvany application in the Microsoft Windows Resource Kit. (However this is not supported by Palmetto Microfilm Systems)
Concepts and Terms All AXUI functions and methods are based around search specifications. Search specifications contain who, what, and where about the integration with legacy applications. The "who" is configured by telling which application you want to integrate with. The "what" is configured when you tell it what data to extract. And the "where" is configured by telling it what AX Application to get the data from or store the data to.
Below are some terms we will use in AXUI and in this help file
A D M I N I S T R A T O R ’ S G U I D E
3
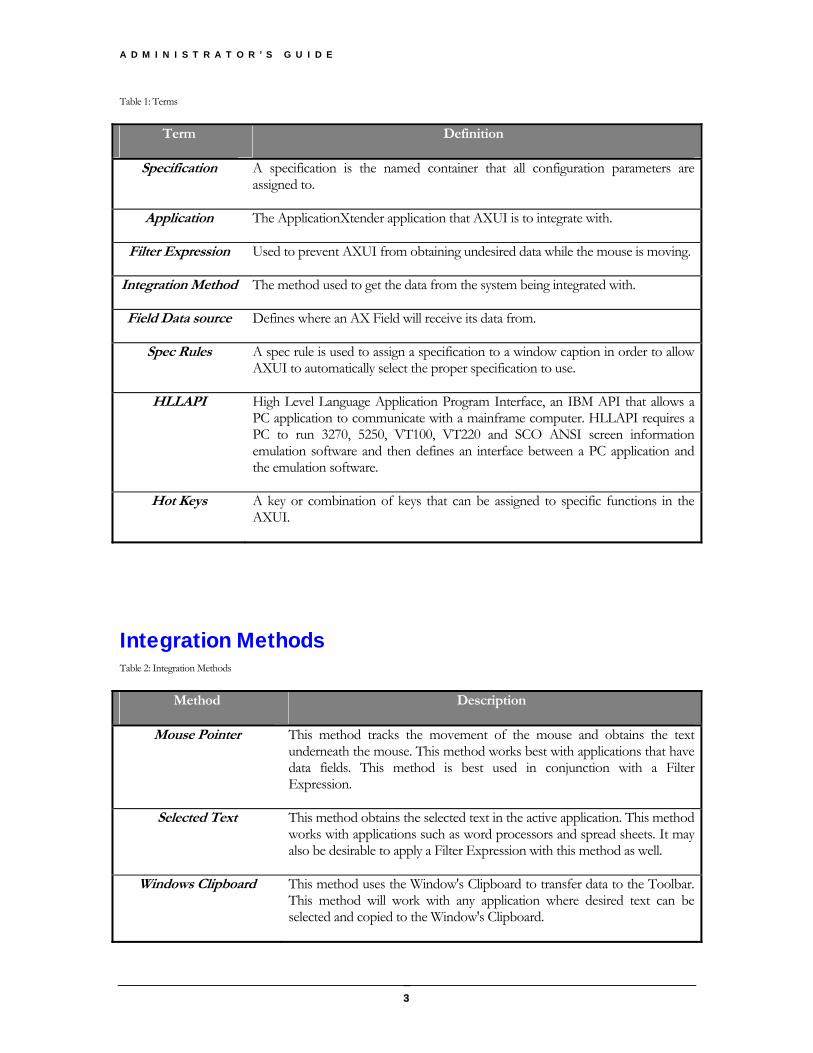
Table 1: Terms
Term Definition
Specification A specification is the named container that all configuration parameters are assigned to.
Application The ApplicationXtender application that AXUI is to integrate with.
Filter Expression Used to prevent AXUI from obtaining undesired data while the mouse is moving.
Integration Method The method used to get the data from the system being integrated with.
Field Data source Defines where an AX Field will receive its data from.
Spec Rules A spec rule is used to assign a specification to a window caption in order to allow AXUI to automatically select the proper specification to use.
HLLAPI High Level Language Application Program Interface, an IBM API that allows a PC application to communicate with a mainframe computer. HLLAPI requires a PC to run 3270, 5250, VT100, VT220 and SCO ANSI screen information emulation software and then defines an interface between a PC application and the emulation software.
Hot Keys A key or combination of keys that can be assigned to specific functions in the AXUI.
Integration Methods Table 2: Integration Methods
Method Description
Mouse Pointer This method tracks the movement of the mouse and obtains the text underneath the mouse. This method works best with applications that have data fields. This method is best used in conjunction with a Filter Expression.
Selected Text This method obtains the selected text in the active application. This method works with applications such as word processors and spread sheets. It may also be desirable to apply a Filter Expression with this method as well.
Windows Clipboard This method uses the Window's Clipboard to transfer data to the Toolbar. This method will work with any application where desired text can be selected and copied to the Window's Clipboard.
A X U N I V E R S A L I N T E G R A T O R
4
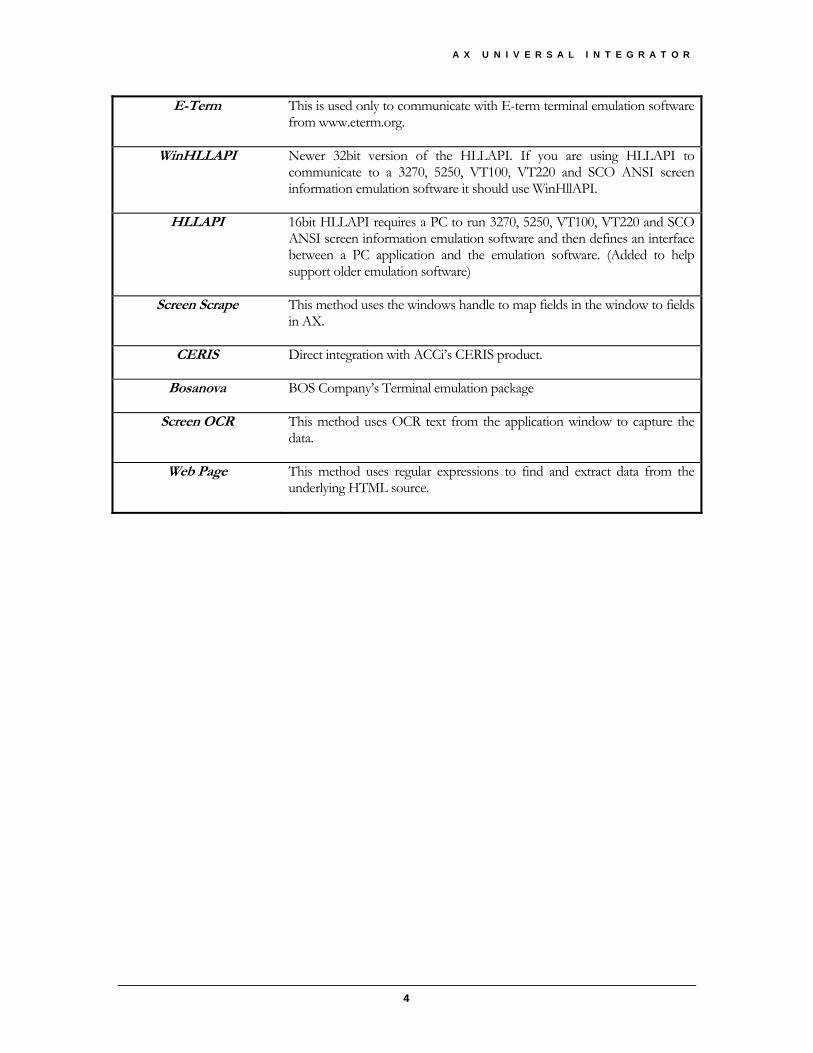
E-Term This is used only to communicate with E-term terminal emulation software from www.eterm.org.
WinHLLAPI Newer 32bit version of the HLLAPI. If you are using HLLAPI to communicate to a 3270, 5250, VT100, VT220 and SCO ANSI screen information emulation software it should use WinHllAPI.
HLLAPI 16bit HLLAPI requires a PC to run 3270, 5250, VT100, VT220 and SCO ANSI screen information emulation software and then defines an interface between a PC application and the emulation software. (Added to help support older emulation software)
Screen Scrape This method uses the windows handle to map fields in the window to fields in AX.
CERIS Direct integration with ACCi’s CERIS product.
Bosanova BOS Company’s Terminal emulation package
Screen OCR This method uses OCR text from the application window to capture the data.
Web Page This method uses regular expressions to find and extract data from the underlying HTML source.
A D M I N I S T R A T O R ’ S G U I D E
5
Installing and Configuring AXUI
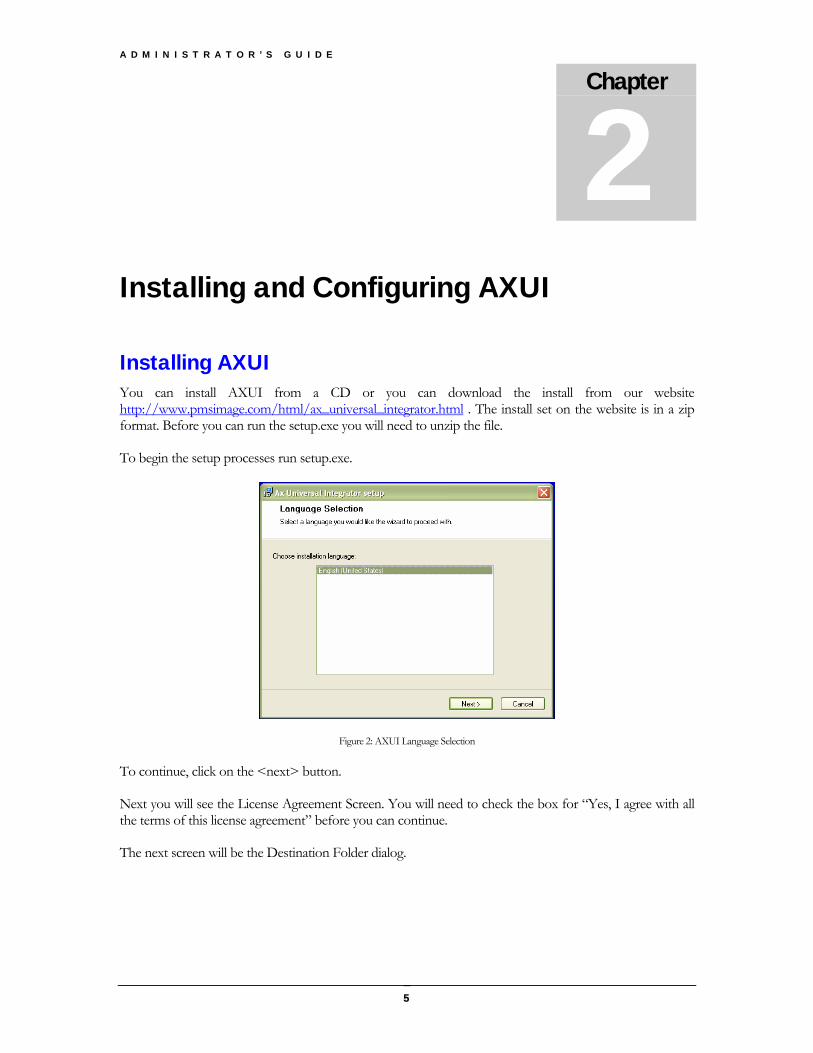
Installing AXUI You can install AXUI from a CD or you can download the install from our website http://www.pmsimage.com/html/ax_universal_integrator.html . The install set on the website is in a zip format. Before you can run the setup.exe you will need to unzip the file.
To begin the setup processes run setup.exe.
Figure 2: AXUI Language Selection
To continue, click on the <next> button.
Next you will see the License Agreement Screen. You will need to check the box for “Yes, I agree with all the terms of this license agreement” before you can continue.
The next screen will be the Destination Folder dialog.
Chapter
2
A X U N I V E R S A L I N T E G R A T O R
6
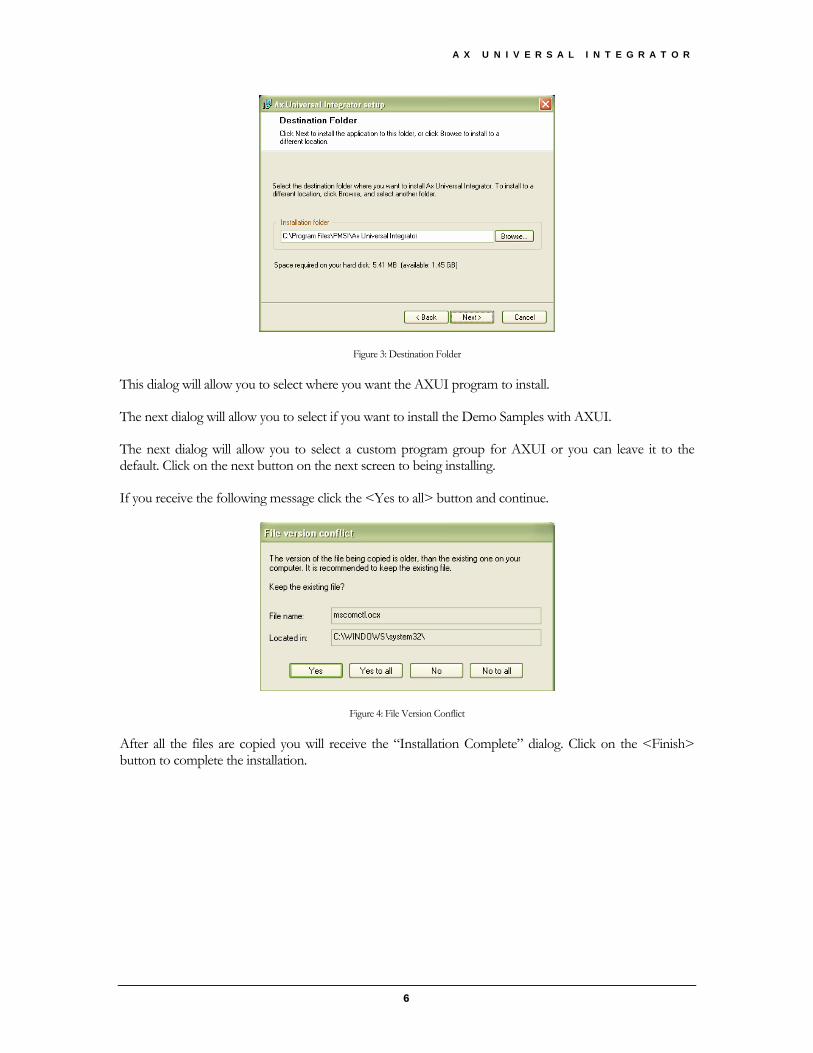
Figure 3: Destination Folder
This dialog will allow you to select where you want the AXUI program to install.
The next dialog will allow you to select if you want to install the Demo Samples with AXUI.
The next dialog will allow you to select a custom program group for AXUI or you can leave it to the default. Click on the next button on the next screen to being installing.
If you receive the following message click the <Yes to all> button and continue.
Figure 4: File Version Conflict
After all the files are copied you will receive the “Installation Complete” dialog. Click on the <Finish> button to complete the installation.
A D M I N I S T R A T O R ’ S G U I D E
7
Configuring AXUI AXUI is flexible program with many configuration options designed to give the best possible integration. In this section we cover the configuration options on each tab as well as how to setup AXUI to use a central configuration database to facilitate multi-user installs.
AXUI Configuration Fundamentals
AXUI uses the AXToolbar.ini and a configuration database to store the configuration settings. The default database is located in the install path of AXUI (default: C:\Program Files\PMSI\Ax Universal Integrator\AXToolbar.mdb). AXUI can use any ODBC compliant DB platform as its configuration database. If you are setting up a multi-user system it is recommended that you use a central configuration database to aid in the setup and maintaining the integration specifications across multiple client machines. The AXToolbar.ini is also located in the install path of AXUI. See Appendix A for a sample AXToolbar.ini.
Note: To use a central database you must modify the AxToolbar.ini.
Configuring AXUI Specifications
Click on the configuration button to start setting up AXUI. You will be asked to enter an Administrator password. AXUI sets a blank password by default. Once you are at the configuration dialog you can click on “Admin” on the menu-bar and then select change password to change the Administrator password. Also under “Admin” you can change the address of the license server that AXUI uses.
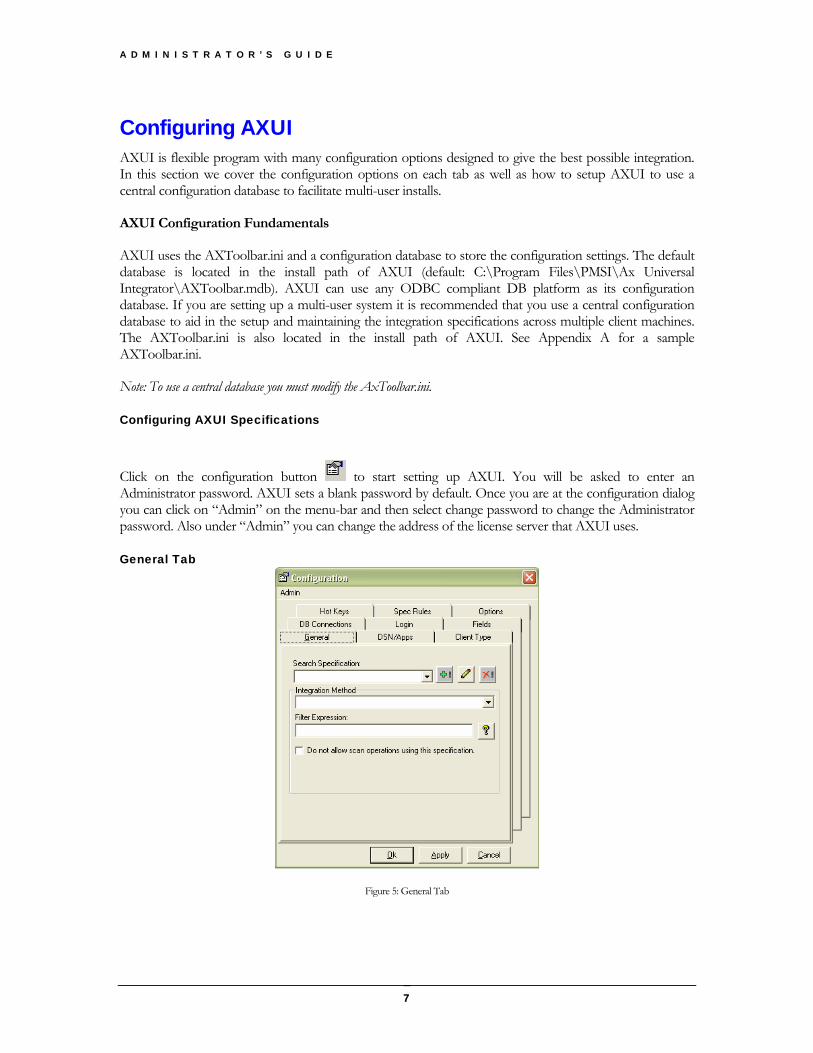
General Tab
Figure 5: General Tab
A X U N I V E R S A L I N T E G R A T O R
8
The general tab is where you begin building your Search Specification. Click the button and enter a name for the new specification.* Next Choose the appropriate Integration Method. You can also choose whether you want scan with this specification. You may also define a Filter Expression if desired.** Filter expressions allow you to filter out data that does not match a certain format. This helps reduce the risk of AXUI extracting erroneous information to send to ApplicationXtender.
Use the button to rename a Specification.
Use the button to delete a Search Specification.
* - If you are using WinHLLAPI, HLLAPI, or E-Term the spec name must be some unique string on the terminal emulation screen being enabled, such as screen id.
** - If you are using WinHLLAPI, HLLAPI, or E-Term enter the location for the string used as your spec name.
NOTE: If you are using WinHLLAPI, HLLAPI, or E-Term AXUI searches through all specs and locates the one that matches the screen you are on that is the reason that the spec name must be some unique string on the terminal emulation screen. Unless you select to ignore the auto-select feature on the Options Tab.
NOTE: If you choose the Web Page method the text in “Enter the base URL of the web page” text box must be found in the URL of the page to be integrated with.
A D M I N I S T R A T O R ’ S G U I D E
9
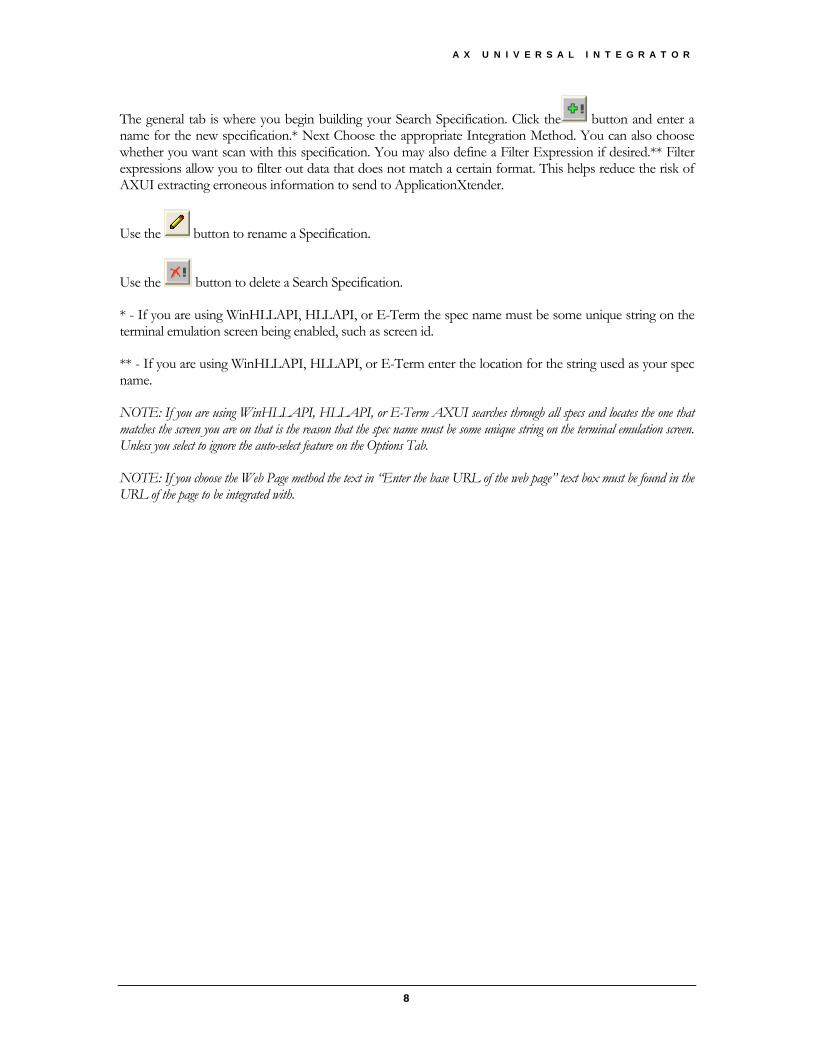
DSN/Apps Tab
Figure 6: DSN/APPS Tab
The DSN/Apps Tab is where you will define your which Application you will attach to your specification. On this tab you will need to select which version of AX you are running and then select you data source. Once you select your data source you will be asked to login to AX. You can then select the proper application from the drop down list.
Client Type Tab
Figure 7: Client Type Tab
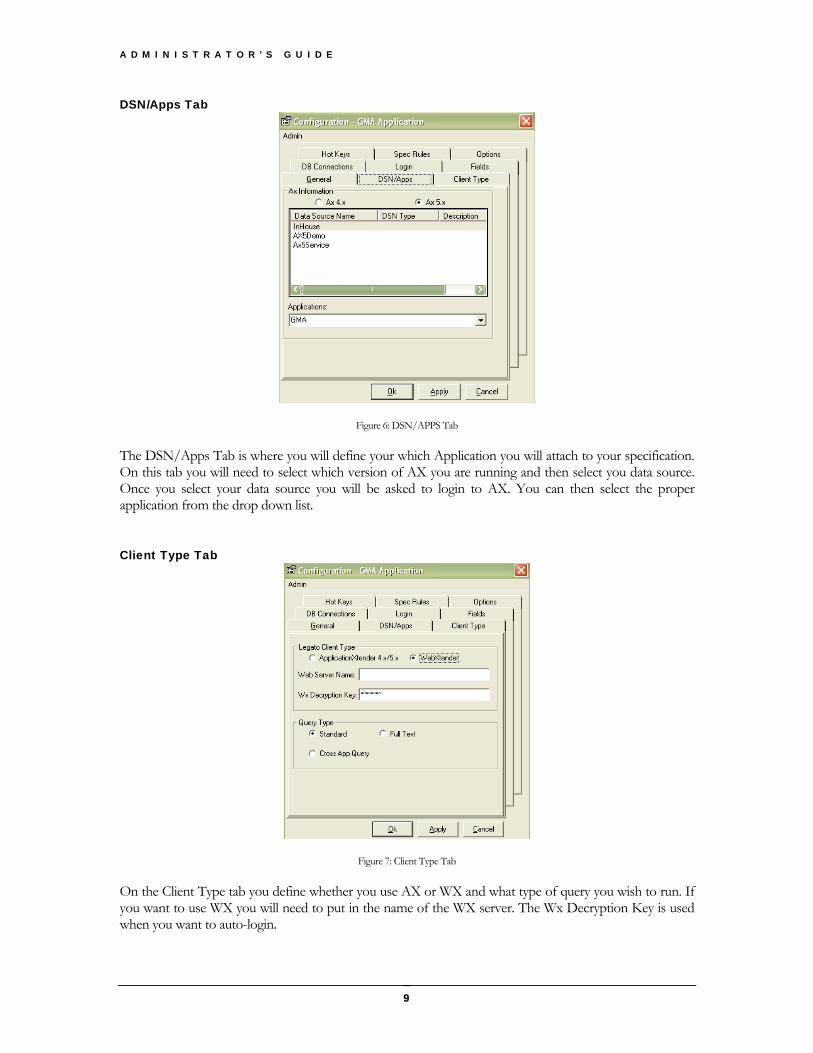
On the Client Type tab you define whether you use AX or WX and what type of query you wish to run. If you want to use WX you will need to put in the name of the WX server. The Wx Decryption Key is used when you want to auto-login.
A X U N I V E R S A L I N T E G R A T O R
10
Note: The default key for WX4 is "WxServerCopyOfKeypassword", and WX5 is “password”. See your WX documentation for the locations of these keys if you wish to change them.
Note: If Cross App Query is selected then you must supply the Saved Cross App Query Name and the linking field must be the first field in the applications.
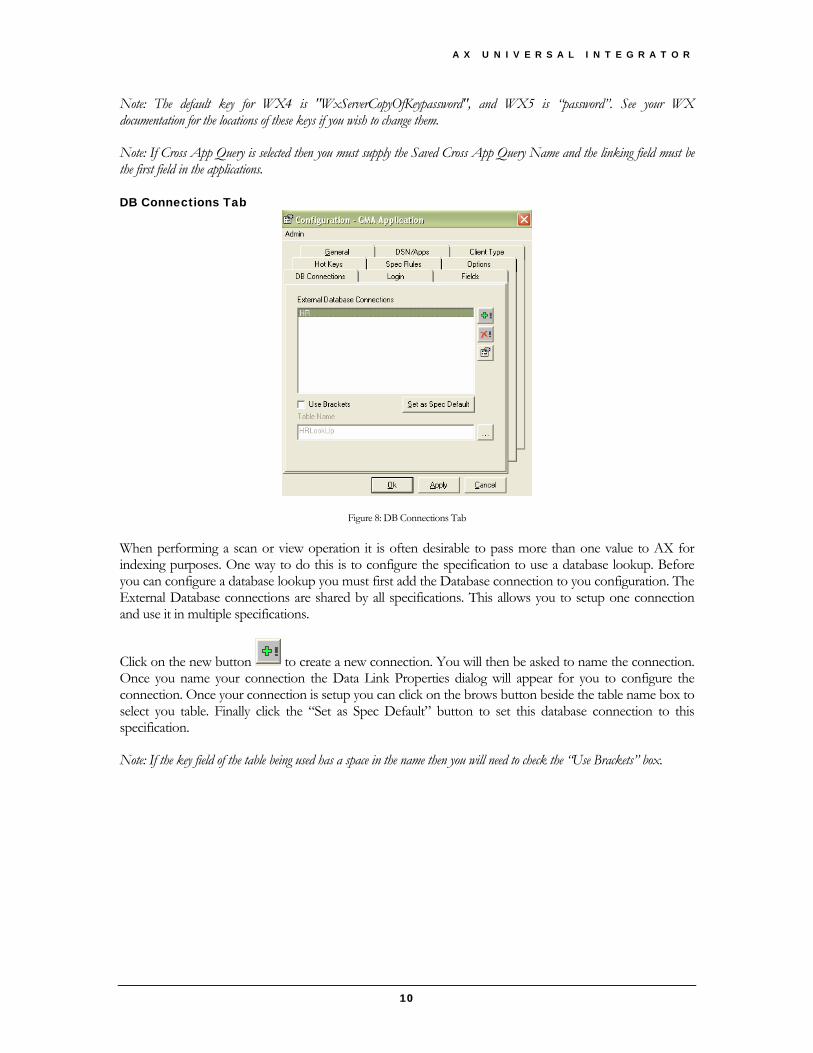
DB Connections Tab
Figure 8: DB Connections Tab
When performing a scan or view operation it is often desirable to pass more than one value to AX for indexing purposes. One way to do this is to configure the specification to use a database lookup. Before you can configure a database lookup you must first add the Database connection to you configuration. The External Database connections are shared by all specifications. This allows you to setup one connection and use it in multiple specifications.
Click on the new button to create a new connection. You will then be asked to name the connection. Once you name your connection the Data Link Properties dialog will appear for you to configure the connection. Once your connection is setup you can click on the brows button beside the table name box to select you table. Finally click the “Set as Spec Default” button to set this database connection to this specification.
Note: If the key field of the table being used has a space in the name then you will need to check the “Use Brackets” box.
A D M I N I S T R A T O R ’ S G U I D E
11
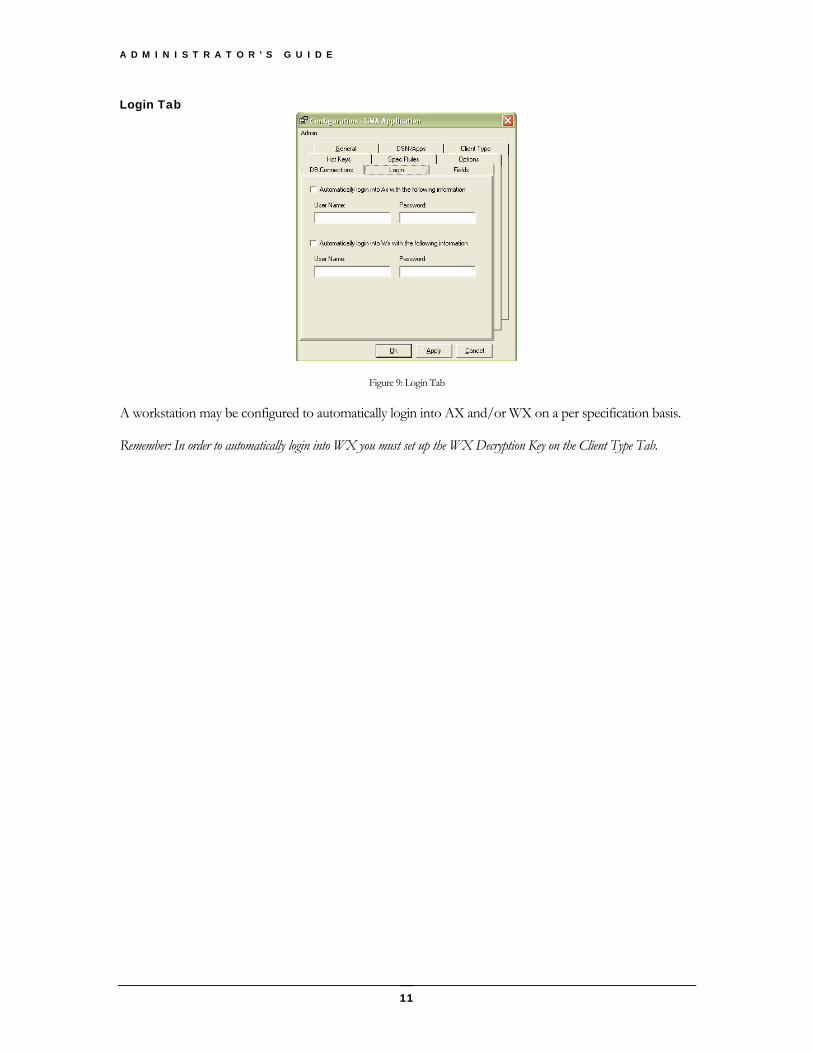
Login Tab
Figure 9: Login Tab
A workstation may be configured to automatically login into AX and/or WX on a per specification basis.
Remember: In order to automatically login into WX you must set up the WX Decryption Key on the Client Type Tab.
A X U N I V E R S A L I N T E G R A T O R
12
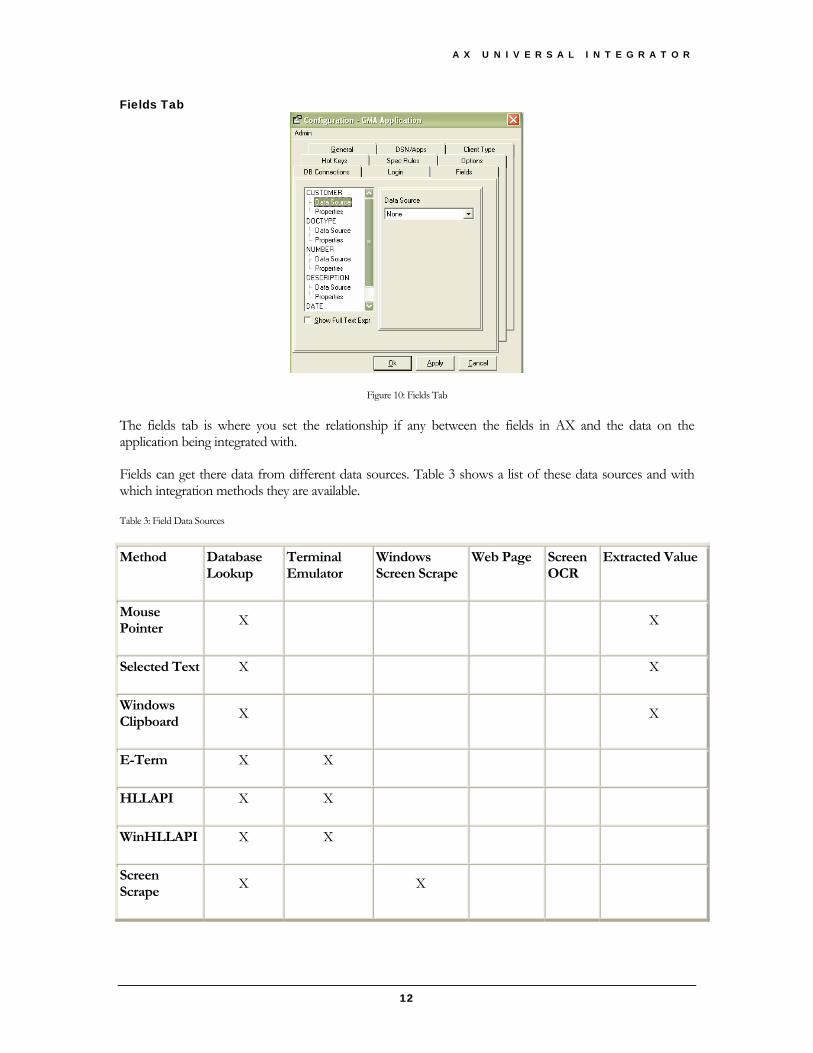
Fields Tab
Figure 10: Fields Tab
The fields tab is where you set the relationship if any between the fields in AX and the data on the application being integrated with.
Fields can get there data from different data sources. Table 3 shows a list of these data sources and with which integration methods they are available.
Table 3: Field Data Sources
Method Database Lookup
Terminal Emulator
Windows Screen Scrape
Web Page Screen OCR
Extracted Value
Mouse Pointer
X X
Selected Text X X
Windows Clipboard
X X
E-Term X X
HLLAPI X X
WinHLLAPI X X
Screen Scrape
X X
A D M I N I S T R A T O R ’ S G U I D E
13
Web Page X X
Screen OCR X X
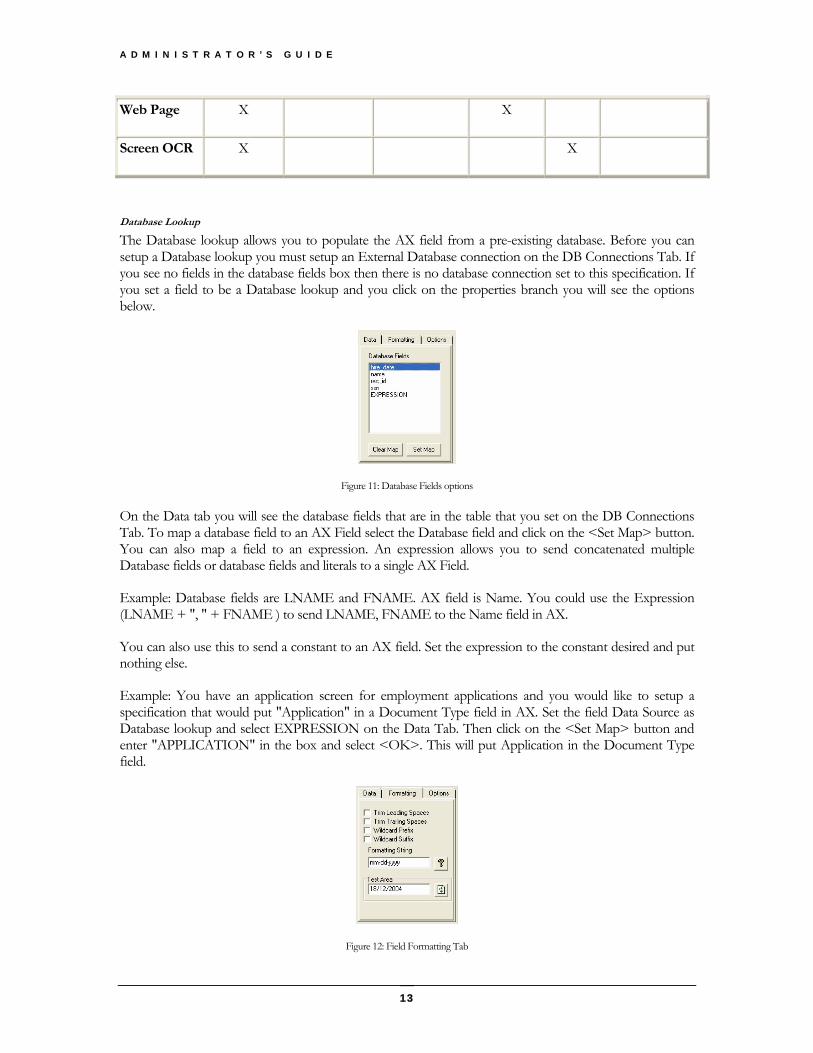
Database Lookup
The Database lookup allows you to populate the AX field from a pre-existing database. Before you can setup a Database lookup you must setup an External Database connection on the DB Connections Tab. If you see no fields in the database fields box then there is no database connection set to this specification. If you set a field to be a Database lookup and you click on the properties branch you will see the options below.
Figure 11: Database Fields options
On the Data tab you will see the database fields that are in the table that you set on the DB Connections Tab. To map a database field to an AX Field select the Database field and click on the <Set Map> button. You can also map a field to an expression. An expression allows you to send concatenated multiple Database fields or database fields and literals to a single AX Field.
Example: Database fields are LNAME and FNAME. AX field is Name. You could use the Expression (LNAME + ", " + FNAME ) to send LNAME, FNAME to the Name field in AX.
You can also use this to send a constant to an AX field. Set the expression to the constant desired and put nothing else.
Example: You have an application screen for employment applications and you would like to setup a specification that would put "Application" in a Document Type field in AX. Set the field Data Source as Database lookup and select EXPRESSION on the Data Tab. Then click on the <Set Map> button and enter "APPLICATION" in the box and select <OK>. This will put Application in the Document Type field.
Figure 12: Field Formatting Tab
A X U N I V E R S A L I N T E G R A T O R
14
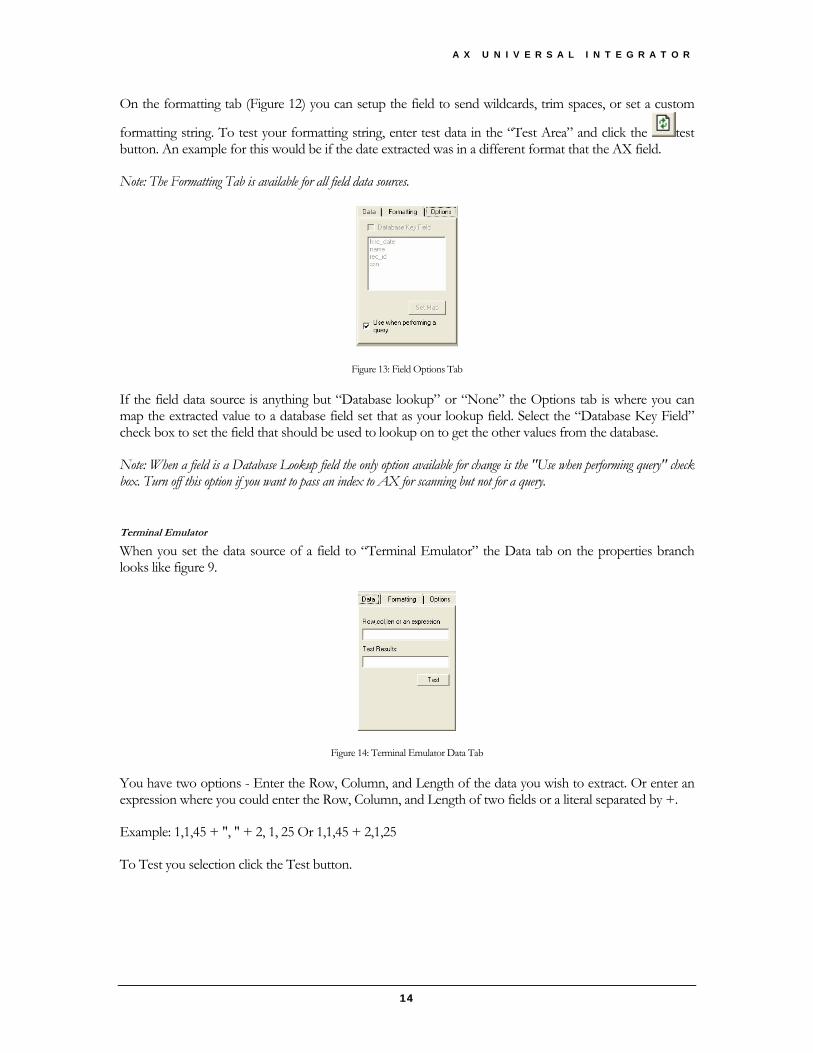
On the formatting tab (Figure 12) you can setup the field to send wildcards, trim spaces, or set a custom
formatting string. To test your formatting string, enter test data in the “Test Area” and click the test button. An example for this would be if the date extracted was in a different format that the AX field.
Note: The Formatting Tab is available for all field data sources.
Figure 13: Field Options Tab
If the field data source is anything but “Database lookup” or “None” the Options tab is where you can map the extracted value to a database field set that as your lookup field. Select the “Database Key Field” check box to set the field that should be used to lookup on to get the other values from the database.
Note: When a field is a Database Lookup field the only option available for change is the "Use when performing query" check box. Turn off this option if you want to pass an index to AX for scanning but not for a query.
Terminal Emulator
When you set the data source of a field to “Terminal Emulator” the Data tab on the properties branch looks like figure 9.
Figure 14: Terminal Emulator Data Tab
You have two options - Enter the Row, Column, and Length of the data you wish to extract. Or enter an expression where you could enter the Row, Column, and Length of two fields or a literal separated by +.
Example: 1,1,45 + ", " + 2, 1, 25 Or 1,1,45 + 2,1,25
To Test you selection click the Test button.
A D M I N I S T R A T O R ’ S G U I D E
15
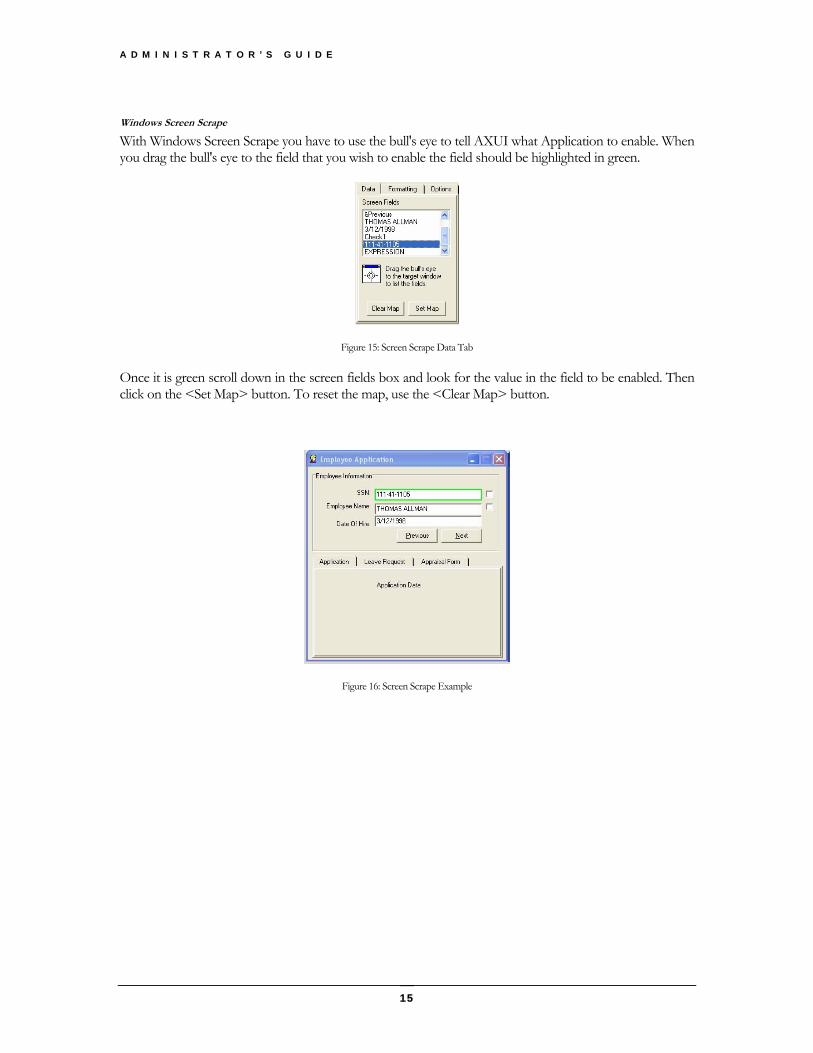
Windows Screen Scrape
With Windows Screen Scrape you have to use the bull's eye to tell AXUI what Application to enable. When you drag the bull's eye to the field that you wish to enable the field should be highlighted in green.
Figure 15: Screen Scrape Data Tab
Once it is green scroll down in the screen fields box and look for the value in the field to be enabled. Then click on the <Set Map> button. To reset the map, use the <Clear Map> button.
Figure 16: Screen Scrape Example
A X U N I V E R S A L I N T E G R A T O R
16
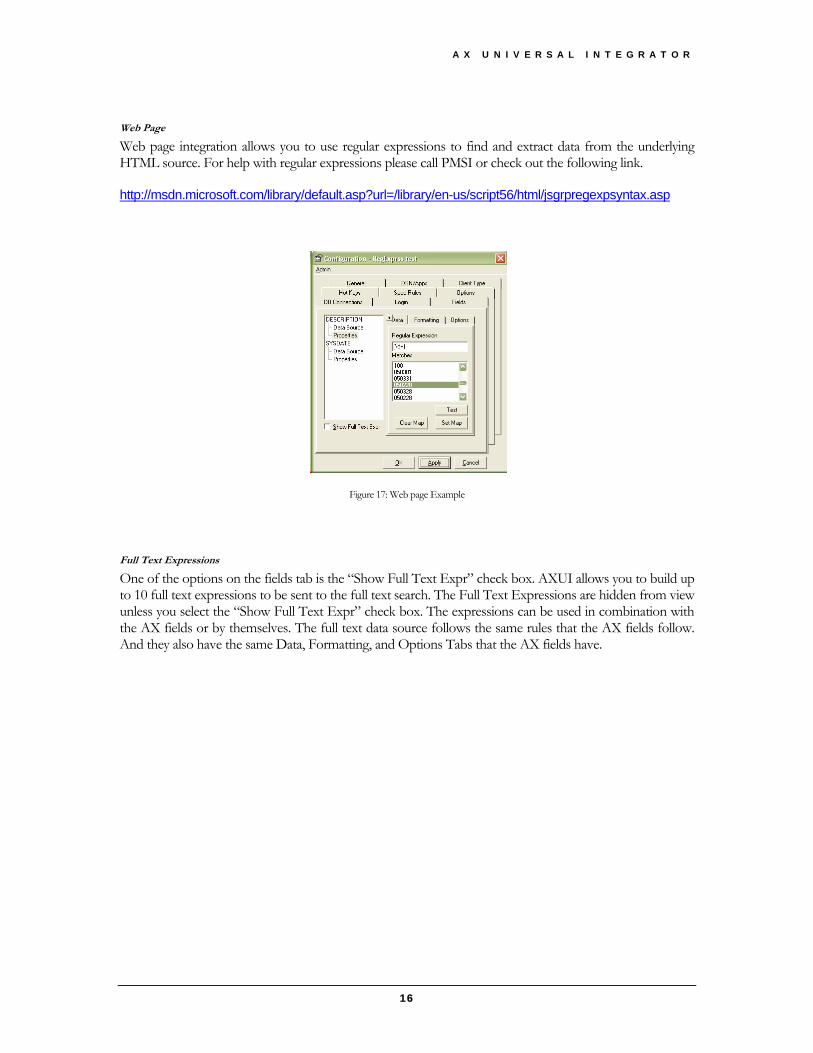
Web Page
Web page integration allows you to use regular expressions to find and extract data from the underlying HTML source. For help with regular expressions please call PMSI or check out the following link.
http://msdn.microsoft.com/library/default.asp?url=/library/en-us/script56/html/jsgrpregexpsyntax.asp
Figure 17: Web page Example
Full Text Expressions
One of the options on the fields tab is the “Show Full Text Expr” check box. AXUI allows you to build up to 10 full text expressions to be sent to the full text search. The Full Text Expressions are hidden from view unless you select the “Show Full Text Expr” check box. The expressions can be used in combination with the AX fields or by themselves. The full text data source follows the same rules that the AX fields follow. And they also have the same Data, Formatting, and Options Tabs that the AX fields have.

A D M I N I S T R A T O R ’ S G U I D E
17
Hot Keys Tab
Figure 18: Hot Keys Tab
AXUI allows you to assign Hot Keys to view, scan, and transfer Data.
Note: If you are using WinHLLAPI, HLLAPI, or E-Term you will only need to setup one set of Hot Keys for all terminal emulation specs. When the hot key is pressed AXUI will find the proper specification based on the spec name and screen ID.
Spec Rules Tab
Figure 19: Spec Rules Tab
In an environment where many applications or screens within an application have been image enabled, the specification drop down list on the Toolbar may contain so many entries that it may becomes difficult to use. To remedy this, rules can be defined to automatically select the appropriate specification based on the window caption on the window underneath the mouse pointer. Defining a Spec Rule is fairly straight forward.
Follow these steps to create a new Spec Rule. First Click on the new button . Then select whether the window caption "Contains" or "Exactly Matches" the String. Next enter the string value AXUI is to look
for. Then select the specification to activate from the dropdown list. Lastly click on the save button.
Note: To define a Rule to activate a Spec when the window caption contains the strings "APPLICATION" AND NOT "XTENDER" use the following notation: APPLICATION !XTENDER Now, if the window captions contains the string "APPLICATIONXTENDER" the specification will NOT automatically be selected.

A X U N I V E R S A L I N T E G R A T O R
18
Options Tab
Figure 20: Options Tab
There are two global options and one Spec option. The global options allow you to select AXUI to run in the system tray. Also you can set AXUI to ignore the screen ID in HLLAPI and WinHLLAPI specification types. The Spec Option allows you to set AXUI to automatically save a document after a data transfer in batch index mode.
Note: Global options will affect all Specifications while Spec Options are per spec.
A D M I N I S T R A T O R ’ S G U I D E
19
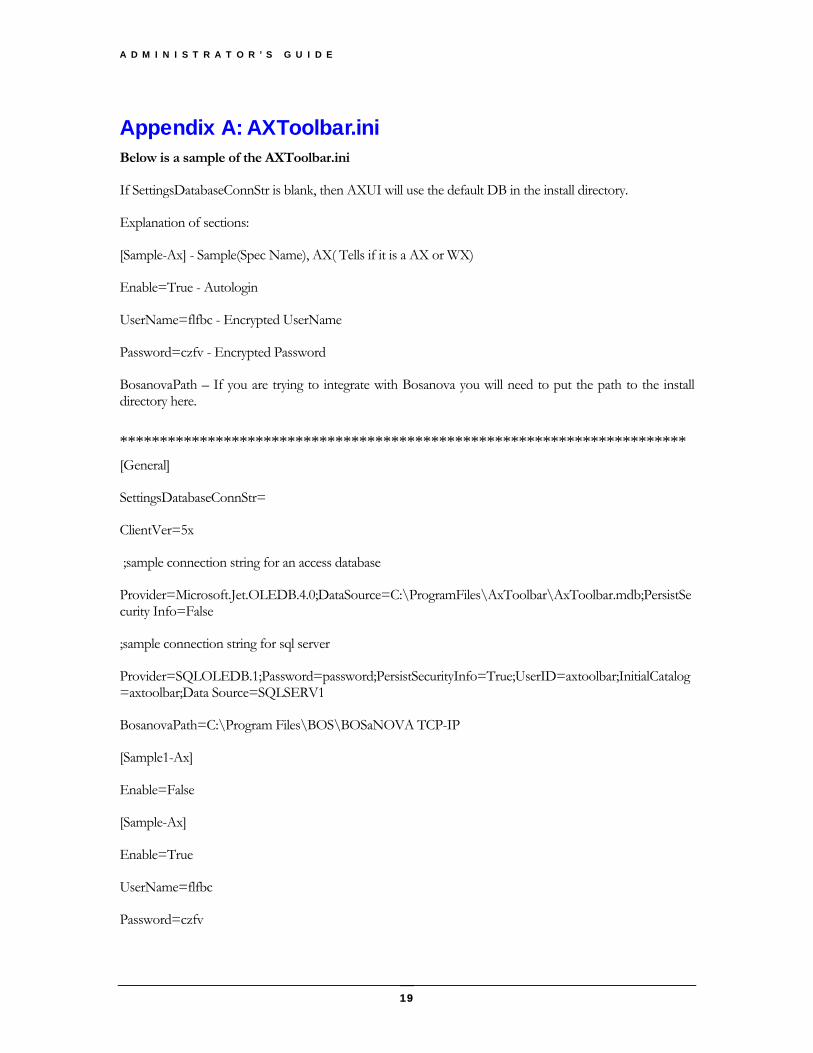
Appendix A: AXToolbar.ini Below is a sample of the AXToolbar.ini
If SettingsDatabaseConnStr is blank, then AXUI will use the default DB in the install directory.
Explanation of sections:
[Sample-Ax] - Sample(Spec Name), AX( Tells if it is a AX or WX)
Enable=True - Autologin
UserName=flfbc - Encrypted UserName
Password=czfv - Encrypted Password
BosanovaPath – If you are trying to integrate with Bosanova you will need to put the path to the install directory here.
*********************************************************************** [General]
SettingsDatabaseConnStr=
ClientVer=5x
;sample connection string for an access database
Provider=Microsoft.Jet.OLEDB.4.0;DataSource=C:\ProgramFiles\AxToolbar\AxToolbar.mdb;PersistSecurity Info=False
;sample connection string for sql server
Provider=SQLOLEDB.1;Password=password;PersistSecurityInfo=True;UserID=axtoolbar;InitialCatalog=axtoolbar;Data Source=SQLSERV1
BosanovaPath=C:\Program Files\BOS\BOSaNOVA TCP-IP
[Sample1-Ax]
Enable=False
[Sample-Ax]
Enable=True
UserName=flfbc
Password=czfv
A X U N I V E R S A L I N T E G R A T O R
20
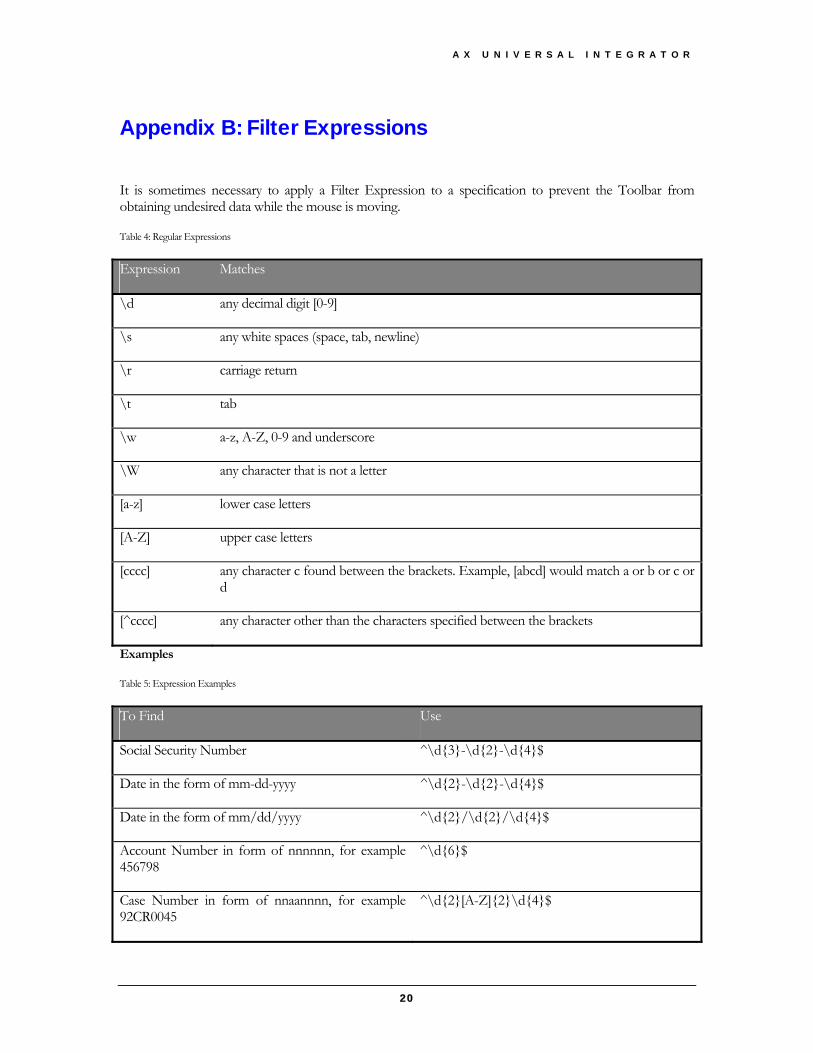
Appendix B: Filter Expressions
It is sometimes necessary to apply a Filter Expression to a specification to prevent the Toolbar from obtaining undesired data while the mouse is moving.
Table 4: Regular Expressions
Expression Matches
\d any decimal digit [0-9]
\s any white spaces (space, tab, newline)
\r carriage return
\t tab
\w a-z, A-Z, 0-9 and underscore
\W any character that is not a letter
[a-z] lower case letters
[A-Z] upper case letters
[cccc] any character c found between the brackets. Example, [abcd] would match a or b or c or d
[^cccc] any character other than the characters specified between the brackets
Examples
Table 5: Expression Examples
To Find Use
Social Security Number ^\d{3}-\d{2}-\d{4}$
Date in the form of mm-dd-yyyy ^\d{2}-\d{2}-\d{4}$
Date in the form of mm/dd/yyyy ^\d{2}/\d{2}/\d{4}$
Account Number in form of nnnnnn, for example 456798
^\d{6}$
Case Number in form of nnaannnn, for example 92CR0045
^\d{2}[A-Z]{2}\d{4}$
A D M I N I S T R A T O R ’ S G U I D E
21
Note to match the characters . $ ^ { [ ( | ) * + ? \ you must precede the entry with the \ character.
^ asserts the beginning the input string
$ asserts the ending of the input string
{n} specifies exactly how many characters
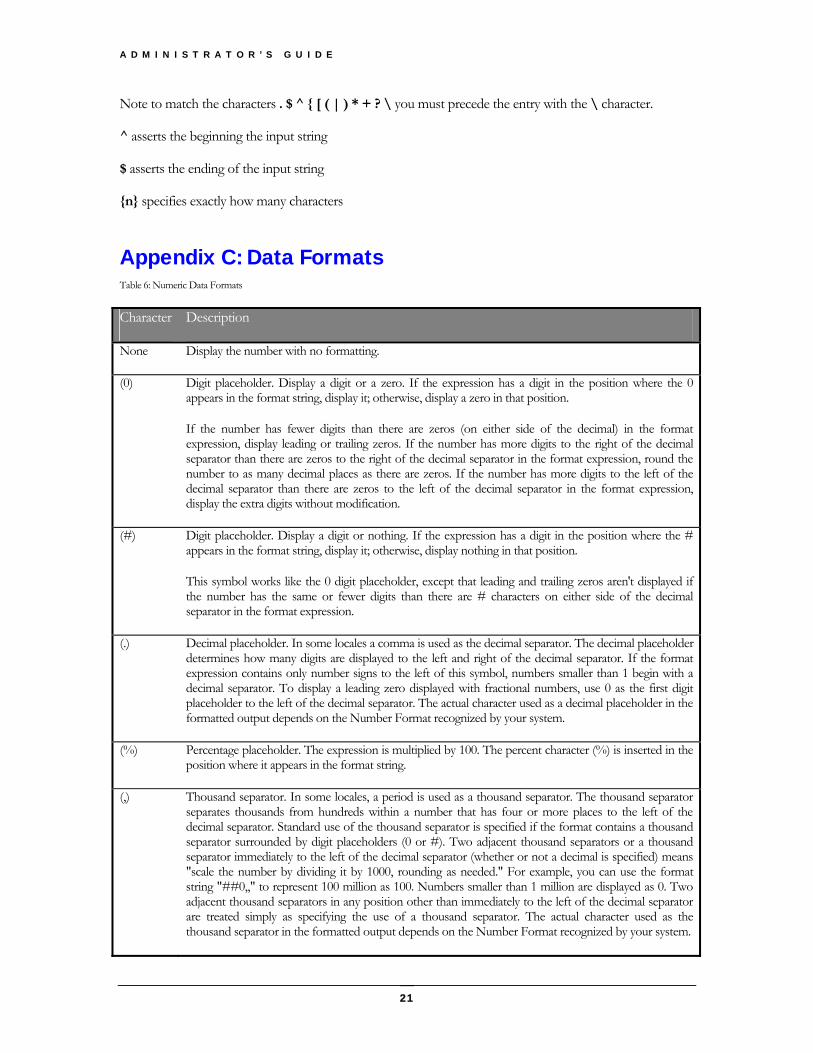
Appendix C: Data Formats Table 6: Numeric Data Formats
Character Description
None Display the number with no formatting.
(0) Digit placeholder. Display a digit or a zero. If the expression has a digit in the position where the 0 appears in the format string, display it; otherwise, display a zero in that position.
If the number has fewer digits than there are zeros (on either side of the decimal) in the format expression, display leading or trailing zeros. If the number has more digits to the right of the decimal separator than there are zeros to the right of the decimal separator in the format expression, round the number to as many decimal places as there are zeros. If the number has more digits to the left of the decimal separator than there are zeros to the left of the decimal separator in the format expression, display the extra digits without modification.
(#) Digit placeholder. Display a digit or nothing. If the expression has a digit in the position where the # appears in the format string, display it; otherwise, display nothing in that position.
This symbol works like the 0 digit placeholder, except that leading and trailing zeros aren't displayed if the number has the same or fewer digits than there are # characters on either side of the decimal separator in the format expression.
(.) Decimal placeholder. In some locales a comma is used as the decimal separator. The decimal placeholder determines how many digits are displayed to the left and right of the decimal separator. If the format expression contains only number signs to the left of this symbol, numbers smaller than 1 begin with a decimal separator. To display a leading zero displayed with fractional numbers, use 0 as the first digit placeholder to the left of the decimal separator. The actual character used as a decimal placeholder in the formatted output depends on the Number Format recognized by your system.
(%) Percentage placeholder. The expression is multiplied by 100. The percent character (%) is inserted in the position where it appears in the format string.
(,) Thousand separator. In some locales, a period is used as a thousand separator. The thousand separator separates thousands from hundreds within a number that has four or more places to the left of the decimal separator. Standard use of the thousand separator is specified if the format contains a thousand separator surrounded by digit placeholders (0 or #). Two adjacent thousand separators or a thousand separator immediately to the left of the decimal separator (whether or not a decimal is specified) means "scale the number by dividing it by 1000, rounding as needed." For example, you can use the format string "##0,," to represent 100 million as 100. Numbers smaller than 1 million are displayed as 0. Two adjacent thousand separators in any position other than immediately to the left of the decimal separator are treated simply as specifying the use of a thousand separator. The actual character used as the thousand separator in the formatted output depends on the Number Format recognized by your system.
A X U N I V E R S A L I N T E G R A T O R
22
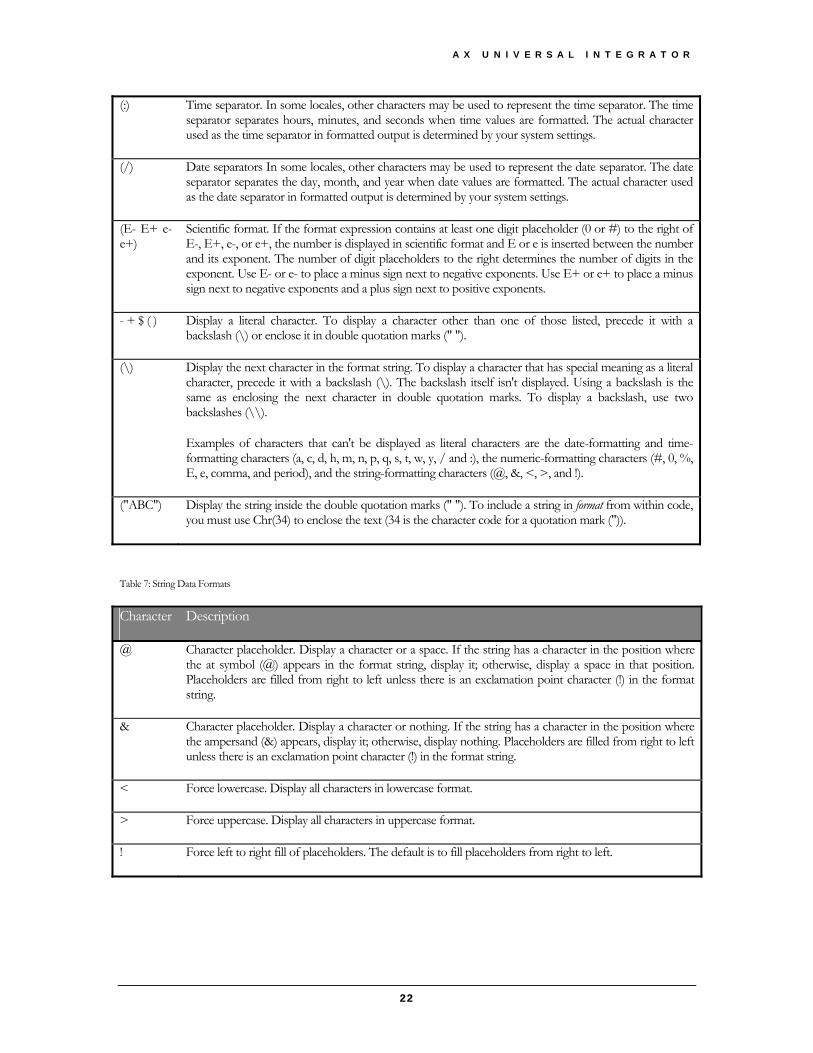
(:) Time separator. In some locales, other characters may be used to represent the time separator. The time separator separates hours, minutes, and seconds when time values are formatted. The actual character used as the time separator in formatted output is determined by your system settings.
(/) Date separators In some locales, other characters may be used to represent the date separator. The date separator separates the day, month, and year when date values are formatted. The actual character used as the date separator in formatted output is determined by your system settings.
(E- E+ e- e+)
Scientific format. If the format expression contains at least one digit placeholder (0 or #) to the right of E-, E+, e-, or e+, the number is displayed in scientific format and E or e is inserted between the number and its exponent. The number of digit placeholders to the right determines the number of digits in the exponent. Use E- or e- to place a minus sign next to negative exponents. Use E+ or e+ to place a minus sign next to negative exponents and a plus sign next to positive exponents.
- + $ ( ) Display a literal character. To display a character other than one of those listed, precede it with a backslash (\) or enclose it in double quotation marks (" ").
(\) Display the next character in the format string. To display a character that has special meaning as a literal character, precede it with a backslash (\). The backslash itself isn't displayed. Using a backslash is the same as enclosing the next character in double quotation marks. To display a backslash, use two backslashes (\\).
Examples of characters that can't be displayed as literal characters are the date-formatting and time-formatting characters (a, c, d, h, m, n, p, q, s, t, w, y, / and :), the numeric-formatting characters (#, 0, %, E, e, comma, and period), and the string-formatting characters (@, &, <, >, and !).
("ABC") Display the string inside the double quotation marks (" "). To include a string in format from within code, you must use Chr(34) to enclose the text (34 is the character code for a quotation mark (")).
Table 7: String Data Formats
Character Description
@ Character placeholder. Display a character or a space. If the string has a character in the position where the at symbol (@) appears in the format string, display it; otherwise, display a space in that position. Placeholders are filled from right to left unless there is an exclamation point character (!) in the format string.
& Character placeholder. Display a character or nothing. If the string has a character in the position where the ampersand (&) appears, display it; otherwise, display nothing. Placeholders are filled from right to left unless there is an exclamation point character (!) in the format string.
< Force lowercase. Display all characters in lowercase format.
> Force uppercase. Display all characters in uppercase format.
! Force left to right fill of placeholders. The default is to fill placeholders from right to left.
A D M I N I S T R A T O R ’ S G U I D E
23
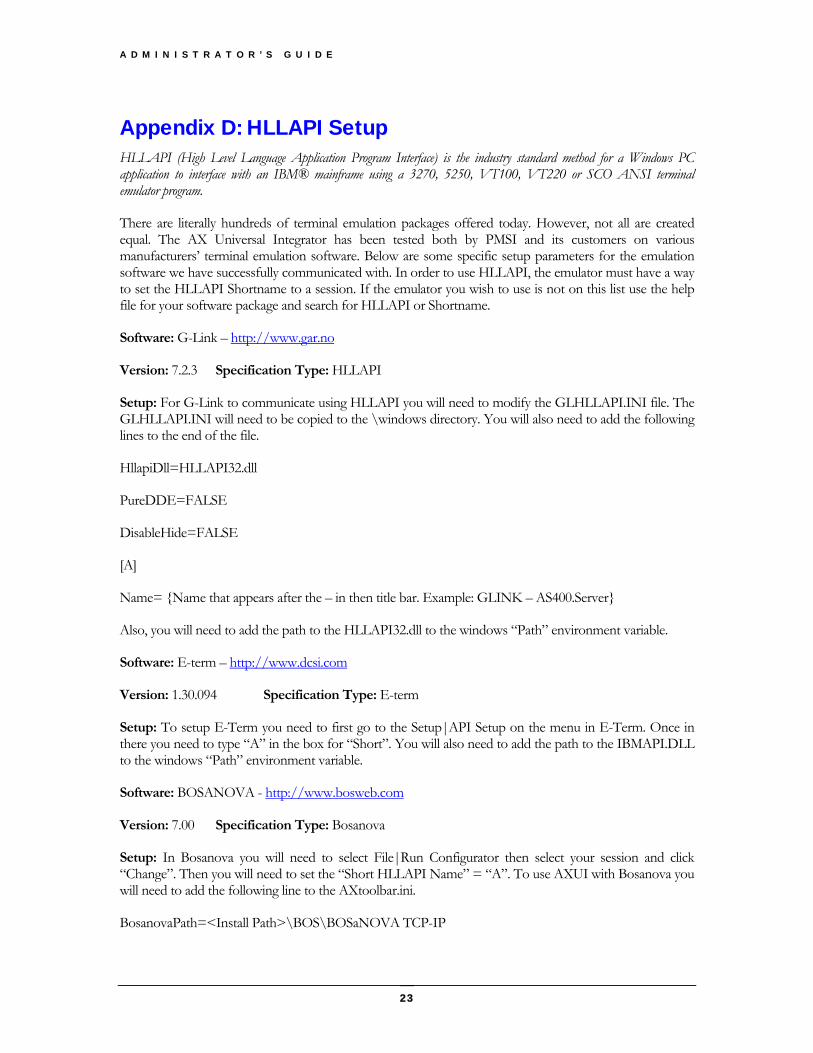
Appendix D: HLLAPI Setup HLLAPI (High Level Language Application Program Interface) is the industry standard method for a Windows PC application to interface with an IBM® mainframe using a 3270, 5250, VT100, VT220 or SCO ANSI terminal emulator program.
There are literally hundreds of terminal emulation packages offered today. However, not all are created equal. The AX Universal Integrator has been tested both by PMSI and its customers on various manufacturers’ terminal emulation software. Below are some specific setup parameters for the emulation software we have successfully communicated with. In order to use HLLAPI, the emulator must have a way to set the HLLAPI Shortname to a session. If the emulator you wish to use is not on this list use the help file for your software package and search for HLLAPI or Shortname.
Software: G-Link – http://www.gar.no
Version: 7.2.3 Specification Type: HLLAPI
Setup: For G-Link to communicate using HLLAPI you will need to modify the GLHLLAPI.INI file. The GLHLLAPI.INI will need to be copied to the \windows directory. You will also need to add the following lines to the end of the file.
HllapiDll=HLLAPI32.dll
PureDDE=FALSE
DisableHide=FALSE
[A]
Name= {Name that appears after the – in then title bar. Example: GLINK – AS400.Server}
Also, you will need to add the path to the HLLAPI32.dll to the windows “Path” environment variable.
Software: E-term – http://www.dcsi.com
Version: 1.30.094 Specification Type: E-term
Setup: To setup E-Term you need to first go to the Setup|API Setup on the menu in E-Term. Once in there you need to type “A” in the box for “Short”. You will also need to add the path to the IBMAPI.DLL to the windows “Path” environment variable.
Software: BOSANOVA - http://www.bosweb.com
Version: 7.00 Specification Type: Bosanova
Setup: In Bosanova you will need to select File|Run Configurator then select your session and click “Change”. Then you will need to set the “Short HLLAPI Name” = “A”. To use AXUI with Bosanova you will need to add the following line to the AXtoolbar.ini.
BosanovaPath=<Install Path>\BOS\BOSaNOVA TCP-IP
A X U N I V E R S A L I N T E G R A T O R
24
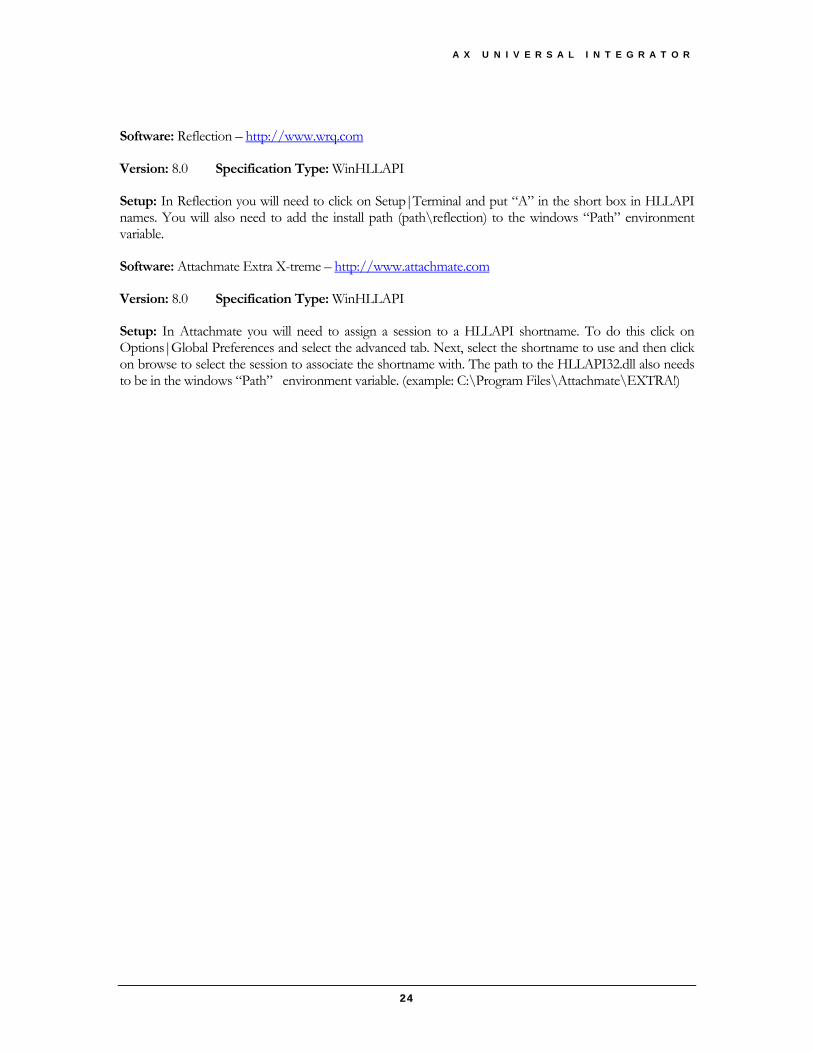
Software: Reflection – http://www.wrq.com
Version: 8.0 Specification Type: WinHLLAPI
Setup: In Reflection you will need to click on Setup|Terminal and put “A” in the short box in HLLAPI names. You will also need to add the install path (path\reflection) to the windows “Path” environment variable.
Software: Attachmate Extra X-treme – http://www.attachmate.com
Version: 8.0 Specification Type: WinHLLAPI
Setup: In Attachmate you will need to assign a session to a HLLAPI shortname. To do this click on Options|Global Preferences and select the advanced tab. Next, select the shortname to use and then click on browse to select the session to associate the shortname with. The path to the HLLAPI32.dll also needs to be in the windows “Path” environment variable. (example: C:\Program Files\Attachmate\EXTRA!)
A D M I N I S T R A T O R ’ S G U I D E
25
Index Application .....................................2, 3, 9, 13, 15 ApplicationXtender ....................................1, 3, 8 Attachmate.......................................................24 AX 0, iv, 1, 2, 3, 4, 9, 10, 11, 12, 13, 14, 16,
19 AxToolbar.ini ......................................................7 AXToolbar.ini................................................7, 19 AXUI 1, 2, 3, 5, 6, 7, 8, 15, 16, 17, 18, 19 Bosanova......................................................4, 19 BOSANOVA.......................................................23 CERIS 4 Clear Map .........................................................15 Configuration......................................................7 Data Formats..............................................21, 22 Database ........................................10, 12, 13, 14 DSN 9 E-term 23 E-Term 4, 8, 12, 17 field 10, 13, 14, 15 Field Data source ...............................................3 Filter Expression ......................................3, 8, 20 formatting.............................................14, 21, 22 Full Text ...........................................................16 G-Link 23 HLLAPI 3, 4, 8, 12, 17, 18, 23, 24 HLLAPI32.dll.....................................................23
Hot Keys .......................................................3, 17 HTML 4, 16 Imaging 0, ii Integration Method.........................................3, 8 License server ................................................... 2 map 4, 13, 14, 15 Mouse Pointer...............................................3, 12 options 7, 13, 14, 16, 18 Path 23, 24 Query 10 Reflection .........................................................24 regular expressions......................................4, 16 Screen OCR ............................................4, 12, 13 Screen Scrape ........................................4, 12, 15 Selected Text ...............................................3, 12 setup 2, 5, 7, 10, 13, 14, 17 Shortname ........................................................23 Spec Rules....................................................3, 17 Specification ..................................................3, 8 Srvany 2 Terminal Emulator......................................12, 14 Web Page..........................................4, 12, 13, 16 Windows Clipboard.......................................3, 12 WinHLLAPI....................................4, 8, 12, 17, 18 WX 1, 9, 10, 11, 19

A X U N I V E R S A L I N T E G R A T O R
26
T H I S P A G E L E F T B L A N K

A D M I N I S T R A T O R ’ S G U I D E
27
T H I S P A G E L E F T B L A N K


![6797709 MySQL Administrator[1]](https://static.fdocuments.nl/doc/165x107/577d2ad41a28ab4e1eaa340b/6797709-mysql-administrator1.jpg)